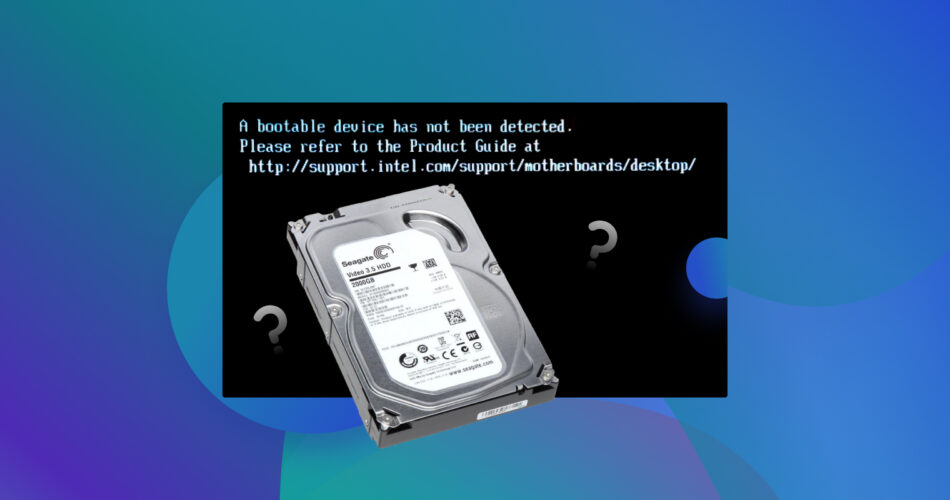
Technology keeps becoming friendlier. And yet, occasionally, you may meet a cryptic error message like “Boot Device Not Found (3F0)”. Your PC might insist on it while unable to reach its familiar desktop.
What does “boot device not found” mean for your PC and, more importantly, your files and data? Is the problem fixable? Are your files gone?
Allow me to offer some answers to those questions, potential solutions to such “boot not found” errors, and more.
What’s the “Boot Device Not Found (3F0)” Error About?
The PC’s operating system allows us to use many storage devices without worrying about their type, manufacturer, or other details. Out of all of them, one stands out for its role in rendering our computers usable: the boot drive.
Regardless of how many storage devices are connected to a PC, one is always assigned as its boot drive, where the computer looks for a usable operating system. That’s why when such a bootable device is not detected, the computer cannot load its OS, and becomes essentially unusable.
What Can Cause a “Bootable Device Not Found” Error Message?
Your PC might inform you that a bootable device was not found if:
- ☯️ The storage device mode in your PC’s BIOS/UEFI changed (for example, from AHCI to Legacy or RAID).
- 🧠 The BIOS/UEFI was corrupted.
- 💾 The file system or Master Boot Record (MBR) of the storage device with the OS was corrupted.
- 🐛 Crucial OS files got corrupted.
- 📉 The storage device is failing.
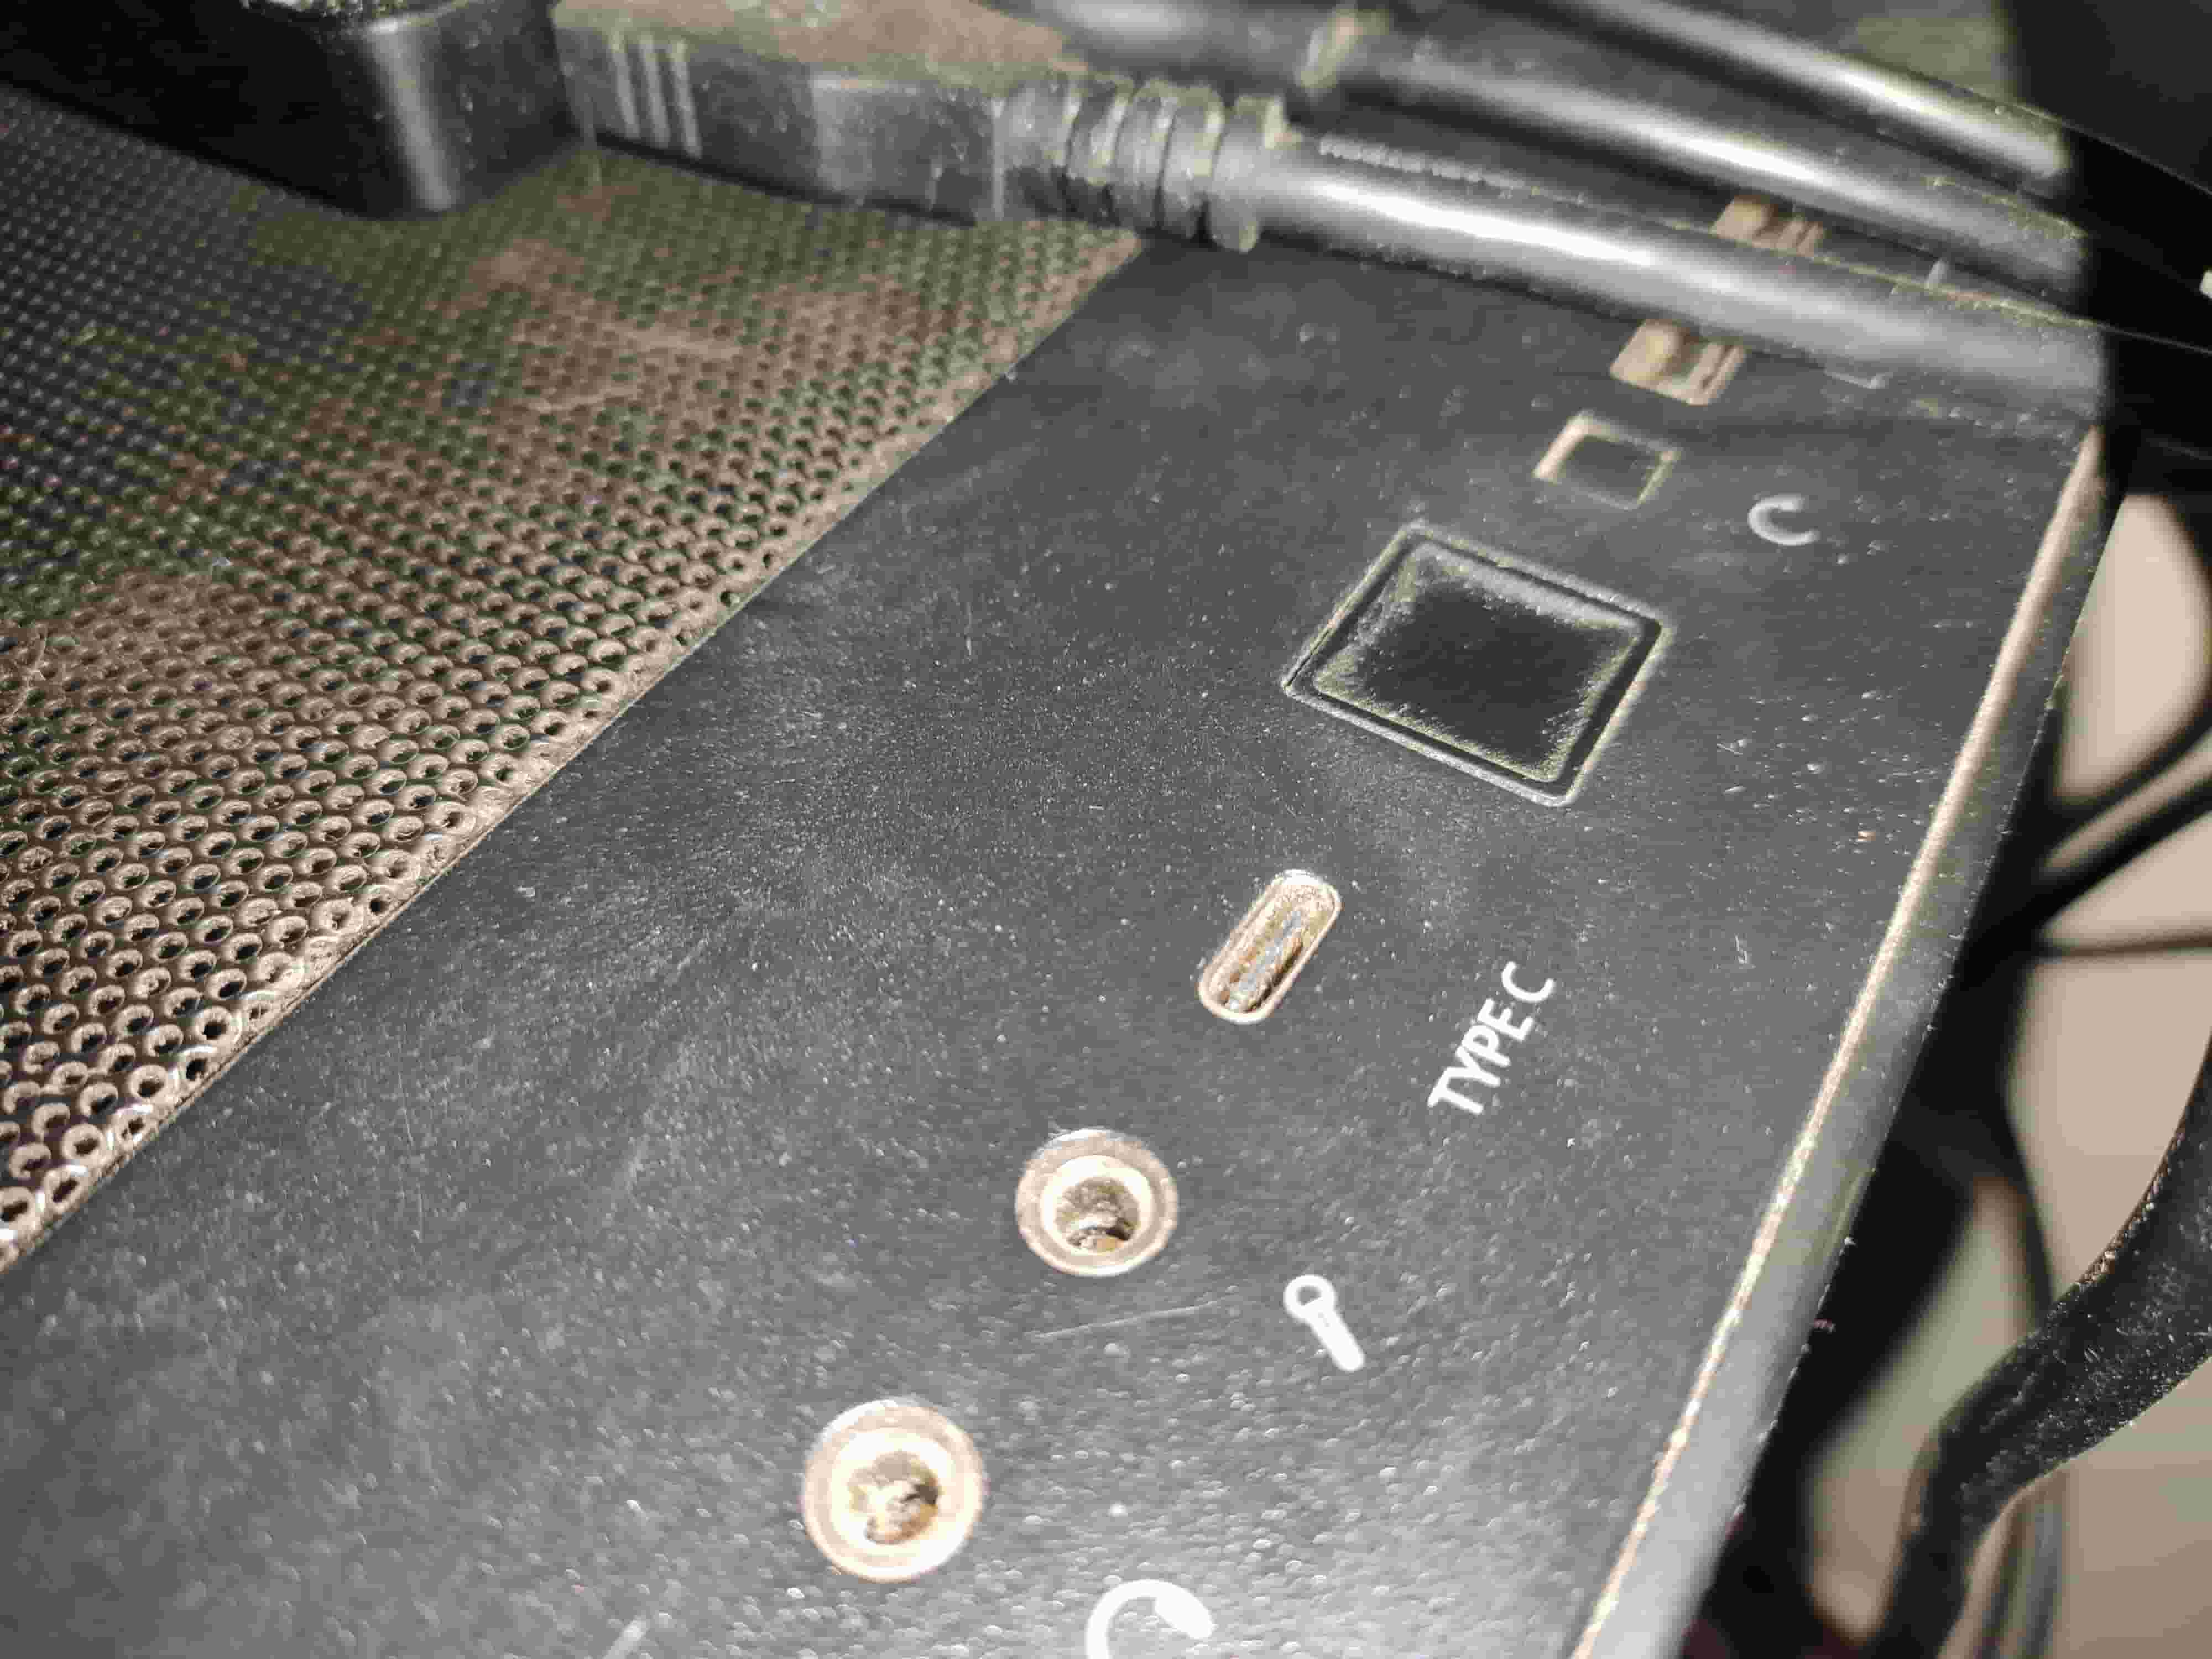
- 🔌 The cables connecting the storage device to the motherboard’s controller and Power Supply Unit (PSU) might be loose or disconnected (don’t worry – it’s a common problem).
How Can You Fix Your PC When a Bootable Device Is Not Detected?
I mentioned some of the reasons your PC might show errors stating that a boot drive was not found. Still, knowing the cause doesn’t fix the issue, so let’s see how you can fix such problems.
Solution 1: Hard Reset the PC (Worth Trying)
Memory leaks, mangled settings stored in a cache, and more can be the reasons for issues where a proper restart can help. And yet, the Windows’ “Restart” option doesn’t really “clean everything” when rebooting a PC.
To perform a true restart that fully clears the current status of your PC:
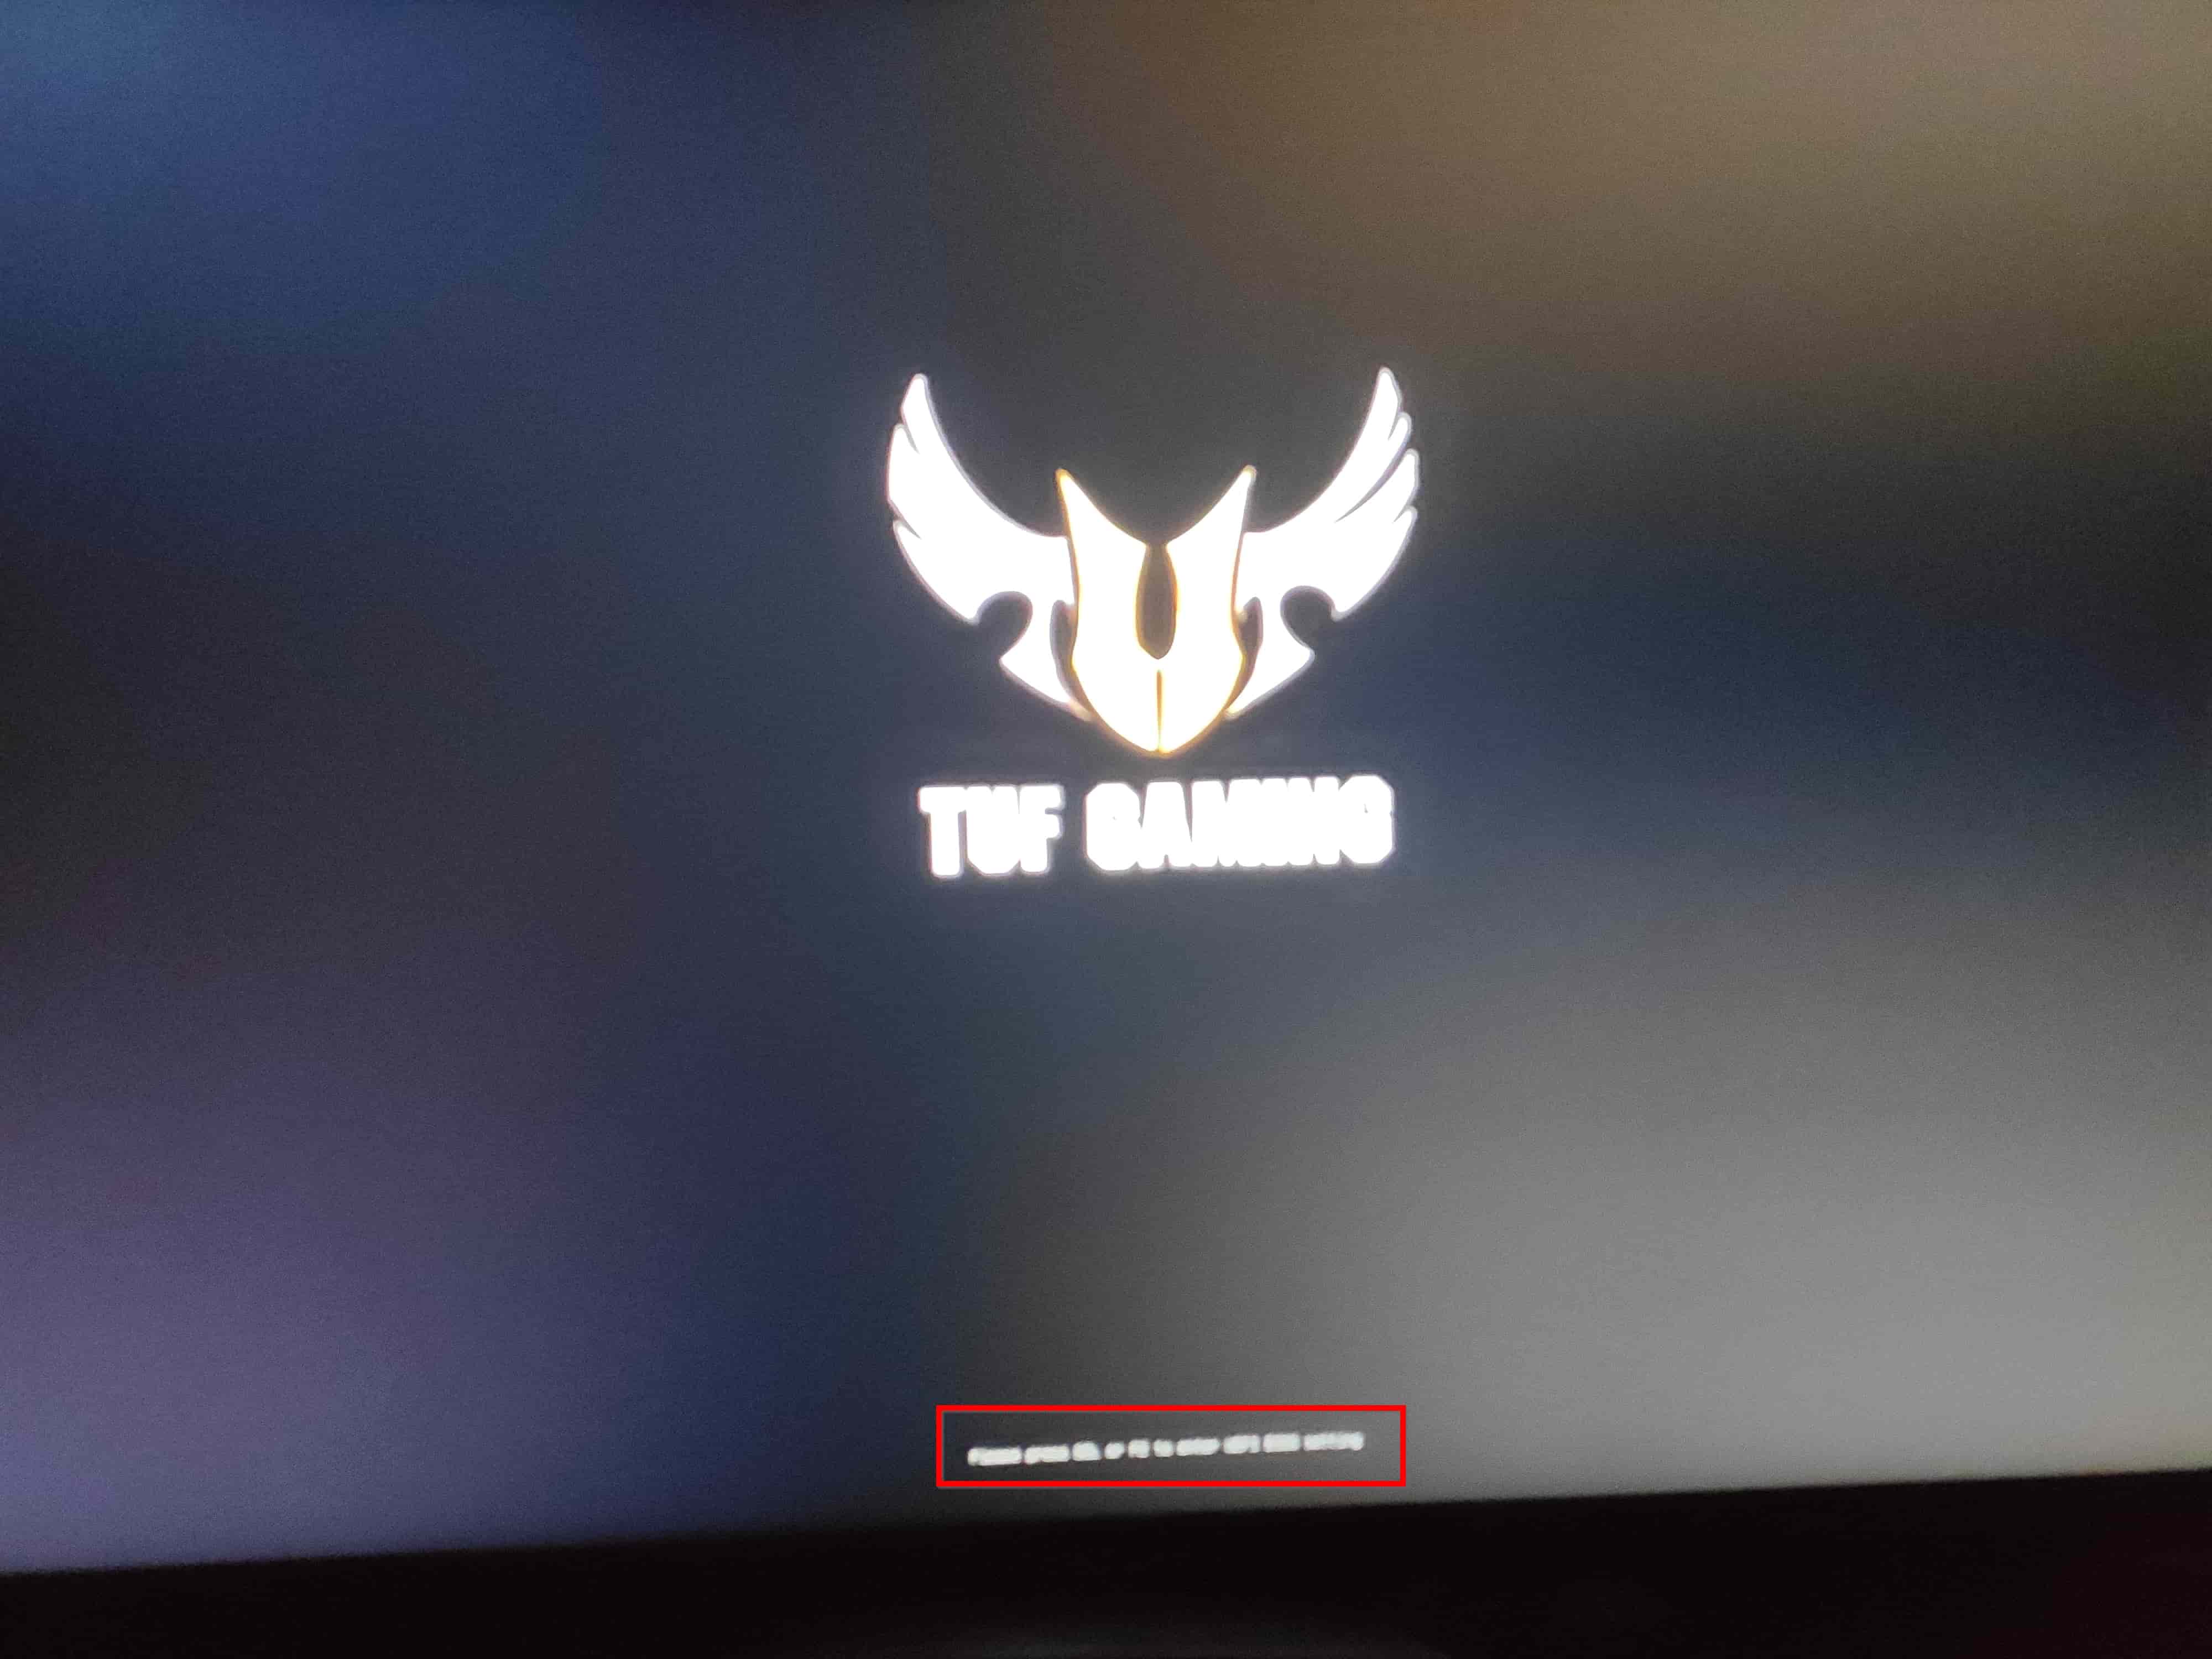
- Restart your PC. Immediately after rebooting, repeatedly press the button for entering its BIOS/UEFI screen (usually Del, F2, or F12).
- When you’re at the BIOS/UEFI configuration menu, shut down your PC from its power button.
- Unplug your PC’s power cable. Press and hold the PC’s power button for at least half a minute to fully discharge all components.
- Reconnect its power cable and turn your PC on.
Solution 2: Check BIOS Settings (Worth Trying)
Does your boot disk seem to work on another PC, but refuses to boot from it on your own/main PC? Your PC might state that a boot disk was not found if its BIOS/UEFI storage-related settings for that storage device changed after the OS’s installation.
To change those settings:
- Restart your PC and repeatedly press the key shown on your screen to enter the BIOS/UEFI menu during the initial boot process. Locate the page or menu related to your storage devices.

- If you have multiple drives, ensure their boot order is correct. You don’t know which drive should go first? Try assigning them one by one as the boot drive, saving the settings, and restarting to see if that solved the issue.
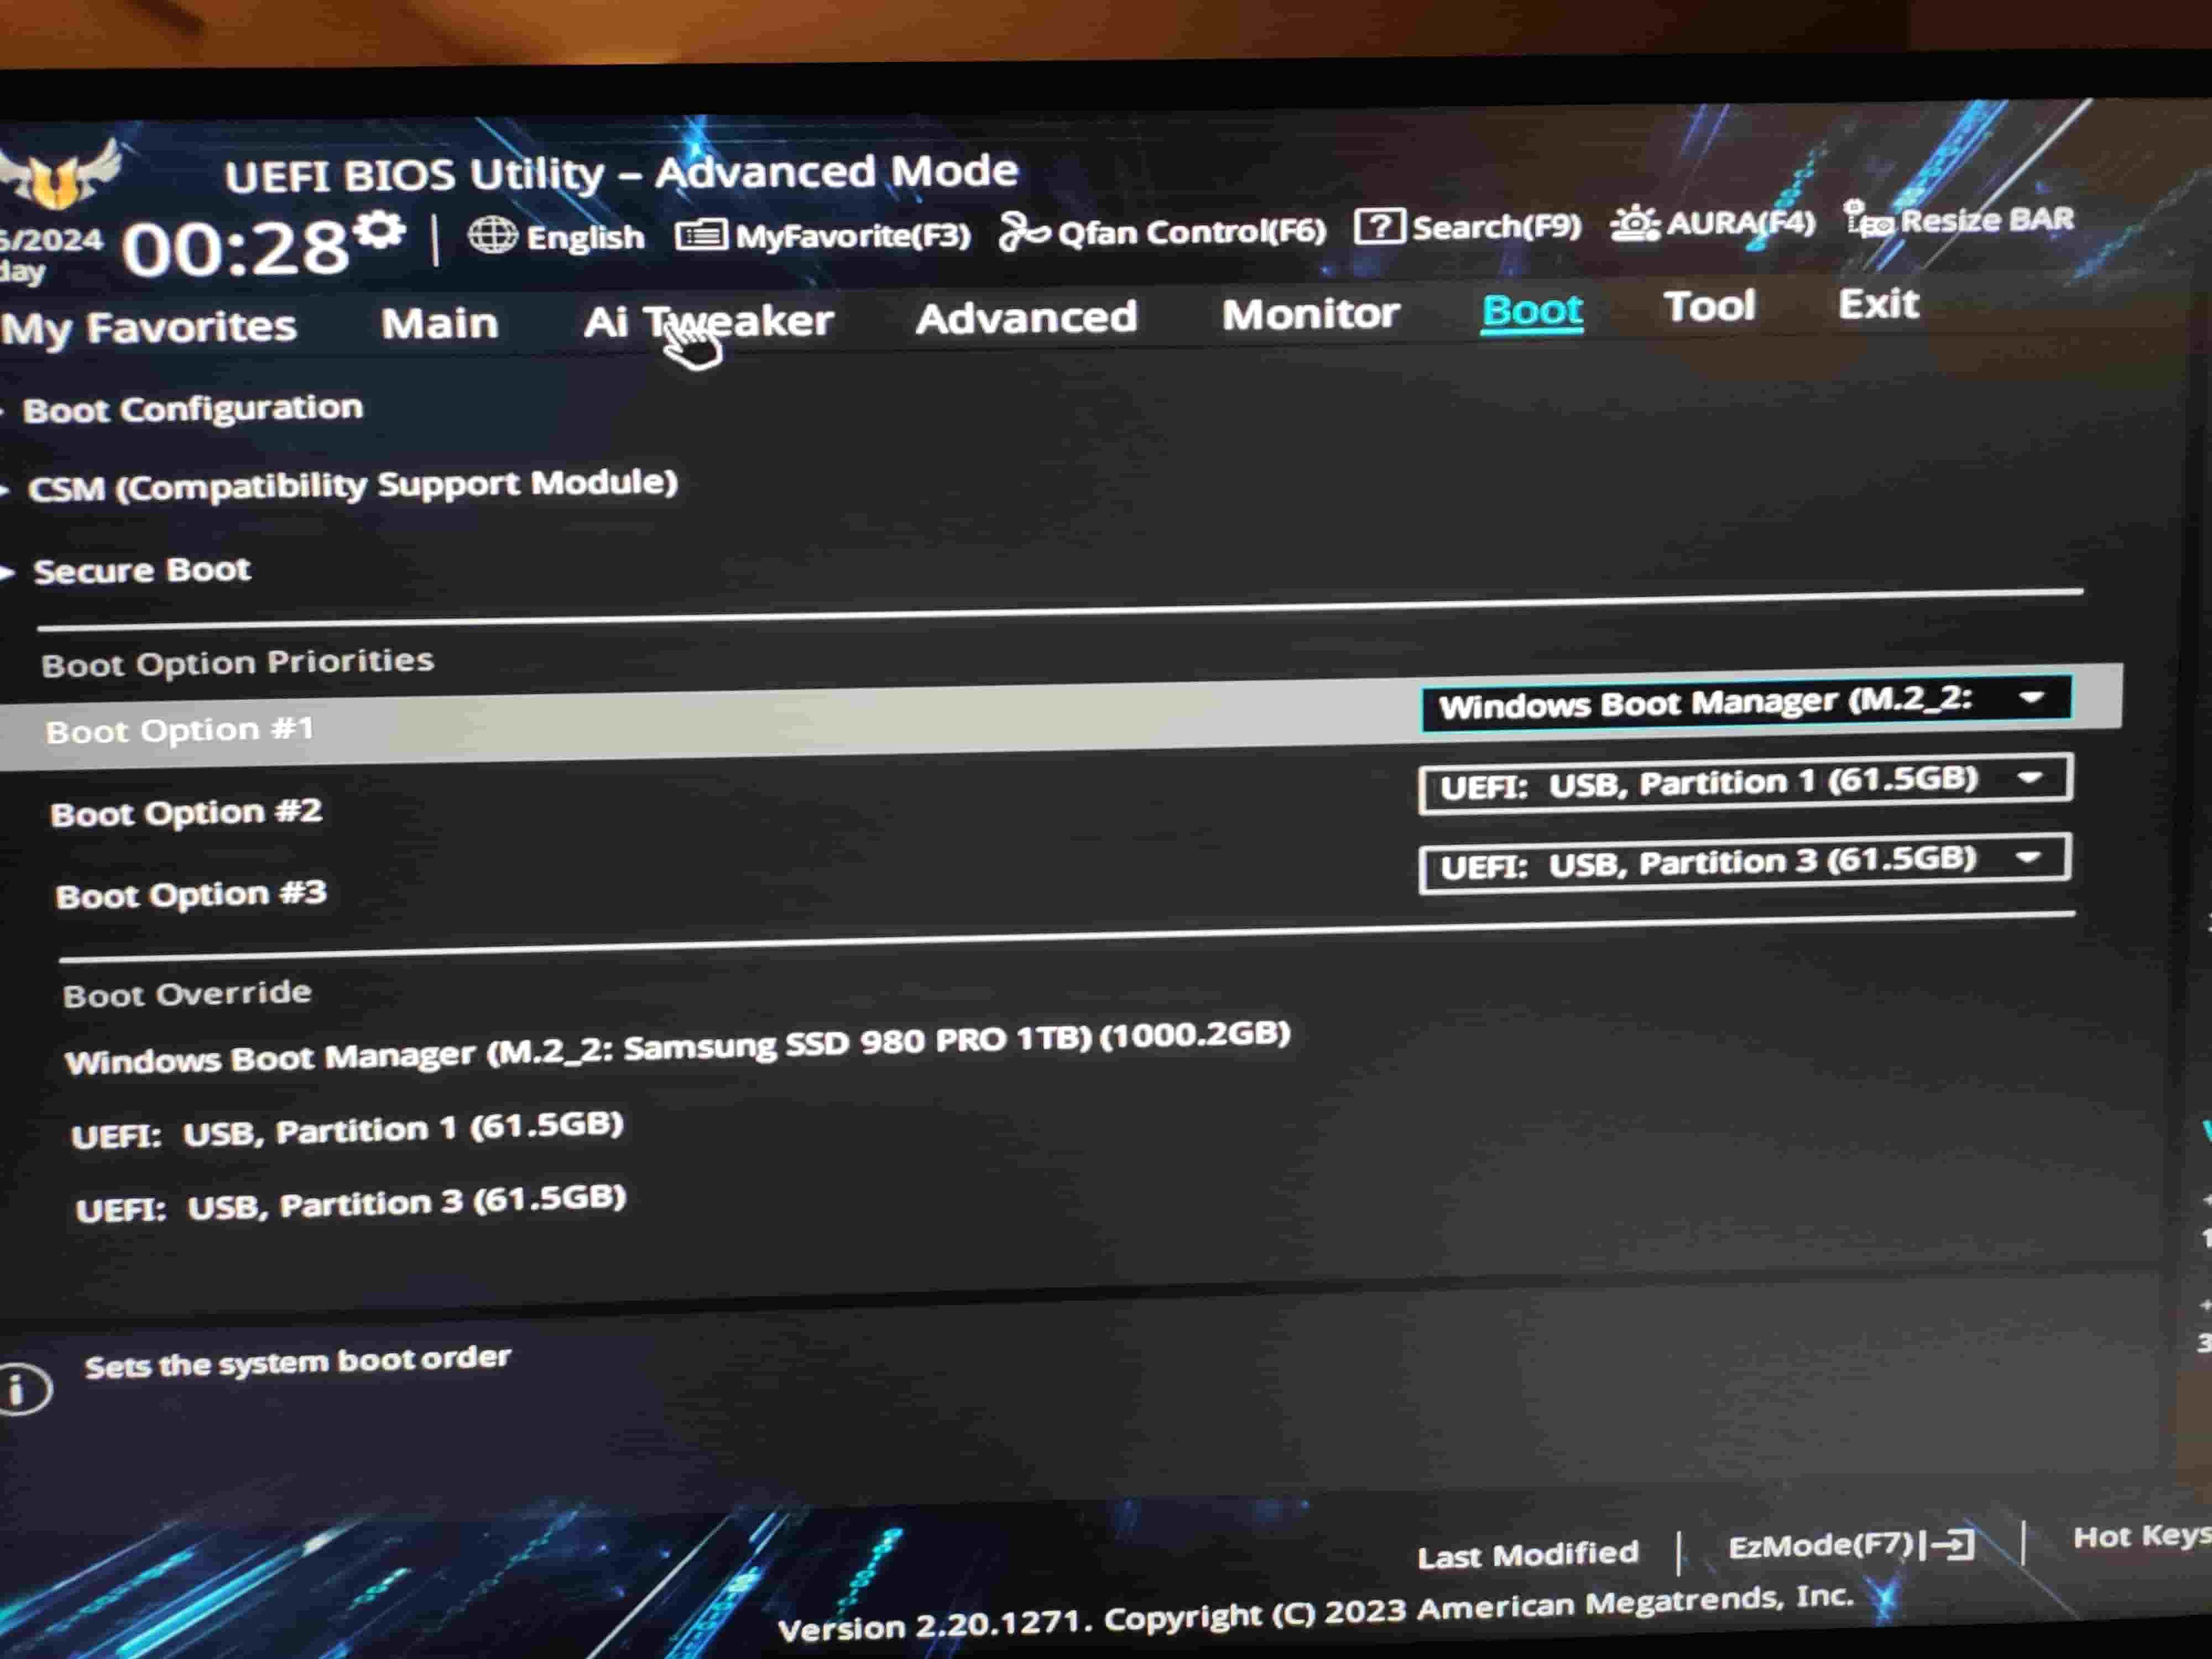
- If you have only a single storage device, or the above didn’t help, try changing the storage device’s “type” or “interface”. Switch from Legacy/Classic (or anything similar) to AHCI or the opposite. Then, save the changes and restart to check if that worked.
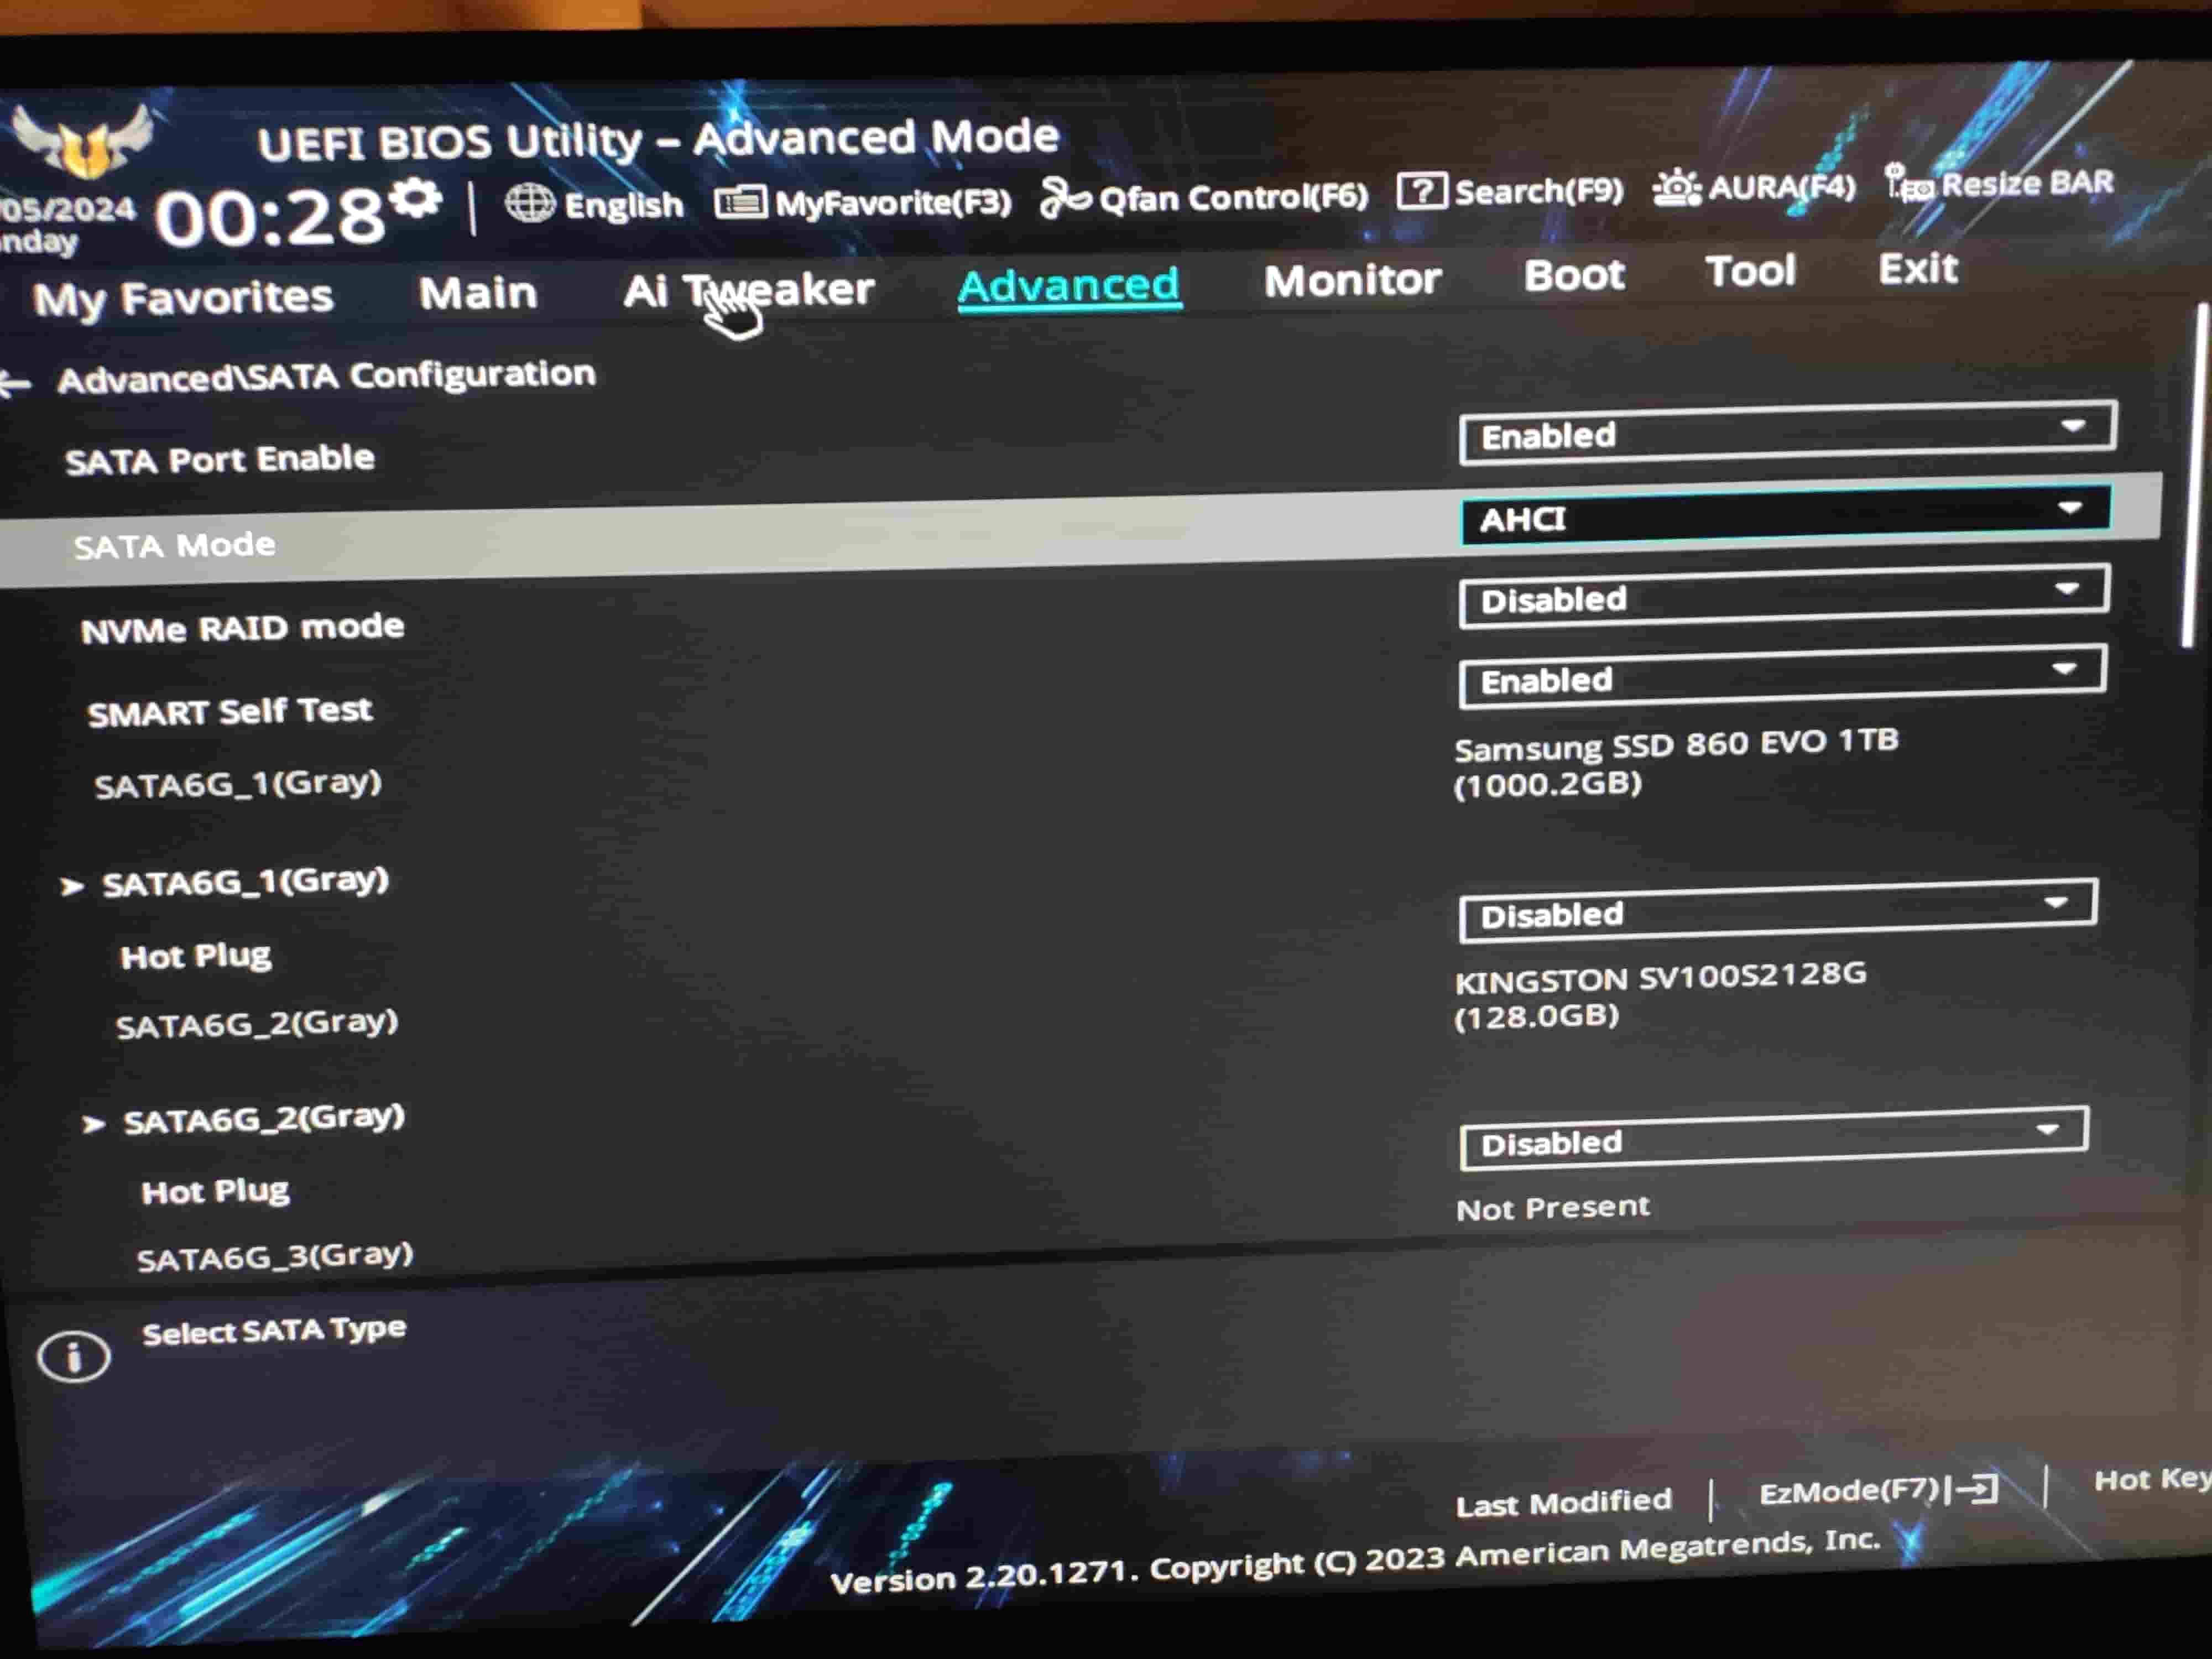
It’s rare to have to change a boot device’s mode to RAID since most consumer-level PCs rarely use a RAID array of drives as their boot drive. So, avoid choosing that option if available. Also note that, according to some users, a bug in HP laptop BIOS/UEFI may lead to 3F0 errors. If you have such a laptop, check its support page for an updated BIOS/UEFI that may fix the issue.
Solution 3: Replace BIOS Battery (Worth Trying)
When wondering how to fix boot device not found errors, the last thing you’d expect to be the culprit is a small battery like those used in watches. Still, if your PC’s BIOS/UEFI settings keep reverting to their default values every time you change them, maybe its CMOS battery can’t hold a charge anymore.
When that CMOS battery fails, it can’t power the memory where those settings are stored, causing the BIOS/UEFI to revert to its defaults.
To replace your PC’s CMOS battery:
- Refer to its motherboard’s manual to locate the battery’s spot.
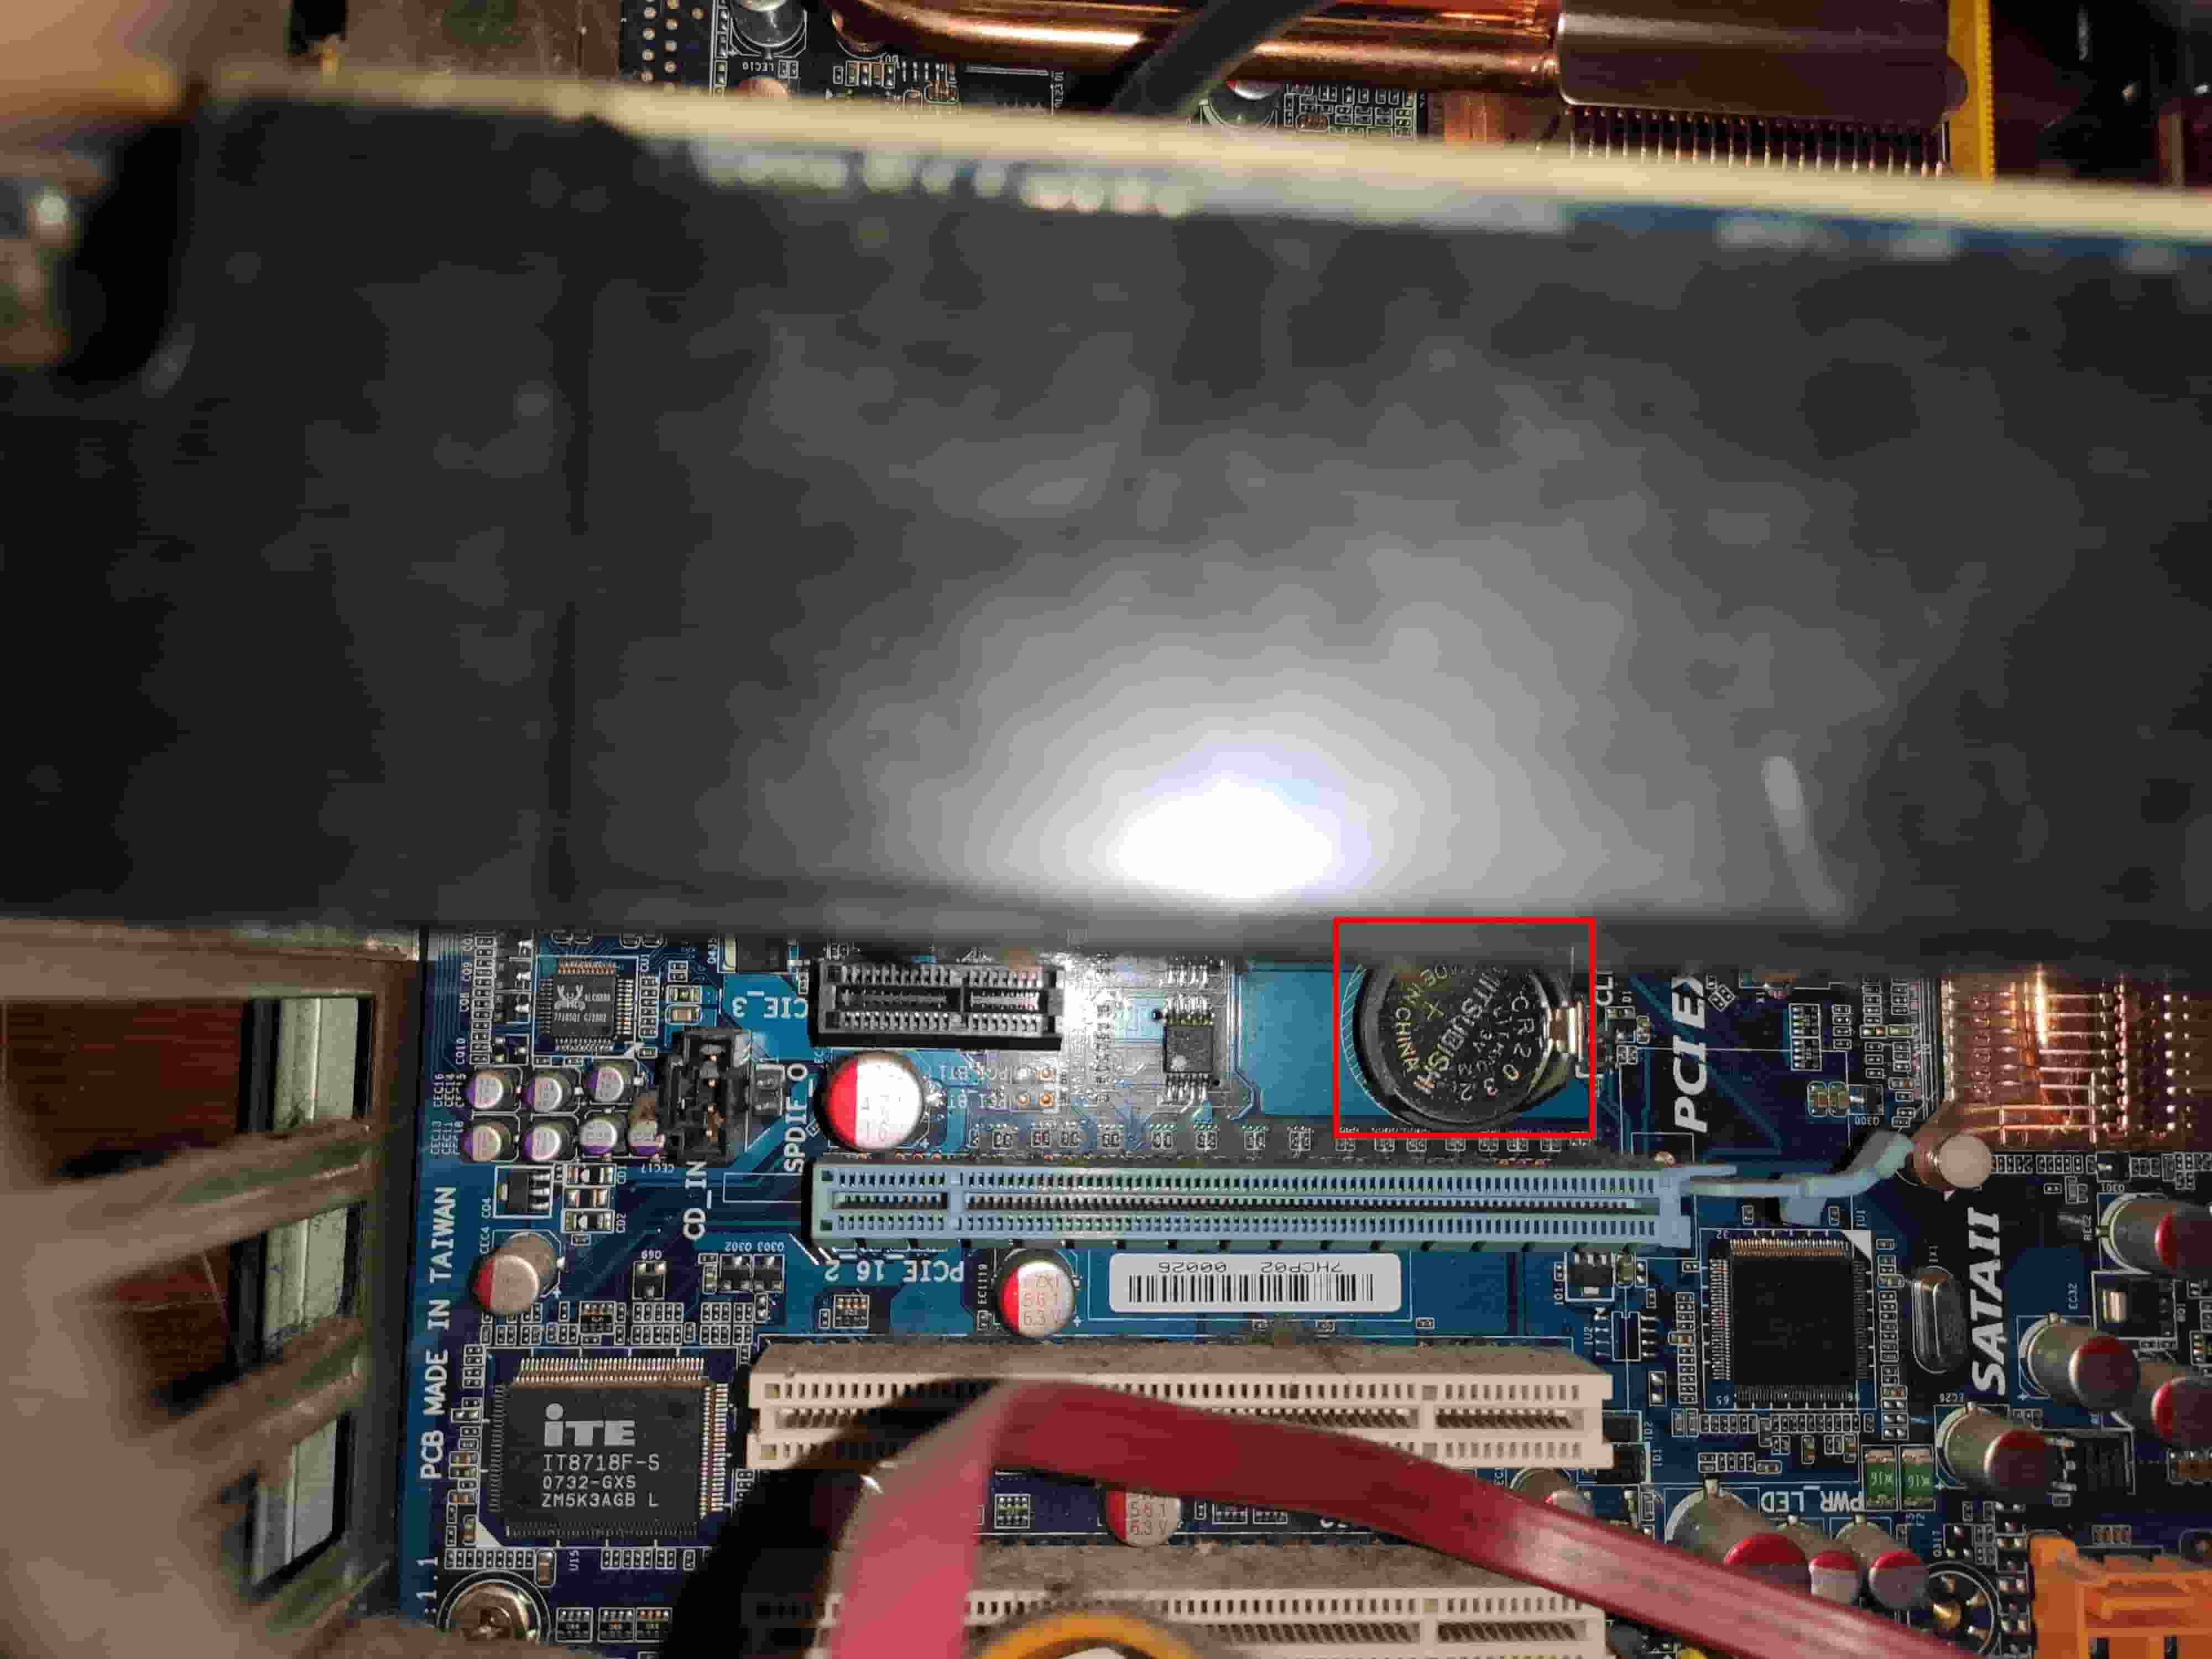
- Power off and discharge your PC (as we saw in the hard reset your PC section).
- Unplug the CMOS battery (tweezers or a screwdriver can help).
- Replace the battery with an identical model.
- Plug your PC back in and turn it on.
Solution 4: Startup Repair (Worth Trying)
Did you manage to boot into your Windows installation but still cannot reach the desktop, or the previous solutions didn’t work?
Try to repair the OS’s startup with Startup Repair as follows:
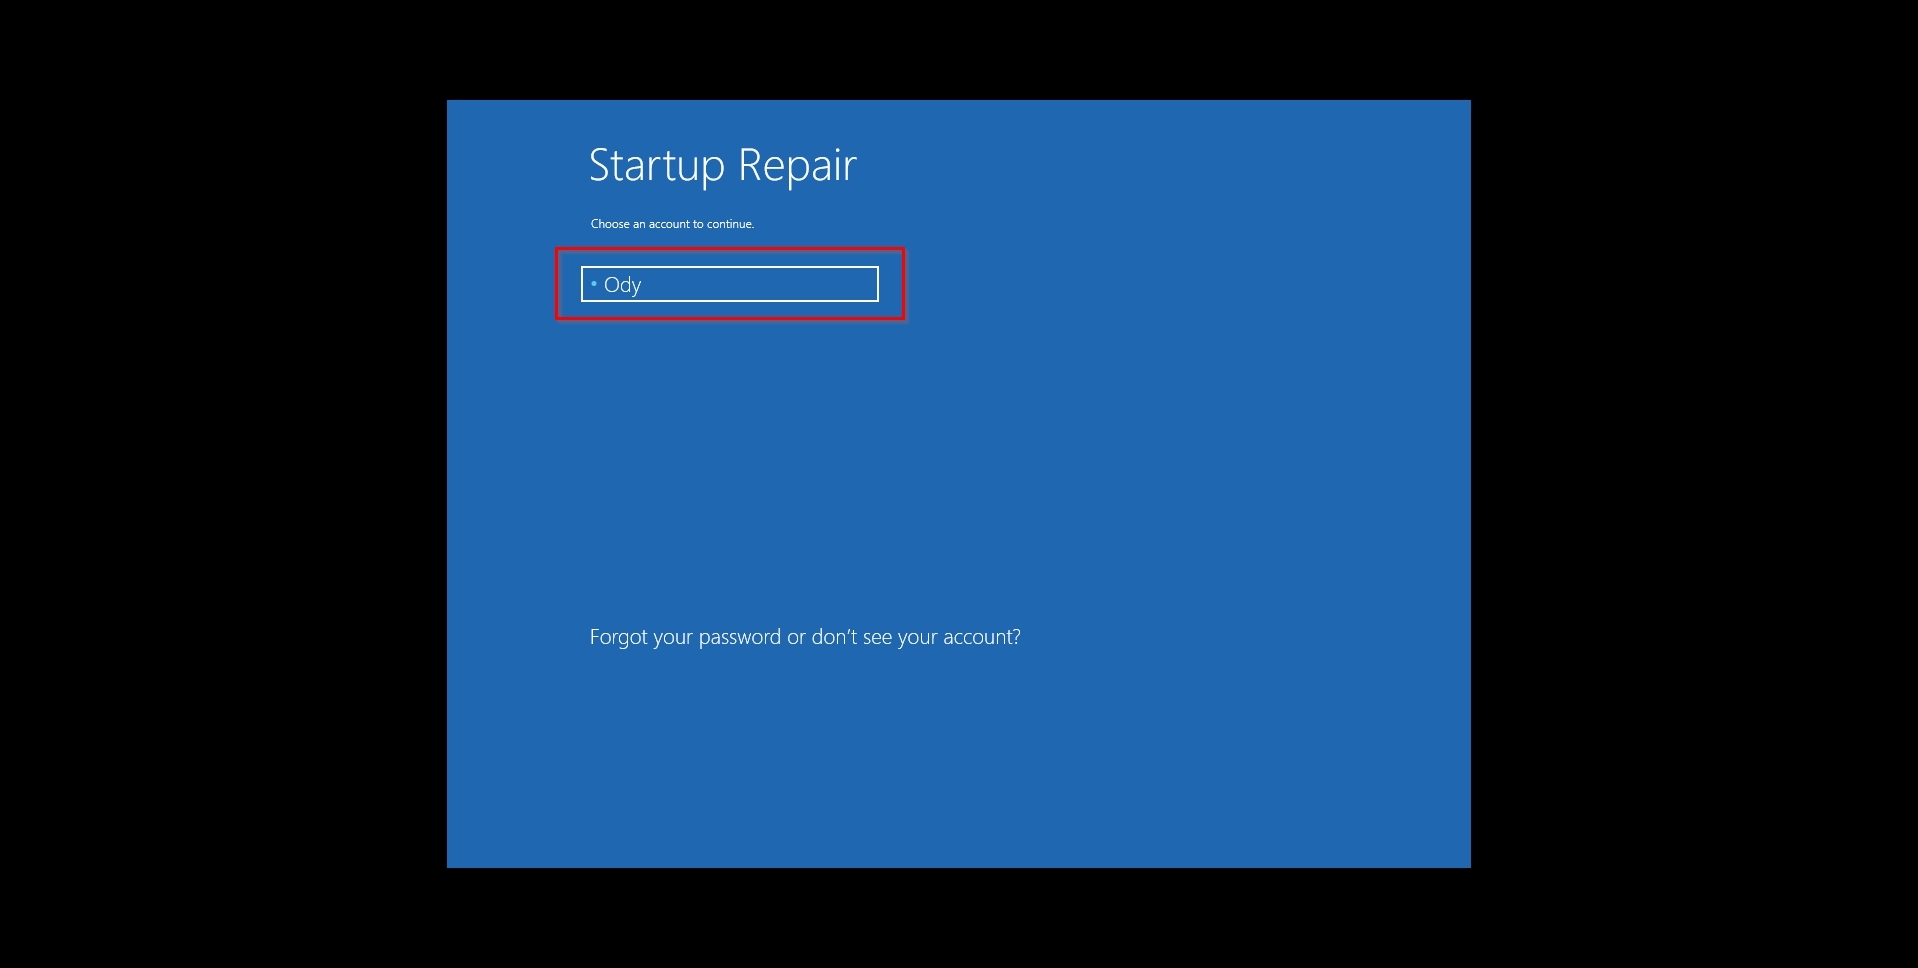
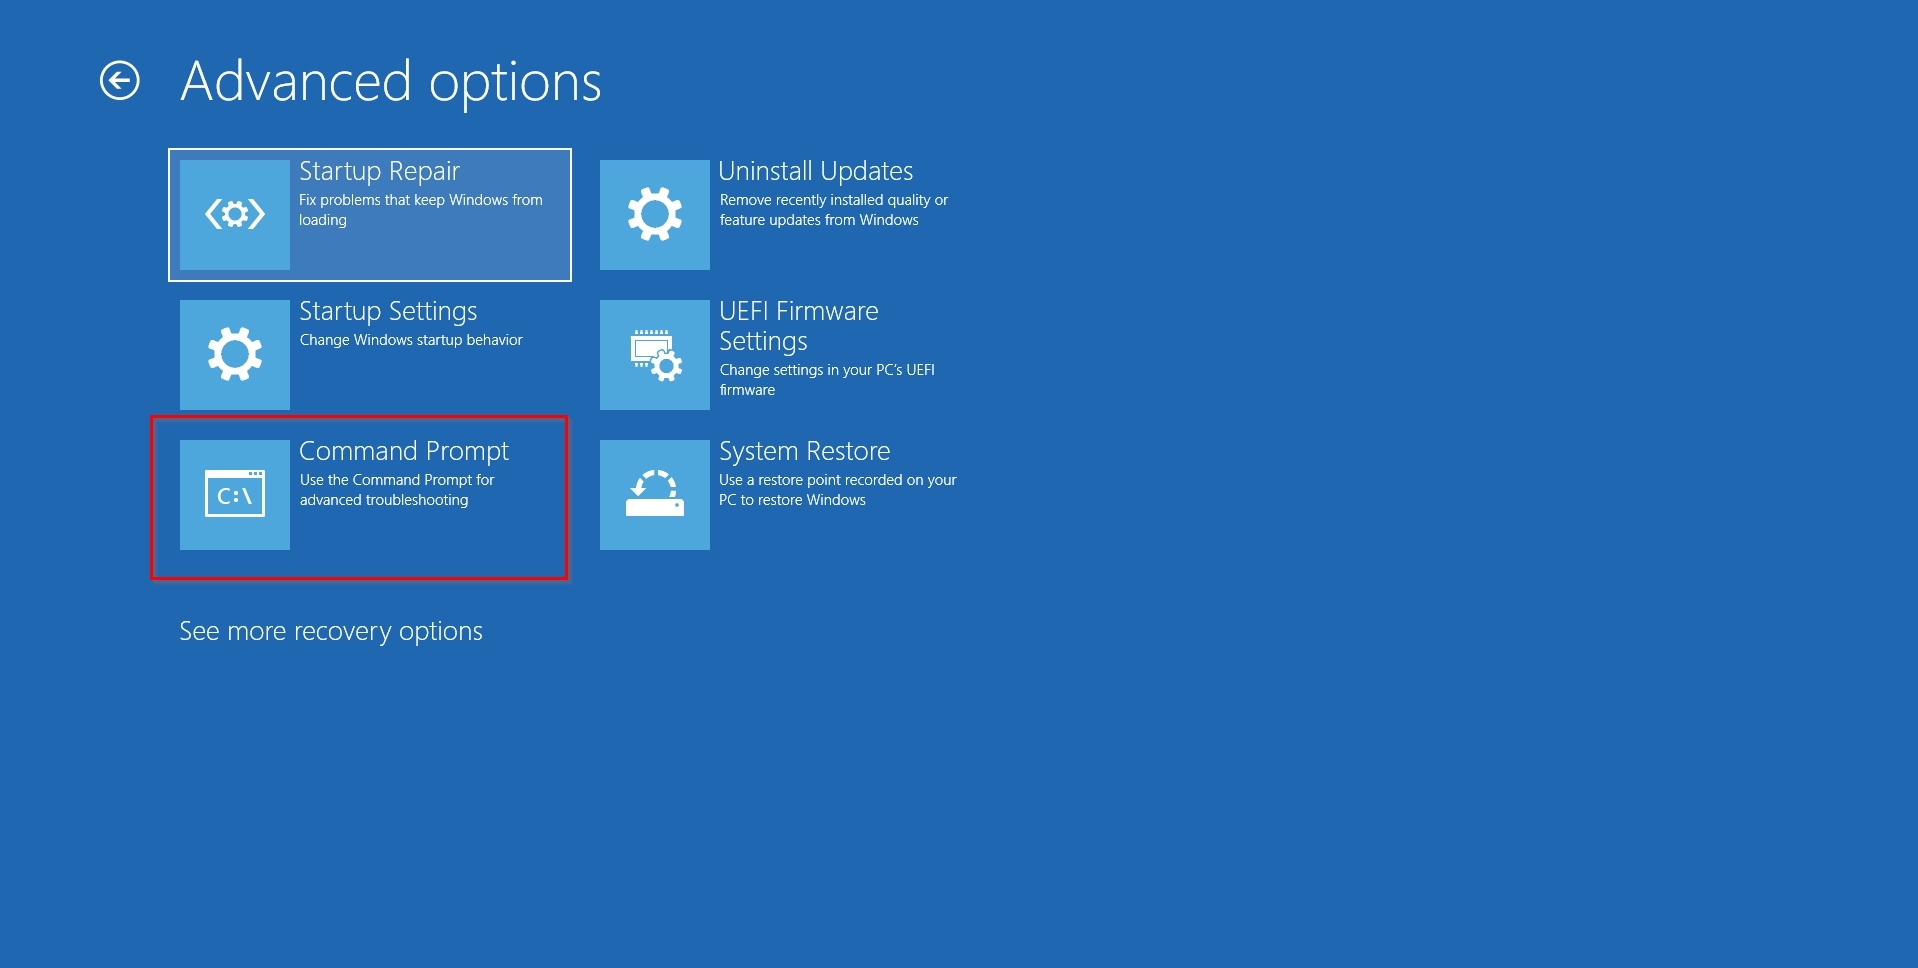
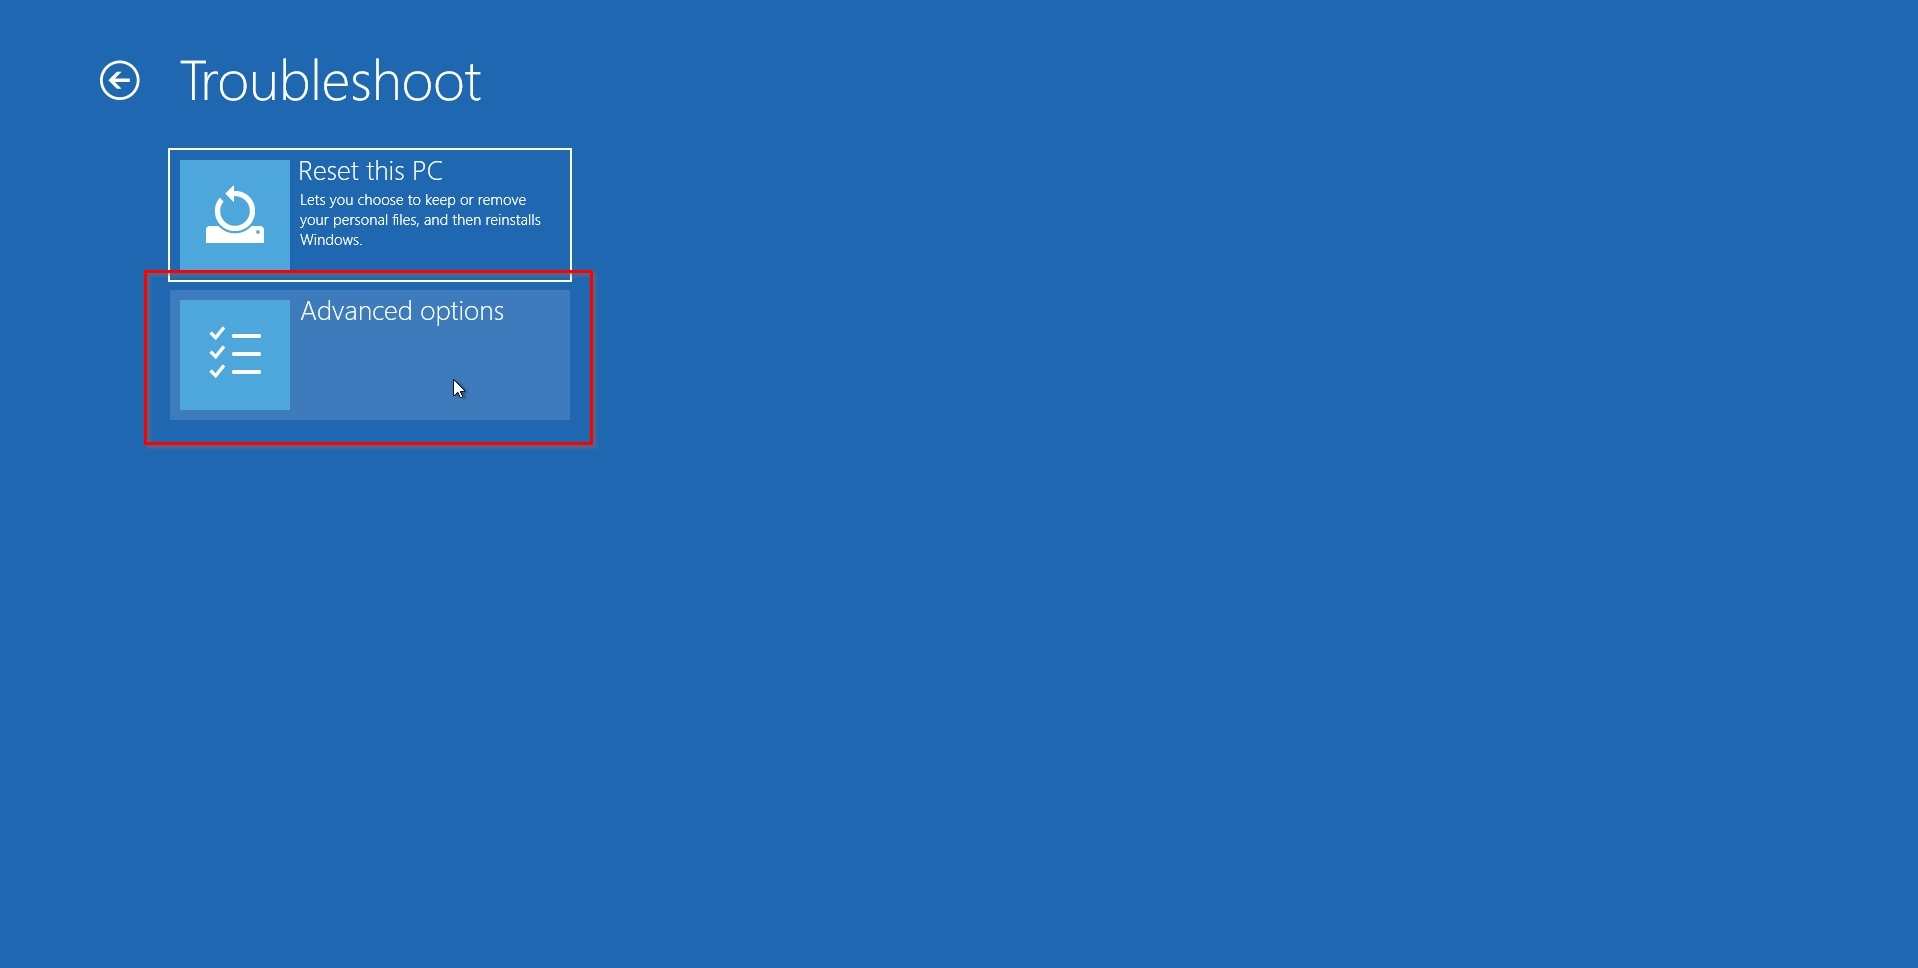
- Enter the Windows recovery environment (see the note below), and select Troubleshoot.
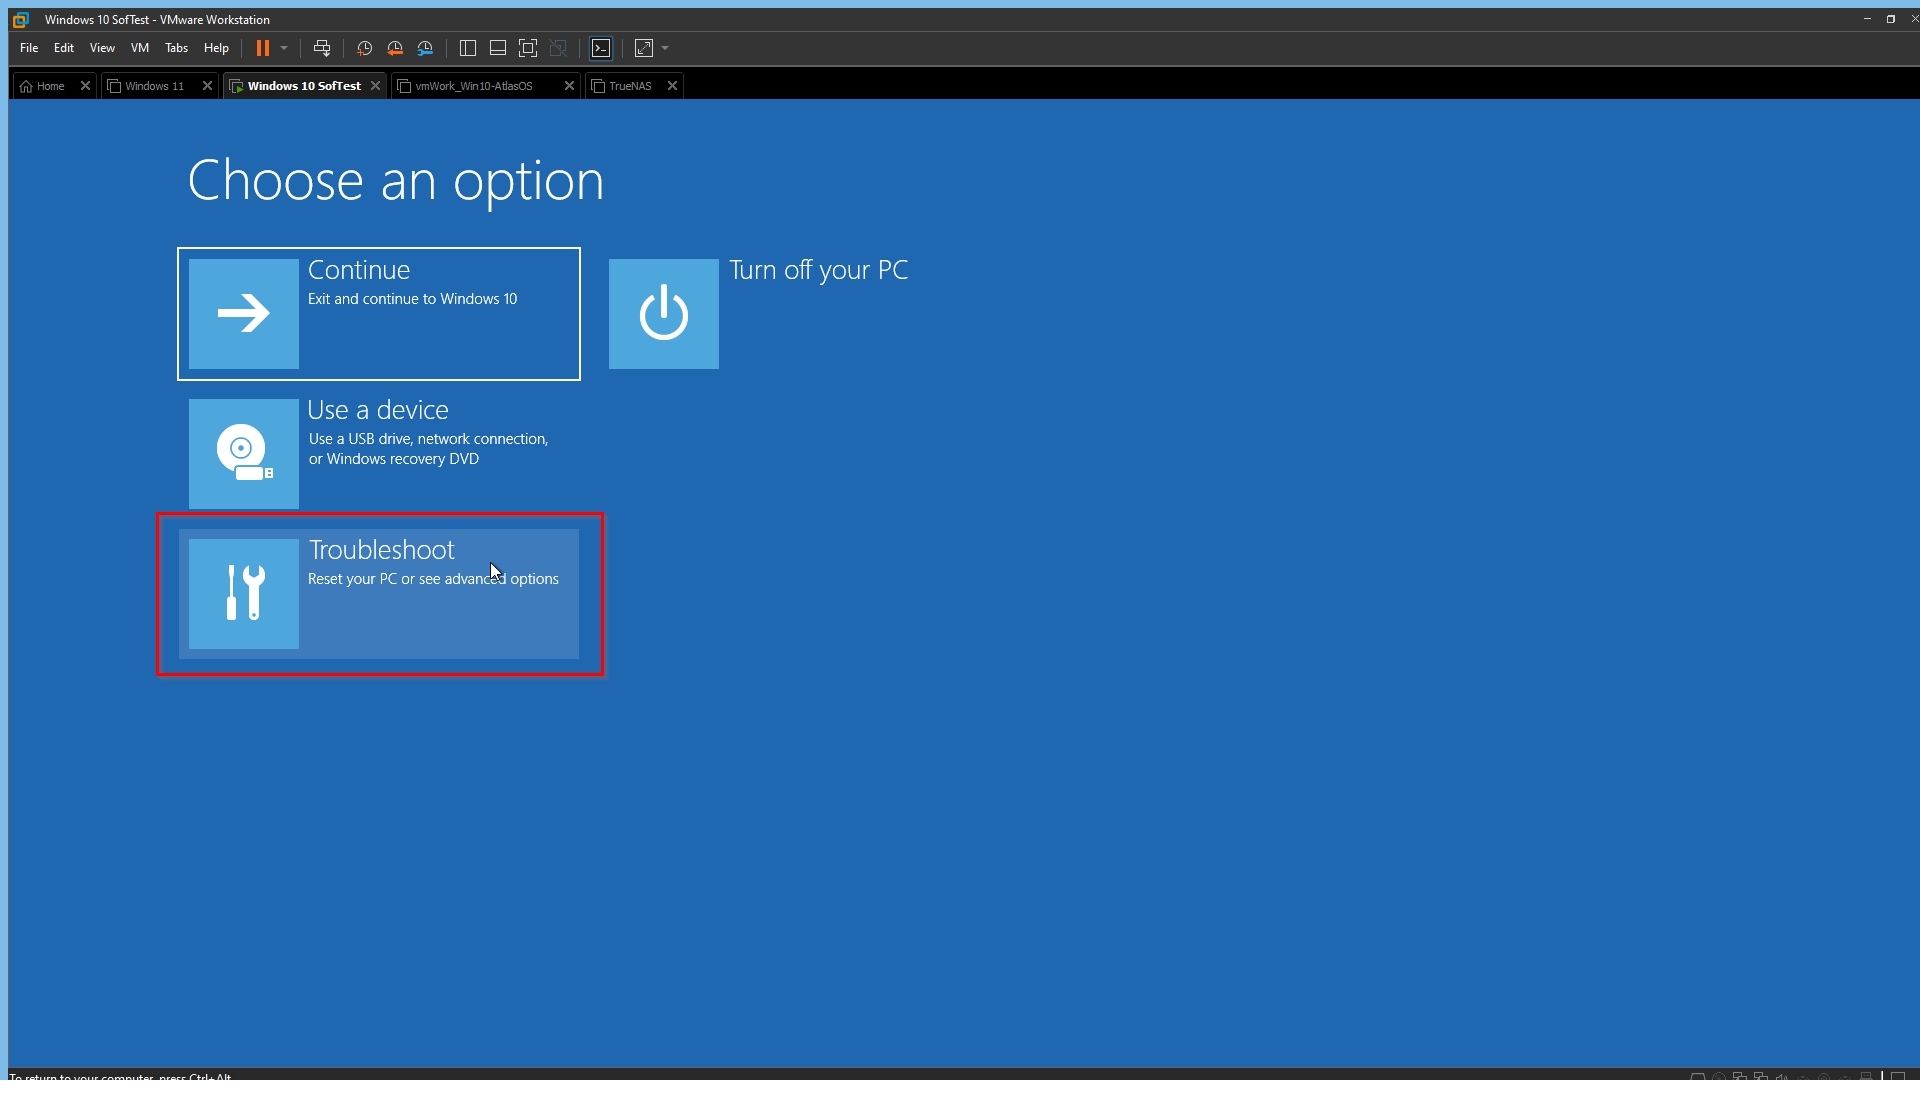
- Choose Advanced options > Startup Repair.
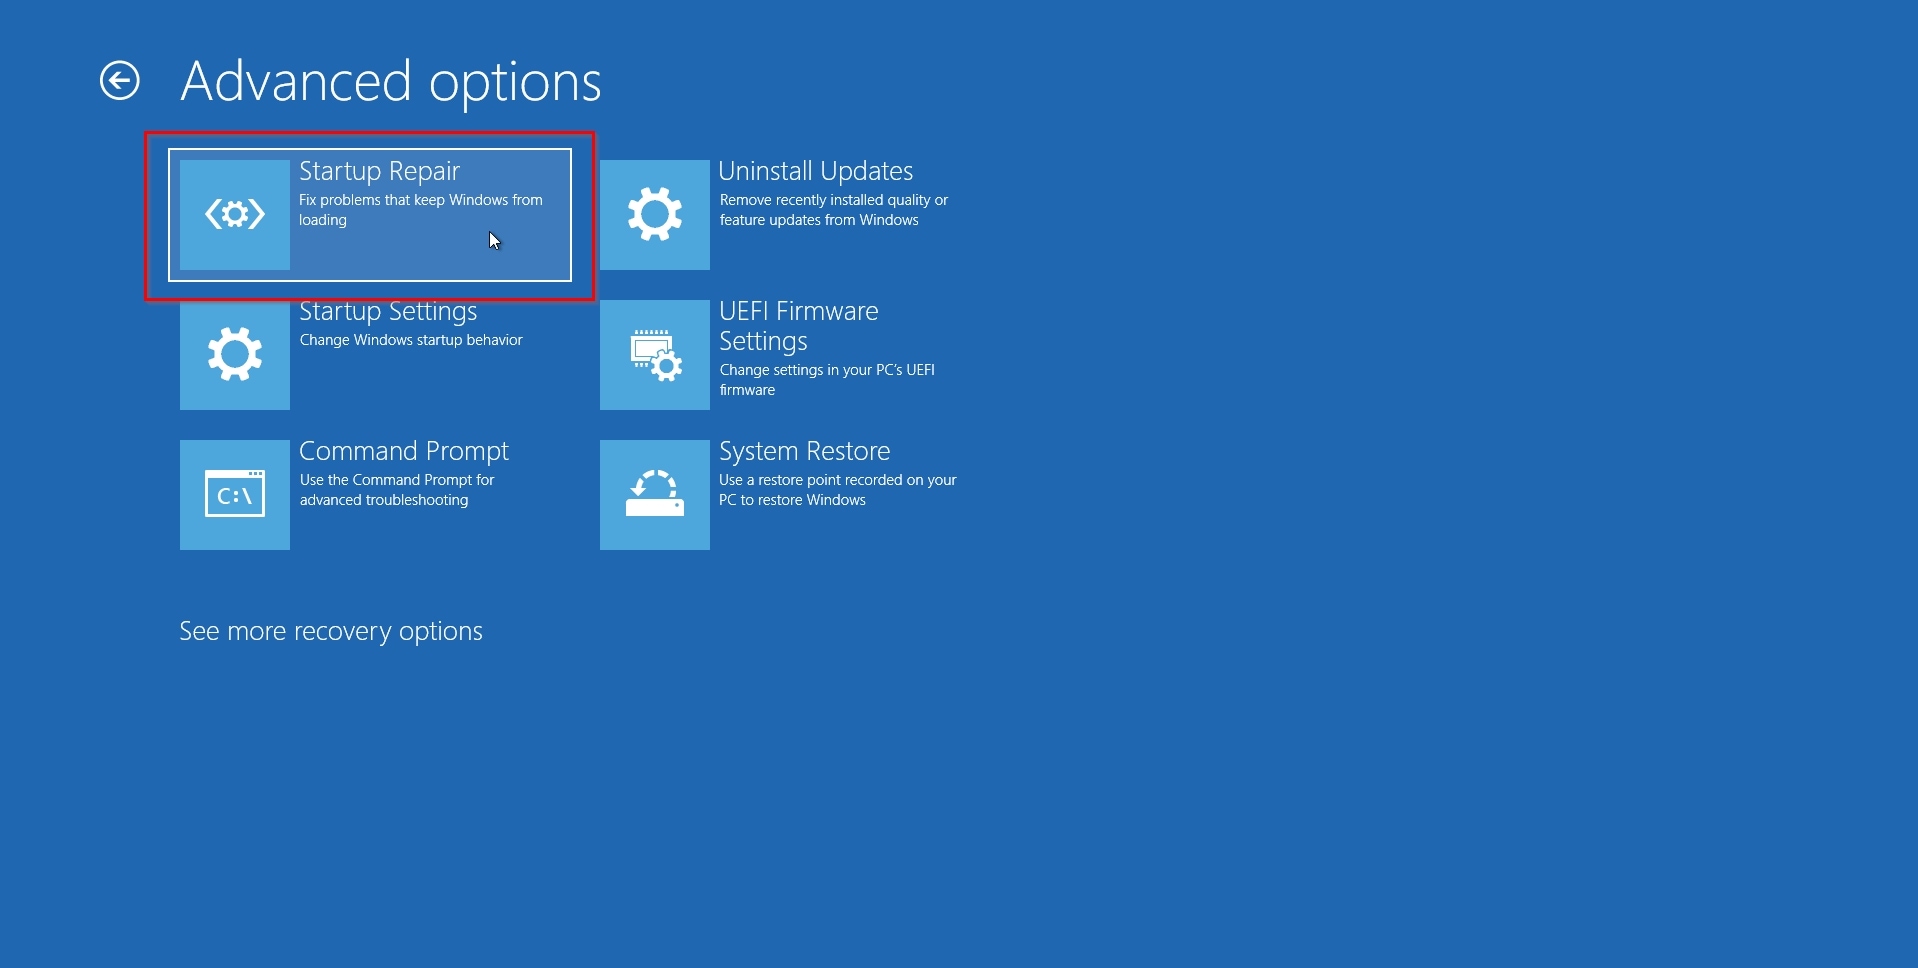
- Select your user account and enter your password.
Windows will start diagnosing your PC and, hopefully, fix the problems that prevent it from reaching your desktop.
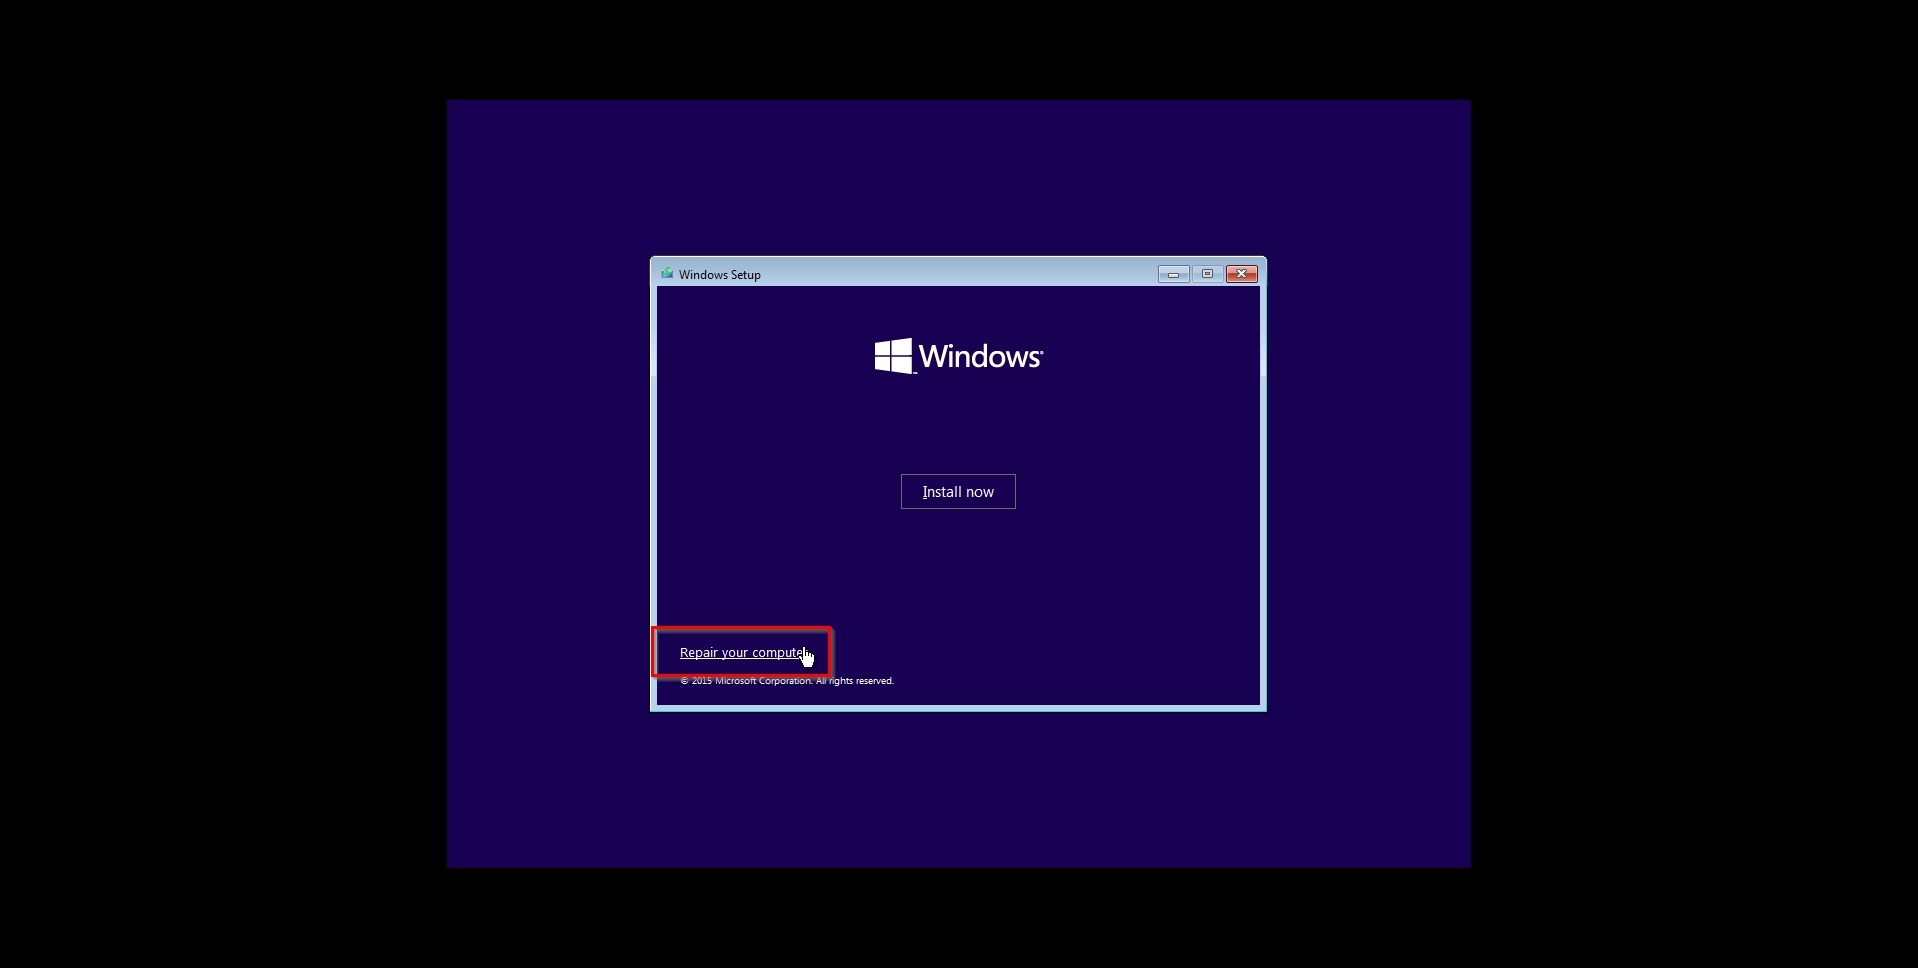
You must visit the Windows Preinstallation/Recovery Environment (Windows PE/RE) for this and most of the following solutions. If your Windows installation is semi-bootable, three failed restarts should bring you there. If not, you can boot from Windows installation media (like a DVD or a USB flash drive) and choose to Repair your computer instead of proceeding with the installation.
Solution 5 Use CHKDSK (Worth Trying)
A corrupted file system may be preventing the OS from booting up. Luckily, Windows’ CHKDSK can deal with such issues.
To check your storage device for problems that could lead to boot drive not found error messages, and fix them:
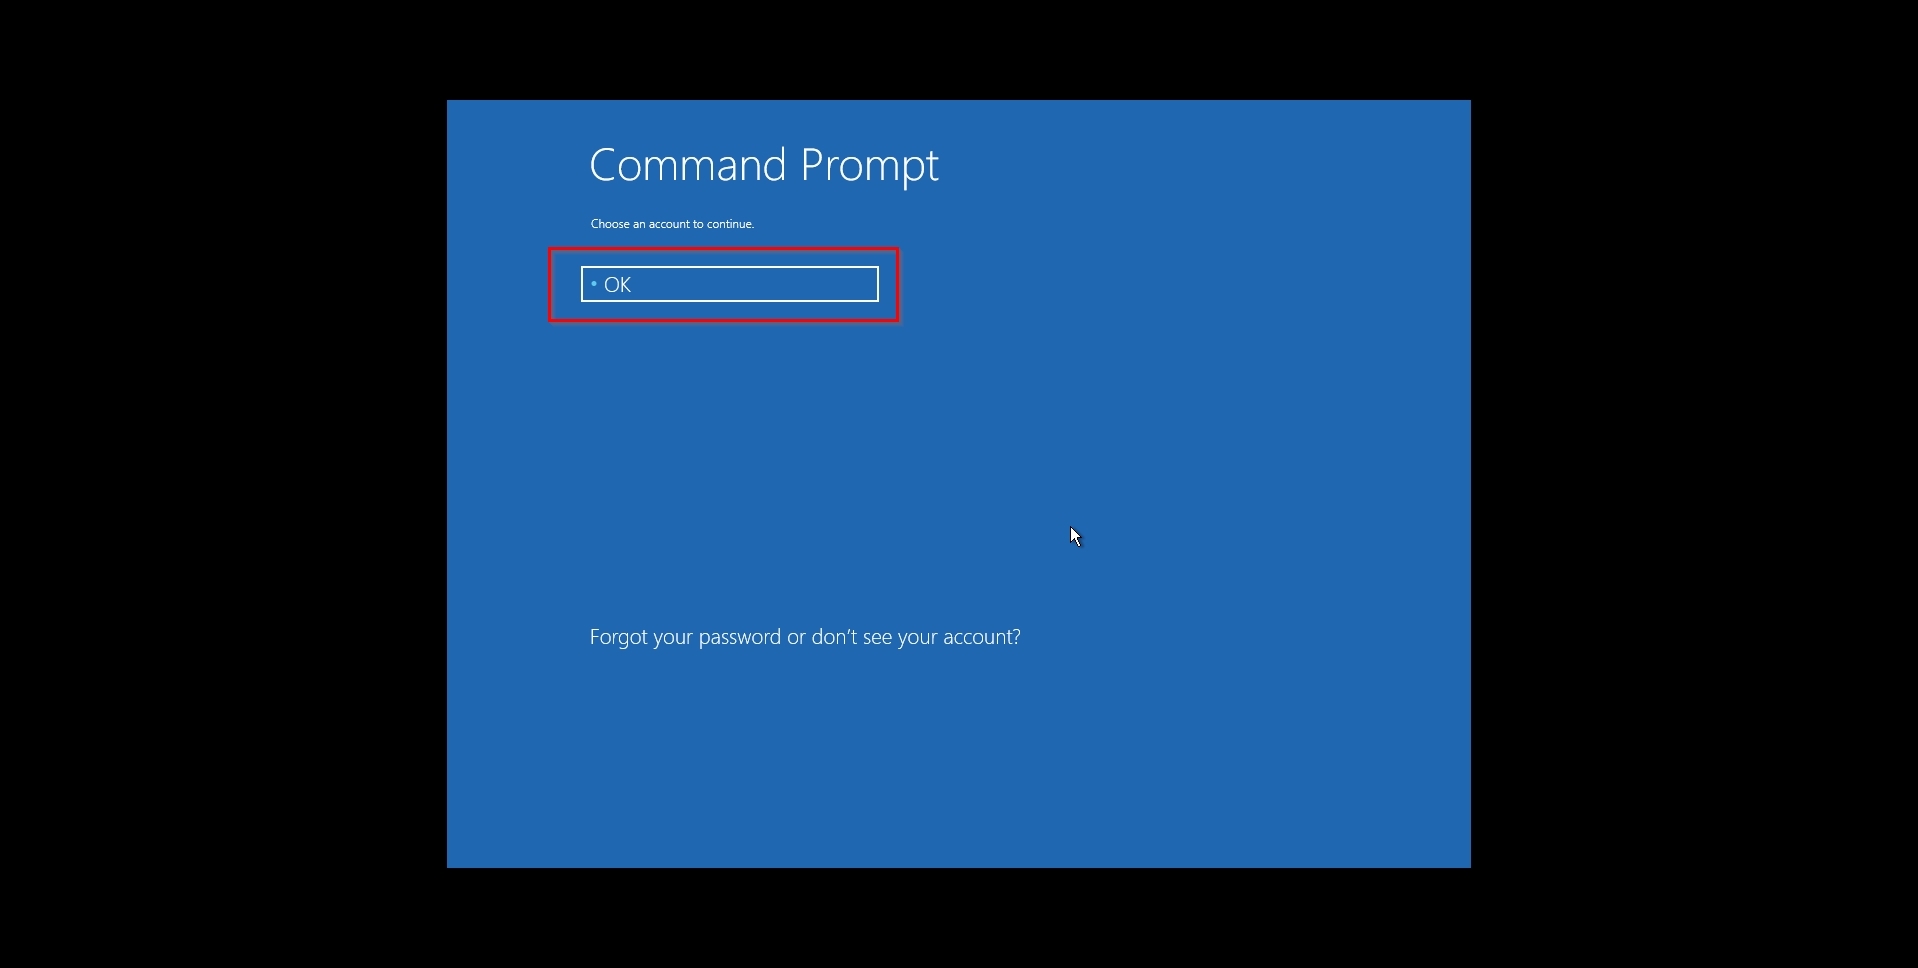
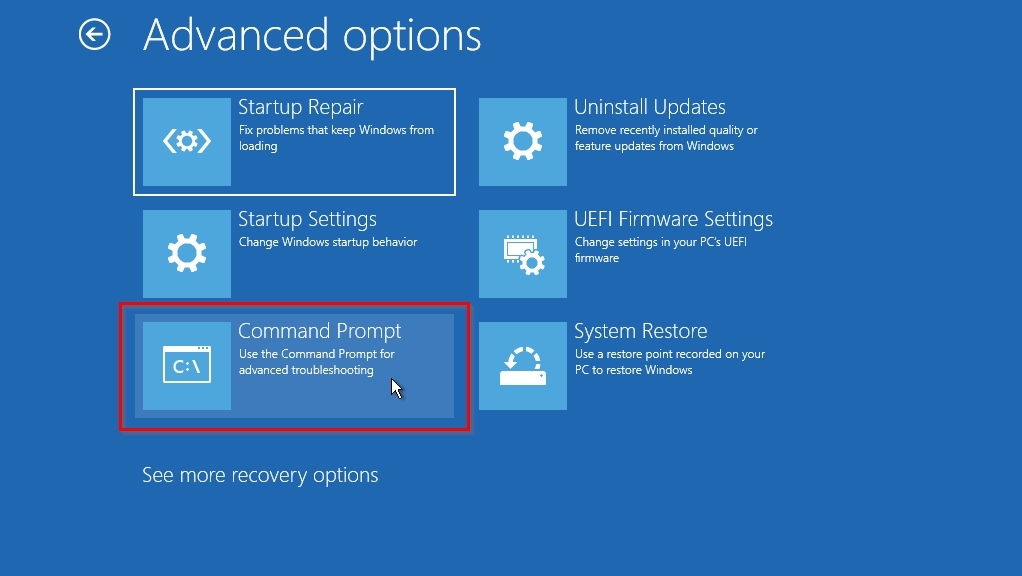
- Boot into a Windows recovery environment. Choose Troubleshoot > Advanced Options > Command Prompt.
- Choose your user account and enter your password to continue.
- Type
chkdsk c: /Fto scan the disk for file system corruption and fix related errors.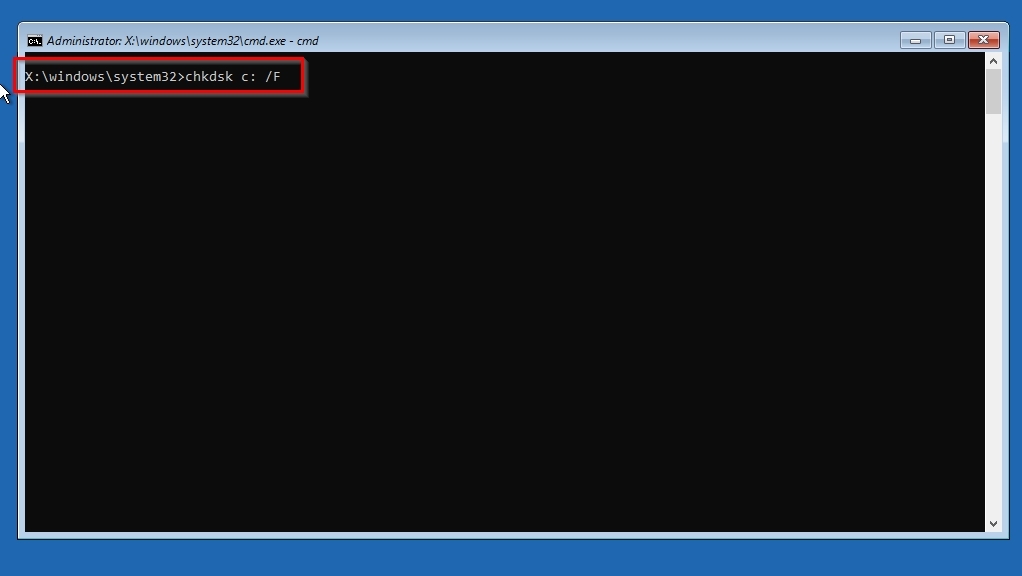
- Type
chkdsk c: /Rto scan the disk for bad sectors and recover as much data as possible from the affected files.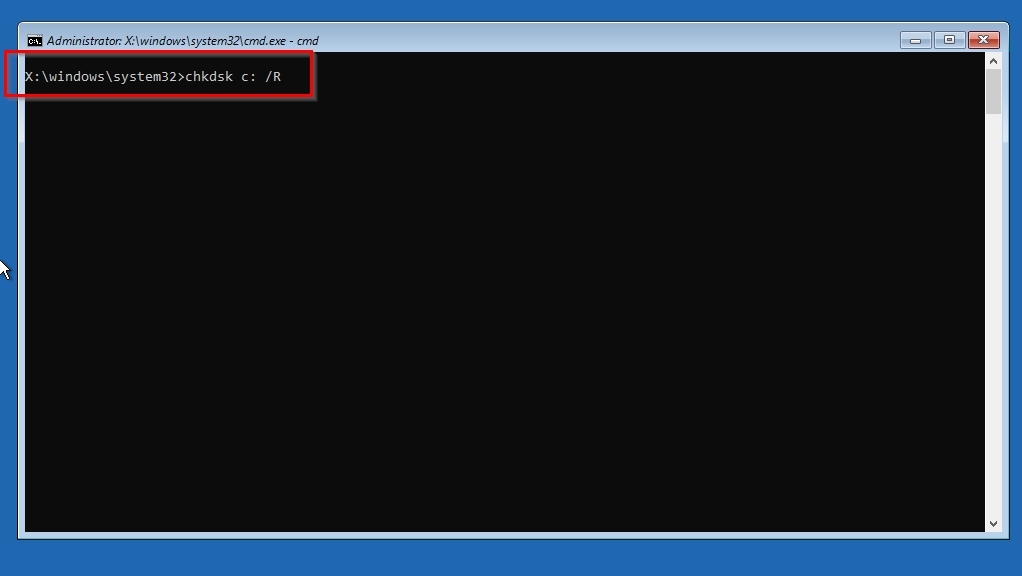
When done, close the command prompt window and choose either Continue to boot into Windows or Turn off your PC.
In the above commands, you might have to change “c:” for the letter of your boot drive if it’s different on your PC. There’s no point using the command chkdsk c: /F /R as others suggest since according to Microsoft’s official chkdsk documentation the “R” (Repair) flag includes the functionality of the “F” (Fix) flag.
Solution 6: Run SFC SCANNOW & DISM (Worth Trying)
CHKDSK can fix file system issues but cannot restore corrupted Windows files. That’s where the SFC (System File Checker) and DISM (Deployment Image Servicing & Management) tools can help.
To fix your Windows installation with SFC and DISM:
- Get to your Windows installation’s or boot media’s recovery environment. Click Troubleshoot, Advanced Options, and then Command Prompt.
- Type
sfc /scannowand hit Enter to have the SFC tool scan your Windows installation’s files and fix any issues it finds.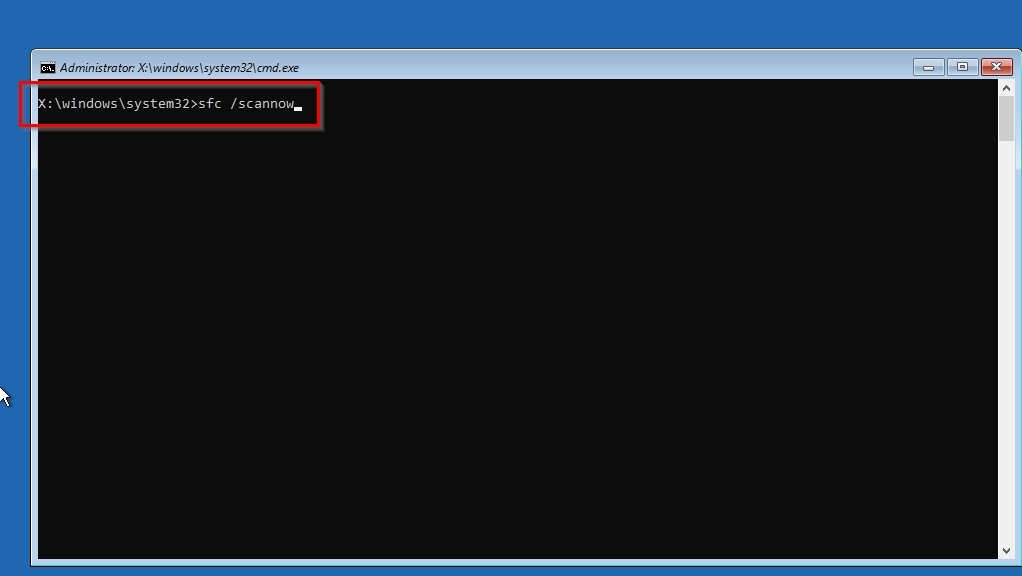
- If SFC fails, or as an extra check, run
dism /online /cleanup-image /restorehealth. The DISM tool will compare the current Windows files with Microsoft’s versions and redownload any that don’t match.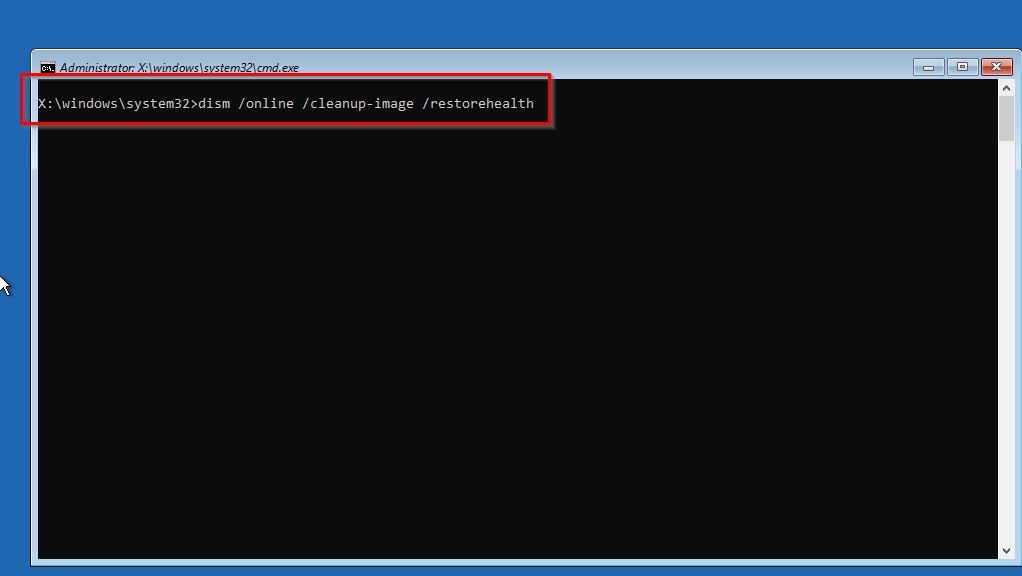
Solution 7: System Restore (Worth Trying)
If System Restore was enabled, you can revert your PC to a previous state to render it usable.
To revert your non-booting PC to a previous System Restore checkpoint:
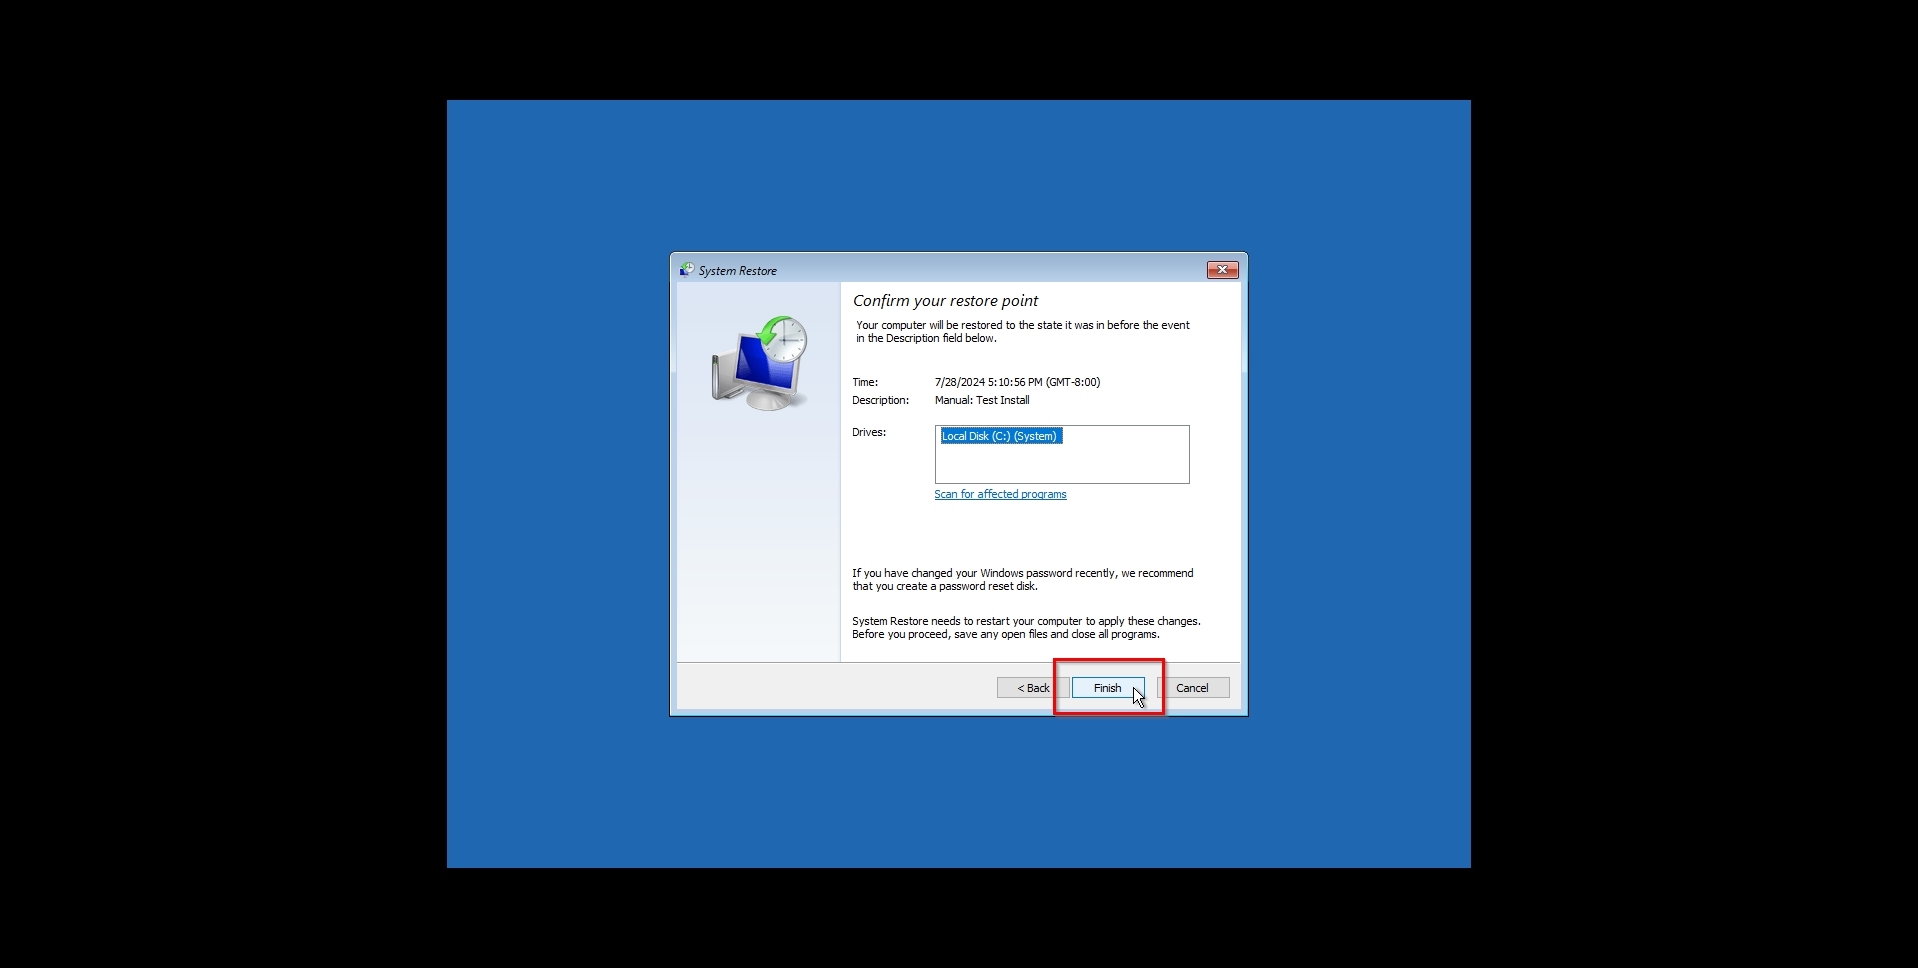
- Visit a preinstallation/recovery environment. Move to Troubleshoot > Advanced Options > System Restore.

- Select your user account and enter your password.

- Click Next on System Restore’s window.
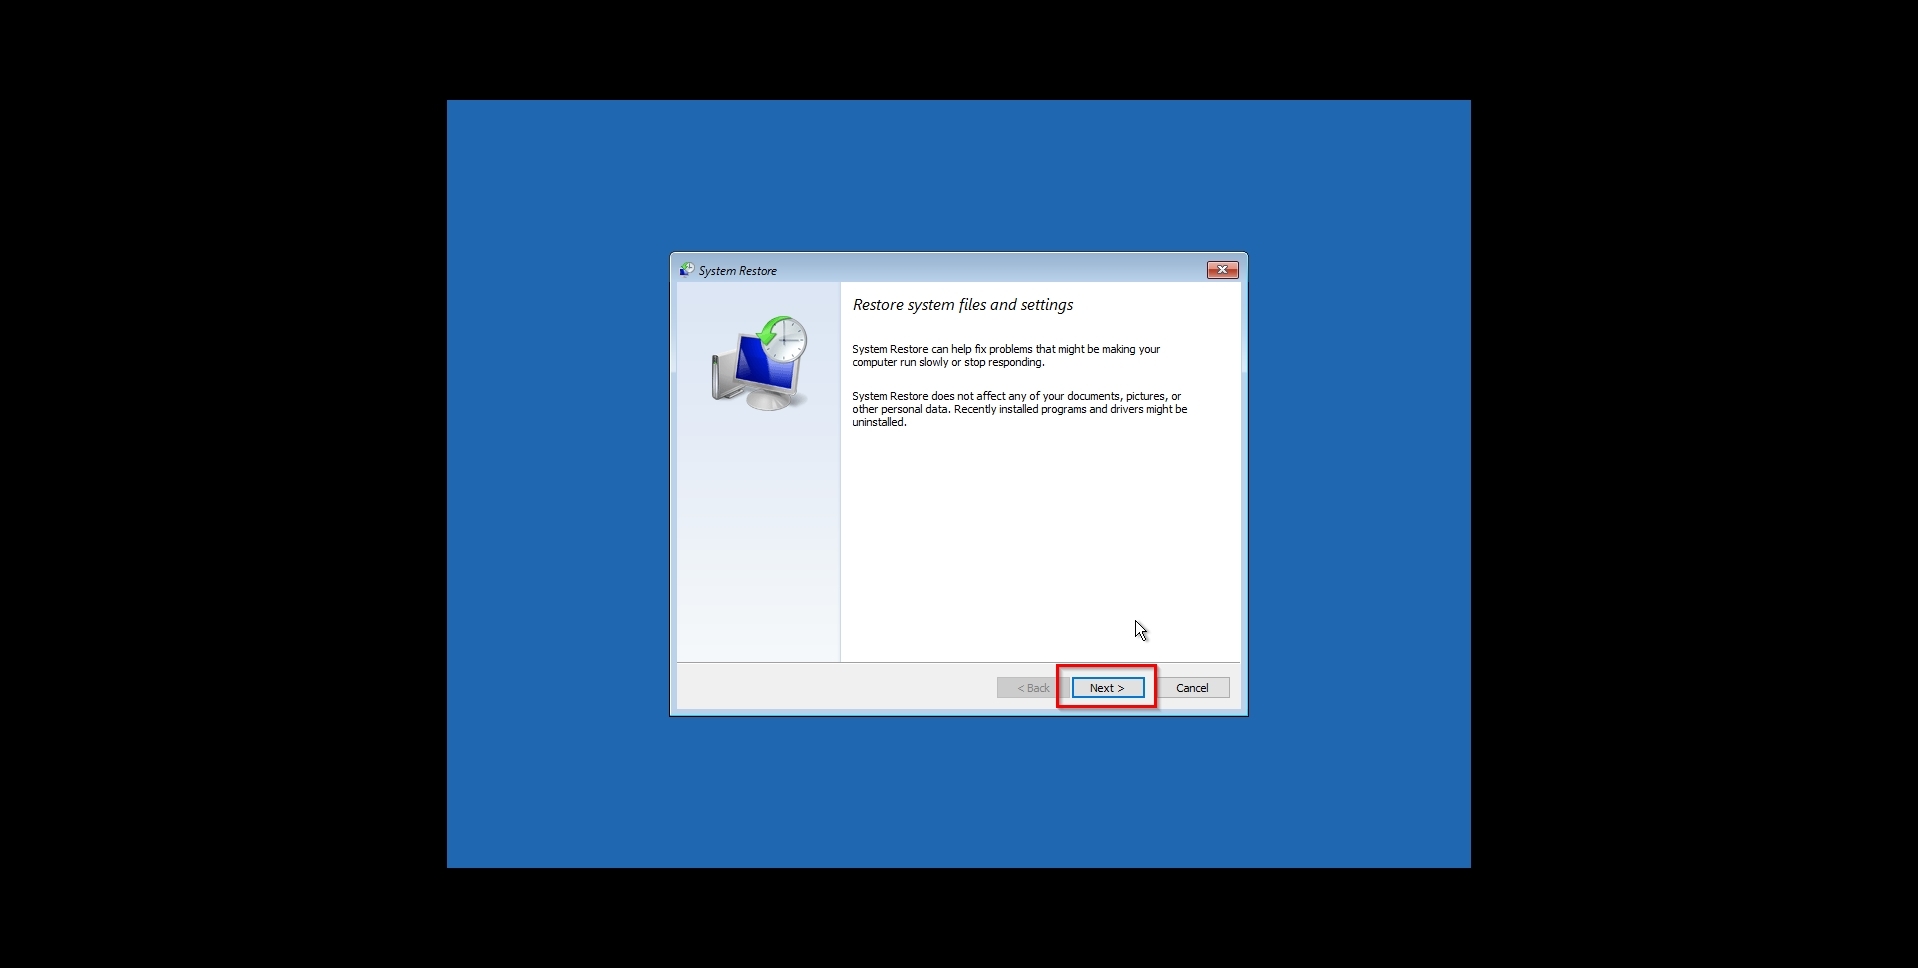
- Select one of System Restore’s checkpoints (if more than one is available). You can Scan for affected programs to see what might stop working after reverting to that checkpoint.
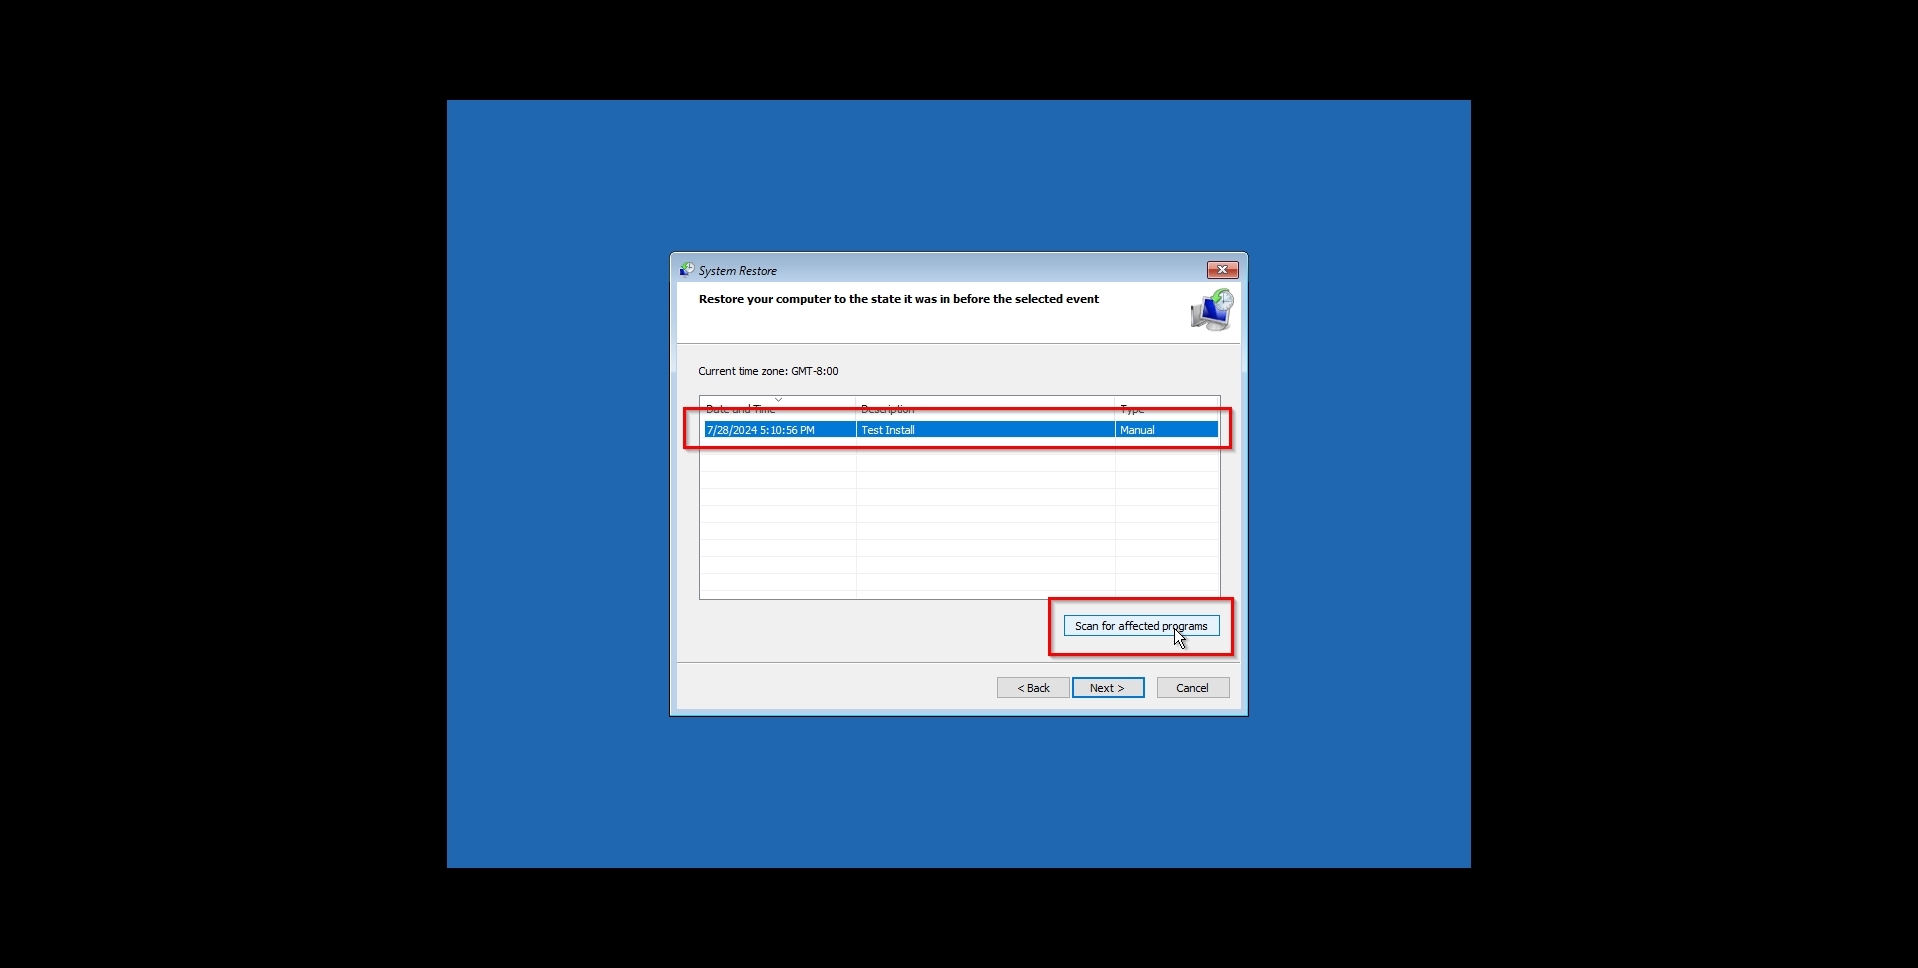
- When ready, click on Next, , and then Finish to revert your PC to the selected checkpoint.
Solution 8: Try to Fix the MBR (Worth Trying)
If your PC keeps refusing to boot from its primary storage device, its Master Boot Record (MBR) might be corrupted. That’s where Boot Recovery (BootRec) can help.
To fix the MBR using bootrec:
- Visit the installed Windows’ RE or an Windows installation media’s PE. Select Troubleshoot, Advanced Options, and then Command Prompt.
- Choose your account and enter your password. In the command prompt, type
bootrec /fixmbrto fix the MBR. Exit, and restart your PC to check if this fixed the issue.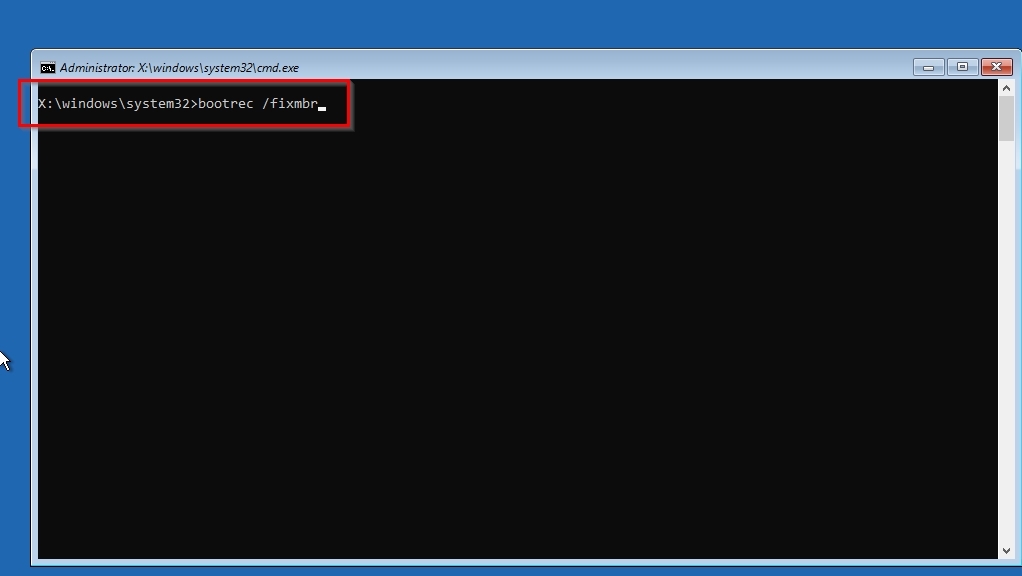
- If this didn’t help, try the commands
bootrec /fixbootandbootrec /rebuildbcdinstead. Those, respectively, a) write a new boot sector to the system partition and b) rebuild the BCD store (that stores the list of bootable operating systems).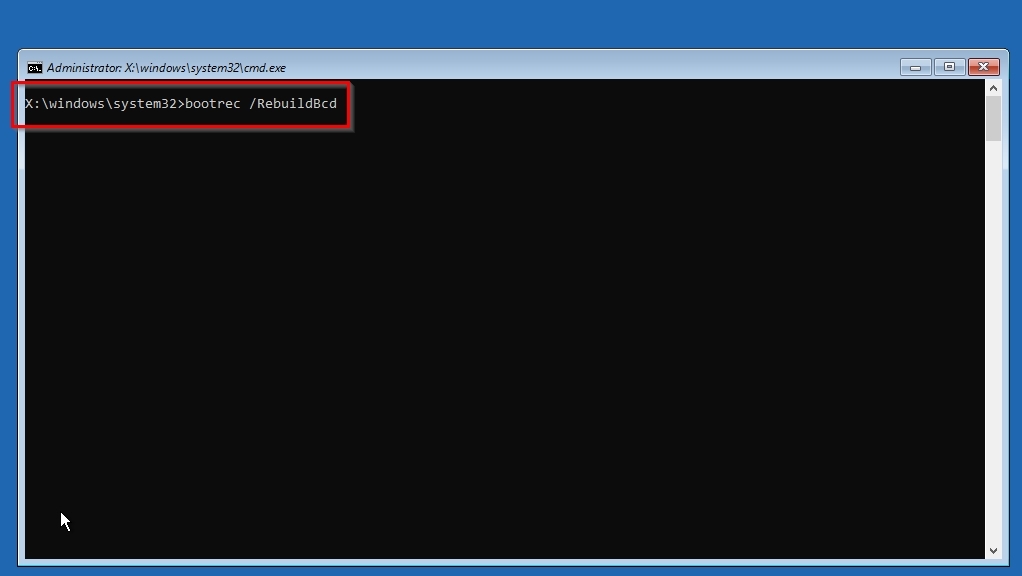
Solution 9: Scan with TestDisk (Worth Trying)
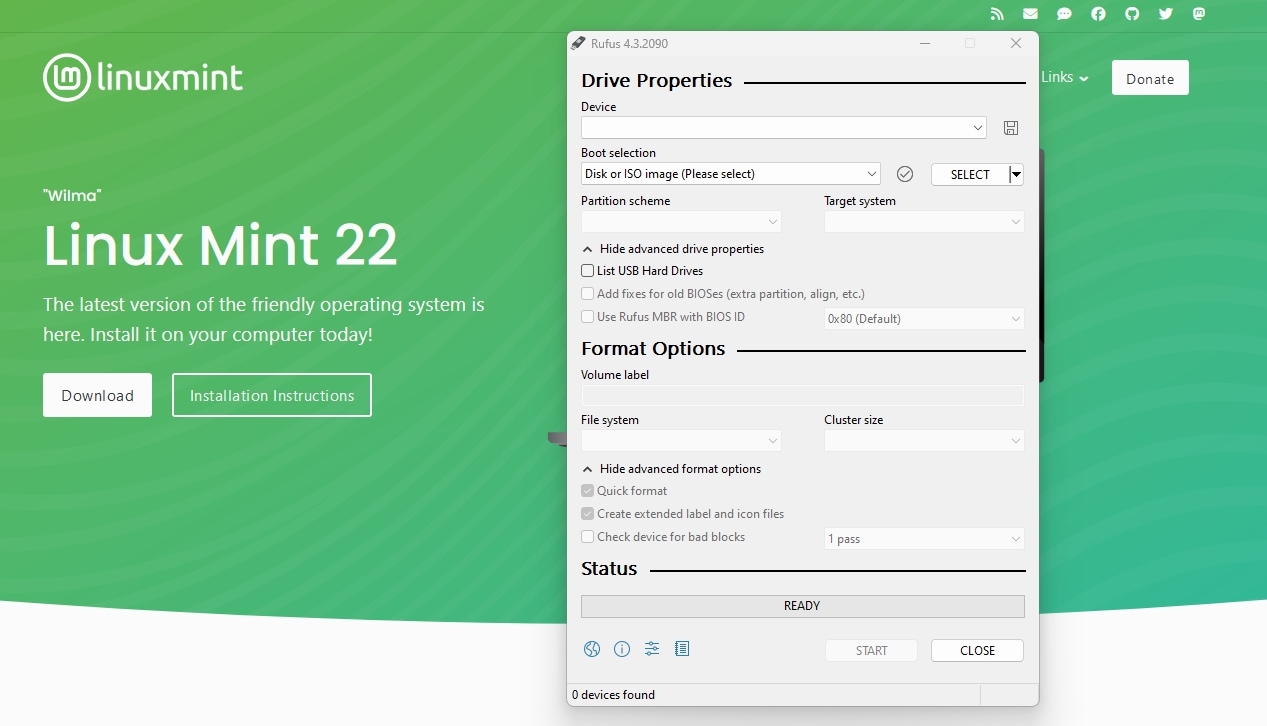
If you can’t reach your Windows desktop because of a corrupted storage device or missing partitions, TestDisk may help. Since your installed Windows is unavailable to run it, you can use a Linux distribution’s installation media as a temporary replacement. Like many others, I love Linux Mint for its simplicity, so let’s go with that for our example.
To locate and restore missing partitions by running TestDisk on a bootable version of Linux Mint:
- Use a secondary PC to download Linux Mint and create bootable installation media.
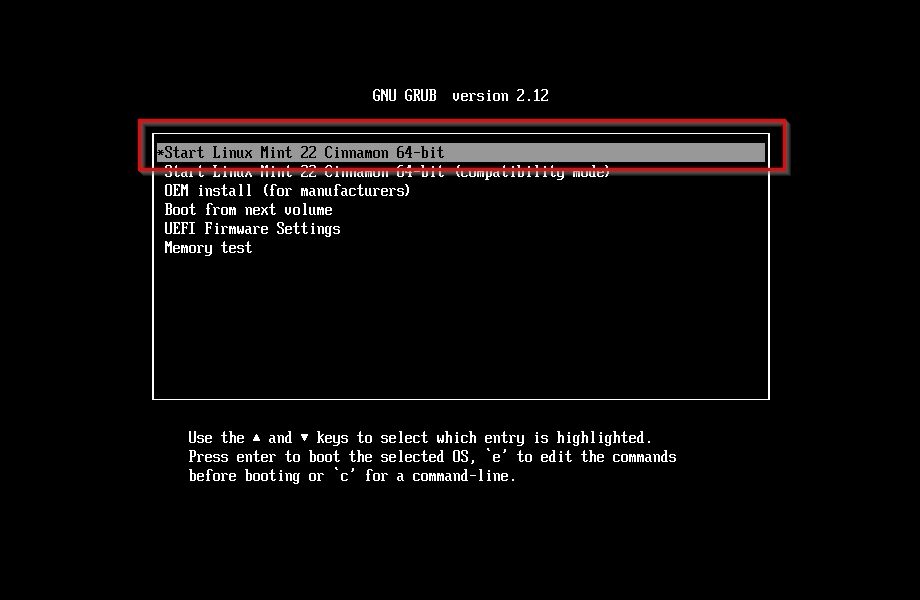
- Visit your PC’s BIOS/UEFI screen and set the bootable media as the primary boot device (refer to your motherboard’s manual for more information). Boot Linux Mint, and select its “main” first entry. If that fails, retry using the second entry (that ends with “compatibility mode”).
- When you reach Linux Mint’s desktop, click on the terminal icon on the taskbar. Install TestDisk with
sudo apt install testdisk.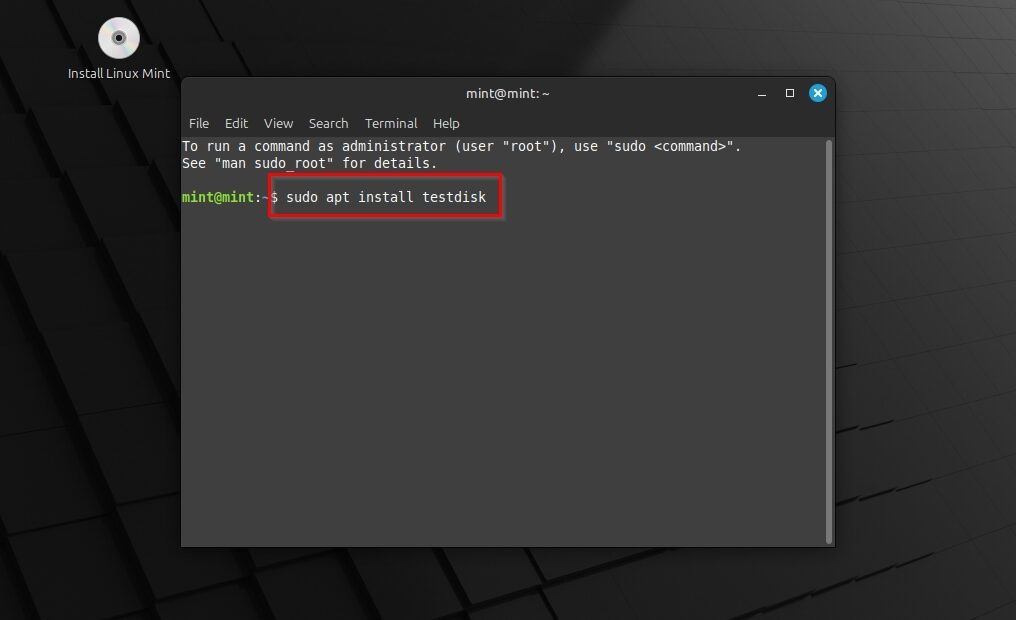
- Type
sudo testdiskto run the app. To access all storage devices, you must run it as an administrator (the “sudo” command).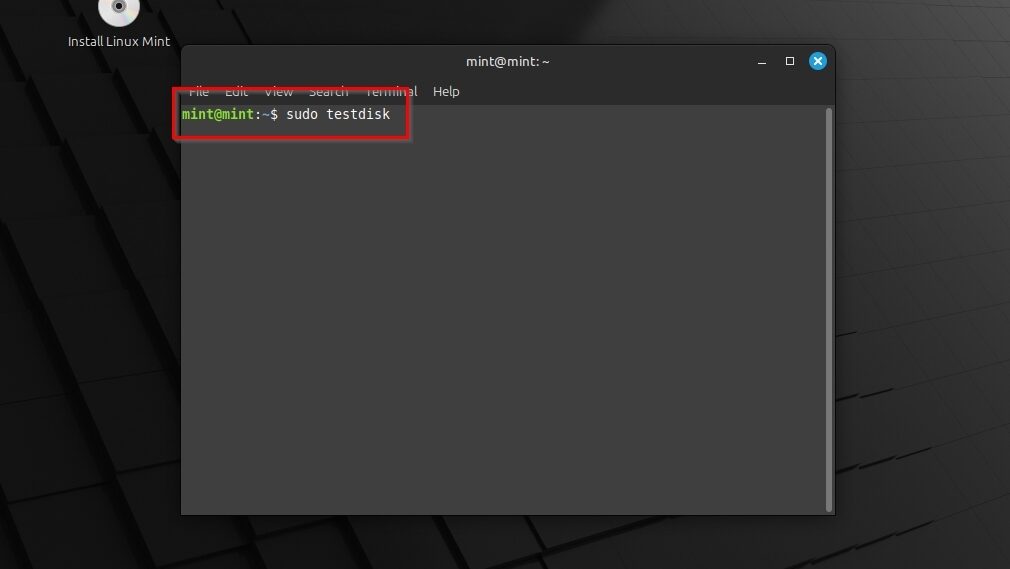
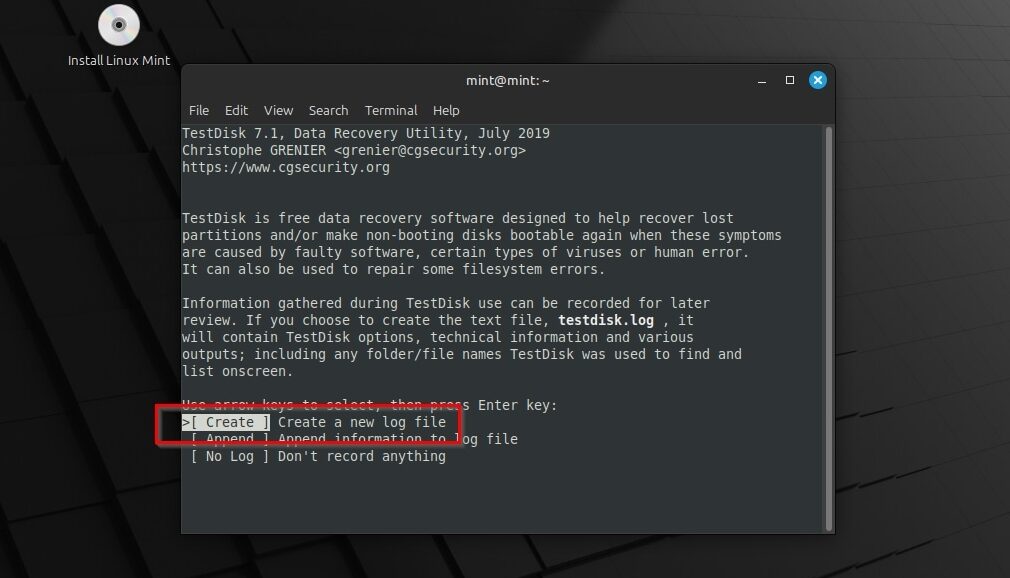
- Create a log file to help with troubleshooting if something goes wrong. Use the cursor keys to navigate and Enter to select an option.
- Select your bootable disk with your Windows installation. Then, Proceed to the next step.

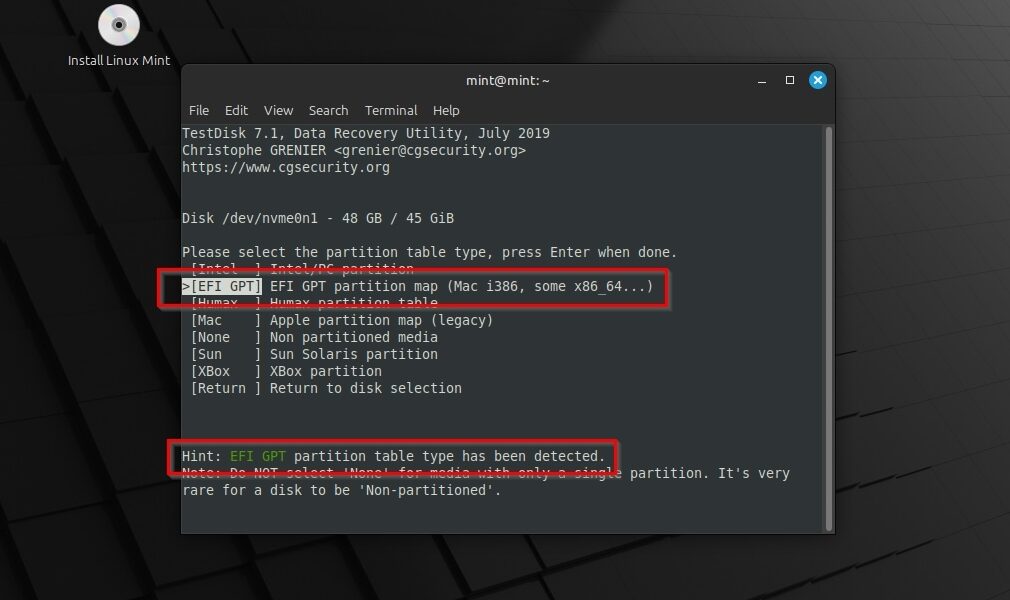
- Choose its partition table type from TestDisk’s list. Usually, for Windows, it should be EFI GPT. TestDisk will also show you a hint with the detected partition table type.
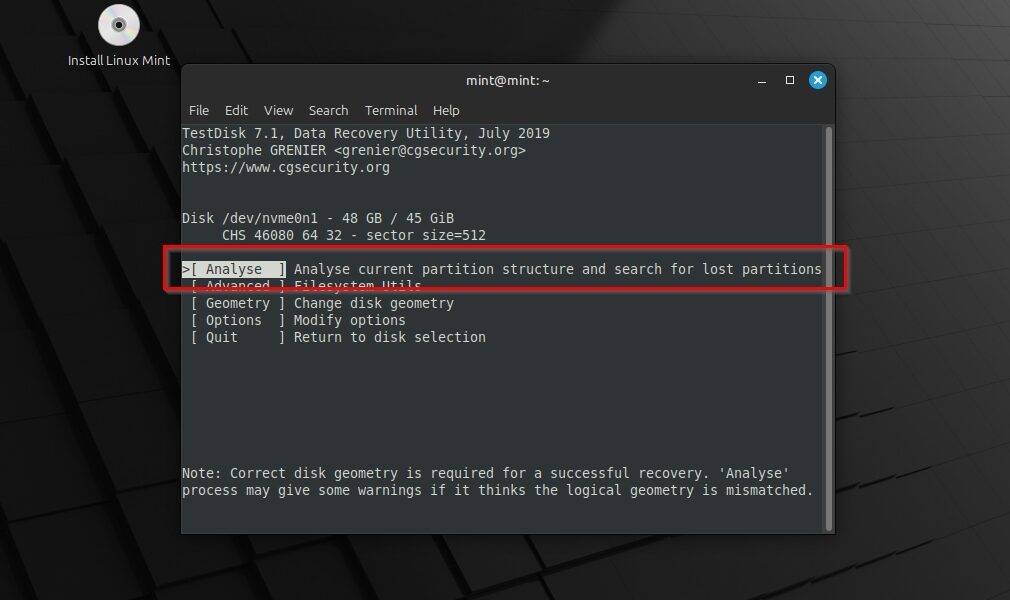
- Select Analyse and then Quick Search to have TestDisk seek partitions on the disk.
- If TestDisk found a lost partition, select it and press Enter to continue. Then, Write the partition structure to disk.
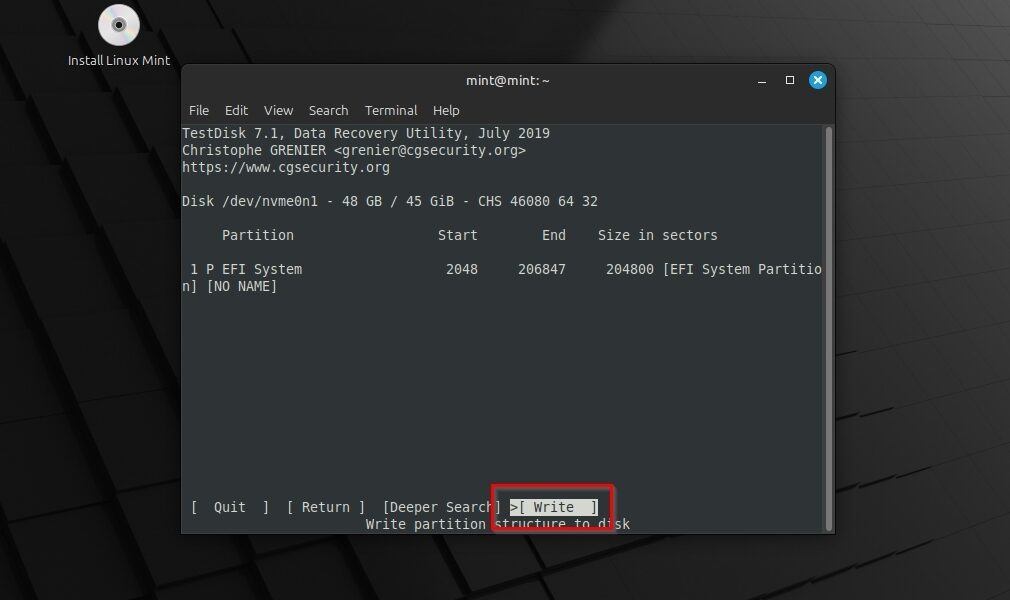
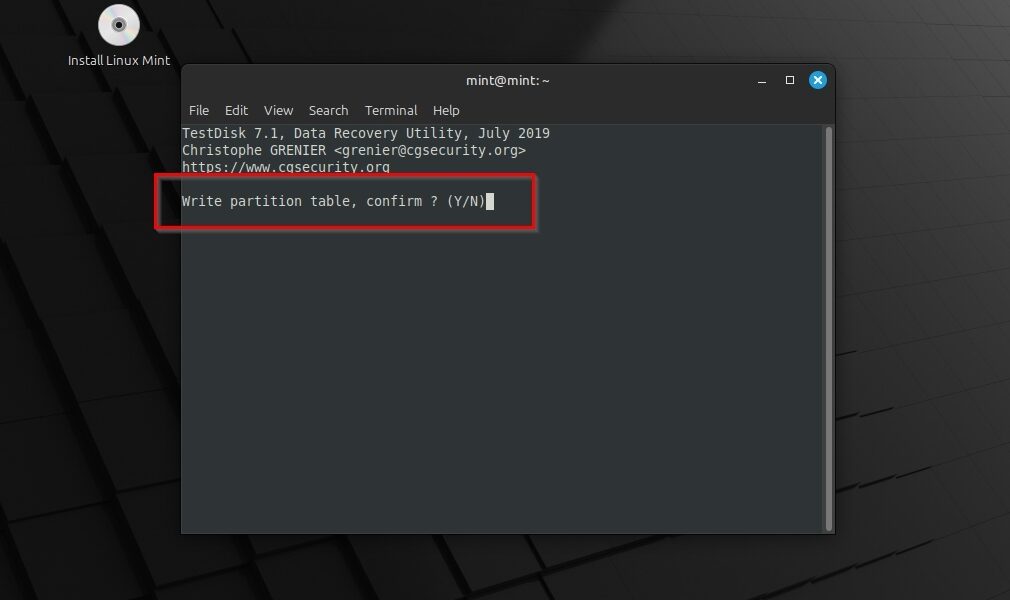
- Confirm that you want to write the new partition table. When done, select OK to return to the previous menu.
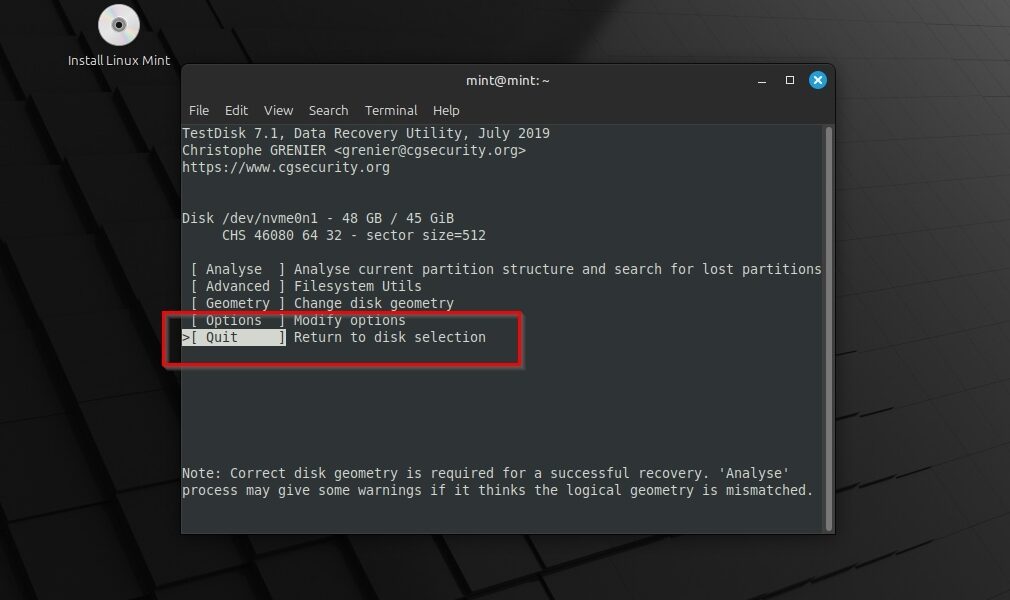
- Select Quit twice to exit the app.
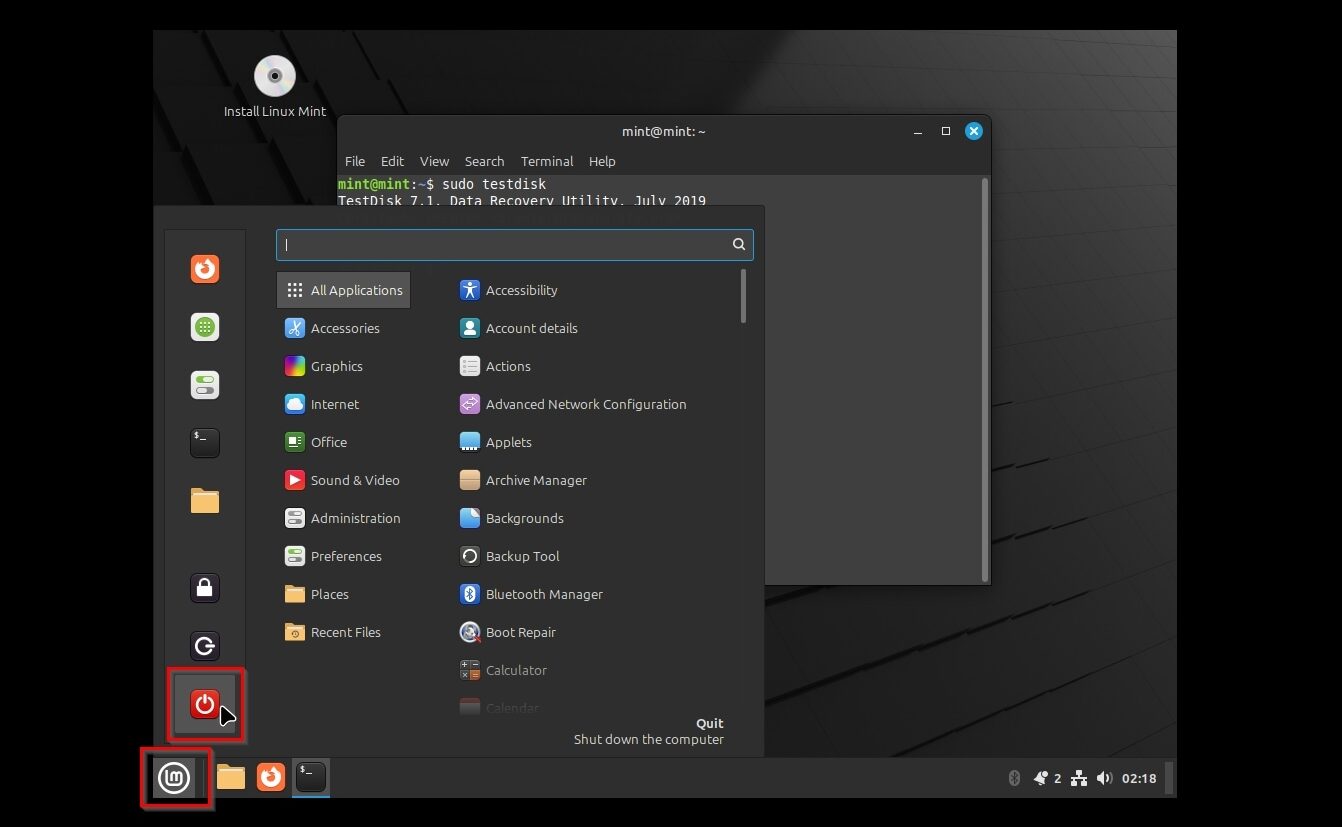
- Click Mint’s app launcher button (on the left edge of the taskbar) and then the familiar power button. Choose to Shut Down your PC.
You can also run the DOS version of TestDisk from bootable media, as we saw in our article on the best bootable data recovery software for different scenarios.
Solution 10: Reinstall Windows (Guaranteed)
The final solution to all Windows-related issues is reinstalling the OS from scratch. A new installation will be free of your current one’s problems. However, you’ll lose all your apps and settings and start fresh with a blank slate.
The short version of how to reinstall Windows is this:
- Create Windows installation bootable media for your version of the OS using another PC.
- Refer to your motherboard’s manual for information on how to boot from that media.
- Follow the Windows installation wizard, as it guides you on selecting the disk where the OS will be installed, your preferred language, creating a user account, etc.

After some reboots and downloading any available updates, you’ll reach your brand-new desktop.
Solution 11: Consult Professionals (Guaranteed)
If the solutions I mentioned didn’t work, a specialized repair service could help. However, remember that those services’ goal is to “fix your PC”, not to keep your data accessible.
To ensure your data is safe, contact data recovery specialists like CleverFiles’ Data Recovery Center. At the very least, recover your data from your disks yourself, as we’ll see next, before handing over your PC to someone else for fixing.
Save Your Files From a Boot Device That’s Not Found With Disk Drill
Would you like to ensure your files are safe before reinstalling Windows or sending your PC for repair? Disconnect its boot disk, stick it as a secondary drive on another PC, and use a trustworthy data recovery solution like Disk Drill to recover your files from it.
To recover your files from your non-booting-anymore boot drive on another PC using Disk Drill:
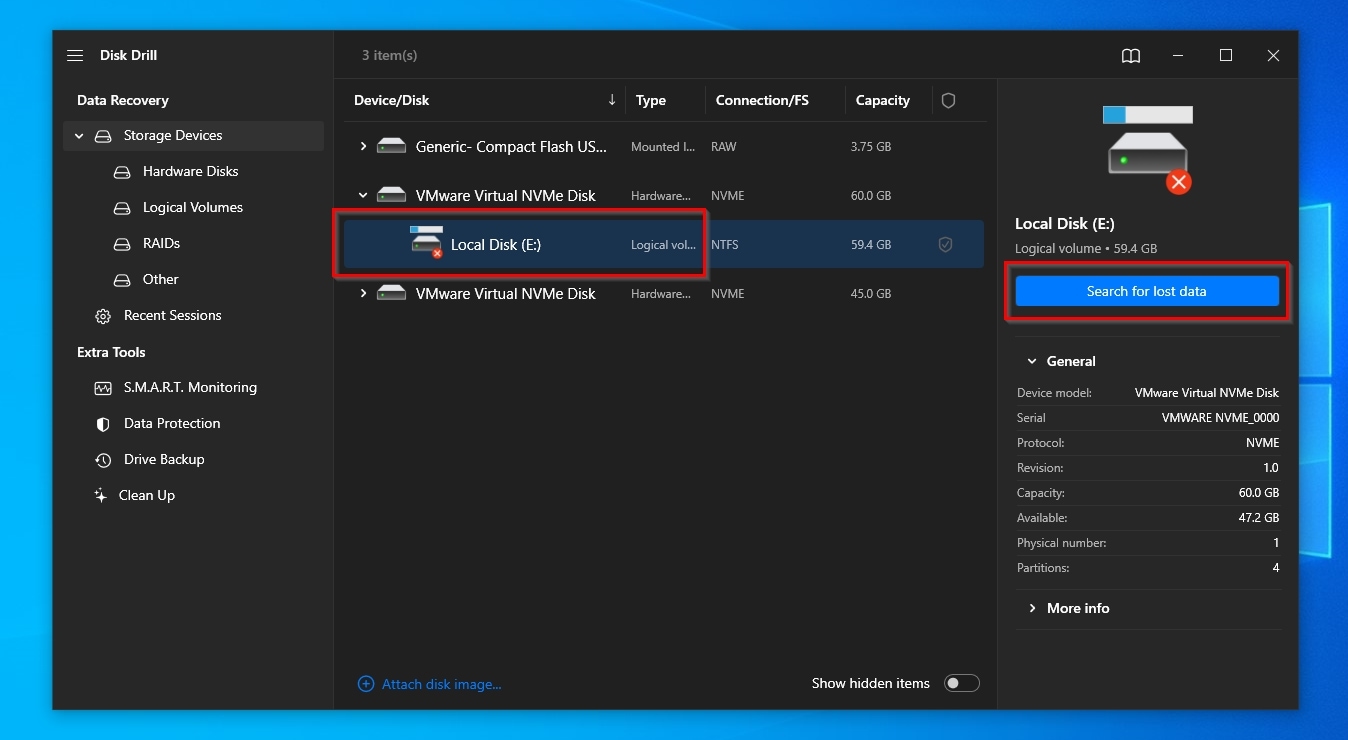
- Connect your ex-boot-drive to another PC as a secondary drive. Download Disk Drill from its official site, install it, and run it. Select your former boot drive from Disk Drill’s Device/Disk list, and click Search for lost data.
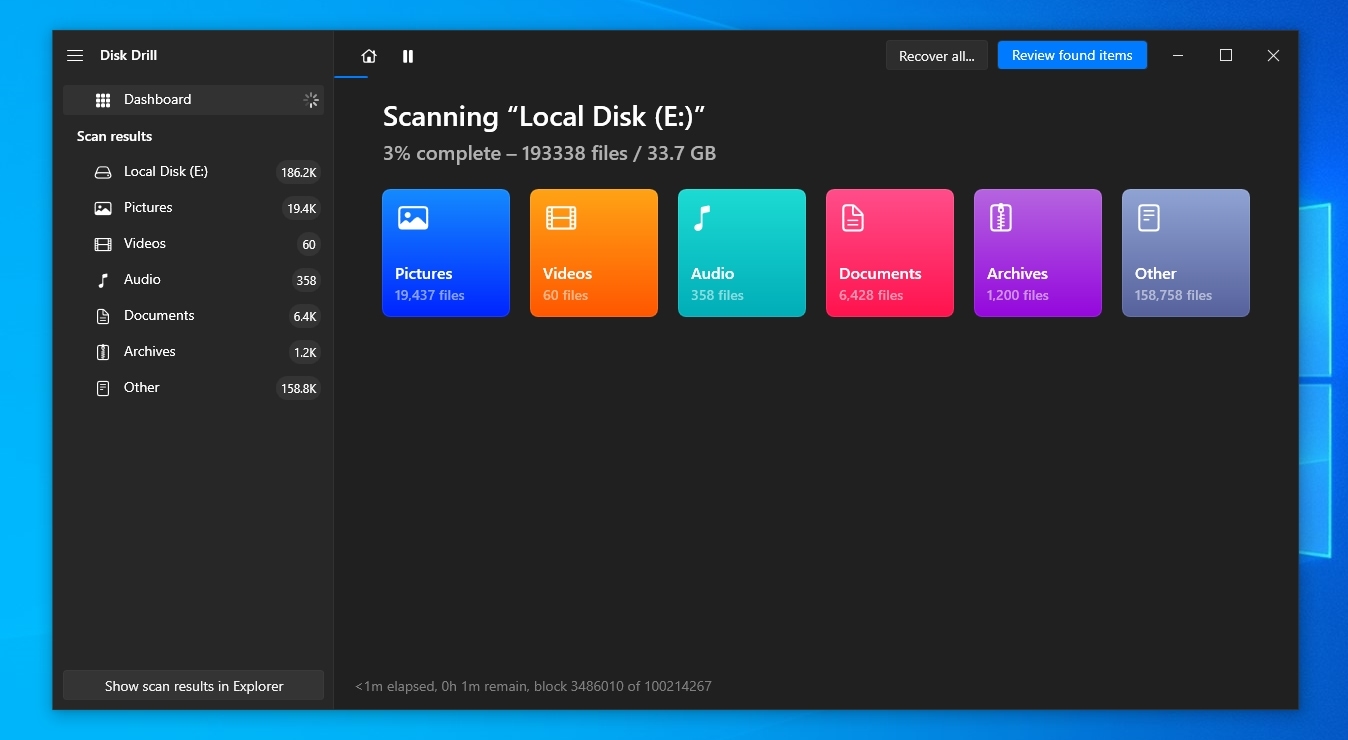
- Let Disk Drill’s scan run its course. When done, the app will inform you that All recovery methods (are) complete. If you’ve only scanned a partition, and Disk Drill believes it may find more data with a more thorough scan, it will prompt you to Scan (the) entire disk.
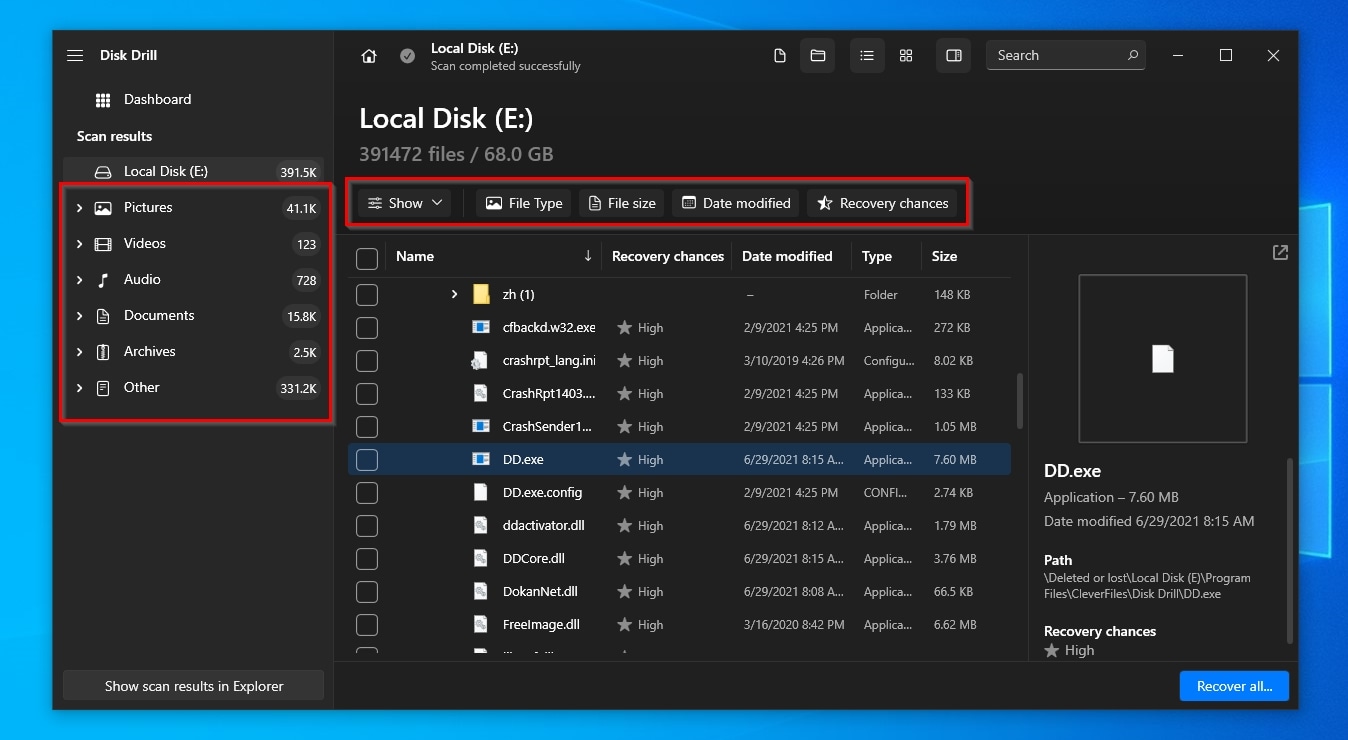
- When the scans are complete, click Review found items to see all the files Disk Drill located.

- Use the categories on the left and the filters on the top of the list to narrow down the number of results based on the files’ type or characteristics (pictures, documents, last time of change, size, etc.).
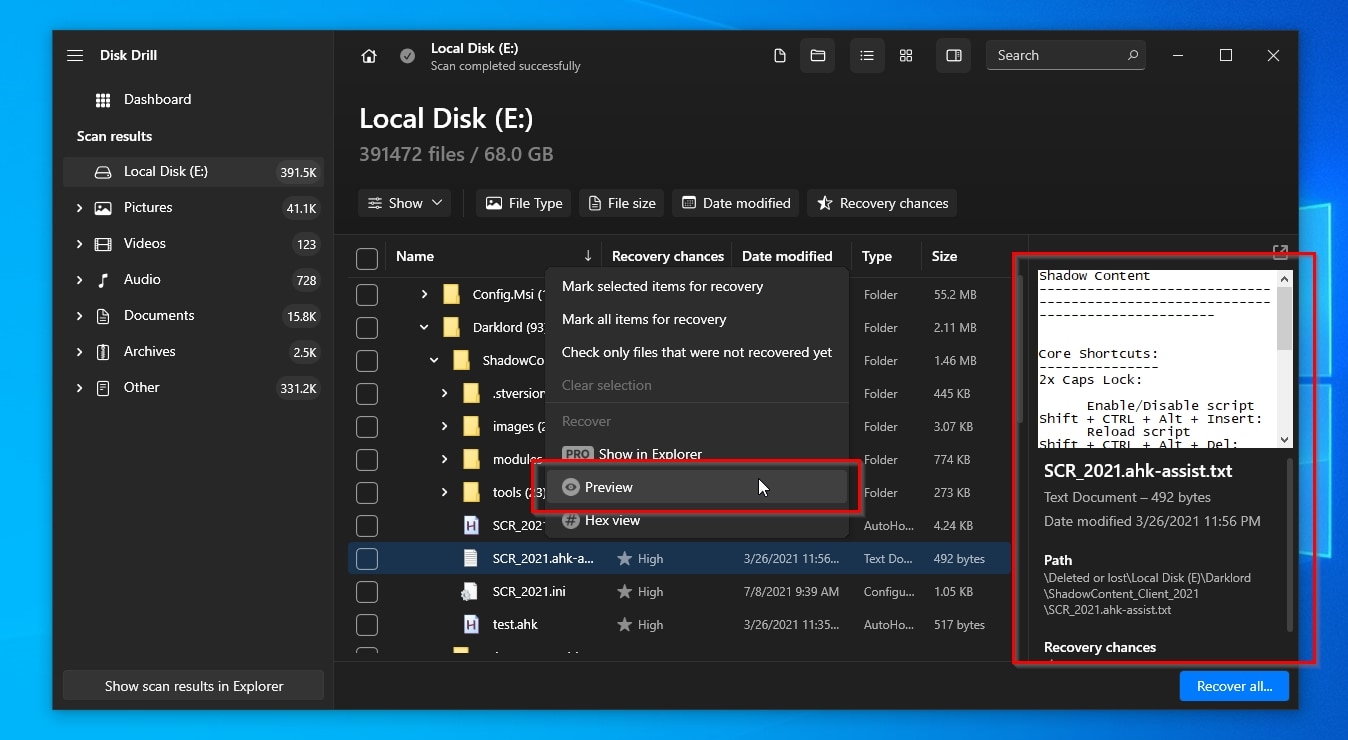
- Disk Drill allows you to check the contents of many types of files (like text documents, JPEG images, etc.) to ensure they’re the ones you want to recover. If the app’s preview pane isn’t visible, click on the little eye icon that appears when you point at a file on Disk Drill’s results list, or right-click on a file and choose Preview.
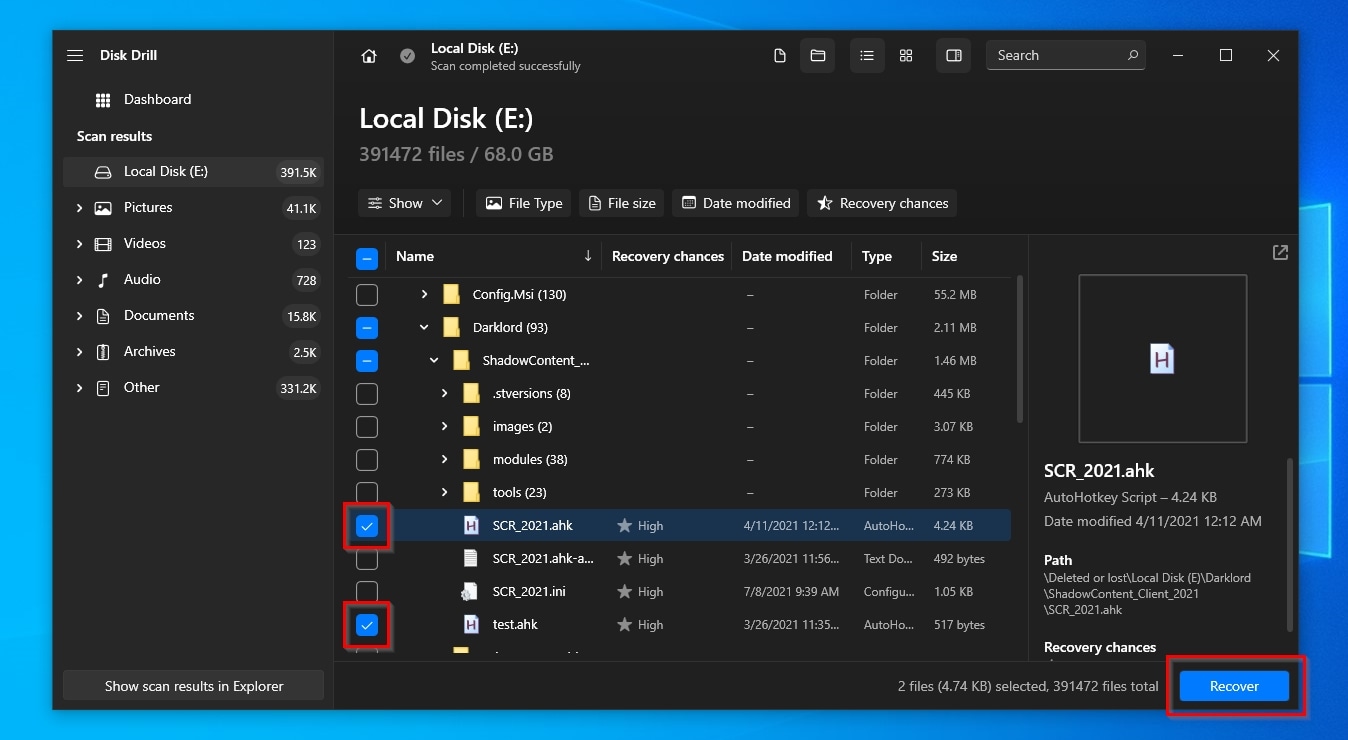
- When you find them, mark the files you want to recover with a checkmark on their left. Then, click on Recover.
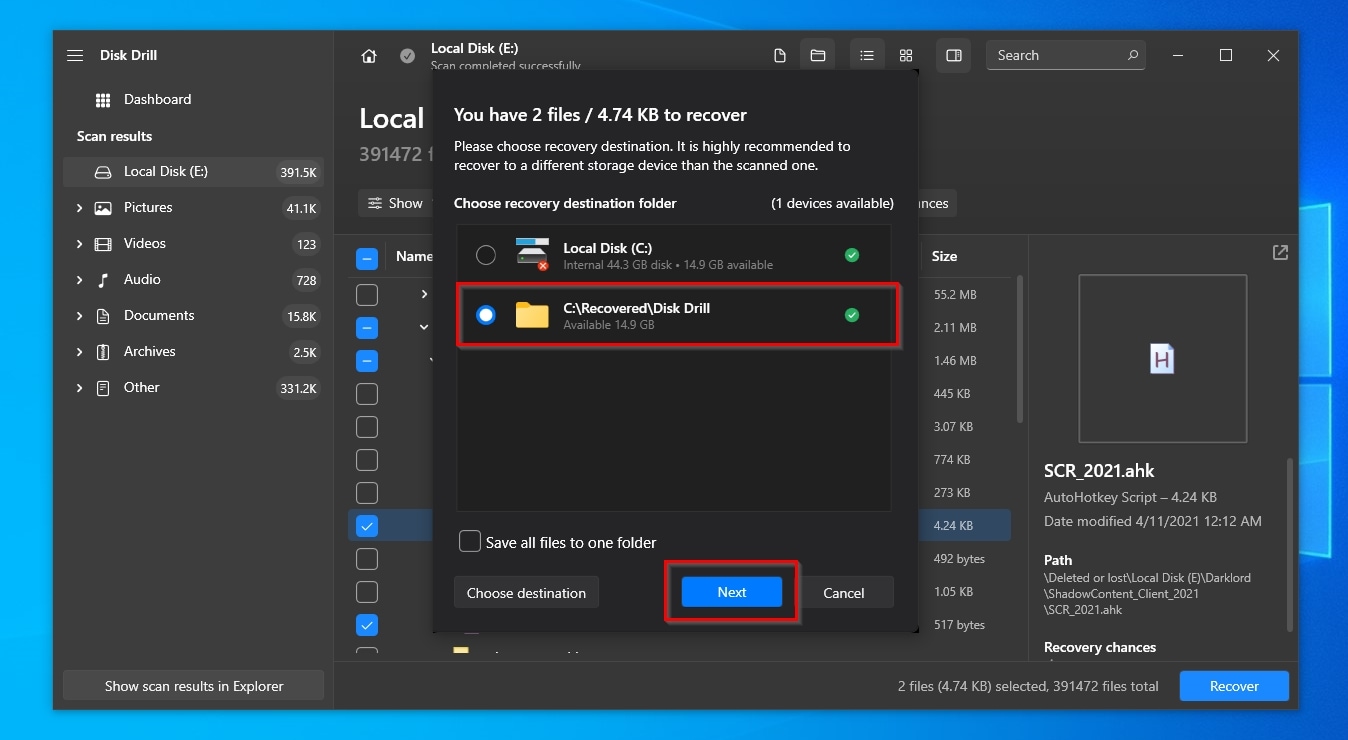
- Select the target folder where you want Disk Drill to store the recovered versions of your files and click Next.
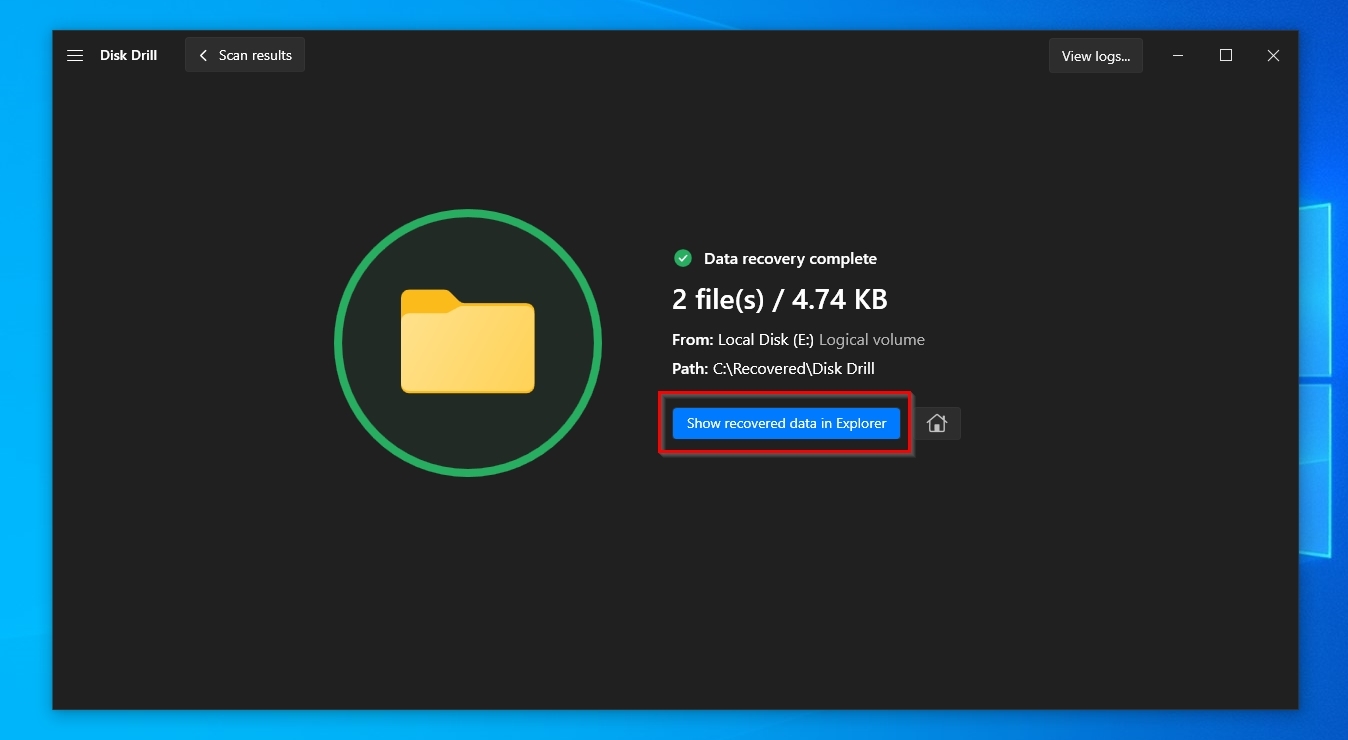
- Disk Drill will recover your files to the folder you selected in the previous step. Click Show recovered data in Explorer to check them out using the OS’s default file manager.
Conclusion
As we saw in this article, even when your PC tells you that “a boot device was not found, please install an operating system” and throws an unknown “3f0” error code at you, that doesn’t mean your primary storage device has vaporized, taking your files with it.
Many causes can lead to such an error, and at least one of the solutions I covered should be able to address the issue. Even in the worst-case scenario where you’ll have to replace the disk, an app like Disk Drill can help save most of your precious files.
FAQ
Are boot device not found (3f0) errors related to hardware or software issues?
The short answer is “both”. Many problems can prevent your PC from detecting or using a boot device, ranging from a misconfigured BIOS/UEFI (software-related) to an old failing HDD (hardware-related).
Should I do as suggested when my PC tells me that a boot device was not found, please install an operating system?
You shouldn’t rush to follow such advice since a) you’ll also lose all the data stored on the boot drive, and b) it won’t help if the issue is hardware-related. Instead, try the solutions I covered in this article until you find one that works for you.
When a bootable device is not detected, can I fix the problem myself?
It depends on the cause of the problem. If your cat bumped on your PC and a SATA cable got loose, plugging the cable back in should fix the issue. If the source of the problem is a failing HDD filled with bad clusters, the process can be more complicated and take longer to resolve.
This article was written by Odysseas Kourafalos, a Editor-in-Chief at Handy Recovery Advisor. It was also verified for technical accuracy by Andrey Vasilyev, our editorial advisor.
Curious about our content creation process? Take a look at our Editor Guidelines.