Let’s take a wild guess—your device suddenly turned RAW, and you thought, “No big deal, I’ll just run CHKDSK.” Maybe you Googled it or pulled that fix straight from memory. But when you tried it, you were met with the error: “CHKDSK Is Not Available For RAW Drives.”
Sound familiar? Trust us, you’re not the first to encounter this, and you won’t be the last. We’ll show you how to quickly bypass this error, fix the RAW drive issue, and recover your data in no time. Let’s get started!
By the way, if you’re like many people who prefer video guides, here’s a video that shows everything you need to know, step by step, to fix this issue. Check it out.
Why Did You Encounter the “CHKDSK Is Not Available for RAW Drives” Error?
CheckDisk is a repair utility included with Windows that is capable of fixing various hard drive-related problems. In order to do so, it relies on the file system and file system metadata of the volumes contained on your drives.
When a partition shows as RAW, it often means one of two things:
- The file system is incompatible with the operating system you’re using
- The file system has become damaged or corrupted
Either way, the data on that partition is no longer accessible, as the operating system has no way of knowing how to read or access it. Since RAW is essentially the absence of a file system, CheckDisk will not work as it has no file system to scan.
There is actually one specific scenario where CheckDisk can fix a RAW drive or partition. If the partition was originally NTFS and became inaccessible (RAW) due to a corrupted boot sector, CHKDSK can sometimes restore it using the backup boot sector—if it’s still intact. In this case, and only in this case, CheckDisk can help you recover the drive.
There are basically two ways to fix the “CHKDSK Is Not Available For RAW Drives” error: you can format the drive or try a repair tool like TestDisk. The catch? Formatting will erase all the data on the drive/partition, and while TestDisk can sometimes fix the issue, it’s not a sure thing. If it fails, you could still lose your data. That’s why it’s important to recover as much data as possible first using data recovery software to avoid complete data loss.
Problem |
Solution |
I get a “CHKDSK Is Not Available For RAW Drives” error and want to restore data |
|
I get a CHKDSK error and I want to fix it. |
How to Recover Data From a Drive If You Can’t Run CHKDSK
If you don’t care about the files stored on your RAW partition and aren’t worried about losing them, you can skip straight to the fixes.
While you can’t access your files on a RAW drive or partition normally, data recovery software can. One of the best tools for the job is Disk Drill, a software with a proven track record of successful recoveries. Disk Drill can handle a wide range of scenarios, including RAW storage, and comes with additional features that can be especially useful with RAW drives—we’ll cover those as we go.
If you rushed to format the drive to fix the RAW issue—no judgment here! The good news is that Disk Drill is also able to recover files from a formatted drive, so all might not be lost.
Follow our guide on how to recover files from a RAW drive or a partition:
- Download and install Disk Drill.
- After you launch Disk Drill, the first stop we recommend is S.M.A.R.T. Monitoring. This tool lets you check the health of your drive, which is especially important because a RAW drive can sometimes be the result of physical problems.
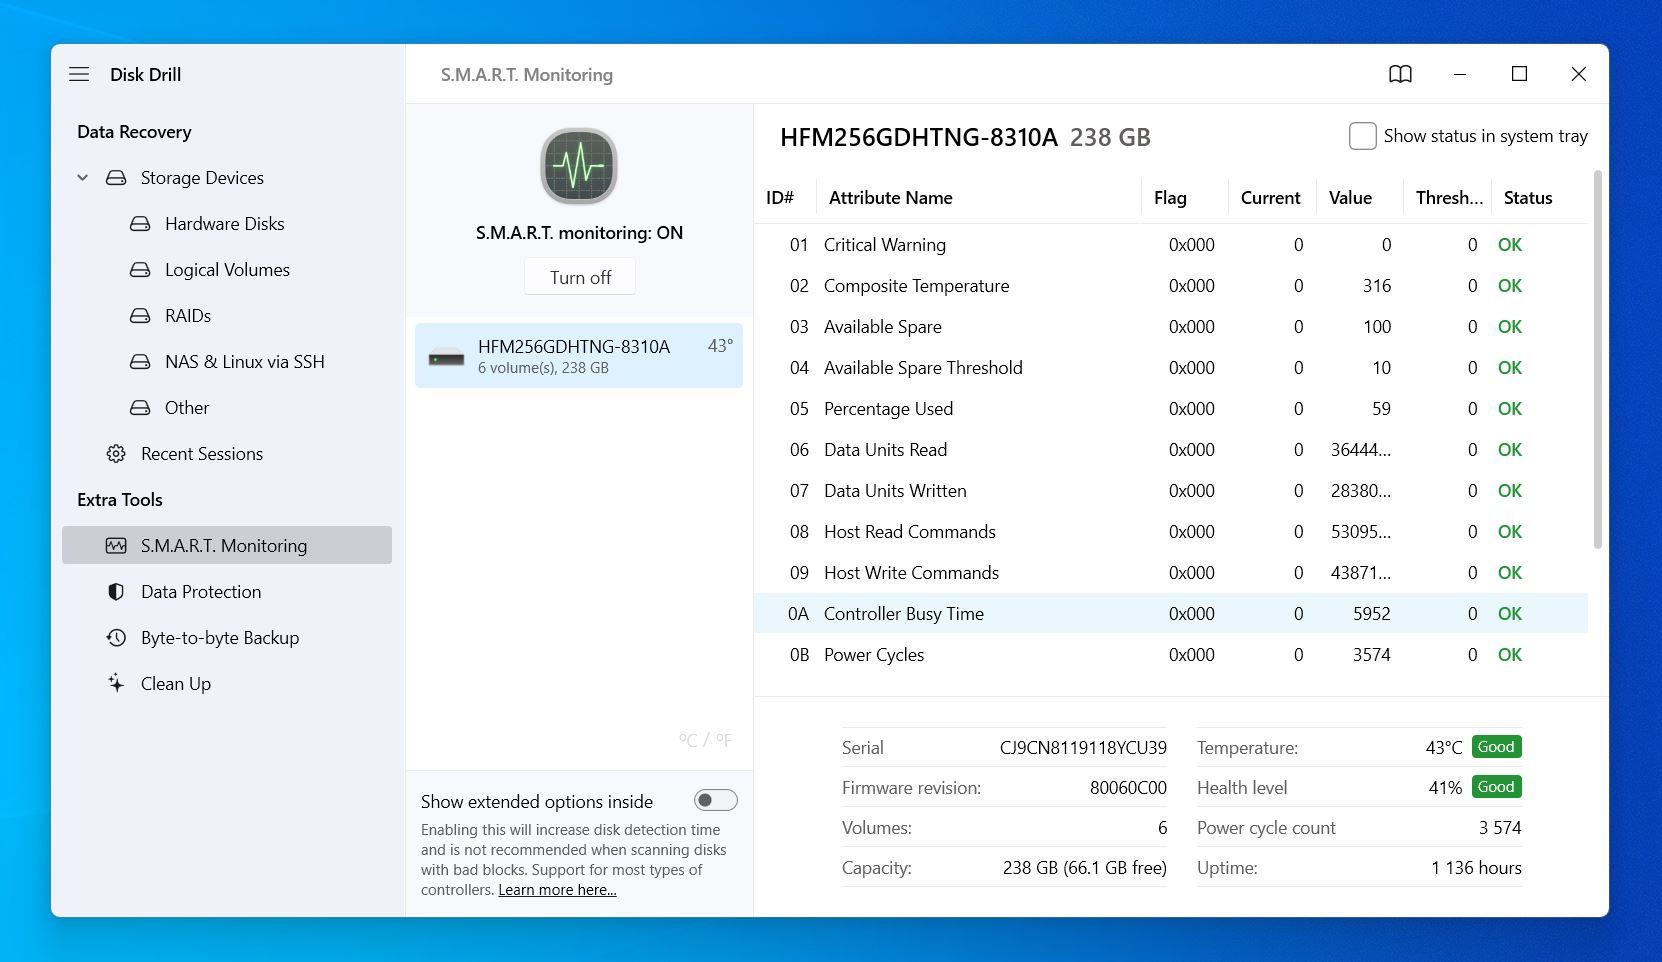
- If the drive status shows as “Good”, then great—you’re in the clear to scan your drive for data. You can skip ahead to Step #7.
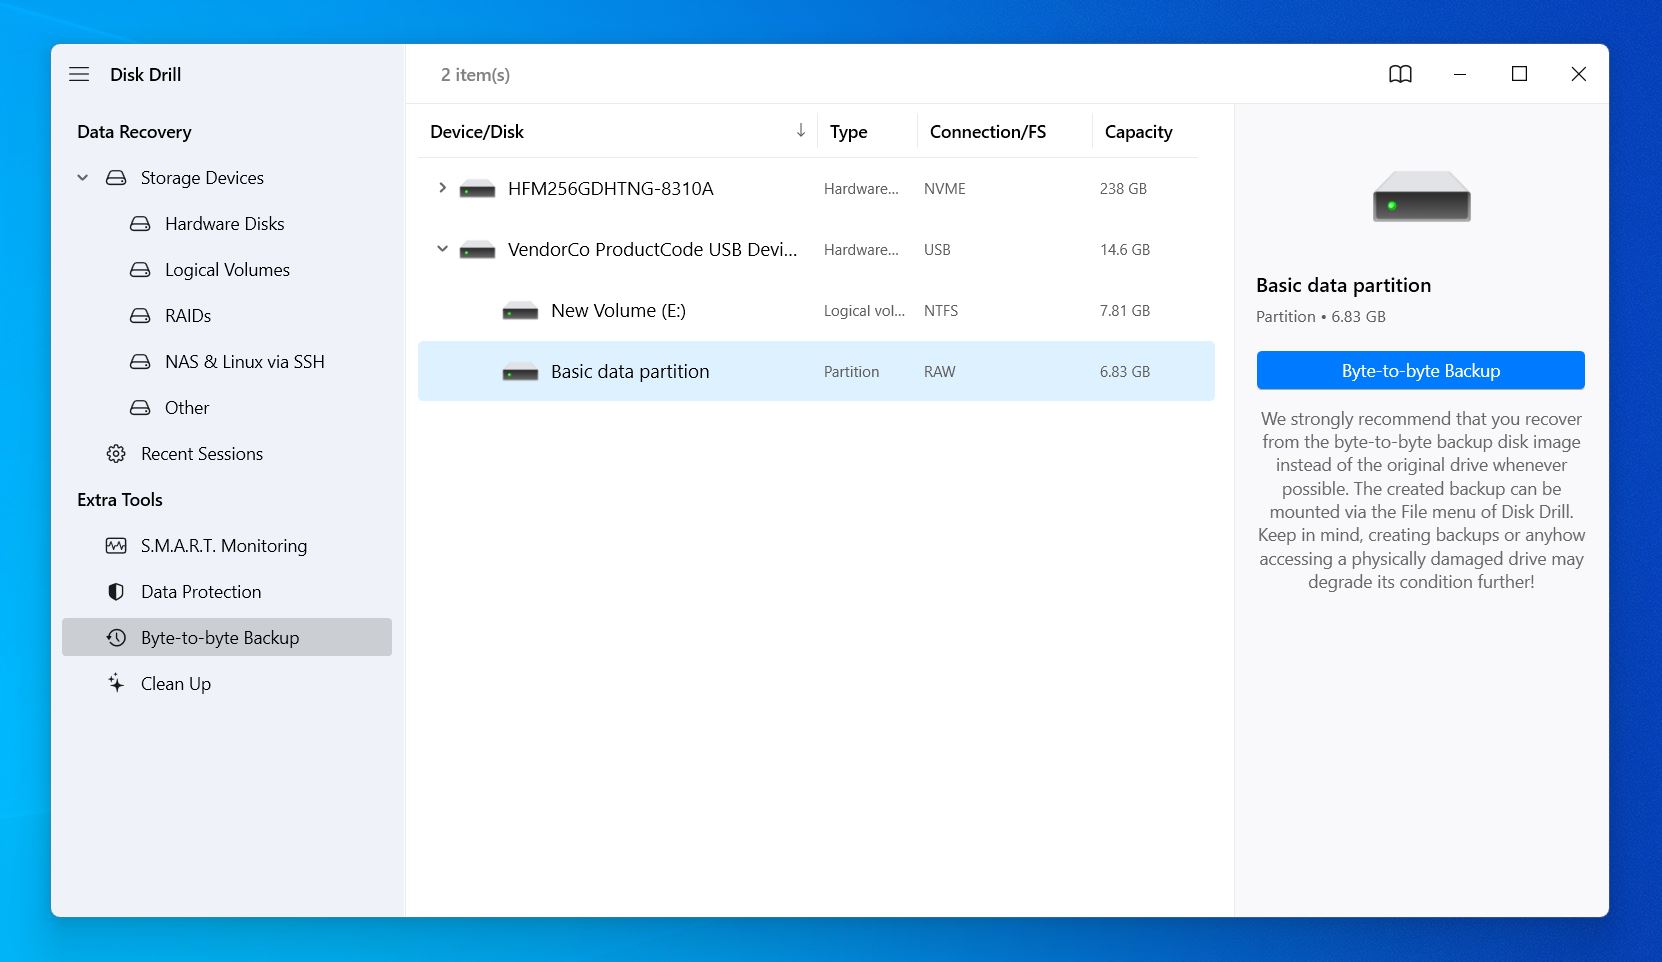
- If the health status shows warnings or issues, it’s a sign the drive might be failing, and you should proceed carefully. In this case, go to the Byte-to-byte Backup option, select your RAW drive, and click the Byte-to-byte Backup button.
- Fill in the necessary details and click OK.
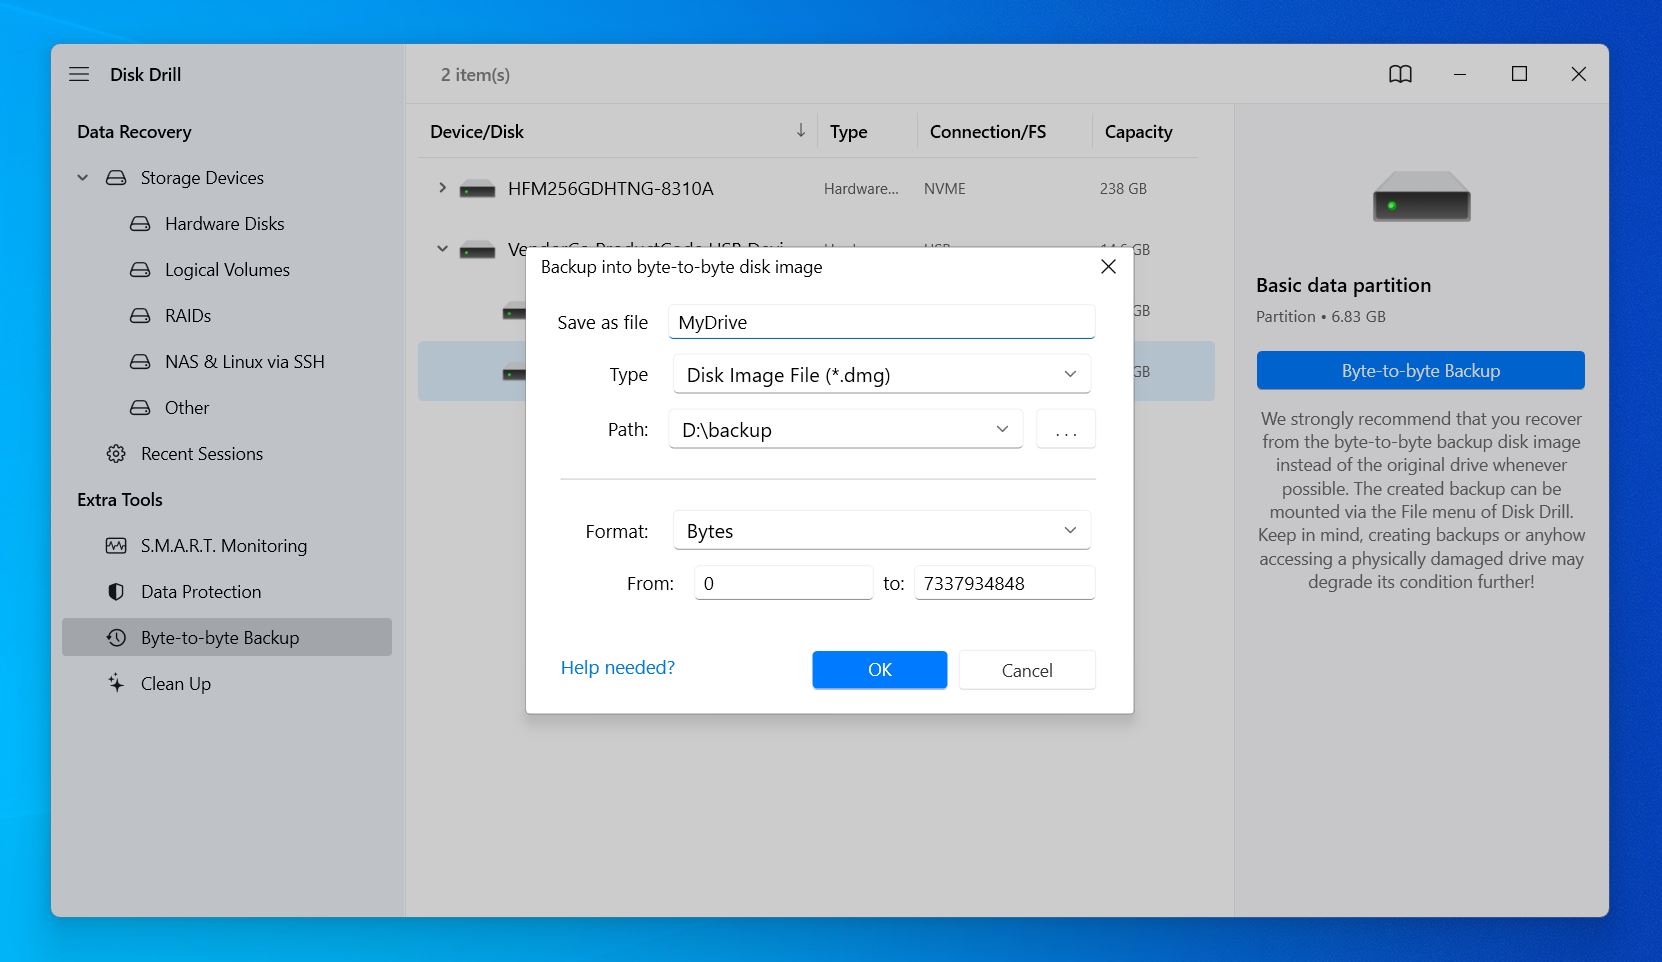 This will create a full copy of your drive or partition, which you can scan for data instead of scanning the drive directly. 🗨️
This reduces stress on the failing drive and helps avoid further data loss during recovery. However, you’ll need enough free space on another storage device to store the backup. Keep in mind that you’ll need free space equal to the entire size of the drive, not just the occupied space. Once the backup is ready, you can scan it for recoverable data instead of risking the health of your original drive.
- Return to the Data Recovery tab in Disk Drill, click on Attach disk image, and select the backup image file you just created. This will mount the backup, and it will appear in the list of drives just like a physical drive.
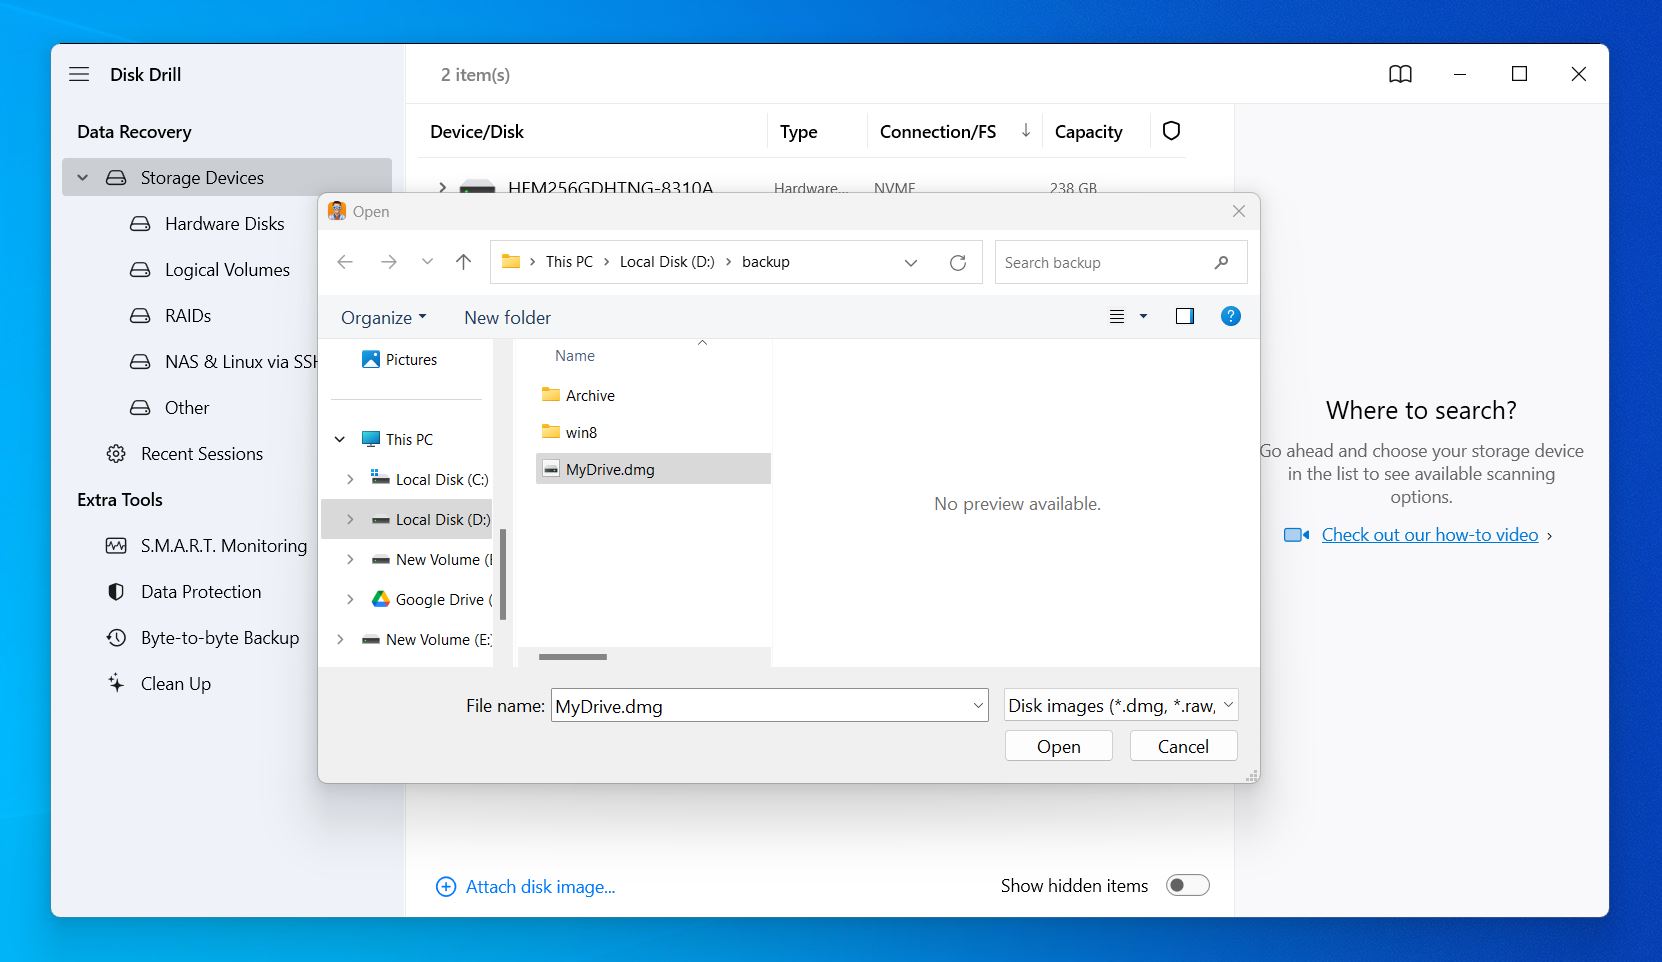
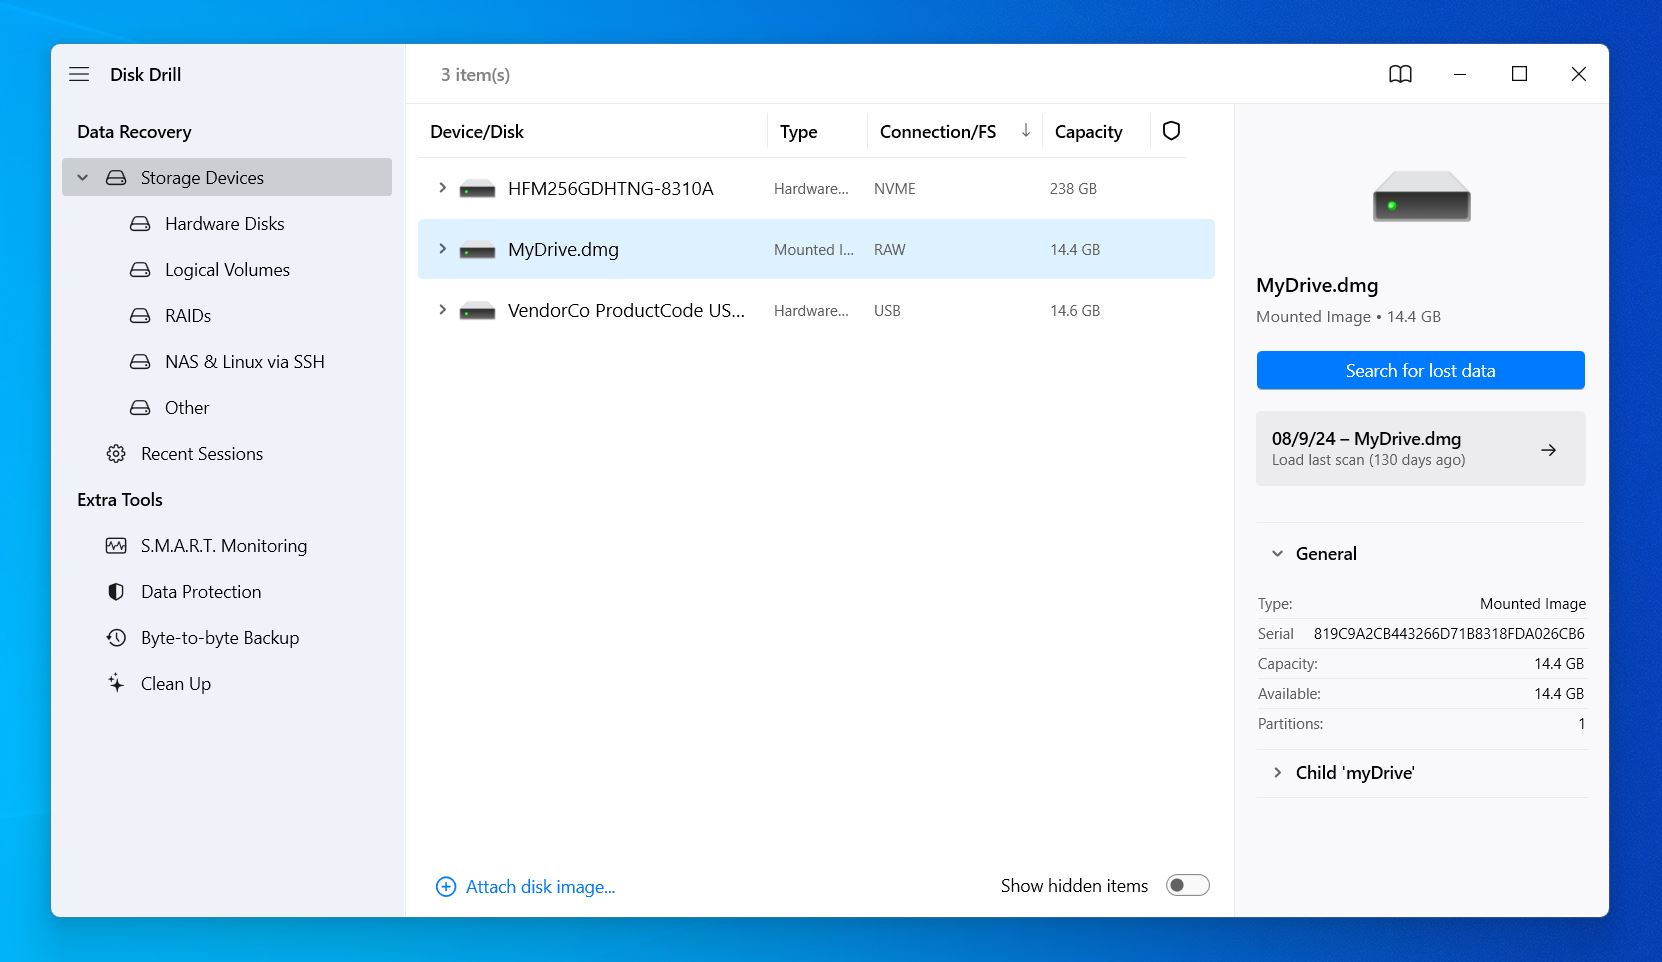
- Select the drive/partition (or its image) and click Search for lost data.
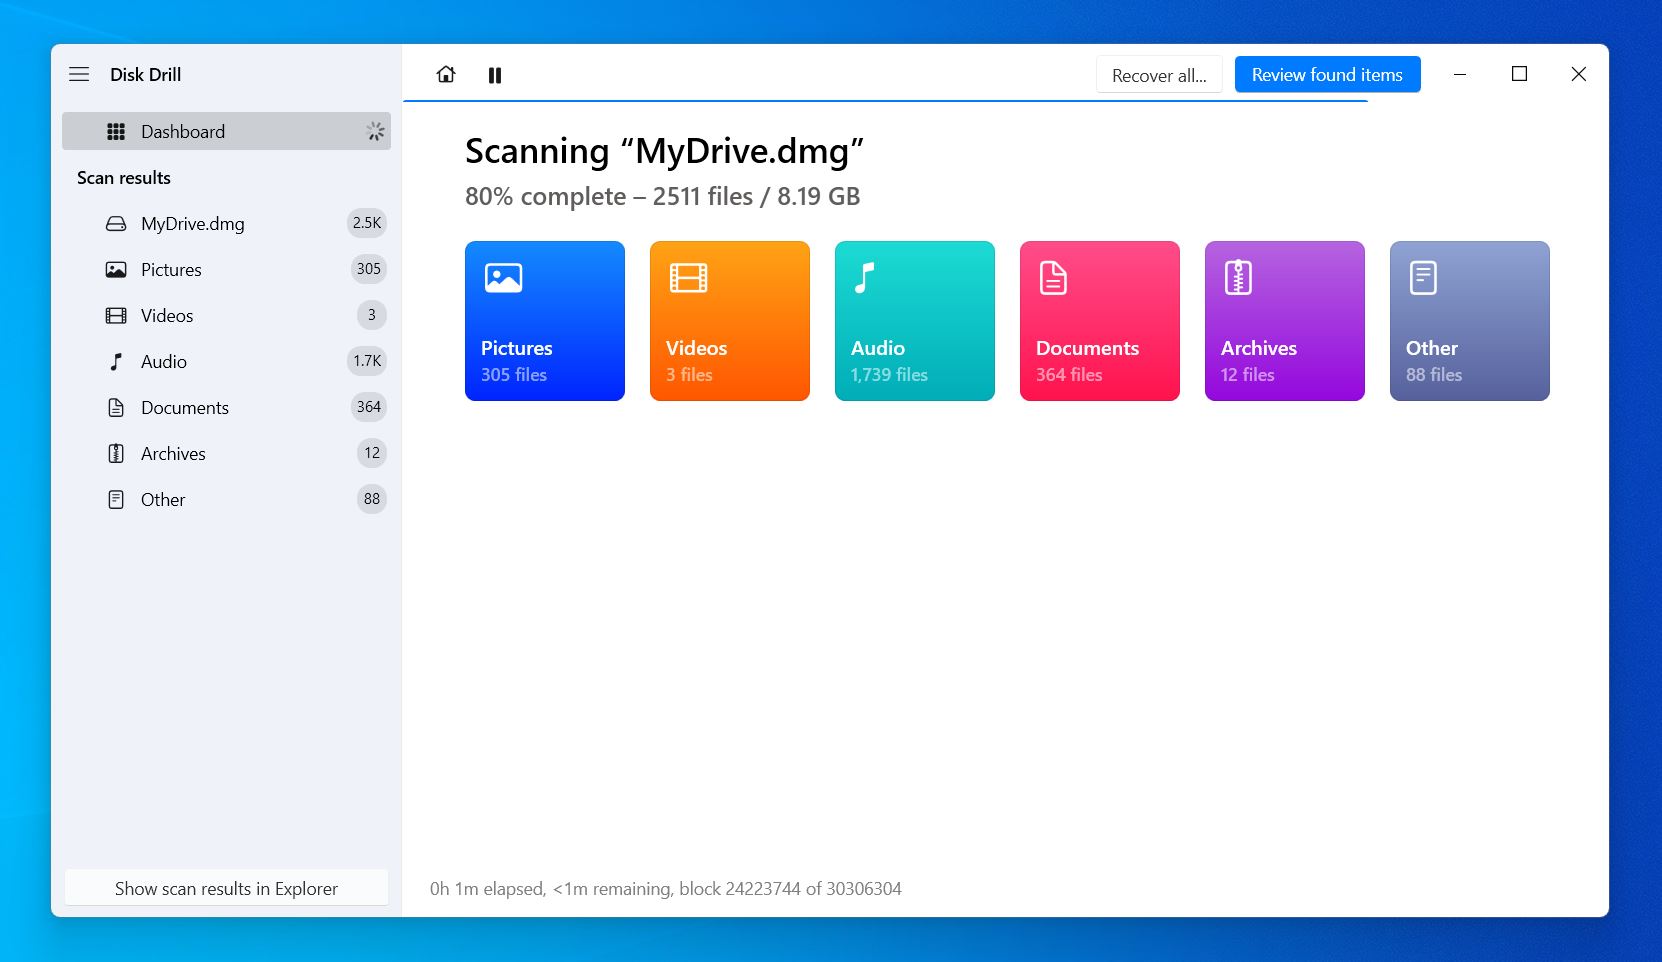
- As the scan progresses, you can wait for the scan to complete and click the Recover All… button to retrieve everything Disk Drill finds. Or, you can click on Review Found Items during the scan to browse the files in real-time and pick and choose which ones you want to recover.
- You’ll see categories like Pictures, Video, Audio, Documents, and Other to narrow down your search. You can also preview each file before recovery. As you hover over a file, you’ll see an 👁️🗨️ eye icon appear. Click on it to open a preview.
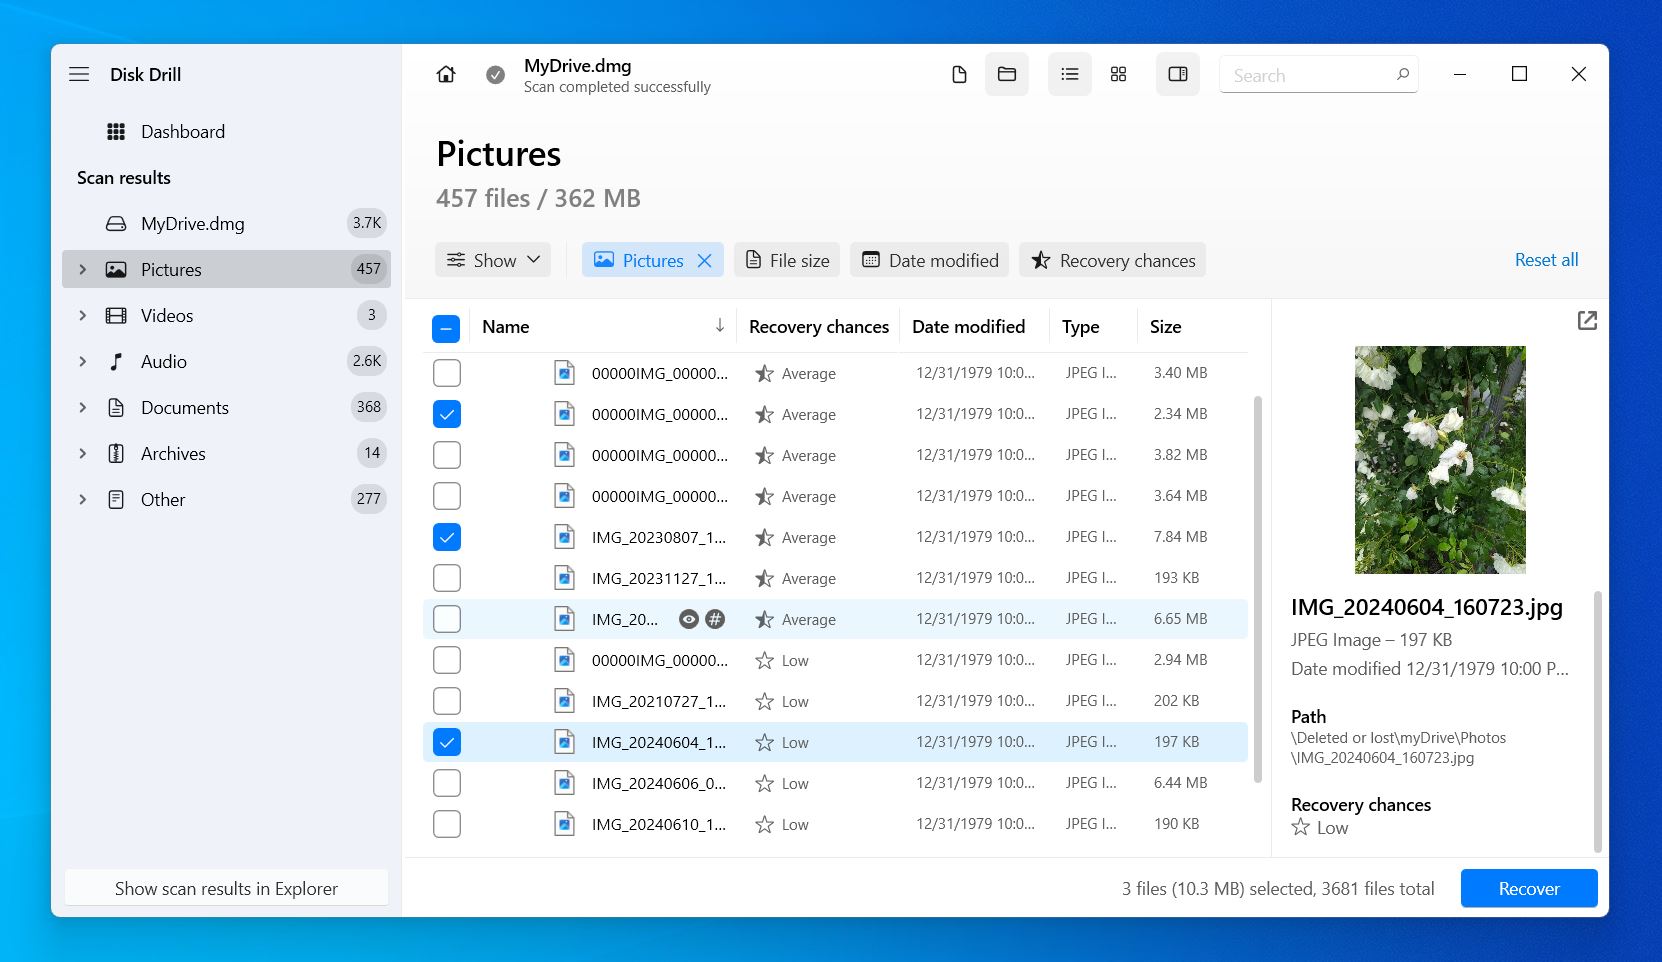
- Mark what files you want to recover. The Recovery chances column will tell you the chances of successfully recovering each file. When ready, click Recover.
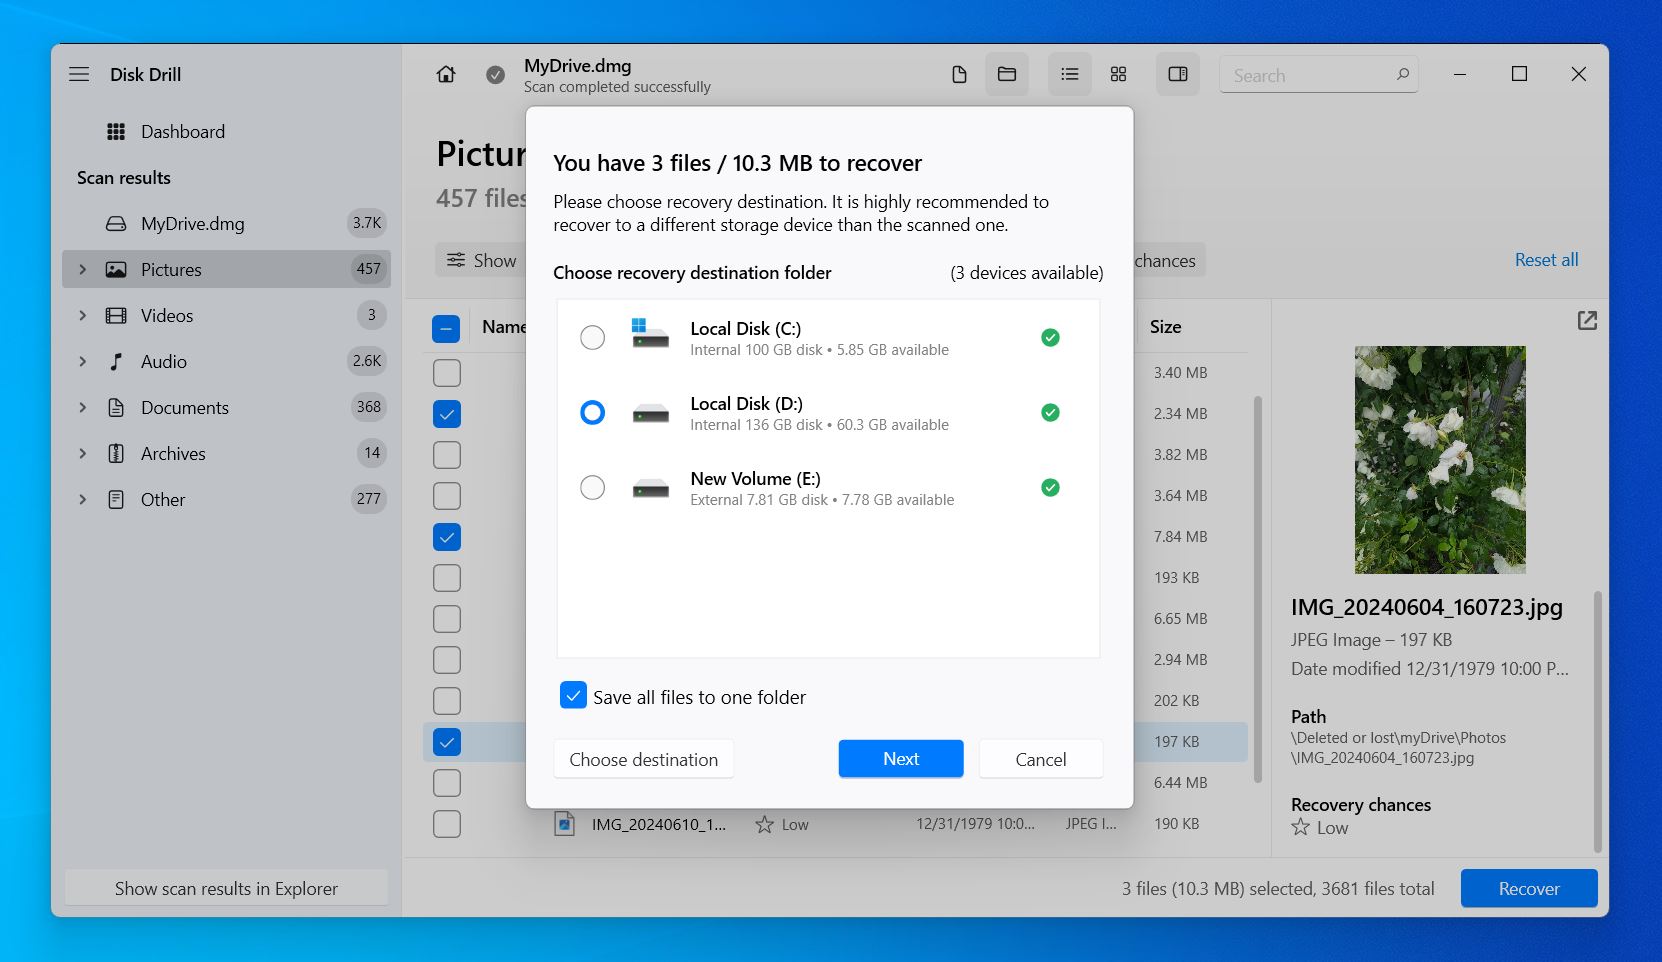
- Next, choose where to save the recovered files. With the free version of Disk Drill, you can recover up to 500 MB of data—perfect for smaller recoveries or testing the software. If you need to recover more, you’ll need to upgrade to the PRO version.
The above steps not only work for RAW drive recovery but also RAW SD card recovery and RAW USB recovery. Disk Drill handles all kinds of storage devices and data loss scenarios. However, no tool is perfect for everyone. If Disk Drill doesn’t fully meet your needs, you can check out our list of Disk Drill alternatives to find a solution that might suit you better.
How to Fix “CHKDSK Is Not Available for RAW Drives” Error
As we mentioned earlier, you have two ways to fix the “CHKDSK is not available for RAW drives” error: you can try your luck with TestDisk, maybe it will be able to restore your RAW partition back as it was, with no data loss, or you can simply format the drive since you’ve already recovered your files. Formatting is the easier option, but the choice is yours. Here’s how to do both.
Method 1: Use TestDisk
TestDisk is a free, open-source tool that can rebuild file systems (FAT, NTFS, and ext2/ext3), recover lost/deleted partitions, and repair corrupted boot sectors (on FAT and NTFS volumes).
We’ve used it in situations where a partition suddenly turned RAW and have seen some successes with it.
Have additional questions about TestDisk? Wondering if it’s safe to download? (Spoiler: it is!) You can check out our full TestDisk review for a detailed breakdown of its features, safety, and performance.
That said, there’s no way to guarantee it will work in every case. While TestDisk has the potential to restore your partition and make your files accessible again—just as they were before the problem—it’s not a sure thing. That’s why we always recommend using data recovery software first to secure your data from the RAW partition. This way, if something goes wrong, your files will still be safe.
But if you’re ready to give TestDisk a shot, here’s how to use it:
- Go to the official TestDisk website. While version 7.3 is the latest, we recommend downloading the stable 7.2 release for reliability.
- Once the file is downloaded, extract it to a folder on your computer. No installation is required.
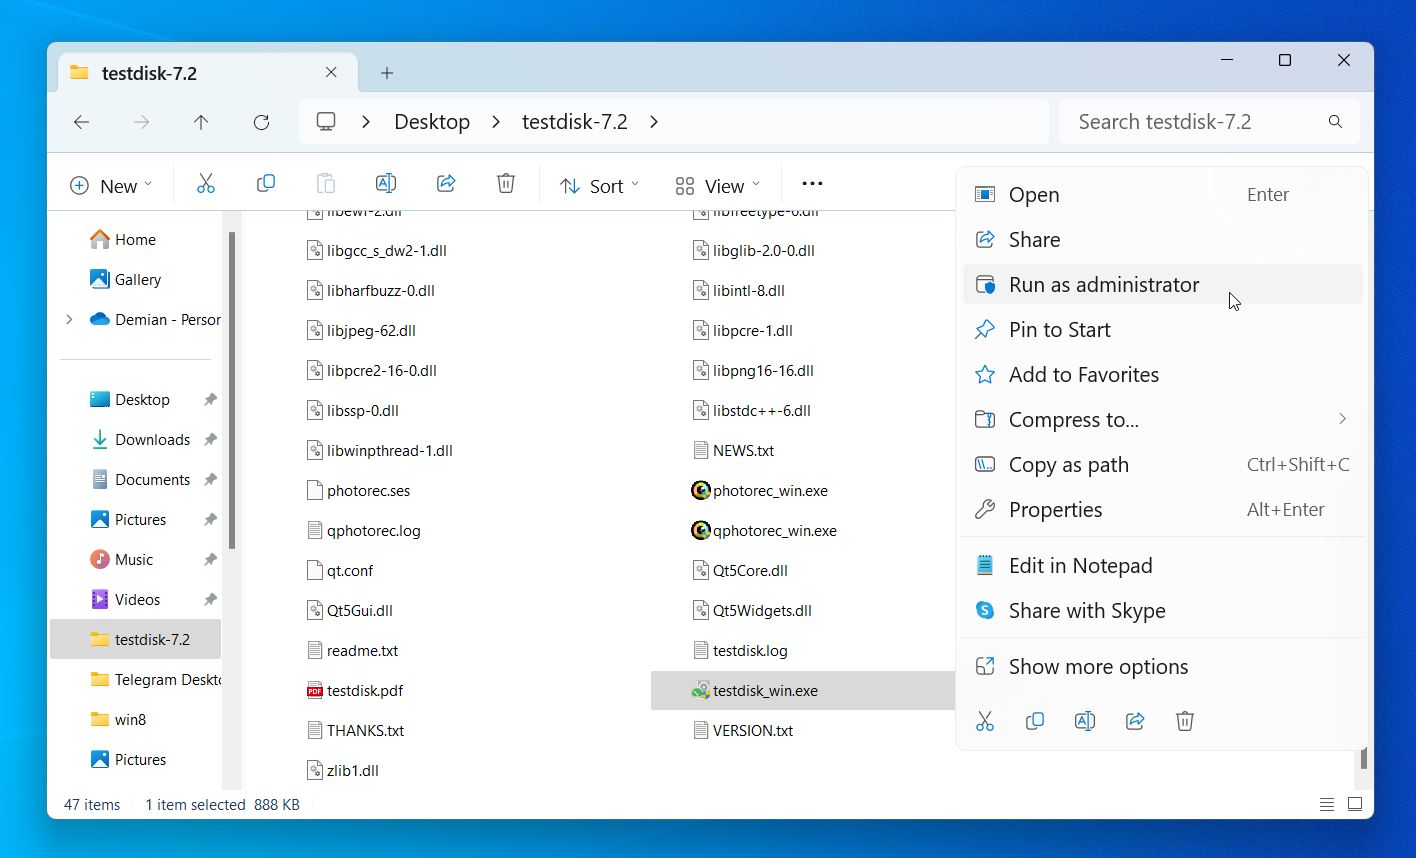
- Open the extracted folder, right-click on testdisk_win.exe, and select Run as administrator.
- When TestDisk starts, choose [Create] to generate a log file. This file records all TestDisk actions and findings. If you don’t need it, select [No Log].
![Choose [Create]](/wp-content/uploads/2024/12/test-disk-raw-log.jpg)
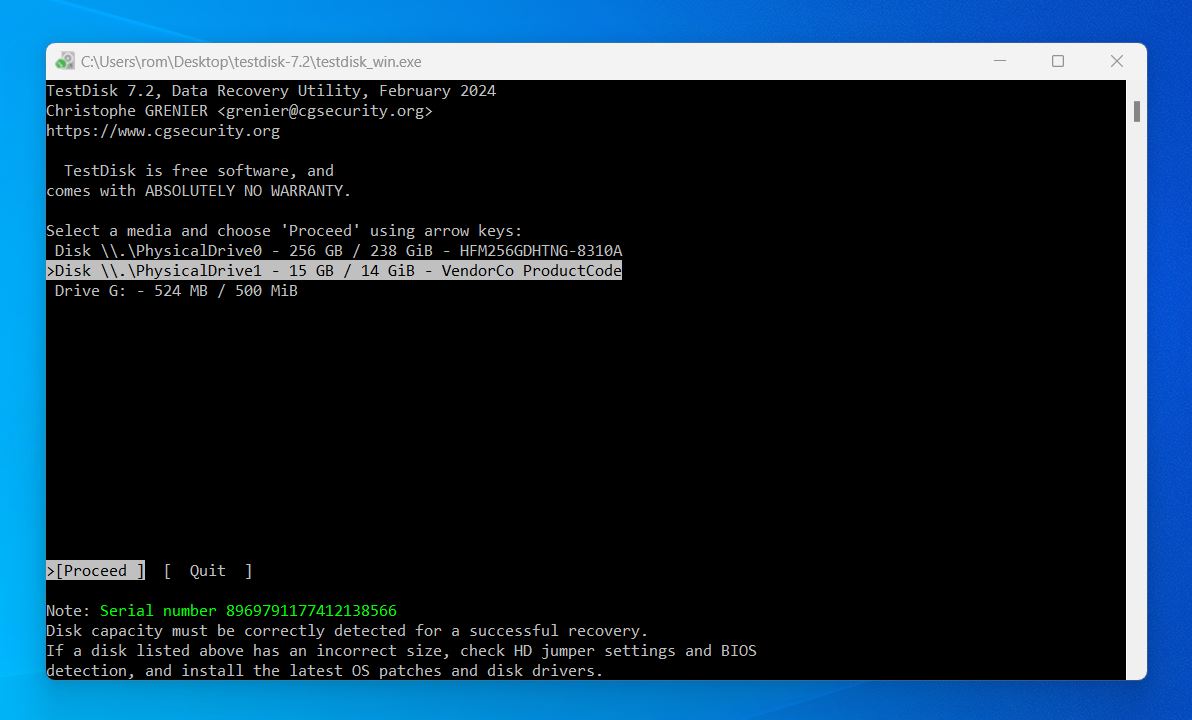
- Use the arrow keys to select the drive that contains your RAW partition, then press Enter.
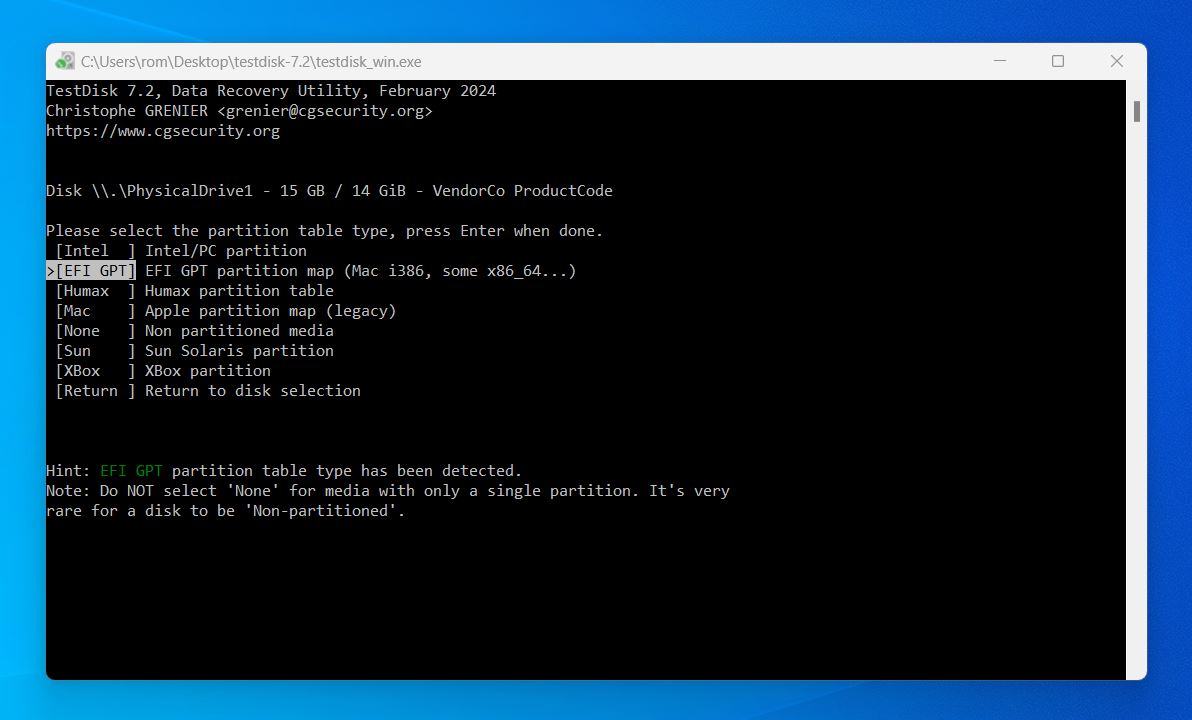
- TestDisk will usually auto-detect the correct partition table type. If it doesn’t, select the appropriate option (usually Intel for most drives or EFI GPT for newer systems). Press Enter.
- Select [Analyse] and press Enter. TestDisk will scan the drive for lost or damaged partitions. If needed, follow up with [Deeper Search] for a more thorough scan.
![Select [Analyse] and press Enter](/wp-content/uploads/2024/12/test-disk-raw-analyze.jpg)
- Once TestDisk identifies the RAW partition, it will offer options to rebuild the boot sector, recover the partition, or repair the file system.
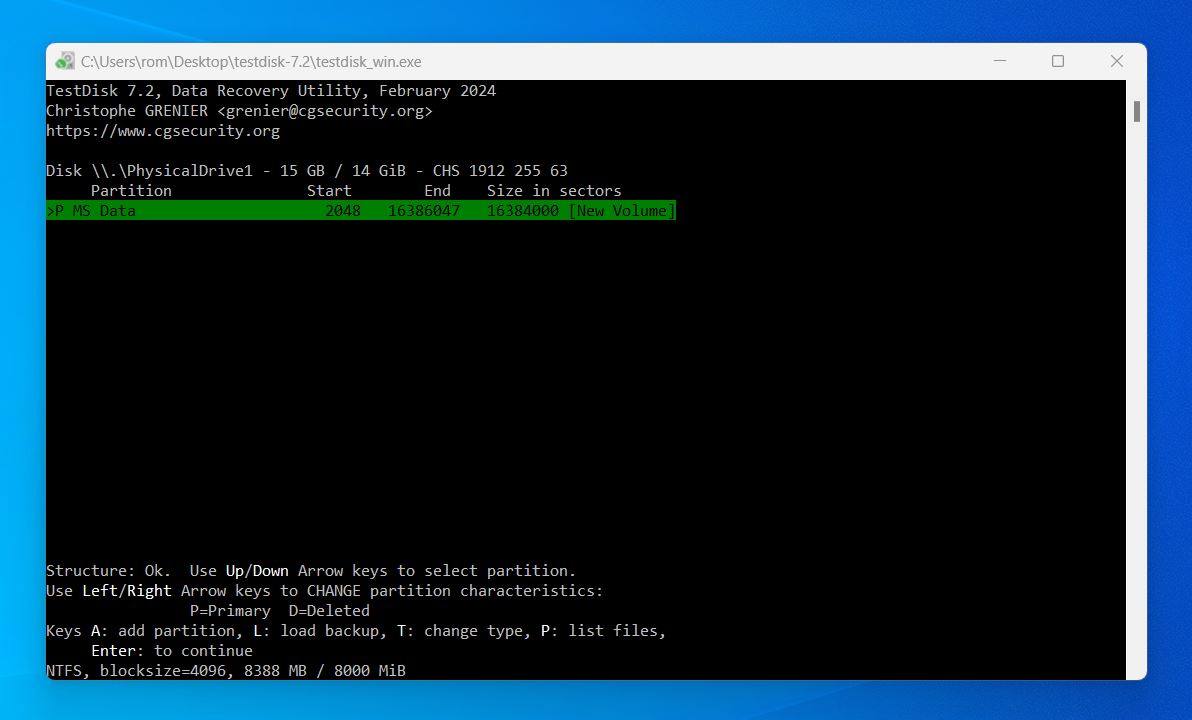
- Choose the appropriate option based on the detected issue and follow the on-screen prompts.
- TestDisk will ask if you want to write the changes to the disk. Confirm this step to finalize the repair.
- Select [Quit] to exit TestDisk. Open File Explorer and check if your drive is accessible. If successful, your files will now be available, and the partition will function normally.
TestDisk is one of the best tools of its kind, but it’s not the only option. And let’s be honest—it’s not the prettiest, with its command-line interface that can feel a bit too much. If you prefer something more visually polished, take a look at our list of TestDisk alternatives. You might find a tool that suits you better.
Method 2: Format the Drive/Partition
When a drive is RAW, Windows often automatically displays a prompt that reads “You need to format the disk in drive *: before you can use it”. If you dismissed the prompt, click the disk in File Explorer to trigger it again. Alternatively, here are some other ways you can format the drive.
Formatting will convert the RAW partition to something like FAT32 or NTFS. If you’re not sure which file system you need, here’s a quick guide to help you decide:
- NTFS: Best for Windows systems. It supports large files, modern features like encryption and permissions.
- FAT32: Works on both Windows and macOS but has a 4GB file size limit. It’s great for USB drives or devices that need compatibility across multiple systems.
- exFAT: A modern version of FAT32 without the file size limit. It’s perfect for external drives used on both Windows and macOS.
Option A: Use File Explorer
You can format your drive directly through File Explorer. This is one of the fastest ways as File Explorer is easily accessible and familiar to a lot of Windows users.
Follow these instructions to format the drive using File Explorer:
- Open File Explorer.
- Right-click the RAW drive and select Format.

- Set the format parameters (check the box for Quick Format, it will skip a full scan and speed up the process) and click Start.

- Click OK to confirm.
Not sure about the difference between Full Format and Quick Format? We’ve got the answers.
Option B: Use Disk Management
Disk Management is a Windows system utility that allows you to manage your disks and the partitions on them. Using it, you can format the drive to fix the “CHKDSK is not available for RAW drives” error.
Here’s how to do it:
- Right-click Start and select Disk Management.

- Right-click the RAW partition, then select Format.

- Name the partition and choose a file system. Make sure Perform a quick format is ticked. Click OK.

- Click OK again to confirm.
Option C: Use CMD (DiskPart)
DiskPart is a command interpreter that does a lot of the same things you can achieve with Disk Management but at a command-line level and with more control. Follow our instructions to add a new file system if CHKDSK is saying the file system is RAW.
Here’s how:
- Right-click Start and select Windows PowerShell (Admin).

- Type diskpart and press Enter.

- Type list disk and press Enter. Make note of the disk number that has the RAW partition.

- Type select disk 2. Replace 2 with your own disk number.

- Type list volume and press Enter. Make note of the RAW volume number.

- Type select volume 4. Replace 4 with your own volume number. Press Enter.

- Type clean and press Enter.

- Type create partition primary and press Enter. This creates a new blank primary partition.

- Type format fs=ntfs and press Enter. This formats the volume with NTFS.

- Type assign and press Enter. This assigns a drive letter.

Some Useful Tools for RAW Drive Recovery
If you’re interested in more software options that can recover RAW partitions, here are a few honorable mentions:
- PhotoRec – You might have noticed PhotoRec in the TestDisk folder—it’s a companion tool from CGSecurity. PhotoRec focuses on file recovery (including from RAW partitions) and is completely free. It operates through a command-line interface, but it has a GUI version as well, you’ll find QPhotoRec in the same folder, which offers a very basic UI.
- DiskGenius – In addition to partition management DiskGenius can also recover RAW partitions. One standout feature of DiskGenius is its “Load Current Partition Intelligently” option, specifically designed to quickly retrieve files from corrupted NTFS partitions that turned RAW. When the partition’s $MFT (Master File Table) isn’t too badly damaged, this feature works well. It can load all the files on a RAW drive within seconds. From there, you can copy the recovered files to a different drive. However, this function is available only in the DiskGenius Professional Edition, so you’ll need to register the software to unlock this feature and copy the files it detects.
- R-Studio – Developed by R-Tools Technology Inc. R-Studio is a powerful and professional data recovery tool capable of handling complex recovery cases, including RAW drives, corrupted file systems, and damaged partitions. Like Disk Drill, R-Studio can create a byte-to-byte image of the drive. This feature is critical for drives at risk of failure because it lets you recover data from the image instead of the original drive, as you now know.
Check out our list of the best data recovery apps for more recommendations.
Your Quick Fix Cheat Sheet (The Recap)
If you’re one of those readers who flip to the last chapter of the book to get all the answers quickly and skipped everything else, here’s the TL;DR version:
You don’t have to be an IT professional to bypass the “CHKDSK Is Not Available For RAW Drives” error and recover your data. The methods and tools in our guide make it easy to DIY.
Use a data recovery tool like Disk Drill to get your files off the RAW drive or partition. After that, you have two options:
- Format the drive—the easier solution, but never before data recovery since formatting erases everything.
- Try TestDisk—in some cases, it can fix the issue and restore your drive to its original state without data loss. However, there’s still a risk of failure, which is why recovering your data first is a must. And that’s pretty much it. Follow these steps, and you’ll have your drive back to normal with minimal fuss.
FAQ
What does it mean when a file system is RAW?
When a partition reads as RAW, it means your operating system cannot read the file system on the drive. This could be because the file system is incompatible or has become damaged. Until a RAW partition is fixed, the data on the partition is inaccessible unless recovered using a data recovery tool.
How do I fix CHKDSK not available for the RAW drive?
To fix this error, you must format the RAW drive with a new file system. Bear in mind that this will delete any data present on it, so make sure you recover what you can first with a data recovery tool. Alternatively, you can try using TestDisk as a potential fix. In some cases, TestDisk can repair the RAW partition and restore it to its previous state.
How do I run CHKDSK on the RAW drive?
You can use CHKDSK for RAW drives, but only in cases where the NTFS file system is recoverable from the boot sectors at the beginning of each volume on the drive. If this is not possible, Windows will display the error message “CHKDSK Is Not Available For RAW Drives”.
Is it safe to format a RAW drive that I suspect has physical damage?
No, formatting a RAW drive with suspected physical damage is not safe. Physical issues, such as bad sectors or failing hardware, can worsen during the formatting process and may lead to permanent data loss.
If you suspect physical damage, your best option is to create a byte-to-byte image of the drive using a tool like Disk Drill. This allows you to work with the image for data recovery without putting additional stress on the drive.
Are there any graphical user interface (GUI) versions of TestDisk?
No, TestDisk does not have a graphical user interface (GUI) version. It’s a command-line tool through and through. While its companion tool, PhotoRec, includes a basic GUI version called QPhotoRec for file recovery, TestDisk itself remains a text-based application.
This article was written by Jordan Jamieson-Mane, a Staff Writer at Handy Recovery Advisor. It was recently updated by Roman Demian. It was also verified for technical accuracy by Andrey Vasilyev, our editorial advisor.
Curious about our content creation process? Take a look at our Editor Guidelines.
