Do you suspect that your hard drive is dead? A dead external hard drive doesn’t always mean you’ve lost all your data- recovery is sometimes possible depending on what caused your drive to die and how the drive appears in Disk Management. We’ve encountered this problem before, and we’ll tell you the best methods that worked for us to try and potentially recover data.
Note: External hard drives fail due to various reasons, with wear and tear being the most common one. Over time, the inner components degrade, with an average lifespan of 3-5 years. Physical damage is another major cause because your hard drives have delicate internal mechanisms that get damaged by drops, moisture, dust, or exposure to extreme temperatures. There can also be problems with the controller board, platters, or read/write heads, which can make your hard drive non-functional. Trusted brands like Seagate, Toshiba, and Western Digital reduce the risk of manufacturing defects and often provide warranties for your peace of mind.
Signs of a Dead Hard Drive and What You Should Check First
Before you conclude that your hard drive is actually “dead,” first check these signs to rule out simpler issues:
1. The Drive Does Not Appear in Disk Management
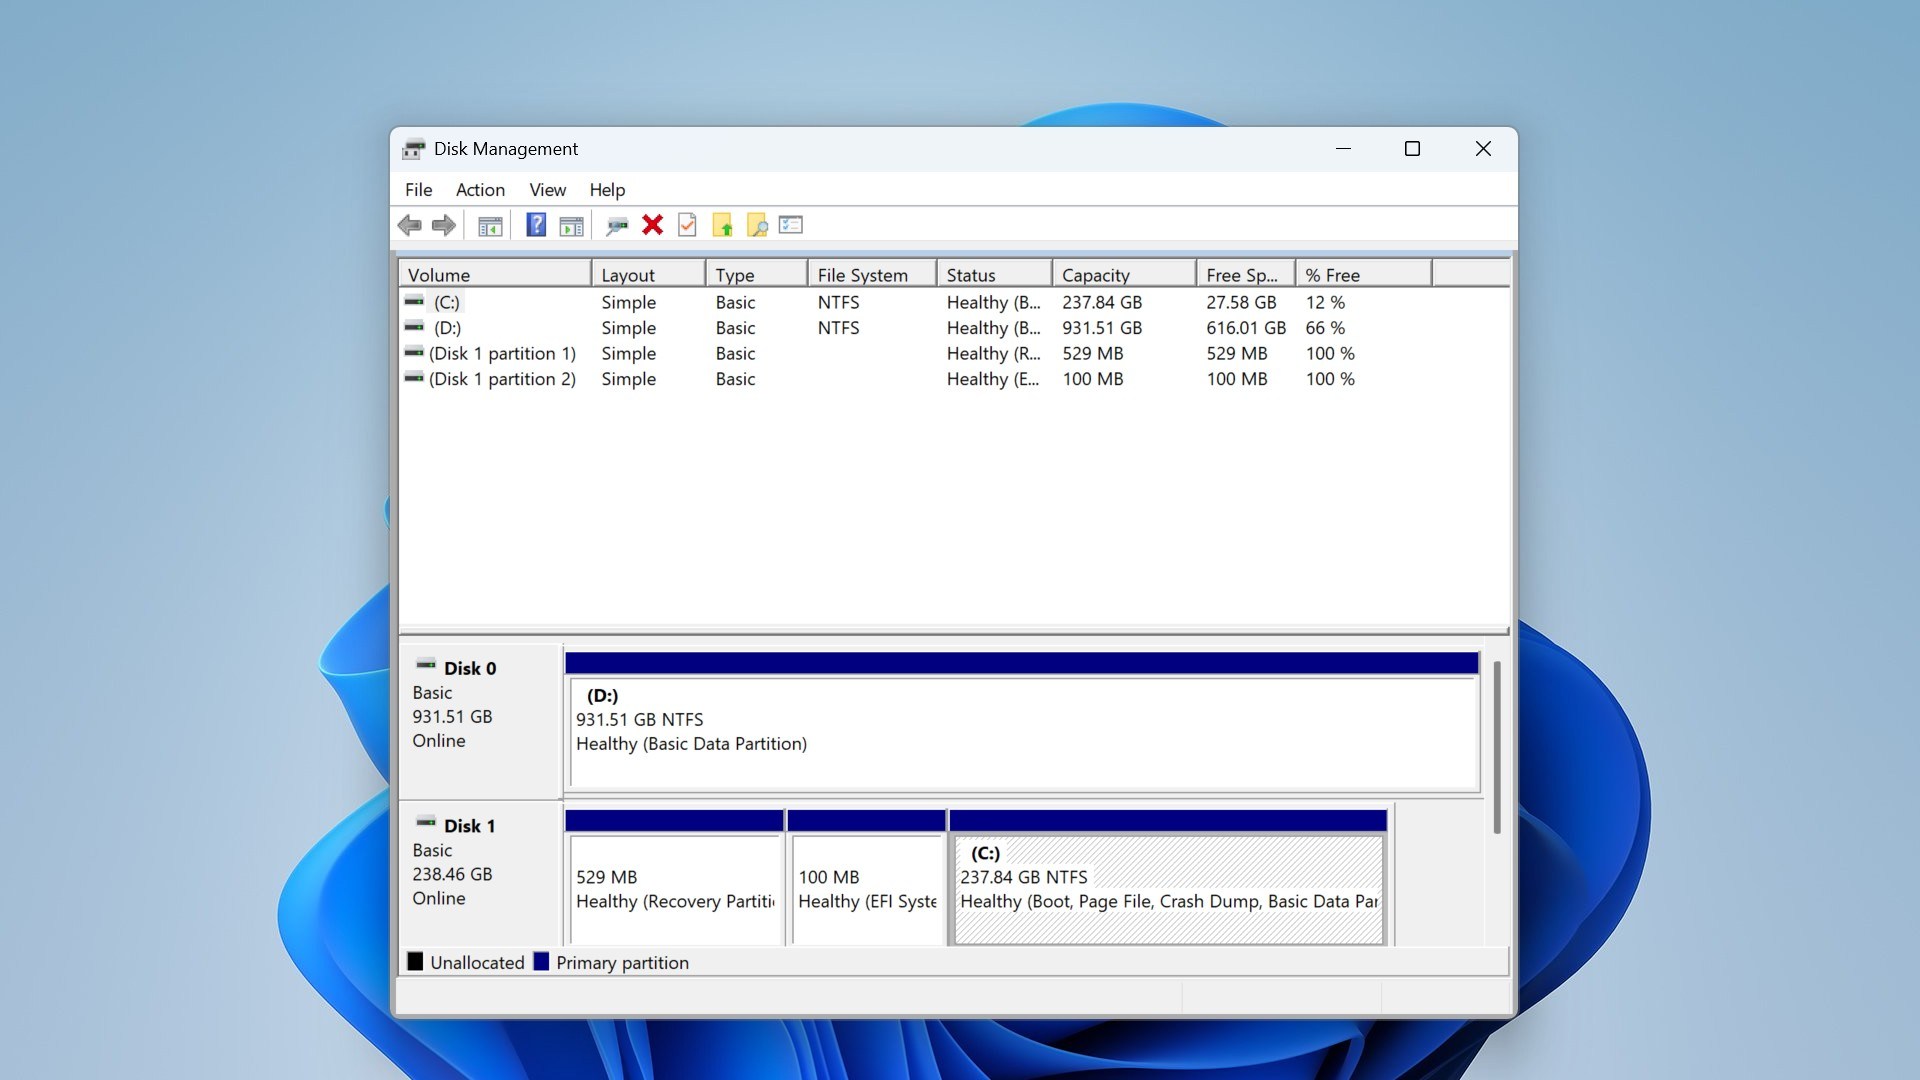
Disk Management is Windows’s built-in tool that displays all connected storage devices, whether they’re operational or not. If your drive doesn’t show up in Disk Management, it’s usually because of some severe hardware issue.
- What to Check: Ensure your drive is connected properly. Try different USB ports, use new cables, or connect it to another computer. Then, open Disk Management (right-click Start>Disk Management) and Device Manager (right-click Start>Device Manager, and expand the Disk Drives section) to see if your drive is detected.
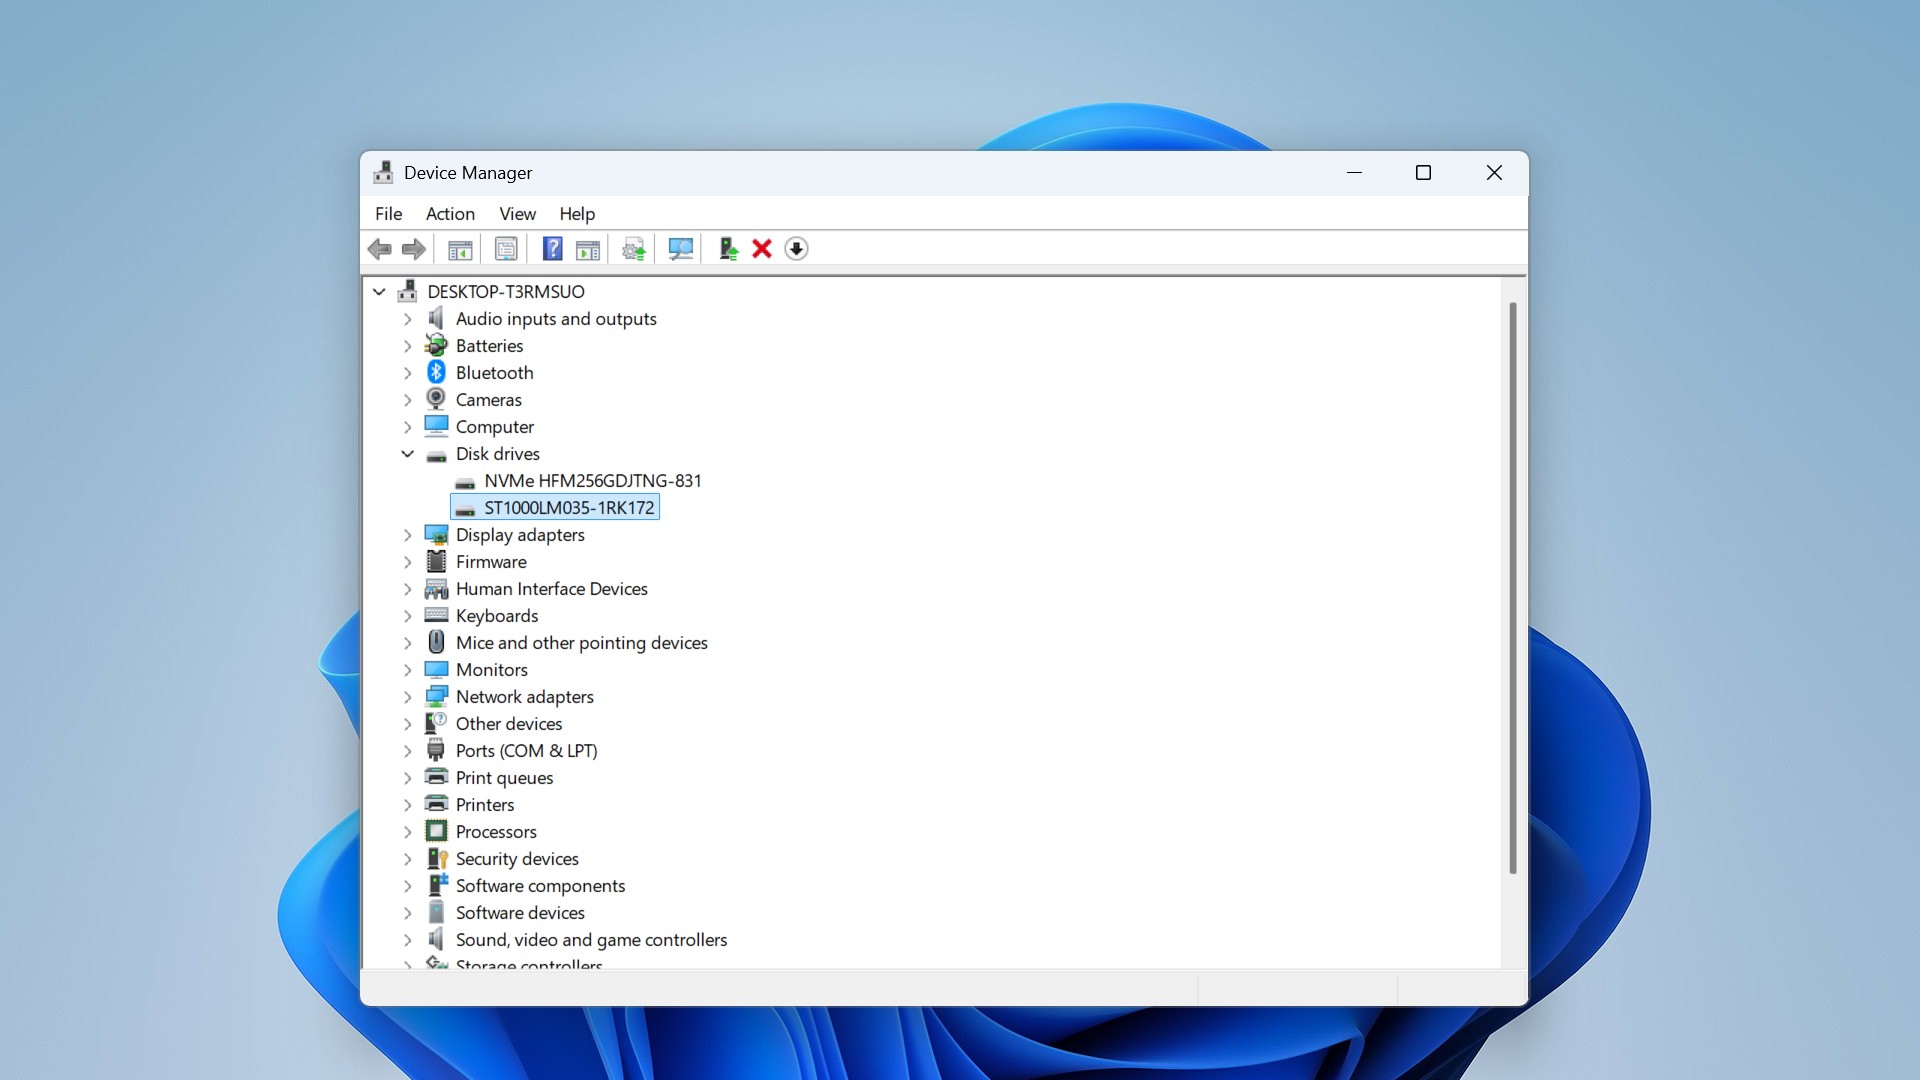
- What Can Cause the Issue: Severe hardware issues, such as a faulty controller board or internal mechanical failure, are the most common causes if your drive doesn’t show up anywhere.
- What You Can Do: If you rule out port and cable issues and your hard drive remains undetected, it is likely a hardware failure. Professional data recovery services are your best option at this point.
2. The Drive is Visible but Not Accessible
- What to Check: Look for the drive in Disk Management like in the previous step. Note its status- if it is labeled as “RAW” or shows its correct size but remains inaccessible, it may have logical errors, or a corrupted or unsupported file system.
- What Can Cause the Issue: Logical corruption or file system errors can prevent access to the drive despite it being detected by your system.
- What You Can Do: Use data recovery software like Disk Drill to retrieve your data. (Refer to the next section for a detailed walkthrough.) Also, you should avoid formatting the drive to prevent overwriting files that might still be recoverable!
3. You can Hear Unusual Noises
- What to Check: Listen to any clicking, grinding, or beeping sounds coming from your hard drive. These are most often signs of internal mechanical damage.
- What Can Cause the Issue: Issues like damaged platters, failed read/write heads, or motor malfunctions typically cause unusual noises.
- What You Can Do: You need to stop using the drive immediately to avoid worsening the damage. DIY recovery attempts are not recommended; instead, we recommend that you consult a professional data recovery service for the best chance of retrieving your data.
So now you have a better idea of whether your drive is dead or not. But can it be fixed?
How to Get Data Off a ‘Dead’ Hard Drive
Before you attempt any repairs, you should try and recover your data from the hard drive. This is because repairs often lead to data loss, and even basic operations like reading from a failing drive can make the situation worse. You can make a disk image to safeguard your files by making an exact copy of your drive. Such a disk image minimizes the risk of causing further damage to your drive during recovery because you interact with a stable copy of the drive, reducing the chances of permanent data loss.
If your drive is visible in Disk Management at its full size but is inaccessible, you can attempt recovery with Disk Drill 5 for Windows. You can back up the entire drive and scan the backup using Disk Drill, which specializes in retrieving ‘corrupted’ or deleted files. The byte-to-byte backup feature of Disk Drill creates a DMG file that stands for Apple disk image and is a common file format that is widely supported by multiple tools on Windows, but the copy created by Disk Drill is primarily designed for data recovery.
Here’s a simple guide on how to use Disk Drill:
- Download and install Disk Drill on your system.
- Launch Disk Drill, select your hard drive, and then click on “Byte to Byte Backup” in the Extra Tools section. In the new pop-up window, select the path you want the image to be copied to (we recommend using a different disk with ample space to create this image).
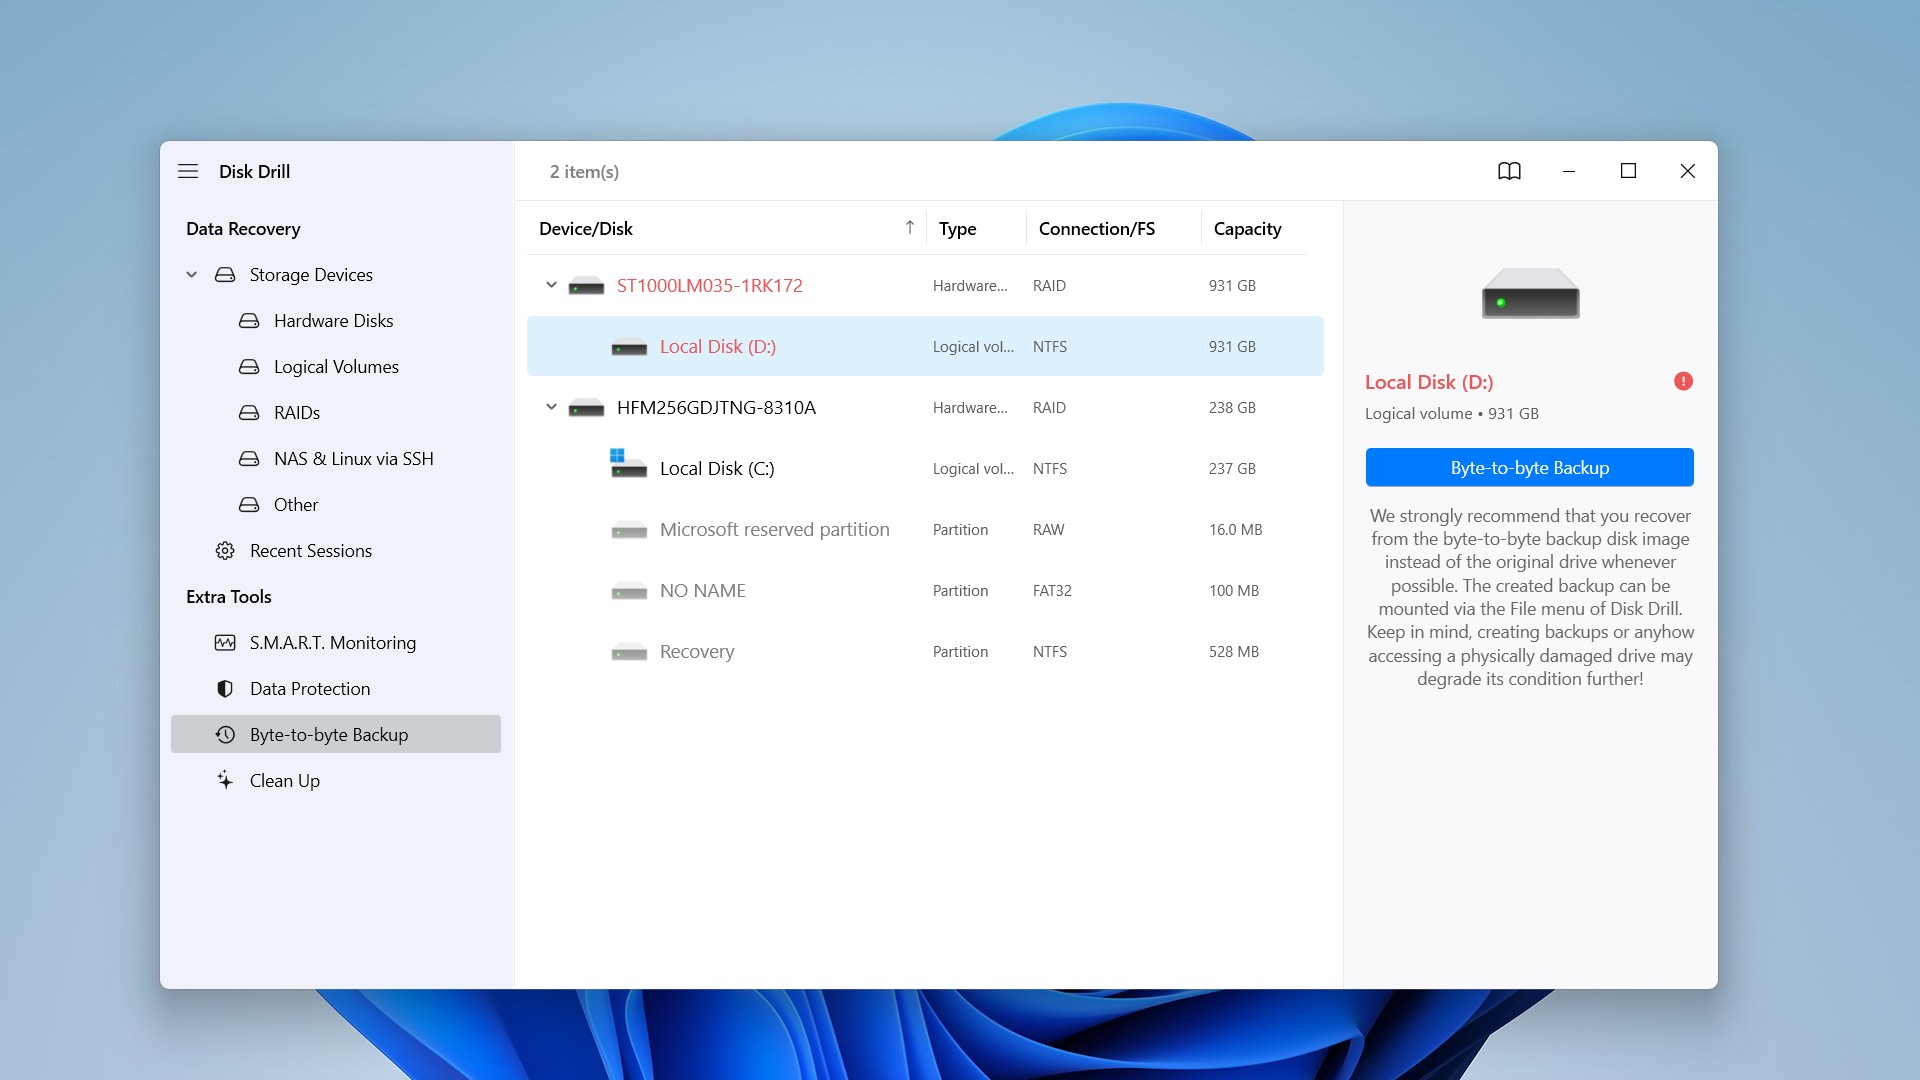
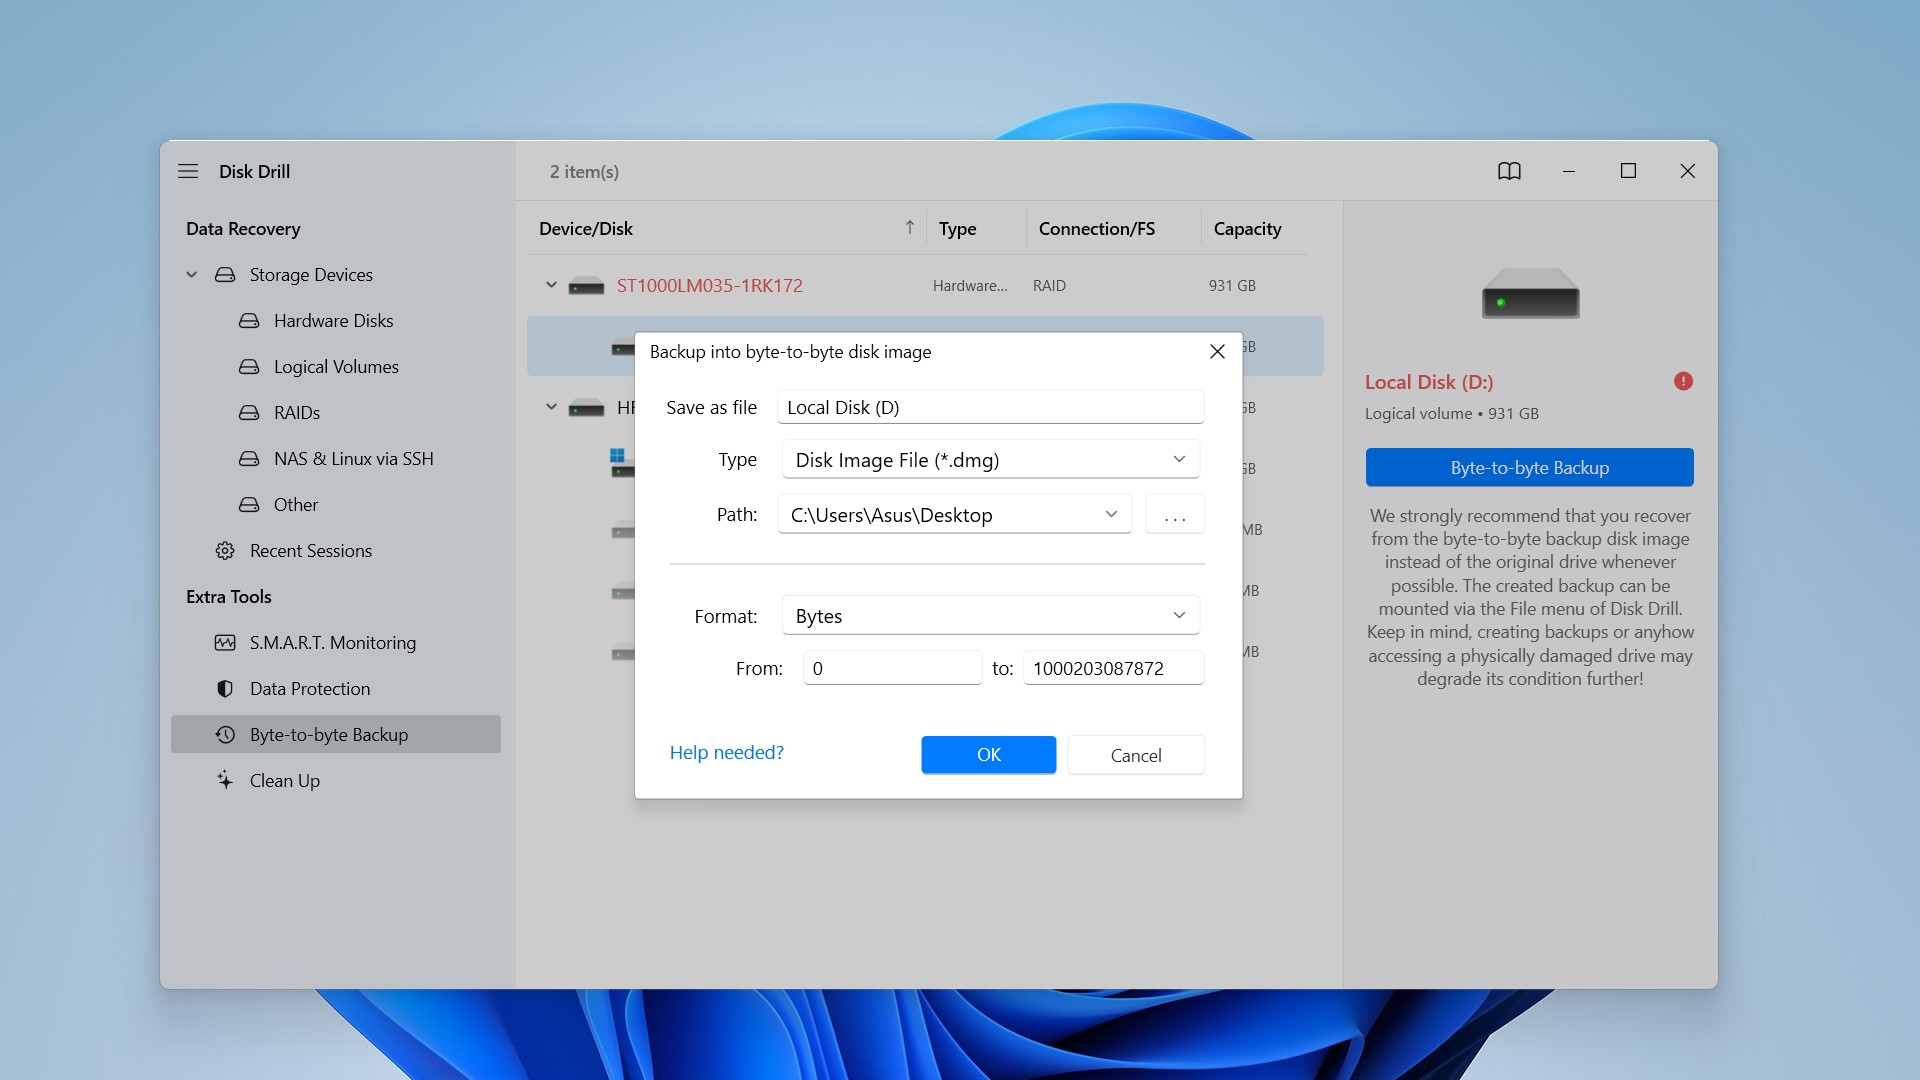
- You can now recover files using the “Search for lost data” function of Disk Drill using the newly created B2B backup file to prevent further corruption of data and damage to the drive.
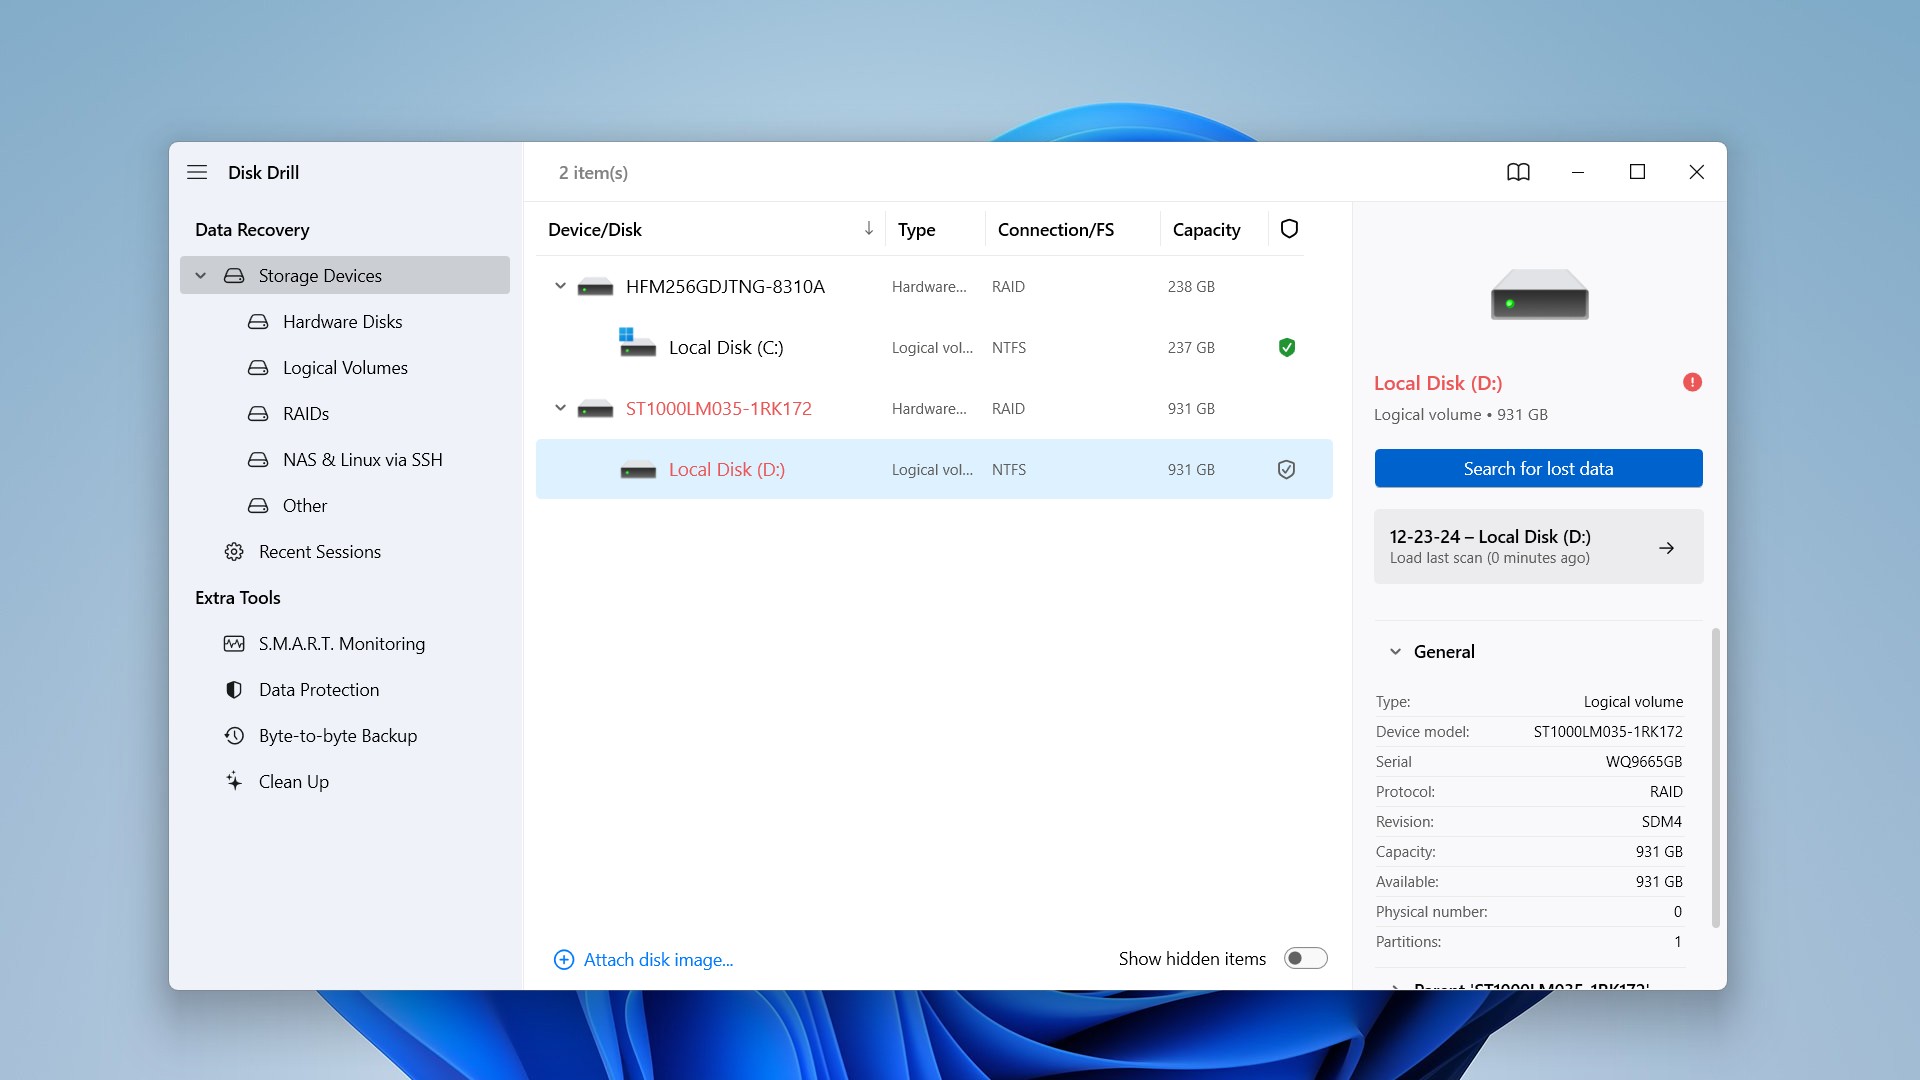
- To search for lost data, select your disk with the image by selecting “Attach disk image” and then scan it; you can wait for the scan to finish or preview your found files by clicking “Review found items.”
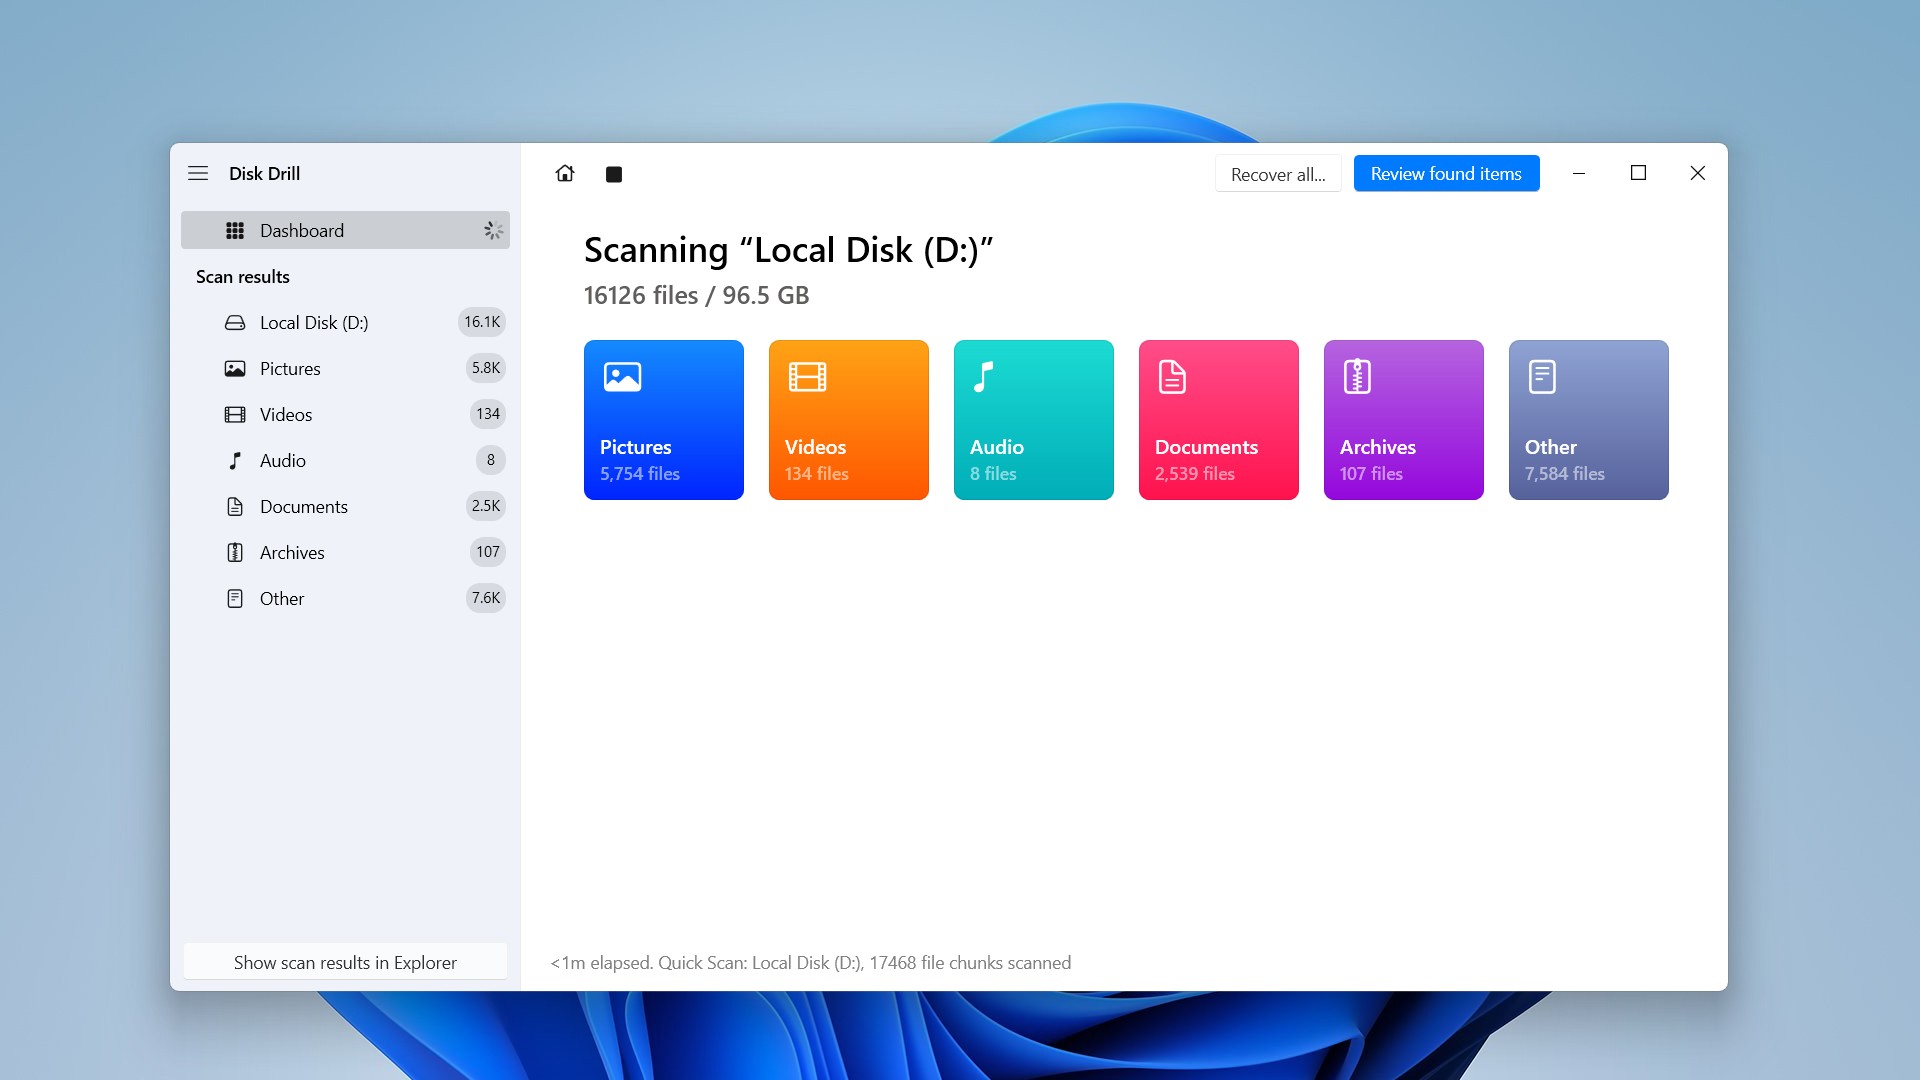
- Once you’ve selected your files, click on “Recover.”And just like that, your hard drive’s recoverable files will get sent to your desired location. Do not recover data to the same drive you are recovering data from.
Interested in Disk Drill? We offer two in-depth reviews of this product: one focuses on its data recovery capabilities, while the other examines its safety and security features.
Alternative Methods for Dead Hard Drive Recovery
Sometimes, the issue with your “dead” external hard drive isn’t internal failure but something less severe like a faulty cable or minor logical errors. The following methods we’re sharing don’t guarantee success, but they’re low-risk and worth a try if you can’t access professional recovery immediately. Here they are:
Method 1: Try Basic Troubleshooting
- Try Different Cables, Ports, or Power Supply: Sometimes, the problem lies in something external to your drive itself. Use a different USB cable or connect the drive to another USB port on your computer. Sometimes, power issues prevent the drive from functioning properly, so if your drive is an external desktop drive that requires a separate power adapter, make sure the adapter works correctly. You can also try to plug the drive into another computer to determine if the issue is related to the device or the connection.
- Driver Updates: Although this method rarely helps with a ‘dead’ drive, try to update your drivers, as this resolves issues if Disk Management detects the drive but indicates an error. To do this, open Device Manager, right-click your drive, select Update driver, and follow the prompts.

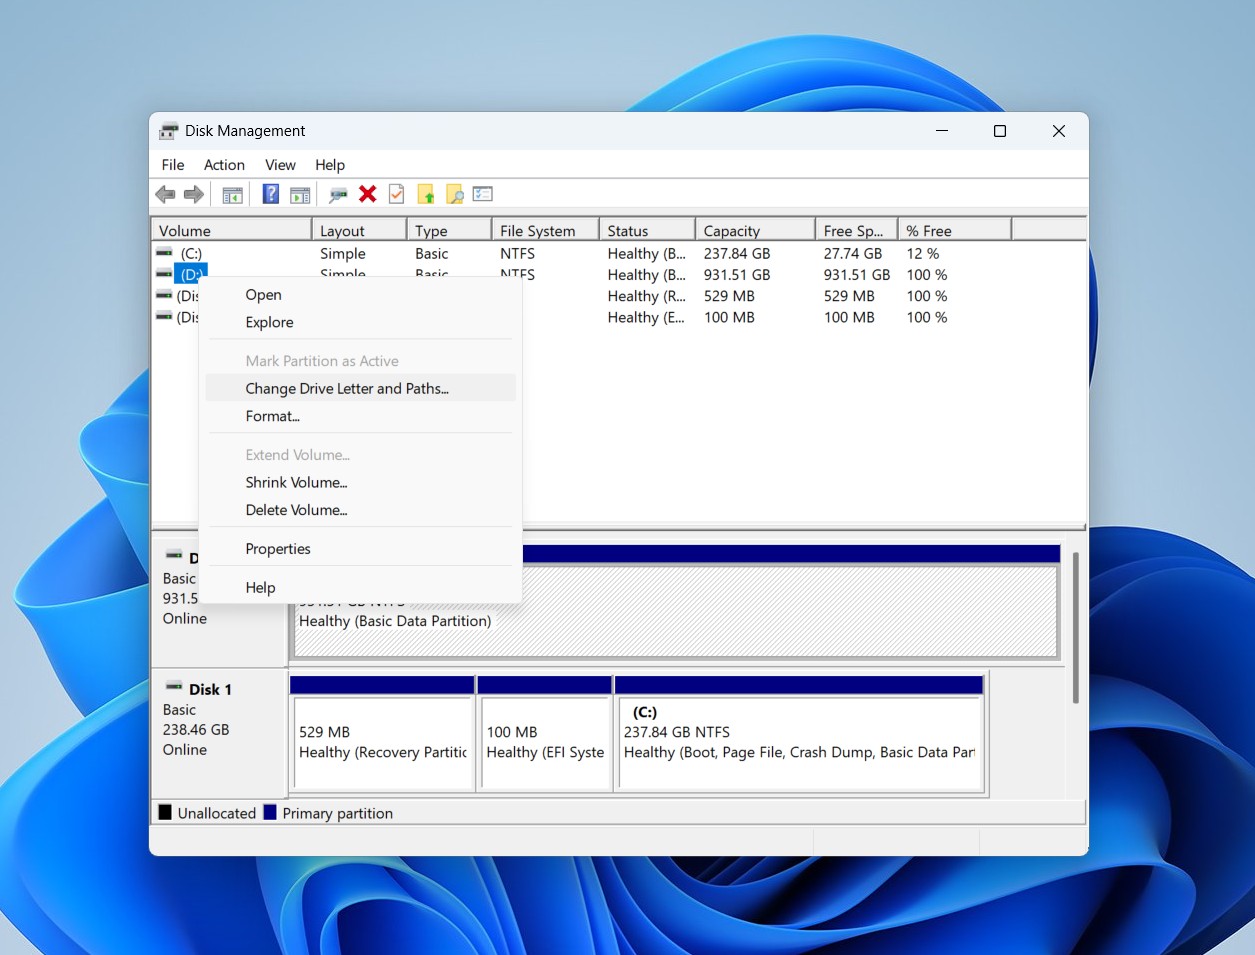
- Change Drive Letter: You can right-click the drive in Disk Management and select Change Drive Letter and Paths to try and make the inaccessible drive visible in File Explorer, though it’s less effective for dead drives.
Method 2: Check for File System Errors
Running a file system check can help if the drive shows minor logical corruption. To do this, go to File Explorer, right-click your drive, go to Properties>Tools>Error Checking, and select Check.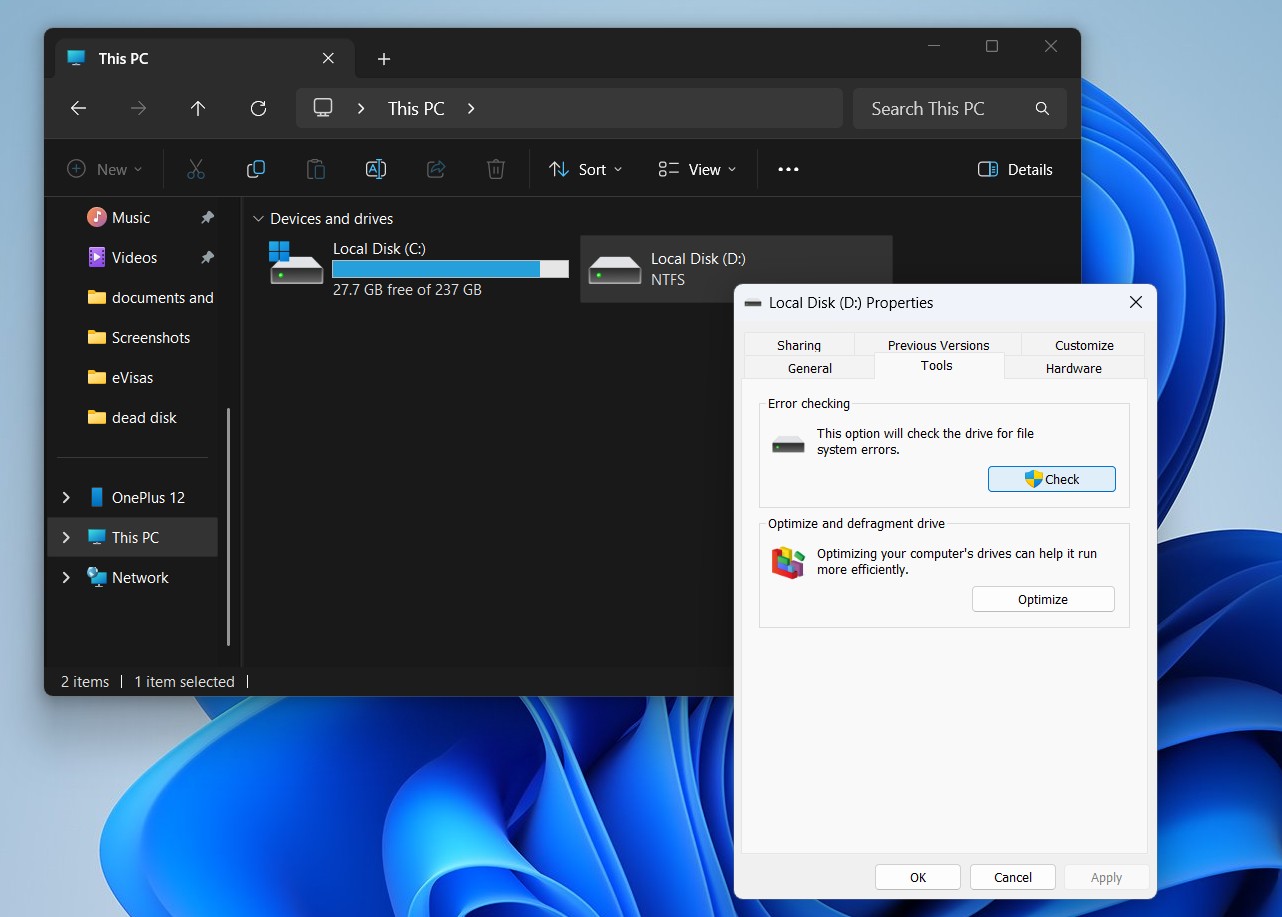
Method 3: Run TestDisk
TestDisk is a free and open-source tool designed to recover lost partitions and fix damaged partition tables. Due to its command-line interface, TestDisk might be intimidating for new users but is highly effective for logical issues.
Here are step-by-step instructions for using TestDisk to scan your disk for lost partitions:
- Download TestDisk from the official site (CGSecurity).
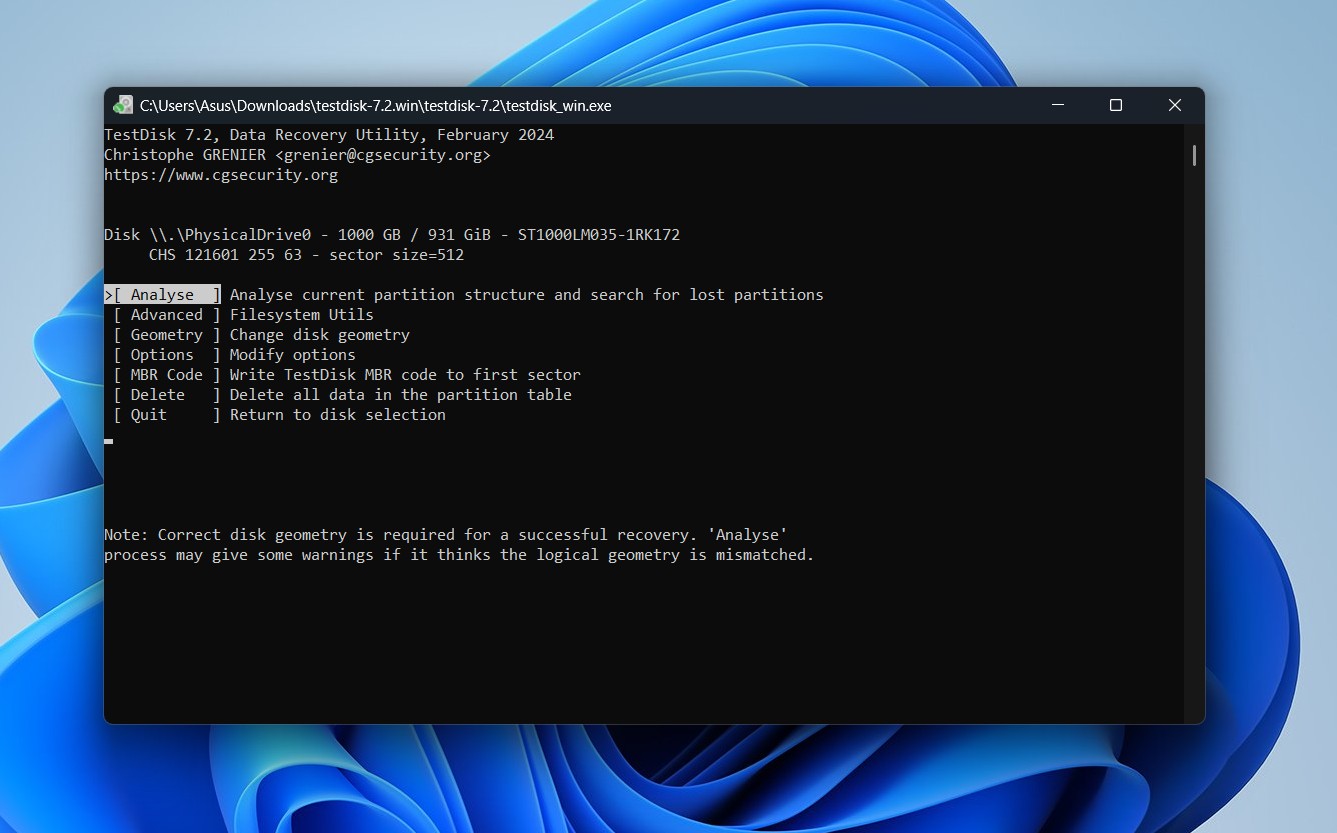
- Run the application directly; no installation is needed. The first interface you’ll see will look like this:
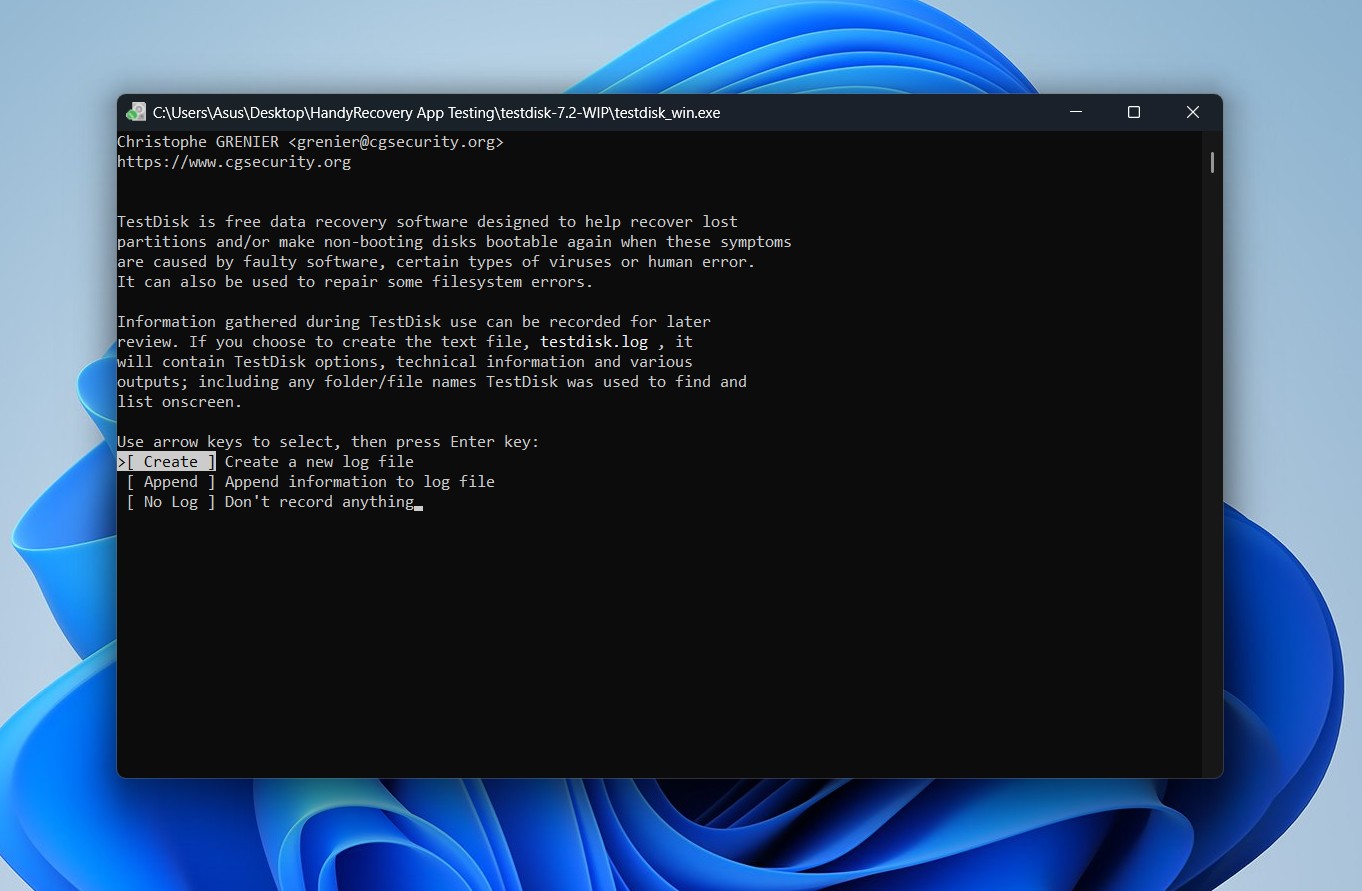
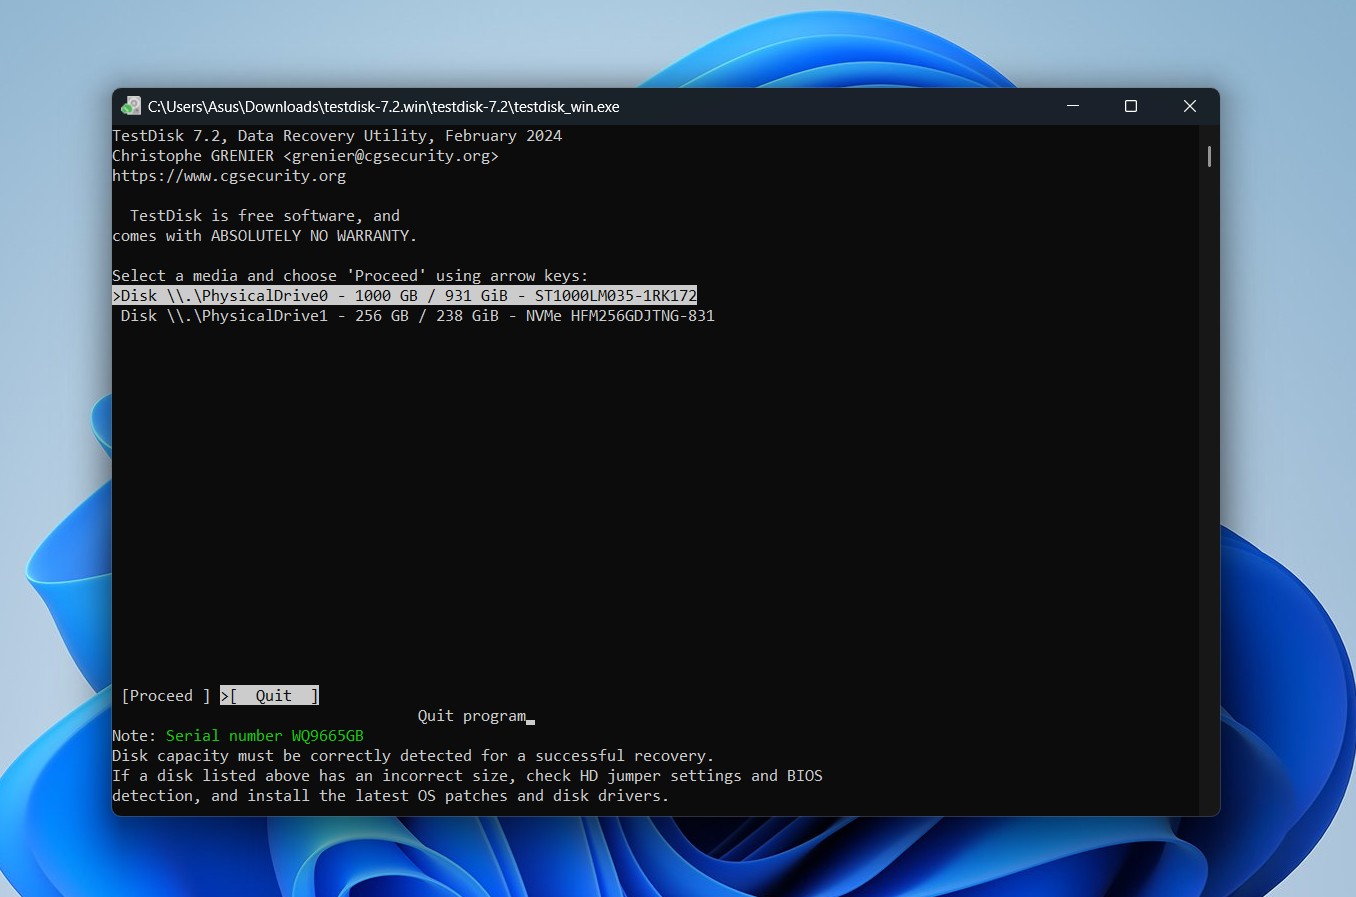
- Go ahead and select Create by hitting Enter. Now, choose your affected hard drive from the list and hit Enter again.
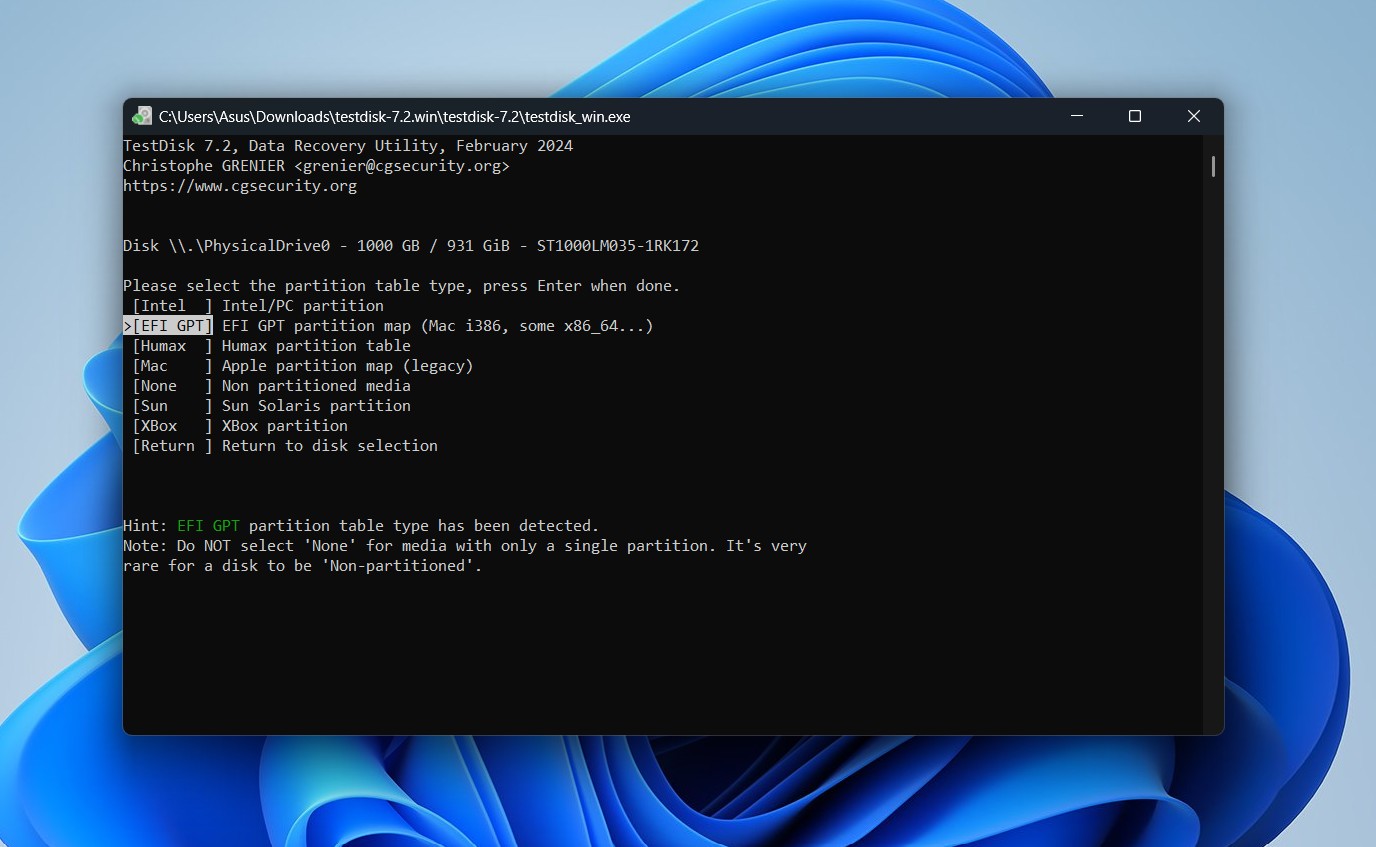
- The next screen will show you partition table types; go ahead and select Intel (or your detected partition) and press Enter. [Note that the software usually detects partitions automatically.]
- On the next screen, TestDisk displays a number of options. These include quick scans to locate lost partitions, modifications to the disk’s storage structure, and even lets you erase the partition table entirely. To recover a deleted hard drive partition, choose the Analyze option and press Enter. TestDisk will then begin scanning the selected disk for any missing partitions.
- Select Quick Search on the next screen and hit Enter. Once the scan is complete you can select recoverable partitions.
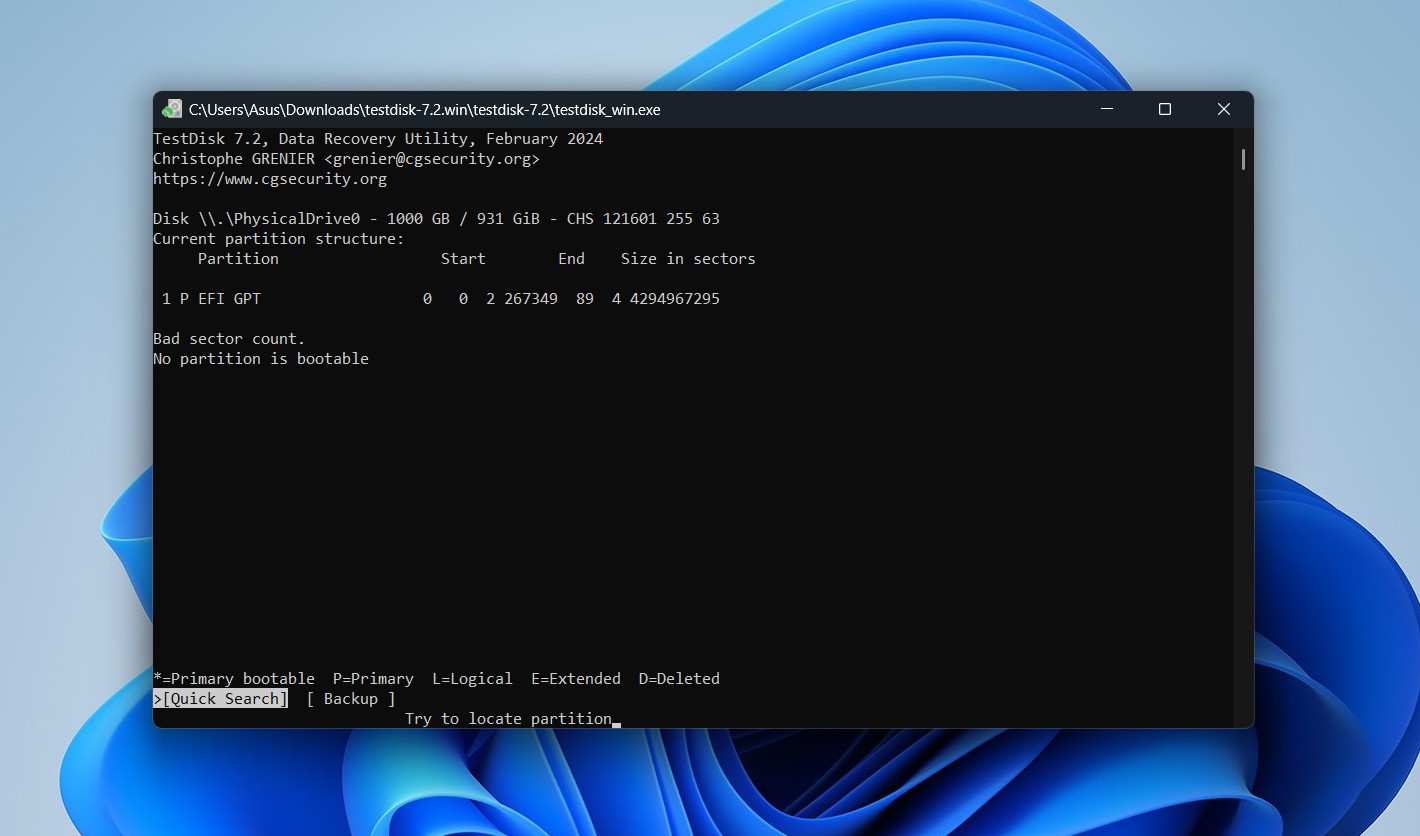
- You can use the arrow keys to highlight the partitions you want to recover and verify their size. To confirm that the partition contains the data you need, press p to preview its file contents. To recover a partition, change its status from D (Deleted) to (Bootable), P (Primary), or L (Logical) as you find appropriate. Once all the desired partitions are marked, you can proceed to the next screen and select the Write option to save these changes to the partition table. Press Enter, confirm with Y, and then select OK to finalize the update.

For other operations using TestDisk, you can use the official documentation from their website, or look for tutorials like this one on YouTube.
Method 4: Try Victoria911
Victoria is a powerful diagnostic tool that can let you assess your hard drive’s health and performance. You can use it to check for bad sectors and SMART data to see if your drive is failing.
More so, this software lets you clone, benchmark, low-level format, and manage partitions, as well as identify and remap bad sectors on your drive. It can remap, erase, and possibly restore data when errors are spotted (Note: Remapping replaces bad blocks with spare memory blocks without preserving the data).
Here are steps to remap bad sectors on your Hard Drive using Victoria for Windows:
- Download and run the Victoria software on your system.
- Select the affected drive from the list of available devices on the top right. Then click on Test and Repair.
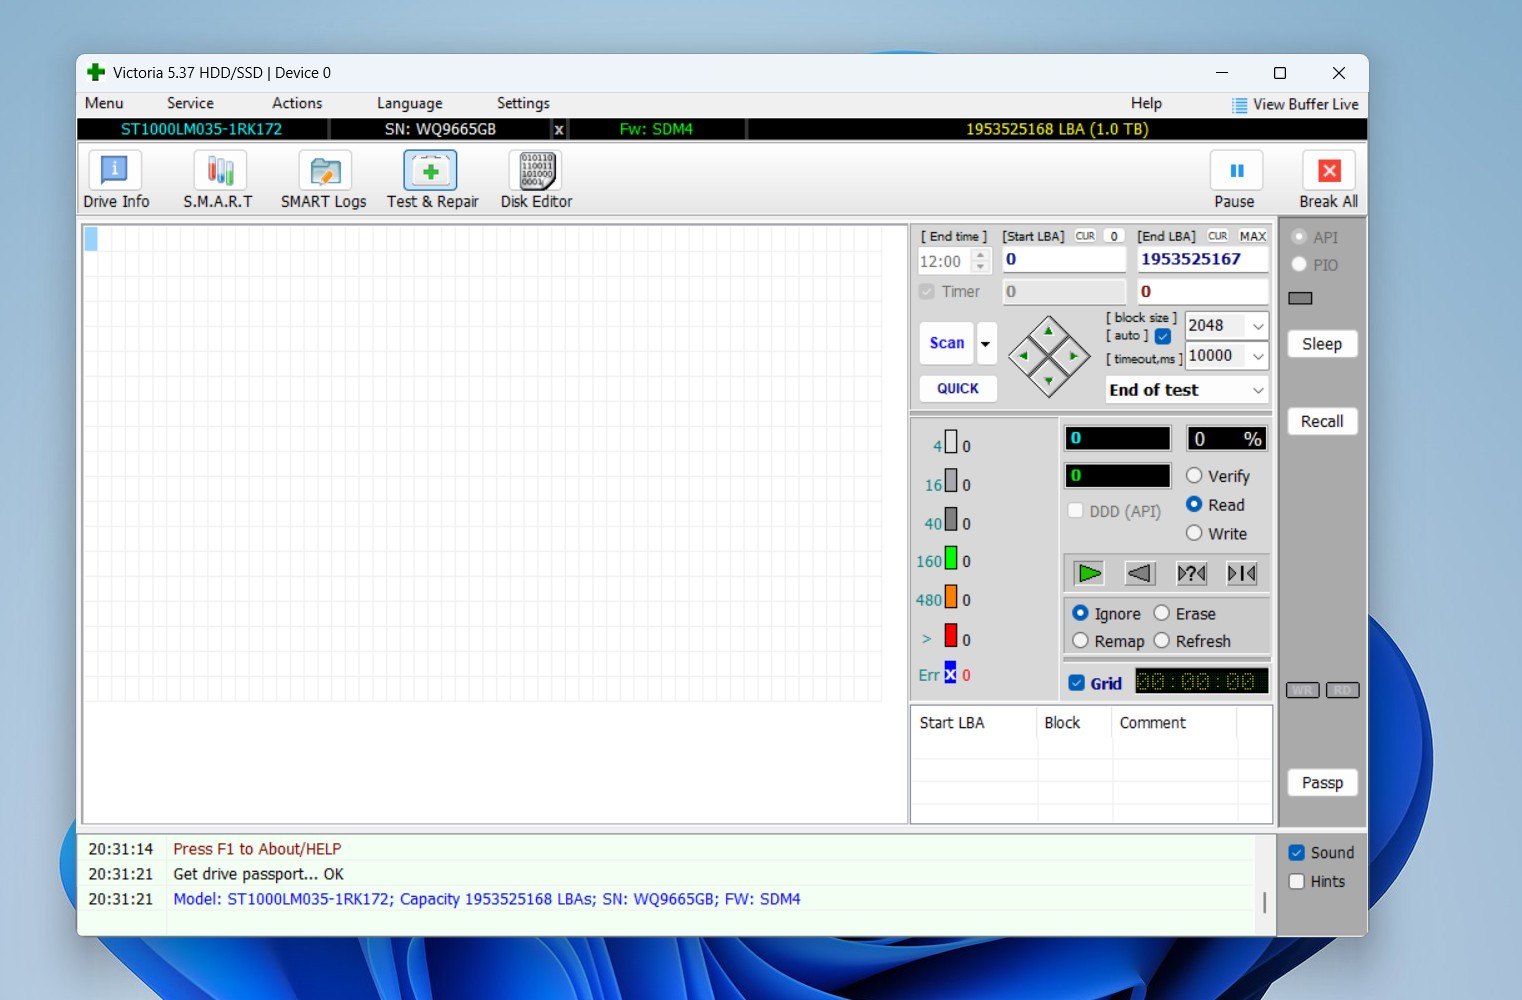
- You must now choose how you want to scan the drive, based on your goal: Erase: This is best for repairing bad sectors by overwriting them with zeros, but it permanently destroys any data in those sectors. Remap: This mode is best for data recovery, as it reassigns bad sectors to spare ones and attempts to preserve the data. Ignore: This identifies bad sectors and maps them without taking any corrective action. Refresh: The final method at your disposal is the Refresh option, which attempts to read and rewrite data to the affected sectors. This might fix less severe issues with your drive.
- Choose your scan type and hit Scan. The software will scan your drive and show the results.
Once again, this method comes with a risk of data loss if used incorrectly, and we don’t recommend it if you don’t know what you’re doing. If you’re still determined to attempt a repair using this software, try using this YouTube tutorial we found on Victoria.
Method 5: Format Your Drive
Finally, if all your recovery efforts fail and the drive is still visible in Disk Management, you can format it to try and restore functionality.
Caution: Doing this will erase all your data, so make sure you properly back up all your files first or create a disk image like outlined in the previous section.
Follow these steps to format your drive:
- Open Disk Management by right-clicking the Start menu.
- Locate your faulty drive, right-click, and select Format.
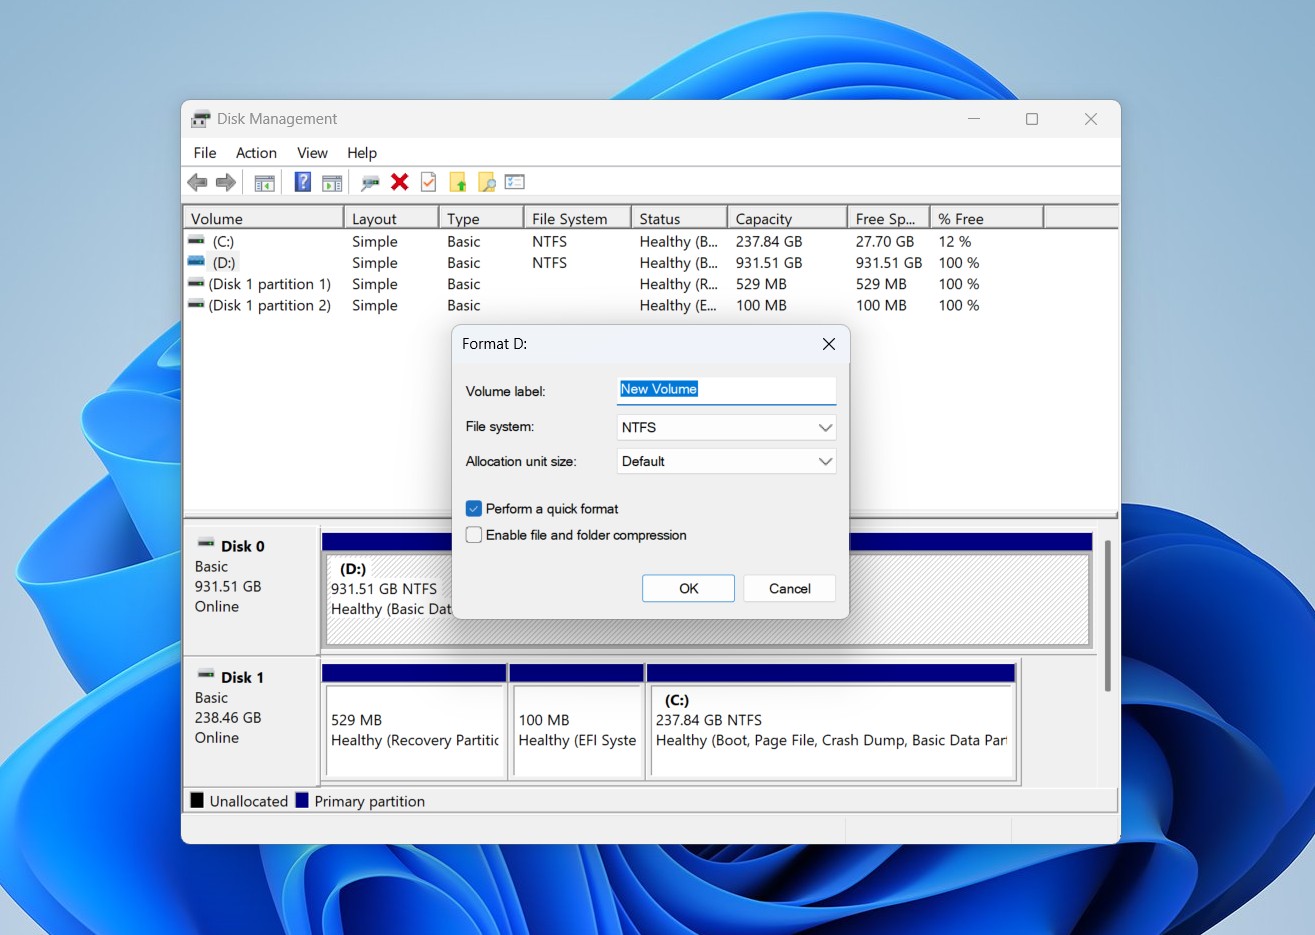
- Choose a file system and complete the process.
This should only be attempted if you’ve recovered or no longer need the data on the drive.
Limitations of the Above Methods and More
When it comes to “dead” hard drives, the outcome of the methods outlined above highly depends on the type of damage your hard disk faced, and whether it is truly ‘dead’. We’ll outline below the cases where some methods may or may not work:
- Using the Windows Troubleshooter: The built-in hardware troubleshooter won’t help if the BIOS or OS doesn’t detect the drive! It’s designed for software issues, not physical hardware failures.
- Formatting the Drive: Formatting is only possible if your system recognizes the drive, but this also erases all your existing data. Without a recent backup or data recovered beforehand, we don’t advise you to format your “dead” drive as it is risky and unnecessary.
- Freezing or Tapping the Hard Drive: This method was not covered in the previous section, but we felt it was still important to include here. Although internet myths will have you believe that freezing or gently tapping a hard drive might “revive” it, this is most likely going to lead to more damage. Hard drives have delicate components that are easily harmed by rough handling or sudden temperature changes, so definitely don’t do this!
And remember, even if you successfully back up and recover data, we advise you not to use the problematic drive to store any future files, especially important ones. The hardware or software issue can still persist and worsen, and your best bet is to try and get your device returned, replaced, or repaired while it is still under warranty.
Your Drive Is Actually Dead. What’s Next?
As we discussed above, data recovery centers are your best bet and the most reliable option to recover data from an ACTUALLY dead external hard drive. You should consider using a data recovery center if:
- Your drive isn’t recognized in Disk Management or File Explorer.
- You hear clicking, grinding, or unusual noises from the drive, which indicate mechanical failure.
- The drive has physical damage (say you dropped it or it suffered water damage).
Professionals at these data recovery centers will disassemble your drive in a cleanroom environment and use advanced tools to repair or replace damaged components temporarily, allowing them to hopefully retrieve your data.
Do keep in mind that the cost of professional data recovery can vary widely based on the extent of the damage, the type of drive, and the amount of data you need to recover. It can range from a few hundred to several thousand dollars, so you need to decide whether the value of your data is worth the potential expense.
This article was written by Vihaan Jain, a Staff Writer at Handy Recovery Advisor. It was also verified for technical accuracy by Andrey Vasilyev, our editorial advisor.
Curious about our content creation process? Take a look at our Editor Guidelines.
