If you want to delete your synced photos for more free space but are unsure how iCloud Photos works and do not want to risk a mistake, this guide is what you need. We will explain how everything works and show you, step by step, how to remove synced photos from your iPhone safely.
This guide covers different scenarios. Whether you want to delete synced photos from your iPhone without affecting iCloud, remove them from iCloud but keep them on your iPhone, delete photos that were transferred from a Mac or PC and won’t go away, or erase all synced media from all connected devices at once you’ll find step-by-step instructions here.
iCloud vs. Device Storage
iCloud Photos syncs your pictures and videos across all Apple devices. When enabled, any change made on your iPhone—when you add, edit, or delete a photo—applies to iCloud and every synced device. This setup gives you seamless access but also leads to one of the biggest mistakes users make when they delete synced media on iPhone, without realizing that iCloud will remove them from every synced device too.
Unlike traditional cloud storage, iCloud mirrors your entire photo library. If you delete a synced photo, it disappears from every device unless you adjust certain settings. Many users only realize this when it is too late.
How to Check Your Current iCloud Settings
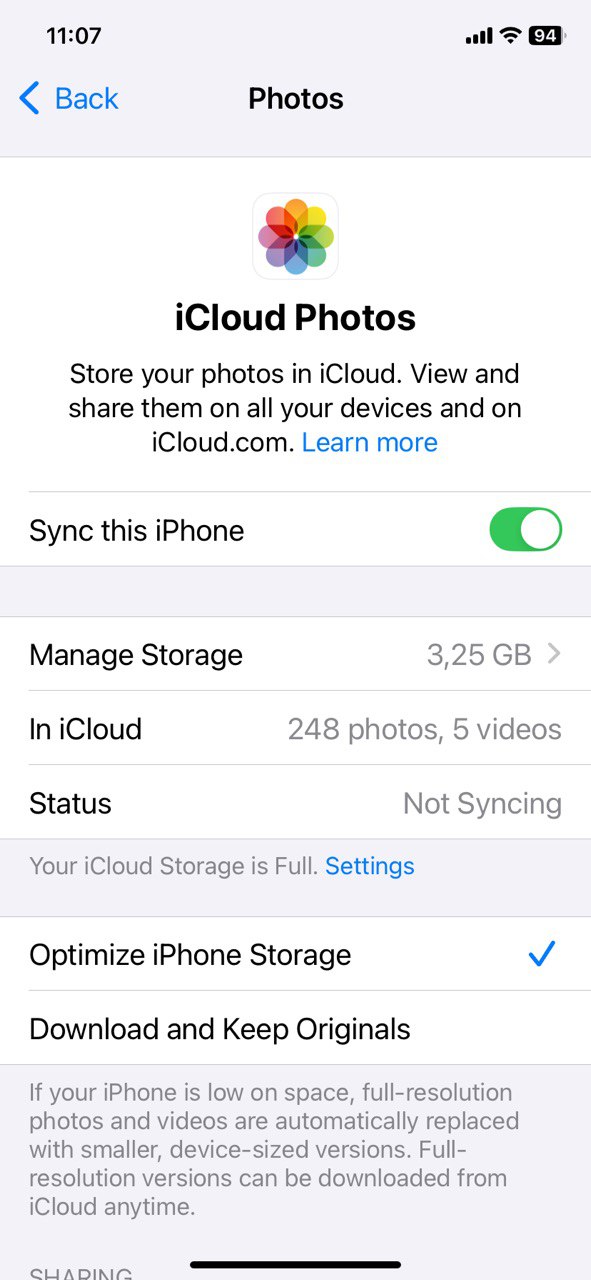
First, we need to know whether iCloud Photos is currently enabled. If it is on, any photo you delete from your iPhone will also disappear from iCloud and all other synced devices. You can check this setting in just a few taps:
- Open Settings.
- Tap [Your Name] > iCloud > Photos.
- Look for the iCloud Photos toggle—Sync this iPhone tells you if your photos are syncing with iCloud.
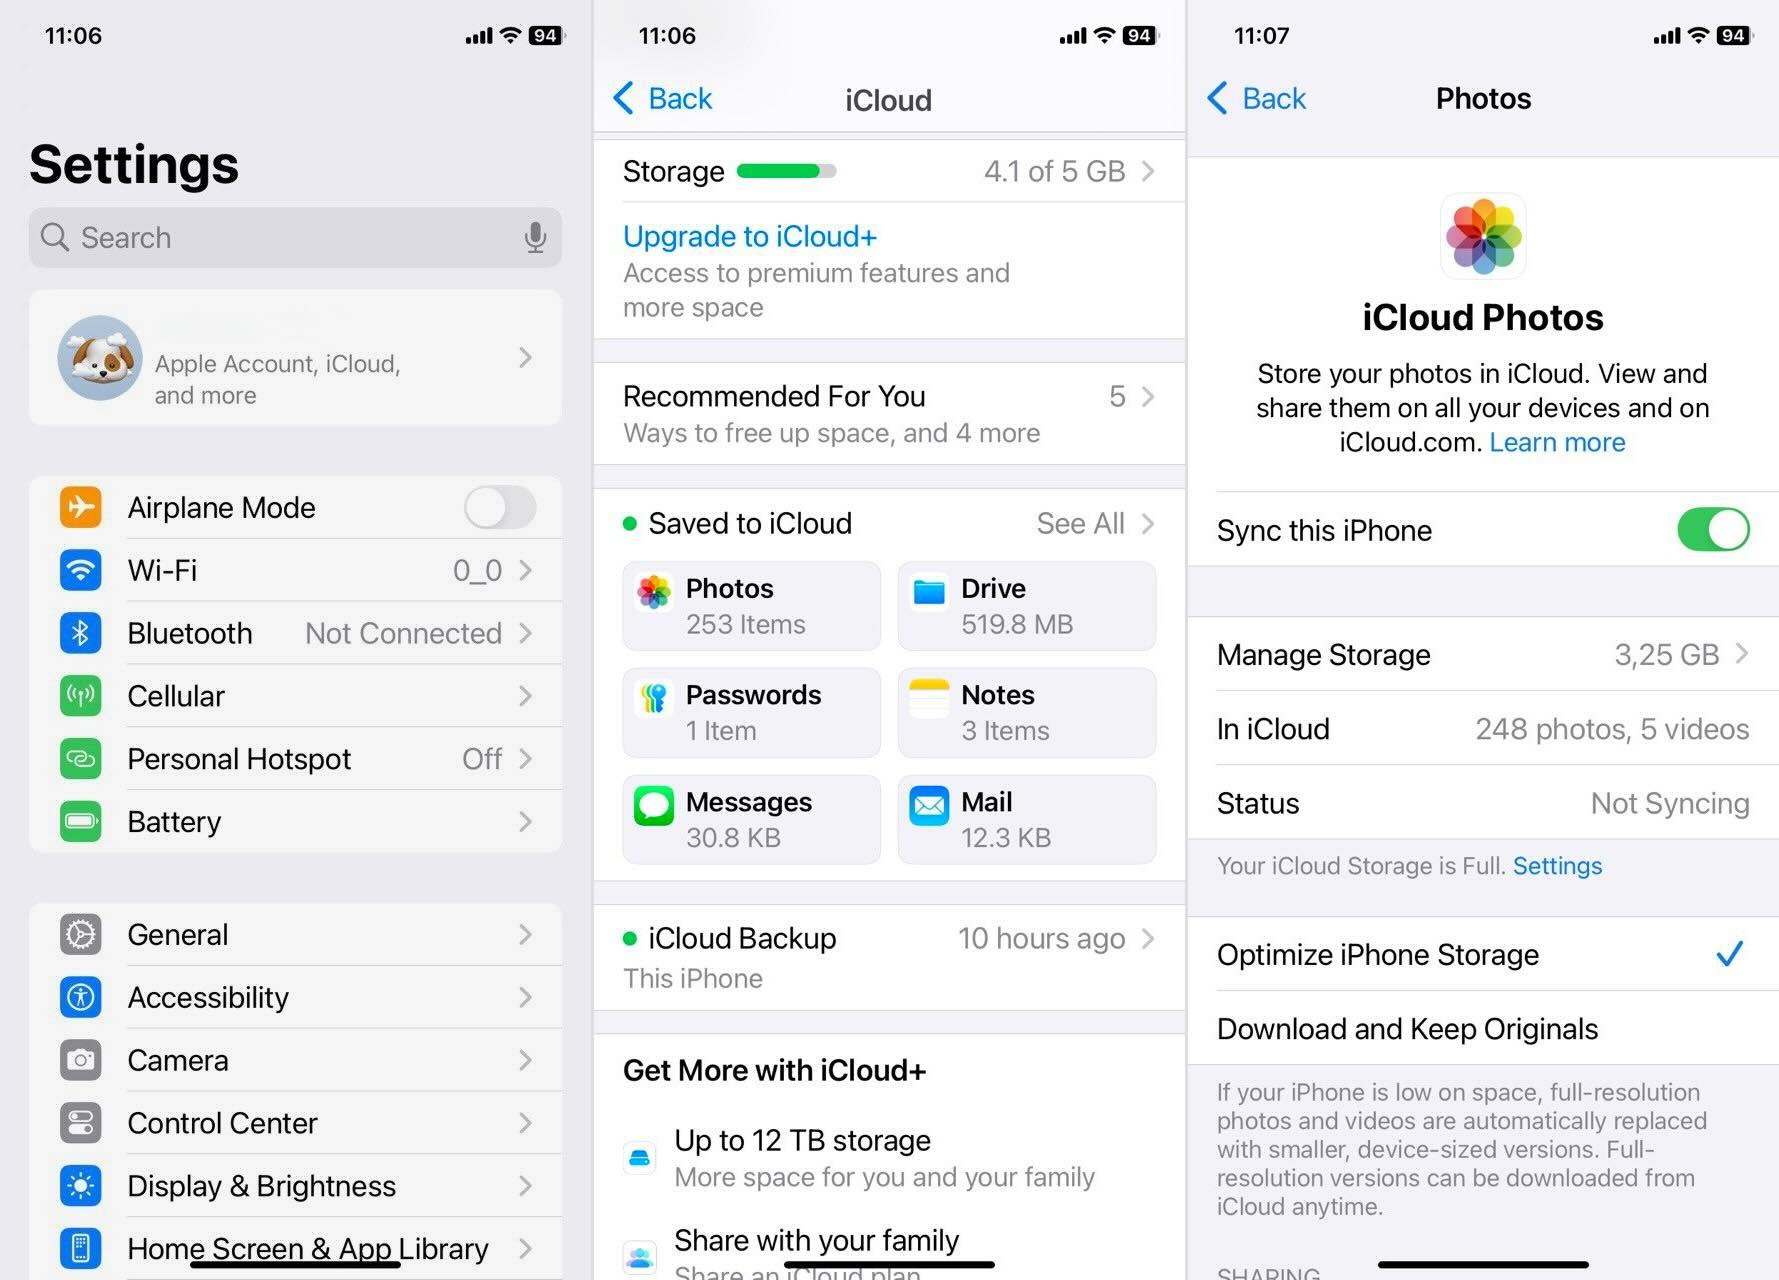
Next, check how your iPhone manages storage for synced photos. iCloud Photos offers two storage modes that directly impact how much space photos take on your iPhone.
- Optimize iPhone Storage – Saves lower-resolution copies on your iPhone while keeping full-resolution images in iCloud.
- Download and Keep Originals – Stores full-resolution photos on your device.
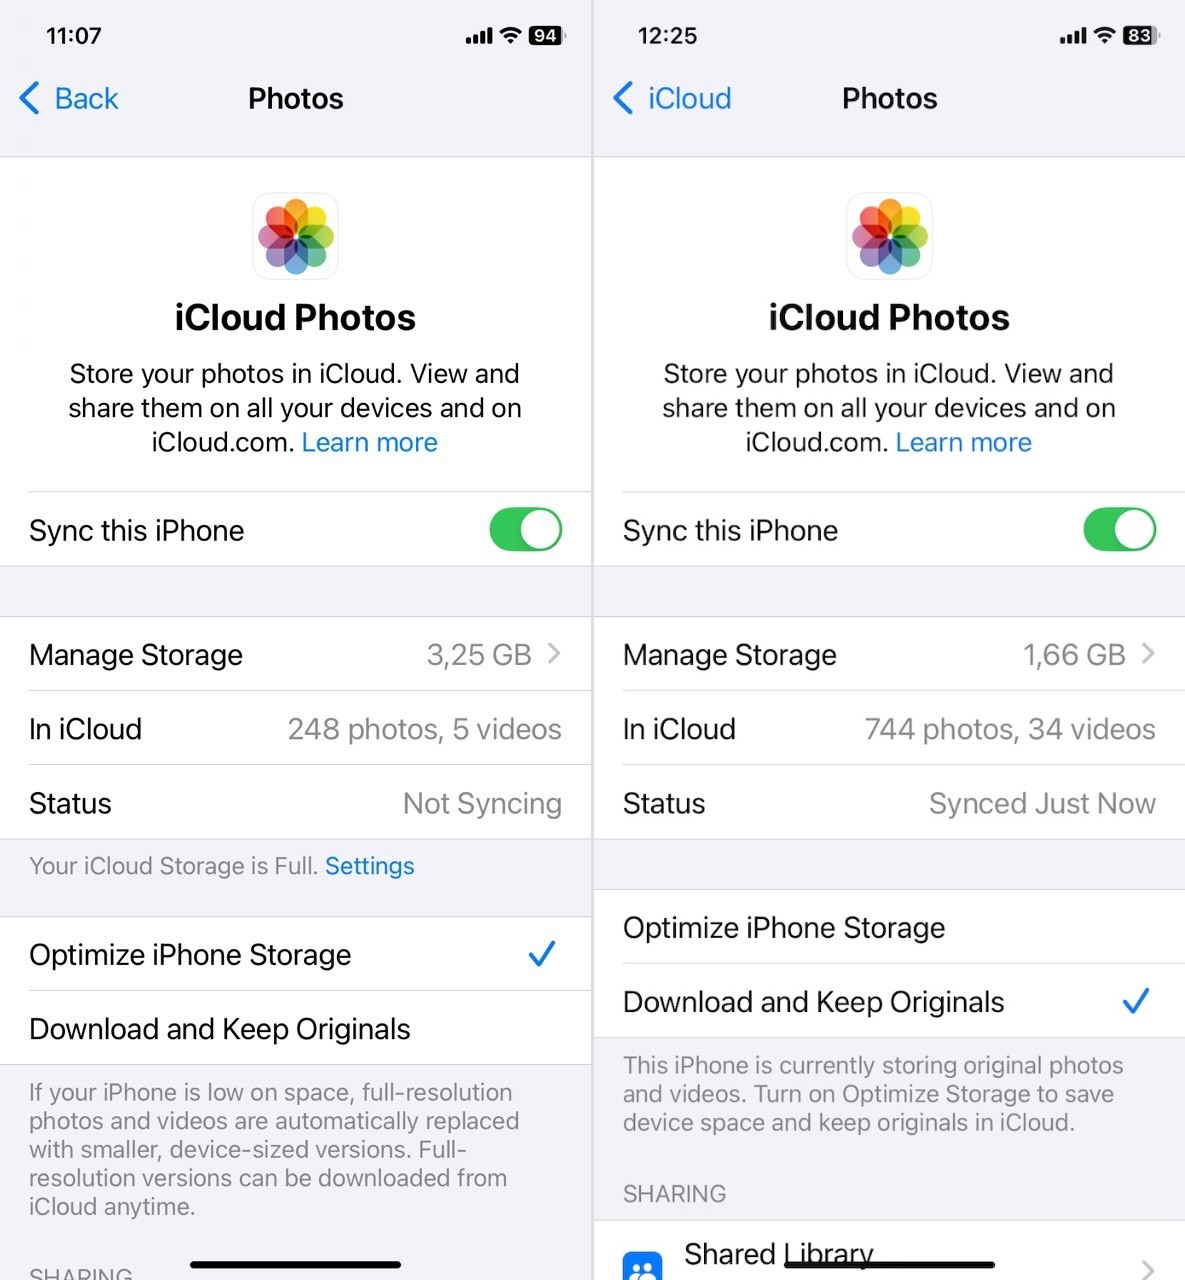
The feature you have enabled determines how much storage you’ll actually free up after deleting synced photos.
- If Download and Keep Originals was enabled, your iPhone stored the full-size photos both on your device and in iCloud. That means once you disable sync and delete the photos you don’t need, you’ll see a noticeable boost in free space.
- If Optimize iPhone Storage was enabled, your photos were already stored in a compressed form on your device while the full-quality versions stayed in iCloud. In this case, deleting them won’t free up much space since they were already taking up minimal storage.
Keep this in mind so you know what to expect.
How to Remove Synced Photos from iPhone (but Keep in iCloud)
Now that we are done with theory, let’s get to practice. Here, we have four steps that will remove synced photos from your iPhone in a safe manner.
Step #1: Turn Off iCloud Photos on the iPhone
As you probably figured from the previous text, first, you should disable iCloud Photos before deleting anything.
If iCloud Photos was already toggled off when you checked the settings, you are free to skip this step and move to Step 2: Delete Synced Photos. Otherwise, follow the steps below.
How to disable iCloud Photos:
- Open Settings.
- Tap [Your Name] > iCloud > Photos.
- Toggle iCloud Photos off.
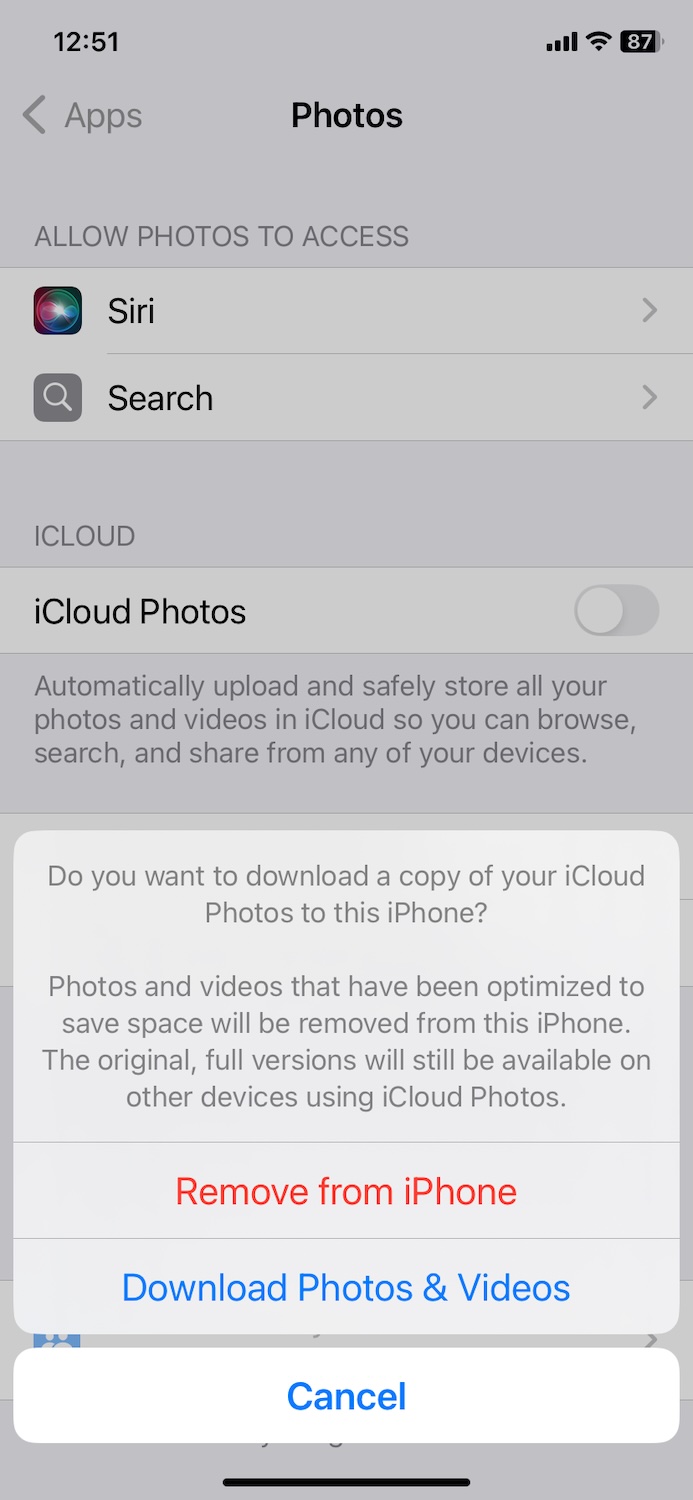
After you toggle it off, in the case you had “Optimize iPhone Storage” enabled, you will see two choices:
- “Remove from iPhone” – This deletes all synced photos from your device but keeps them in iCloud. You will still have access to them on iCloud.com and any other Apple device where iCloud Photos remains enabled.
- “Download Photos & Videos” – This downloads all your full-resolution iCloud photos to your iPhone before disabling sync.
So if you see these choices and want to delete all synced photos from your iPhone, tap “Remove from iPhone.” Or if you prefer to pick and choose which photos remain, select “Download Photos & Videos” and delete them on your own in the next step. But keep in mind that this option demands enough space to hold the full-resolution versions.
If you had “Download and Keep Originals” enabled all along, these options will not appear. In that case, iCloud Photos will simply turn off, and you can move to Step 2.
Step #2: Delete Synced Photos
Okay, so now your photos no longer sync with iCloud, and you can safely delete them from your iPhone. You have two options for iPhone synced media removal: automatic deletion or manual deletion. Let’s start with the automatic one.
This step applies if you picked Download Photos & Videos or had Download and Keep Originals on. If you chose Remove from iPhone, this won’t affect you right now, but it might be useful if you want to clean up your gallery sometime later or turn iCloud Photos back on and download everything again in the future.
Option A: Delete Photos Automatically (With an App)
Most people already know how to delete files from the Photos library manually, and we will cover that too. But let’s talk about an easier, faster way. Plenty of iPhone cleaner apps can simplify this to just a few taps, and save you a lot of time and effort.
We have tested quite a few of these apps, and you can find some great options in our rating of the best iPhone cleaners. For the sake of demonstration, we will show you how the #1 app from that list works—Clever Cleaner: Free Photo Cleaner. It’s a 100% free app, so you can try it with no limitations and see if it works for you. There are no locked features and no restrictions on how many photos you can clean up.
Clever Cleaner can scan your photo library and detect:
- Duplicates and visually similar images – Its AI algorithms identify identical and similar images and can clean up all the unwanted surplus automatically.
- Screenshots – Finds old screenshots you probably do not need anymore and can delete them all in one tap.
- Large video files – Sorts all videos in your library from largest to smallest, so you can quickly delete the biggest videos.
- Live Photos – Offers an option to convert Live Photos into standard images without the short video clip to save space.
Here is an example of how you can automatically delete all duplicates and near-duplicates from your library using Clever Cleaner:
- Type “Clever Cleaner” into the search bar in the App Store or go straight to its page using this link.
- Open the app and go to the Similars tab.
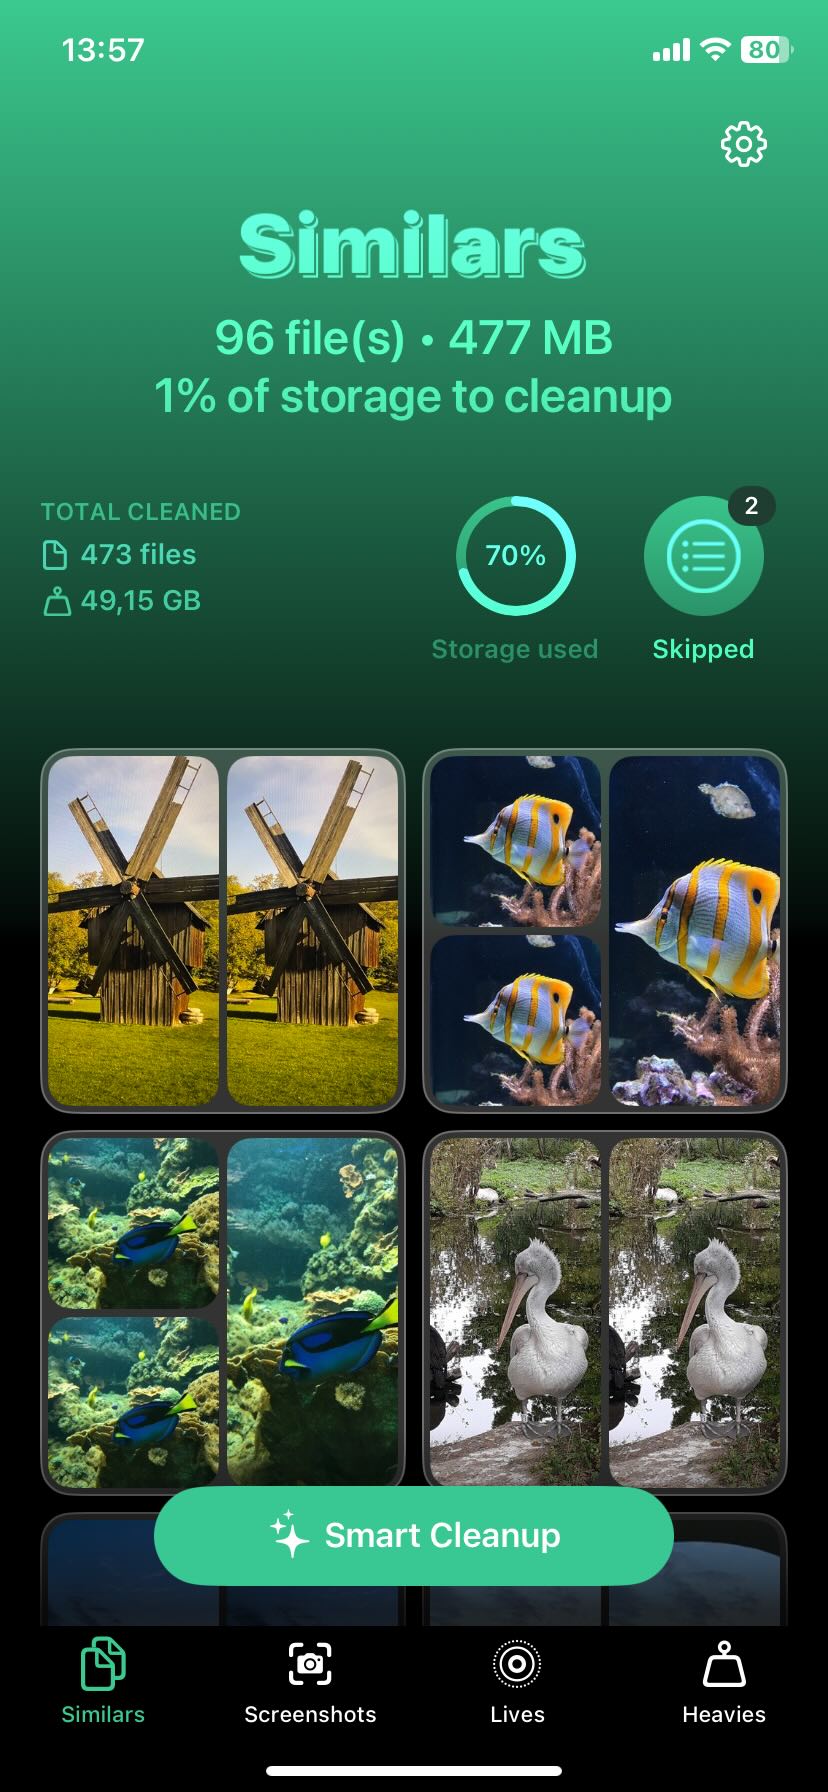
- This is where you can either manually go through all the similar photos or go for Smart Cleanup.
- If you prefer to review each batch, tap on a group of similar photos, then select which ones to delete.
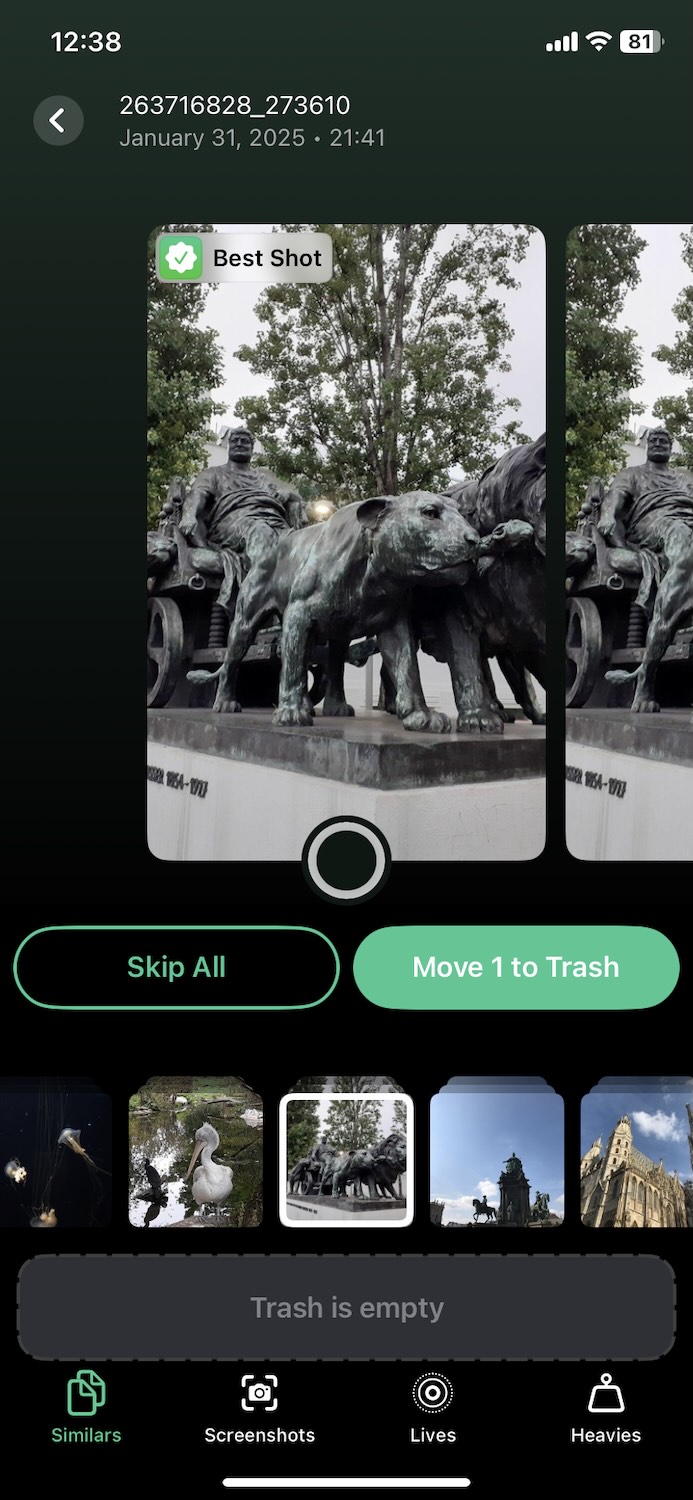
- The app pre-selects duplicates for you, with its AI labeling the best-quality image as “Best Shot” so you don’t have to do it on your own. Of course, you can select differently if you choose to.
- Now, tap “Move to Trash” and the app will show you the next group of similar photos for review. If you tapped by mistake, you can use the Undo button that appears at the top.
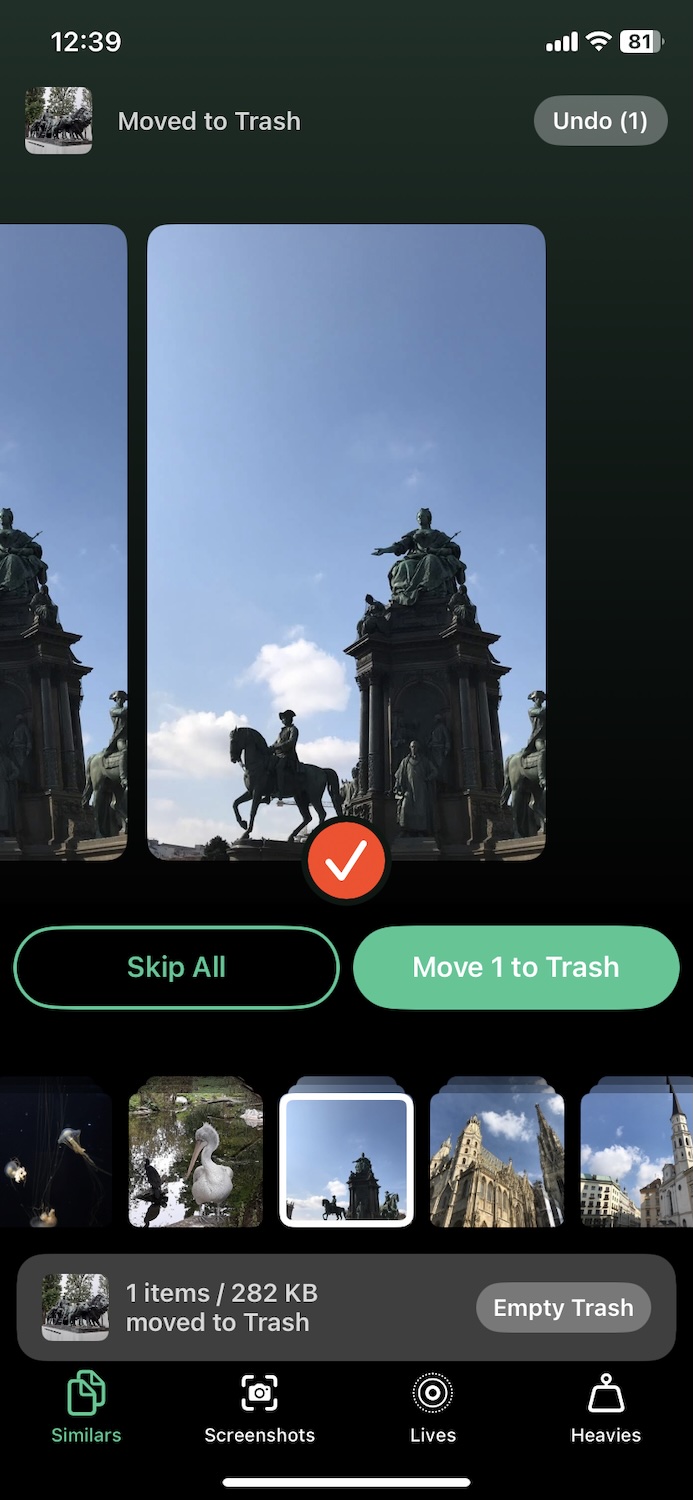
- Then tap “Empty Trash” at the bottom and confirm that you want to delete all the photos you selected.
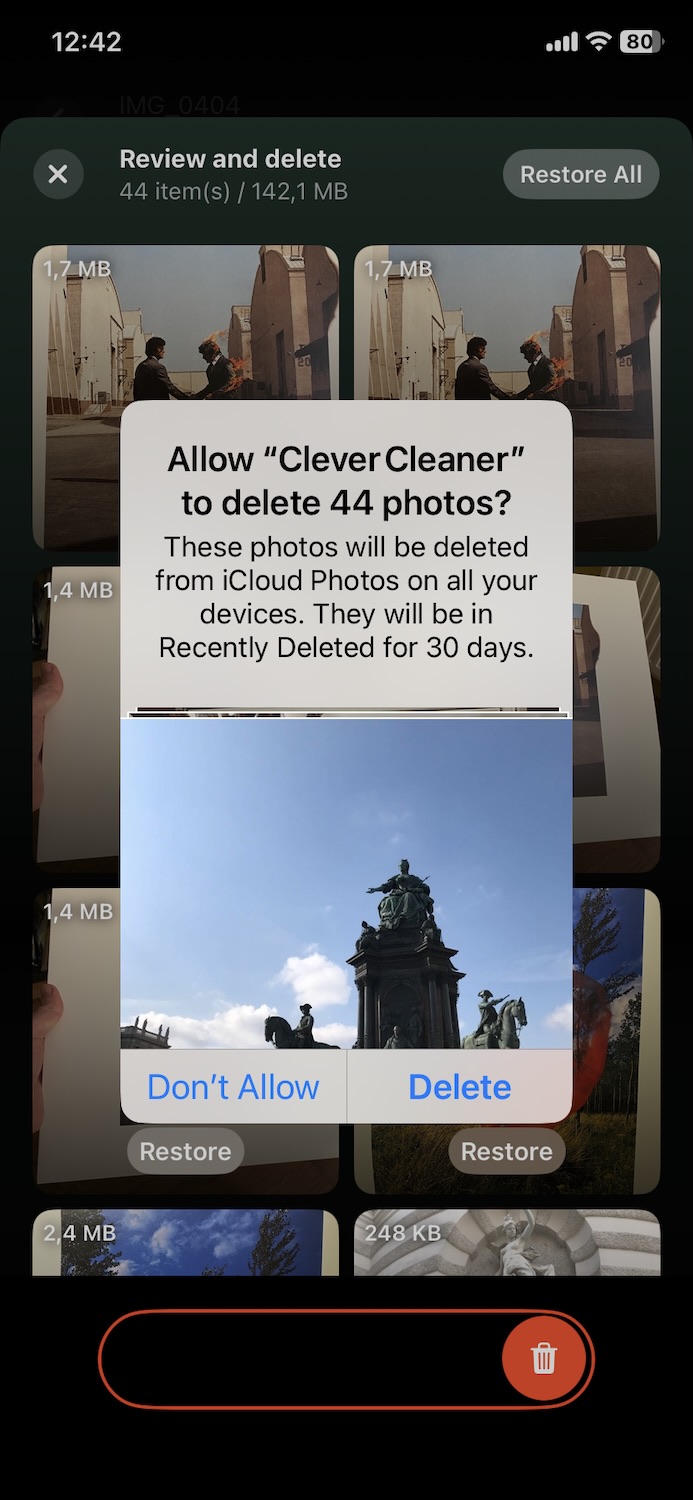
- If you go for Smart Cleanup, the app will display all duplicates and similar images it suggests for deletion. Simply Slide to delete them all in one go.
- The app will ask for permission to remove the photos from iCloud Photos across all your synced devices.
It’s a pretty intuitive process, and once you are done, you can try the other three cleanup tools in the app for an even deeper library cleanup. Based on our testing, all tools in this app are free to use with no quantity or time limits, and we didn’t even encounter any ads—a pretty generous offer.
Also, if we take into account what’s stated on the official Clever Cleaner cleanup app’s page: “Download Clever Cleaner today and enjoy lifetime access for free. Early users will never be asked to pay for upgrades or new features.” It makes it one of the best completely free cleanup tools for iPhone users right now.
Option B: Delete Photos Manually
If you want to go all manual, you can remove synced content from your iPhone yourself through the Photos app. This method gives you full control over what stays and what goes, but it takes a lot more time.
How to manually delete synced photos from your iPhone:
- Open the Photos app.
- Tap Select in the top-right corner.
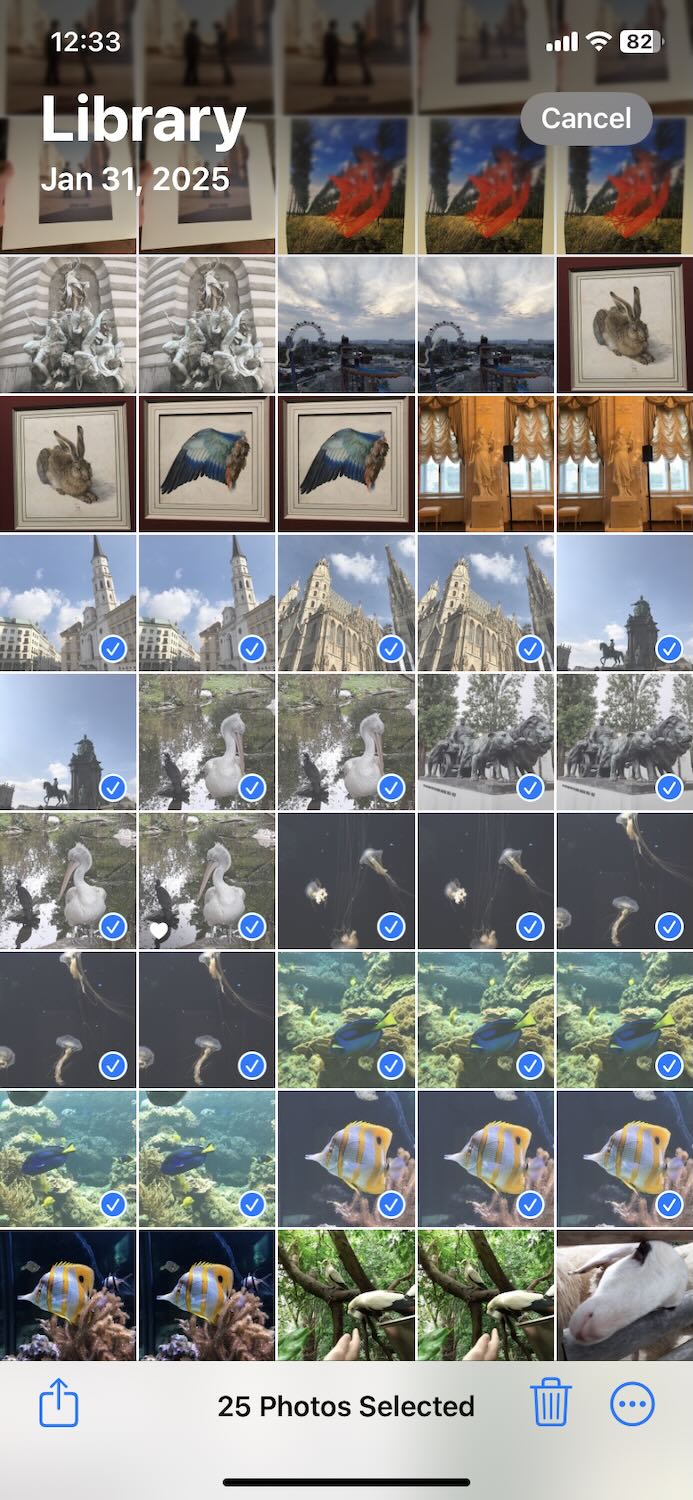
- Choose the photos you want to delete.
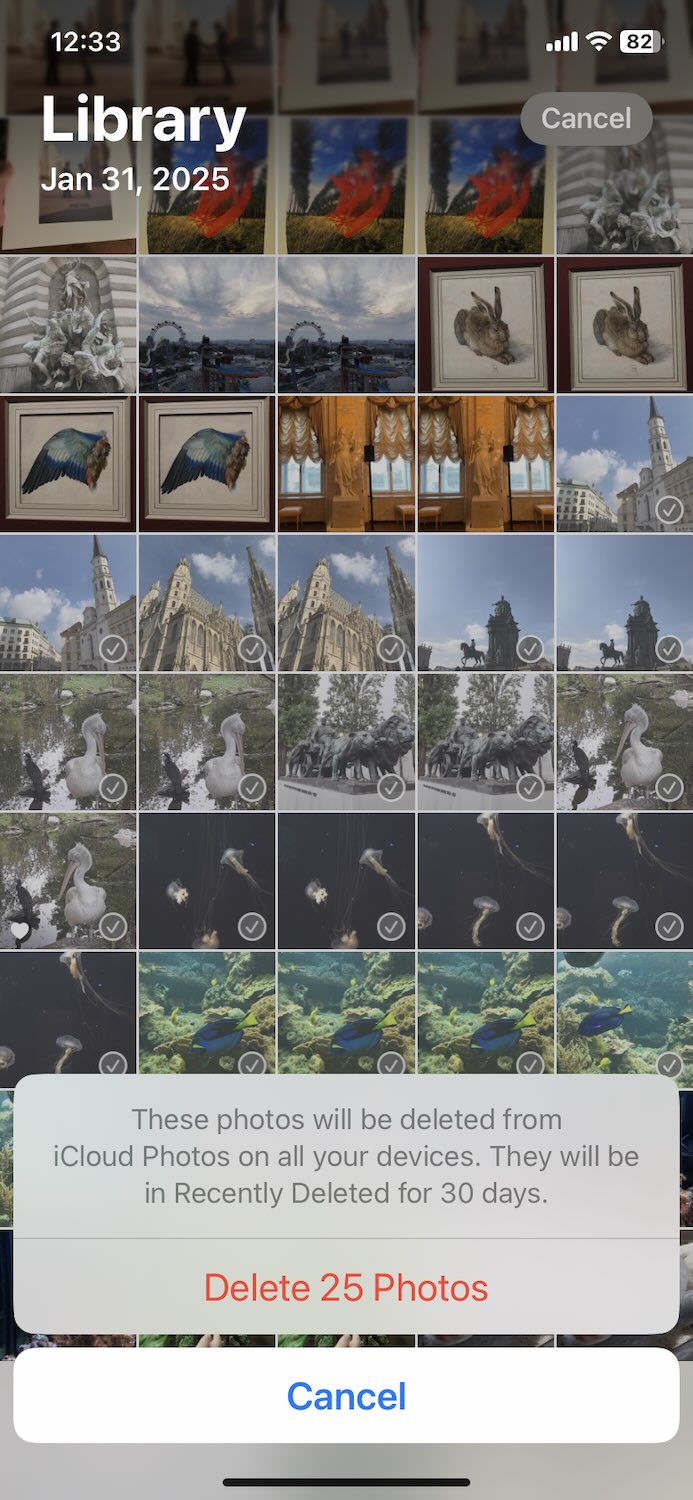
- Tap the trash bin icon and confirm deletion.
If you want to select every single image in your library, it’s not as straightforward as you might expect. Apple does not provide a “Select All” button in the main Photos library, but you can read this guide on a workaround to select all photos on an iPhone.
And don’t forget about the Duplicates album. Yeah, it’s very limited compared to the previous option, but if you decided to go for manual deletion, this can at least remove all exact copies. To use it:
- Open Photos > Utilities > Duplicates.
- Review the identical photos grouped together.
- Tap Merge—this keeps the highest-quality version and deletes the rest.

It won’t detect similar images the way an AI-powered app would, but it’s still a quick win for freeing up space without spending too much time sorting through duplicates yourself.
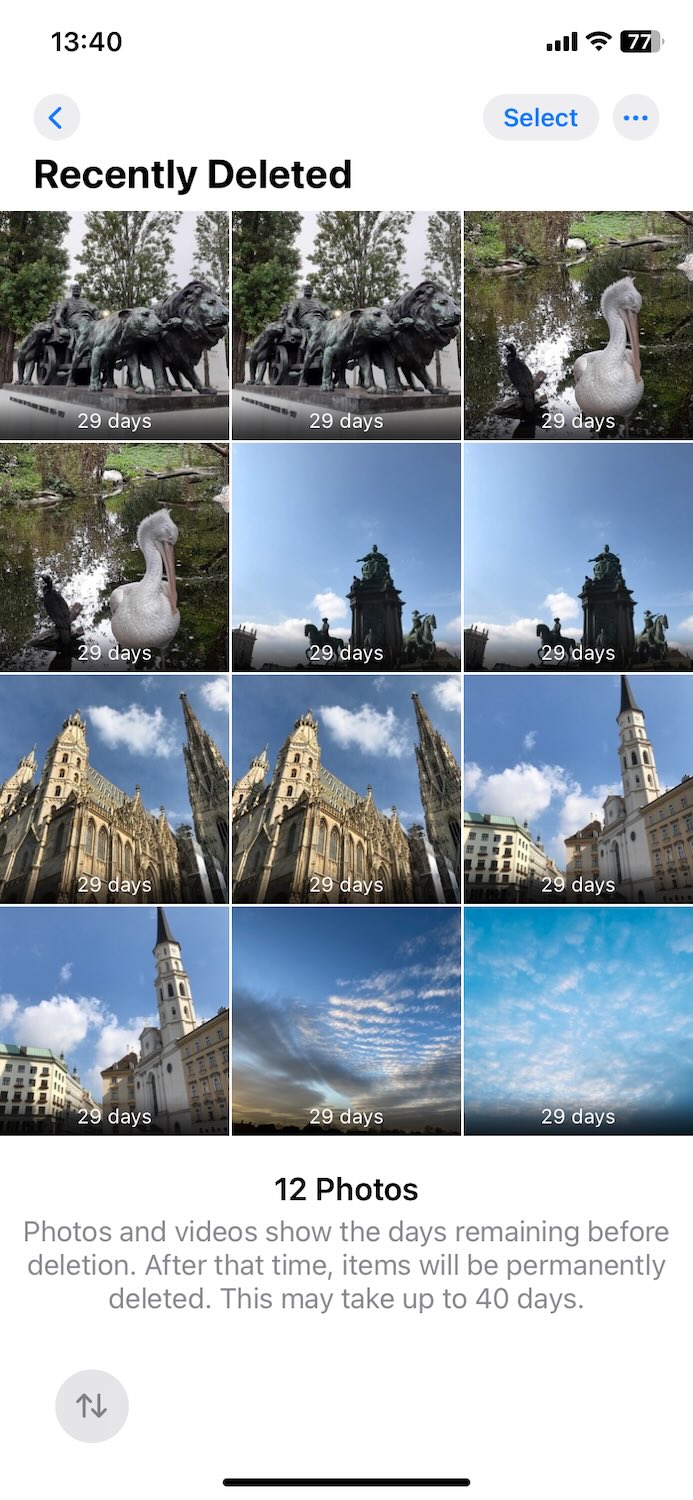
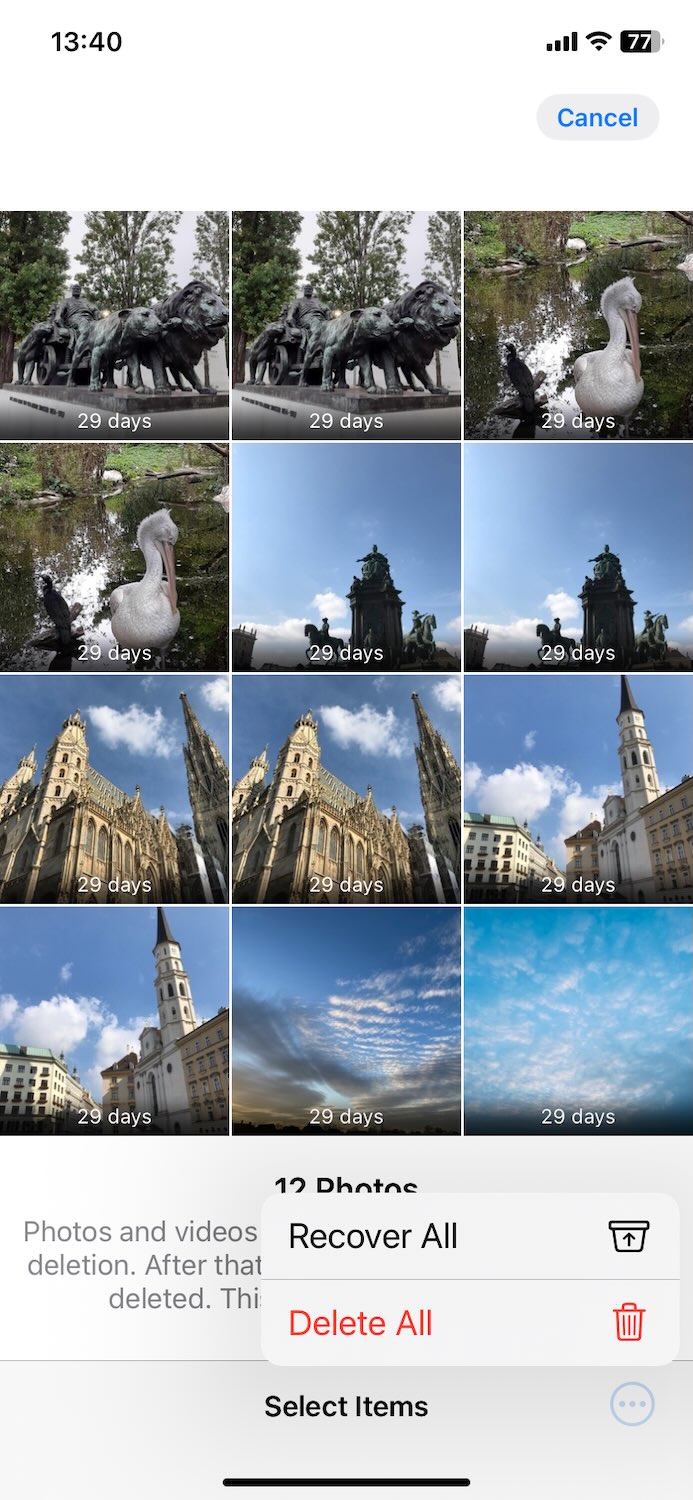
Step #3: Empty the “Recently Deleted” Folder
No matter which option you went with, your deleted photos are not truly gone yet. When you remove images from your library, they move to the Recently Deleted folder, where they stay for 30 days before being permanently erased. Until then, they still take up storage space.
If you want to free up space immediately, you need to manually empty the Recently Deleted folder:
- Open the Photos app.
- Scroll down and tap Recently Deleted (under “Utilities”).
- Tap Select in the top-right corner.
- Choose Delete All, then confirm.
Important. Once you do this, the photos are gone for good. If you think you might want to restore anything, you can still review the folder before deletion and Restore the photos you still need.
Now, your deleted photos are truly gone, and your iPhone storage will finally reflect the freed-up space.
If you re-enable iCloud Photos in the future, your iPhone will resync with iCloud and restore all photos still stored in iCloud back to your device. If you want to be selective about what gets synced to your phone, Apple does not offer a built-in way to sync only certain photos and leave others out of iCloud. You either sync your entire library or none of it. However, you can try some alternatives to access selected photos without syncing everything:
- Use Shared albums. If you want to keep iCloud Photos off but still have easy access to certain pictures, Shared Albums can help. First, turn off iCloud Photos on your iPhone, then, go to iCloud.com or another Apple device where your photos are still available. Move only the images you actually want on your iPhone into a Shared Album. When you enable Shared Albums (without turning iCloud Photos back on), you can view and download just those photos and keep everything else off your device.
- Turn to another cloud service. If iCloud Photos feels too restrictive, switching to a different cloud service like Google Photos or Dropbox can give you more flexibility. Turn off iCloud Photos so it no longer syncs anything to your iPhone. Then, use a third-party app to upload only the photos you want stored in the cloud.
- Keep iCloud Photos off and manually download. For the ultimate control, keep iCloud Photos off entirely and only download pictures when you need them. You can go to iCloud.com from any web browser, find a specific photo, and save it to your iPhone. It’s not automatic, but it’s simple and keeps everything exactly where you want it.
How to Delete All Synced Photos From iPhone and Other Synced Devices
If you want to delete all synced photos from your iPhone and every other connected device, you need to make sure that iCloud Photos is enabled so the changes sync across all devices. Unlike in Step 1, where turning off iCloud Photos was necessary to delete photos only from your iPhone, in this case, you need to keep iCloud Photos turned on so that the deletion applies to your entire iCloud library.
For the deletion to be final and fully synchronized, make sure everything is set up correctly:
- Your iPhone, iPad, Mac, and any other Apple devices must be connected to the internet since iCloud Photos won’t update without an active connection.
- Also, check that Low Power Mode is turned off because when it’s enabled, iCloud may pause syncing to save battery.
- Finally, check if all devices are signed into the same Apple ID—if even one device is using a different account, it won’t reflect the changes.
To check and enable iCloud Photos:
- Open Settings on your iPhone.
- Tap [Your Name] > iCloud > Photos.
- Check if iCloud Photos is toggled on. If it’s off, enable Sync this iPhone.
Now, delete the photos from your iPhone using the instructions from Step 2: Delete Synced Photos. Since iCloud Photos is active, your deletion will apply to iCloud and all connected devices.
Once the photos are deleted from all devices and iCloud.com, they are gone permanently unless you restore them from the Recently Deleted folder within 30 days. If you want an immediate and irreversible deletion, follow Step 3 to empty the Recently Deleted folder.
How to Delete Synced Media in iCloud (but Keep on iPhone)
If you want to clear out iCloud Photos but keep all your pictures on your iPhone, this is basically the reverse of the first scenario. However, the key step remains the same—you need to turn off iCloud Photos first, so your phone stops syncing deletions. If you skip this step and delete photos from iCloud while syncing is still active, they’ll disappear from your iPhone too.
To prevent that, follow the instructions from Step 1: Turn Off iCloud Photos, but this time, make sure to select Download Photos & Videos when prompted. This will safely copy all photos stored in iCloud to your iPhone before you proceed.
Once iCloud Photos is off, you’re free to delete photos from iCloud without affecting your iPhone:
- Open a web browser on any device and go to iCloud.com.
- Sign in with your Apple ID.
- Click on Photos.
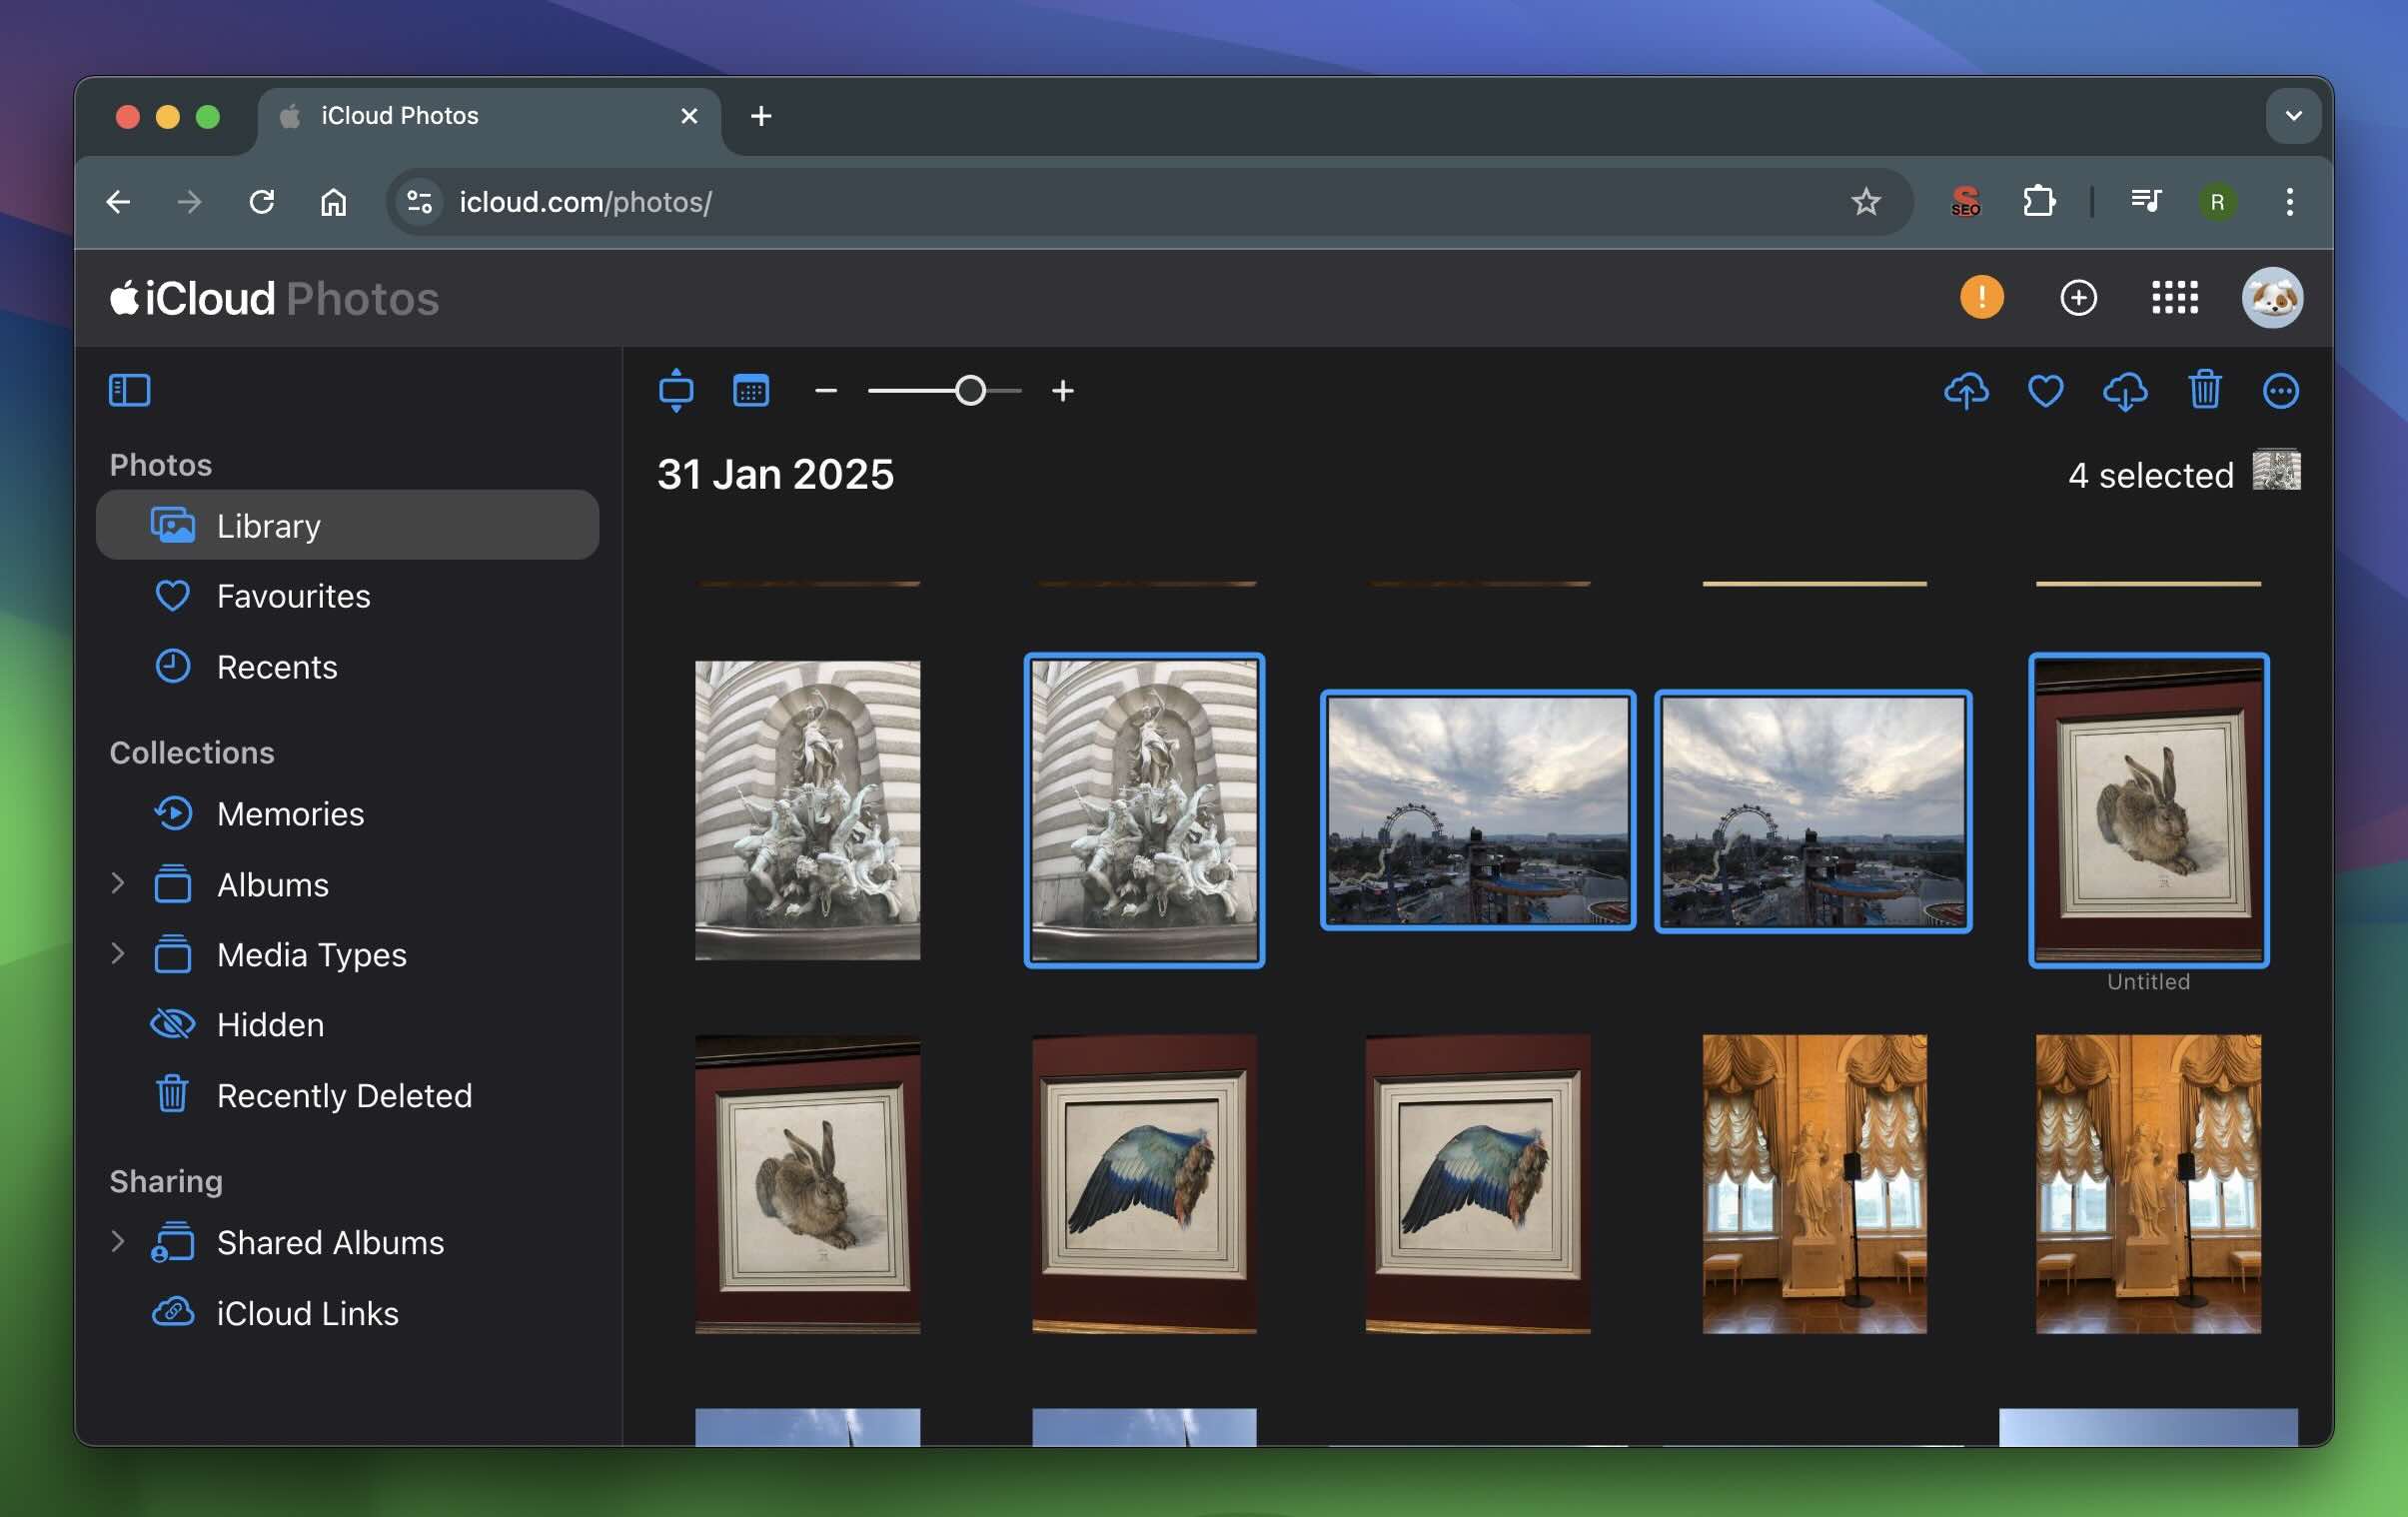
- Select the photos you want to delete.
- Click the trash bin icon, then confirm deletion.

Since iCloud Photos is now disabled on your iPhone, these deletions won’t sync to your device, and your local copies will remain untouched.
If you change your mind, deleted photos remain in Recently Deleted for 30 days, so you can still recover them. But if you’re sure you no longer need them, you can permanently delete them from the Recently Deleted folder to free up iCloud storage right away.
To confirm everything worked as expected, open the Photos app on your iPhone and make sure your pictures are still there. If you did everything correctly, iCloud will be wiped clean, but your iPhone will still have all its photos.
If you’re moving away from iCloud Photos, consider using Google Photos or Dropbox to back up your images instead. You can also use Shared Albums for selective syncing without storing everything in iCloud. This way, you free up iCloud and keep control over your photos.
How to Remove Synced Photos From iPhone That Were Transferred From Mac/PC
Some people try to delete photos from their iPhone only to find out they can’t—the trash icon is grayed out, and there’s no way to remove them from the Photos app. This happens when photos are transferred from a Mac or PC rather than downloaded from iCloud or taken with the iPhone’s camera.
Plenty of iPhone users have run into this problem. Like this Reddit user who transferred photos from their Android to PC, then from PC to iPhone, only to realize that those photos couldn’t be deleted directly from the iPhone. If you’re in the same boat, the issue here is that these synced photos are managed from your computer, not your iPhone, so you’ll need to use a computer to remove them.
To delete synced photos, you need to sync your iPhone with a different (empty) folder to overwrite the existing synced media. Here’s how:
- Connect your iPhone to your Mac or PC using a USB cable.
- If you’re using a Mac, open Finder. If you’re on Windows, open iTunes.
- Select your iPhone from the sidebar.
- On your Mac or PC, create a new empty folder anywhere—it doesn’t matter where, as long as it contains no photos.
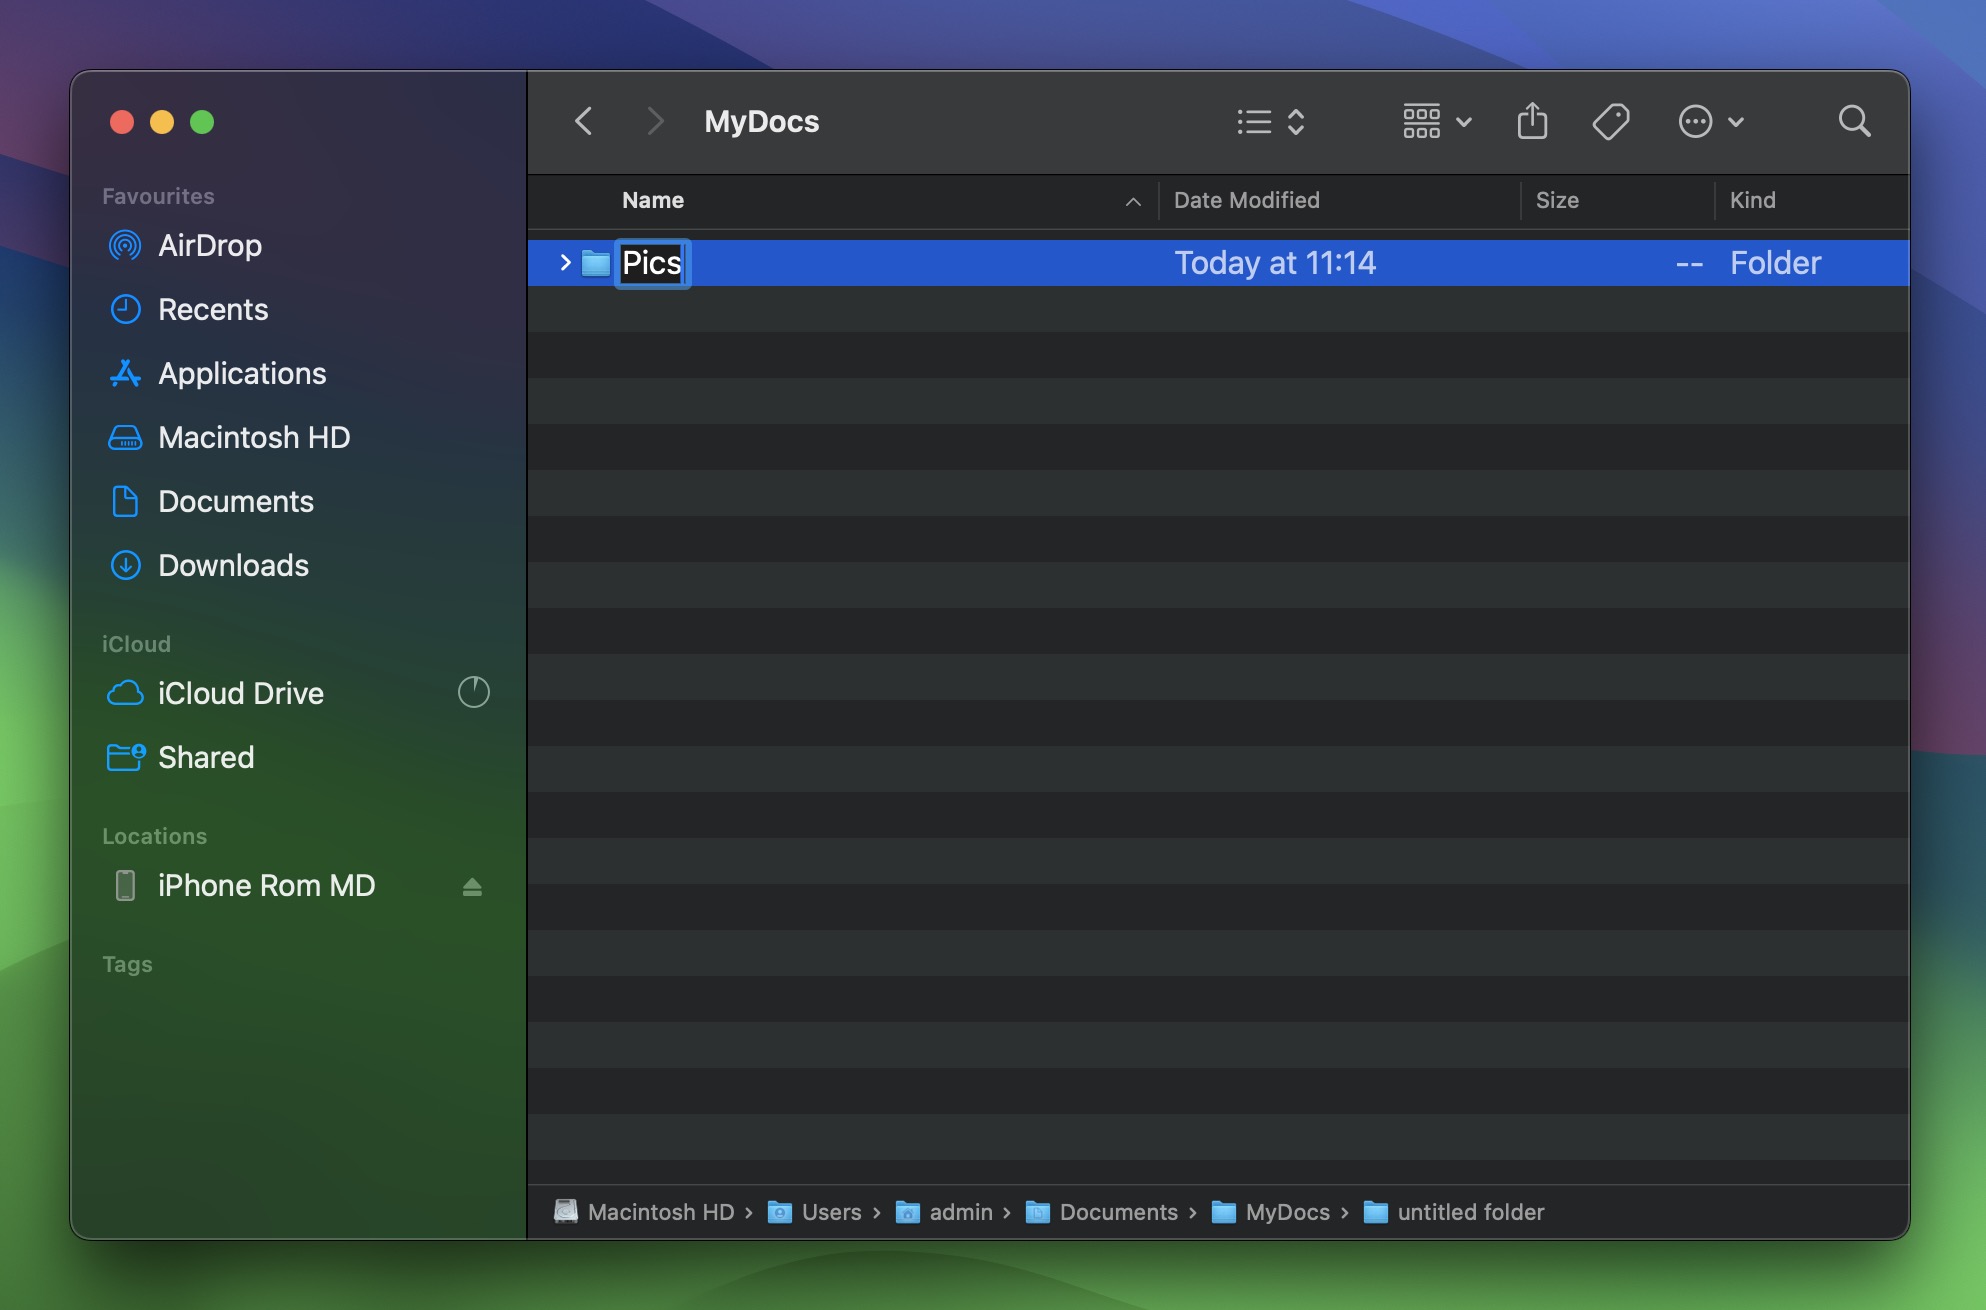
- In Finder (Mac) or iTunes (PC), go to the Photos tab under your iPhone settings.
- Select Sync Photos and choose the empty folder you just created.

- Click Apply or Sync.
Once the sync process is complete, iOS will replace the existing synced photos with the empty folder, which will essentially delete all synced photos from your iPhone that were transferred from your Mac or PC.
Final Storage Tips
If your main goal with all this was to clean up storage and reclaim free space on your iPhone, know that while Photos usually take up the most storage, they are not the only place to look. Your device holds plenty of other data that may be wasting space.
We have many guides that can show you other ways to free up storage, and while we won’t go into much detail here, we’ll list them below. We suggest starting with the first one, which covers Documents & Data—the files and caches that apps generate over time. After photos, this is the biggest hidden storage hog on most iPhones.
Other ways to free up storage on your iPhone:
- Your apps are hoarding hidden junk – Learn how to clear Documents & Data and get rid of all those cached files, logs, and other clutter.
- Downloads you forgot about? – See how to delete downloads and clear out unnecessary files lurking in your storage.
- Temporary files aren’t so temporary – Find out how to clear temporary files and remove leftover system junk.
- “System” storage taking up too much space? – Check how to clear system storage and take back control of your iPhone’s space.
FAQ
Is it possible to remove photos from the iPhone after syncing?
Yes, but you need to be careful how you do it to avoid accidentally deleting them from iCloud as well. If iCloud Photos is enabled, any photo you remove from your iPhone will also be erased from iCloud and all other synced devices.
So, first disable iCloud Photos if you don’t want your deletions to sync across all devices. Once iCloud Photos is off, you have two ways:
- Delete them manually – Open the Photos app, select the images you want to remove, and move them to the trash.
- Use a third-party cleaner – Apps that can automatically scan and delete duplicates, similar photos, blurry shots, screenshots, and large files.
Once the photos are gone, check the Recently Deleted folder and clear it to free up storage immediately.
How to delete synced photos from an iPhone without using iTunes?
You can simply delete synched photos without using iTunes by manually deleting them yourself in Photos. However, it will take a bit of effort, and there are some photos that you might miss. To easily delete synced photos, you can use a third-party software tool. It can delete, manage, transfer, and back up iPhone photos and data without iTunes.
Does deleting synced photos from an iPhone also remove it from iCloud?
All synced photos that are deleted while your iCloud is active will also be deleted from iCloud. However, if you decide to turn off iCloud for a while and delete the synced photos, the images will stay on iCloud. But you must take note that those photos will be restored to your device once you turn iCloud back on.
How to delete photos in an iPhone from a PC?
If your iPhone is synced with iCloud and iCloud Photos is enabled, you can delete photos from any device, including a PC, and the changes will sync across all connected devices. Here’s how:
- Open a web browser on your PC and go to iCloud.com.
- Sign in with your Apple ID.
- Click on Photos.
- Select the photos you want to delete.
- Click the trash bin icon, then confirm deletion.
- Since iCloud Photos is enabled, these deletions will sync automatically, removing the photos from your iPhone and all other devices connected to the same iCloud account.
This article was written by Mako Young, a Contributing Writer at Handy Recovery Advisor. It was recently updated by Roman Demian.
Curious about our content creation process? Take a look at our Editor Guidelines.