It can seem like a bad joke when you connect your external hard drive to your computer and it doesn’t show up in File Explorer despite Windows detecting it just find (you can see it in the Device Management tool, for example). But it’s not a joke. Instead, it’s a common Windows problem with several possible solutions, all of which I describe in this article.
Don’t Waste Your Time
Before I get any further, I want to warn you about some commonly suggested fixes that won’t solve your problem so that you don’t waste your time on them (it’s okay—I know you have multiple tabs opened with different articles—we’ve all been there when troubleshooting):
- Updating drivers: While keeping your system up-to-date is generally good practice, this issue isn’t about drivers. Windows uses standard drivers for external hard drives, and the likelihood of them suddenly not working correctly and causing your external hard drive to be recognized but not accessible.
- Running CHKDSK: Microsoft’s CHKDSK is a useful tool, but its purpose is to verify the file system integrity of a volume and to fix logical file system errors of drive that are visible in File Explorer. If your external hard drive isn’t showing up in File Explorer, then you won’t be able to use CHKDSK because the tool requires a drive letter as an argument. What’s more, CHKDSK doesn’t work with RAW disks because such disks also don’t have a drive letter associated with them.
- Changing permissions: Again, it’s impossible to change permissions on a drive that isn’t visible in File Explorer. What’s more, your external hard drive may use a file system that doesn’t even support standard Windows permissions, such as FAT.
Now that you know which solutions won’t help you, let’s move on to solutions that can actually get your external hard drive to show its face in File Explorer.
How to Fix an External Hard Drive That’s Not Displayed in File Explorer AT ALL
Unless you’ve done so already, please restart your computer and open File Explorer. Still can’t see your external hard drive? If not, then I’ve compiled the main methods to fix it and arranged them in the order you should try them. Let’s get started on bringing your external hard drive that’s detected but not showing up back to life.
Start by Performing a S.M.A.R.T. Check
Many external hard drives support the S.M.A.R.T. (Self-Monitoring, Analysis, and Reporting Technology) monitoring technology, which can predict drive failures and give you other valuable insight into your drive’s health. I always perform a S.M.A.R.T. check when fixing a hard drive issue just to see what I’m working with, and I recommend you do the same:
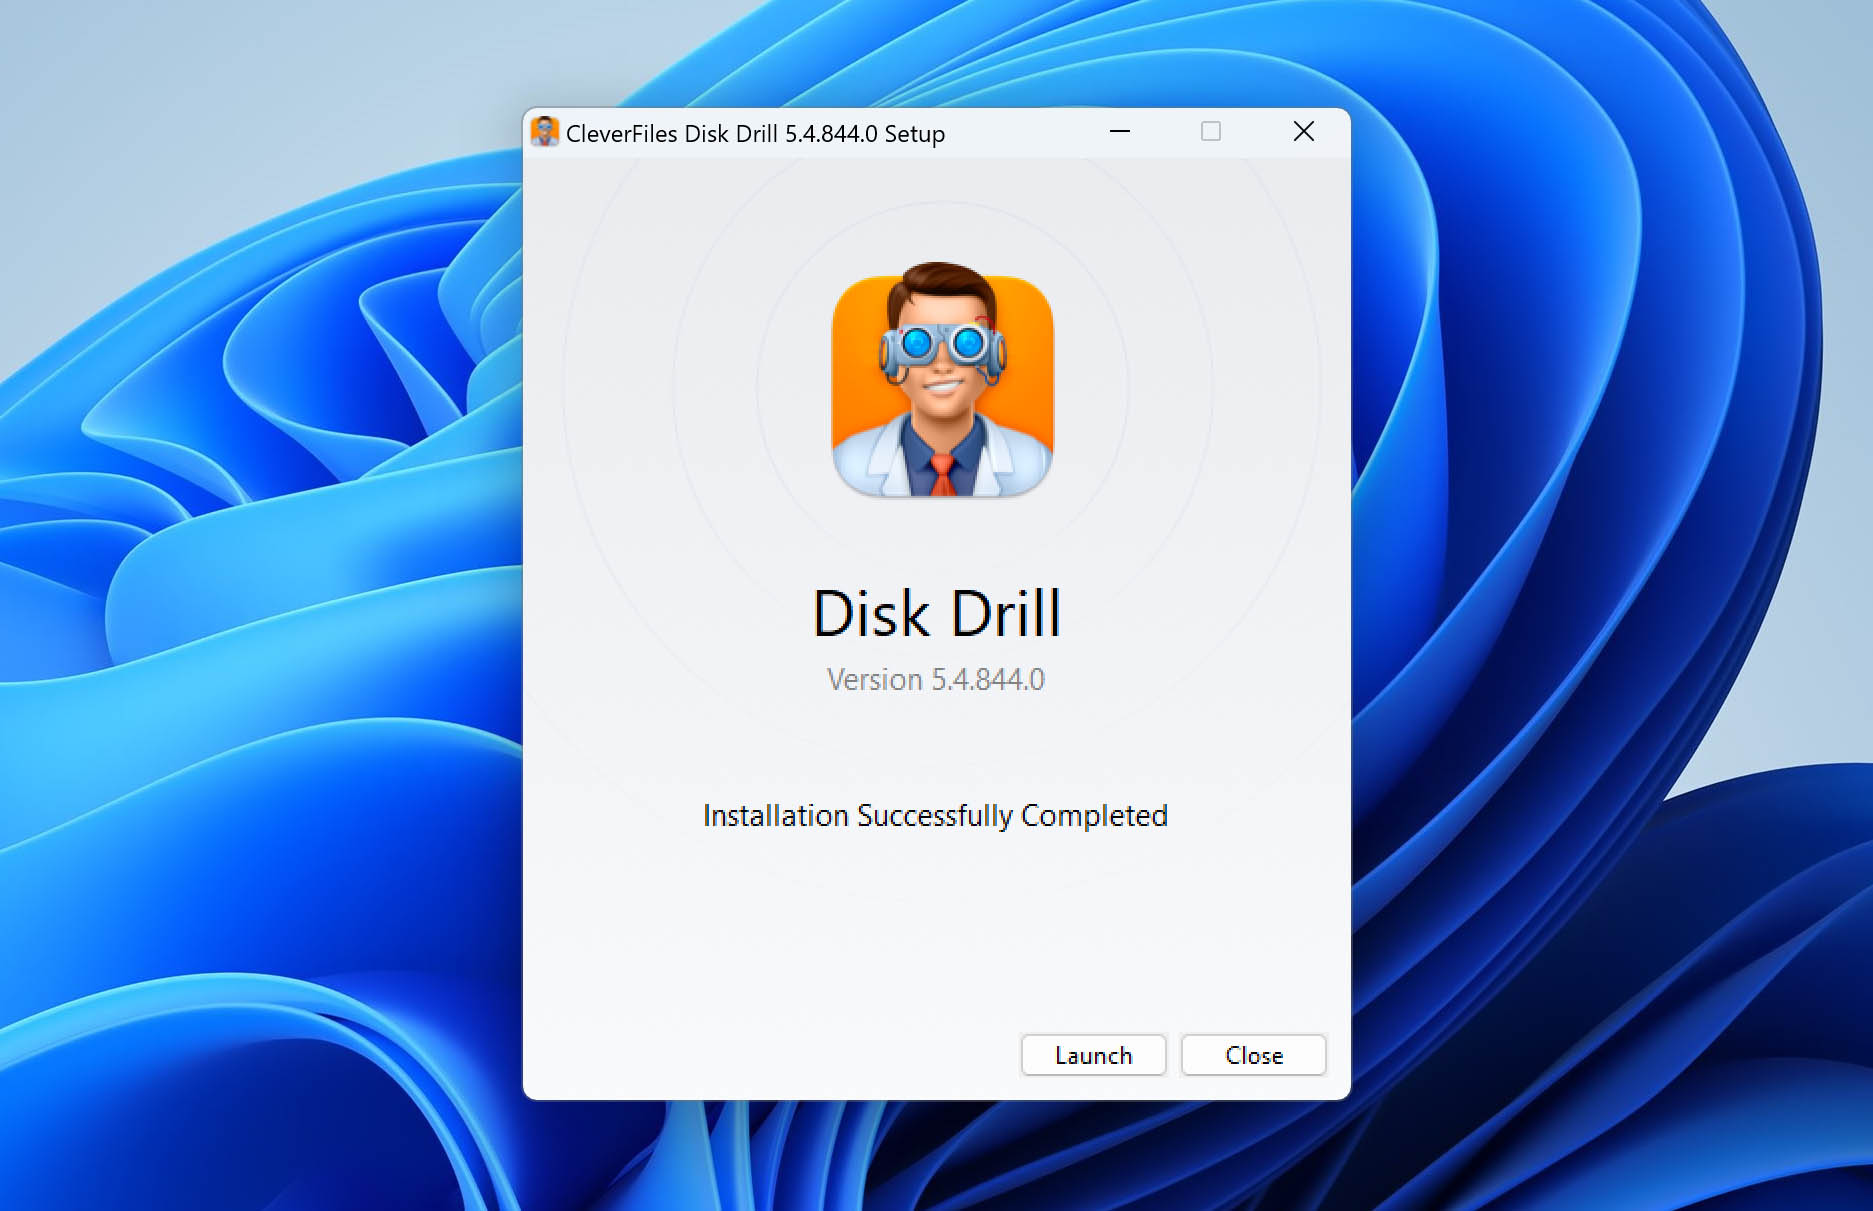
- Download a S.M.A.R.T. monitoring tool. Disk Drill for Windows is a great choice because you can also use it to recover data from any storage device or create complete byte-to-byte backup.
- Select your external hard drive and read its S.M.A.R.T. using the tool of your choice. I’m using Disk Drill in this example.
- Look for any abnormal values indicating potential drive issues. Pay special attention to attributes like the Reallocated Sectors Count, Current Pending Sector Count, Uncorrectable Sector Count, Spin Retry Count, or Temperature.
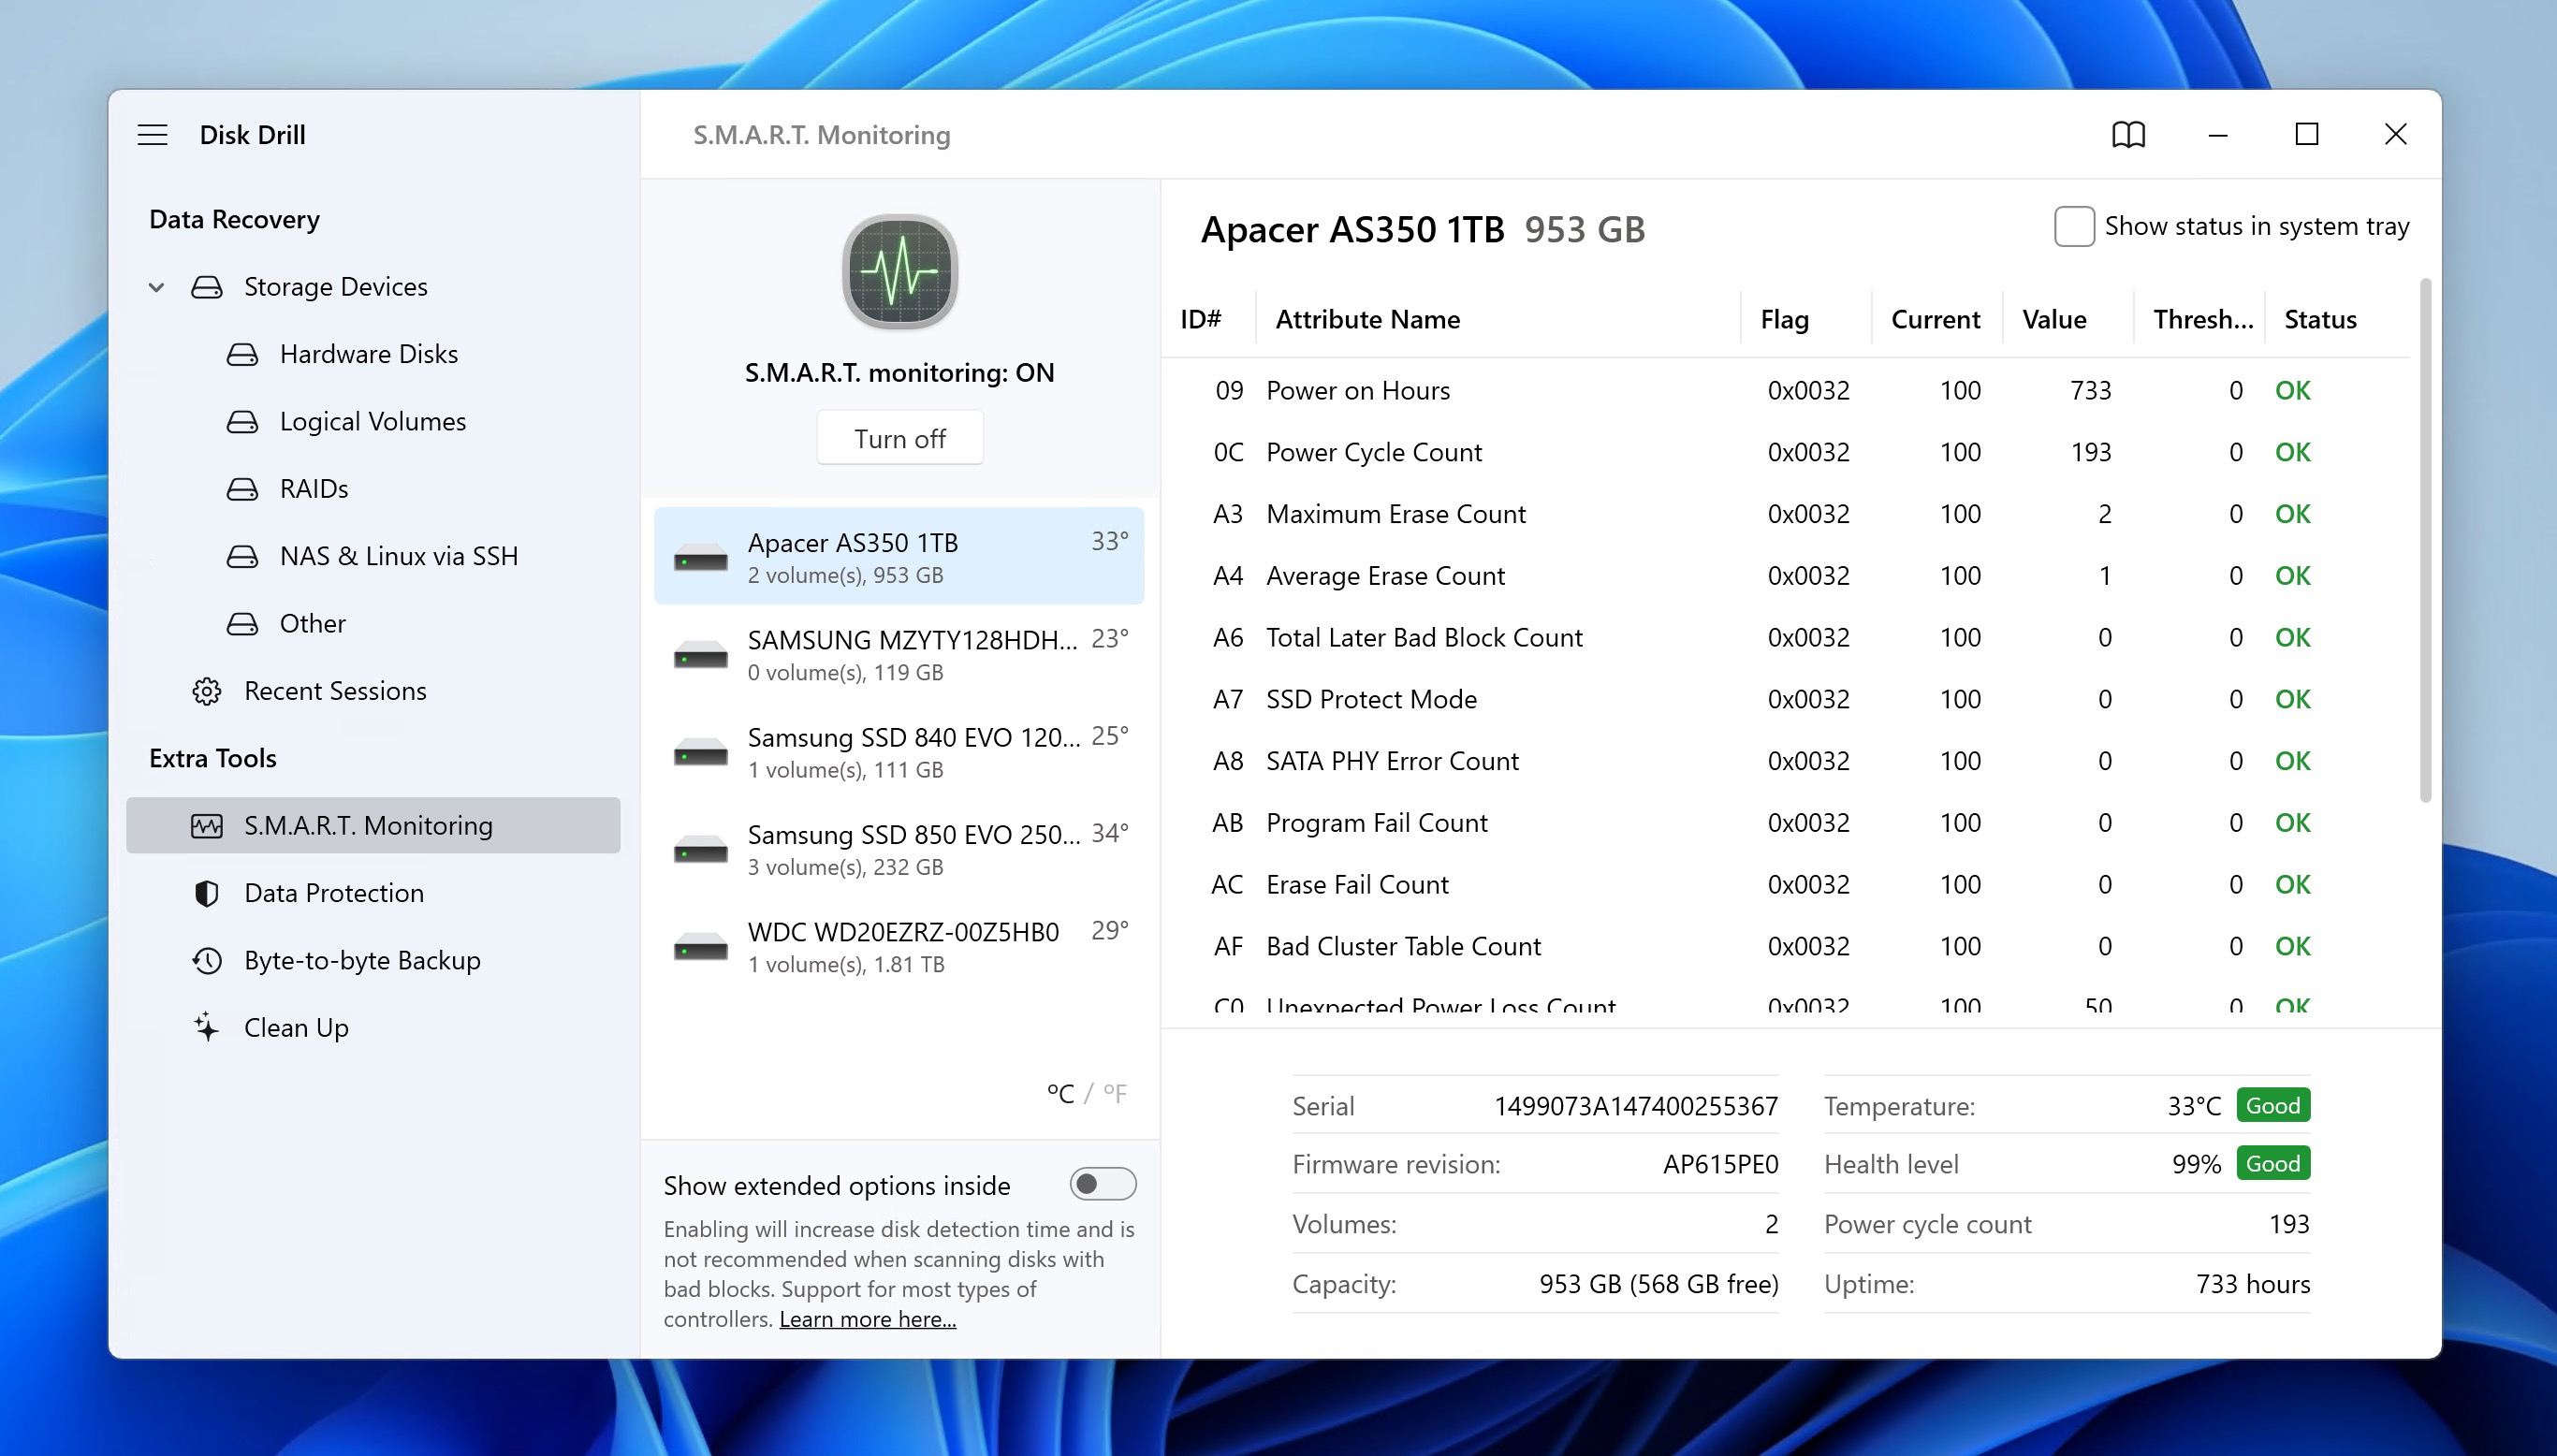
If you see high values in these attributes or any “Fail” status, your drive might be failing. In this case, stop all operations and focus on data recovery immediately. Specifically, skip to the last section of this article, where I provide detailed step-by-step instructions on how to recover important data from your external hard drive using Disk Drill.
Solution 1: Initialize the External Hard Drive
When to use this solution: If you’ve just purchased your external hard drive, then there’s a good chance that it has yet to be initialized (there’s no partition table on it). Additionally, a previously working disk can become uninitialized if its partition table (MBR or GPT) becomes corrupted. You can confirm this using the Disk Management tool as described in the following implementation instructions. In such cases, you should recover your files using data recovery software like Disk Drill, which can work with uninitialized disks.
How to implement the solution: You can initialize your external hard drive in Windows (= create a partition table on it) using the Disk Management tool. Here’s how it works:
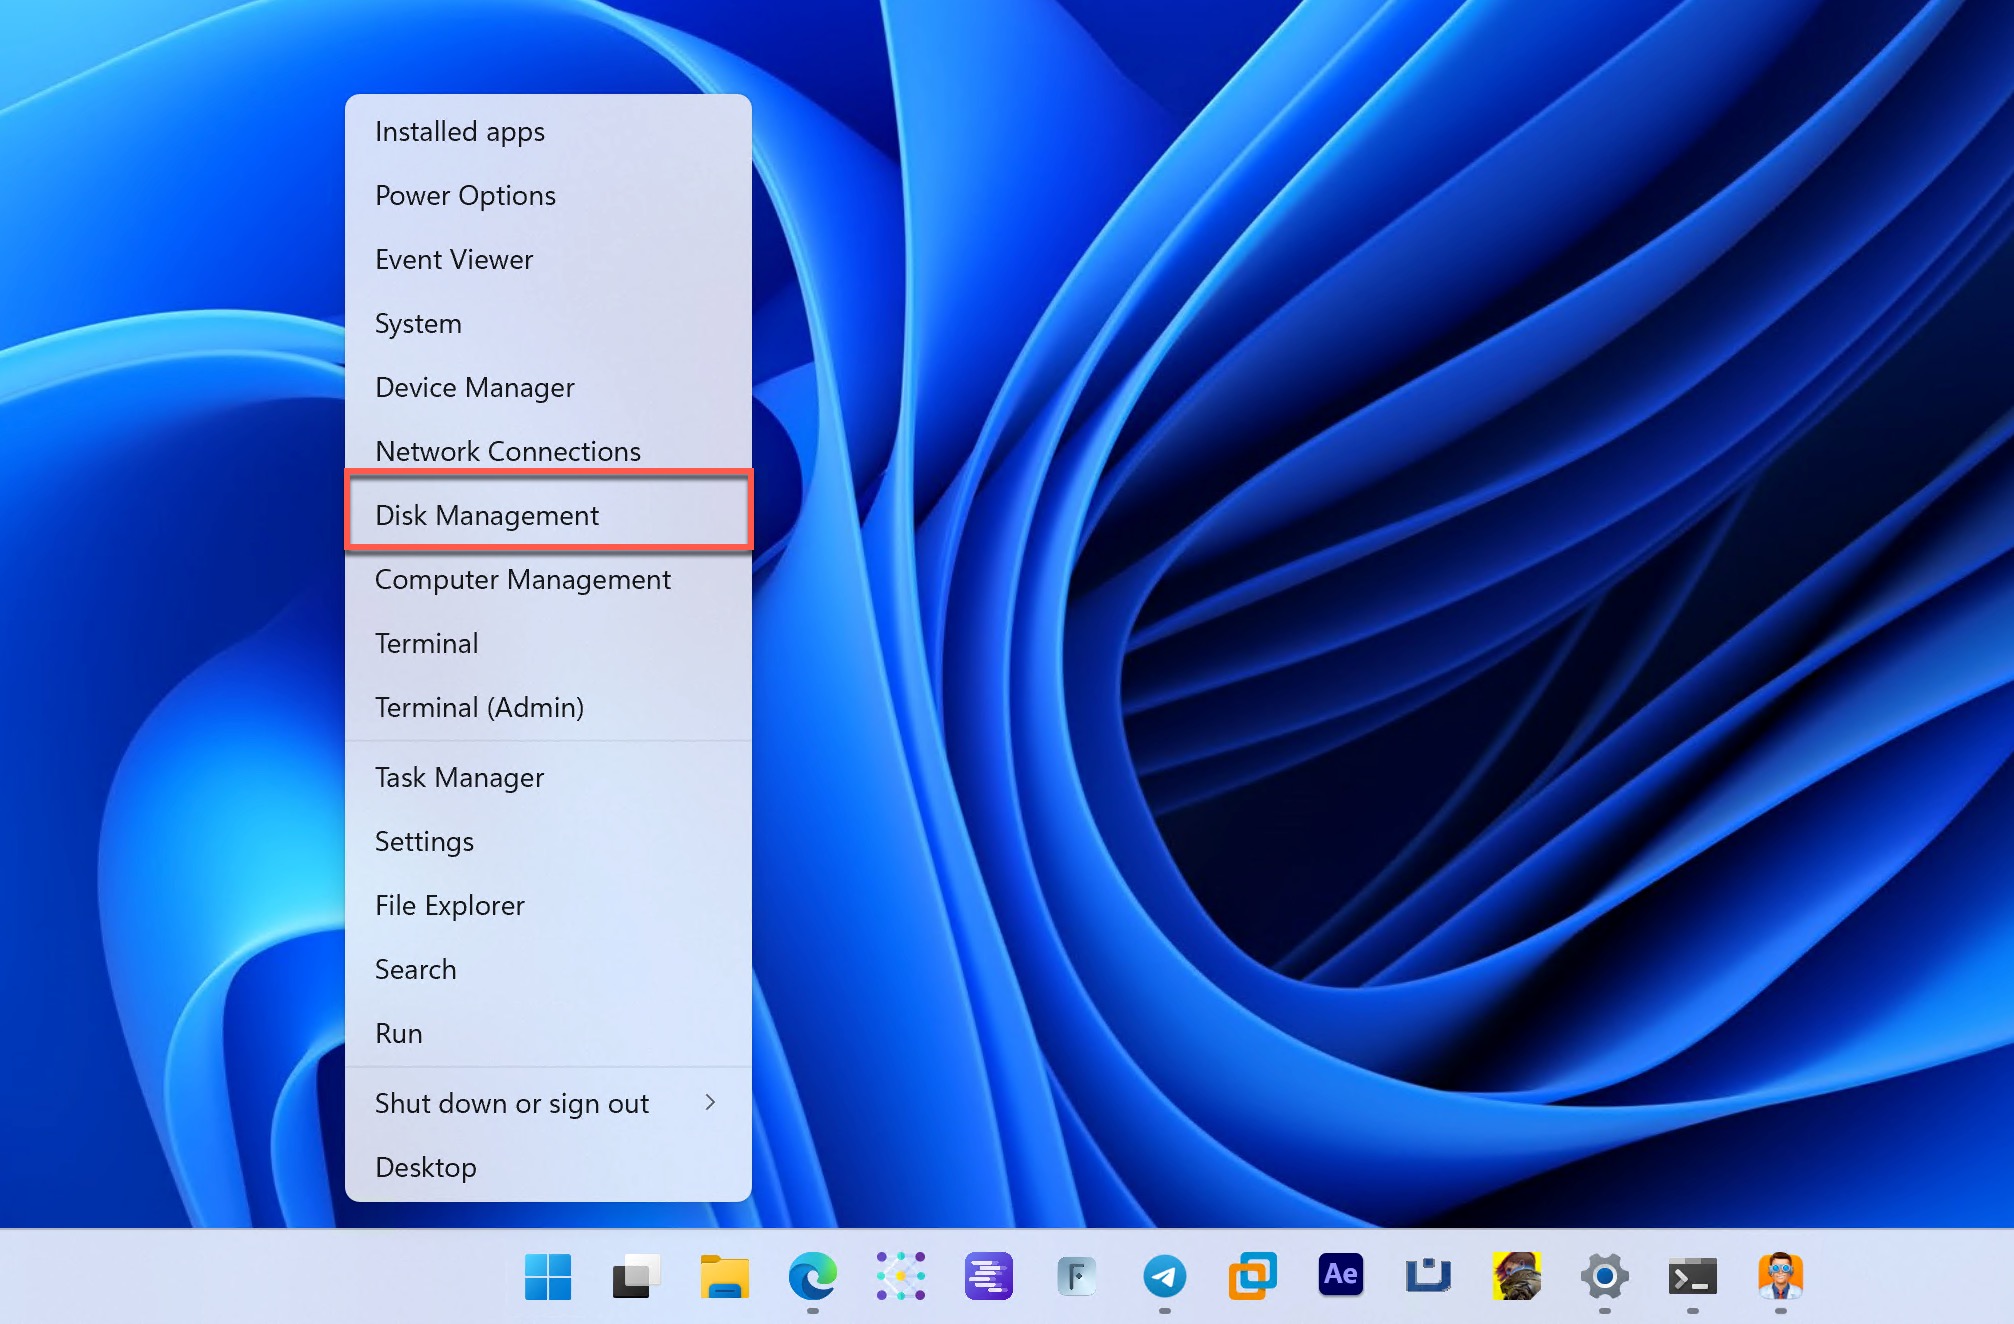
- Right-click the Start button and select the Disk Management option.
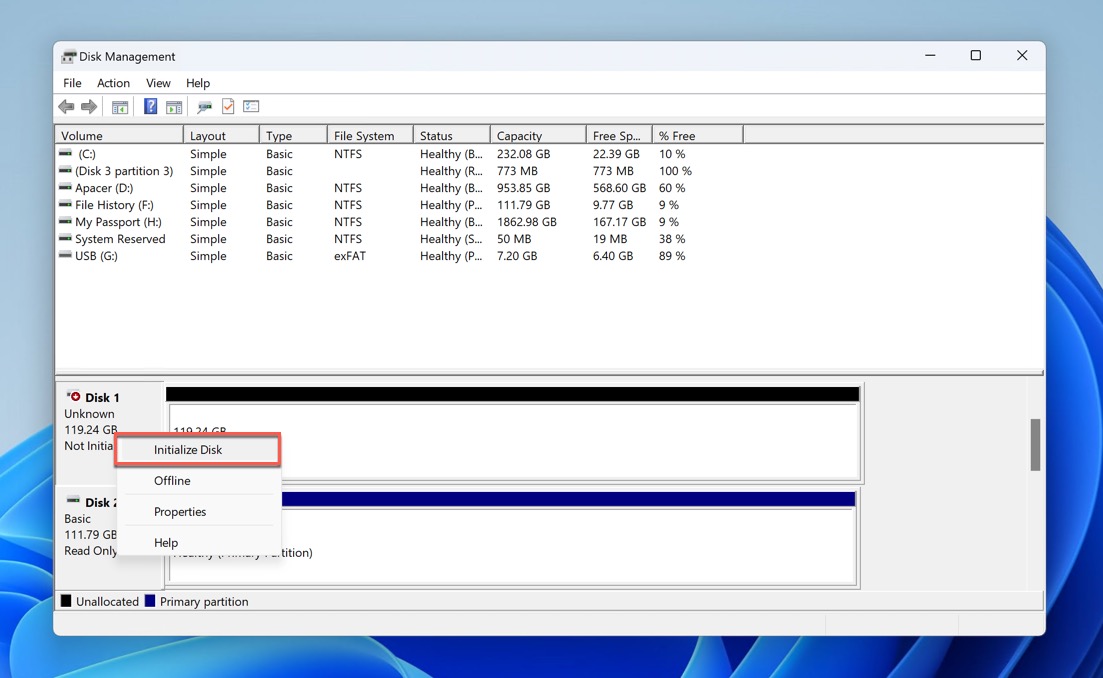
- Look at the graphical list of connected storage devices in the bottom half of the Disk Management tool. Do you see a drive whose size matches the size of your external hard drive (keep in mind that there’s always some discrepancy between the advertised capacity of a storage device and its actual usable space) and its status is “Not Initialized”? If so, then you know for sure that you need to create a partition table to initialize it.

- Right-click on the drive and select the Initialize Disk option from the context menu.
- In the Initialize Disk dialog box, choose between MBR (Master Boot Record) or GPT (GUID Partition Table) partition style. For drives larger than 2TB, select GPT. For smaller drives or if you need compatibility with older systems, choose MBR.

- Click OK to proceed. The actual initialization shouldn’t take any time because the partition table is tiny.
Your external hard drive should now be initialized, but you won’t be able to see it in File Explorer yet because there’s no partition on. To create it, you need to implement the next solution.
Solution 2: Create or Format a Partition on Your External Hard Drive
When to use this solution: All storage devices need at least one partition with a file system supported by the operating system to be usable. If your external hard drive is initialized but still not showing up in File Explorer, it’s likely because it either lacks a partition or has a partition with an unsupported file system. In Disk Management, you’ll see unpartitioned space as “Unallocated.”
How to implement the solution: There are several ways to create and format partitions in Windows (the diskpart command-line tool, for example), but I personally use the Disk Management tool because it provides the best combination of feature and ease of use:
Formatting a partition will erase all data on that partition. Only continue with formatting if you’re sure you don’t need any data from the drive. If you do need some or all of the data, recover it using data recovery software like Disk Drill first and then return to these steps. If you would like to know more about partitioning, then you can learn more about it in this detailed guide on partitioning and data loss.
- Right-click the Start button and select the Disk Management option.
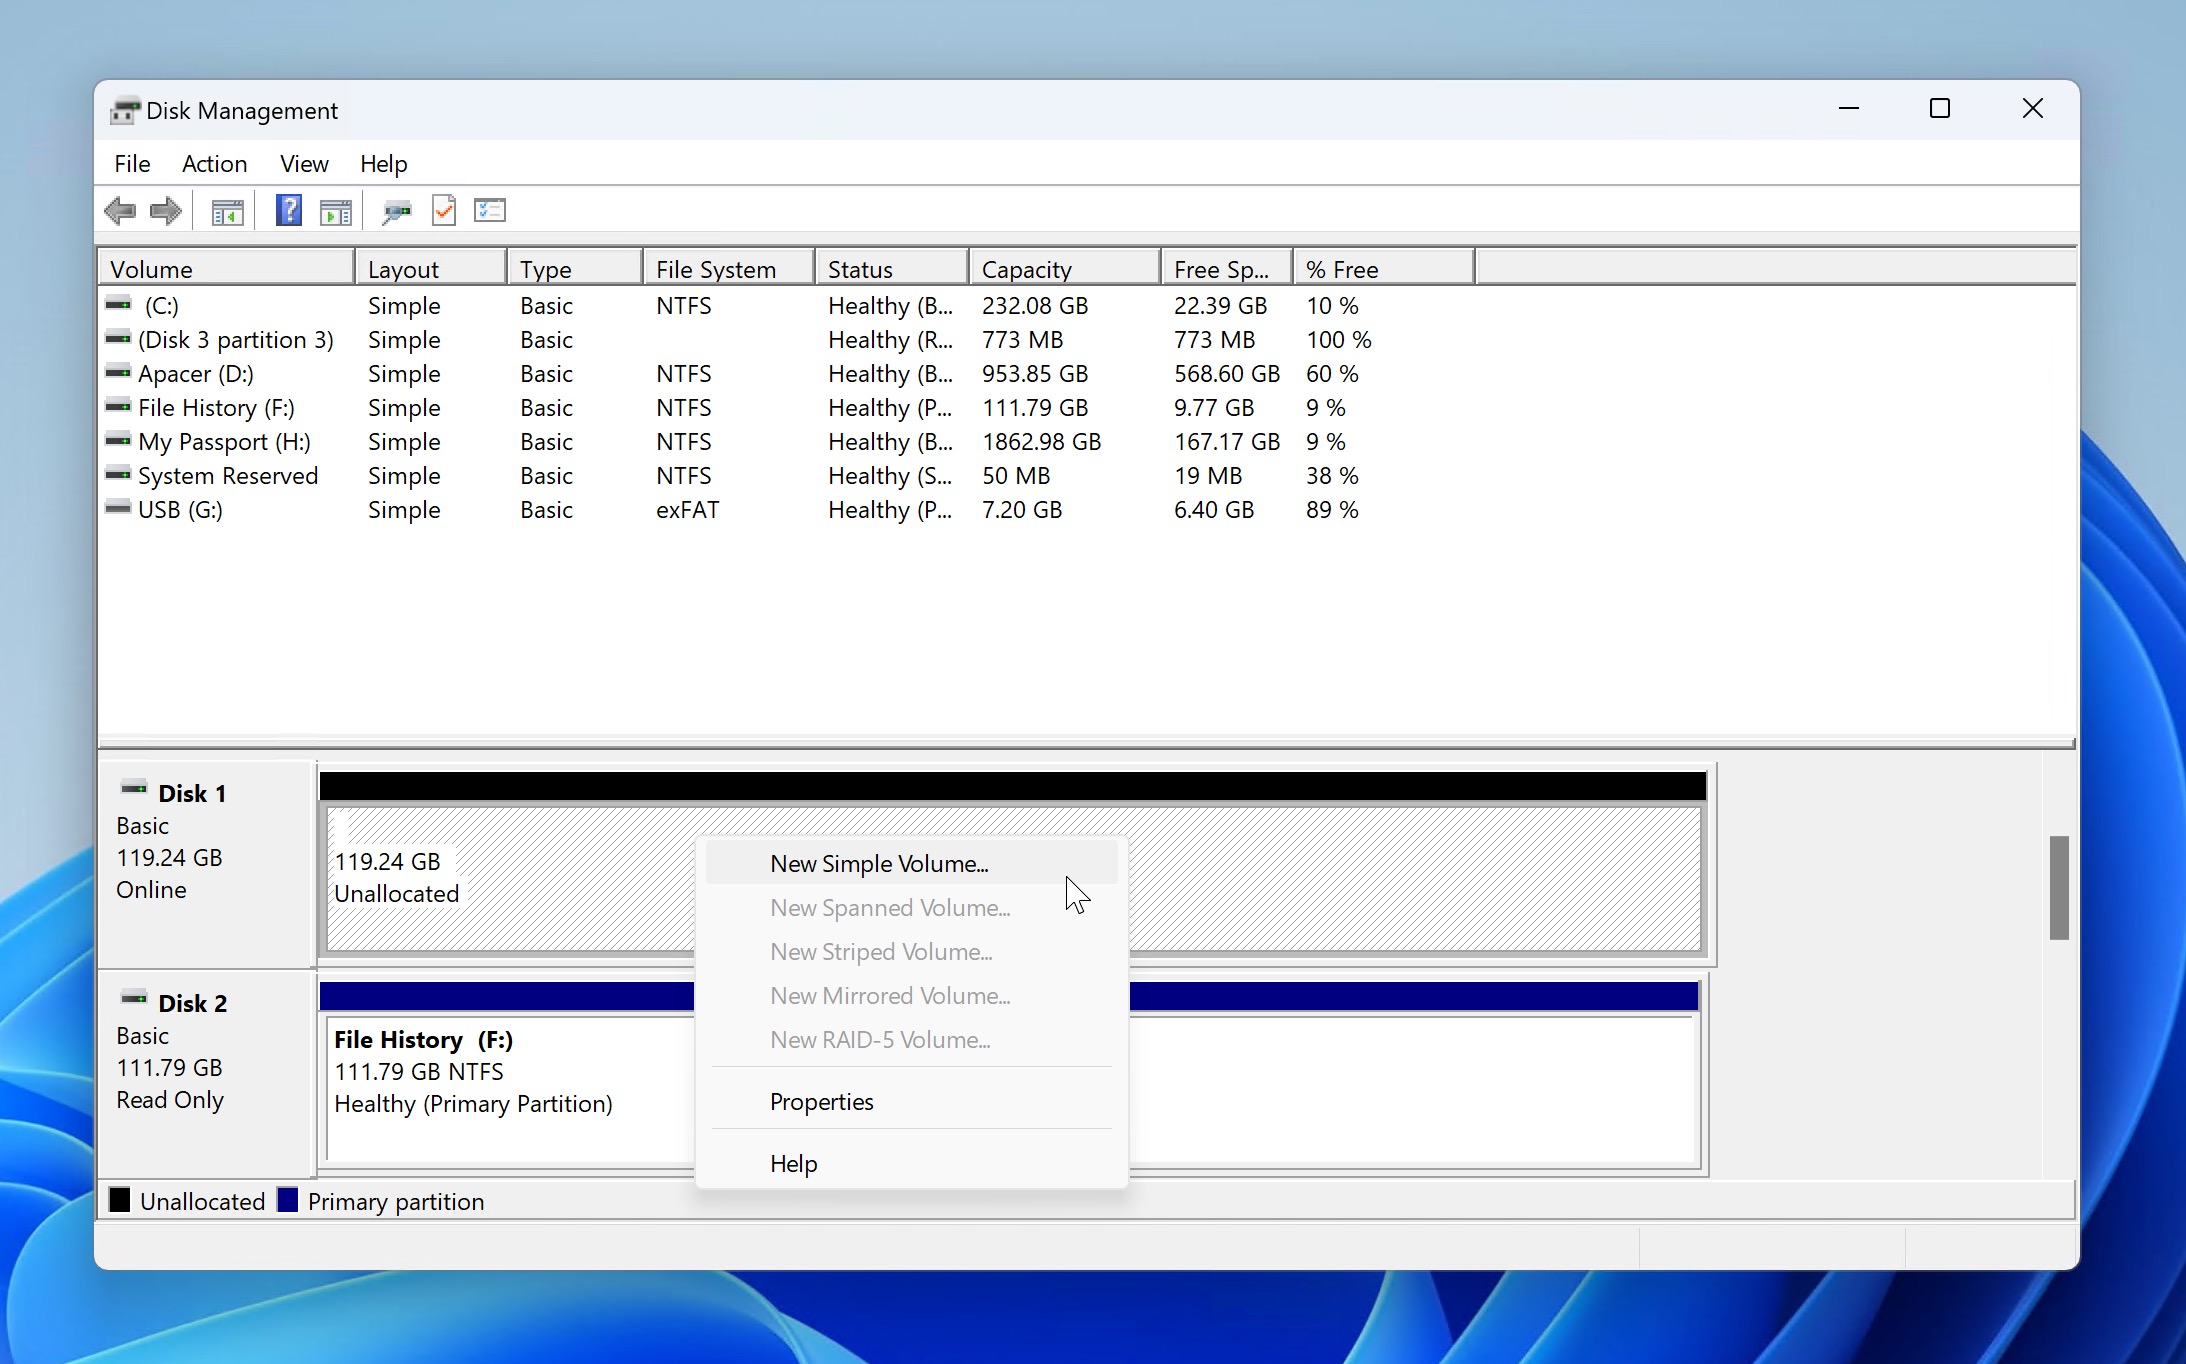
- Locate your external hard drive in the bottom half of the Disk Management tool and right-click on the unallocated space. Then, select the New Simple Volume option. Click Next.
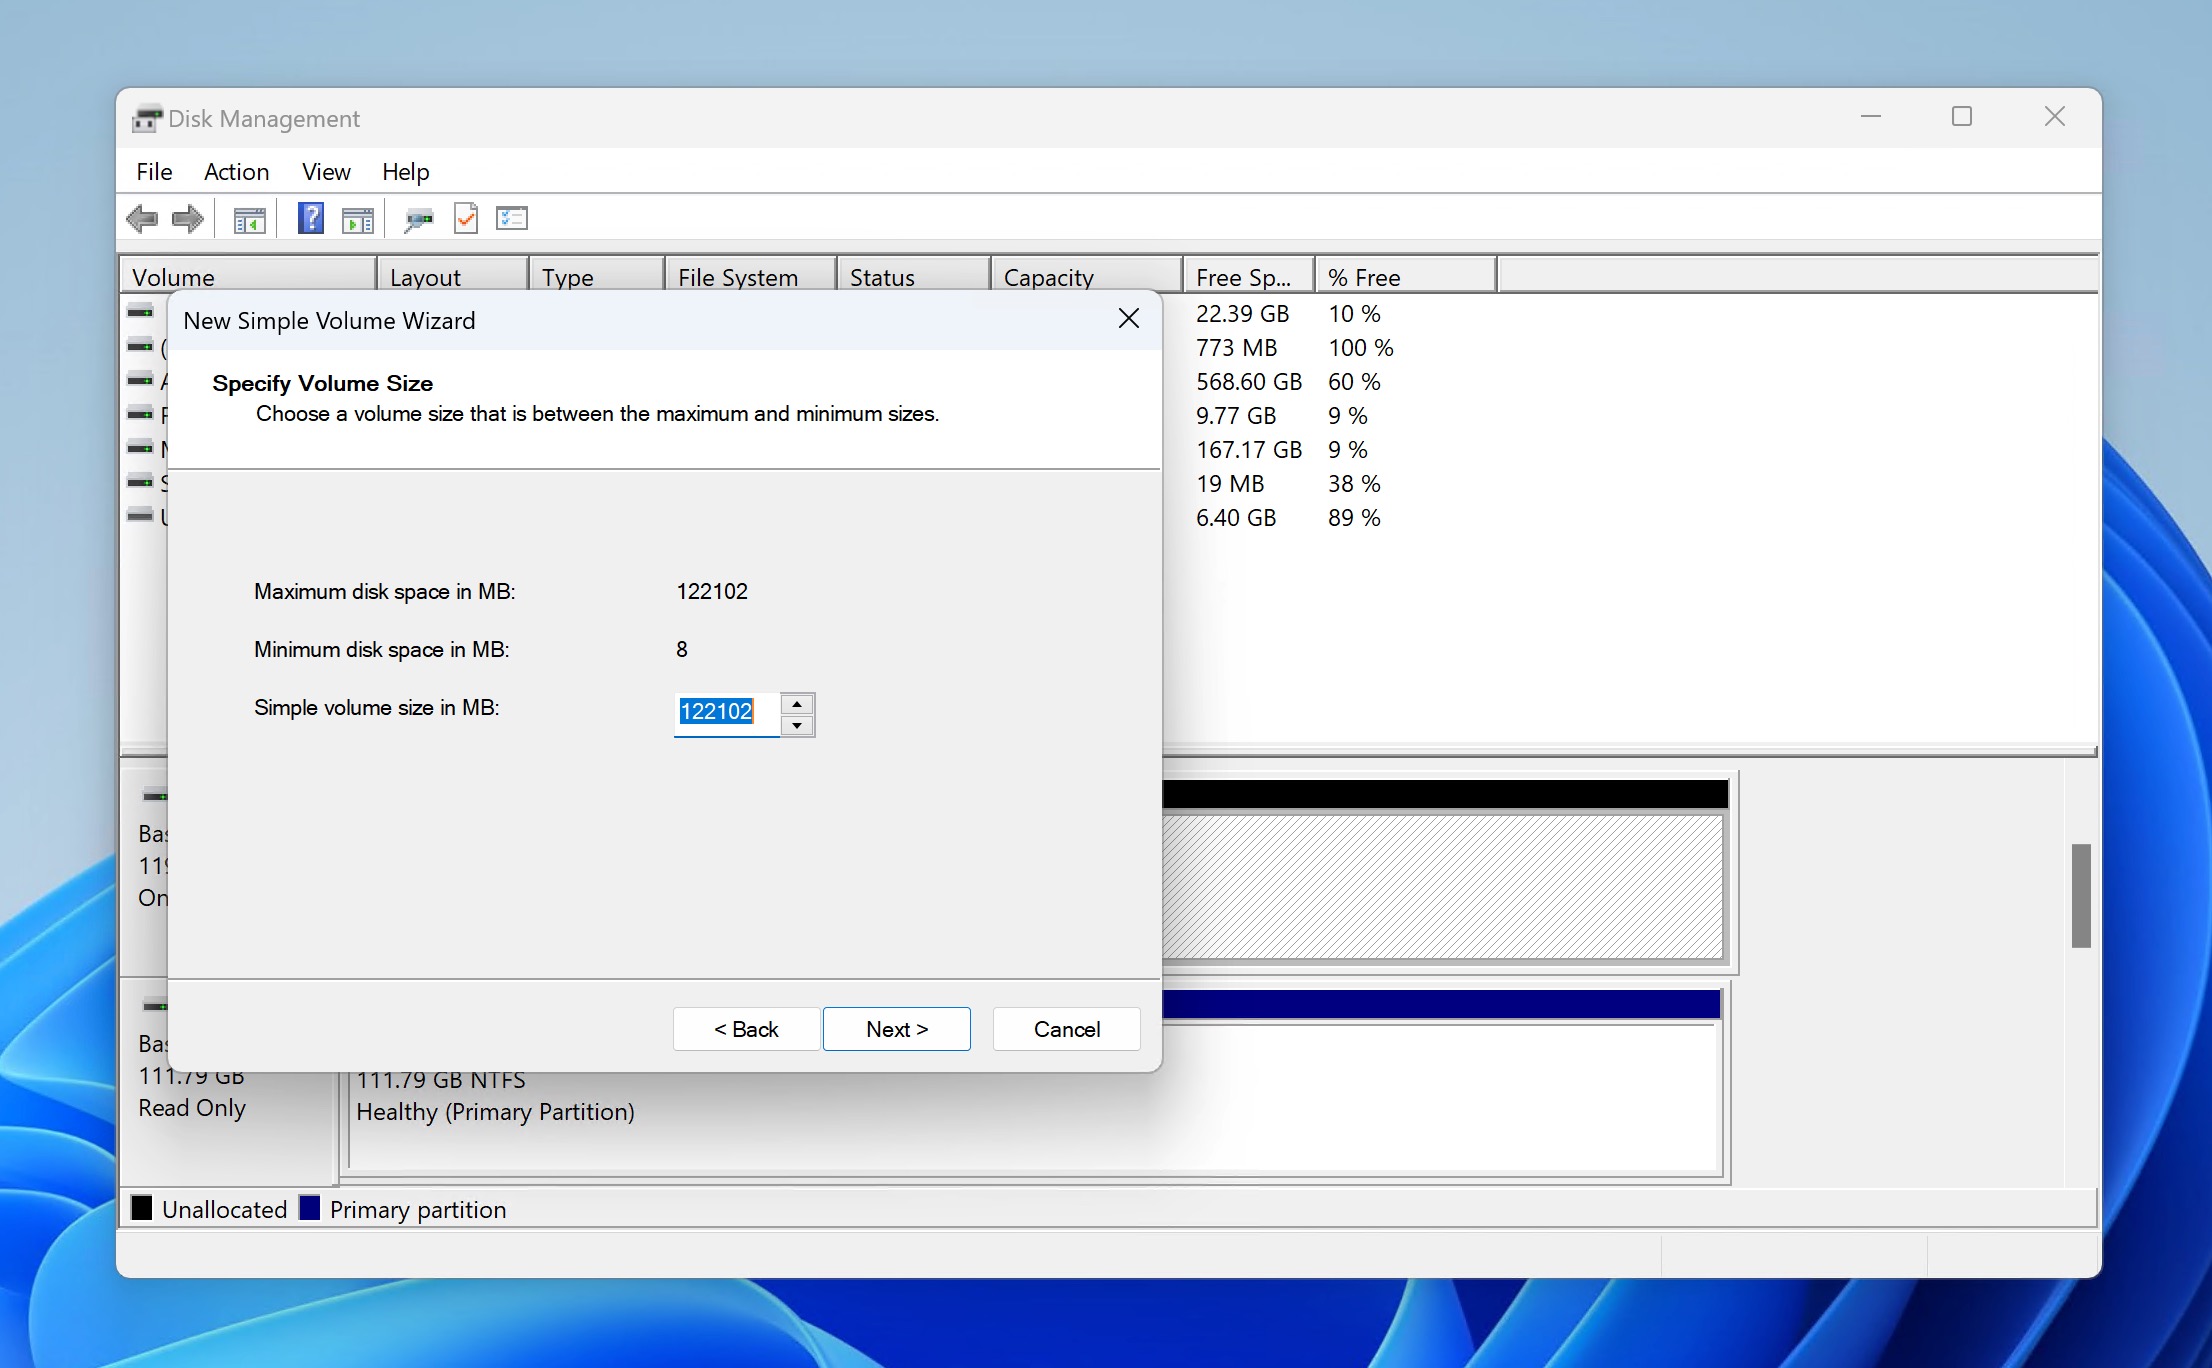
- Specify the volume size (the default value is what you need unless you want to create more than one partition on the drive) and click Next.
- Assign a drive letter or path. Again, the default value is usually okay, so you can just click Next.

- You could click Next for the third time and be done with the creation of the new partition, but I recommend you take a few moments to pick the best file system. For drives you’ll use exclusively with Windows, I always choose NTFS because it supports the most Windows features but doesn’t always work well with other operating systems. If cross-platform compatibility is what you need, then exFAT is a better choice.
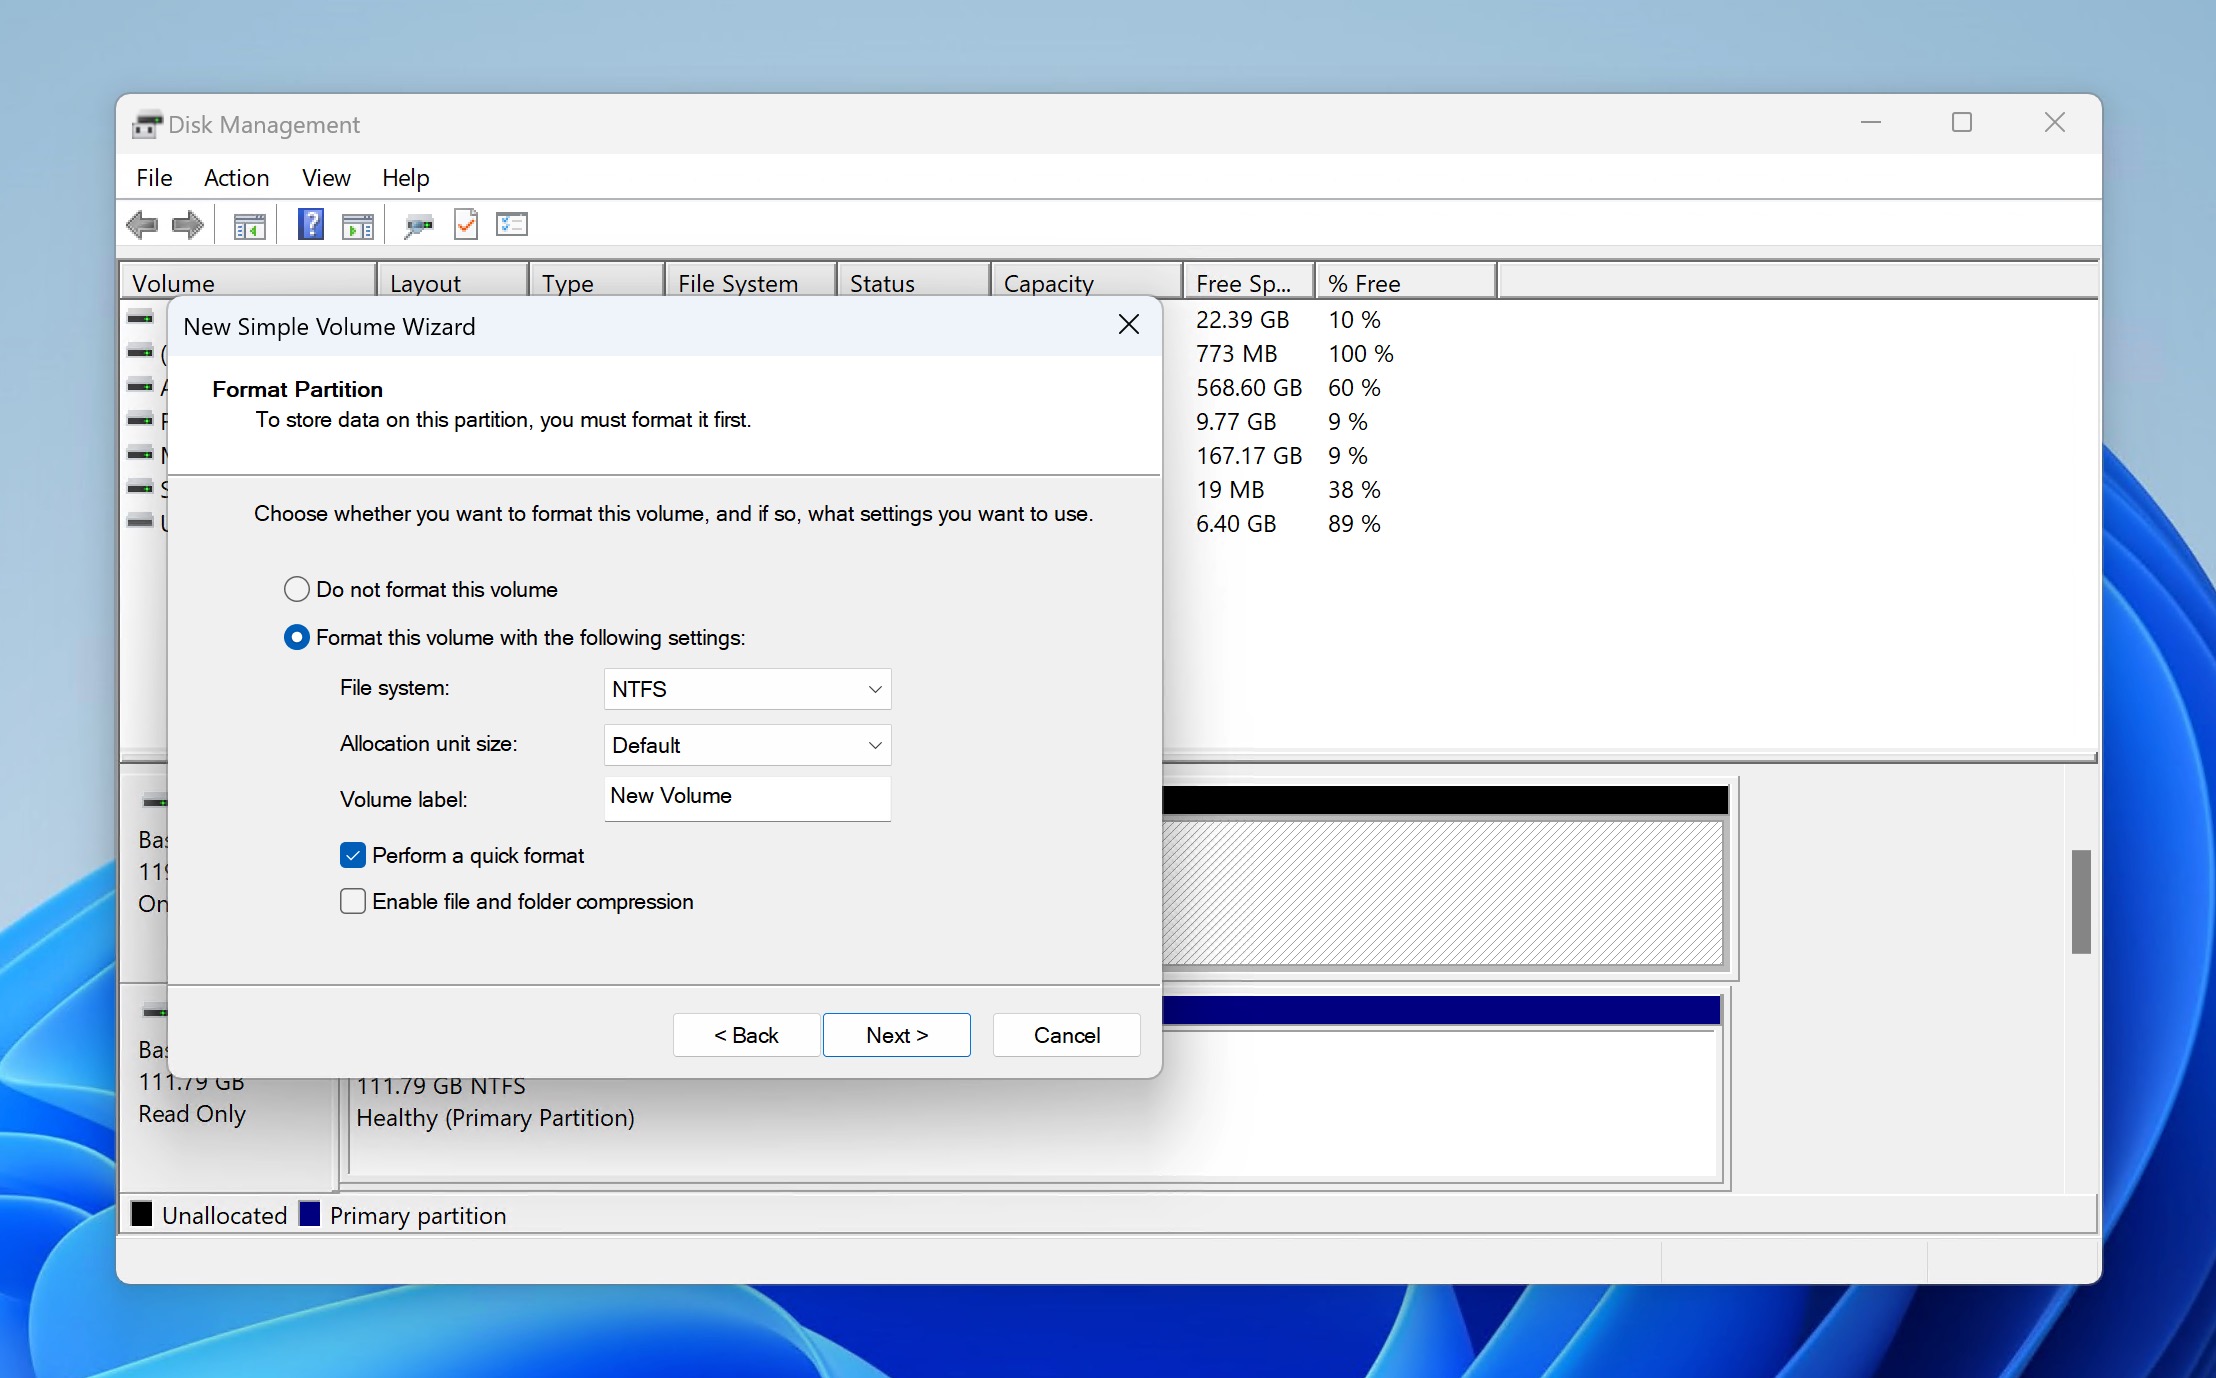
- Finally, you have one last chance to review your choices. Once you’re done, click the Finish button to complete the process.
If you’ve kept the Quick Format option checked, then the new partition should be created very quickly. If not, then it might take a while (a few hours even because ). Once complete, your external hard drive should appear in File Explorer, ready for use.
Solution 3: Assign a New Drive Letter to Your Drive’s Partition
When to use this solution: A newly connected external hard drive should automatically get a new drive letter assigned by Windows. In reality, that doesn’t always happen, as clearly evident from posts like this one or this one. If your external hard drive has been initialized, has a partition with a supported file system, but is missing a drive letter, then it’s time to assign one manually.
How to implement the solution: Those of you who have already implemented the first two solutions are probably getting sick of the Disk Management tool, but please bear with me one more time because we need it to assign a new drive letter to your external hard drive’s partition. If you’ve skipped to this solution directly, don’t worry: you just need to follow these steps:
- Right-click the Start button and select the Disk Management option.
- Locate your external hard drive in the bottom half of the Disk Management tool and right-click on the unallocated space. Then, right-click on the problematic partition and select the Change Drive Letter and Paths option.
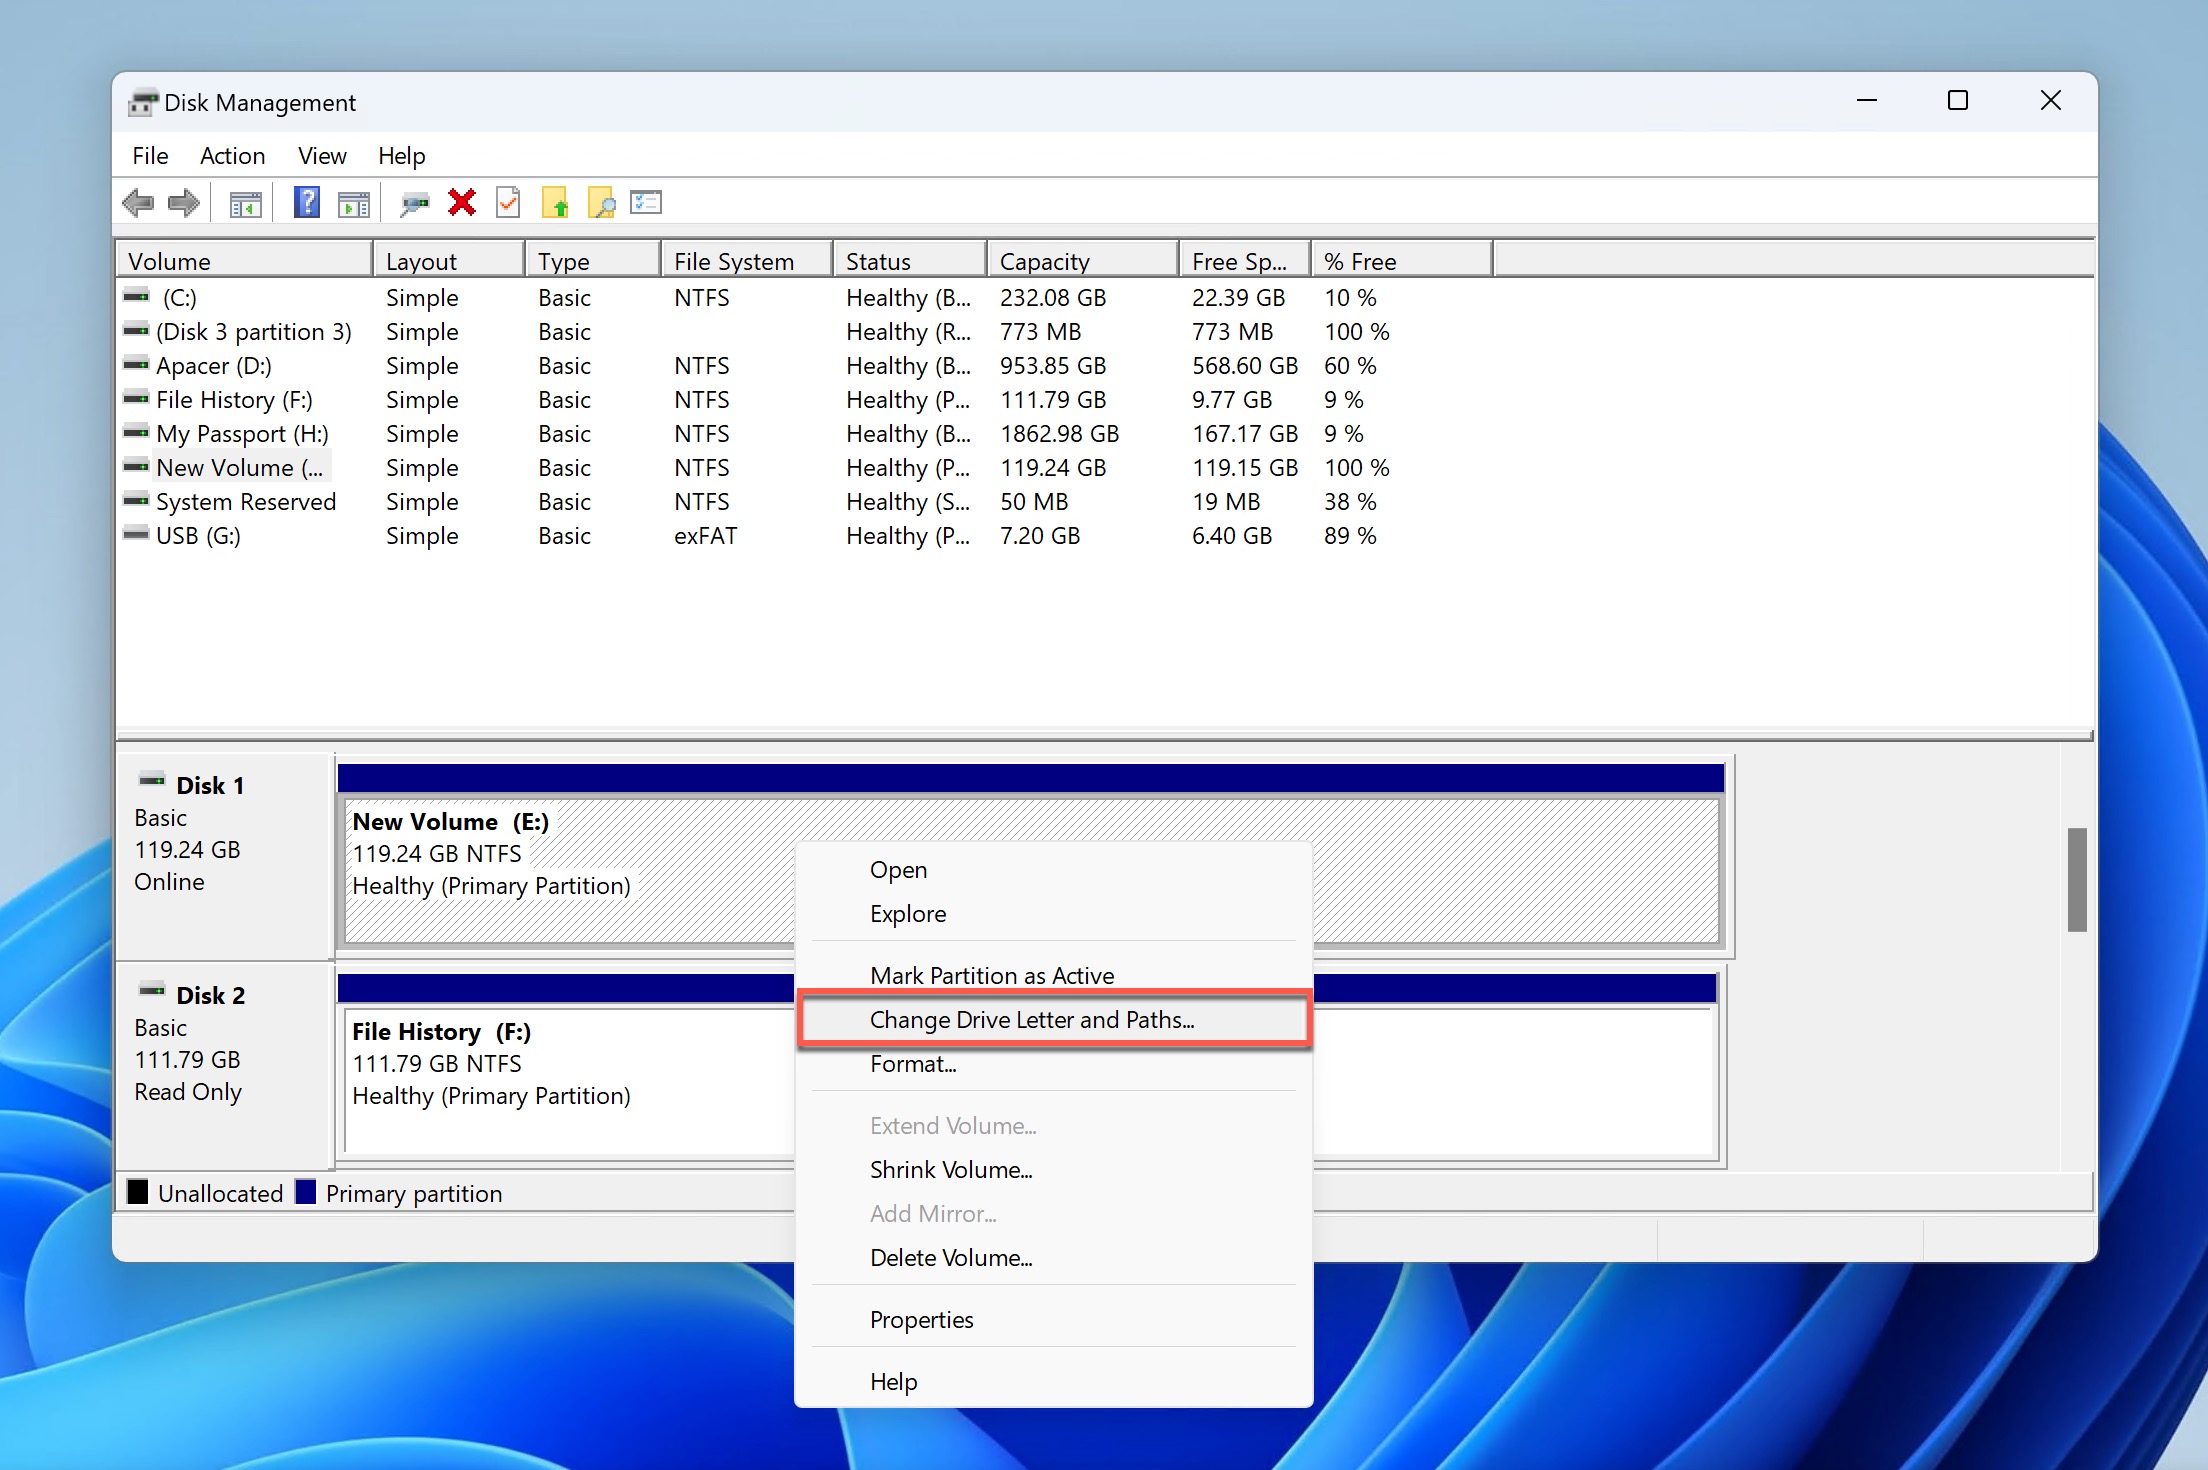
- Is there currently a drive letter? If so, select it and click the Remove button. Once there’s no drive letter, you can click the Add button.
- Choose an available letter from the dropdown menu. When troubleshooting external hard drive issues, I always pick a latter from the latter part of the alphabet to avoid conflicts with system drives.
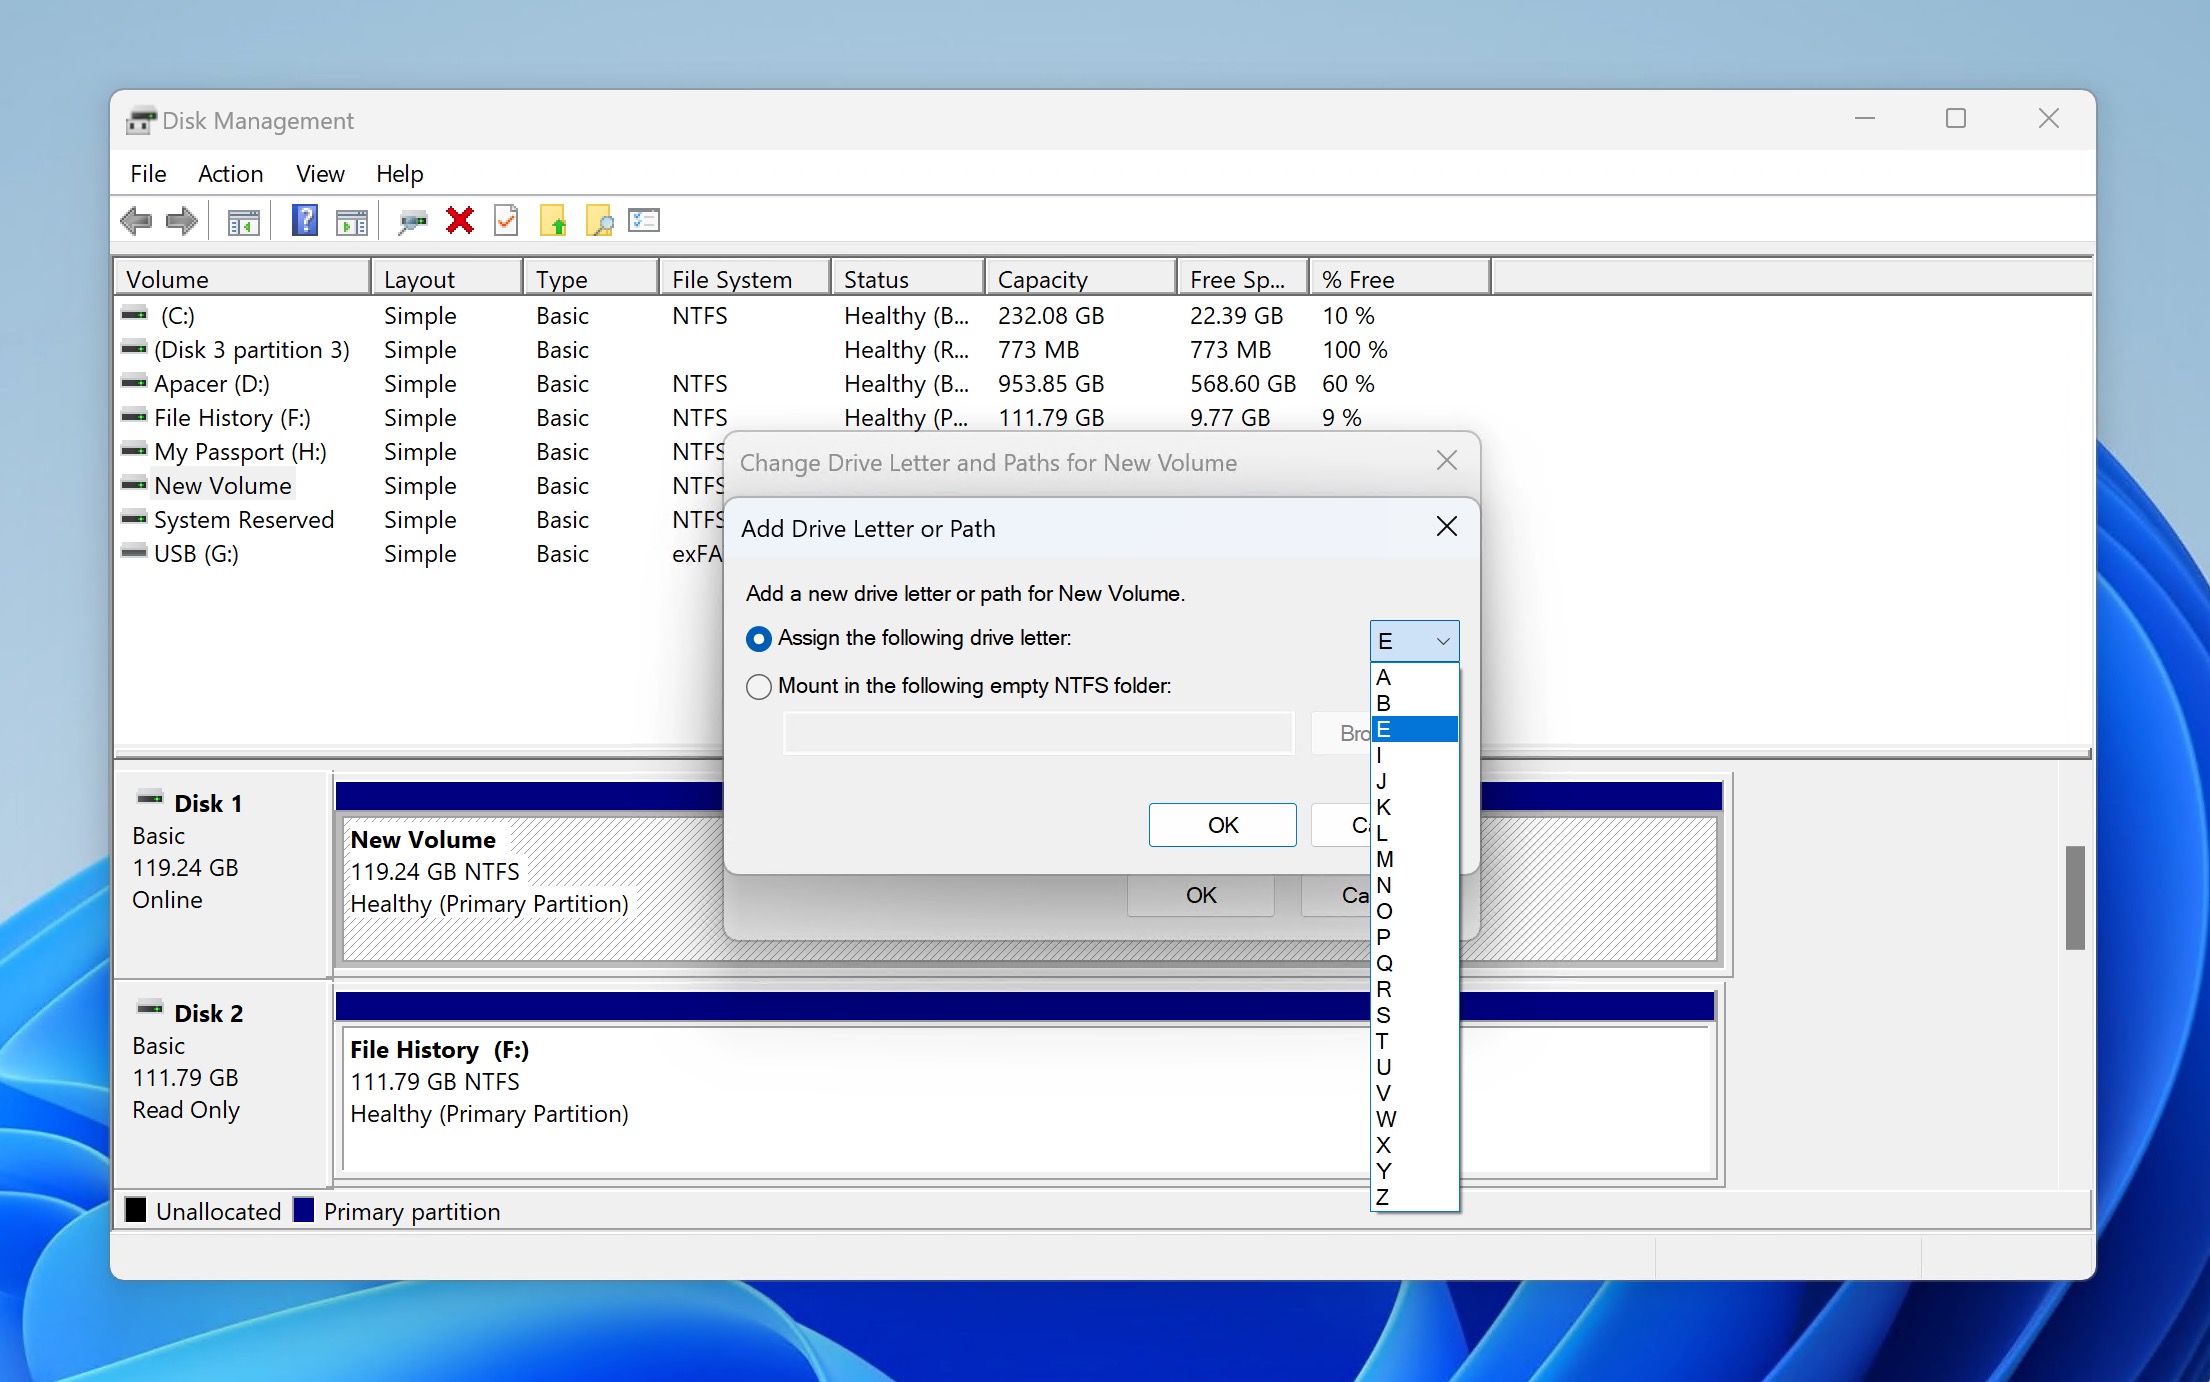
- Confirm your choice by clicking the OK button until the Change Drive Letter and Paths is closed.
Your external hard drive should now be available in the File Explorer. If it isn’t, I recommend you restart your computer. A simple restart is often all it takes for Windows to correctly register the new drive letter and make your drive accessible.
How to Recover Data from an External Hard Drive That’s Not Detected Using Disk Drill
As I’ve already explained in this article, sometimes it’s best to recover all important data from your external hard drive BEFORE attempting any fixes. This is especially true if you’ve encountered S.M.A.R.T. errors or if you’re about to format a partition.
My data recovery software of choice is Disk Drill for Windows. It supports hundreds of file formats, Windows (and Linux and macOS) file systems, is very simple to use, and has yet to disappoint me. What’s more, the free version can recover up to 500 MB of data, and that might be enough for you to recover your most critical files without spending a dime.
I have personally tested whether Disk Drill is as safe as it claims to be, and the results were very convincing: the tool doesn’t contain any malware, doesn’t share user data with third parties, and relies exclusively on non-destructive algorithms.
Here’s how to use Disk Drill to recover data from your problematic external hard drive:
- Download and install Disk Drill from the official website.
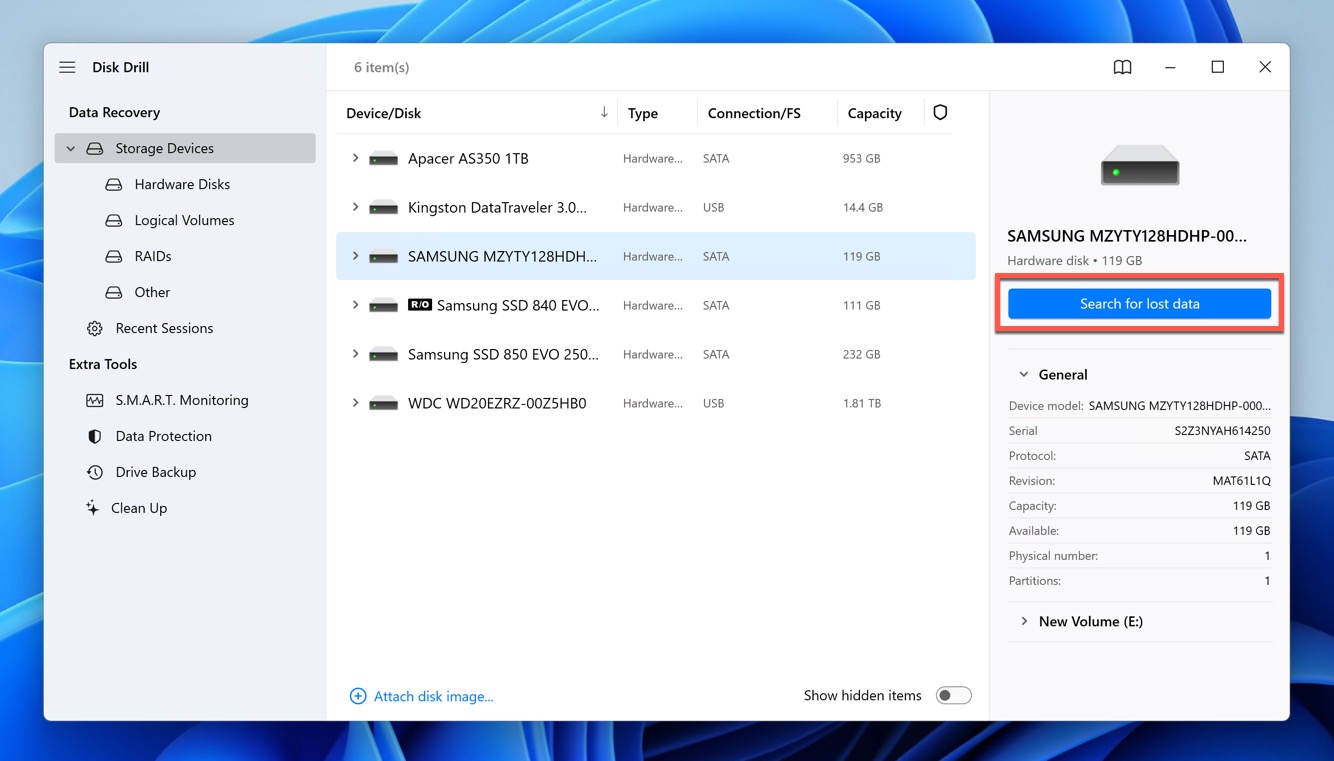
- Launch Disk Drill and select your external hard drive from the list of available devices. The drive should be listed even if it isn’t visible in File Explorer. Click the Search for lost data button to initiate the scanning process.
- Wait for the scan to complete. The duration depends on your drive’s size and size. If you’re in a hurry, you can click the Review found items button while Disk Drill is still scanning, and it will continue in the background, allowing you to browse the scan results.
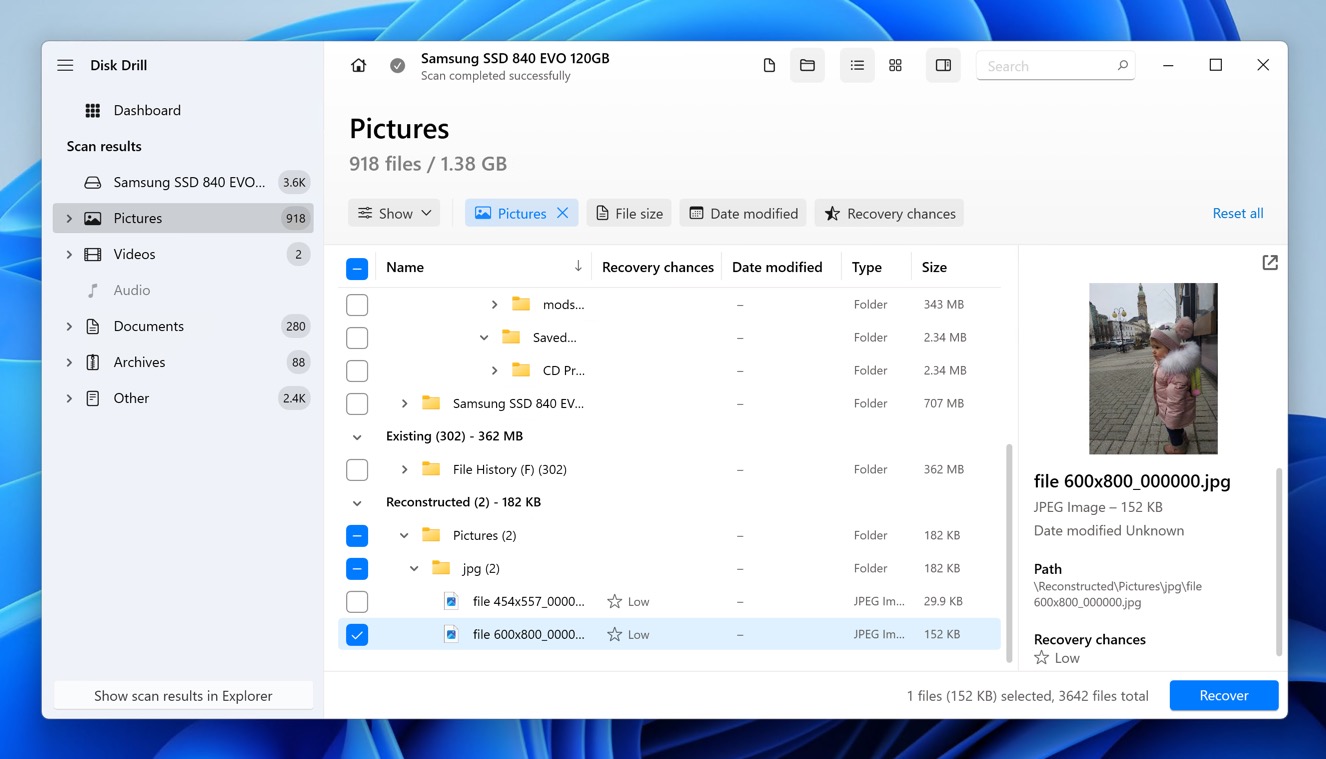
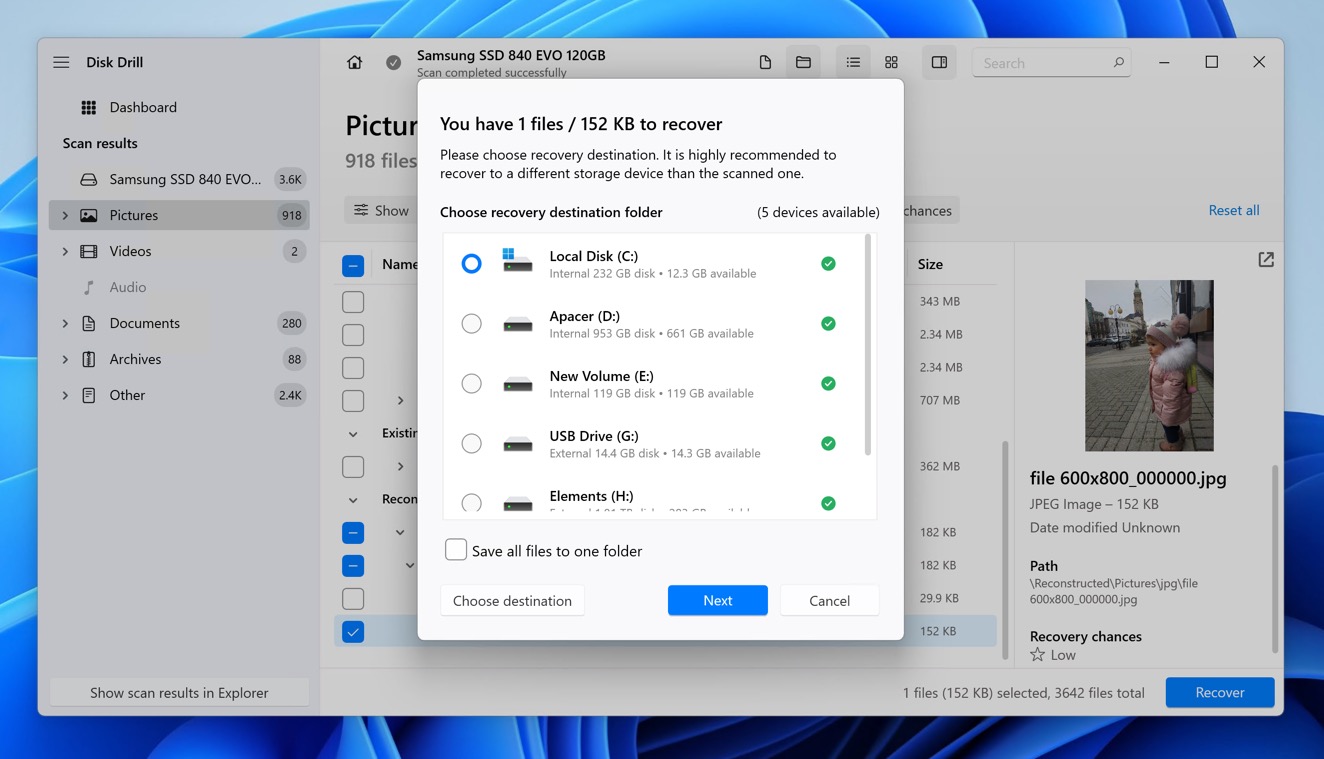
- Select the files you want to recover by checking the boxes next to them. Click the Recover button and choose a safe location on a different drive to save the recovered files.
- Navigate to the recovery location using File Explorer to check if the selected files have been successfully recovered.
After the recovery of all important data from your external hard drive, you can implement the solutions described in this article to make your drive usable again.
FAQ
Why is my external hard drive not showing up in File Explorer?
You can experience issues with an external hard drive not showing up in File Explorer for a number of reasons, including the lack of a partition table, missing partition, or drive letter conflicts.
Can I recover data from an external hard drive that's not showing up?
Yes, you can recover data from an external hard drive that’s not showing up by either fixing the issue so that you can access the drive again in File Explorer, or you can use data recovery software like Disk Drill to retrieve your data directly.
What's the difference between MBR and GPT when initializing a drive?
MBR (Master Boot Record) is an older partition table format, and it works with drives up to 2 TB, while GPT (GUID Partition Table) is newer and supports larger drives. GPT is generally recommended for modern systems and larger drives.
When an external hard drive is assigned the letter “X” in Windows, it can be due to drive letter conflicts, but it can also be a sign of serious hard drive corruption, especially if you get the “There is no disk in the drive” error when you try to access the drive.
Final Thoughts
The key to solving issues with an external hard drive that’s detected but not available in File Explorer is to approach the problem methodically and always prioritize data safety. That’s why the approach I’ve recommended starts with a S.M.A.R.T. test (and potentially data recovery using Disk Drill or its alternatives) and only then continues with initializing, partitioning, and assigning drive letters. I sincerely hope that this guide has helped you resolve your external hard drive issues. If you’ve found it helpful, feel free to share it with others who might be experiencing similar issues.
This article was written by David Morelo, a Staff Writer at Handy Recovery Advisor. It was also verified for technical accuracy by Andrey Vasilyev, our editorial advisor.
Curious about our content creation process? Take a look at our Editor Guidelines.