Is your video unplayable on any media player (and even the device used to capture it)? Signs point to corruption — and If you don’t have a copy of the footage, you’re on the brink of losing it permanently. But we can help.
With the assistance of our tech team, we carefully analyzed how video corruption manifests and reverse-engineered it to figure out what happened to the video’s data… And most importantly, how to fix it using a Mac machine.
Here are 5 proven ways to repair corrupted videos on Mac using free and (mostly) open-source tools!
We’ll be demonstrating the repair methods in this guide using a corrupted MP4 video file because it’s one of the most common and widely supported formats today. That said, the methods we featured in this guide should work for any popular video format, such as MOV, AVI, M4A GIFV, F4V, and more.
Top 5 Methods to Repair Corrupted Videos on Mac
Method |
Difficulty |
Requirements |
Pros |
Cons |
1: Online Video Repair Service |
Very Easy |
Internet connection, healthy file sample |
Free for files up to 5 GB in size, can repair certain cases of severe corruption, works for missing Moov Atom |
Requires a healthy file sample (same device and settings) |
2: VLC’s Always Fix Option |
Easy |
VLC Media Player (free software) |
Quick and beginner-friendly method |
Only suitable for limited cases of minor corruption |
3: Re-Encode Broken Video |
Easy |
Shutter Encoder and VLC Media Player (both are free software) |
Can fix multiple types of corruption at once, uses beginner-friendly tools |
Slightly degrades video quality, balloons video file size |
4: Use Untrunc to Fix Truncated Videos |
Hard |
Homebrew, Docker, and Untrunc (all free), as well as a healthy file sample |
One of the best tools for video files that have been partially formatted or deleted, or have failed to save completely |
Tedious setup that can confuse beginners, requires a healthy file sample |
5: Use FFmpeg Framework |
Medium |
Homebrew and FFmpeg (both free) |
Offers a VAST assortment of video processing tools and parameters, allowing for multiple unique repair attempts |
Downloading, installing, and operating the app all happen via Terminal commands |
Before you attempt any of the fixes we mentioned above, make sure that your video is actually the problem. In some cases, it’s your media player simply failing to recognize the file. Also, make sure that you saved a copy of the file on your Mac (locally) and are trying to open it from there – not from an external device like a USB stick. And use VLC Media Player, which is a free and open-source media app with superior compatibility.
If you’re trying to use this guide for a Windows machine, you can check out our Windows repair guide for corrupted MP4 videos instead.
Method 1: Use Online Video Repair Service
There are websites that host real-time file repair services where you can simply upload your file to be repaired directly inside your browser (with no human technicians involved).
To follow along with our guide, recommend using a site called Clever Online Video Repair. It’s free for files up to 5 GB in size (compared to 500 MB on other sites) and it’s compatible with almost all popular video file signatures. That includes MP4, which we’ll be using as an example, as well as MOV, DAT, GIFV, M4A, QT, DAT, 3GP, and many more.
To fix a corrupted video file, Clever Online Video Repair needs a healthy sample as a reference. It should be a clip taken with the same device and settings as the corrupted video.
It can also repair videos with a missing Moov Atom, which is a common cause of corruption (the Moov Atom is written last so it doesn’t get written in case of a drone crash or sudden camera shutdown, for example).
Difficulty Level: Very easy. You only need a browser, your file, and a healthy file sample.
- Open any browser on your Mac (we recommend Google Chrome or Safari). Then, navigate to the Clever Online Video Repair’s webpage.
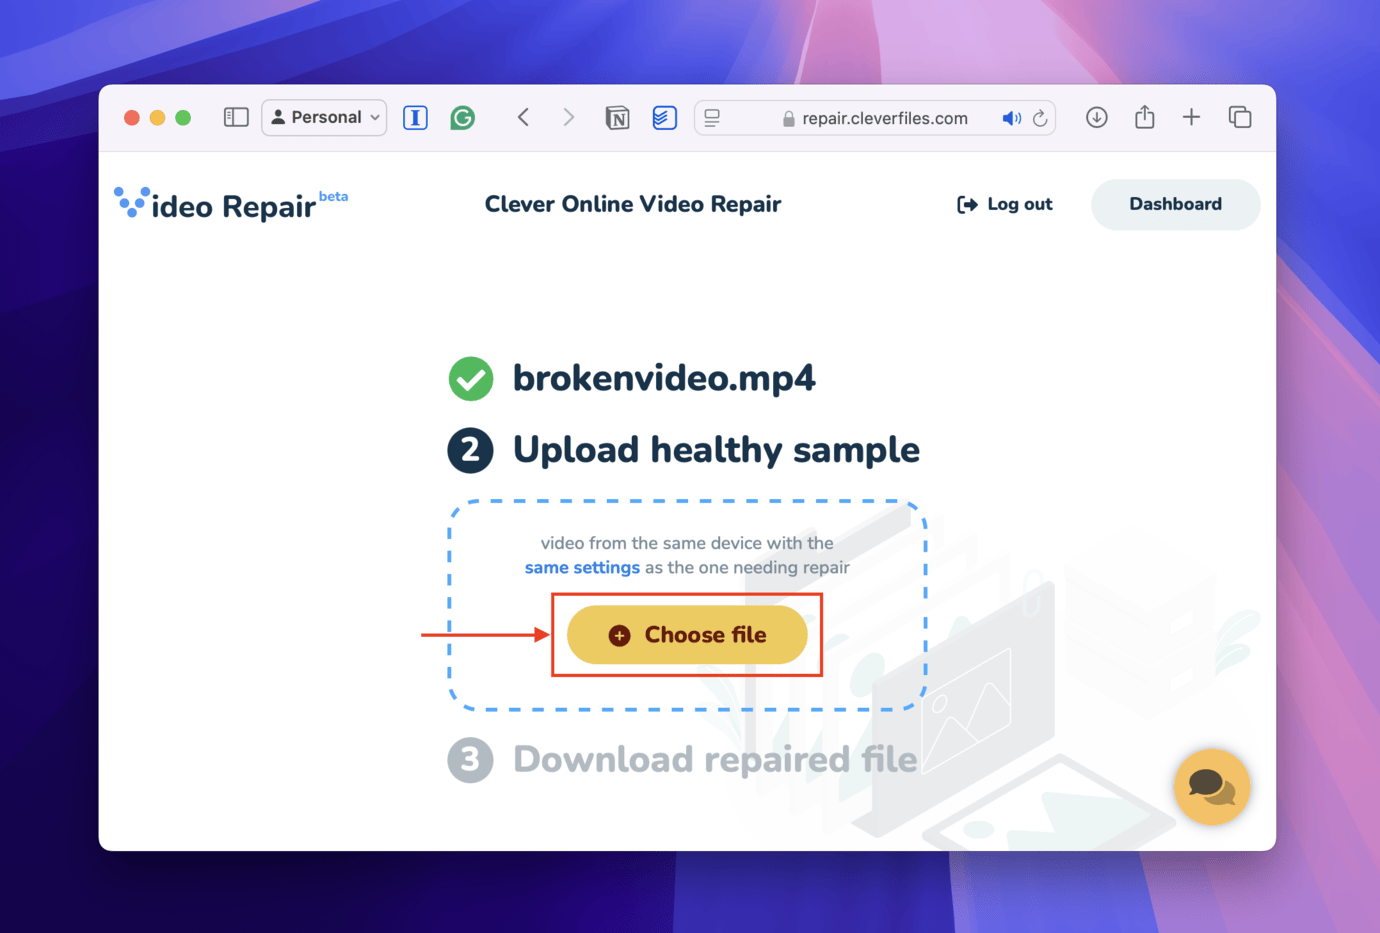
- Click the yellow Choose file button.
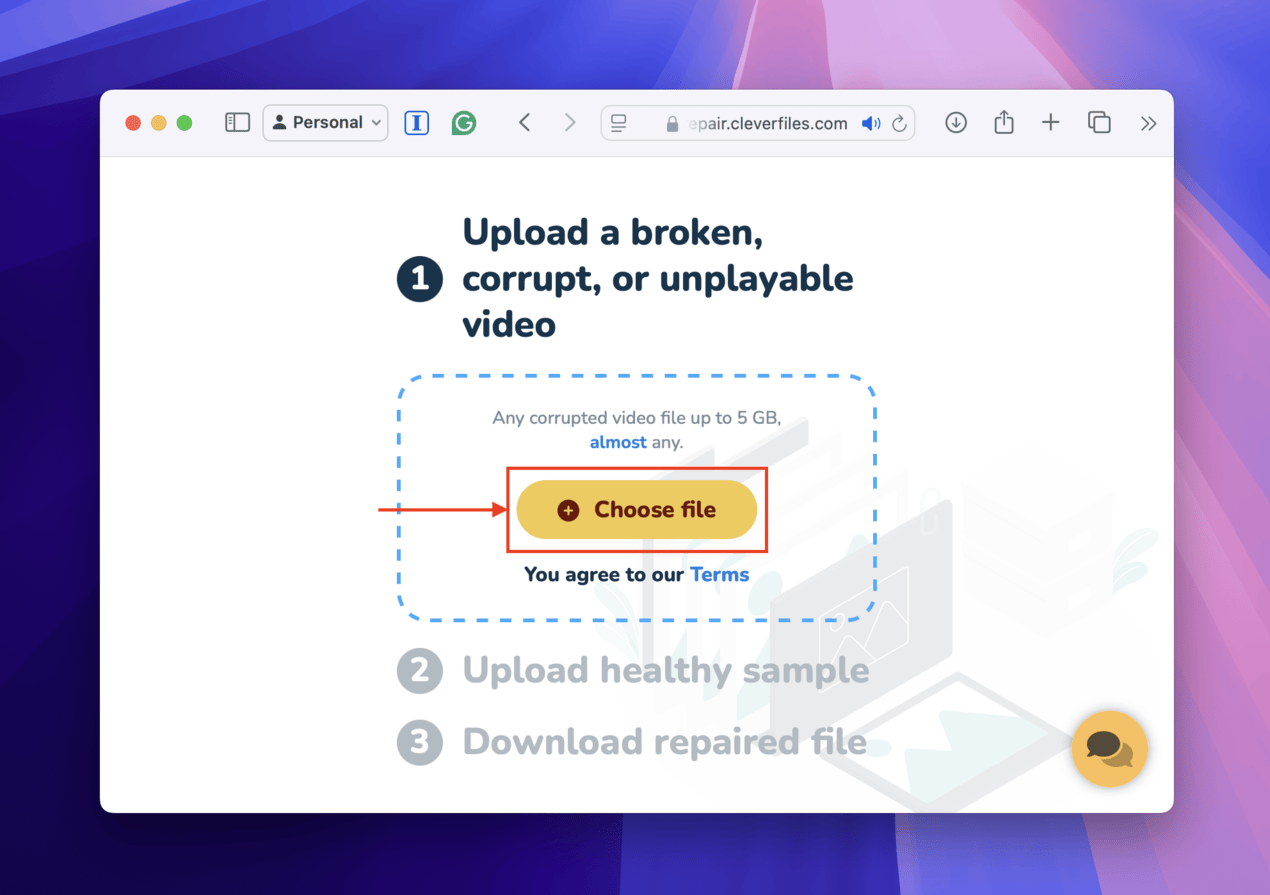
- In the dialogue box that appears, locate and select your corrupted video file. Then, click Upload.

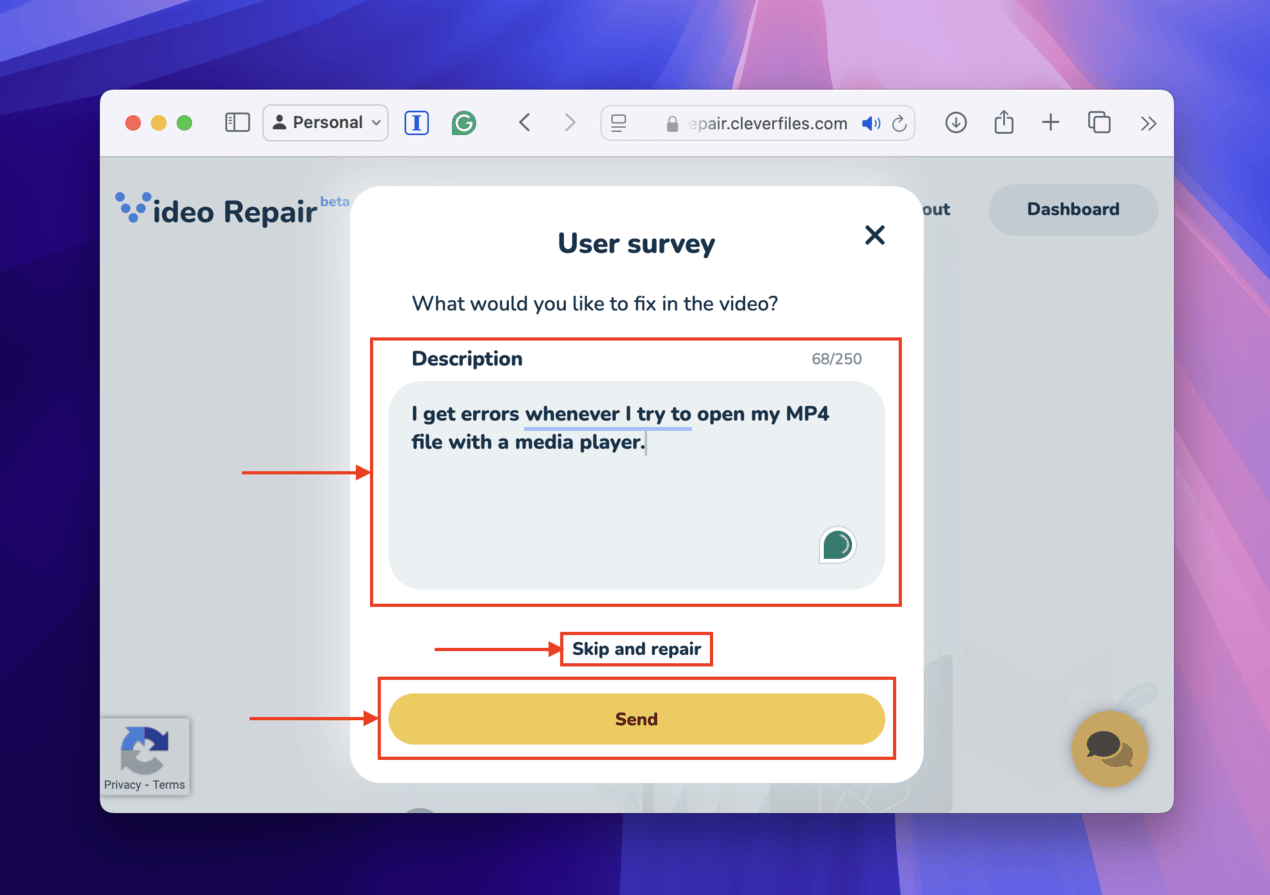
- A new dialogue box will appear. In the text field, describe the events leading up to and immediately after the corruption of your video file. Then, click Send. You can also click Skip and repair if you don’t recall.
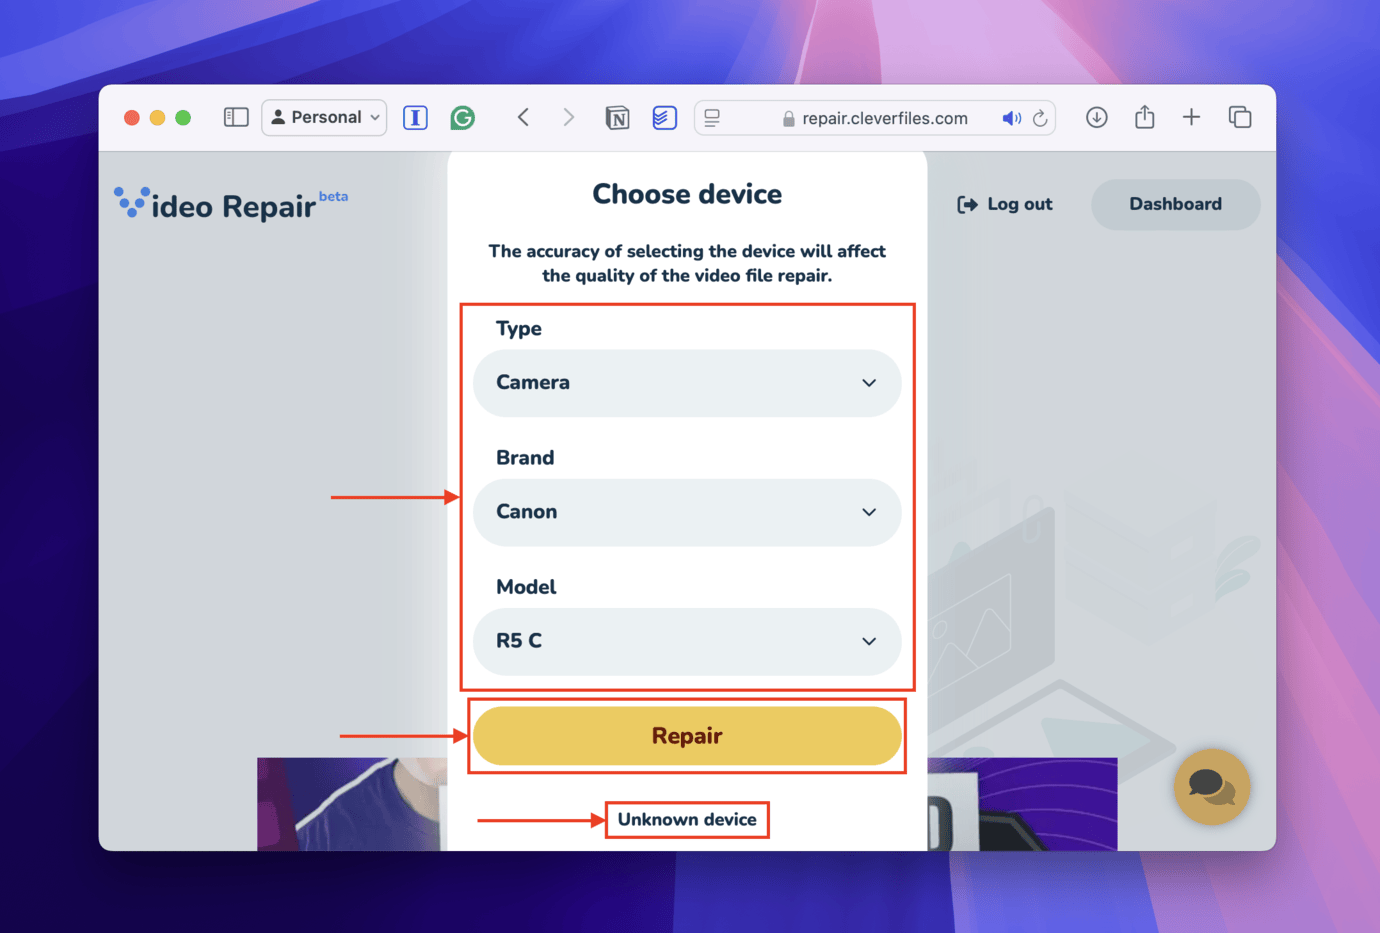
- In the next dialogue box, utilize the dropdown menus to select the brand and model of the device you used to capture the corrupted video. Then, click Repair. It really helps if you can remember these details accurately, but you can click Unknown device if you don’t (an attempt will still be made).
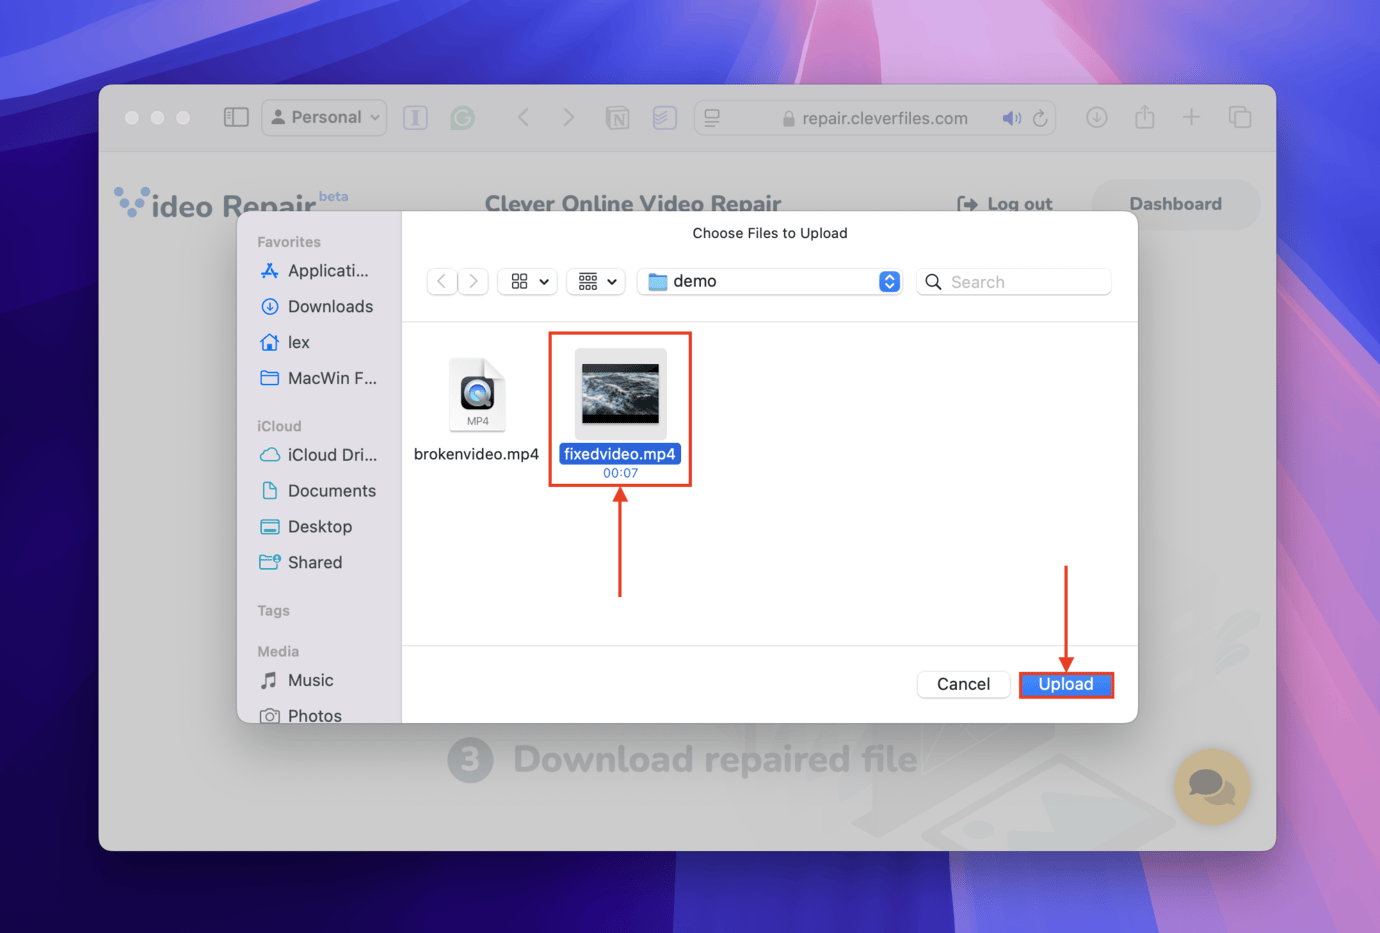
- Once your file has been successfully uploaded, another Choose file button will become available. Click it.
- You’ll be greeted by the same dialogue box that appeared in step 3. This time, select the healthy video sample we mentioned in the beginning and click Upload.
- Once the sample file has been uploaded, Clever Online Video Repair will prompt you to log in or register with your email address and password. Once you’re logged in, the repair process will start – if successful, you’ll be able to preview screenshots of the repaired video and download it to your Mac.

Aside from Clever Online Video Repair, there are several video repair tools competing with each other to be the #1 solution. The key to selecting the right one is knowing exactly what they offer and whether or not they make sense for the scope of your needs.
We actually wrote another article comparing the top video repair software – here, you’ll find a more detailed breakdown of Clever Online Video Repair’s features and capabilities as well as comprehensive reviews of its competitors.
Method 2: Use VLC’s Always Fix Option
VLC Media Player is a popular multimedia editing and streaming app with a simple interface and various tools that can help make corrupted video files playable again. For this method, we’ll be utilizing its auto-repair feature for AVI files (we’ll show you how it can work for ANY video file type).
While it’s unsuitable for more complex errors (e.g. “moov atom not found” error), it can work for minor corruption.
Difficulty level: Easy. This method requires you to download and install an app but it’s very easy to use.
- Download and install VLC Media Player but don’t open it yet.
- Open Finder.
- Navigate to the folder where your corrupted video file is located. Then, right-click your file and select Rename.
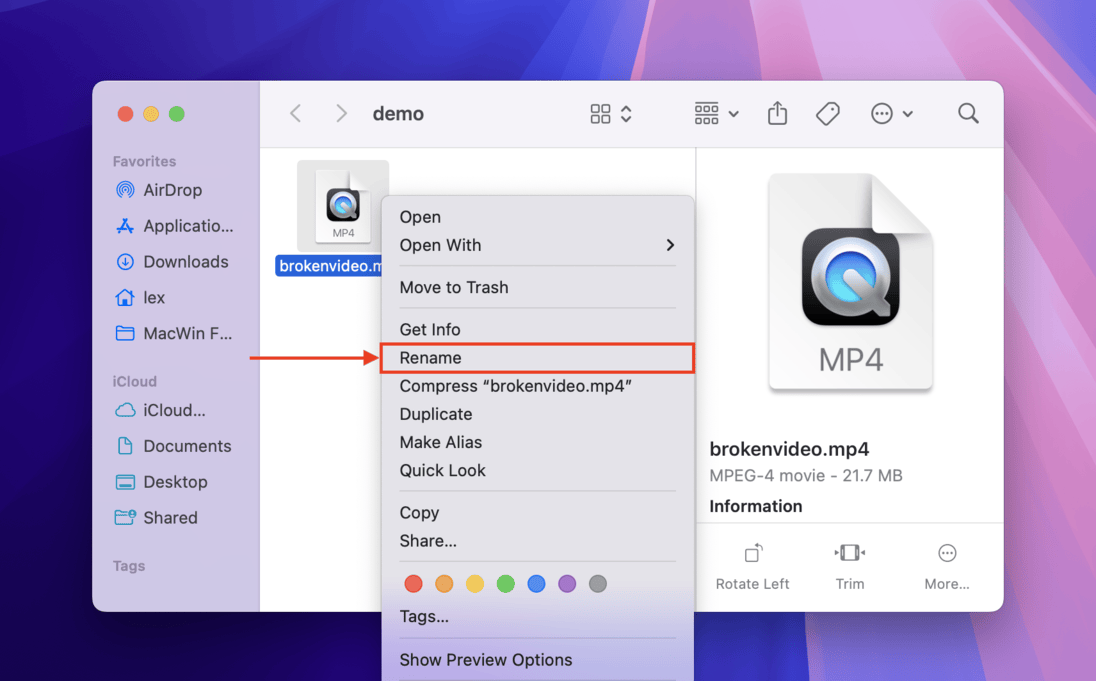
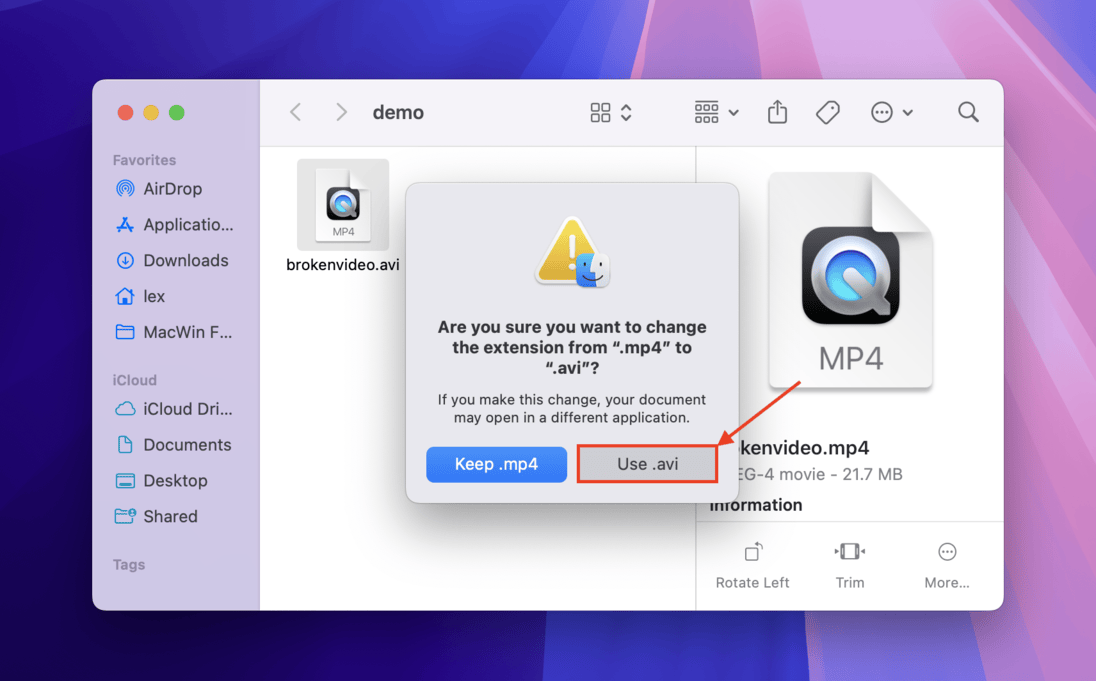
- Replace the characters after the . from whatever it currently is to avi (e.g., brokenvideo.mp4 becomes brokenvideo.avi). Then, in the dialogue box that appears, click Use .avi to confirm the renaming.
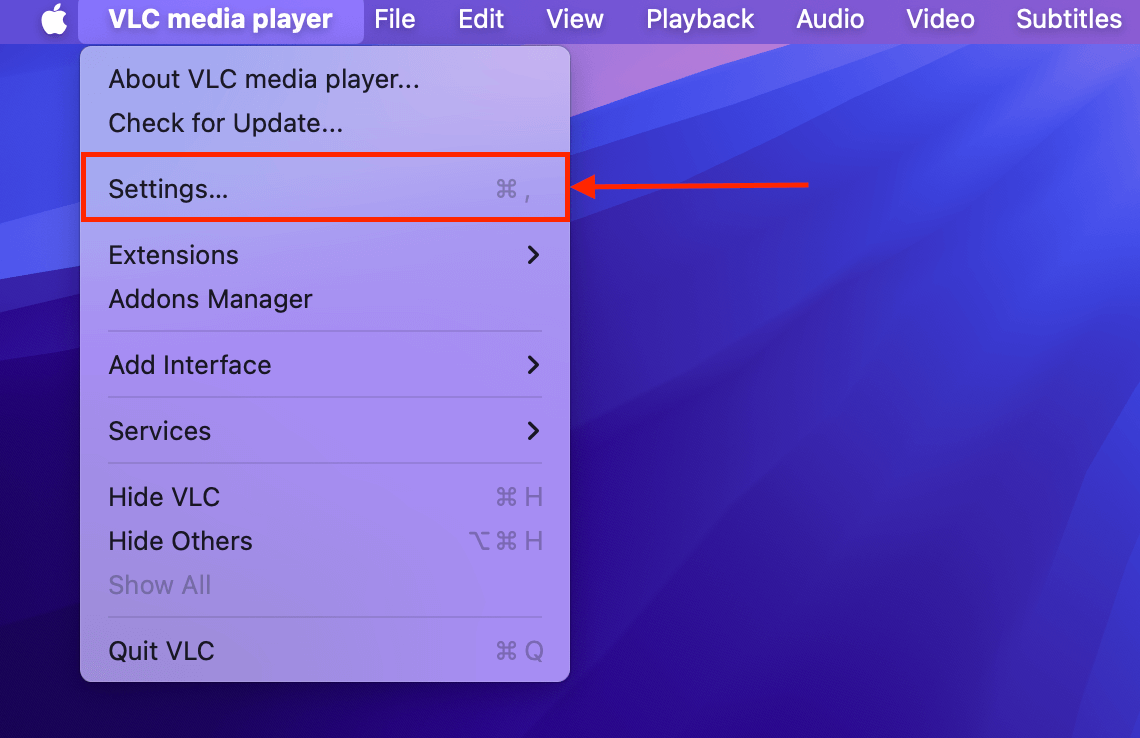
- Open VLC Media Player. On the menu bar, click VLC media player and select Settings…
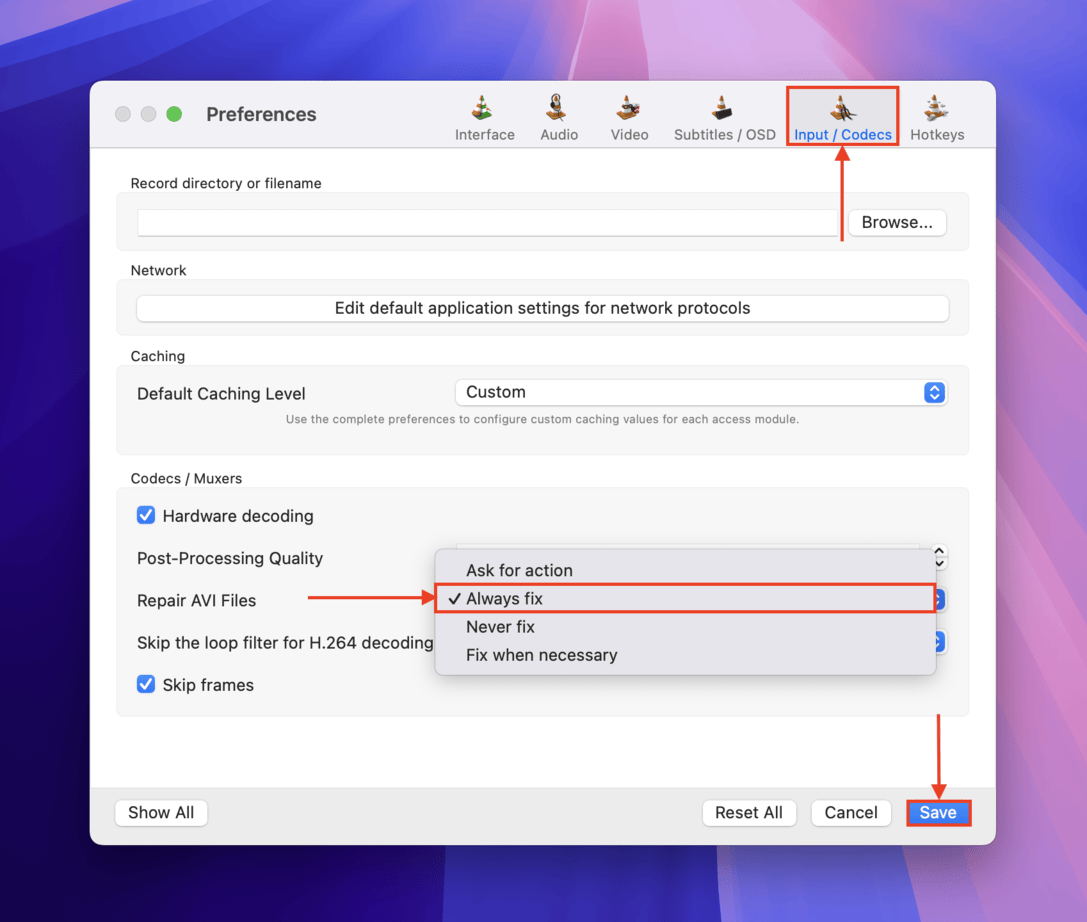
- Navigate to the Input / Codecs menu. Under the Codecs / Muxers section, click the dropdown menu beside Repair AVI Files and select Always fix. Then, click the Save button to confirm the new settings.
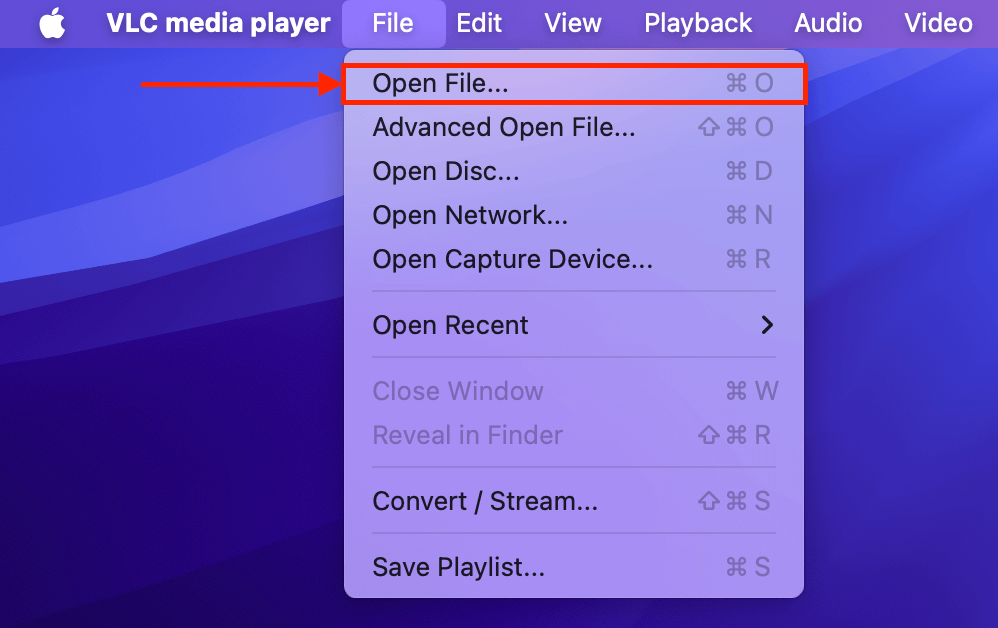
- On the menu bar, click File and select Open File…
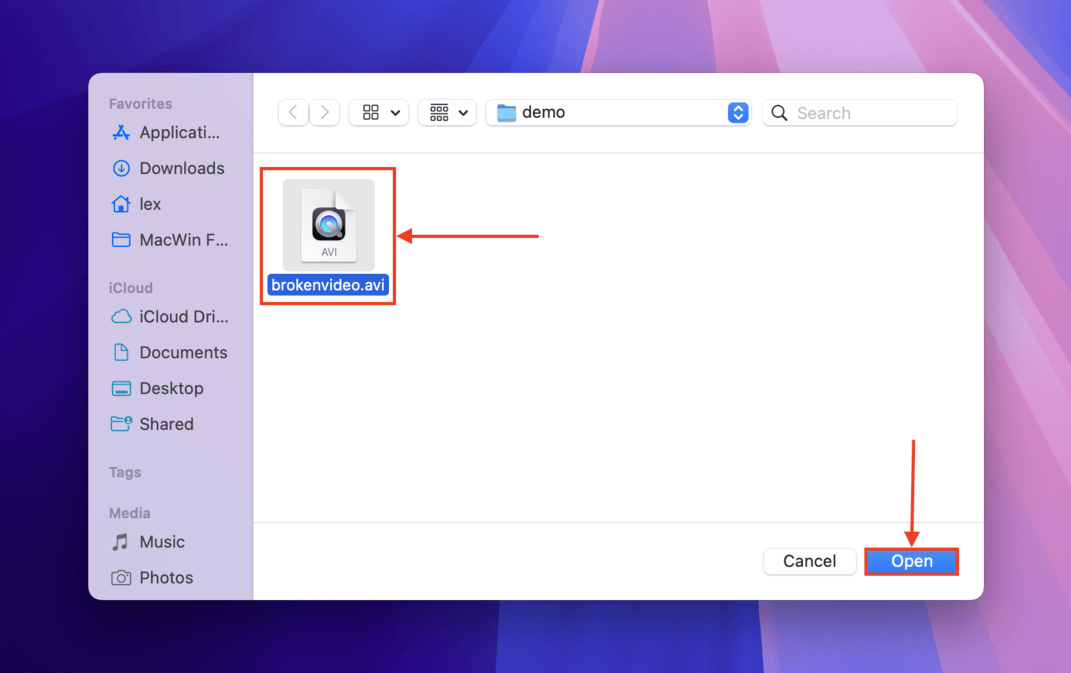
- In the dialogue box, select the video file you renamed in step 3. Then, click Open.
When you attempt to open the video file, VLC will automatically try to repair it before streaming — you’ll quickly find out if the repair attempt was successful.
You can also use VLC to temporarily “fix” audio playback synchronization issues. Press the J and K keys to delay and advance the audio, respectively.
Method 3: Re-Encode Broken Video
Another way to fix a corrupted video is to convert (re-encode) it. Conversion refers to rebuilding or transcoding a video file, which can help repair corruption in different ways. It can rebuild damaged containers (which can fix indexing and file structure errors), replace corrupted codecs, and make the file more compatible with the media player you prefer to use.
Difficulty level: Easy. This method requires apps that are easy to download, install, and use, even for beginners.
Option A: Shutter Encoder
Shutter Encoder is a video encoder and converter built around FFmpeg, a powerful multimedia processing tool. Basically, Shutter Encoder wraps the FFmpeg tool into a beginner-friendly interface (whereas FFmpeg by itself is only operable via Terminal commands).
It offers a lot of re-encoding options (as well as other modification features like Rewrap) whilst still being easy for beginners to pick up immediately.
- Download Shutter Encoder from the app’s official website. Its pkg installation file comes with a handy wizard to guide you through installing the app.
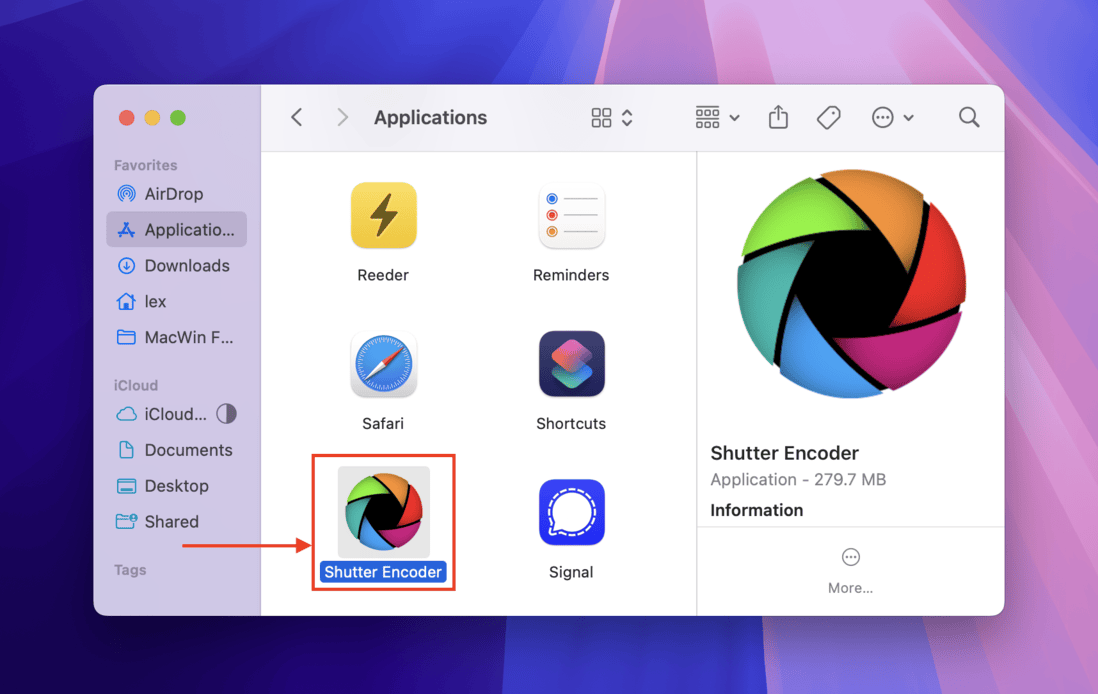
- After installing it, open Shutter Encoder (you’ll find it in the Applications folder).
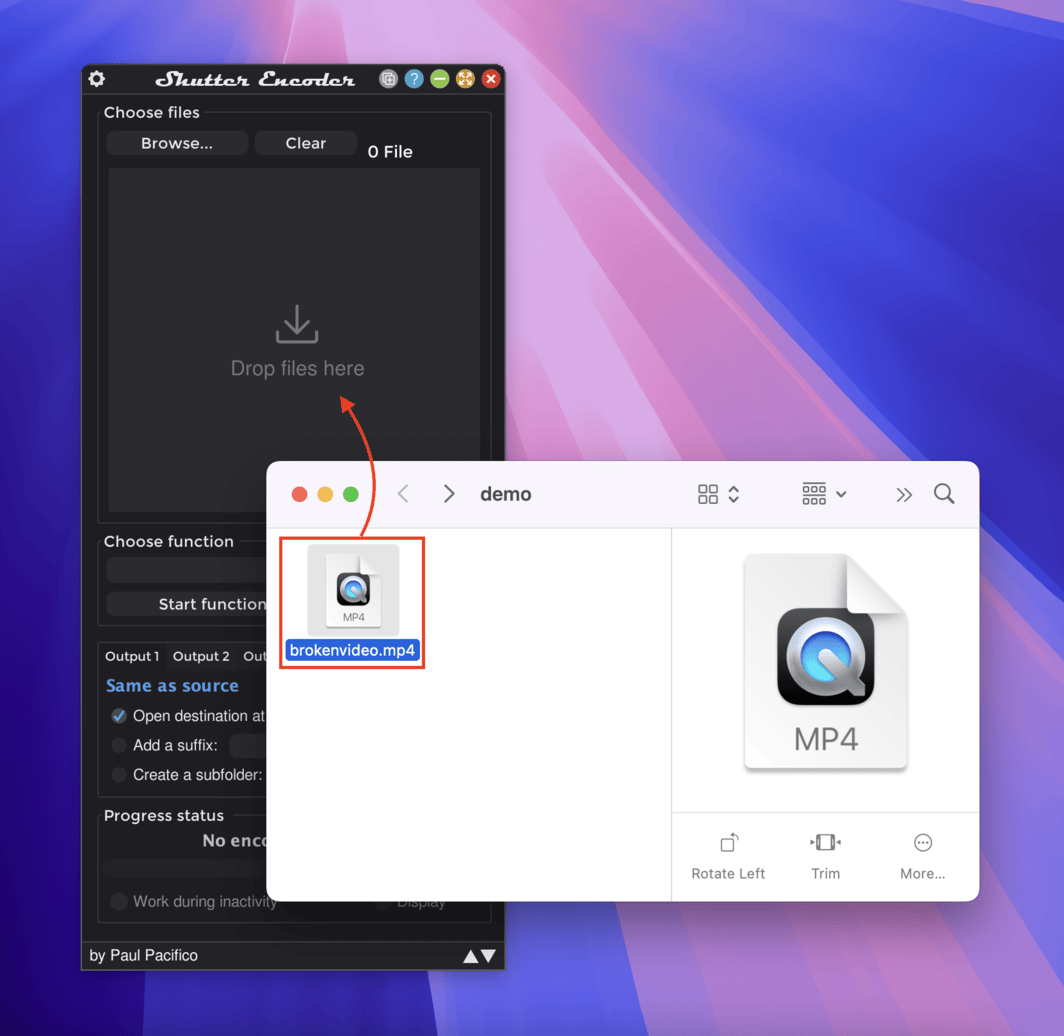
- Drag your corrupted video file into the empty space in Shutter Encoder’s window (where it says “Drop files here”).
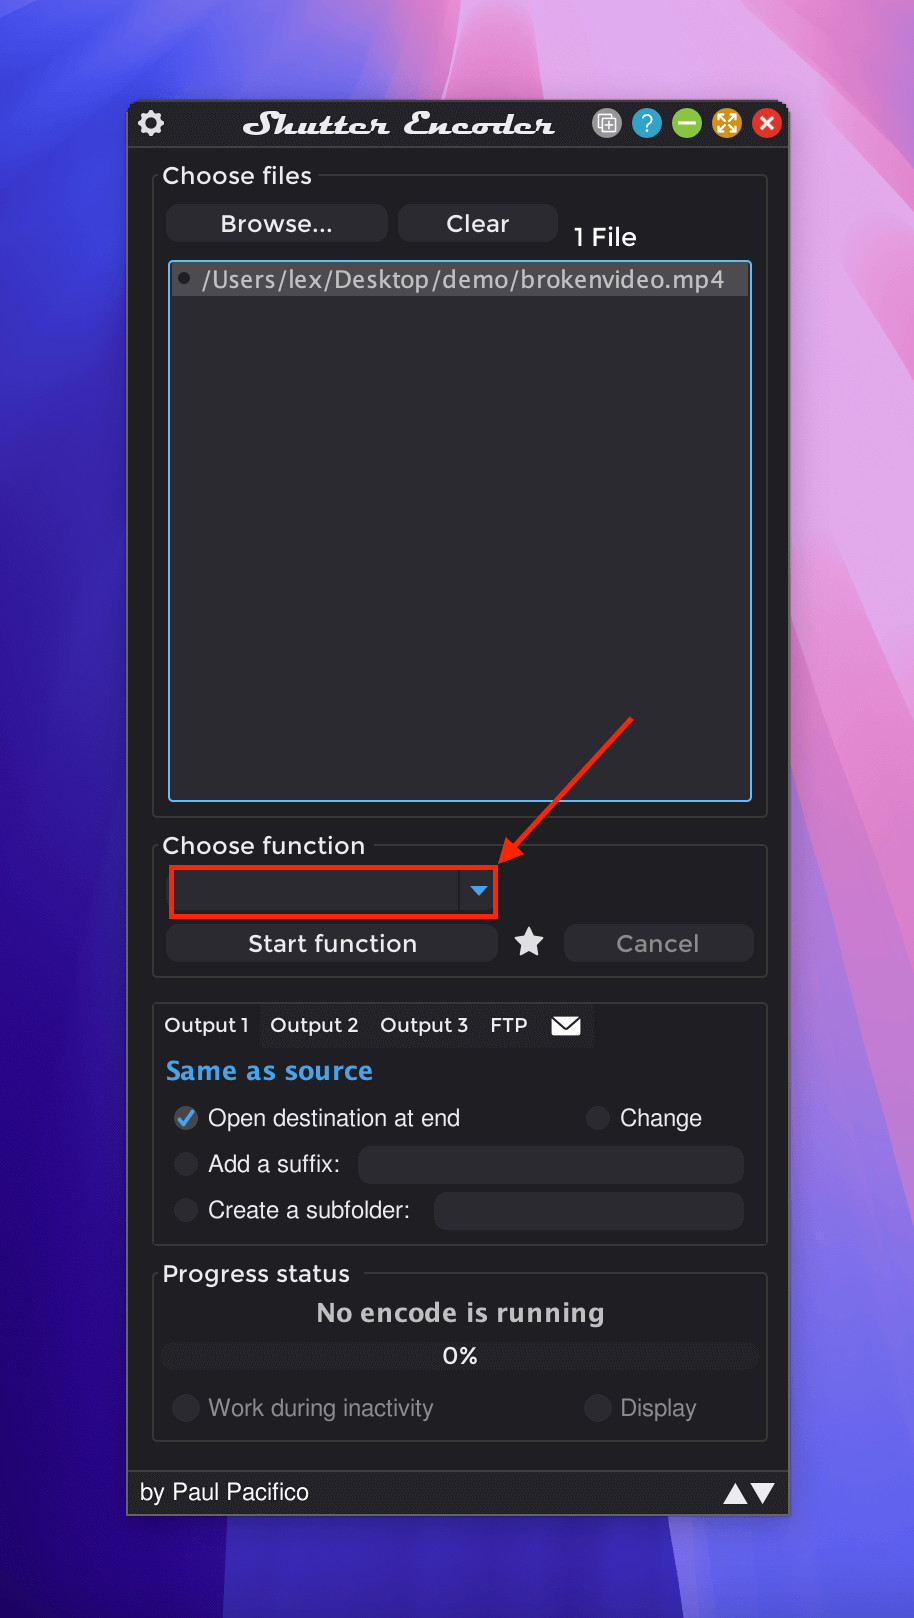
- Click the blank dropdown menu under Choose function.
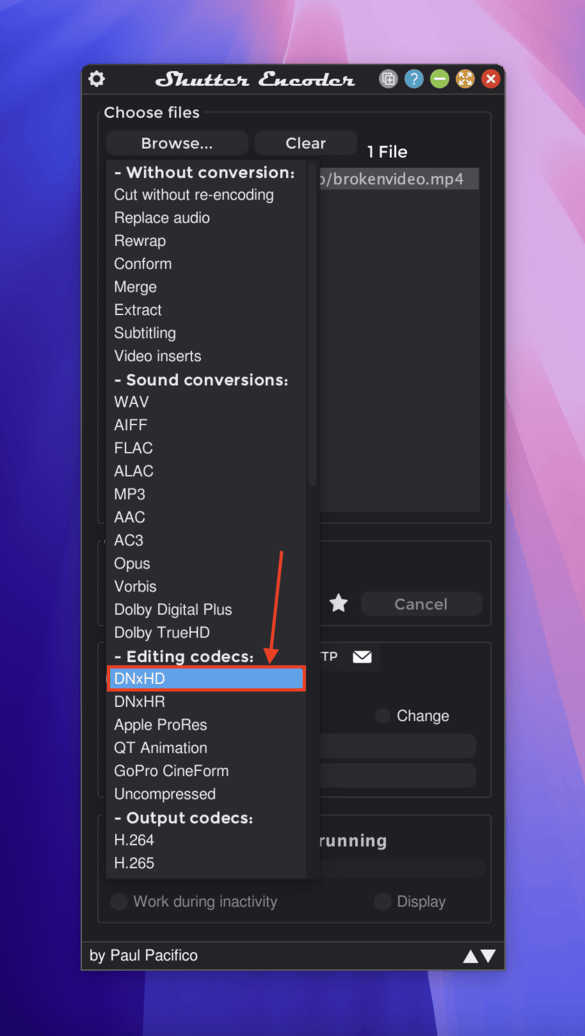
- Scroll through the pop-out menu and select DNxHD.
- Click the dropdown menu beside DNxHD — on the other side of the arrow — and select your preferred bit rate (higher bit rates result in superior quality but much larger file size outputs). Finally, click Start function.
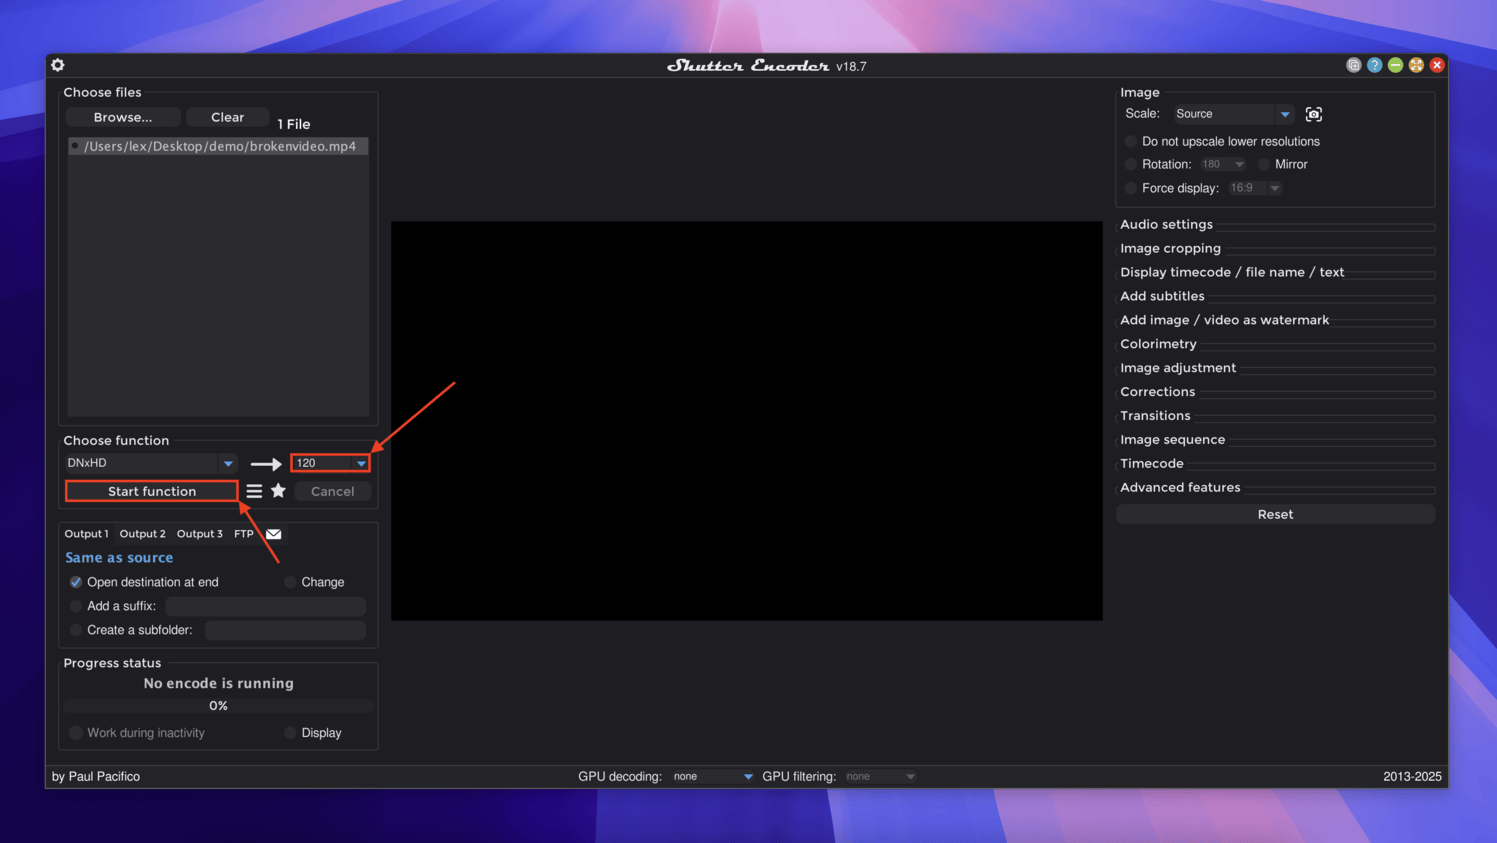
Once the progress bar at the bottom of the window (under Progress status) shows 100%, you’ll find the new video file in the same folder the corrupted video file is also stored in.
Option B: VLC Media Player
VLC Media Player, which we already featured in Method 2, is also capable of converting and transcoding video files. It’s worth trying if you already installed the app earlier or if Shutter Encoder doesn’t work – VLC Media Player has its own way of managing errors during the transcoding process that might prove more effective in your specific case.
- Download and install VLC Media Player on your Mac (If you haven’t already done so).
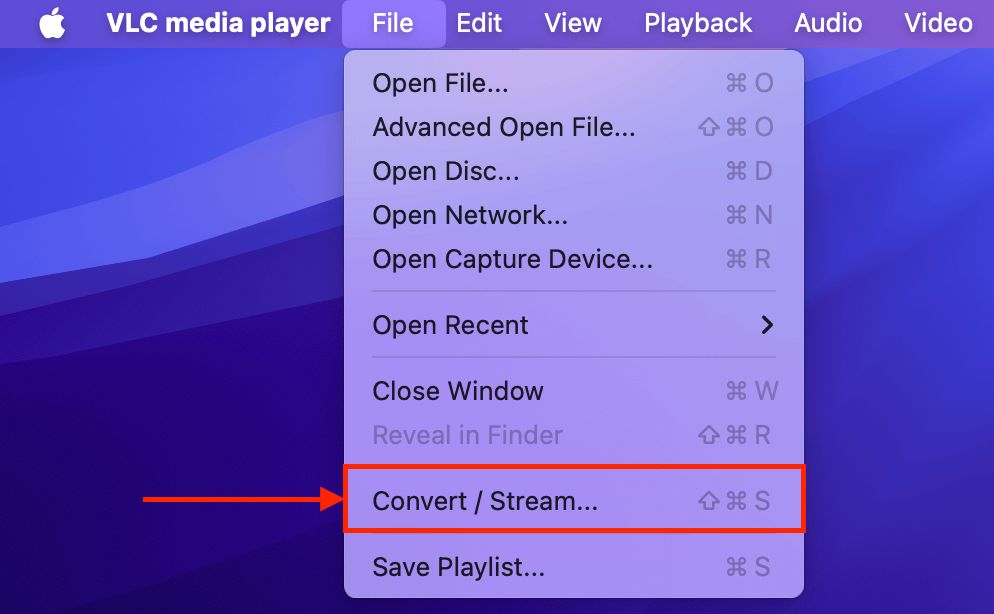
- Open VLC Media Player. On the menu bar, click File and select the Convert / Stream option.
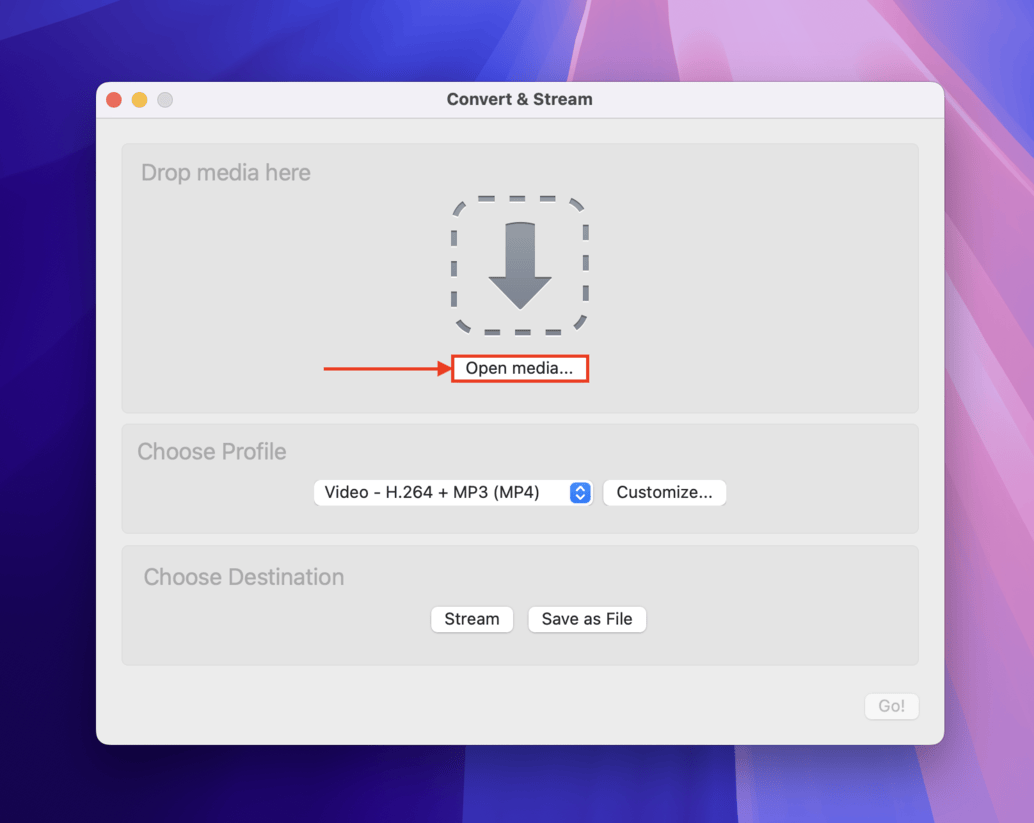
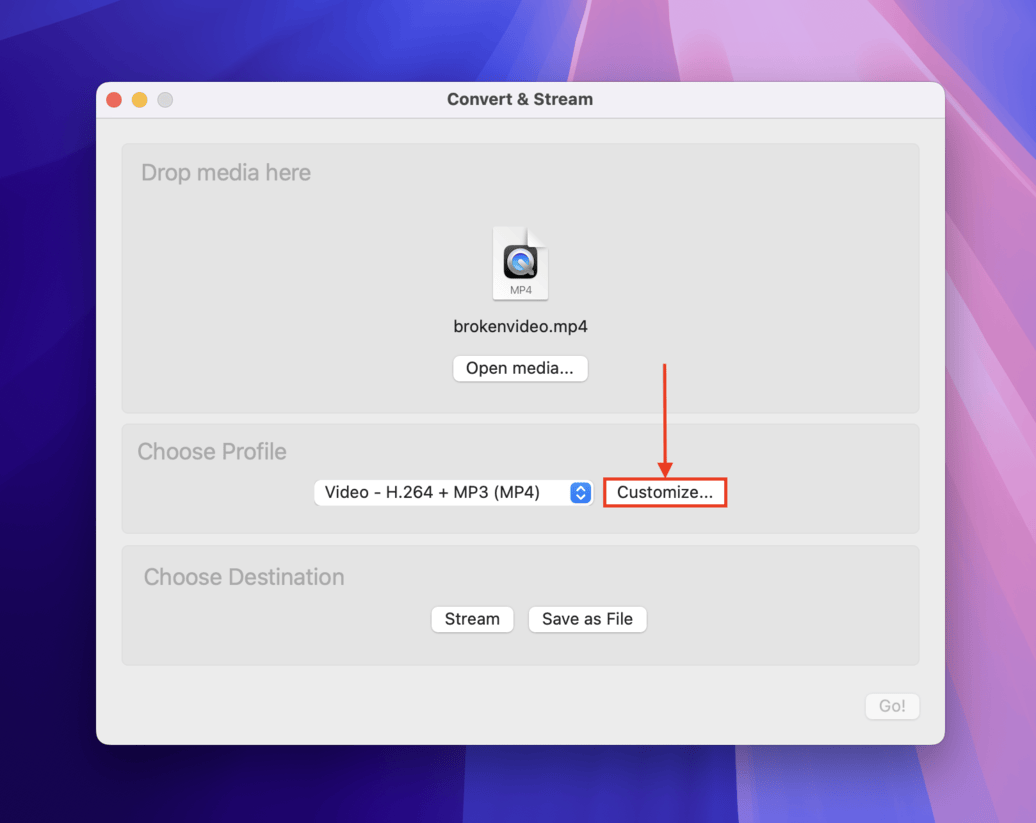
- In the Drop media here section, click the Open media… button.
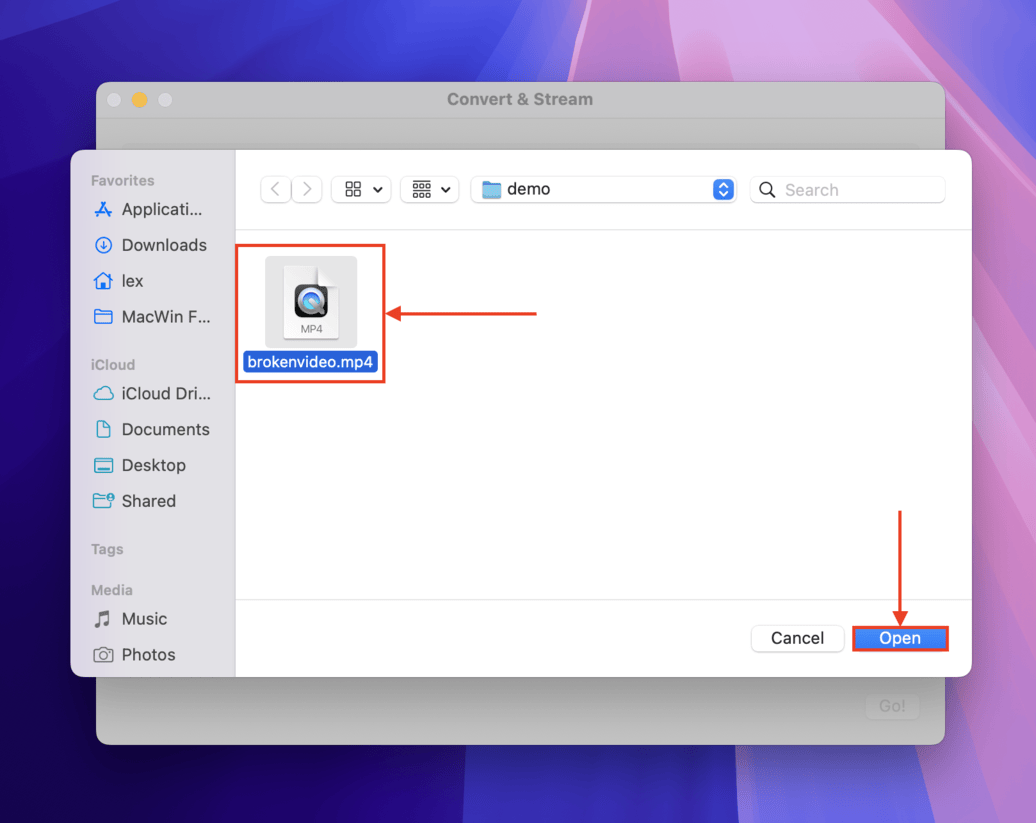
- In the dialogue box that appears, locate and select your corrupted video file. Then, click the Open button.
- In the Choose Profile section, click the Customize… button.
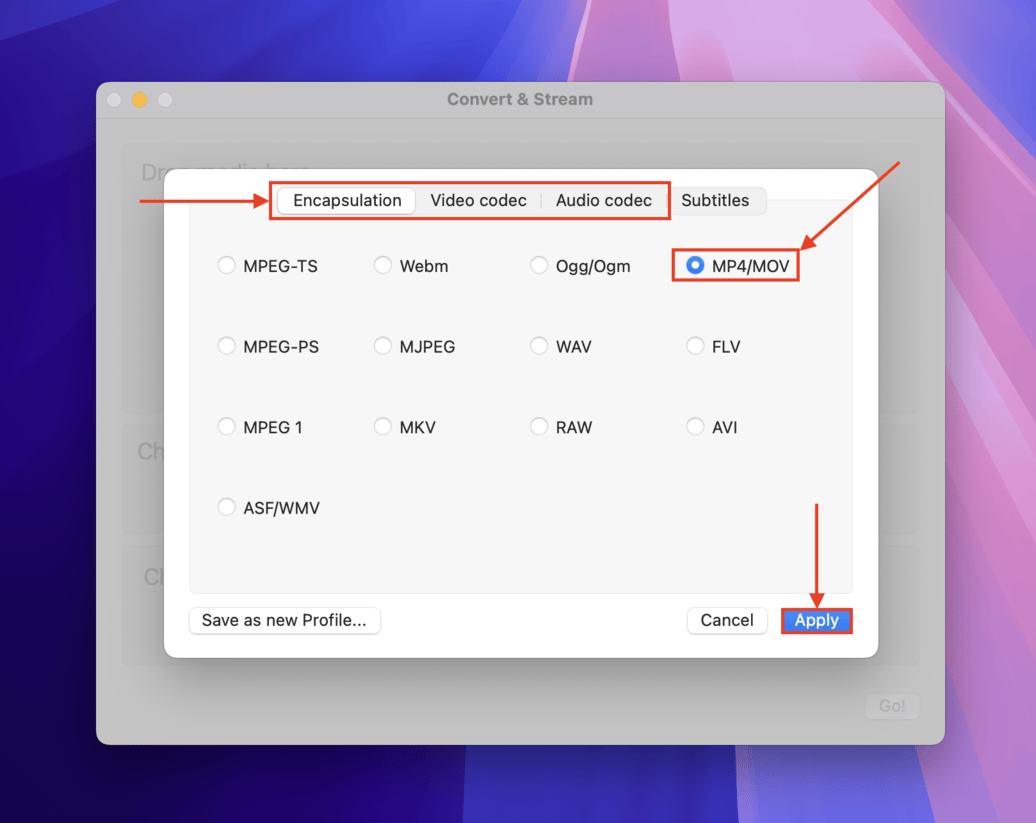
- Navigate to the Encapsulation menu. Then, select the format of the new container VLC will build for your corruption video file. We recommend MP4/MOV for compatibility purposes (even if it’s the format originally used). You can also modify the video file’s Video codec and Audio codec if necessary. Click Apply when you’re satisfied with the parameters.
- In the Choose Destination section of the Convert & Stream window, click Save as File.

- Next, click the Browse… button that appears in its place.

- Choose a new name for your video file. Then, use the dropdown menu to select a folder where you want VLC to save the converted file. Finally, click Save.

After clicking the Save button, the conversion process will automatically commence. Once it’s done, make sure to test the video file by opening it with VLC Media Player (File > Open File).
Method 4: Use Untrunc to Fix Truncated Videos
Untrunc is a free and open-source video repair tool that can fix videos with truncated or “incomplete” file data. This typically results from disrupted recording sessions like your camera suddenly dying mid-capture. Basically, Untrunc attempts to make incomplete videos ”whole” again by parsing reference data from a healthy file sample.
Difficulty level: Hard. Using Untrunc itself is easy but installation can be tedious and confusing for beginners.
- Open any browser on your Mac.
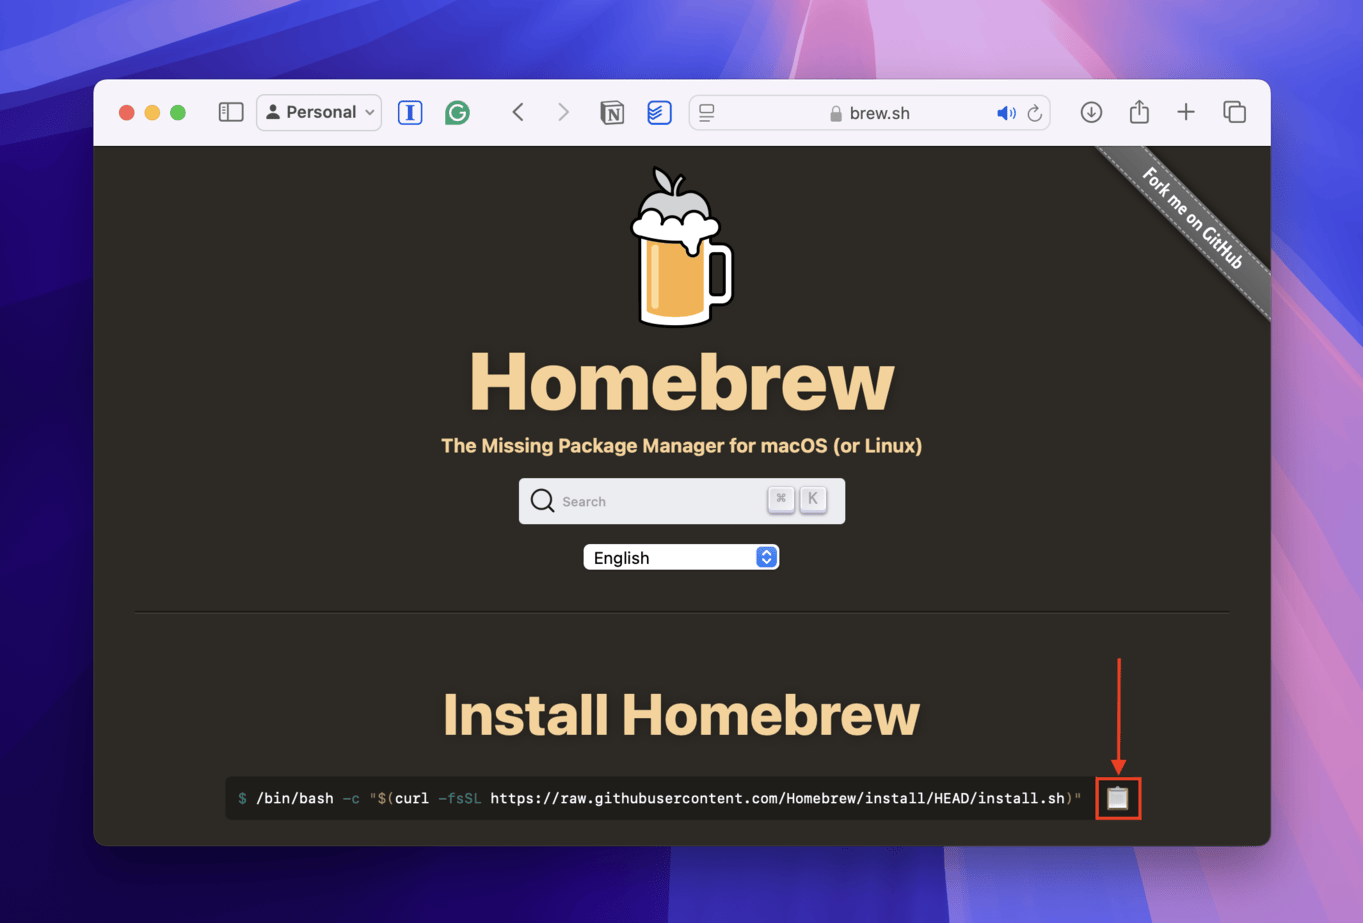
- Navigate to the brew.sh webpage. Click the clipboard icon beside the code snippet in order to copy the command that will let you install Homebrew.
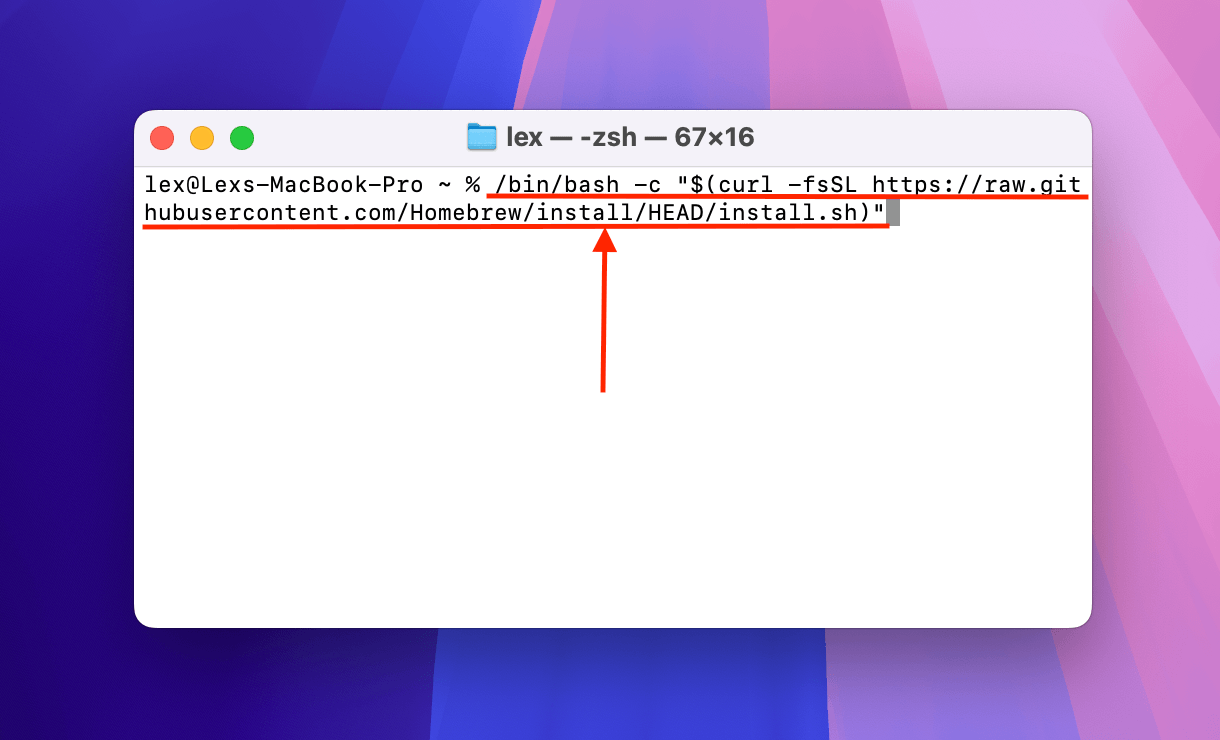
- Open the Terminal app (which you can find in the Utilities folder inside the Applications folder). Then, paste the command you copied in step 2 and press Return.
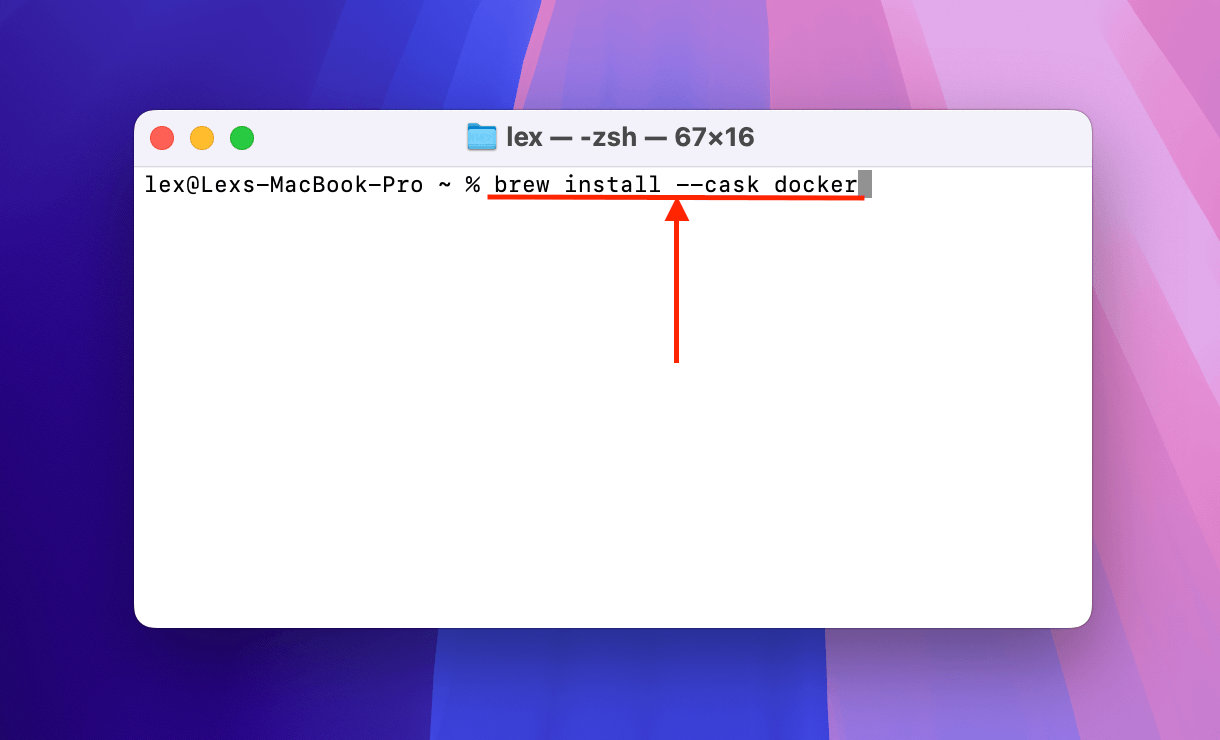
- The Terminal logs will let you know once Homebrew has been successfully installed. When you’re able to enter commands again, execute the following:
brew install --cask docker
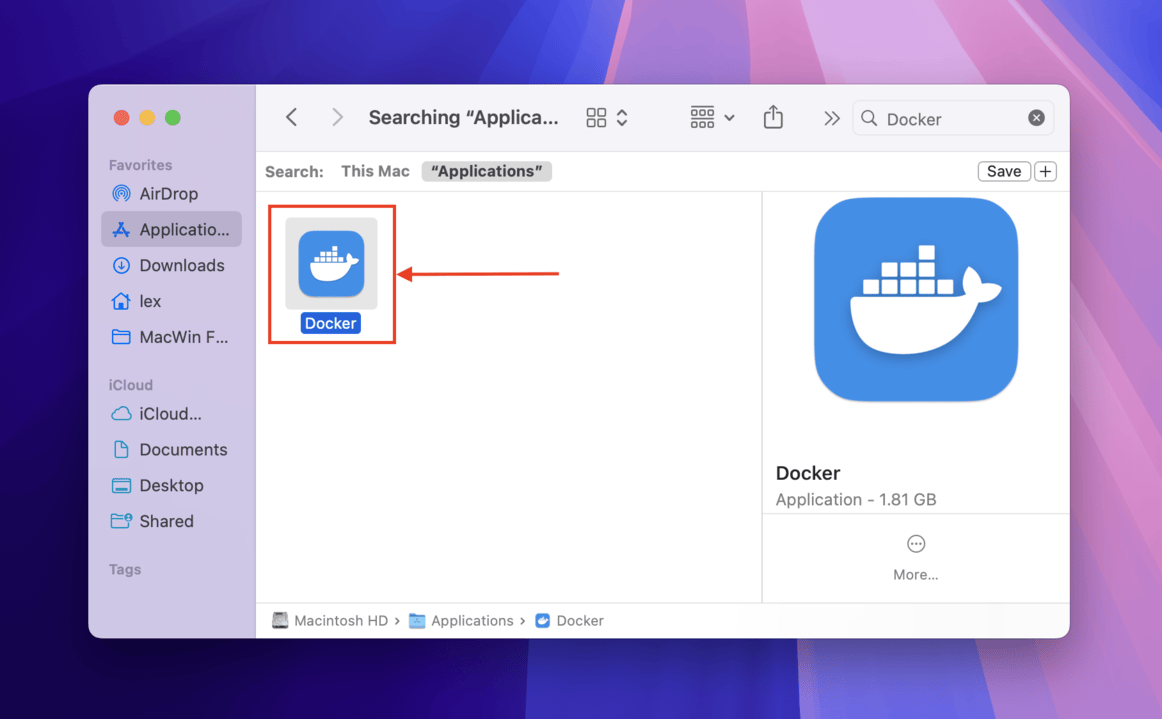
- You’ll find a new app called Docker in your Applications folder. Launch it and click Open if prompted by macOS.
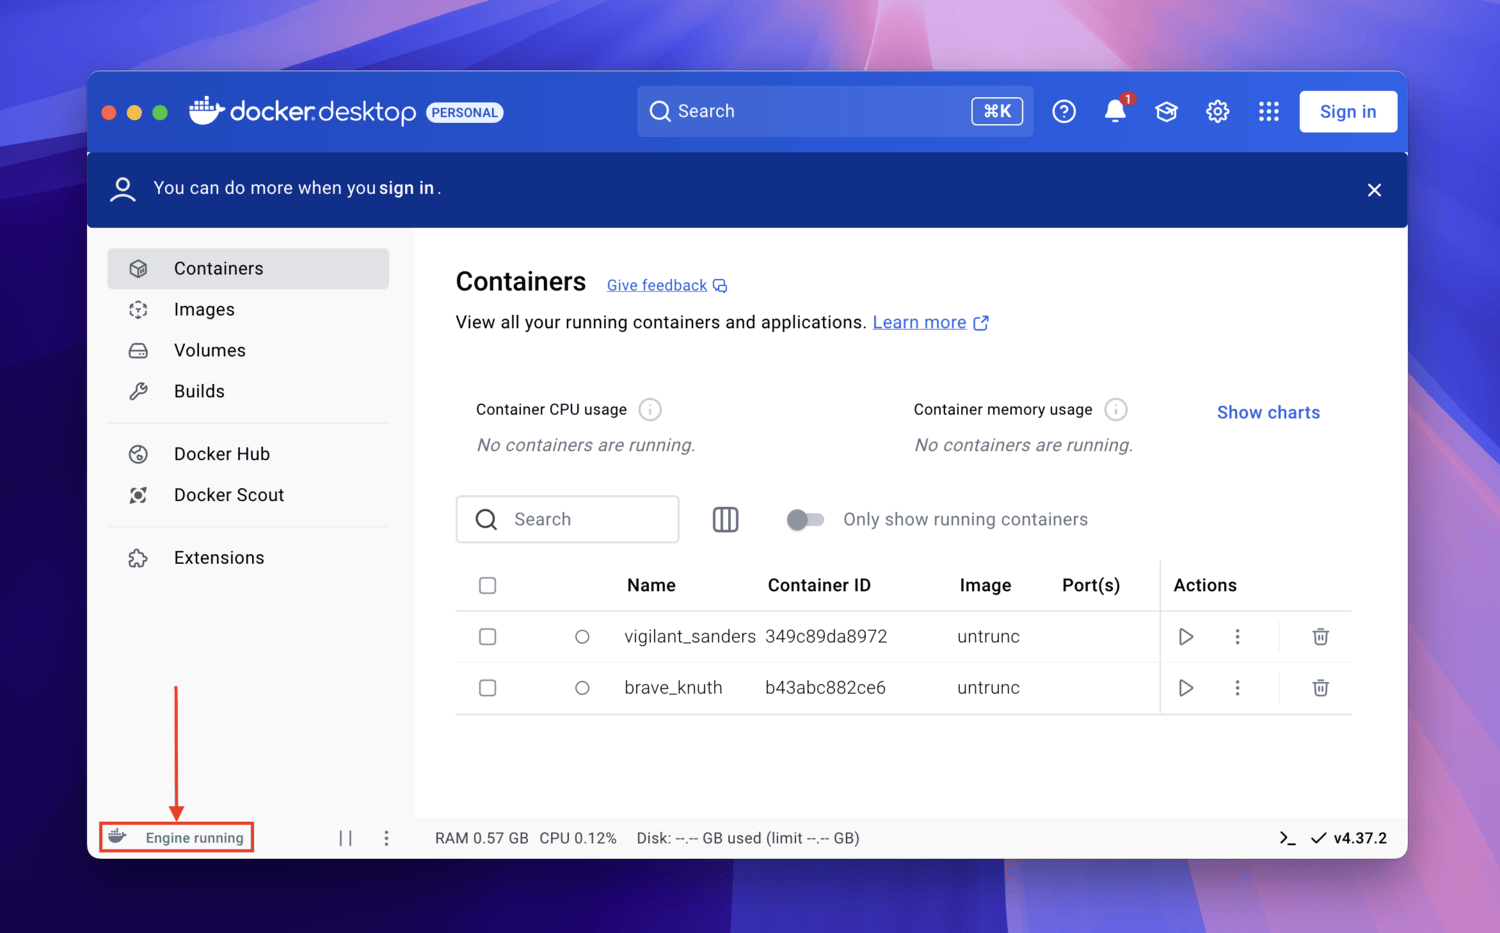
- In the Docker Subscription Service Agreement dialogue box, click Agree (don’t worry — paid subscriptions are only for commercial use). You can skip the sign-in and profile customization steps. Once Docker’s dashboard appears, check for the words Engine running in the bottom left corner of the window. Then, minimize Docker but keep it running.
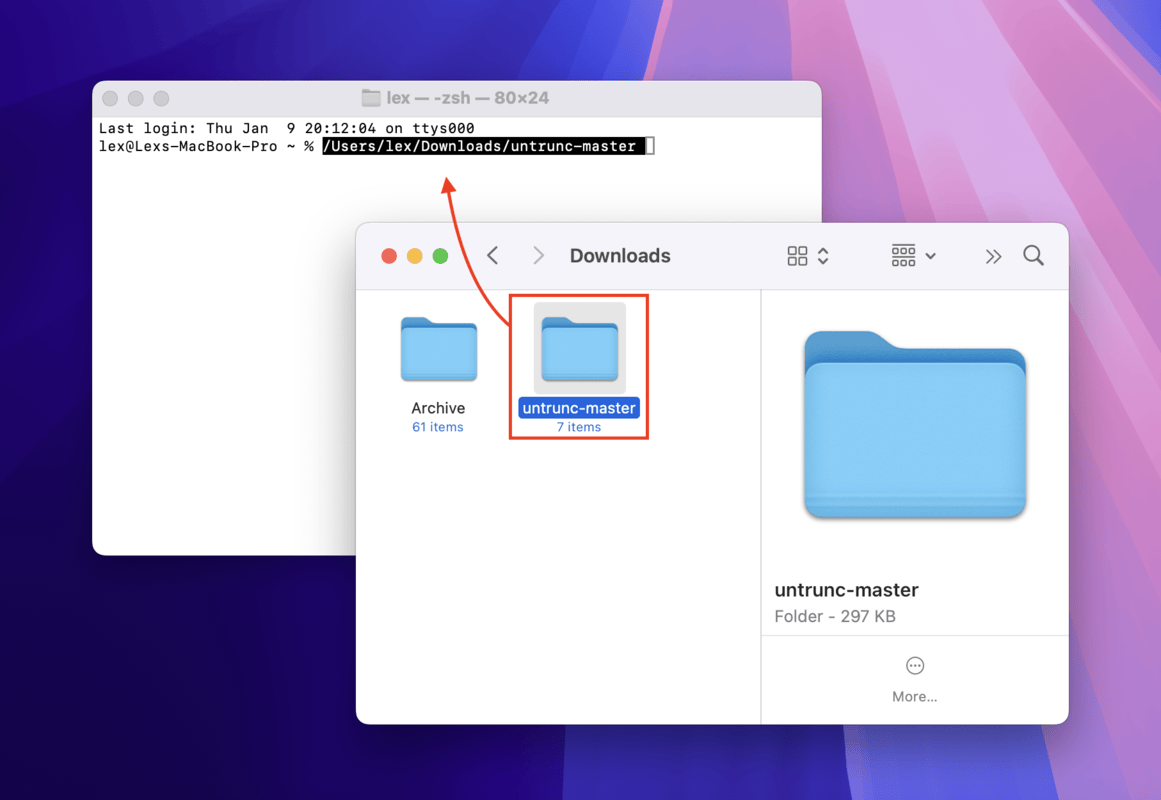
- Open your browser again and open this GitHub page of an updated version of Untrunc. Then, click <> Code and select Download ZIP. macOS should automatically unzip the downloaded file and output a folder called untrunc-master.

- Open the Terminal app again. Drag the untrunc-master folder into the Terminal window and press Return (if you encounter an error, type cd and add a space before dragging the folder).
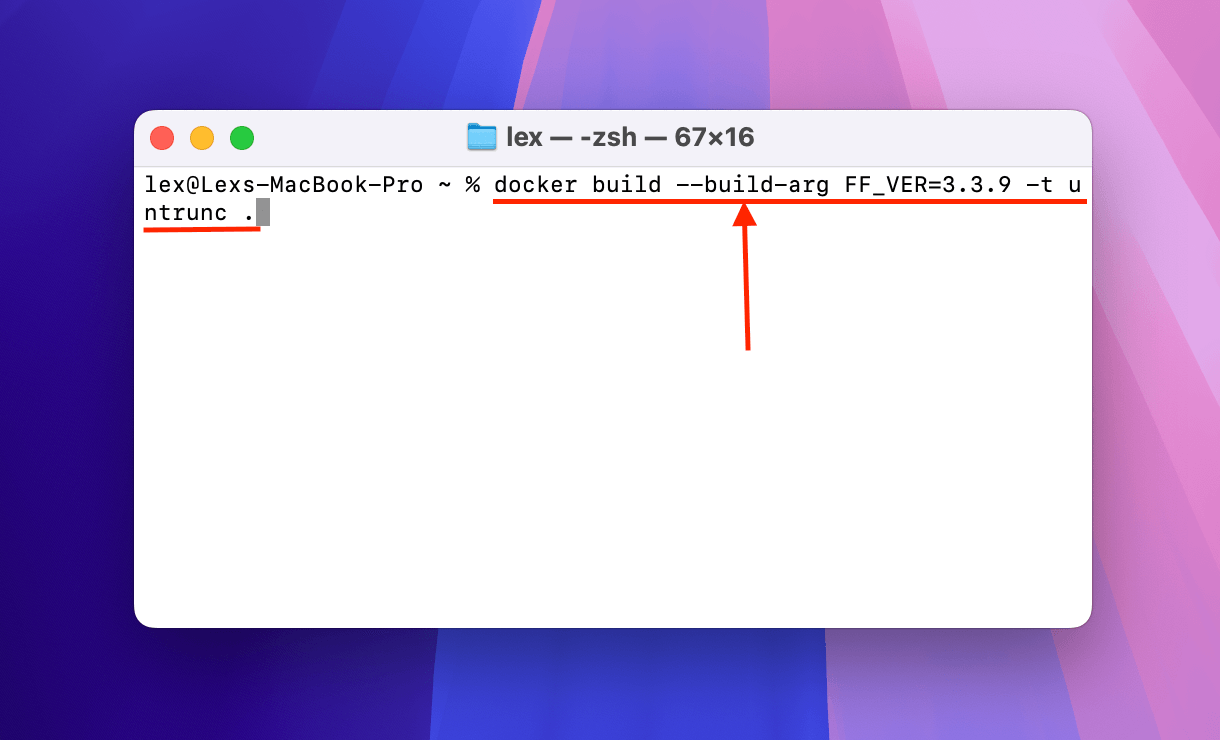
- Then, paste the following command in Terminal and press Return:
docker build --build-arg FF_VER=3.3.9 -t untrunc .
- Finally, you can use the following command to execute the untrunc operation on your corrupted video file:
docker run -v ~/Desktop/demo/:/mnt untrunc /mnt/fixedvideo.mp4 /mnt/brokenvideo.mp4
Replace Desktop/demo with the appropriate folder pathname of the directory where your corrupted video and healthy video files are stored. Replace fixedvideo.mp4 and brokenvideo.mp4 with the appropriate file names of your corrupted and healthy videos.
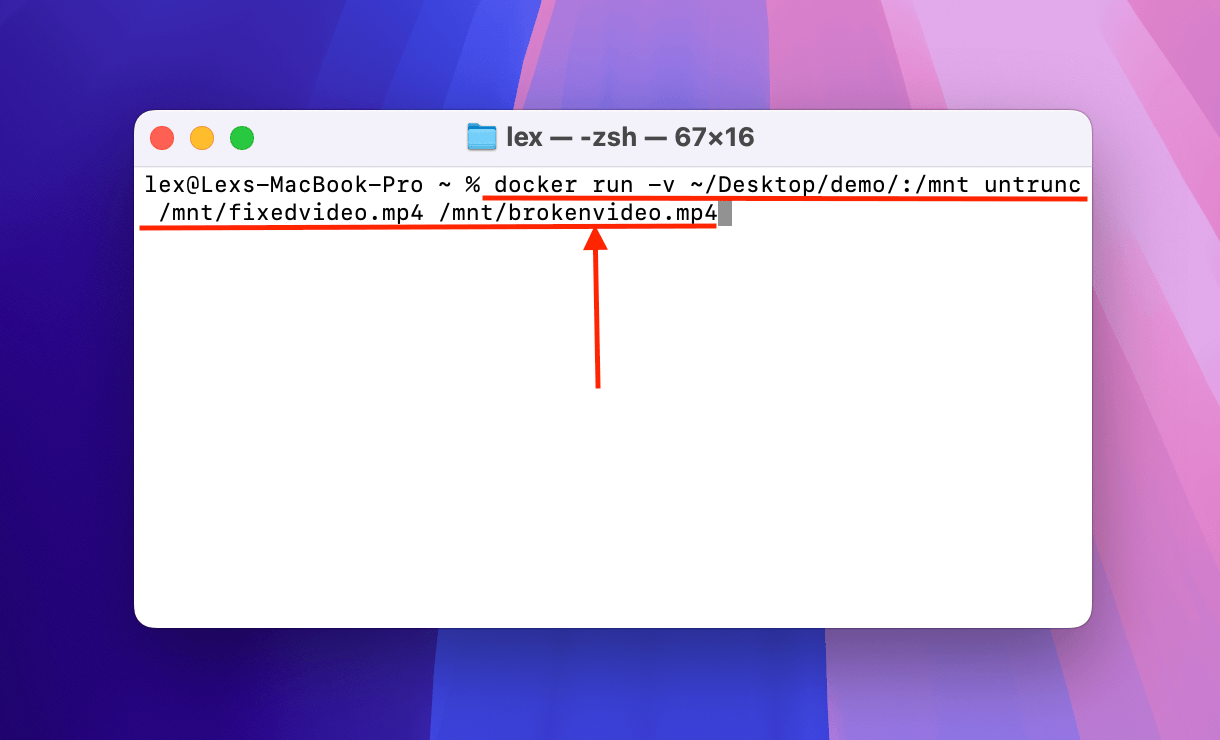
Once Untrunc is done creating the file, it will be saved as brokenvideo.mp4_fixed.mp4 (except the first part will use whatever you named your corrupted file).
Method 5: Use FFmpeg Framework
FFmpeg is a free, open-source, and comprehensive suite of tools and libraries that you can use to convert or transcode your video file. With FFmpeg, you can quickly execute a bunch of different operations on your corrupted video file to attempt to fix it with a variety of solutions.
Difficulty level: Medium. It only takes a few commands to install and utilize FFmpeg for our purposes but the entire process takes place inside Terminal. It requires Homebrew, covered in steps 2-3 of Method 4.
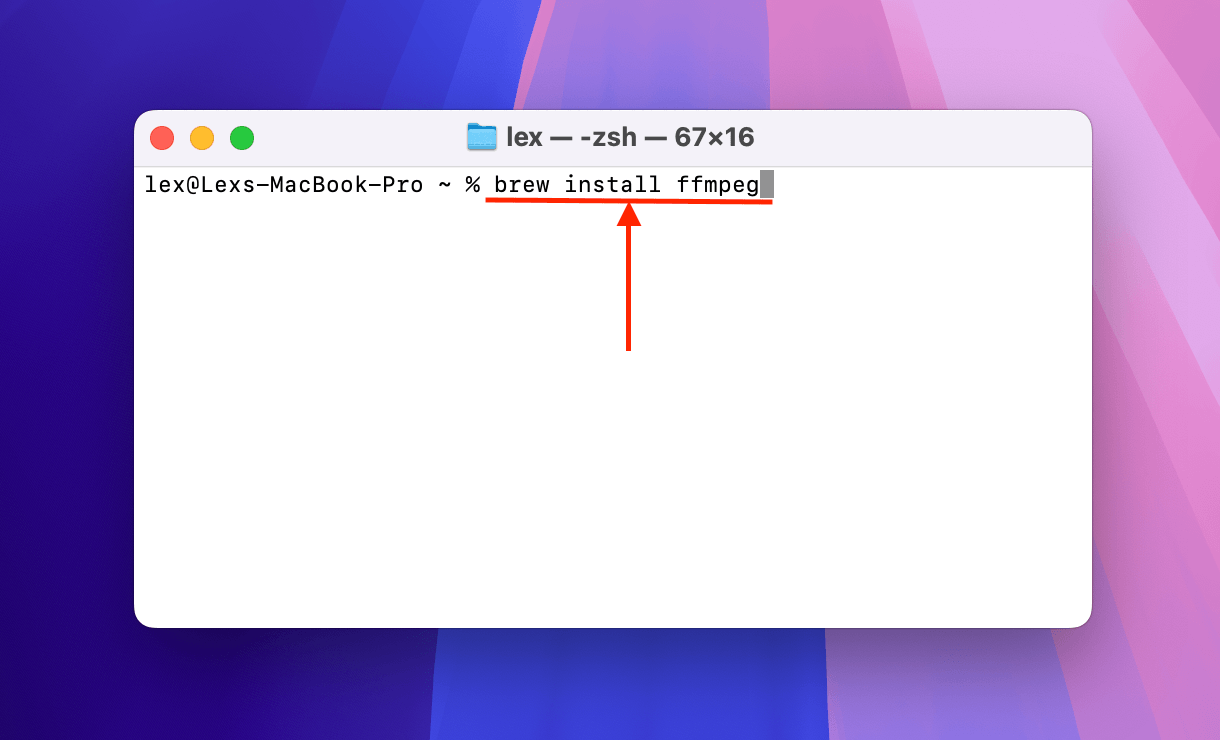
- Open the Terminal app (Finder > Applications > Utilities). Then, use the following command to install FFmpeg via Homebrew:
brew install ffmpeg
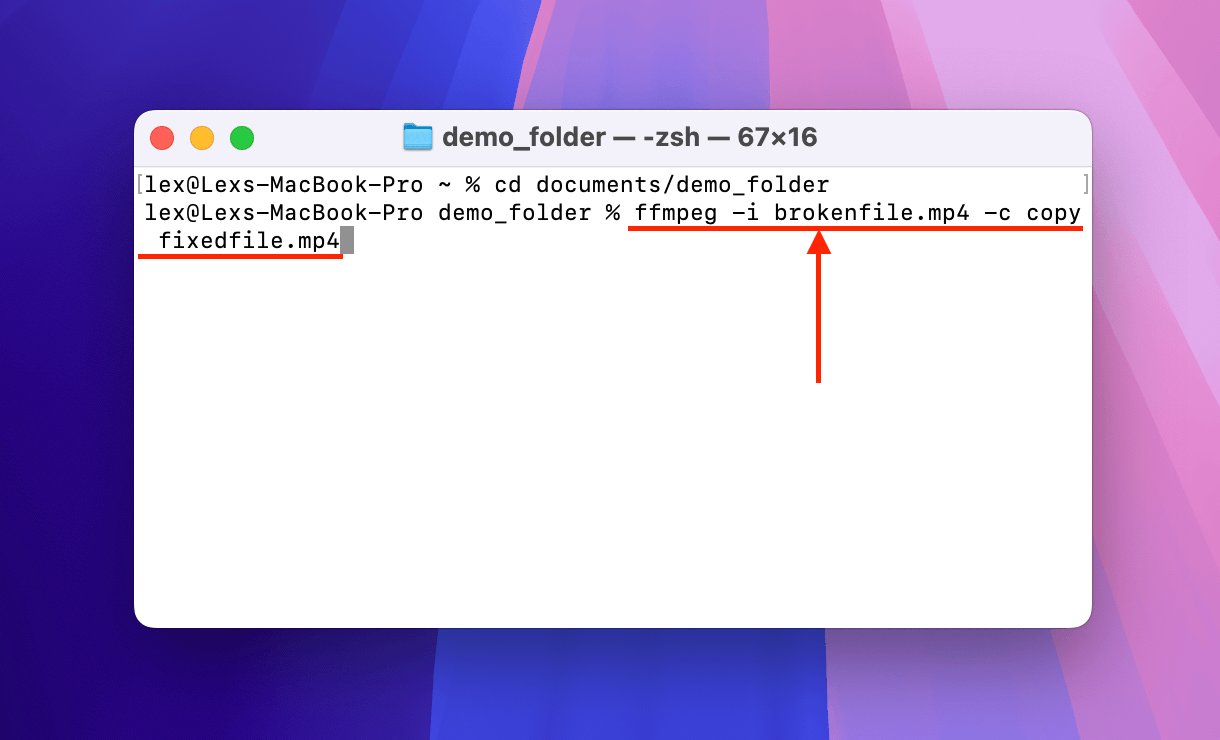
- Again, Terminal will let you know once FFmpeg is fully installed. Then, use the Change Directory command to operate Terminal in the folder where your corrupted file is located:
cd documents/demo_folder
Replace documents/demo_folder with the corresponding folder pathname on your Mac.

- You can now use FFmpeg’s tools on your corrupted video. Steps 6, 7, and 8 feature 3 different commands that you can try to repair your video. The first command simply copies the video and audio streams of the original file to a new one, which is helpful for minor file system structure damage:
ffmpeg -i brokenfile.mp4 -c copy fixedfile.mp4
Replace brokenfile.mp4 with your corrupted video’s file name. This goes for the rest of the commands featured below.
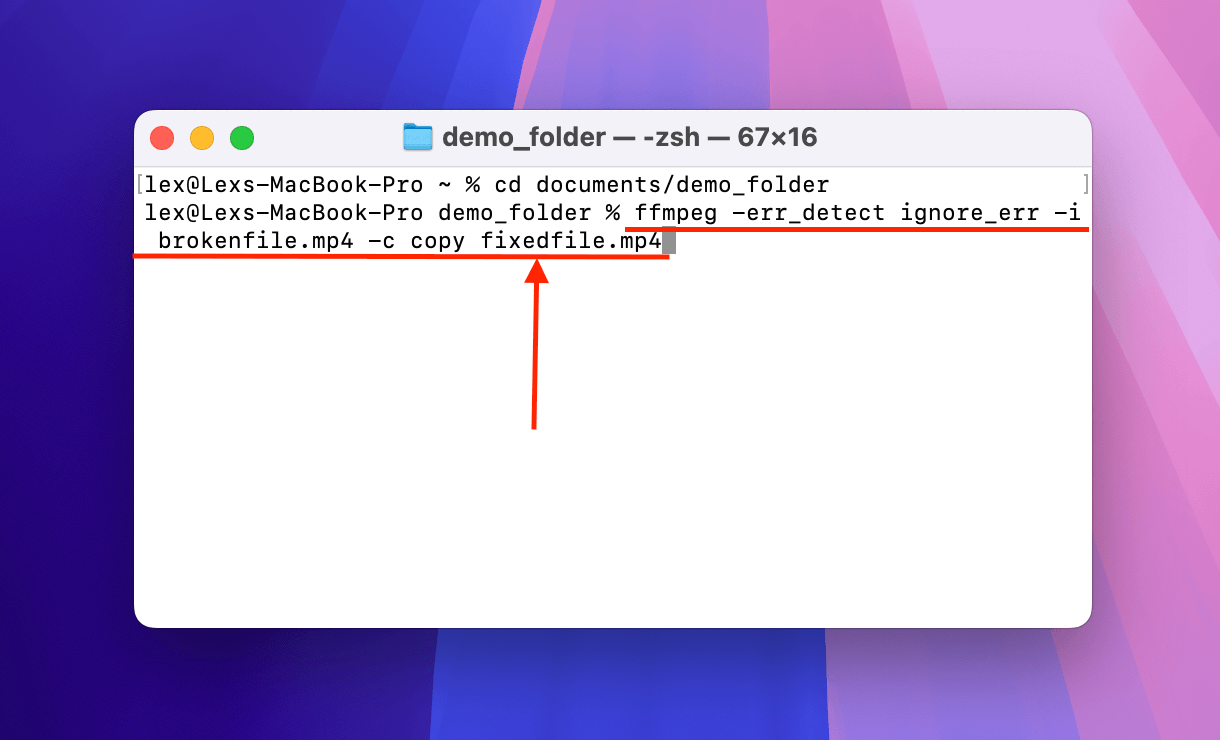
- This command also copies the original video and audio streams of your corrupted file and creates a new file. The difference is that this command contains parameters that tell FFmpeg to ignore errors that may prevent the operation from commencing:
ffmpeg -err_detect ignore_err -i brokenfile.mp4 -c copy fixedfile.mp4
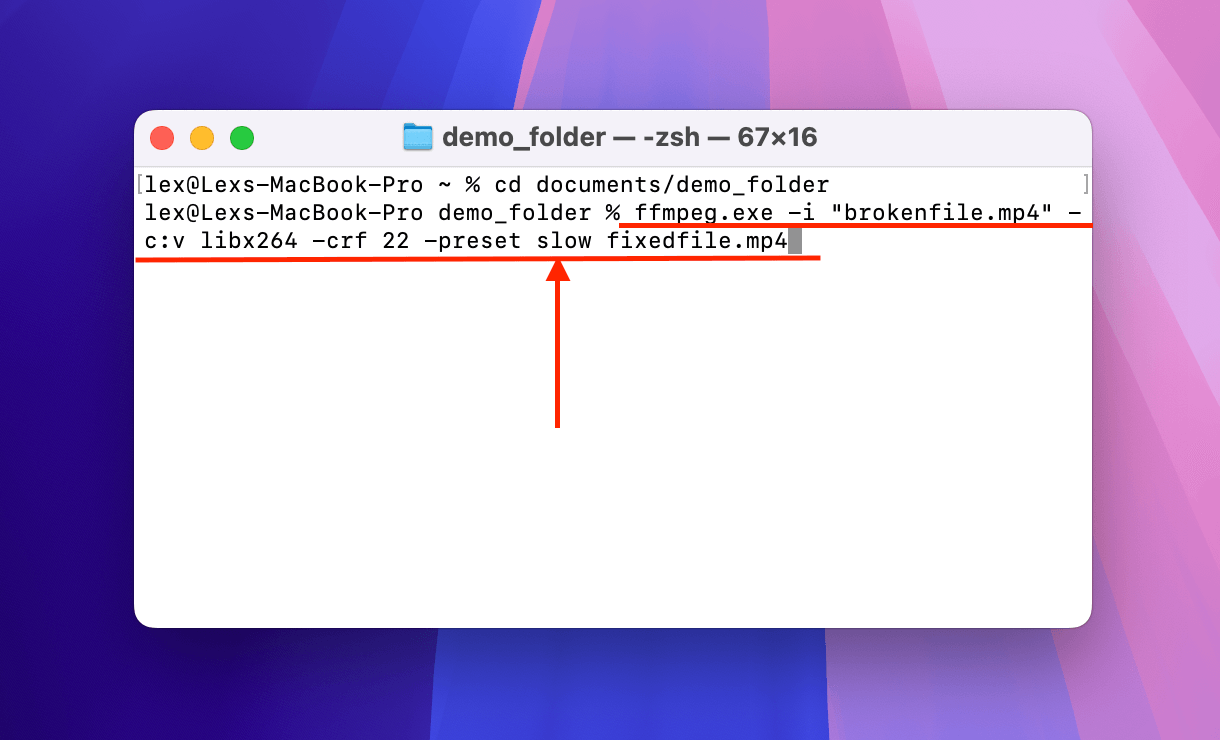
- If copying the streams of the corrupted file didn’t work, the next operation you can try is re-encoding the video. This can repair more severe corruption like damaged frames or corrupted codec data. Use the following command to re-encode your video file to an MP4 file with a H.264 codec:
ffmpeg.exe -i "brokenfile.mp4" -c:v libx264 -crf 22 -preset slow fixedfile.mp4
After running each command, the Terminal logs will tell you if the repair attempt was a success or not.
Need Help With Your Corrupted Videos?
Video repair is a complex process. If you hit a wall, try reaching out for help from other users or from paid experts. Here are a few places you can try:
- Handy Recovery Forum – The Handy Recovery Advisor Community is a discussion forum where you can engage directly with our team and other users to ask for help with repairing your video file (as well as talk about other file preservation topics, like data recovery).
- Reddit – Reddit is a very well-known discussion forum and an incredible resource where you can find hundreds of users bringing in unique knowledge about video repair and repair tools (e.g. r/ffmpeg is FFmpeg’s dedicated “subreddit”).
- Paid services – You pay for experts to repair your file directly. Check if there are any reputable video repair services in your local community or find one online (e.g. Aero Quartet).
FAQ
Why do video files get corrupted?
Video files get corrupted when they are damaged or incomplete. These situations occur when:
- Read/write processes are interrupted (e.g. mid-shoot drone crash, improper ejection)
- Storage device or capture device has been physically damaged or infected with malware
- You only recovered part of the file (in case of data loss)
Can corrupted MP4 files be completely recovered?
Yes, corrupted MP4 files can be completely recovered under certain conditions. However, it’s never a 100% guarantee… To improve your chances: (a) don’t save new files to the storage device, (b) duplicate your videos to test multiple solutions, and (c) save working video files to use as healthy samples.
What are the best video repair tools specifically designed for Macs?
There are no video repair tools specifically designed for Mac computers, but here are a few recommendations that work great on macOS (all free):
- Clever Online Video Repair – Powerful and convenient browser-based app offering free online repair for files up to 5 GB in size.
- FFmpeg/Shutter Encoder – Offers many options for converting and transcoding videos, as well as bypassing errors to salvage usable data.
- Untrunc – Utilizes healthy file samples to rebuild damaged or missing data in a corrupted video file.
How can I repair damaged video files on a Mac without software?
Here are some fixes that don’t require downloading or installing new apps:
- If the file was captured with a camera on an SD card, try reinserting it into the camera (DON’T format if prompted)
- If the video file uses the MOV container format, try opening it with QuickTime Player (built into macOS)
- Copy the file to your Mac before trying to play the video
- Use online video repair tools like Clever Online Video Repair (which is technically software but it’s contained in your browser and doesn’t require installation)
Does macOS have any built-in features to fix corrupted MP4 files?
No, macOS doesn’t have built-in features to fix corrupted MP4 files on Mac. You can try to rename your file in Finder and change the extension, which might help certain media players stream your video. However, most video repair tools for Mac are free!
Can I fix corrupted MP4 files on Mac for free?
Yes! You can repair damaged video files on Mac for free. In fact, most of the best video repair tools available for macOS are free (and many are open-source), such as:
- Clever Online Video Repair (browser-based)
- Shutter Encoder (GUI) or FFmpeg (command-line tool)
- Untrunc (command-line tool)
Note that Shutter Encoder and FFmpeg are media processing utilities (converters and encoders) that can “reverse” the effects of corruption.
Are there risks involved in using command-line tools like FFmpeg?
First, downloading and installing any third-party software carries the risk of malware so make sure to download FFmpeg from trusted sources. Second, command-line tools can sometimes override system protocols for what users are allowed to do. Research what each command does carefully.
Are online video repair services safe to use?
Yes! Trusted and reputable video repair services are safe to use. For extra protection, you can check if the website is owned by a company that is compliant with data privacy laws (e.g. GDPR, CCPA, etc.) and install apps like MalwareBytes for macOS to scan the downloaded files.
Does re-encoding reduce video quality?
Yes, re-encoding technically reduces video quality because you lose some information during the process (as it includes an operation called “lossy compression”). However, that doesn’t mean you’ll necessarily notice the drop in quality. We recommend trying it anyway.
This article was written by Alejandro Santos, a Staff Writer at Handy Recovery Advisor. It was also verified for technical accuracy by Andrey Vasilyev, our editorial advisor.
Curious about our content creation process? Take a look at our Editor Guidelines.