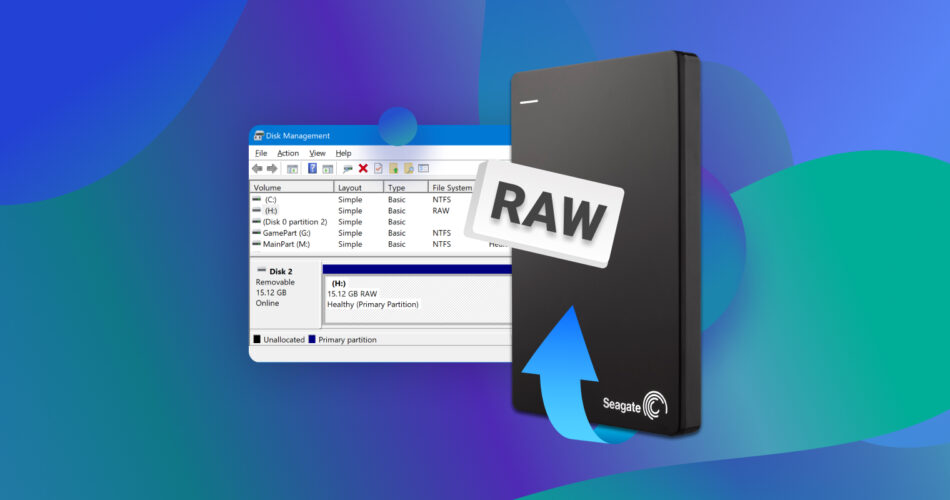
A RAW external hard drive indicates a file system issue with the drive, resulting in data becoming inaccessible and muddled. Typically, you need to format the external hard drive to fix it, which means losing all your previous data. But, there are workarounds to this, and we’ll take a look at some ways on how to fix RAW drive without formatting and losing your data.
Initial Steps Before You Recover a RAW HDD Without Formatting
As for the reasons why your hard drive become RAW, we will explain it later in this article. The most important task at the beginning is to provide safety to the data on the drive.
Before you attempt any repair methods for a RAW hard drive, you must first ensure that your data remains safe. Unless you’re trying to use a macOS/Linux-formatted drive on a Windows PC, a RAW drive typically indicates that the drive’s file system is corrupted, making the data inaccessible to your computer.
This corruption can stem from improper usage, power failures, malware, or interrupted formatting processes. Repair operations might modify the disk structure, making future data recovery efforts more complicated or even impossible. Therefore, recovery of your data using reliable recovery software should be your top priority.
Here are some essential precautions before recovery:
- We usually advise against writing new data to the affected drive, as adding new information can overwrite existing files and reduce the chances of recovery. However, with RAW drives, this is typically not possible anyway. Consider this a tip for future situations.
- Resist the urge to format the drive, even if prompted by the operating system. Formatting can erase the file pointers, making data recovery more challenging.
- Choose a reliable data recovery software that specializes in handling RAW drives. Make sure that you have enough storage space on a separate drive to save the recovered data.
Overall, you have two main options on how to proceed:
Option 1: Simple Recovery
Simply scan your RAW hard drive using data recovery software (like Disk Drill), recover all the data, and then format the drive to restore it to a working state. Since your data will already be recovered, the final step won’t involve any risks.
Option 2: Advanced Recovery
- Begin by the creation of a backup through Disk Drill to ensure that your data remains secure throughout the recovery process. This backup is crucial to avoid any risk of file loss during the repair attempts.
- Next, attempt to fix the drive through the use of TestDisk. This utility can help repair the corrupted file system and potentially restore access to the drive without any effect on your data.
- If TestDisk does not resolve the issue, proceed to recover the necessary files either from the backup you created in Step 1 or from the RAW drive itself through recovery software.
- Once you secure your files, it is time to fix the drive. In most cases, you may format the drive as the final step to restore it to a usable state. Although a format erases data on the drive, a quick format may still allow the recovery of some or all of the original data, since the file system structure undergoes redefinition but the file content may remain intact.
We’ll now go through each option in detail, starting with the simpler one.
How to Recover a RAW Drive Without Formatting (Simple Method)
The first step you need to take if you want to recover a RAW drive without losing data is to download a data recovery program. The software will help you recover your files, and then you can format the external drive to a recognized format. There are plenty of options available at your disposal, but remember, you need a program that can recover files from an external RAW drive. Because of the nature of this problem, data recovery software should have broad support for different file types and include deep and signature scanning capabilities.
To make your job easier, we recommend using Disk Drill, one of the most effective and easy to use data recovery applications in the market. Essentially, it supports data recovery from hard drives with a RAW file system, while being easy-to-use and packaged with other features such as drive backup and data protection. Windows users can take advantage of the free trial that lets you recover up to 500 MB of data for free.
Instructions on how to recover data from a RAW external hard drive using Disk Drill:
- Download Disk Drill and install it. It is compatible with the various Windows versions. You just need to select compatible version of the Disk Drill so you can run it. You can also install the program on macOS and the instructions will be, more or less, identical.
- Connect the RAW external hard drive to your PC.
- Launch Disk Drill. Then select the RAW drive from the list of devices, and click Search for lost data. Disk Drill will begin the data recovery scan.
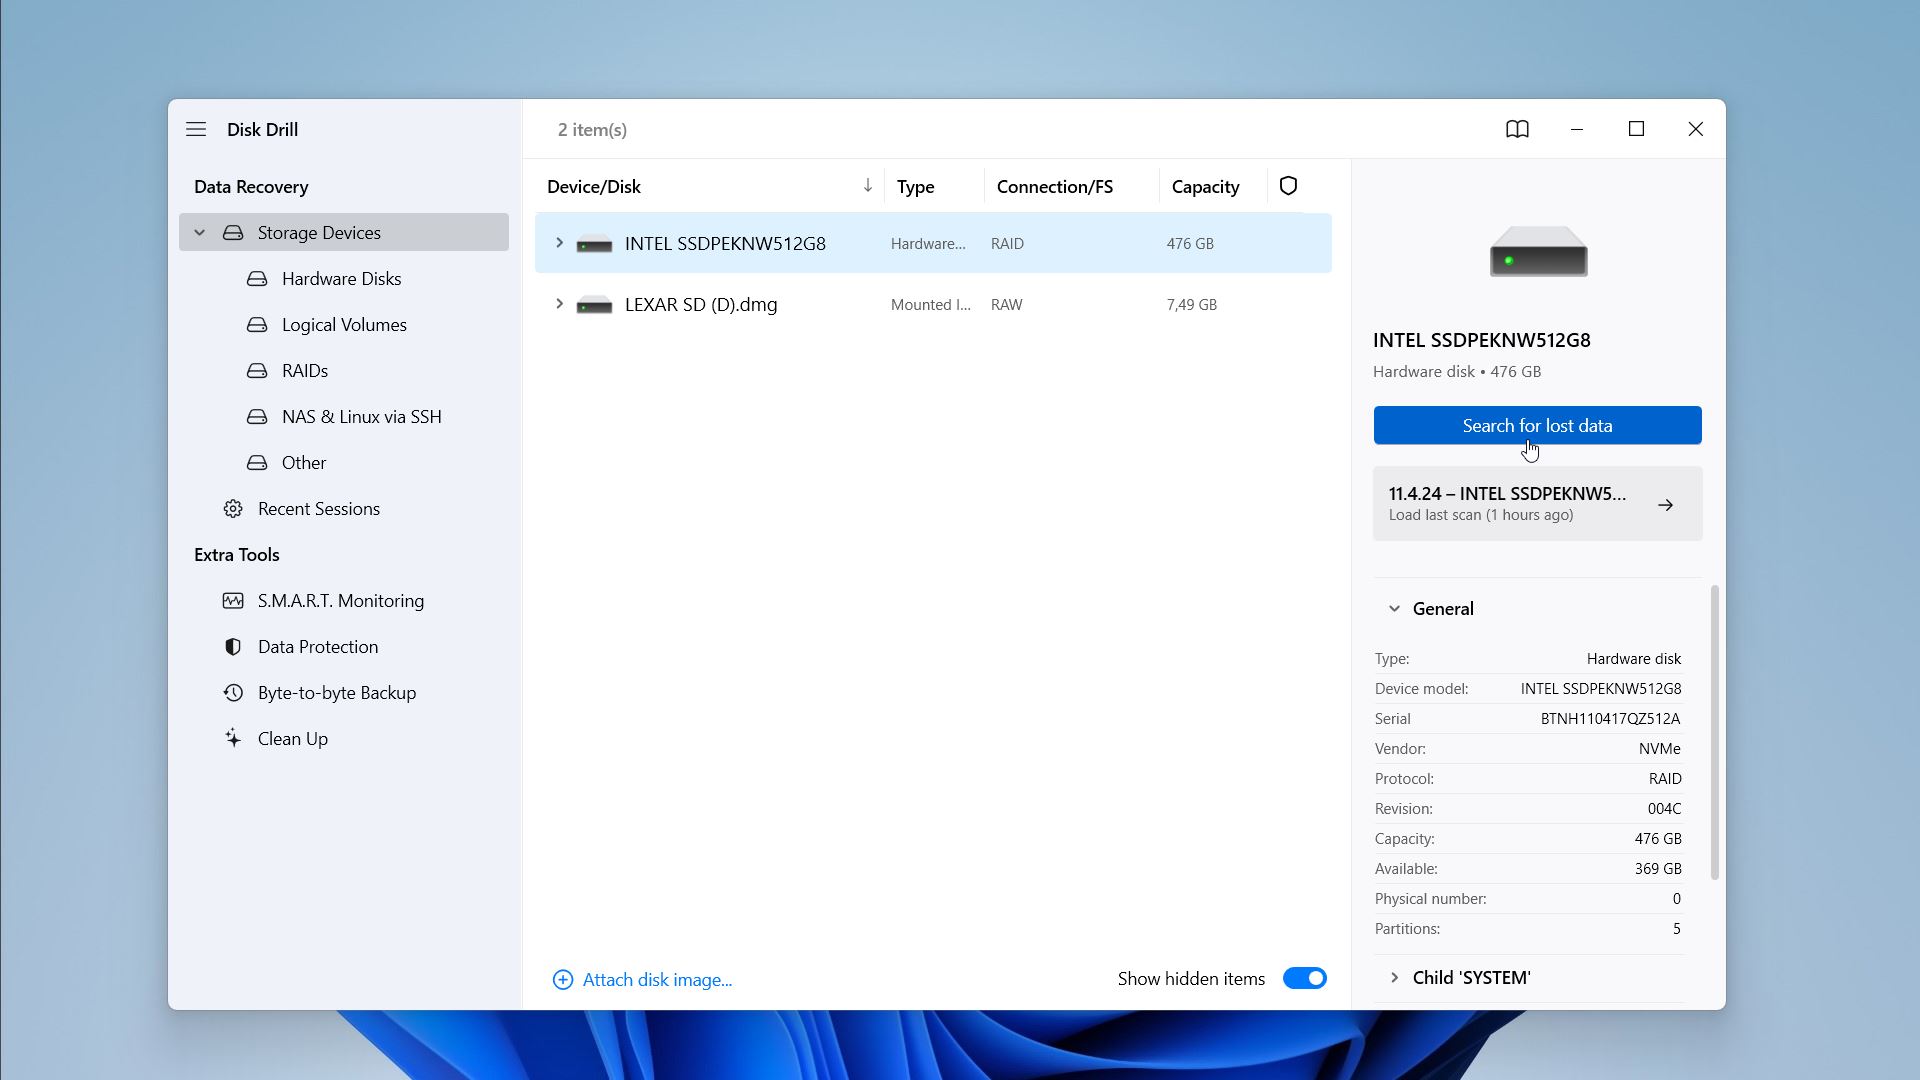
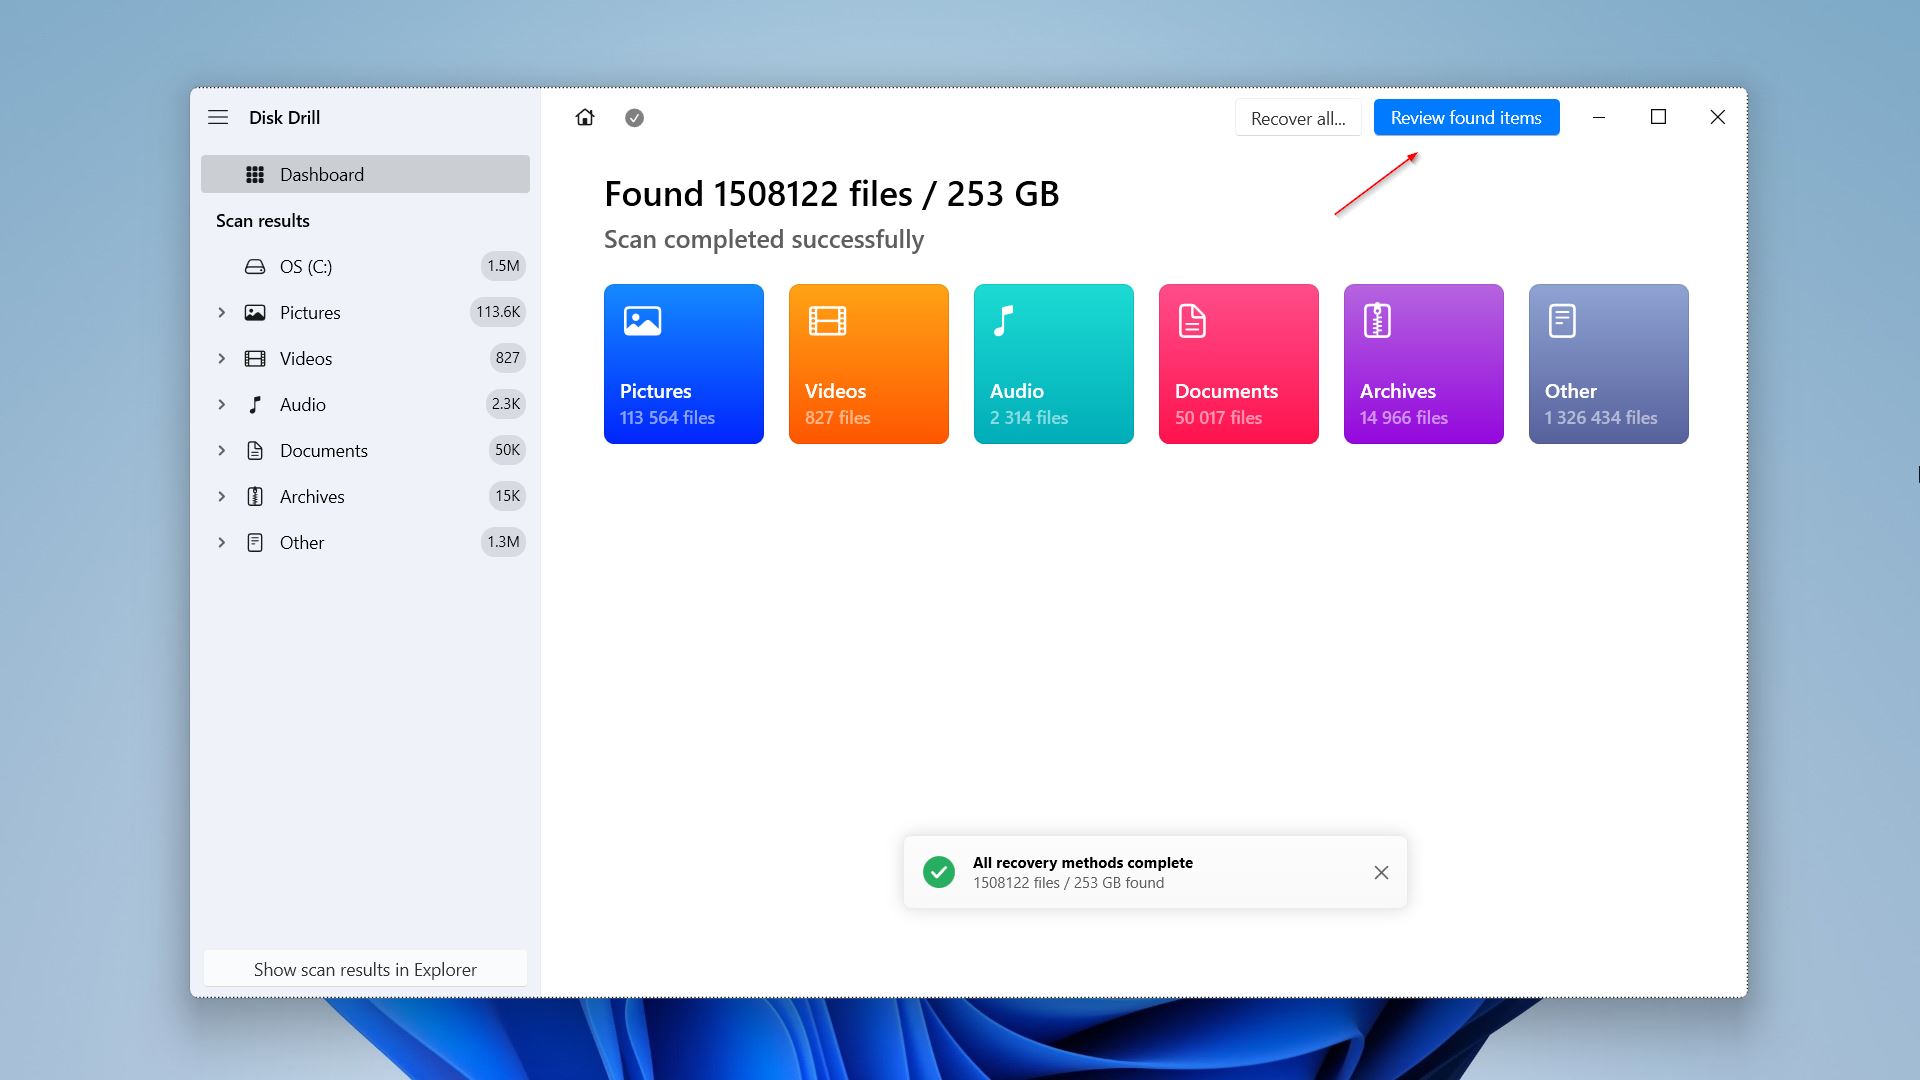
- You can view the recoverable files in real-time or wait for the scan to complete. To do any of it, click on Review found items. You can also directly choose the file type you want to view, by clicking the options available (Pictures, Video, Music, Documents, and Archives).
- Depending on the type of files you need to recover, you can use the different filters available in the program to make it easier for you to find them. Files can be sorted by type, date, or their size.
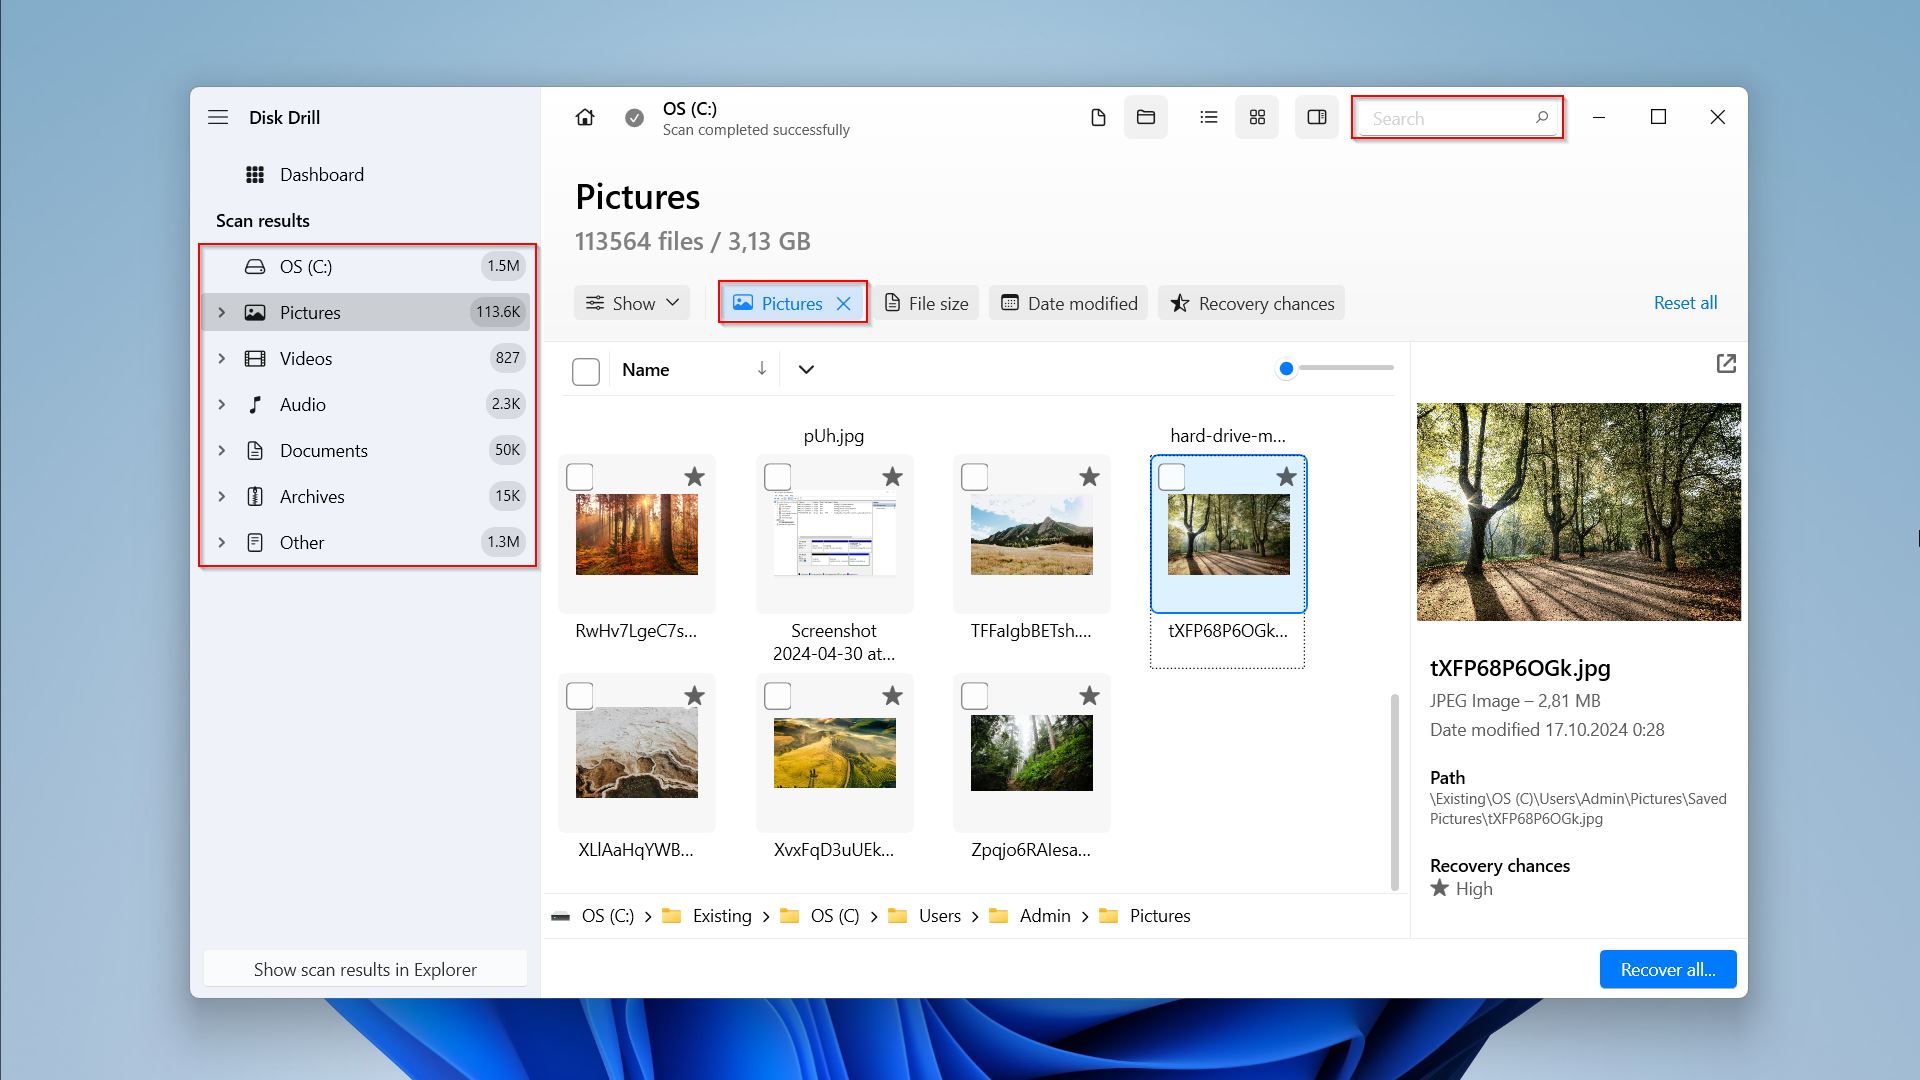 👀
👀Note: You can recover all the found data without selecting specific files by clicking the ‘Recover all…‘ button.
- Once you found files you need, select the files you want to recover, using the checkbox next to each file. Double-click a file to preview it. Once confirmed, click on Recover.
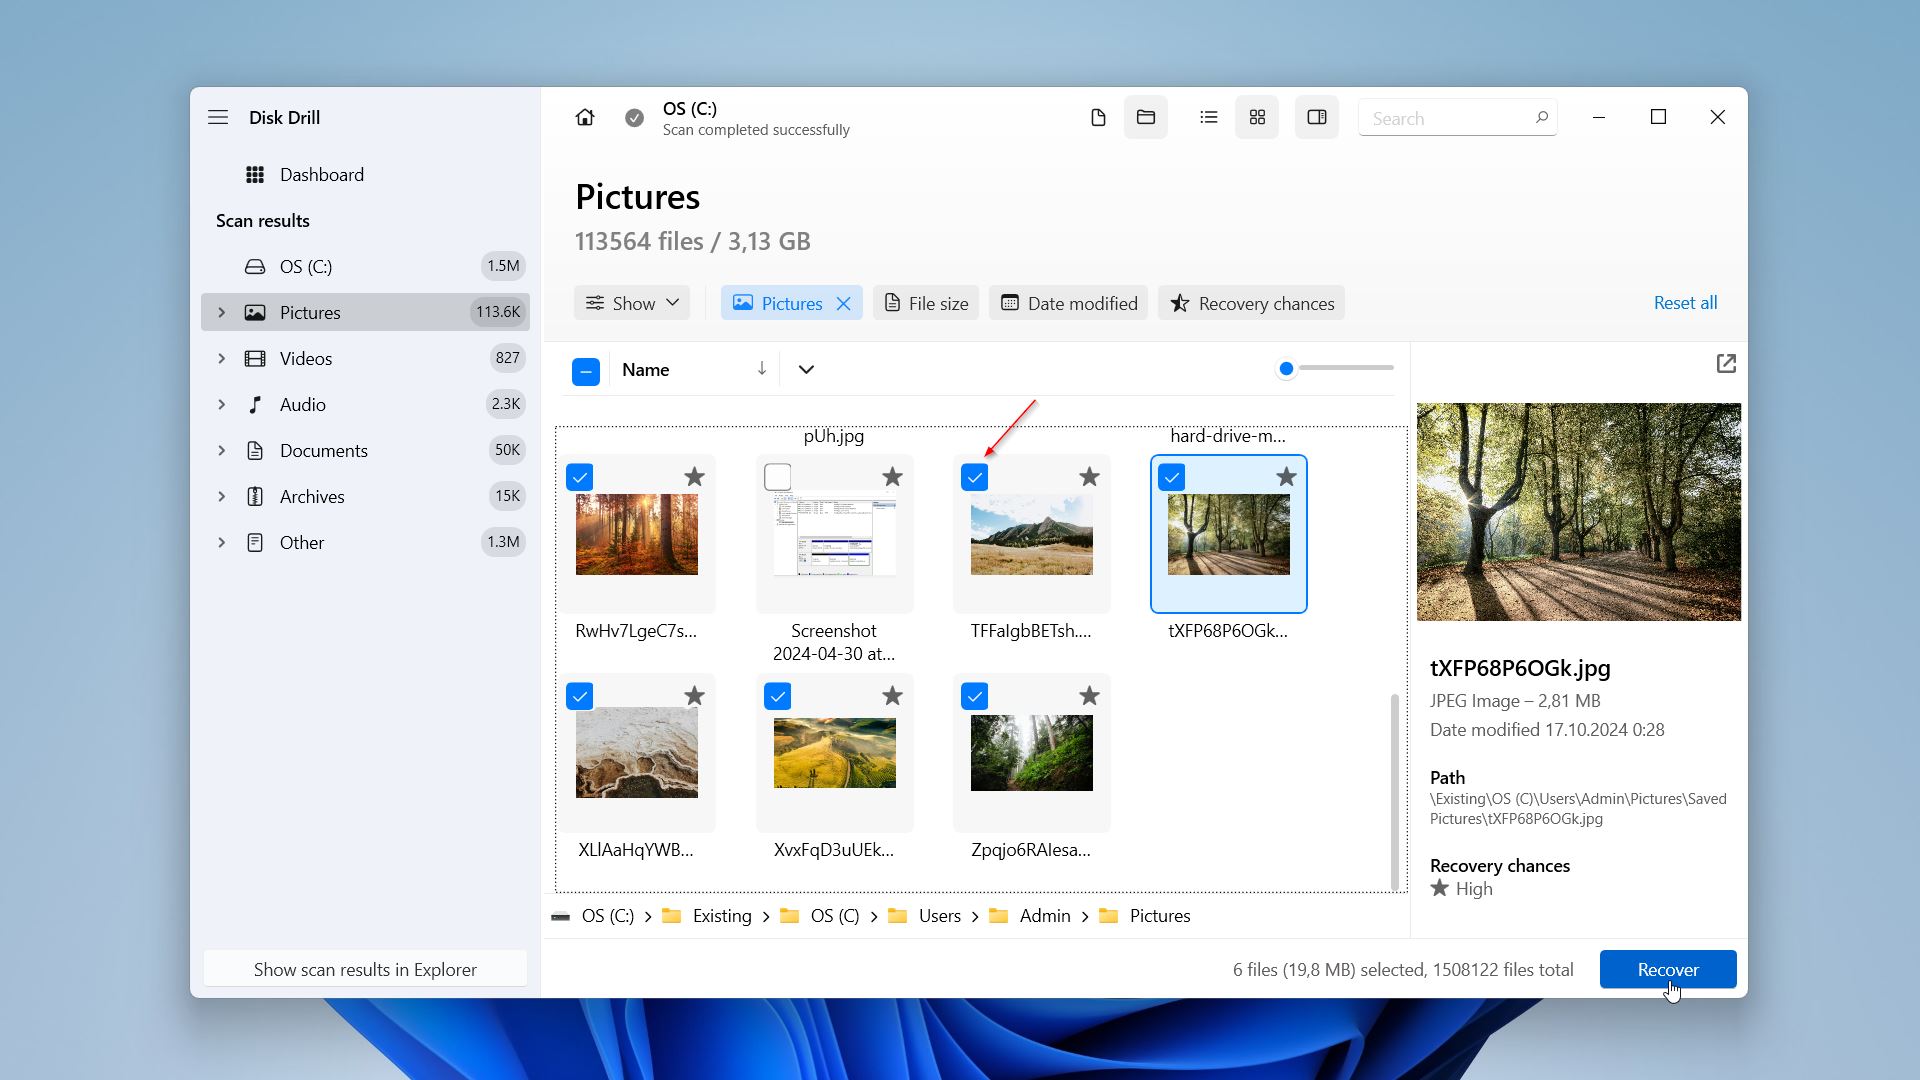
- Select a recovery destination for the files that will not be the drive you recover data from. Click on Next. Note the icons to the right of the disk. If you select a disk that has insufficient space or is the same disk from which you are recovering data, you will receive a notification. The latter scenario is irrelevant in this case, as you cannot write data to a RAW drive.
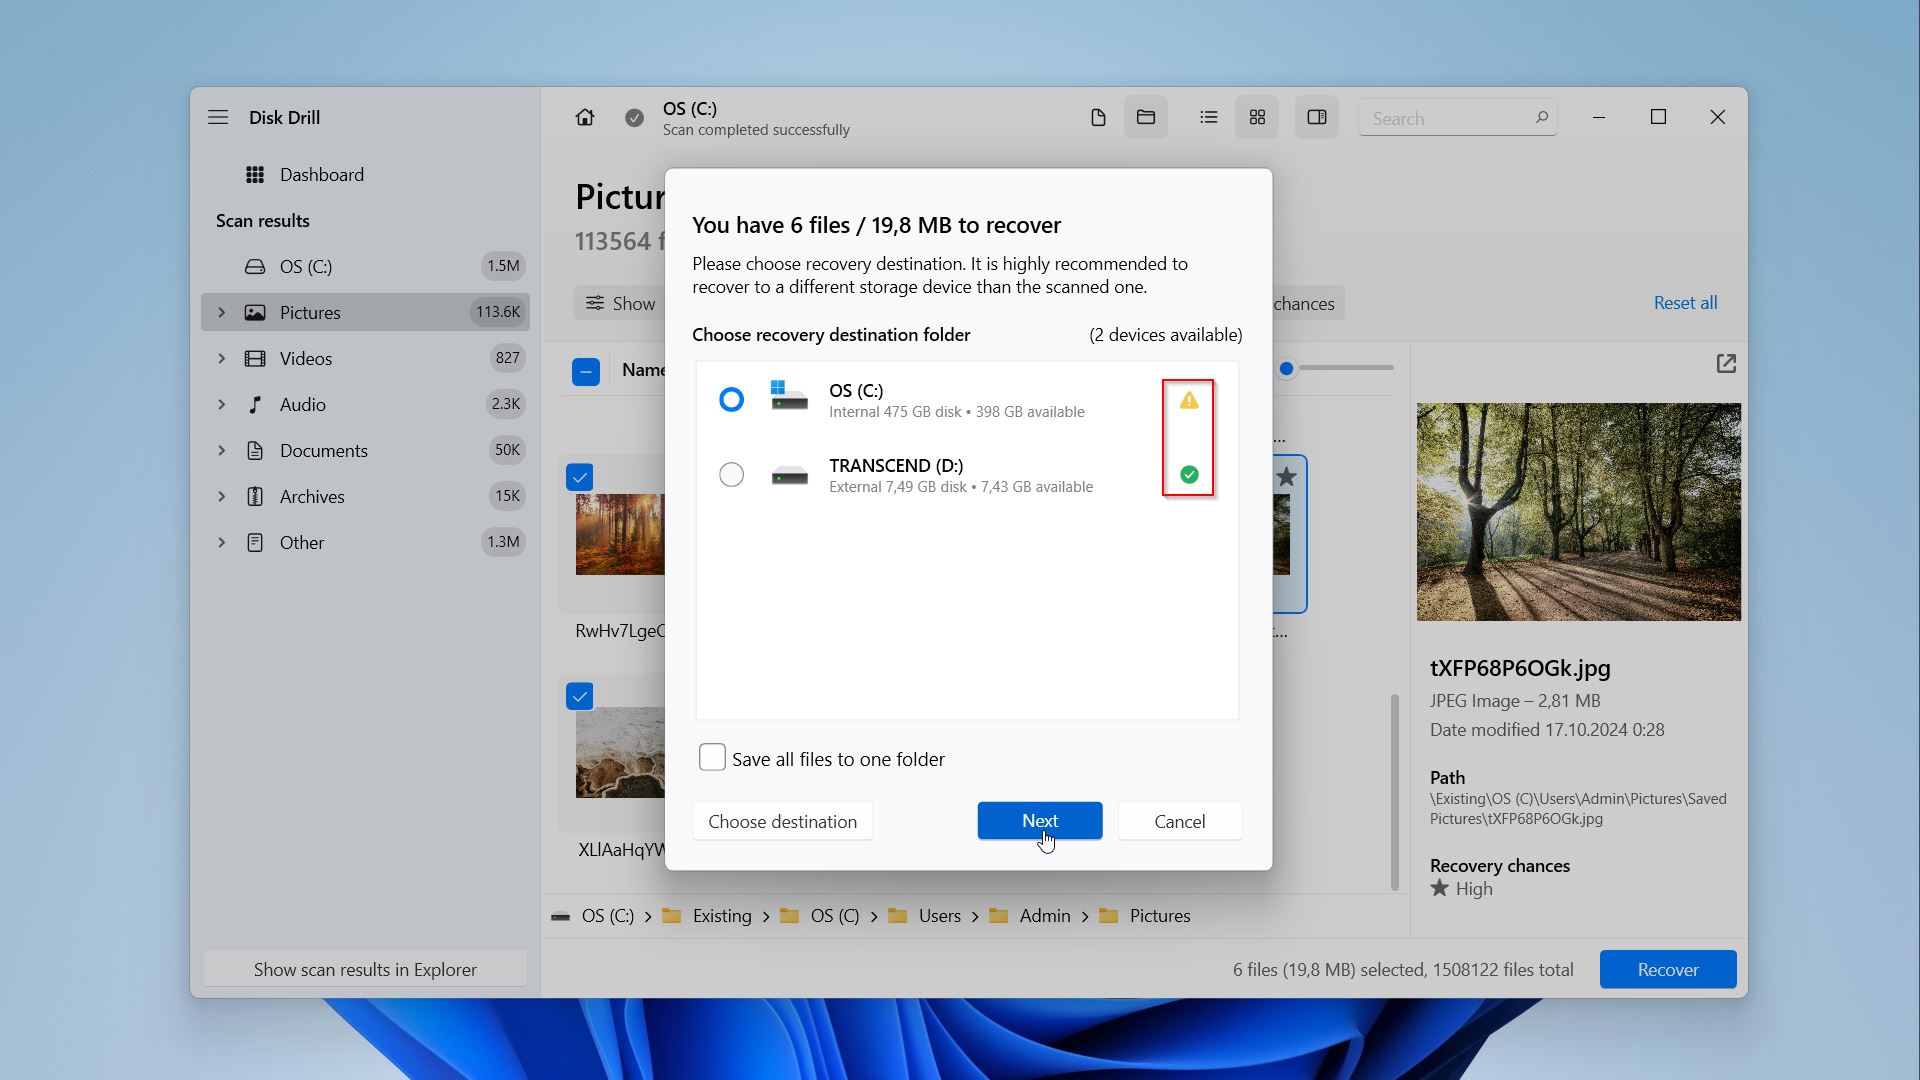
- Disk Drill will recover the selected files.
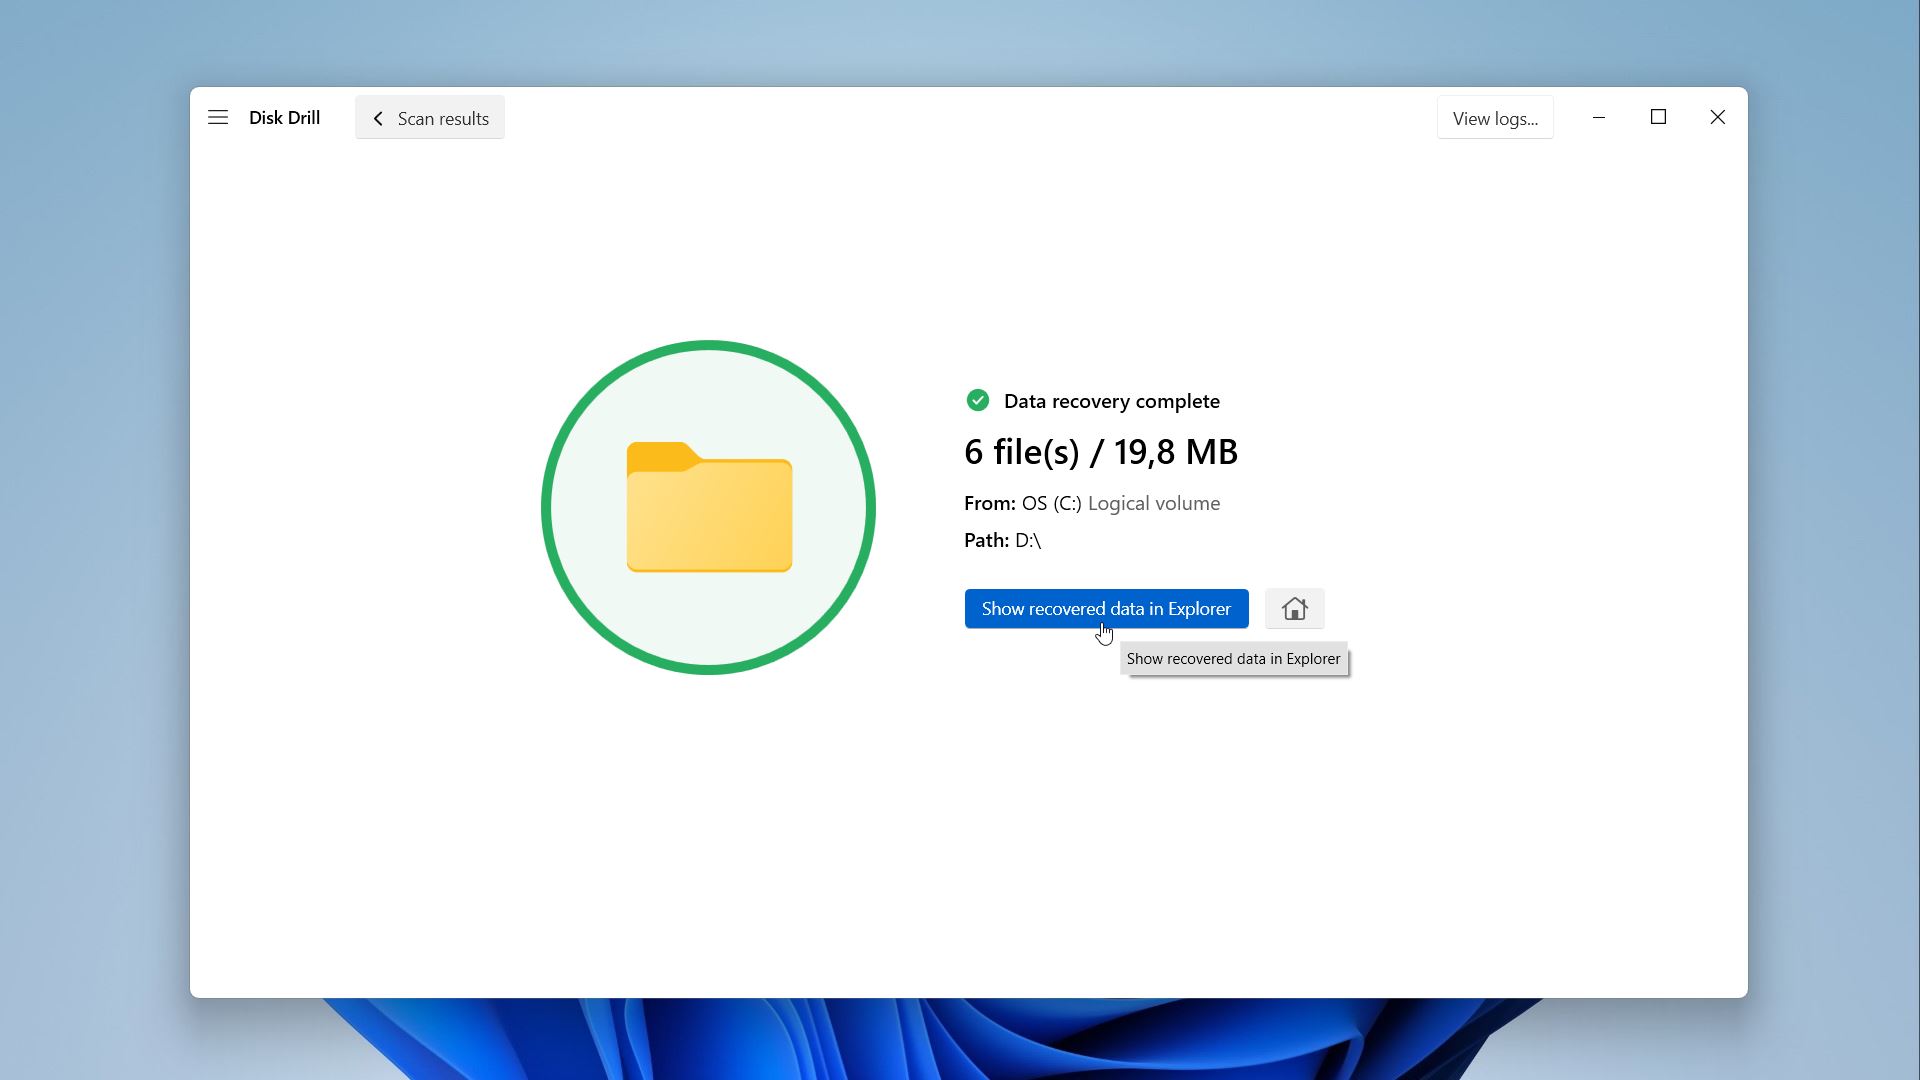
From here, you can do whatever you want with the external drive, including formatting it. You can restore the recovered data back to the drive, but we’d like to warn you: if this issue happens again, consider whether it’s wise to store important files on such a device.
How to Access a RAW Drive Without Formatting (Advanced Method)
We briefly touched on this process earlier in the article; now, let’s explore it in more detail.
Create a Backup of Your RAW Drive
First, create a byte-to-byte backup (image) of your drive. This way, if something goes wrong during the repair process, you will still be able recover your data from the backup.
We’ll stick with Disk Drill, mainly because it’s a convenient one-stop shop for both backup and recovery, all in a user-friendly interface. But you can always create a backup using another tool like Macrium Reflect or Acronis True Image and then recover data (if necessary) with any software that can scan disk images.
Here’s to how create a ‘copy’ of your drive using Disk Drill:
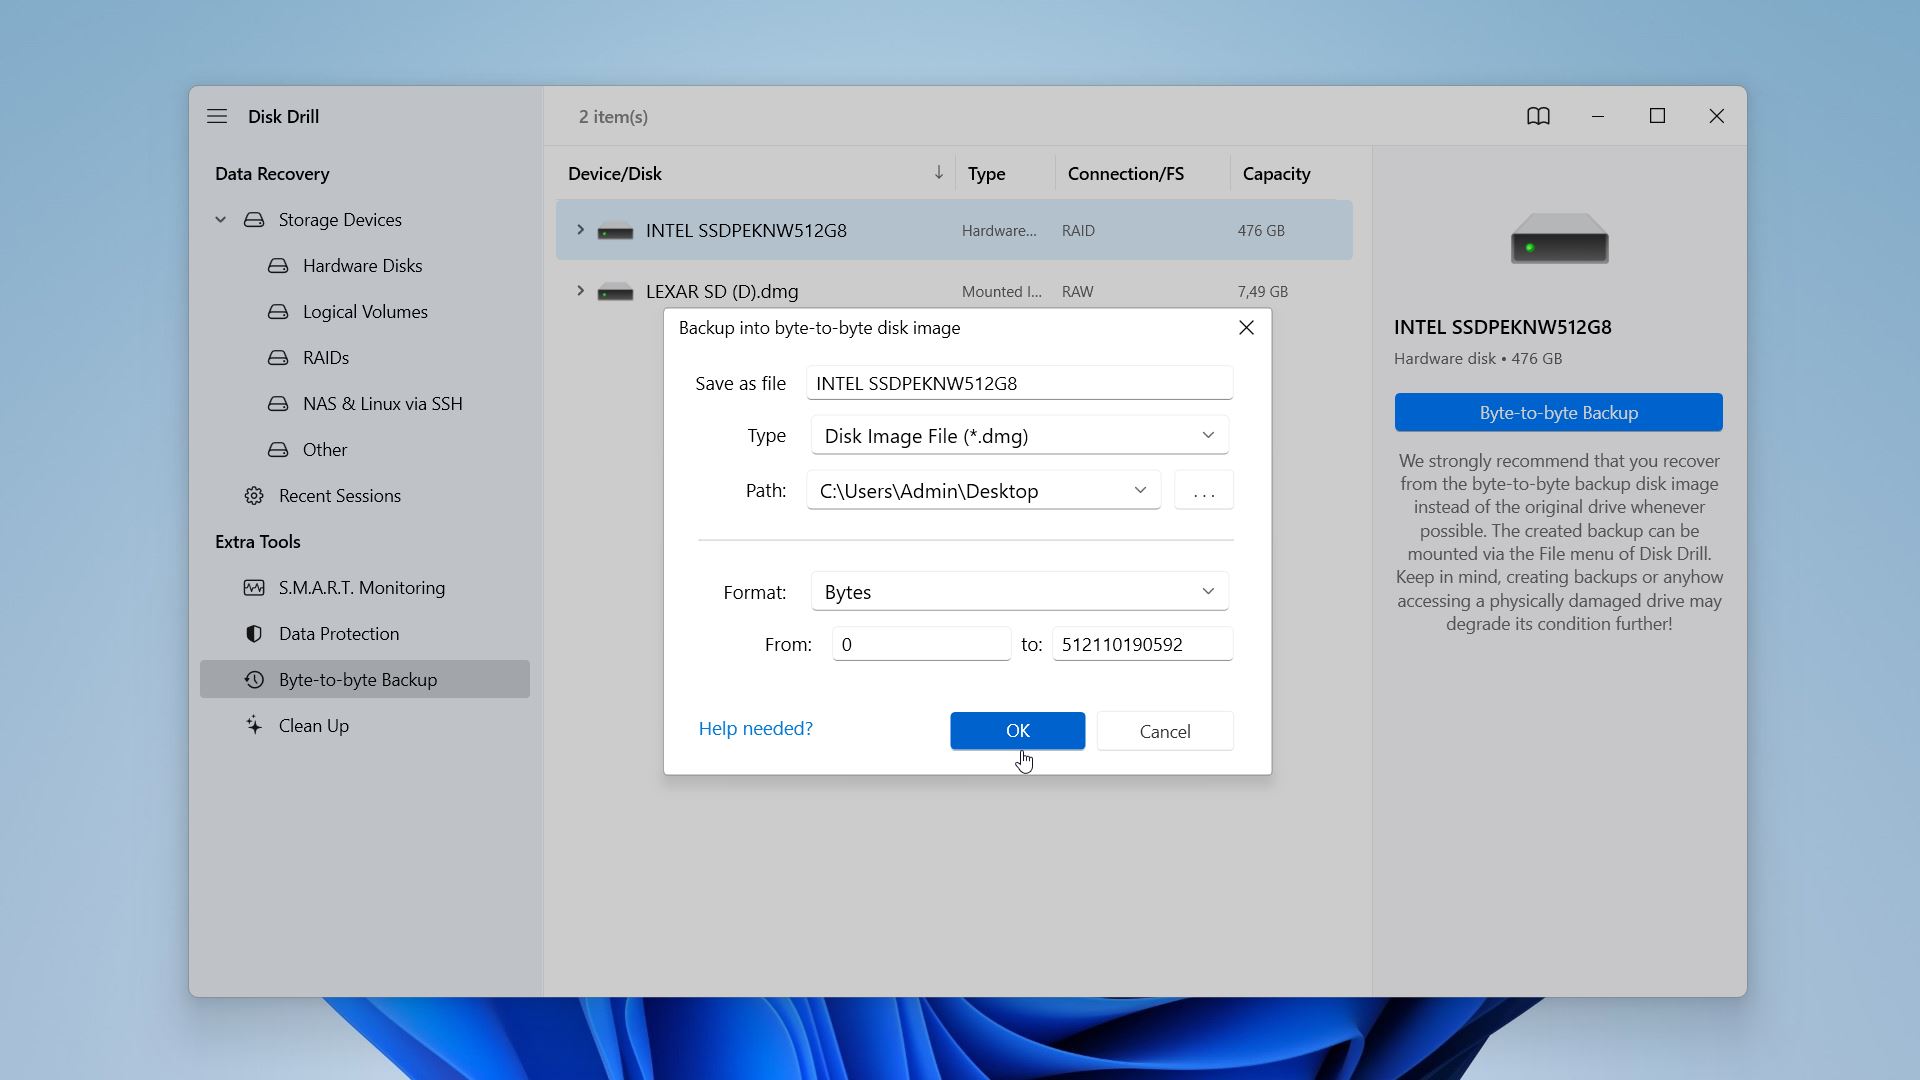
- Go to the Byte-to-byte Backup option in the left panel, located in Extra Tools. Select your RAW drive from the device list and click on the Byte-to-byte Backup button that will appear on the right.
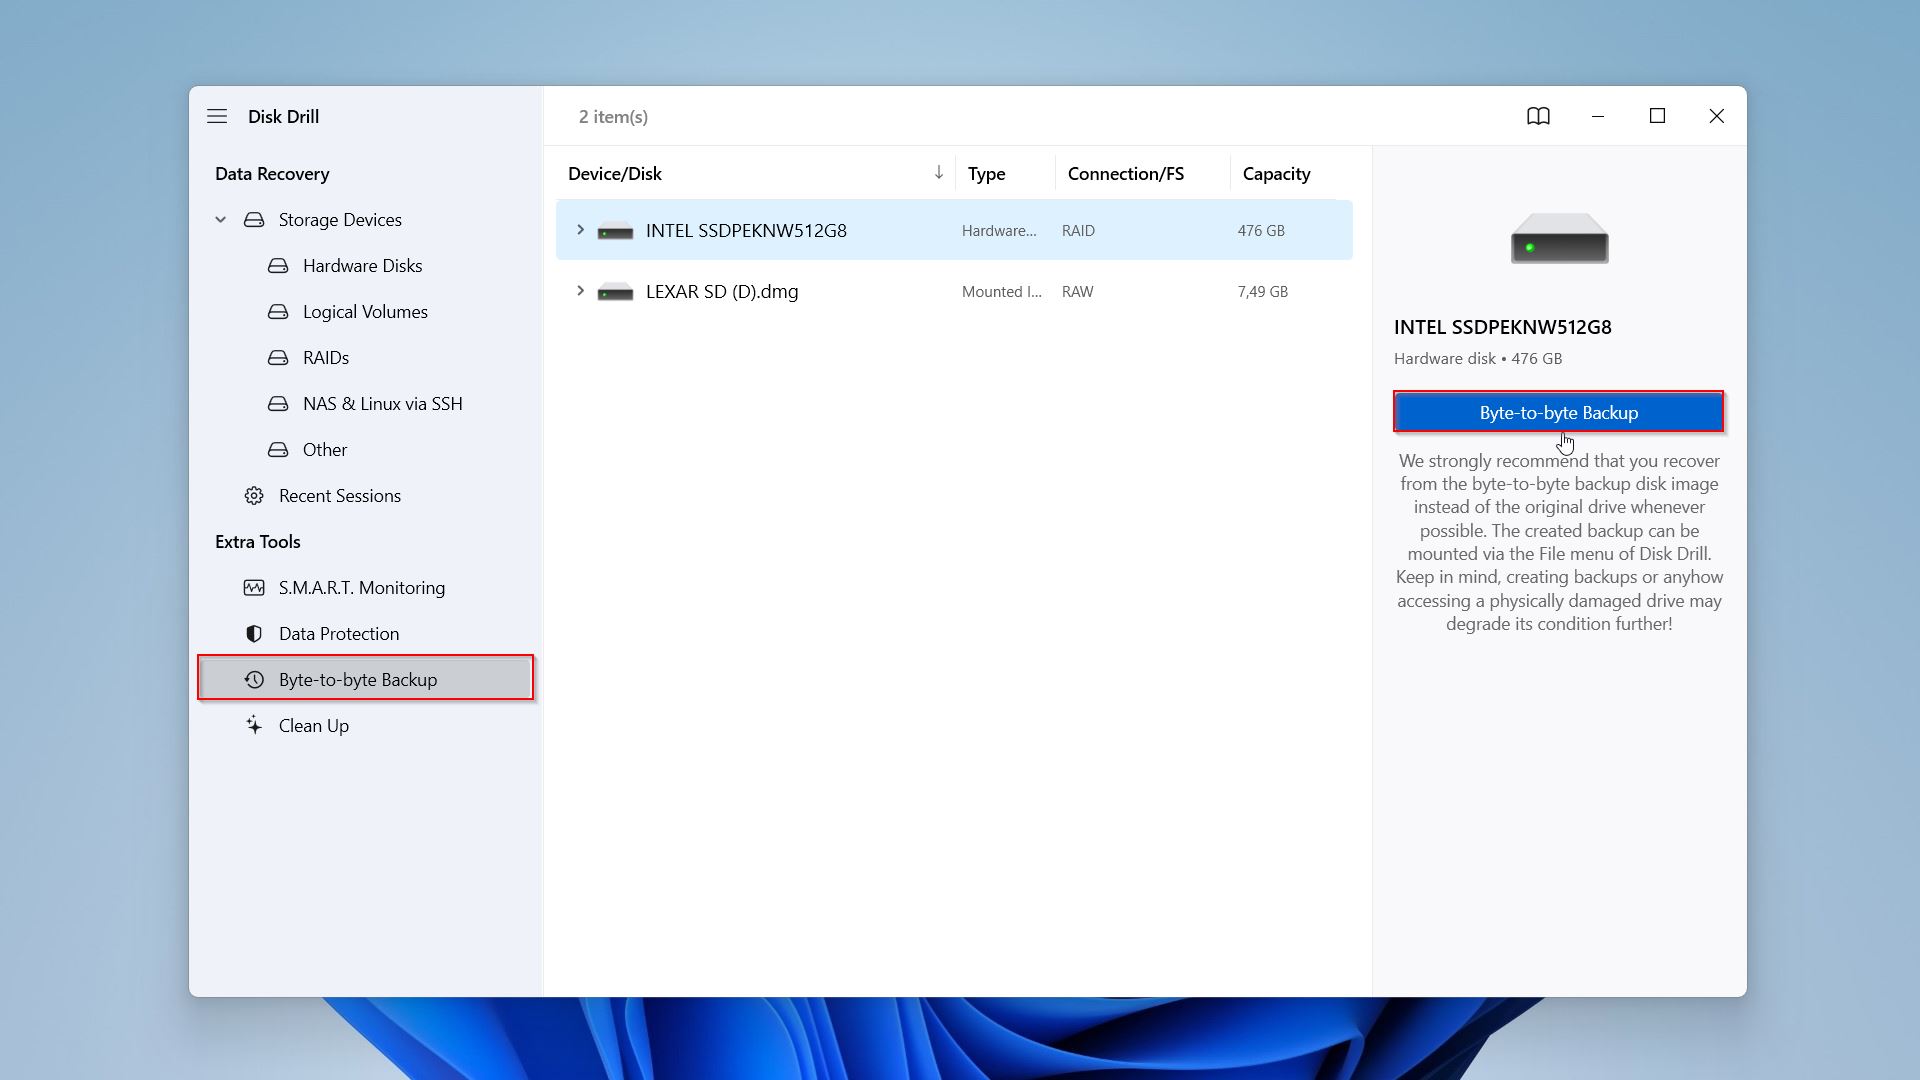
- Then, select a location where you want to save your backup and click OK. Keep in mind, that it must have sufficient space must have sufficient space to accommodate a disk image equal in size to the capacity of the source disk. After you are done, Disk Drill will begin the creation process. It can take some time, depending primarily on the size of the drive, but also factors like the drive’s performance characteristics, the type of connection used, and the presence of bad sectors.
Try to Fix a RAW Drive or Partition Using TestDisk
TestDisk is an open-source data recovery software that can help you recover a RAW partition. This is an alternative approach to regain access to your data without formatting and losing it, and its free. However, you should realize that each action must be done thoughtfully and deliberately, as a mistake could result in data loss. But that’s what the backup is for. The other downside of this tool is that it doesn’t have a GUI and thus casual users may find it difficult to navigate the program. Thus, it’s even more important to closely read the instructions that follow.
Here is how you can fix a RAW partition using TestDisk:
- Download TestDisk and extract the contents of the archive.
- Ensure the RAW external hard disk drive is connected to your PC.
- Run TestDisk using the testdisk_win.exe executable file. Use the arrow keys to navigate the UI.
- Select whether you want to create a log file or not. We chose not to create one (No Log). Use arrow keys to highlight the option and press Enter to select it.

- Select the RAW external hard drive from the device list and press Enter.

- Now, select the partition table type using the arrow keys. It’s best to leave it at the option highlighted by default, since TestDisk automatically detects it. Press Enter.

- On the next screen, select Analyze and then select Quick Search. Press Enter.

- You can now view the partitions that TestDisk found. Highlight the partition, and press P to view the files in the partition. Press Q to go back.
- Use the left and right arrow keys to change the label next to the partition. Make sure it is set to P. The partition itself will be highlighted in green when you select this. Press Enter.

- The next screen lets you perform a deeper search. Simply highlight the Deeper Search option and press Enter. We chose to perform a deeper search in order to locate more partitions. After the deep search is over, perform step 9 again.

- Now, highlight the Write option and press Enter. When prompted press Y.

If you’ve successfully regained access to your drive (hopefully no longer RAW), you can consider the issue resolved. Otherwise, proceed to the next method.
No Luck? Retrieve Files from Your RAW Drive Backup
If you had no success with TestDisk, your next step is to recover the files from the backup. At this point, only formatting can fix the issue with the drive, but we will cover that in the next section.
To recover RAW drive data from the byte-to-byte backup you created, follow these steps:
- Open Disk Drill.
- Click on Attach disk image… button at the bottom of the Disk Drill’s window.
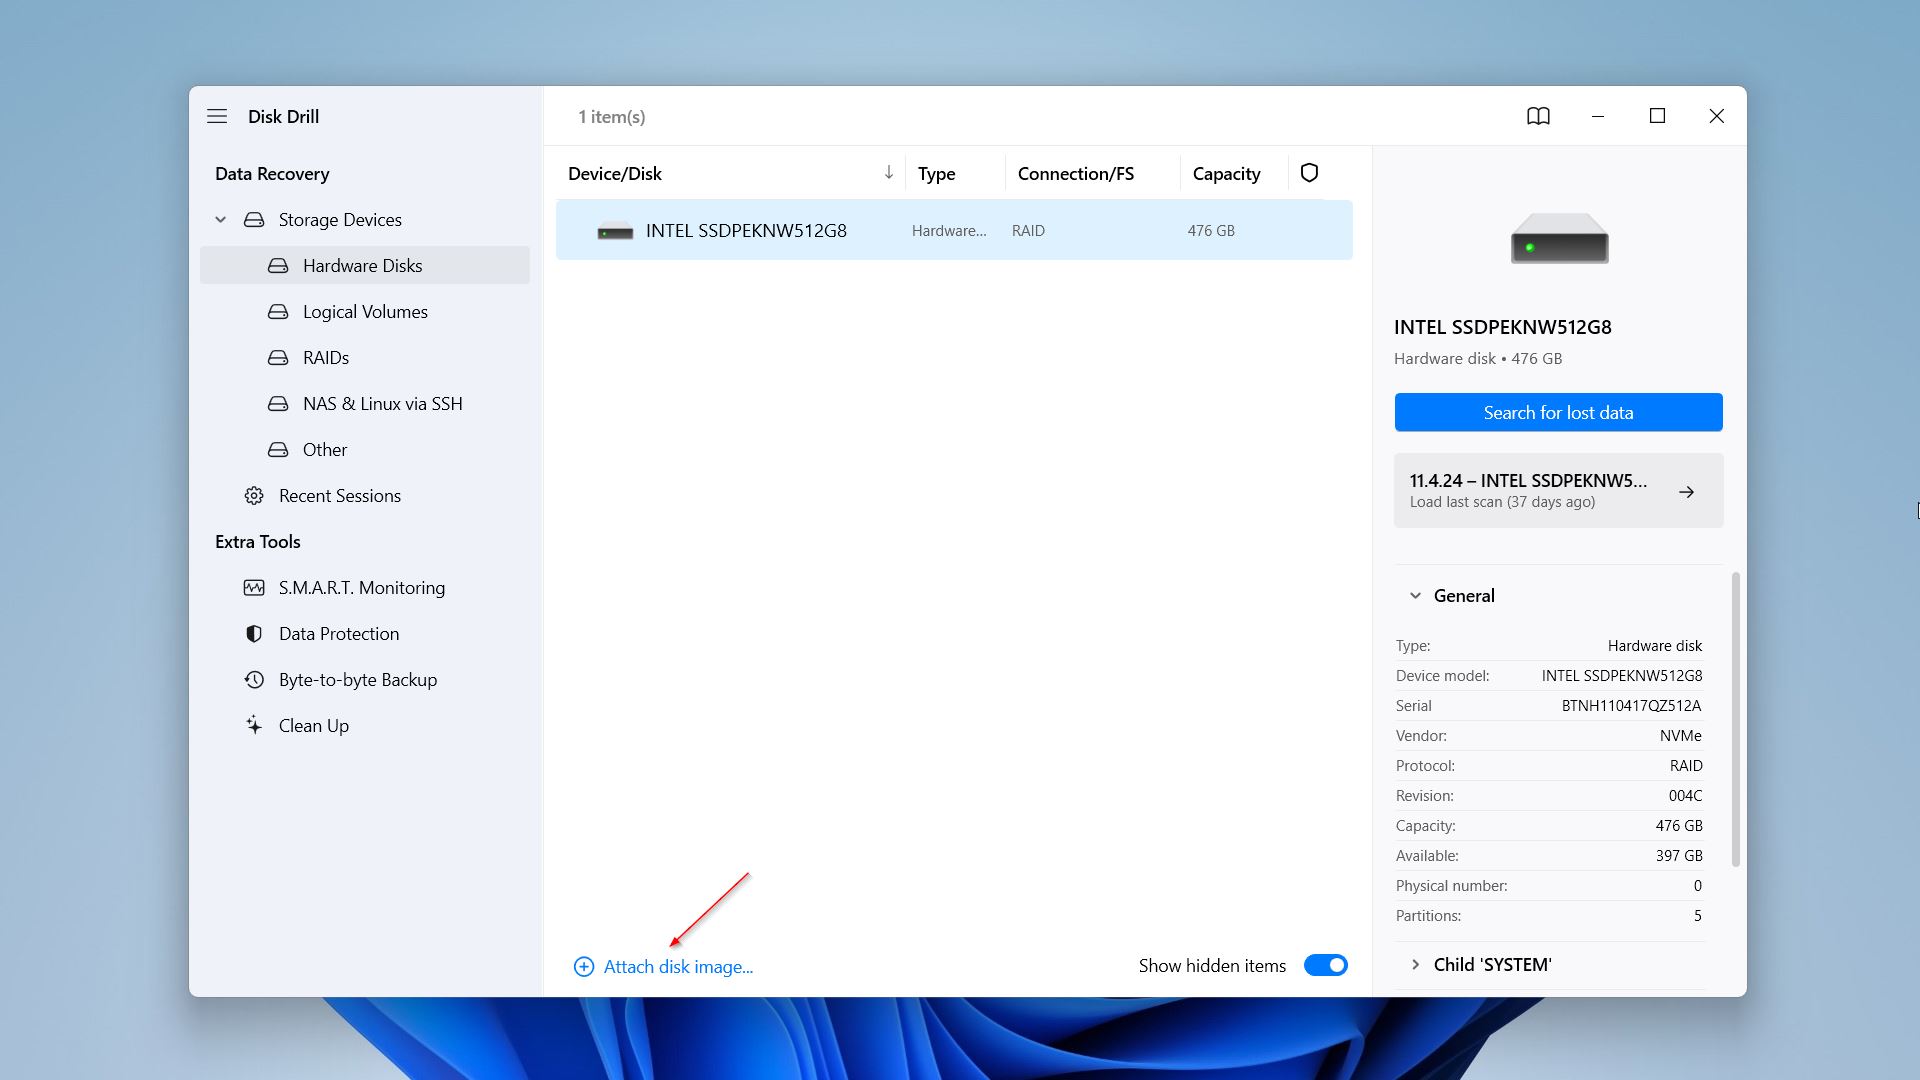
- Proceed to the location you saved the backup (.dmg file) to and select it.
- Now, select your backup from the list of available devices, click on the Search for lost data button, and follow the steps we provided in the Disk Drill recovery section.
Recovered Your Data? Restore Your RAW Hard Drive to a Working State
If data recovery was successful, formatting will restore your external drive to working condition. However, we recommend that you pay attention to the reasons why your drive became RAW, which we will discuss in the next section, or diagnose the drive’s health. If a serious malfunction exists, the problem could recur or worsen.
So, if you’re at this stage and still can’t access your data, consider contacting data recovery services with specialized expertise.
Here is how you can perform a Quick Format on Windows:
- Type Disk Management in Windows Search (Windows Key + S). Choose the Create and format hard disk partitions option from the search results.

- Right-click the RAW external hard drive and select Format.

- In the Format Options window, ensure that the Perform a Quick Format option is ticked. Press OK.

- On the next prompt too, press OK.
That’s it. Your data should be safe now, and your drive’s RAW state is fixed. If you decided to skip the recovery part because you thought your data wasn’t worth it, you can still run data recovery software after the format is complete, since data from a quick-formatted drive can still be recovered. To do this, follow the Disk Drill recovery instructions in the sections above.
Why Did My External Hard Drive Become RAW?
A RAW external hard drive is one that has a malfunctioning, corrupt, unrecognizable, or missing file system. When you insert a RAW external hard drive into your PC, it won’t be able to access the data on it. This doesn’t mean the data has been wiped off, it is just inaccessible to your PC. Typically, unless you format the drive to a recognizable file system like NTFS or exFAT, your computer won’t be able to access or interpret the data on the external drive. However, as we demonstrated earlier in the article, there are several methods for accessing data on the drive before resorting to formatting.
Nonetheless, here are common reasons why your external hard drive might have become RAW:
- ❌ Improper Usage: Suddenly disconnecting your drive in the middle of read/write operations, unplugging it without ejecting it first, and leaving it connected to your PC 24/7 can all cause damage to the file system, resulting in your external hard drive becoming RAW.
- 🔌 Power Failure: A power failure in the middle of a read/write operation can damage the file system, resulting in the external hard disk showing a RAW partition. In fact, any kind of unexpected system shutdown can have an adverse effect on the external hard drive.
- 🦠 Malware: It’s quite common for malware to be the cause of a RAW file system. Malware can directly delete your files too. If you suspect this is the case, it is advisable to refer to our guide on how to recover files deleted by a virus. Some otherwise safe third-party applications may also modify the file system of your external hard drive and damage the file system.
- 💽 Format Disruption: If the formatting process of the external hard drive is disrupted due to any reason, the drive could become RAW.
- 💻 Automatic Formatting: Some devices may automatically format the drive when you connect it to them. Or they will simply display a prompt stating the incompatibility of the format, and ask you to format it to a recognizable format. This format, in turn, may be incompatible with Windows and the partition will simply show up as RAW when you connect the drive to a Windows PC.
an You Fix RAW Drives Using CMD (CHKDSK)?
The CHKDSK command (executed using CMD) is frequently used to find and fix drive-related errors on Windows. However, CHKDSK is typically not available for RAW drives. It might be helpful only in limited cases where the affected drive was initially formatted with NTFS and subsequently became RAW. In such cases, CHKDSK can restore the NTFS file system without formatting and removing your data, provided that the issue is limited to damage in the primary boot sector and the backup boot sector remains intact. Additionally, CHKDSK works properly on drives that are formatted to a Windows-recognized format.
While CHKDSK may not work on RAW drives in other cases, there is another command line utility, called Diskpart, that can be used to format the drive to a recognizable format.
FAQ
How to recover data from a RAW drive without format?
The best way to recover data from a RAW drive without formatting is to use Disk Drill:
- Download and install Disk Drill.
- Run Disk Drill.
- Select the drive and click Search for lost data.
- Click Review found items.
- Select the files you want to recover and click Recover.
How to convert RAW to exFAT or NTFS without formatting?
It is impossible to convert a RAW drive to exFAT or NTFS without formatting it. But, if the drive was initially formatted to NTFS and then became RAW, CHKDSK may be able to restore the file system without formatting.
How do I open a RAW partition without formatting?
You can view a RAW partition in Windows using Disk Management. However, it is impossible to view the contents of the partition as the file system is unreadable. It first needs to be converted to a recognizable format, only then will Windows be able to view its files.
Besides this, you can recover the files from a RAW partition using programs like Disk Drill. The recovered files can be restored to any drive or partition of your choice.
Can a RAW drive be fixed?
Yes, you can fix a RAW drive. To fix a RAW external hard drive without formatting, first recover the data you want using Disk Drill, then convert the drive’s file system into a recognizable one, using Disk Management.
Is it possible to recover files from a RAW external hard drive without software?
A situation in which you can recover files from a RAW external hard drive without software, is if the drive was first formatted to an NTFS file system and subsequently became RAW, because CHKDSK may still be able to scan the drive and restore the broken NTFS file system. In other cases, you will need data recovery software to help you restore the missing data.
Can diskpart fix a RAW partition?
Diskpart can fix errors in an external drive because you can use it to format the RAW drive to NTFS, FAT32, exFAT, or any other Windows-recognized format.
Here is a quick guide on how to do this:
- Run Command Prompt as administrator.
- Type diskpart and press Enter.
- Type list disk and press Enter.
- Type in select disk X (replace X with the RAW disk’s number) and press Enter.
- Type clean and press Enter.
- Type create partition primary and hit Enter.
- Penultimately, type format fs=ntfs quick and press Enter.
- Lastly, type assign X: (replace X with the drive letter you want to assign) and press Enter.
Conclusion
While a RAW drive can be fixed by first recovering the data and then formatting the drive, you prevent a drive from becoming RAW by paying heed to the reasons why an external hard drive becomes RAW in the first place. It also helps to keep regular backups of your data in multiple locations, so you can instantly restore it in case of a mishap.
This article was written by Manuviraj Godara, a Staff Writer at Handy Recovery Advisor. It was recently updated by Oleksandr Medvediev. It was also verified for technical accuracy by Andrey Vasilyev, our editorial advisor.
Curious about our content creation process? Take a look at our Editor Guidelines.
