Have you lost data from your HGST hard drive and are looking for ways to recover it? Look no further; this guide will take you through all the methods you can try to recover lost files from an HGST device.
Whether you’re facing issues like an HGST hard drive not being detected or need an HGST hard disk repair tool, we’ve looked into various solutions and will help you recover your data!
How to Improve Your Chances of Successful HGST Hard Drive Recovery
When you’re dealing with data loss on an HGST hard drive, you can take some preliminary steps to significantly improve your chances and successfully recover your lost data. Here are a few things to keep in mind:
🛑 Stop Using the Drive Immediately
Why It Matters: Any operation on your drive, whether it’s reading or writing, will increase the risk of overwriting potentially recoverable data. Once it’s overwritten, data recovery becomes nearly impossible.
How to Do It: Disconnect your drive and do not run any disk checks installations or copy any files until you’ve attempted data recovery. In case your HGST hard drive is being used as a system drive, it’s best to leave it alone. Keep reading below, where we’ll discuss the specifics of data recovery in such cases.
🔌 Check Physical Connections
Why It Matters: Connection issues are a common cause of unrecognized HGST drives. This is an easy fix without risking further damage.
How to Do It: You can try and use a different USB port or cable to rule out faulty connections. If you’re using an external drive, try a different enclosure or adapter.
🛠️ Try and Diagnose the Underlying Cause
Why It Matters: You need to understand what caused your drive to stop working correctly or led to data loss. Look out for some of these common symptoms.
How to Do It: Try to remember if you noticed any clicking, grinding or beeping noises before you stopped using the disk per our recommendation. These usually indicate physical defects and hardware problems, and your best bet is to use a professional data recovery service. Software issues that indicate logical corruption can manifest as your drive being detected but inaccessible or randomly missing files due to corruption. In such cases, data recovery software can help (keep reading for a detailed guide on the same).
❌ Avoid DIY Repairs for Physical Damage
Why It Matters: If you open or attempt to repair the drive without expertise, you can worsen the damage and make professional recovery impossible. Avoid this at all costs.
How to Do It: If you suspect physical damage, simply disconnect the drive and do not use it further. Go to a professional data recovery service as soon as possible.
🔄 Have Data Backups
Why It Matters: Regular data backups are essential for preventing data loss. According to our data backup survey, while 78% of users say they back up their data, only 33% do so consistently. Plus, 63% of respondents don’t know the difference between data syncing and data backup, which can lead to misunderstandings about data safety.
But if you’ve already lost access to your data, you might be wondering—how can backups help now? Even after data loss, creating a backup of your disk still has several benefits:
- Making a copy of your current disk state helps secure existing files and prevents further loss during recovery.
- If your disk is malfunctioning, a backup lets you try different fixes without the risk of making things worse.
- Scanning a disk image instead of the actual disk reduces the chances of causing more damage during the recovery process.
How to Do It: You can use tools like Acronis True Image or Macrium Reflect to create a disk image. This image can be both mounted later and scanned using data recovery software that supports disk images.
If you need an all-in-one solution, you can use software like Disk Drill. This software not only creates images but also scans them for lost data. But you might ask, how can I back up if it’s my system disk? Or how do I back up when we advised you to disconnect and not touch the disk? The thing is, yes, you’ll still have to connect the disk, but you can create an image even if it’s your system disk and even if it doesn’t boot. Keep reading.
Backing up and Recovering Non-Booting HGST System Disk
Note: If your HGST drive isn’t a system disk, your PC boots normally, or you have another computer where you can connect the drive as an external disk, you can skip this section. You can also skip it if your system still boots to some extent and you’re willing to take the risk of running data recovery software directly from the disk without creating a backup.
We get that not everyone has extra storage for backups or the ability to set up a bootable environment. But in all other cases, we strongly recommend either making a copy of your drive or running recovery from a bootable environment to avoid further data loss.
1. How to Back Up a System Disk That Still Boots (But Barely)
If your PC still starts, but your drive is unstable, we recommend you create a full disk image immediately. You can scroll down to see how we use Disk Drill to create a byte-to-byte backup, or you can use other free tools like Macrium Reflect Free to clone the disk to another drive or external storage. (Avoid heavy usage because each additional operation increases your risk of total disk failure).
2. How to Back Up a System Disk That Won’t Boot
The ideal case scenario would be to remove your HGST drive and connect it to another PC using an adapter or enclosure and then use a disk imaging tool to back up the drive. But if you don’t have one, and your system disk has failed but isn’t completely dead, you can try using a bootable environment. You can do this by creating a bootable USB with tools like Rufus and the Windows PE recovery environment. Again, if you don’t have a computer on which you can do this, you’ll have to ask your friends and acquaintances. Here’s how to go about it.
- First, create a Bootable USB with ample storage capacity and download a bootable disk creation tool (a free tool like Rufus should do the trick).
- Next, you’ll require an ISO image of a bootable operating system such as Linux or a diagnostic tool likeHiren’s BootCD. These will allow you to access your HGST drive’s content without the Windows OS booting.
- You can now insert your bootable USB device into your computer.
- Now restart your computer and access the BIOS settings. Press F2, F10, or Del on your keyboard during startup (depending on your PC’s make). Some systems will let you access the boot menu directly without having to enter the BIOS. Most often, the designated key is F12 or Esc to access the boot menu.
- In the boot menu, navigate to the boot priority/boot order settings. In the priority list, set your USB drive as the first boot device. After saving changes and exiting the BIOS settings, your system should restart automatically.
- Your system will now boot from your inserted bootable USB device. Simply follow the on-screen instructions to boot into the OS or diagnostic environment on the USB device.
- Once you’ve booted into the OS, you should be able to access your failing HGST hard drive.
If your only issue was that you couldn’t access certain files because your system disk wasn’t booting, then good news—the problem is now solved! You can access your HGST drive and copy your files to another location, whether that’s an external drive or a cloud service like Google Drive or OneDrive.
If you’d rather create a full backup of the entire disk—either for extra security or to use later with data recovery software—you can do that using a backup tool designed for this environment. Creating a disk image lets you scan and recover data later on another computer without putting extra strain on the original disk. Tools like Acronis True Image, Macrium Reflect, and RescueZilla can help you create a complete disk image.
On the other hand, if your main goal is data recovery rather than just backing up, you’ll need data recovery software that runs in a bootable environment. Some tools work directly within this setup, while others let you create bootable recovery media. Options like R-Studio Emergency, DiskGenius, and UFS Explorer Backup and Emergency Recovery CD offer bootable solutions for recovering lost files.
Need to Recover Deleted Files or Access Data on an HGST Hard Drive? Use Data Recovery Software
HGST hard drive recovery can be easy if you use good data recovery software. As mentioned in the previous section, Disk Drill 5 for Windows is one such versatile and user-friendly software that can help you recover data from HGST hard drives. Accidental deletion, data loss due to corruption, or even formatting issues; Disk Drill can help retrieve your data safely in many scenarios.
Note: The procedure we’ve described below is suitable only if you are recovering deleted data, your HGST disk is not a system disk, or you were able to connect your disk as an external drive to another computer. It also applies if you were able to create a backup using other software and want to scan it on the same or another PC.
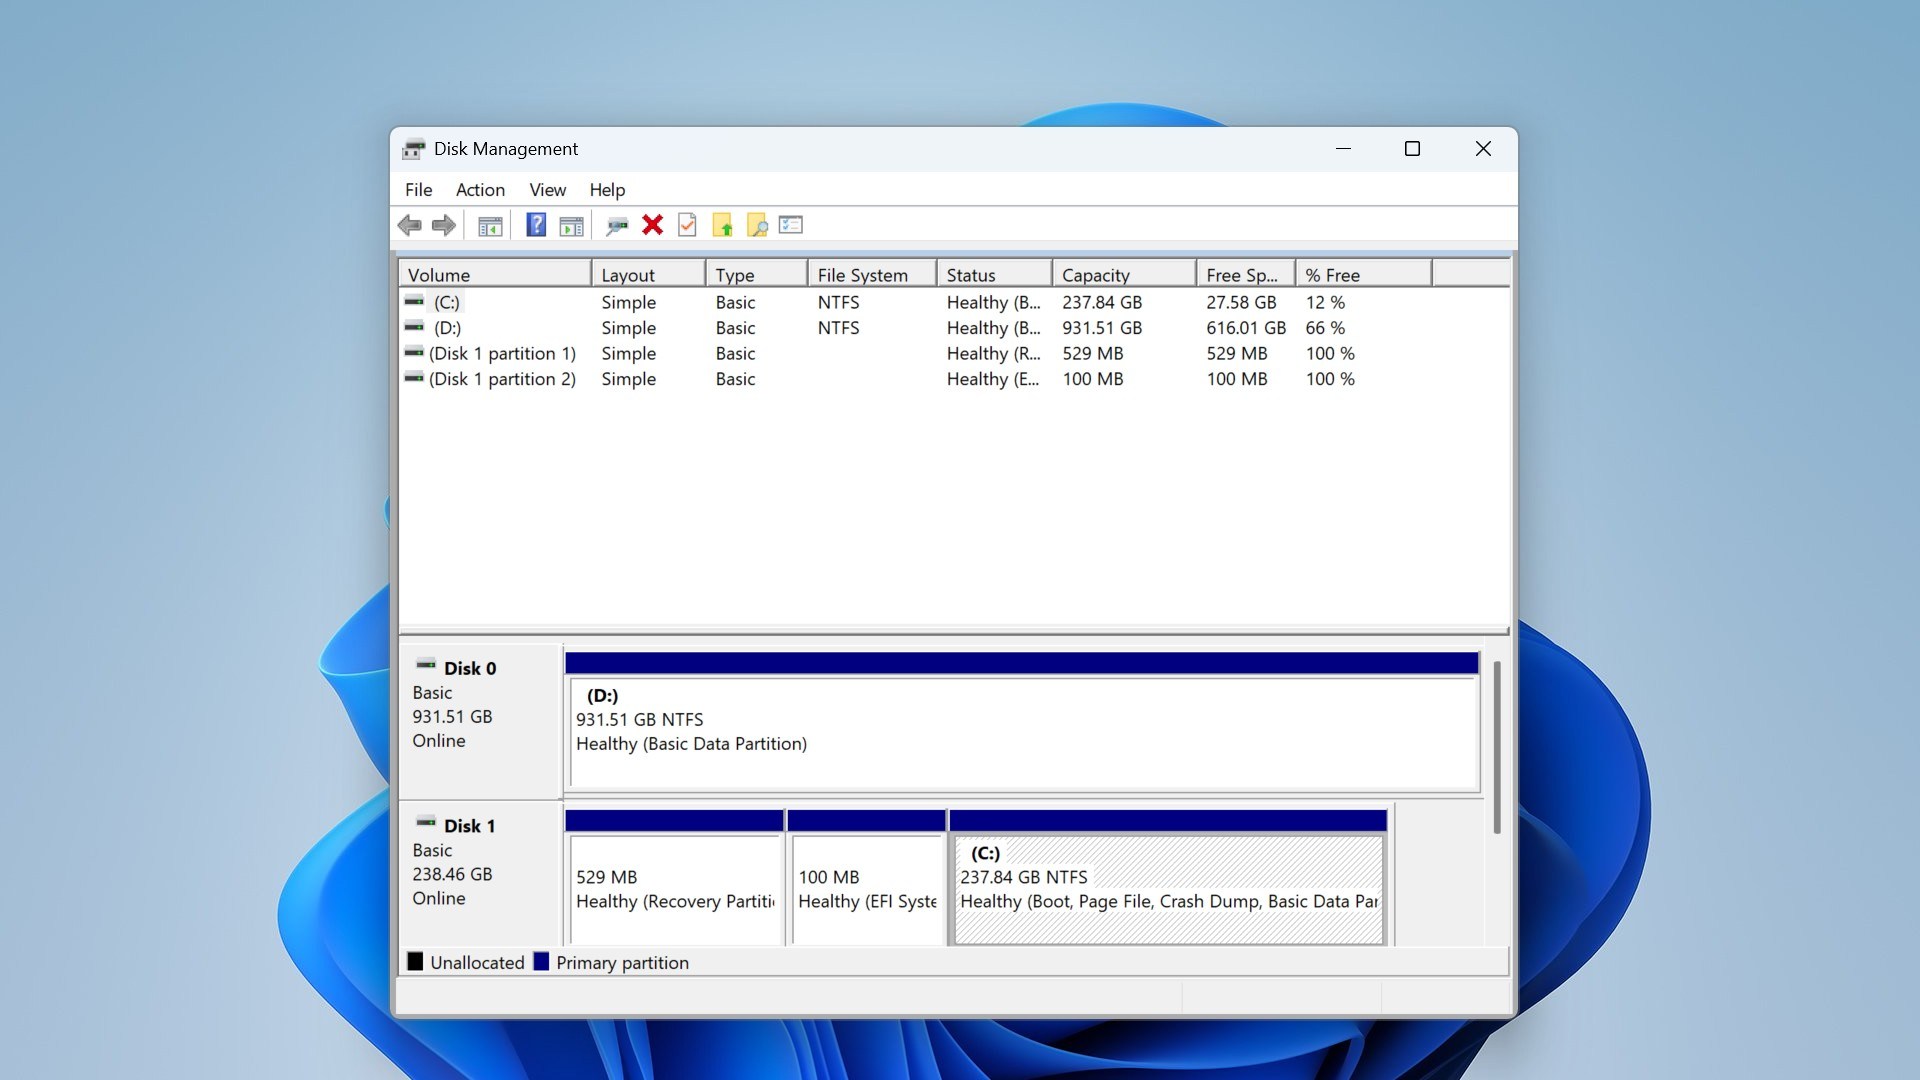
If your drive is visible in Disk Management at its full size but is inaccessible, you can attempt recovery with Disk Drill as well. To check for this, open Disk Management (right-click Start>Disk Management) and Device Manager (right-click Start>Device Manager, and expand the Disk Drives section) to see if your drive is detected. [This does not apply to disk images if you’ve already created one in the previous part].
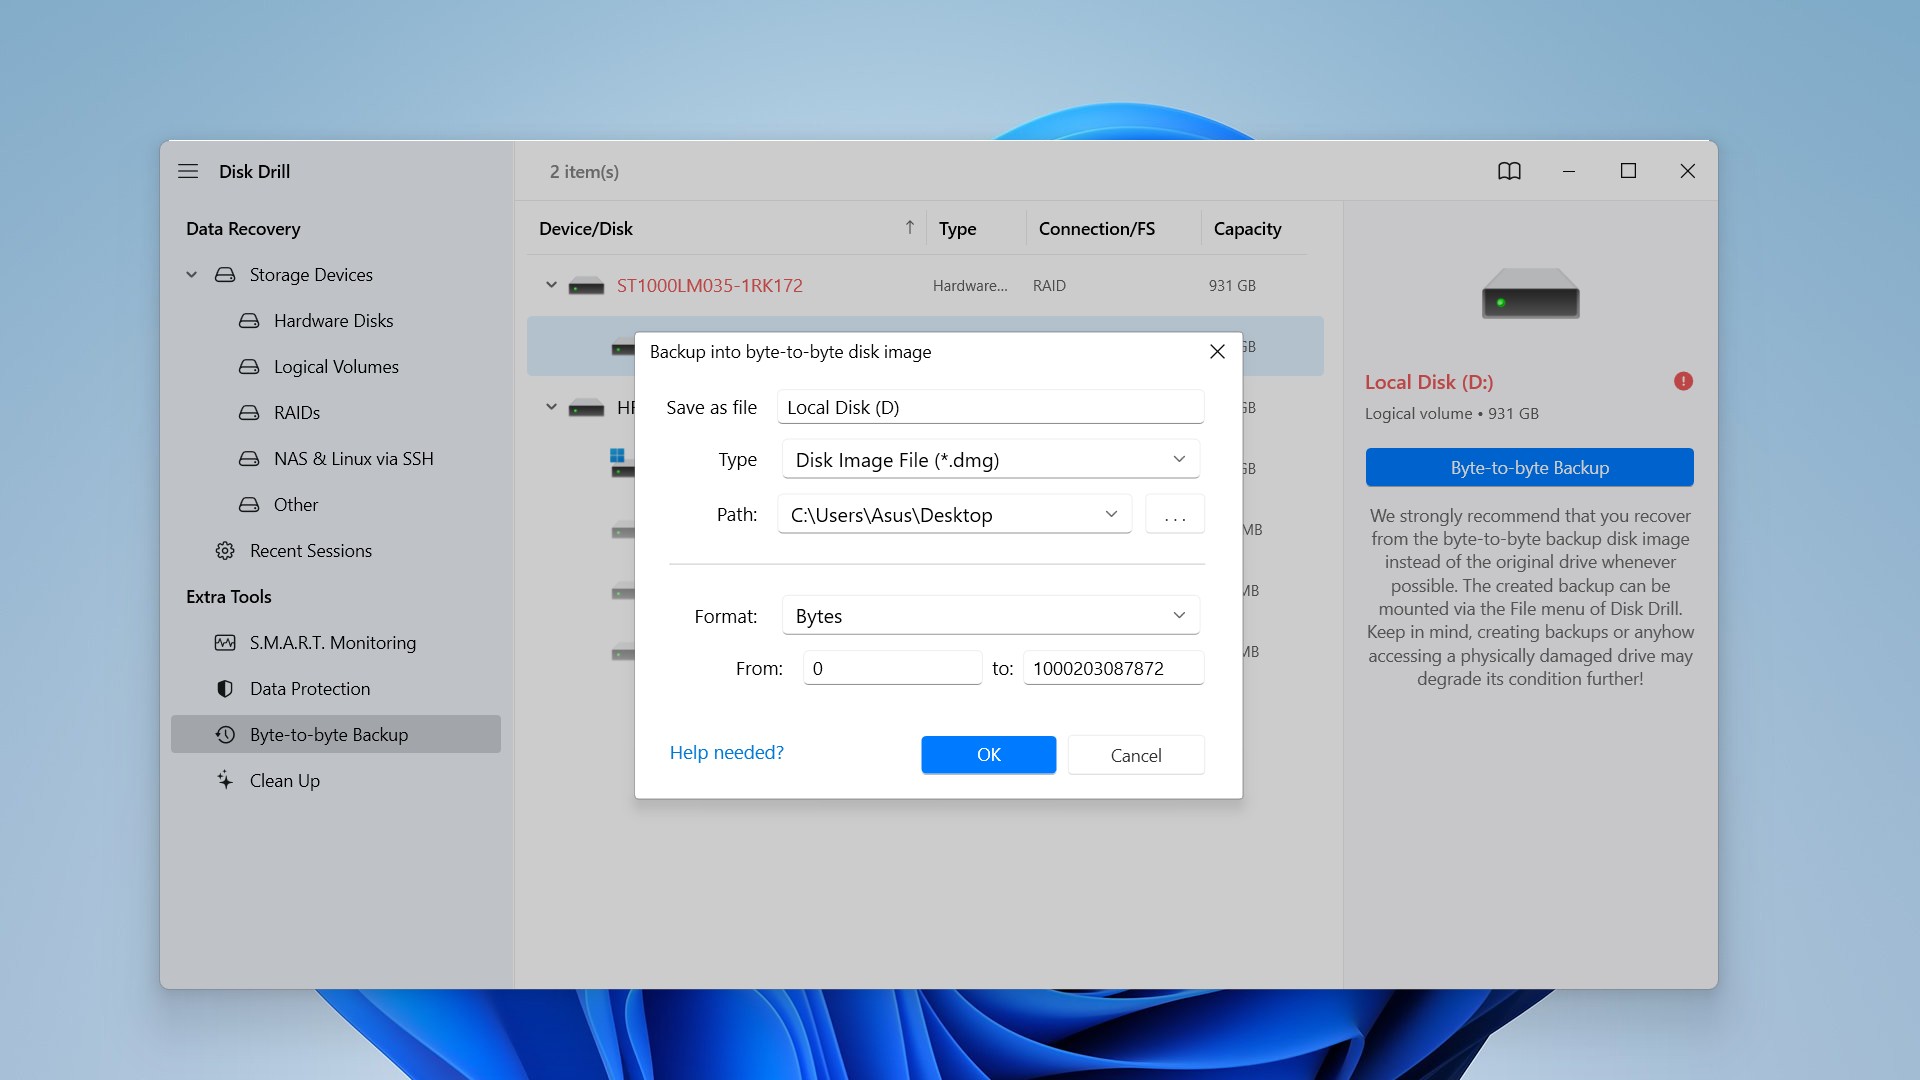
Disk Drill lets you back up the entire HGST drive and scan the backup, which can potentially help you retrieve data from a problematic drive. The byte-to-byte backup feature of Disk Drill creates a DMG file that stands for Apple disk image and is a common file format that is widely supported by multiple tools on Windows, but the copy created by Disk Drill is primarily designed for data recovery.
Here’s how to go about it:
- Download and install Disk Drill onto your system.
- Launch the application. If you don’t have any issues with the disk and want to scan the disk directly, select it and click on Search for Lost Data, and skip to step #5. You can also choose to scan a disk image, even if it was created outside of Disk Drill (Disk Drill supports disk image formats like IMG, ISO, and VMDK). Otherwise, you can create a disk image using Disk Drill as shown below, and then scan it.
- To create the image, select your HGST hard drive, and then click on “Byte to Byte Backup” in the Extra Tools section. From the new pop-up window that opens, select the path you want the image to be copied to (we recommend using a different disk with ample space to create this image).
- You can now recover files using the “Search for lost data” function of Disk Drill using the newly created B2B backup file to prevent further corruption of data and damage to the drive.
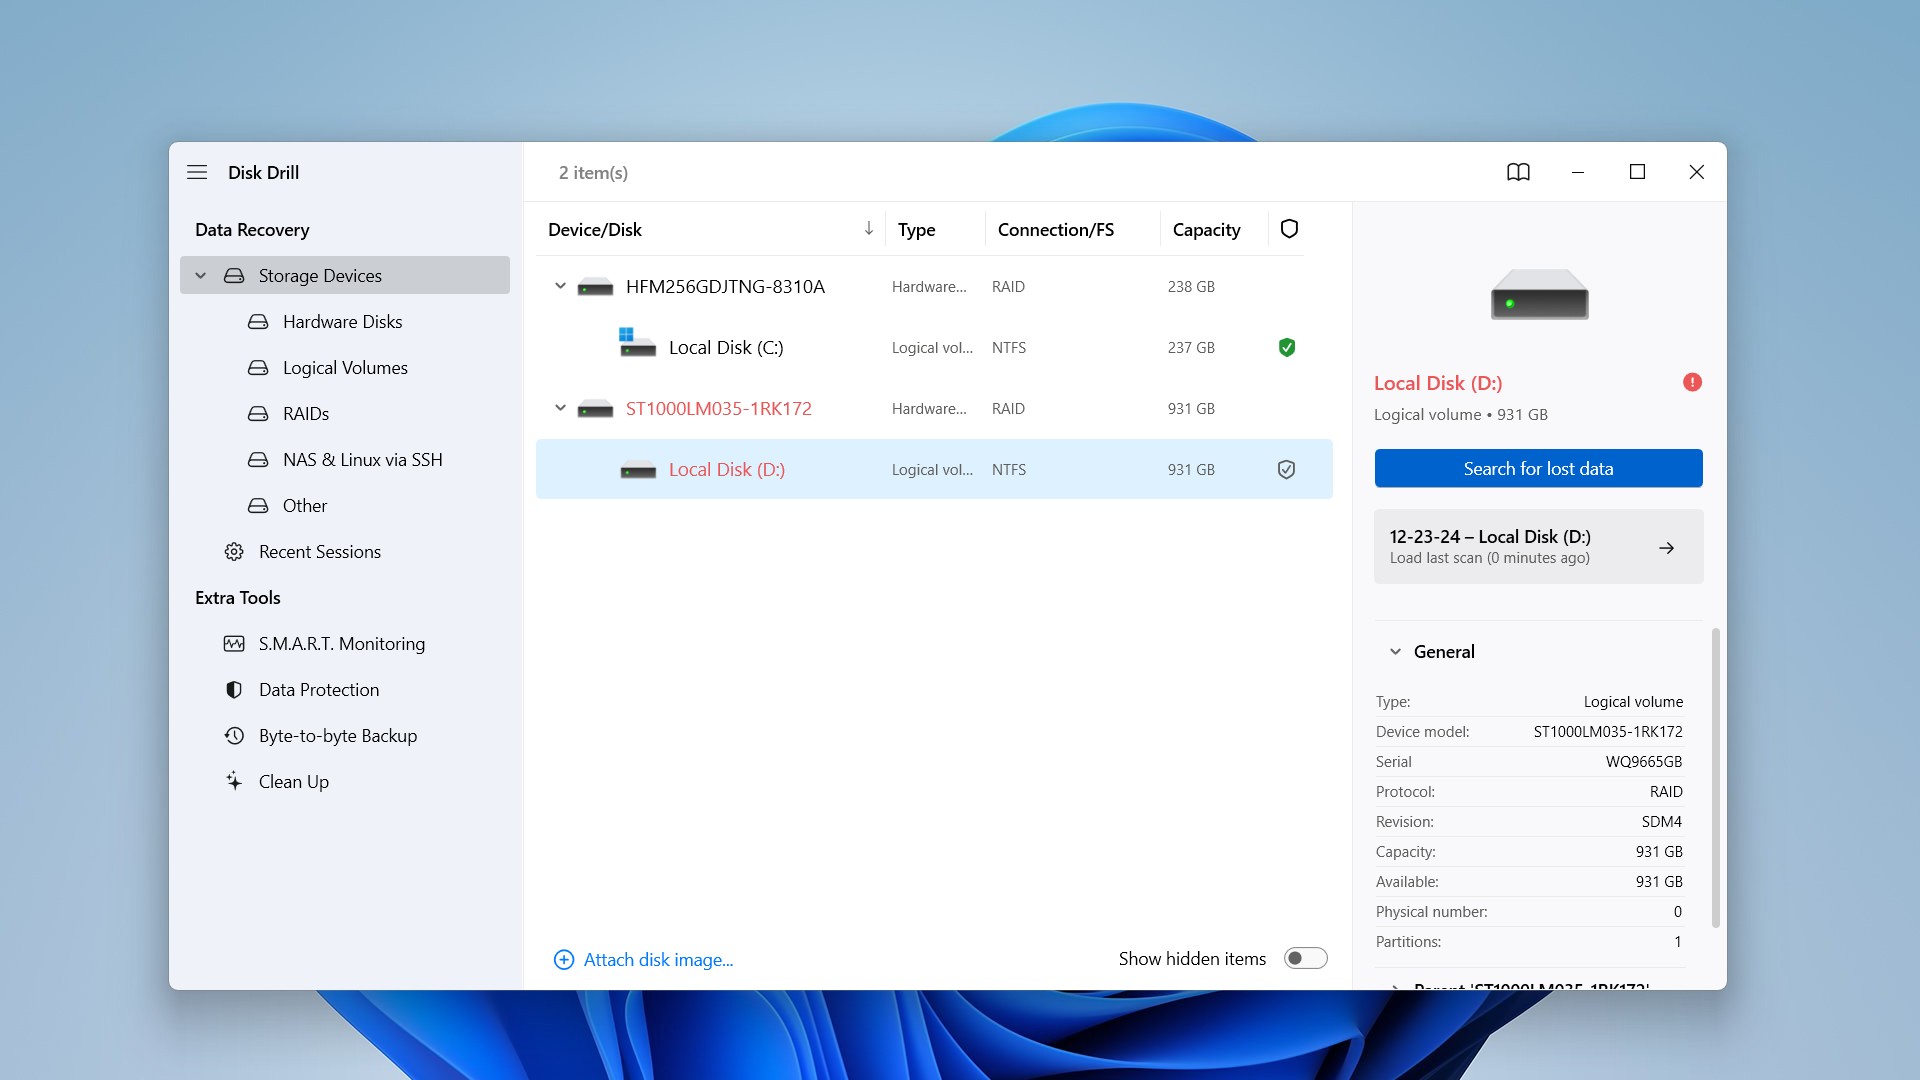
- To search for lost data, select your disk image by clicking “Attach disk image”, then start the scan.
- Either you created the backup or you skipped the backup step, you should now be at this stage with the scan already in progress. At this point, you can either wait for the scan to finish or start previewing the recovered files immediately by clicking “Review found items.”

- Once you’ve selected your files, click on “Recover.”Select your your desired location and your HGST hard drive’s recoverable files will get sent there.
Note: Do not send the data to the same drive you are recovering data from!
Need to Repair a Corrupted or Unreadable HGST Drive? Try These Fixes
Note: Since we’ve already secured your HGST hard drive’s data and (OR) now have a secure backup, we can safely proceed to attempt some fixes.
When an HGST hard drive becomes corrupted or unreadable, it might have file system errors, the disk might become RAW, or your files stored on it may not open despite showing up. Below are three methods you can try to fix this:
Method 1: Repair a Damaged or Lost Partition Using TestDisk
TestDisk is a free and powerful open-source tool designed to recover lost partitions and repair damaged ones. It has a command-line interface, but don’t let that intimidate you, as it is highly effective for logical issues.
Note: TestDisk is available in bootable systems like GParted LiveCD, Hiren’s BootCD, and others (TestDisk LiveCD). This allows you to restore a damaged system, even if it’s on the system disk.
You can read our full review on TestDisk here. And here are step-by-step instructions for using TestDisk to scan your disk for lost partitions and repair them:
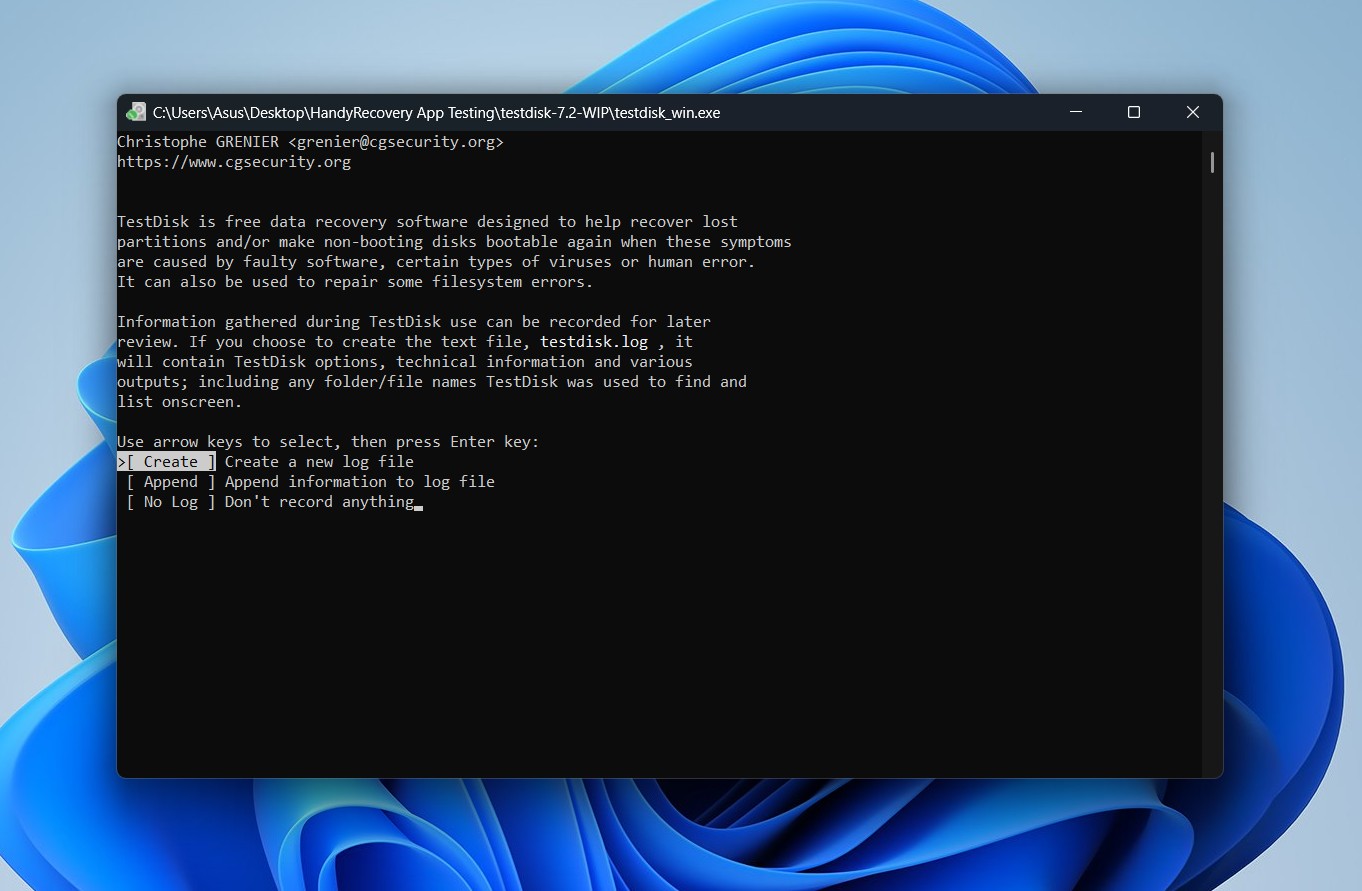
- Download TestDisk from the official site (CGSecurity).
- Run the application directly, no installation is needed. The first interface you’ll see will look like this:
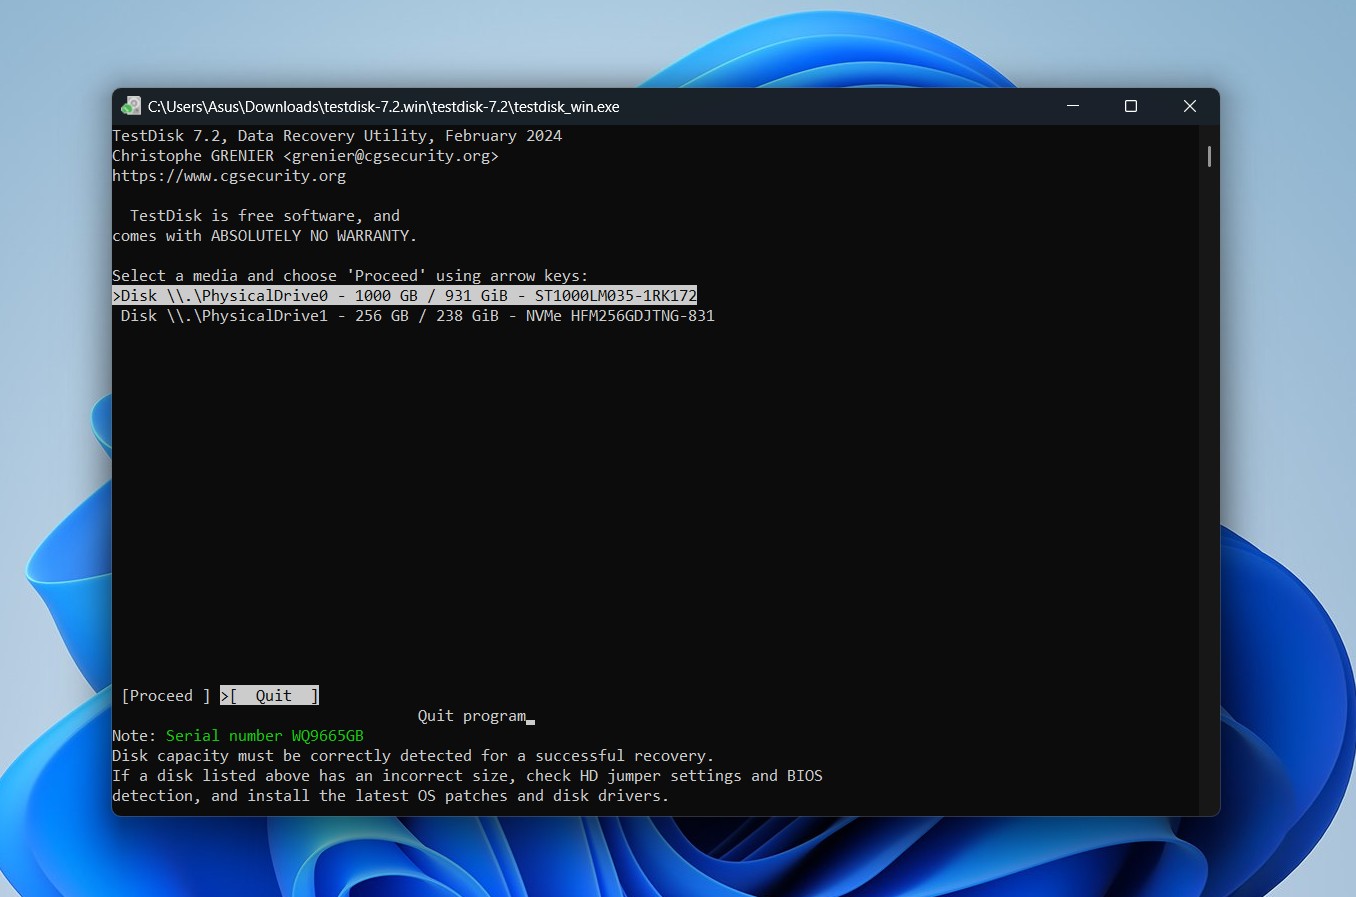
- Go ahead and select Create by hitting Enter. Now, choose your affected HGST hard drive from the list and hit Enter again.
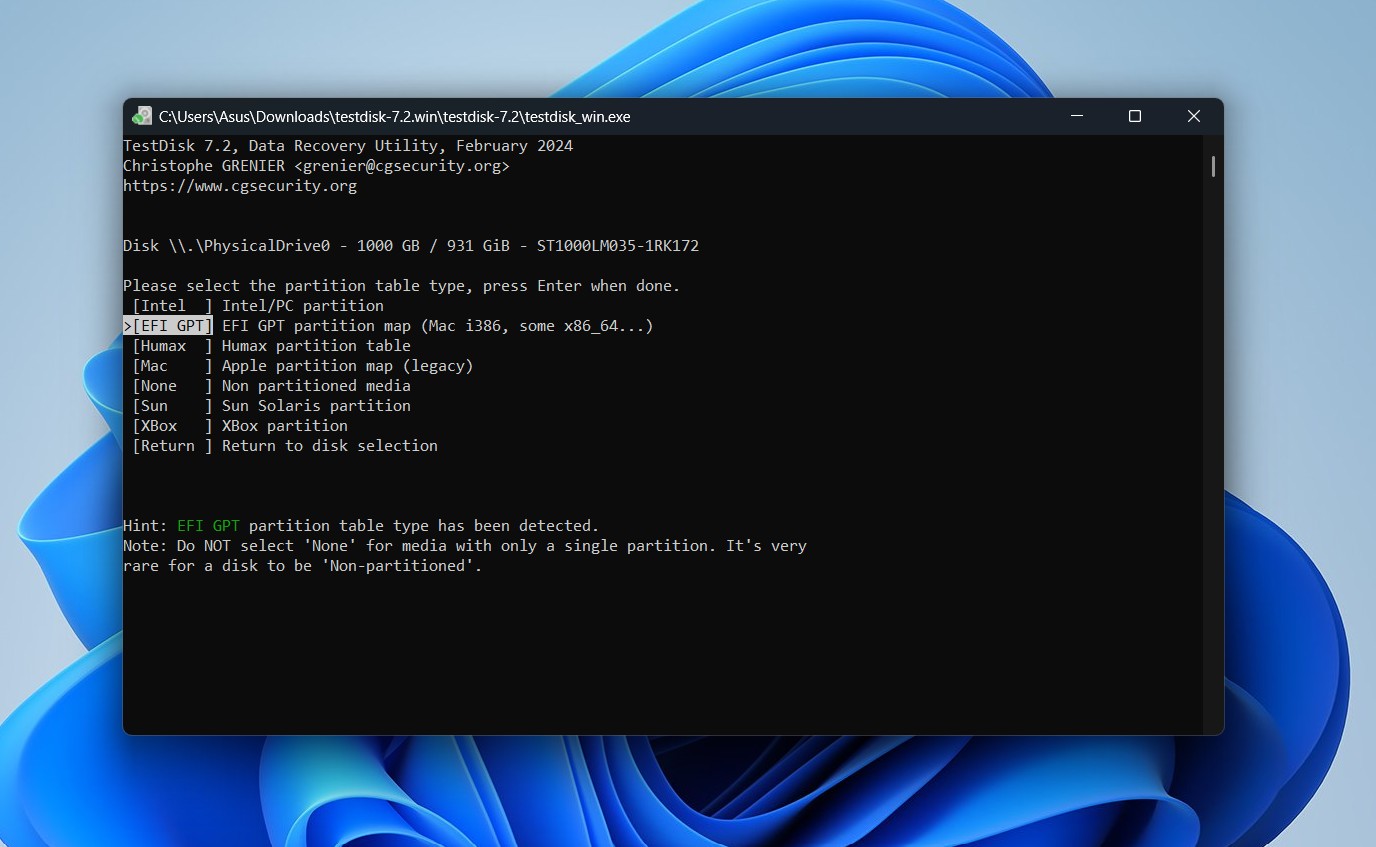
- The next screen will show you partition table types; go ahead and select Intel (or your detected partition) and press Enter. [Note that the software usually detects partitions automatically.]
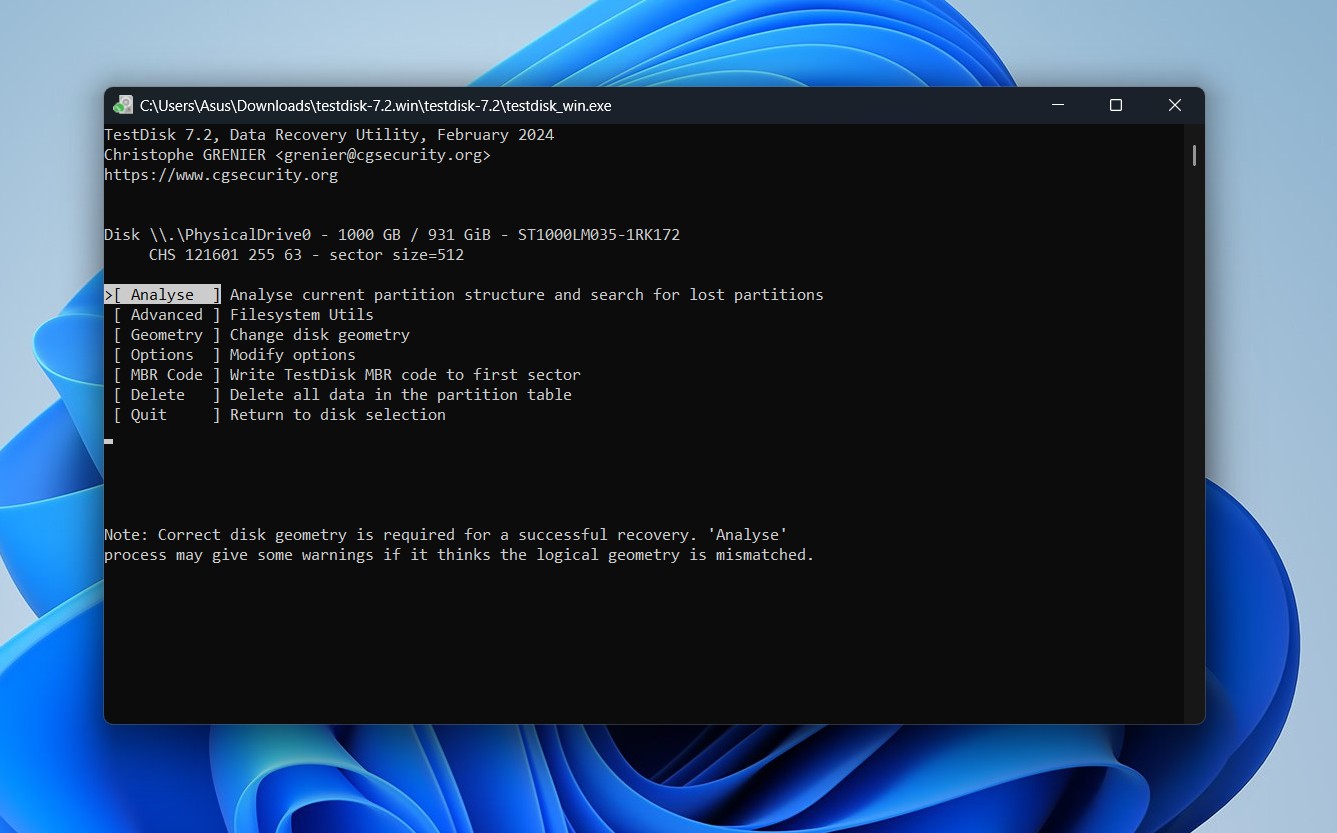
- On the next screen, TestDisk displays a number of options. These include quick scans to locate lost partitions, modifications to the disk’s storage structure, and even lets you erase the partition table entirely. To recover a deleted hard drive partition, choose the Analyze option and press Enter. TestDisk will then begin scanning the selected disk for any missing partitions.
- Select Quick Search on the next screen and hit Enter. Once the scan is complete you can select recoverable partitions.
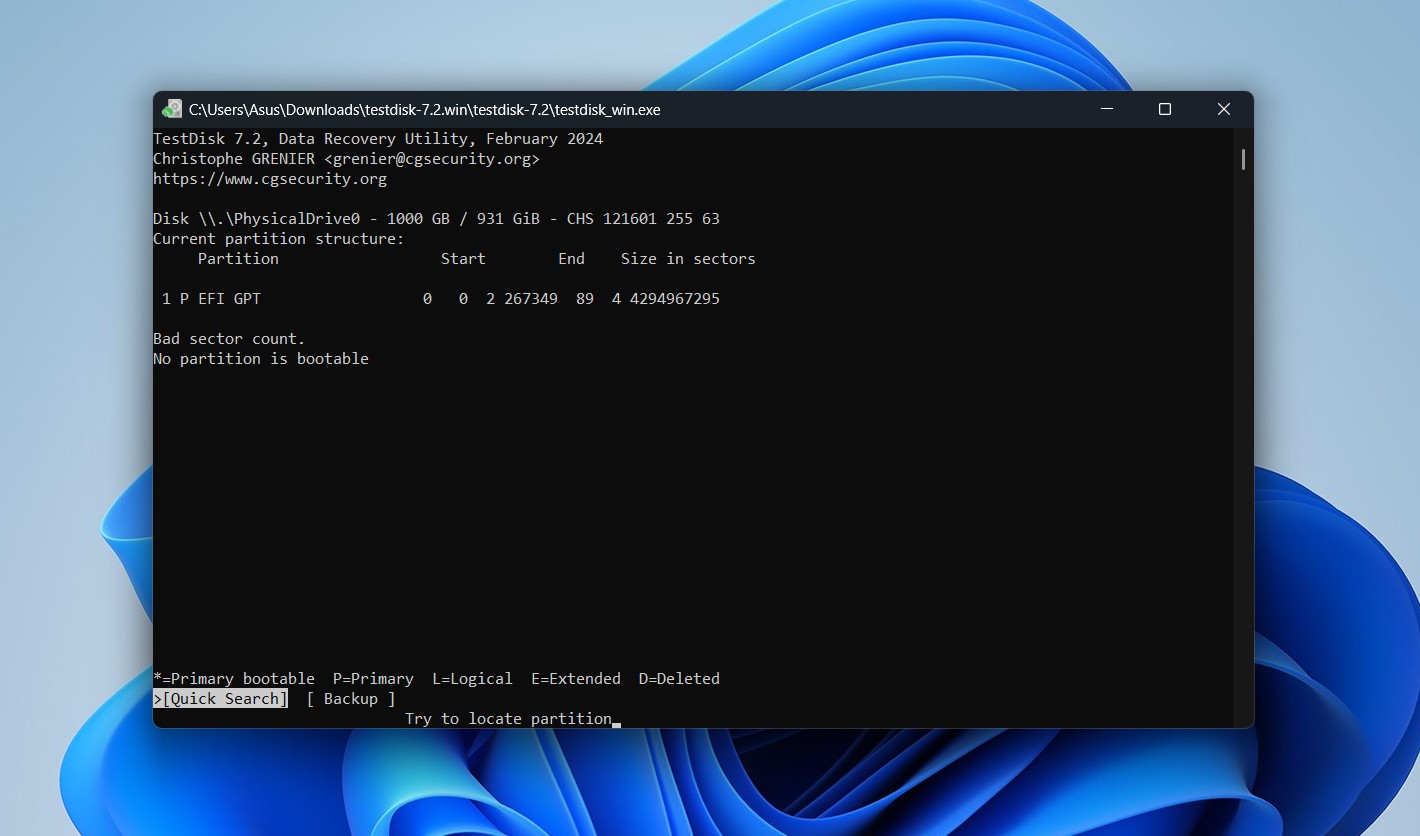
- You can use the arrow keys to highlight the partitions you want to recover and verify their size. To confirm that the partition contains the data you need, press p to preview its file contents. To recover a partition, change its status from D (Deleted) to (Bootable), P (Primary), or L (Logical) as you find appropriate. Once all the desired partitions are marked, you can proceed to the next screen and select the Write option to save these changes to the partition table. Press Enter, confirm with Y, and then select OK to finalize the update.

For other operations using TestDisk, you can use the official documentation from their website, or look for tutorials like this one on YouTube.
Method 2: Fix Your Drive’s File System/Bad Sectors With CHKDSK
CHKDSK is a command-line utility on Windows that you can use to scan and repair file system errors on your HGST hard drive. It can also be run via File Explorer, and we’ll show you how in this section.
This utility can potentially fix logical errors within your HGST drive.
Note: In some cases, CHKDSK can inadvertently overwrite your data, so it’s important that you proceed with caution when using this tool.
Here’s how you can use CHKDSK to check for bad sectors and fix them on your HGST drive:
- Open File Explorer on your Windows system.
- Click on This PC and right-click on your HGST hard drive.
- In the pop-up window that appears, select Properties and then navigate to the Tools tab.
- Under the Error checking section, click on Check. This will start the scan and check your drive for file system errors.
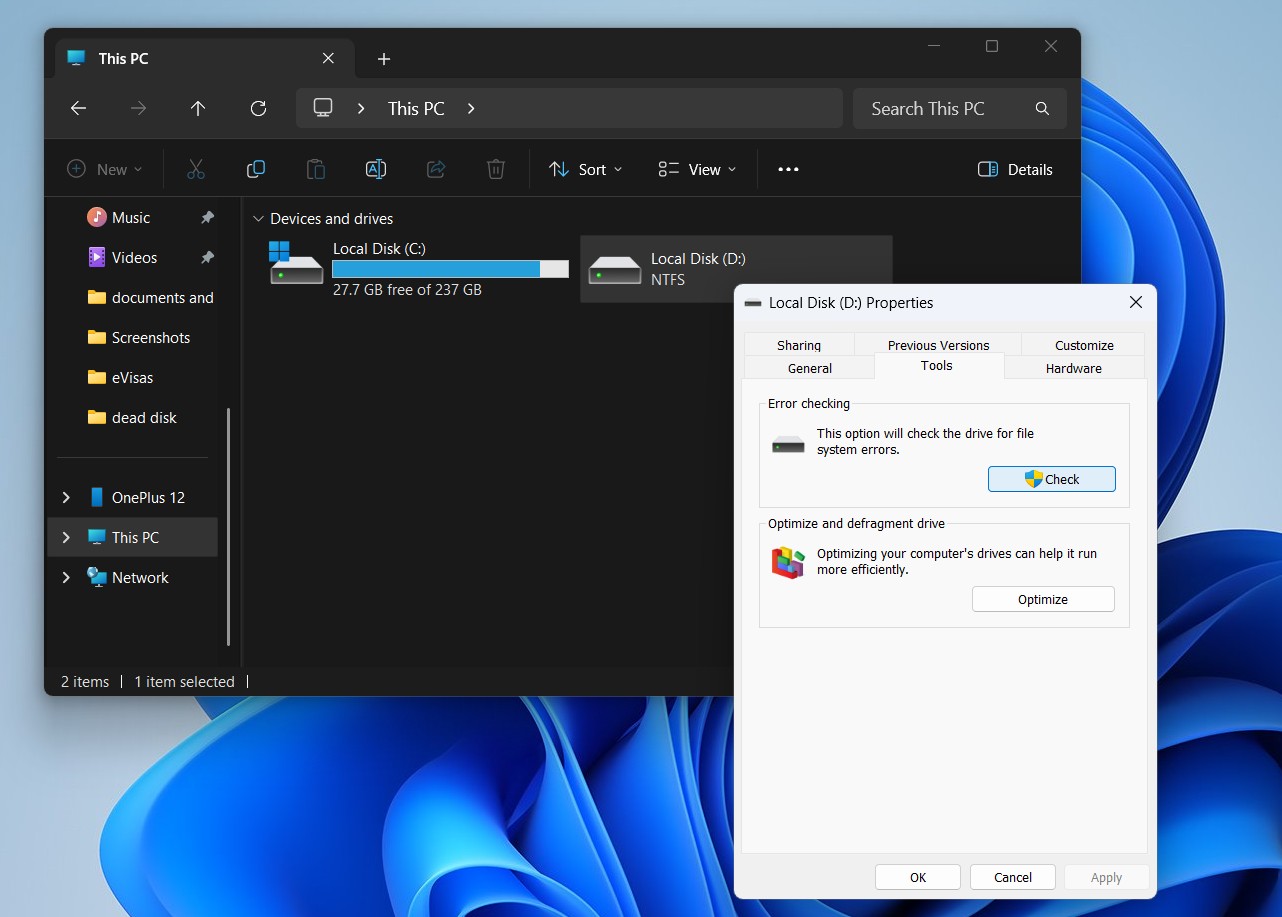
- Click Scan drive on the window that pops up. If any errors are found, you can choose to fix them.
Remember, CHKDSK can only repair soft bad sectors, where data might be written incorrectly. In the case of hard bad sectors, likely due to physical damage, CHKDSK simply marks them as unusable (this TestDisk feature can only be used via a command in Terminal with the /r parameter—it’s not available in the graphical version). Here’s our full guide on how to use CHKDSK for your reference.
Method 3: Resolve All Possible Issues by Formatting the Drive
If all other methods fail, you can try and format the drive as a last resort. This erases all data but might restore your HGST drive’s functionality.
Note: Doing this erases all your data, so make sure you properly back up all your files first or create a disk image like we outlined in the previous section before formatting.
Follow these steps to format your drive:
- Open Disk Management by right-clicking the Start menu.
- Locate your HGST drive, right-click, and select Format.
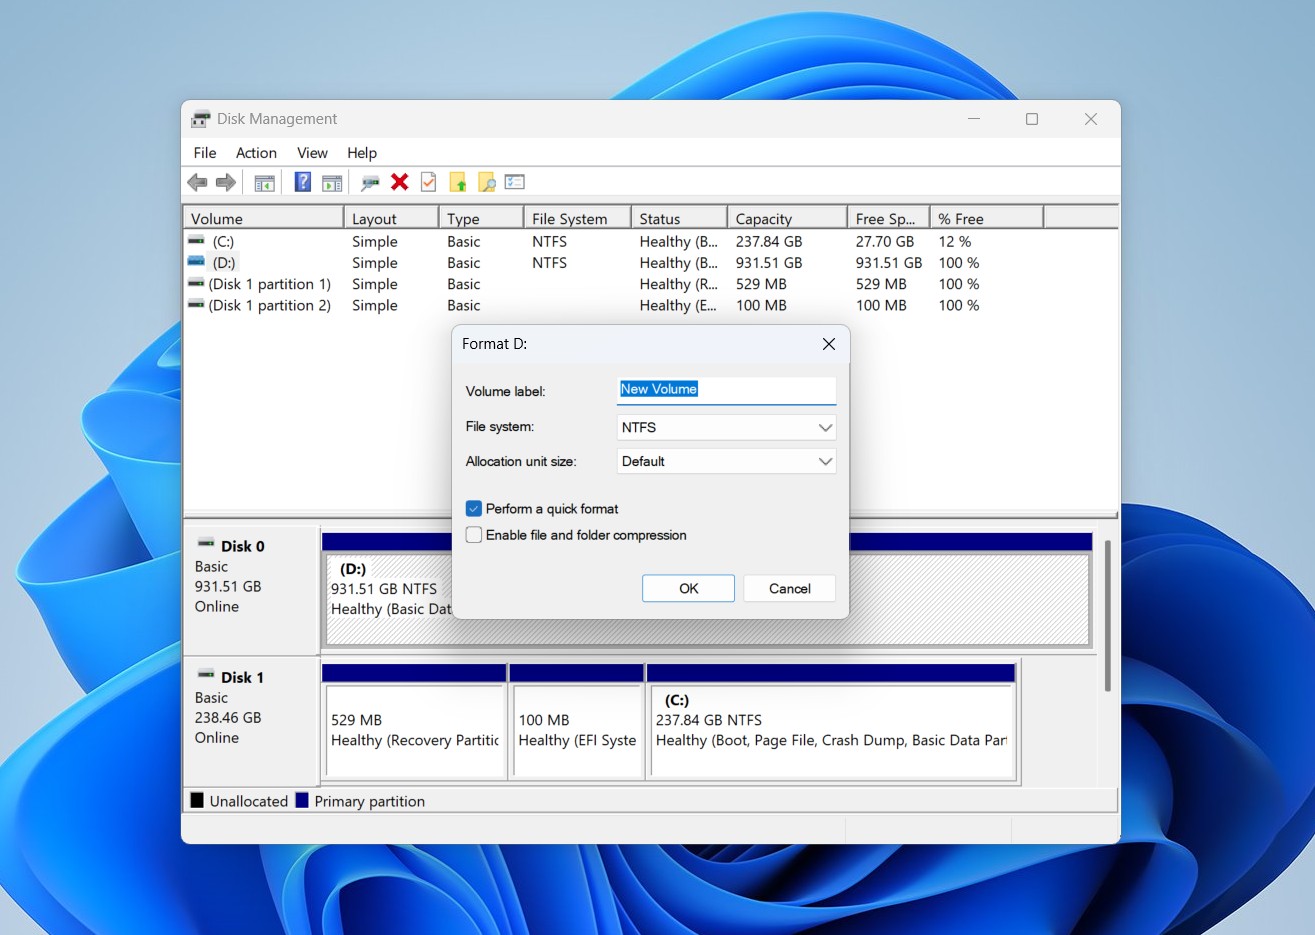
- Choose a file system and uncheck the quick format option for a more thorough format. Now click on OK to complete the process.
Remember, this should only be attempted if you’ve recovered or no longer need the data on your HGST hard drive.
Don’t Want to Go DIY? Contact a Data Recovery Service
If our DIY methods seem too complex, risky, or remain unsuccessful for you, you should reach out to a professional data recovery service. These centers are especially useful if you suspect physical damage, severe corruption, or other complex issues like clicking noises, failed platters, and damaged components, which require specialized hardware and expertise.
These facilities have experts with the right tools and expertise to handle even severe cases of physical or logical damage and are your best bet to successfully retrieve valuable data from your damaged or unreadable HGST hard drive.
Sending your HGST disk to a data recovery center will ensure the best chance of recovery without further risk to your data.
Note: Do keep in mind, these services can range in price from a few hundred to even thousands of dollars depending on your specific data recovery needs. Weigh the costs and benefits and make your decision.
Final Words
Articles about older disks are always more complex. They need to cover a wide range of scenarios—from simple file deletion and basic data loss to more serious cases where you can’t access the disk at all. Some situations are even trickier, like when the disk was used as a system drive, making it impossible to boot your computer, and you don’t have another device to connect it as an external drive.
That said, we hope this article helped you find a solution and successfully recover your data—maybe even revive your HGST disk using our repair tips. Before we wrap up, here are a few more tips to keep in mind:
- Alternative Recovery Software: You can use Disk Drill alternatives like R-Studio and UFS Explorer to scan the disk images you’ve already made to recover data from your failing HGST hard drive.
- Hard Drive Repair Utilities: If your drive has bad sectors, you can use hard drive repair software like Victoria911 or DiskGenius to attempt to remap sectors and restore functionality of the HGST drive.
- System File Repair for Boot Drives: If your HGST drive is a system disk, you can try and run
SFC /scannowandDISM /Online /Cleanup-Image /RestoreHealthcommands in CMD to fix corrupted system files on your drive. Here’s a forum discussion with steps to use these commands.
If you’re still unsure, join our forum at the Handy Recovery Advisor Community. You can also check out the helpful discussions on r/DataRecoveryHelp for expert advice.
This article was written by Vihaan Jain, a Staff Writer at Handy Recovery Advisor. It was also verified for technical accuracy by Andrey Vasilyev, our editorial advisor.
Curious about our content creation process? Take a look at our Editor Guidelines.