Hitachi hard drives aren’t exactly the latest thing, but if you’ve still got one and need to recover it, you’re in the right spot. They work like any other HDD, and our team has worked on these plenty of times before.
Whether you deal with deleted files or a corrupted drive, we’ve got simple and effective solutions lined up. Stick with us, and you’ll learn everything you need for a successful Hitachi hard drive recovery.
Possible Scenarios of Hitachi Hard Drive Recovery
Before we jump into solutions, it’s important to figure out exactly what’s going on with your Hitachi hard drive. Different problems require different approaches, so let’s break things down into clear scenarios and potential fixes.
Scenario |
What You Can Do |
I accidentally deleted files from my Hitachi drive. |
|
I formatted the drive and realized later I had important data. |
Choose a recovery tool with deep scan capabilities and use it to scan for traces of formatted data. |
I need data from my external Hitachi drive, but it isn’t showing up in Windows. |
1. Check cables, USB ports, and try to connect it to a different computer. 2. If visible in Disk Management but not File Explorer, use recovery tools to scan the drive and recover data. 3. Alternatively create a byte-to-byte image of the drive if you suspect the drive is on its last legs. |
My Hitachi drive won’t boot, and I need to recover my files. |
1. Remove the drive from the system and connect it as an external drive to another computer using a SATA-to-USB adapter or docking station. 2. Copy files manually if accessible through File Explorer. 3. If files are inaccessible, use recovery software to scan the drive for data. Save recovered data to the host computer or an external storage device. |
The drive behaves oddly/shows errors when I try to open/copy files. |
1. Repair the drive with built-in tools like CHKDSK. 2. If errors persist, use advanced tools to repair file systems or recover inaccessible data. 3. If you suspect physical damage, create a backup image and recover data from the image instead of the drive. |
I suspect physical damage on my Hitachi drive. |
Do not attempt repairs. Power down the drive to avoid additional damage and send it to a professional data recovery service. When consulting with experts, mention the symptoms (e.g., clicking noises or overheating). |
The drive seems slower than usual or has random freezes. |
1. Use VictoriaHDD to check for bad sectors. If errors are found, repair them using the tool’s sector repair feature. 2. If it shows serious problems, create a backup image and recover data from the image instead of the drive. |
I don’t need any files but I want to fix my Hitachi drive. |
If the file system is corrupted, use CHKDSK or TestDisk to repair it. If the drive still misbehaves, format it to rebuild the file system. For drives with bad sectors, run VictoriaHDD to fix minor physical problems. |
Method 1: Recover Data Using Data Recovery Software
When to use: When your hard drive works but has experienced data loss like deleted files, formatting mistakes, or partition problems.
No matter what your problem is—deleted files, a formatted drive or partition, or your Hitachi hard drive not showing up in File Explorer—in order to use data recovery software you need to check if your drive shows up in Disk Management.
Why is Disk Management important? Disk Management lists all connected storage devices, even if they don’t appear in File Explorer. If your Hitachi drive shows up in Disk Management, it means your computer recognizes the hardware, and you can likely recover data. If it doesn’t show up here, the issue might be physical or related to a faulty connection.
How to check Disk Management:
- Press Win + X and select Disk Management from the menu. You can also search for “Disk Management” in the Start menu.
- Find your Hitachi drive. It may appear as “Disk X” (with X as a number). Look at the size listed for each disk in Disk Management. Match it with the size of your Hitachi drive (e.g., 1TB, 500GB).
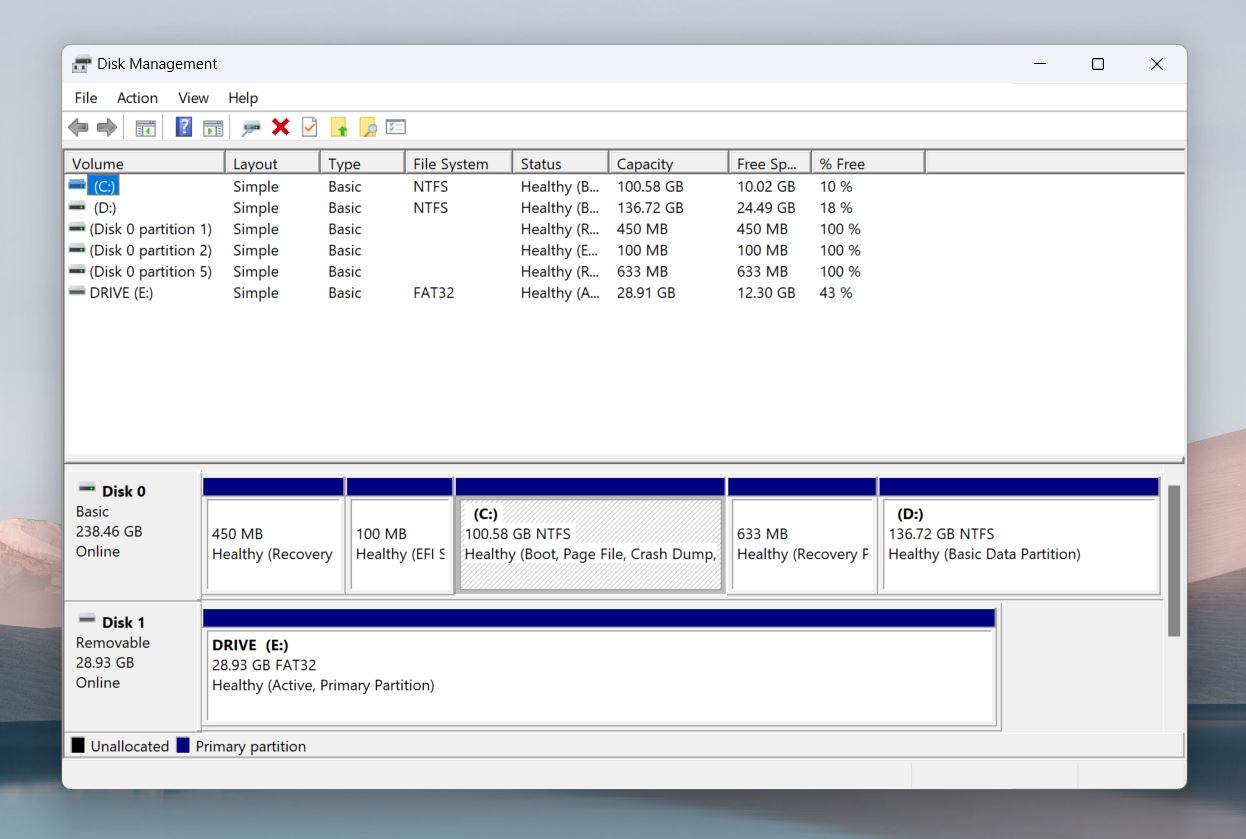
- If the drive is unallocated DON’T FORMAT it. Data recovery tools can scan unallocated drives to recover data. And if you already formated it in some cases recovery is still possible.
- If the drive isn’t listed: check your connections, cables, and USB ports. If it still doesn’t appear, the issue might be physical, and recovery tools won’t help at this point. You’ll need to contact a data recovery service.
If your Hitachi drive shows up in File Explorer, do not install recovery software on it. Installing anything on the same drive could overwrite the very data you’re trying to recover, which will make it impossible to retrieve. Always install the recovery tool on a different drive or, at least, a separate partition.
We have tested numerous data recovery options (see for yourself) and if we had to recommend one recovery tool, it’d be Disk Drill.
How to Recover Data from a Hitachi Hard Drive with Disk Drill
We’ve worked with it on countless recovery tasks, and Disk Drill always delivers solid results. It’s easy to use, reliable, and packed with features beyond basic data recovery.
Here’s why Disk Drill great for Hitachi hard drive recovery:
- It handles just about every file type and works seamlessly with all kinds of hard drives, including Hitachi models.
- Disk Drill has several scan modes, each for different data loss situations: Quick Scan mode quickly searches for recently deleted files; Deep Scan digs deeper into the drive’s file system, which is great for formatted drives or severely corrupted drives; Signature Scan identifies files based on their signatures, which will allow you to recover files even if the file system is heavily damaged or missing.
- The free version lets you scan your Hitachi drive, preview recoverable files, and recover up to 500 MB of data at no cost.
- It includes advanced options like partition recovery, health monitoring, and byte-to-byte backups, which we’ll cover later.
To get started, go to the official CleverFiles website and download the version of Disk Drill that matches your Windows system:
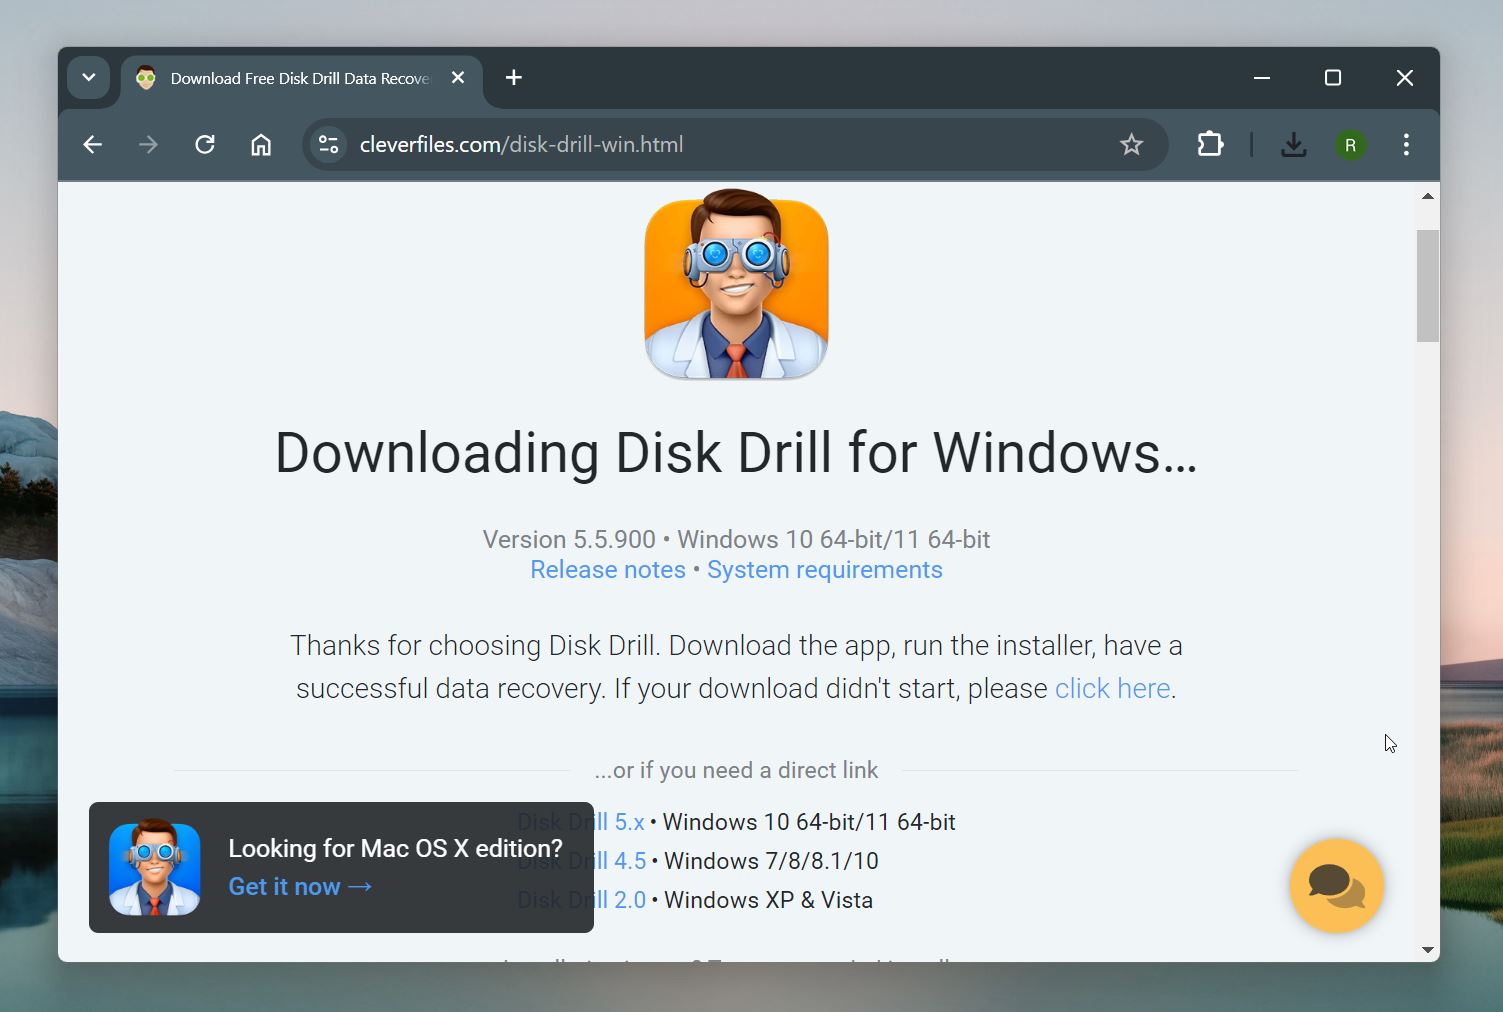
- Disk Drill 5.x: Works with Windows 10 (64-bit) and Windows 11 (64-bit). This is the latest version and offers the most advanced features.
- Disk Drill 4.5: Best for older systems, like Windows 7, 8, 8.1, and 10.
- Disk Drill 2.0: Specifically for Windows XP and Vista users.
When you install the right version for your OS, follow these steps to recover deleted files from hitachi hard drive:
- Open Disk Drill and choose your Hitachi drive from the list of connected devices.
- Click Search for lost data to begin the recovery process.
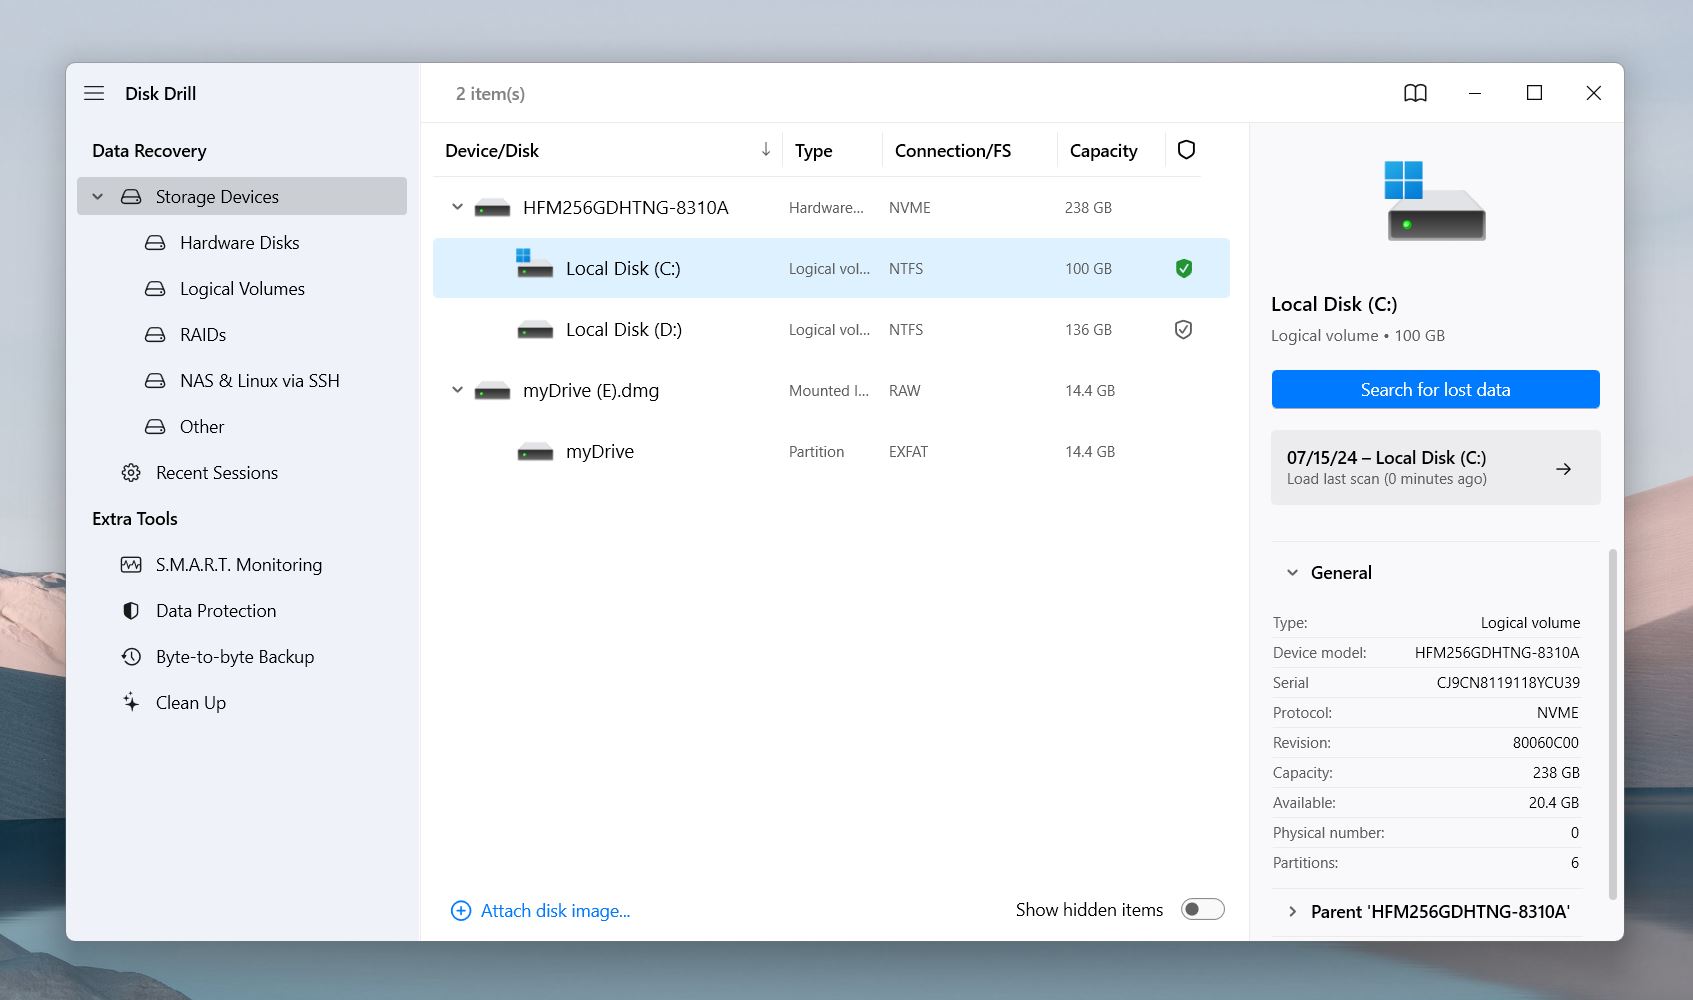
- Disk Drill will start scanning your drive for recoverable data. You don’t have to wait for the scan to finish—click Review found items anytime during the process.
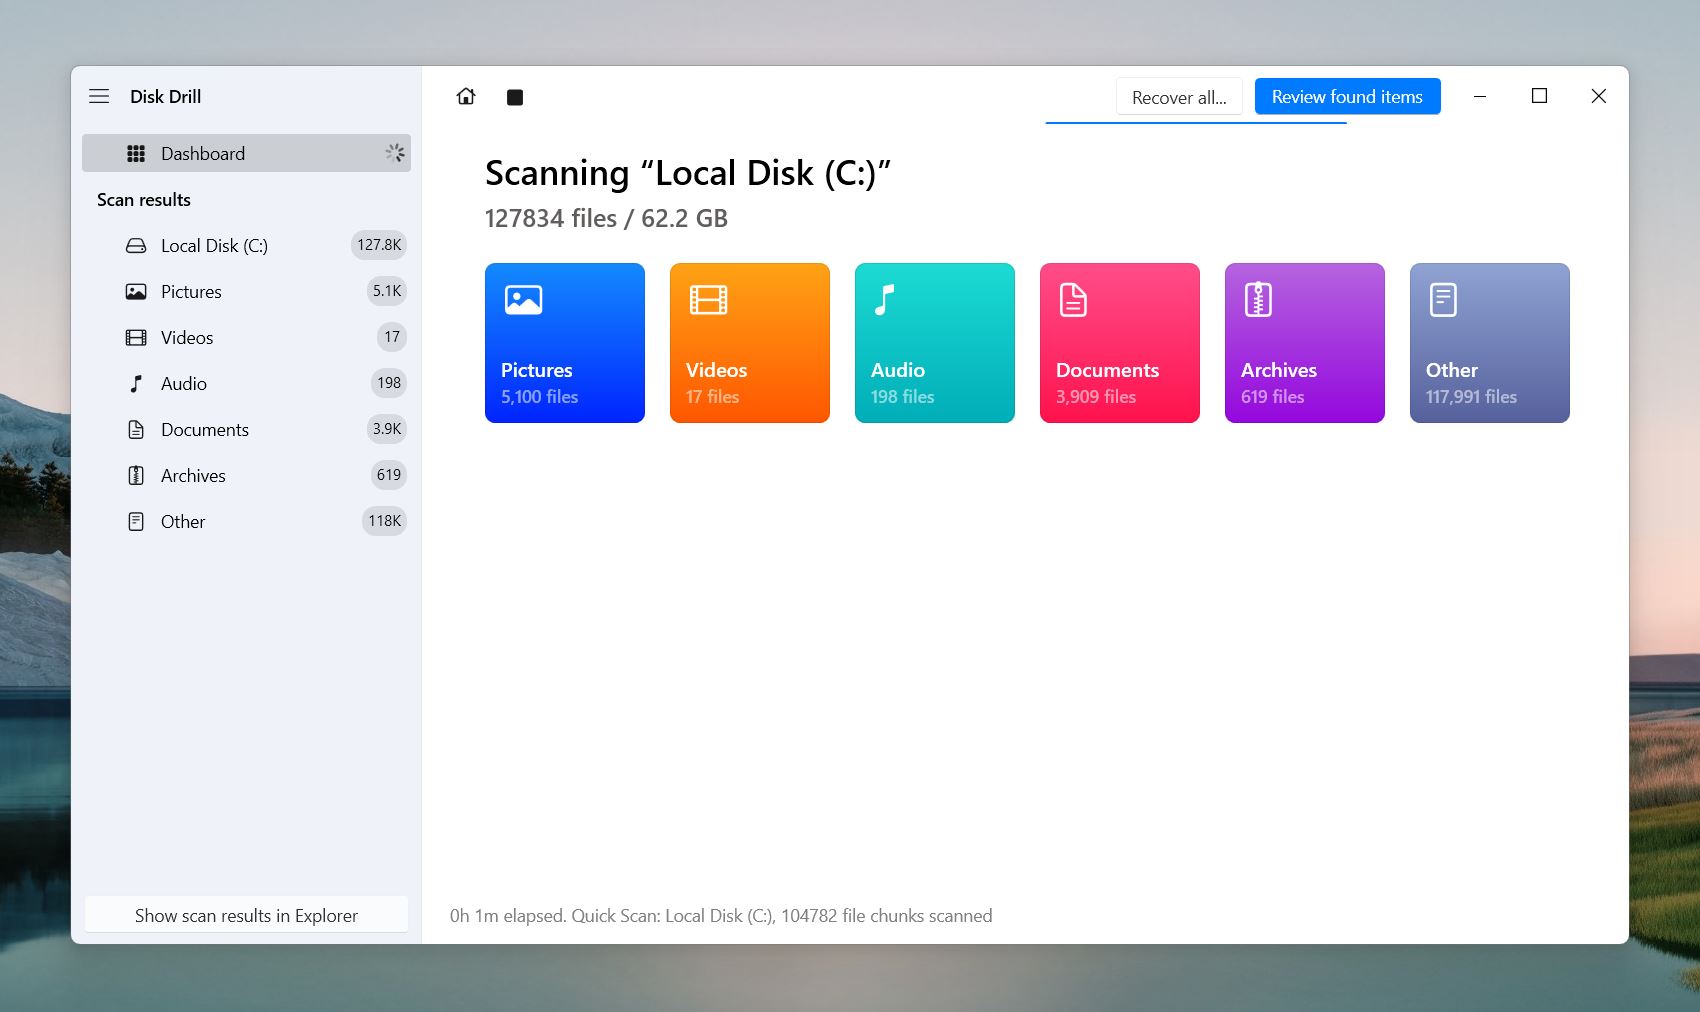
- Browse through the list to check for the files you need. If you find them early, you can start recovery right away.
- Use the search bar in the top-right corner to filter files by name or type. For example, type “.pst” if you want to recover Outlook data file or “.mp4” for MP4 videos. You can also use the sidebar on the left to navigate by file type.
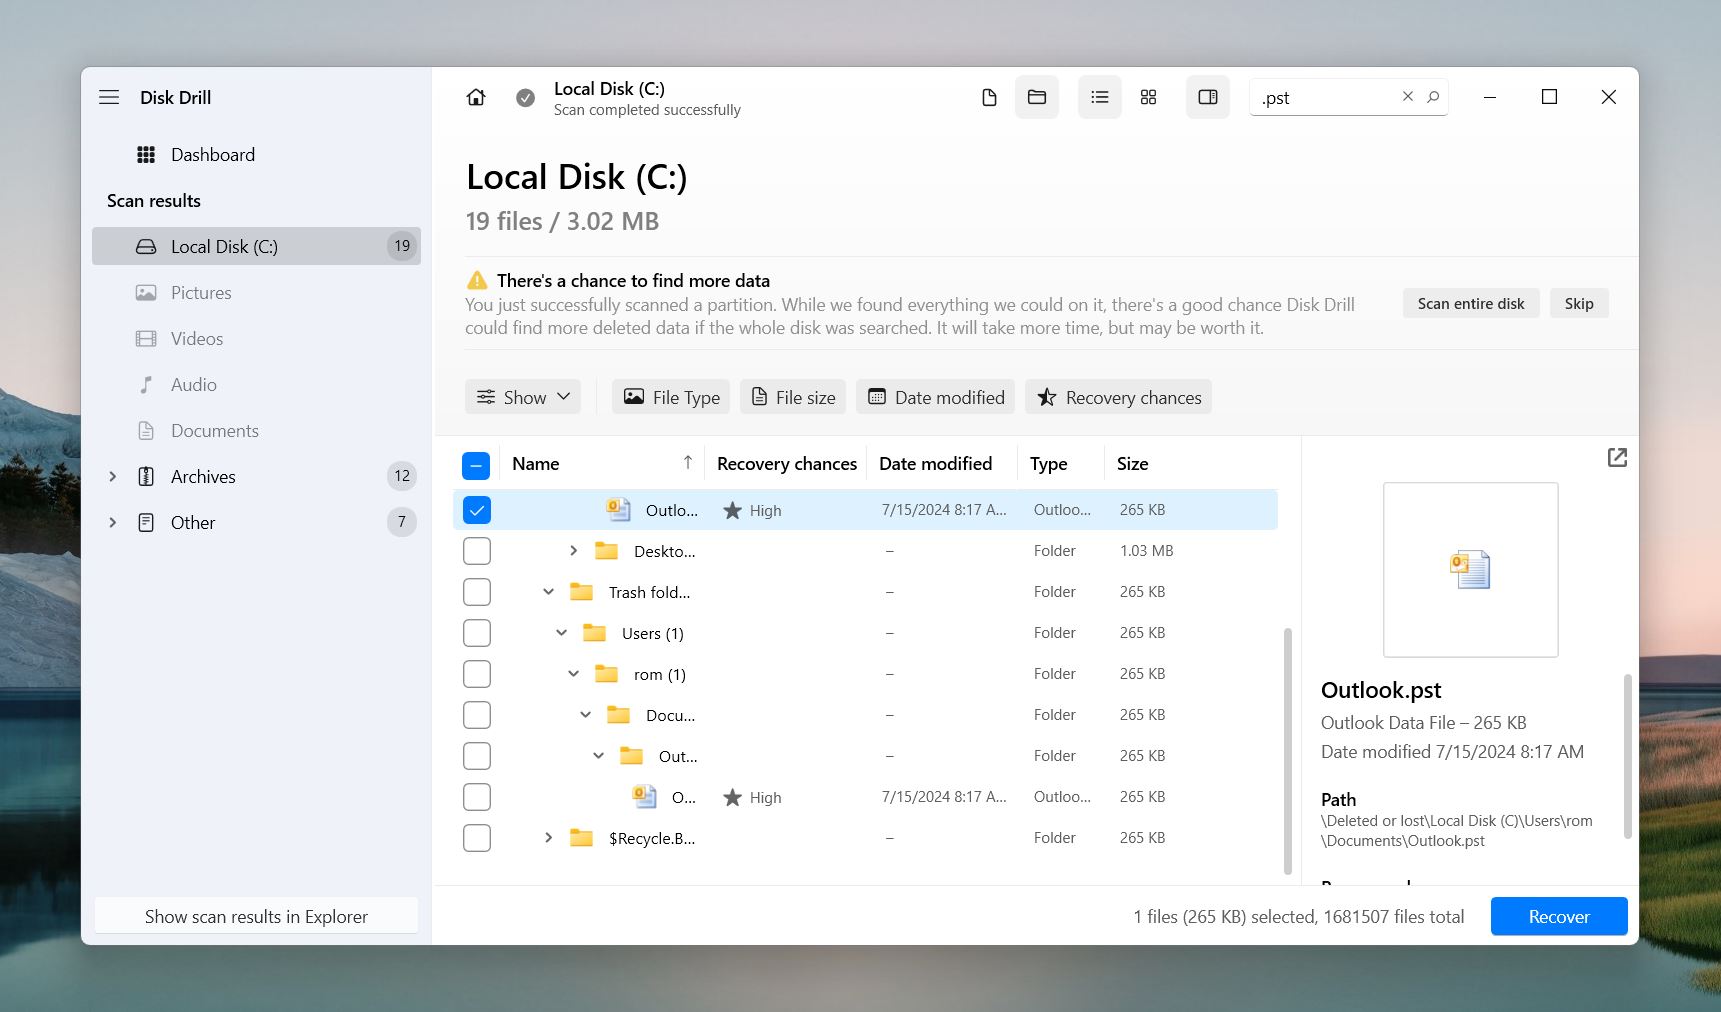
- Hover over a file name and click the eye icon to preview it. Disk Drill supports previews for all file types your Windows system can open.
- Use the checkboxes next to the files you want to recover.
- Click the Recover button and choose a destination where you want Disk Drill to send your lost files to (be sure to store the files to a different volume/drive to avoid overwriting).
Method 2: Create a Byte-to-Byte Backup and Scan It Instead of the Drive
When to use: When your hard drive shows signs of instability or is physically degraded but still accessible in Disk Management.
Let’s talk about what to do when your Hitachi hard drive becomes unstable, shows early signs of failure, or develops a corrupted file system. Data loss often stems from hardware issues like bad sectors (or bad blocks), but can also result from file system corruption caused by sudden shutdowns, power surges, or software errors. In these situations, the drive may still function, but it might exhibit slower performance, fail to open files, or show other signs of degrading performance.
If you deal with an early-stage failing drive, we recommend using Disk Drill’s byte-to-byte backup feature. This process saves everything on your Hitachi drive as an image file and allows you to recover data from it so as not to put further strain on the Hitachi hard drive itself.
Signs your drive might be failing include:
- Slower performance than usual.
- Errors or unresponsiveness when you try to access files.
- Issues with data transfers.
If you skipped the previous section, go back and read how to install Disk Drill. After you’ve installed it, follow these steps to create a Byte-to-Byte Backup for your Hitachi hard drive:
- Open Disk Drill and navigate to the Byte-to-Byte Backup option in the left-hand menu.
- Pick the Hitachi drive you want to back up from the list of connected devices and click on Byte-to-Byte Backup button.
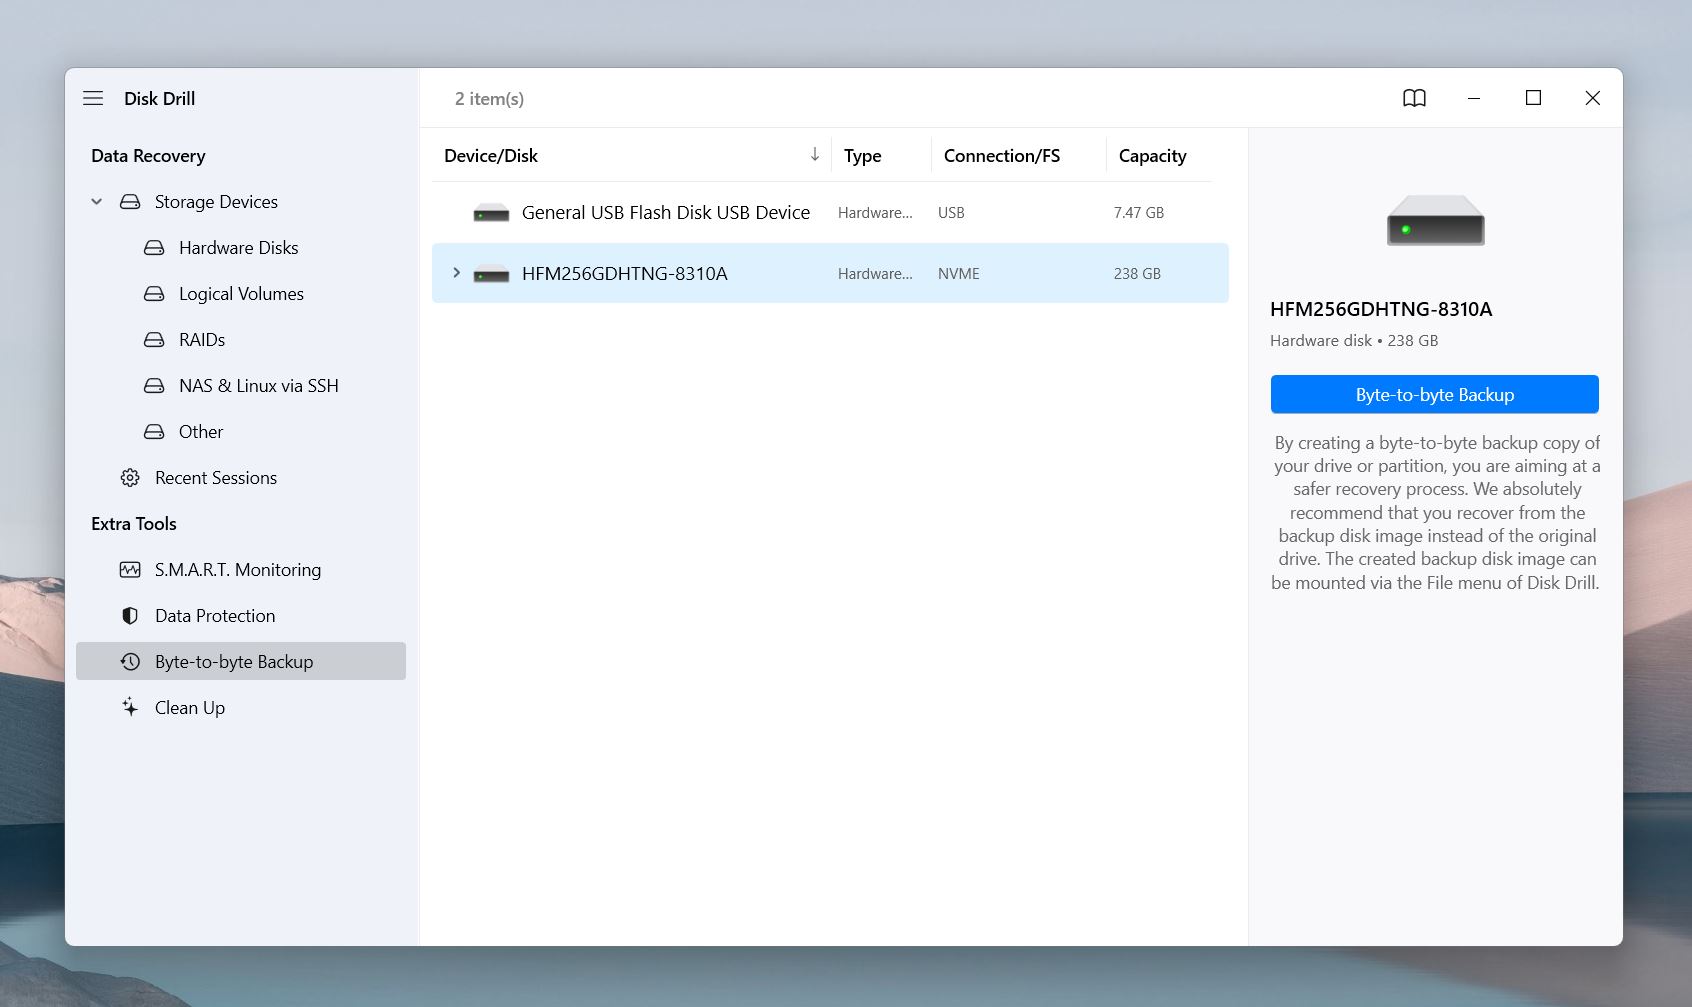
- Choose a reliable storage device with enough free space to hold the backup.
- Start the backup process. Disk Drill will create an image file of your Hitachi drive. This is a complete image, capturing all the data on the drive—visible files, hidden files, deleted data, and even the empty space. It’s called a byte-to-byte backup because it copies every single byte from the drive, exactly as it is.
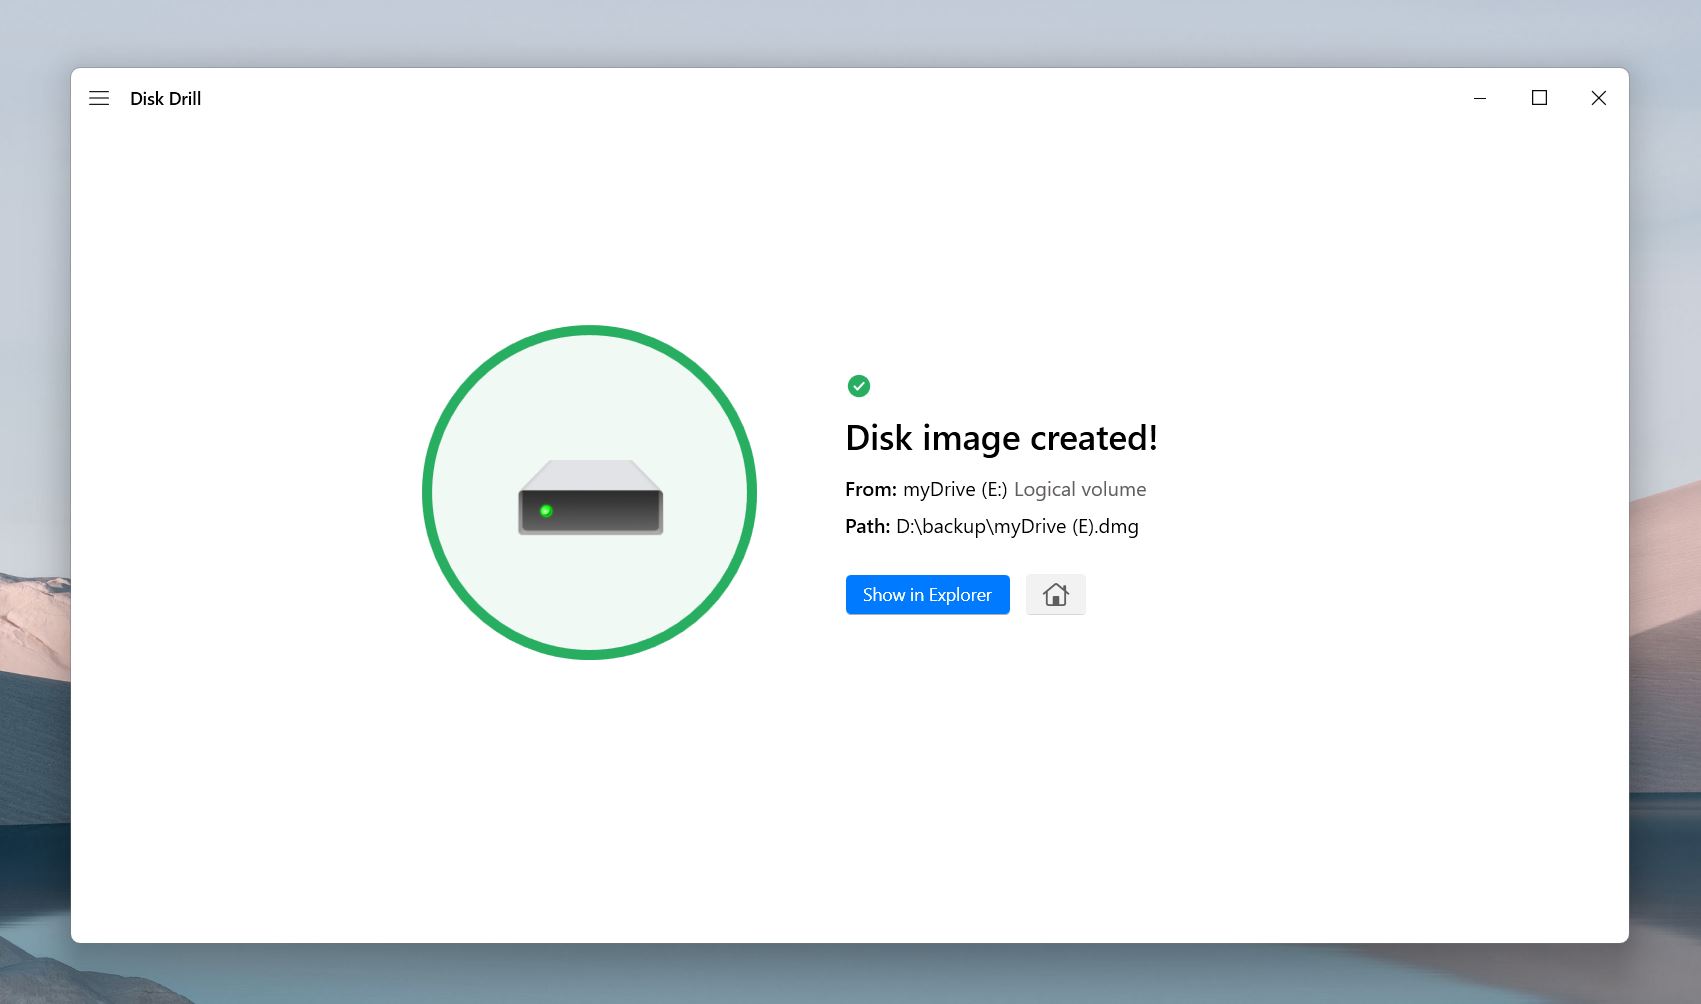
- Once the backup is complete, go to the Data Recovery section in Disk Drill.
- Click Attach Disk Image and select the backup file. The backup image will appear listed alongside your other storage devices.
- Choose the image and click Search for lost data to start the recovery process. From this point, you can follow the same steps we covered in the previous section.
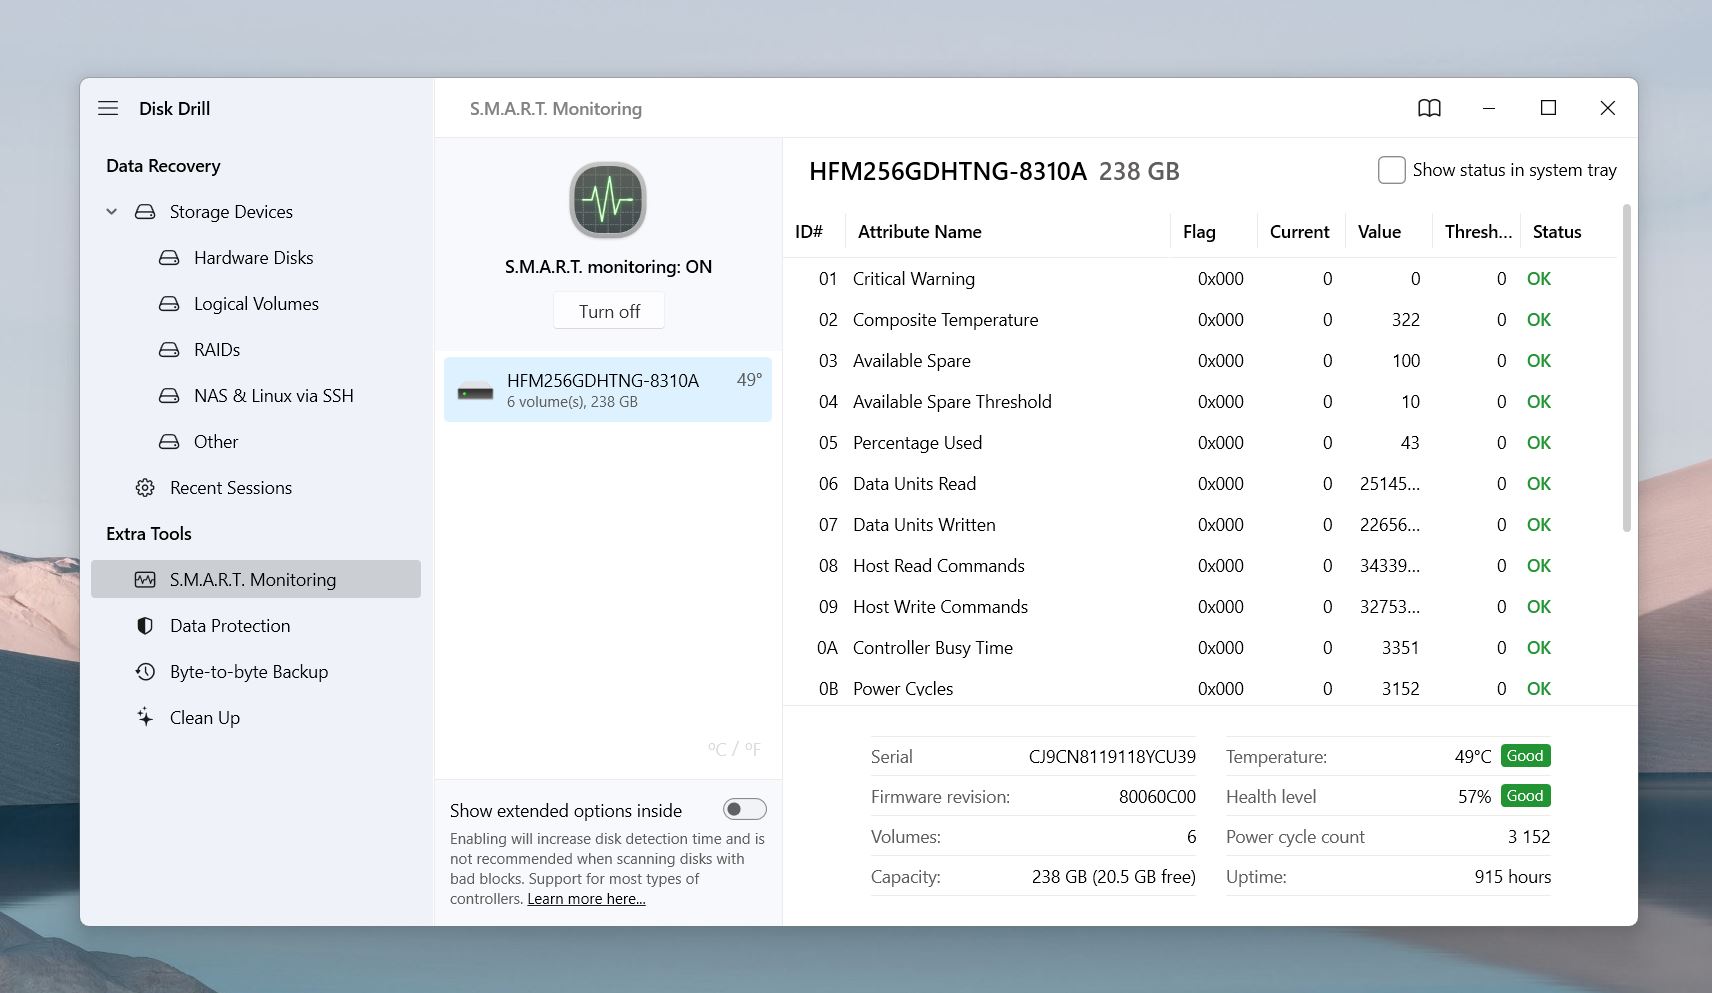
Disk Drill isn’t just about byte-for-byte backups—it’s loaded with other super useful tools. When you’re dealing with a problematic HDD, you can take advantage of its S.M.A.R.T. monitoring to check your drive’s health. Go to the S.M.A.R.T. Monitoring section in the app. If Disk Drill flags any warnings or shows issues, it’s a clear sign that you should stop using the drive for important files.
Method 3: Try to Fix Your Hitachi Hard Drive
Hitachi hard drives aren’t fundamentally different from other HDDs, so the methods to fix them are the same as with most hard drives. We’ll cover several fixes and tools in this section and explain the situations where each tool is effective under “When to use.”
Most methods in this section carry the risk of data loss, and formatting will DEFINITELY ERASE EVERYTHING on your Hitachi drive. If you have important data stored on it, make sure to check out our guide on how to recover your files first.
Option A: Use TestDisk
When to use: The drive appears in Disk Management but partitions are missing or inaccessible.
TestDisk is a powerful open-source tool designed to repair corrupted partitions, rebuild file systems, and recover lost partitions. It’s highly effective when your Hitachi hard drive has logical issues but is still detected by the system.
That said, it’s not the most user-friendly tool—it runs entirely through a command-line interface. You’ll need to open it in Command Prompt and navigate its text-based menus. It requires extra care. Follow the steps closely—you wouldn’t want to choose the wrong option here, trust us.
Here’s how to use TestDisk:
- Go to the official TestDisk website and download the latest version.
- Extract the contents of the archive.
- Open the folder where you extracted TestDisk and double-click testdisk_win.exe. This will launch TestDisk in a command-line window.
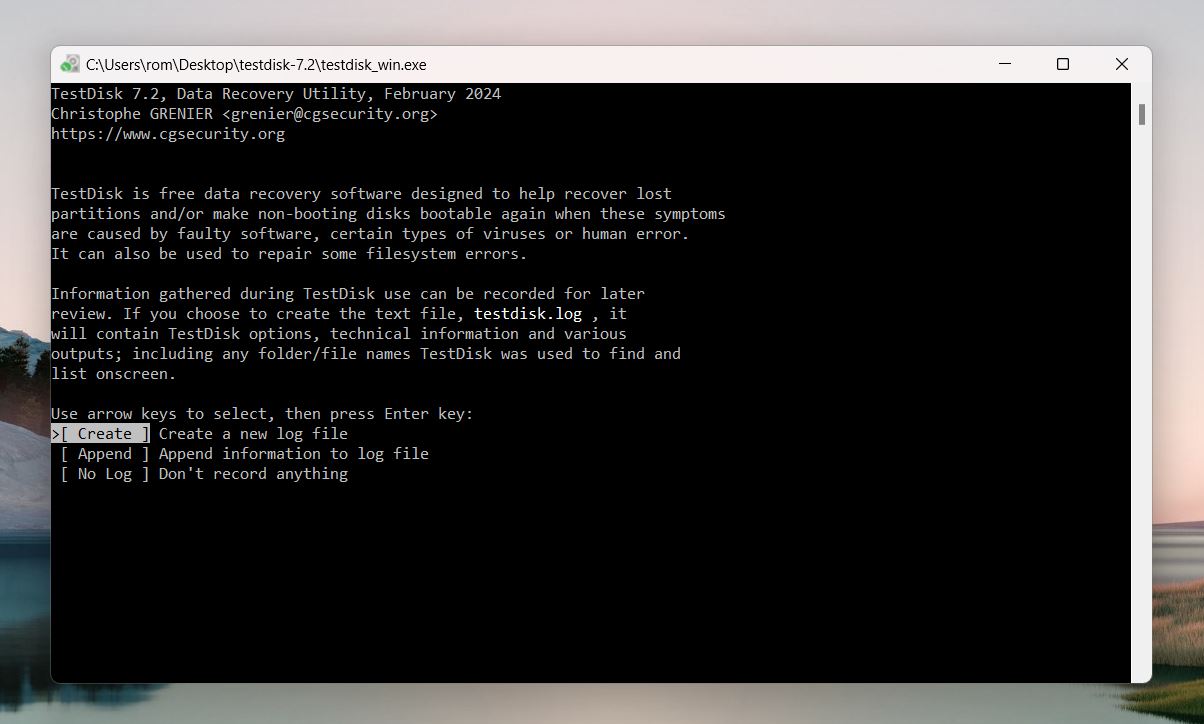
- TestDisk will ask if you want to create a log file. Use the arrow keys to select Create, Append, or No Log, and press Enter to confirm. A log file can be useful for troubleshooting.
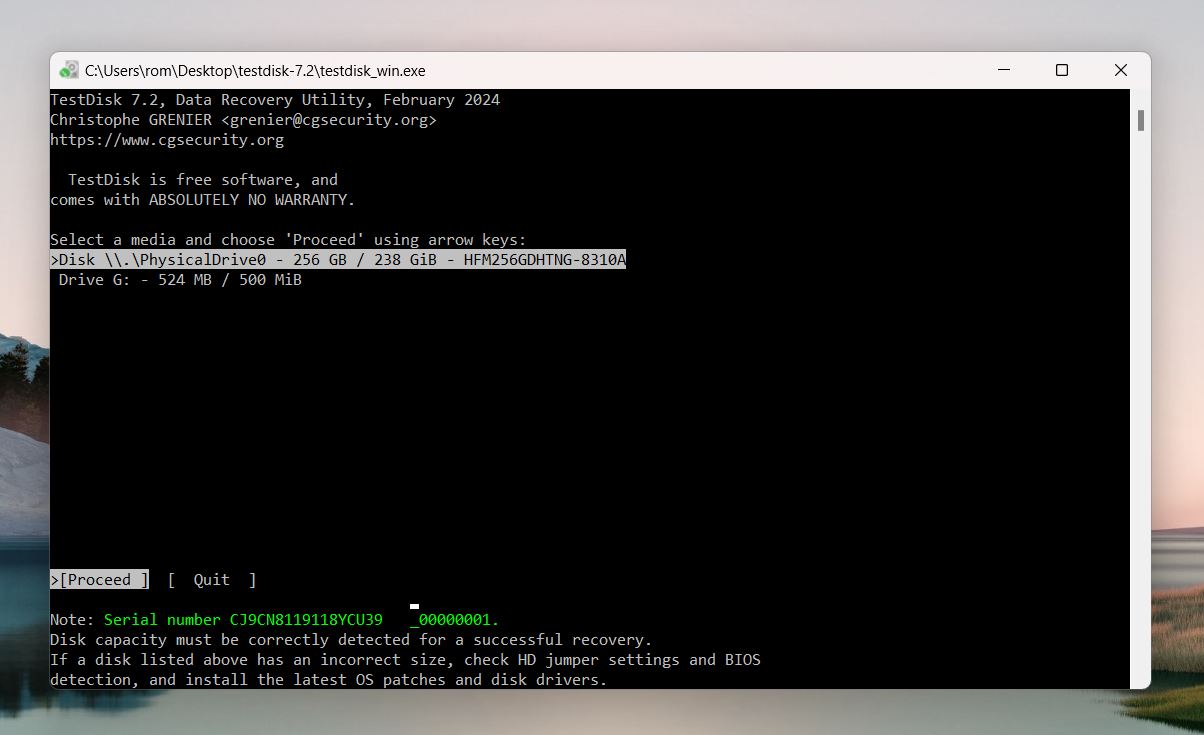
- TestDisk will display a list of connected drives. Use the arrow keys to highlight your Hitachi hard drive and press Enter.
- TestDisk will auto-detect the partition table type. It’s recommended to press Enter to proceed with the default selection unless you know otherwise.
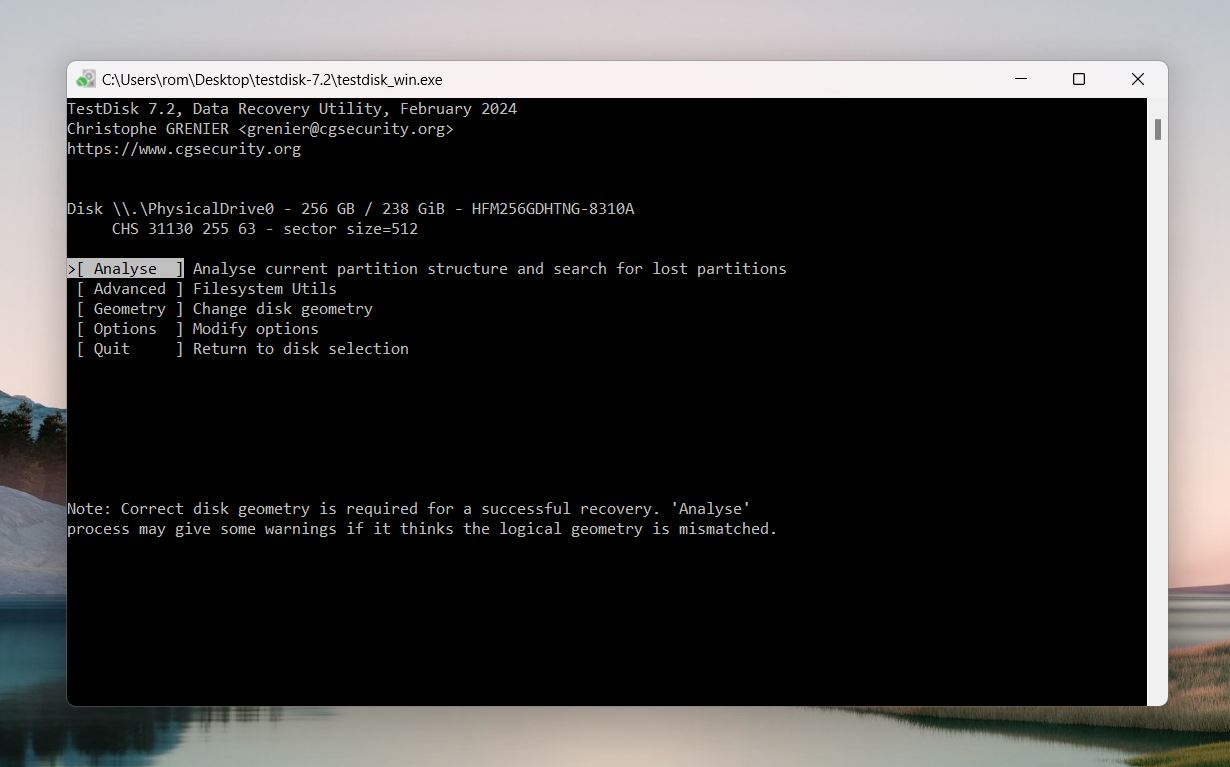
- Highlight the Analyze option in the menu and press Enter. This will initiate a scan to identify issues with the partitions on your Hitachi drive.
- Select Quick Search by highlighting it and pressing Enter. TestDisk will perform a basic scan and list any recoverable partitions it finds.
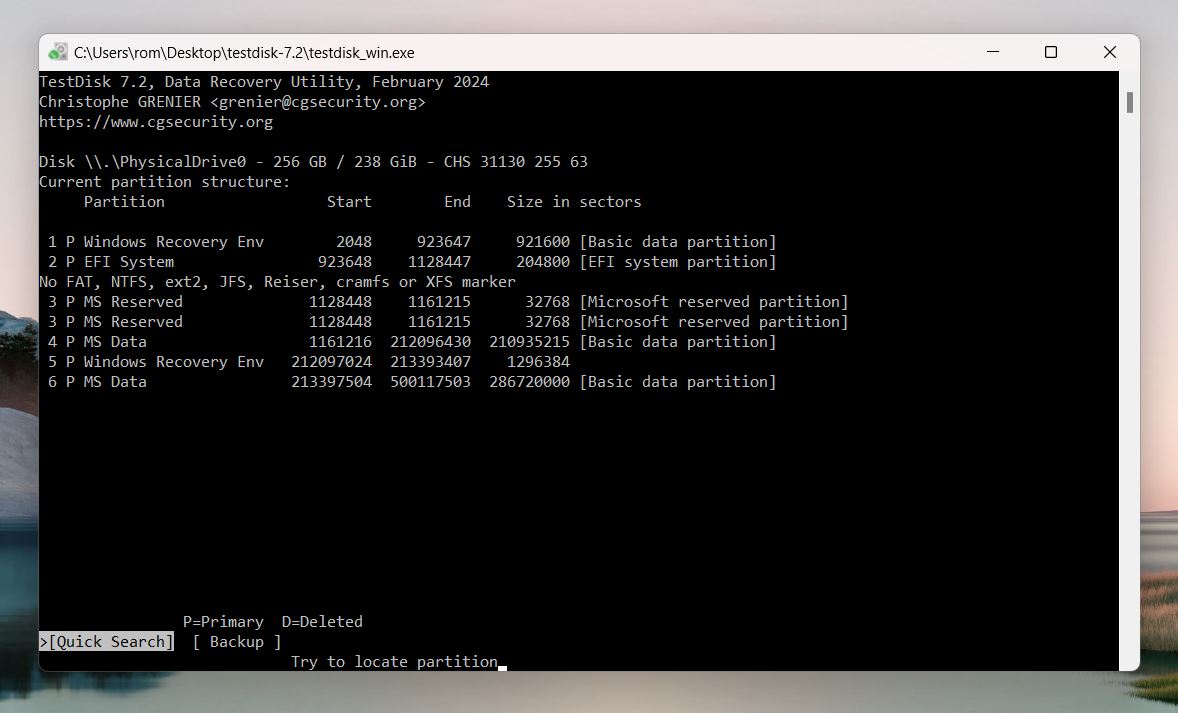
- To view the files in a specific partition, highlight the partition and press P. This allows you to confirm the contents before proceeding. Press Q to return to the partition list.
- If the partition isn’t listed after the Quick Search, highlight Deeper Search and press Enter. This option performs a more thorough scan to locate partitions.
- Each partition will have a prefix such as D (deleted), P (primary), * (bootable), or L (logical). Use the left and right arrow keys to change the prefix of the partition you want to recover to P (primary).
- Highlight the Write option and press Enter to save the changes to the partition table.
- TestDisk will prompt you to confirm your changes. Press Y to proceed with writing the updated partition table to the Hitachi drive.
- Once the process is complete, reboot your computer. After the reboot, open File Explorer to check if your Hitachi hard drive and its partitions are accessible.
Option B: Use CHKDSK
When to use: Your Hitachi hard drive shows errors, when you try to open or copy files.
CHKDSK (Check Disk) is a built-in Windows tool that scans your drive for issues like file system errors and bad sectors. It can repair a lot of common problems and help stabilize your Hitachi drive.
If you have important files on the drive, back them up first—there’s a chance CHKDSK could overwrite data during repairs.
CHKDSK checks both your drive’s file system and physical surface for issues:
- Soft bad sectors. These are caused by things like improper shutdowns or power failures. CHKDSK rewrites/relocates data to a good part of the drive to fix this.
- Hard bad sectors. These are from physical damage and can’t be repaired. CHKDSK marks them as unusable so no new data gets written to those spots.
- File system fixes. It cleans up errors like lost clusters, broken file references, and directory problems by reorganizing the file system.
- Metadata repairs. It checks and corrects mismatches in file information, like names and sizes, so everything is where it’s supposed to be.
How to run CHKDSK:
- Press Win + S, type Command Prompt, and right-click it. Choose Run as Administrator to open it with elevated permissions.
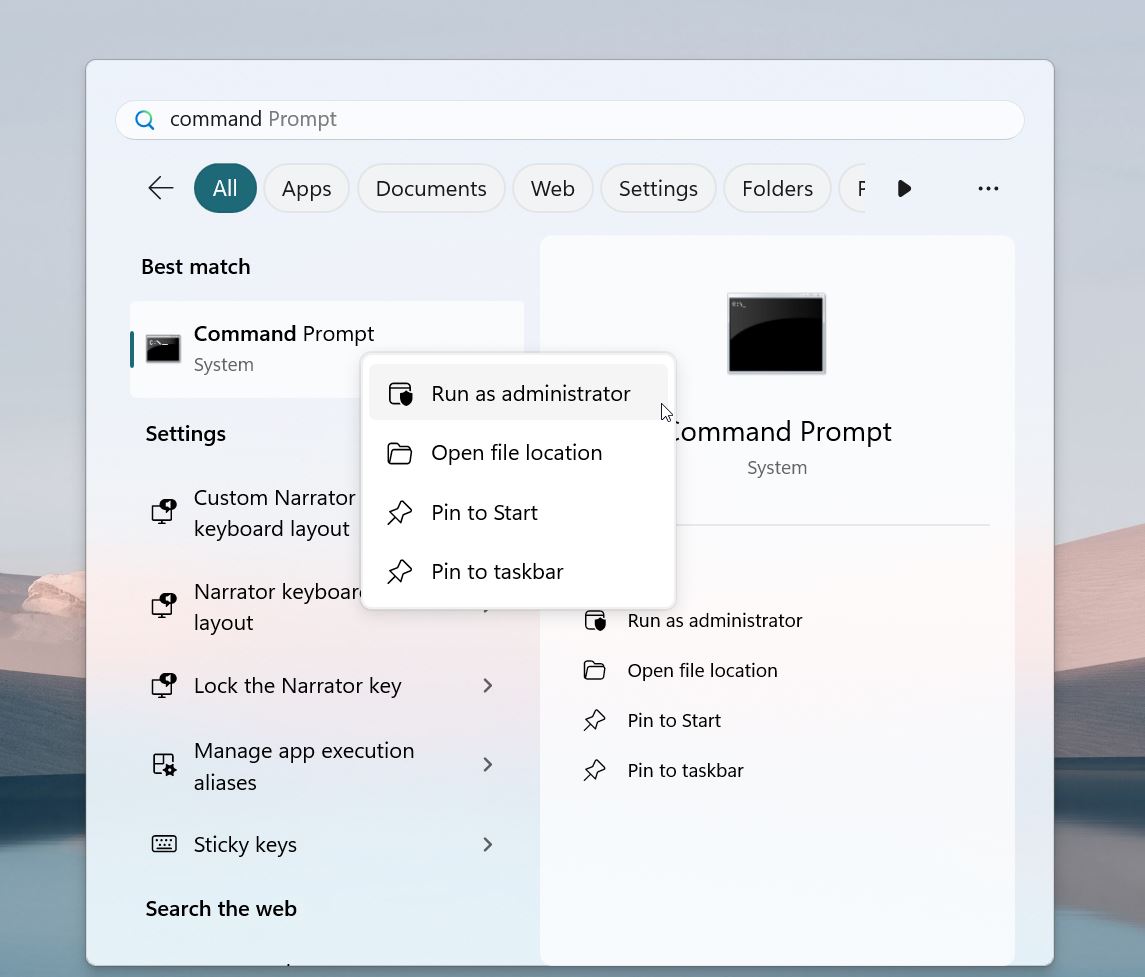
- Run the CHKDSK command:
chkdsk E: /r
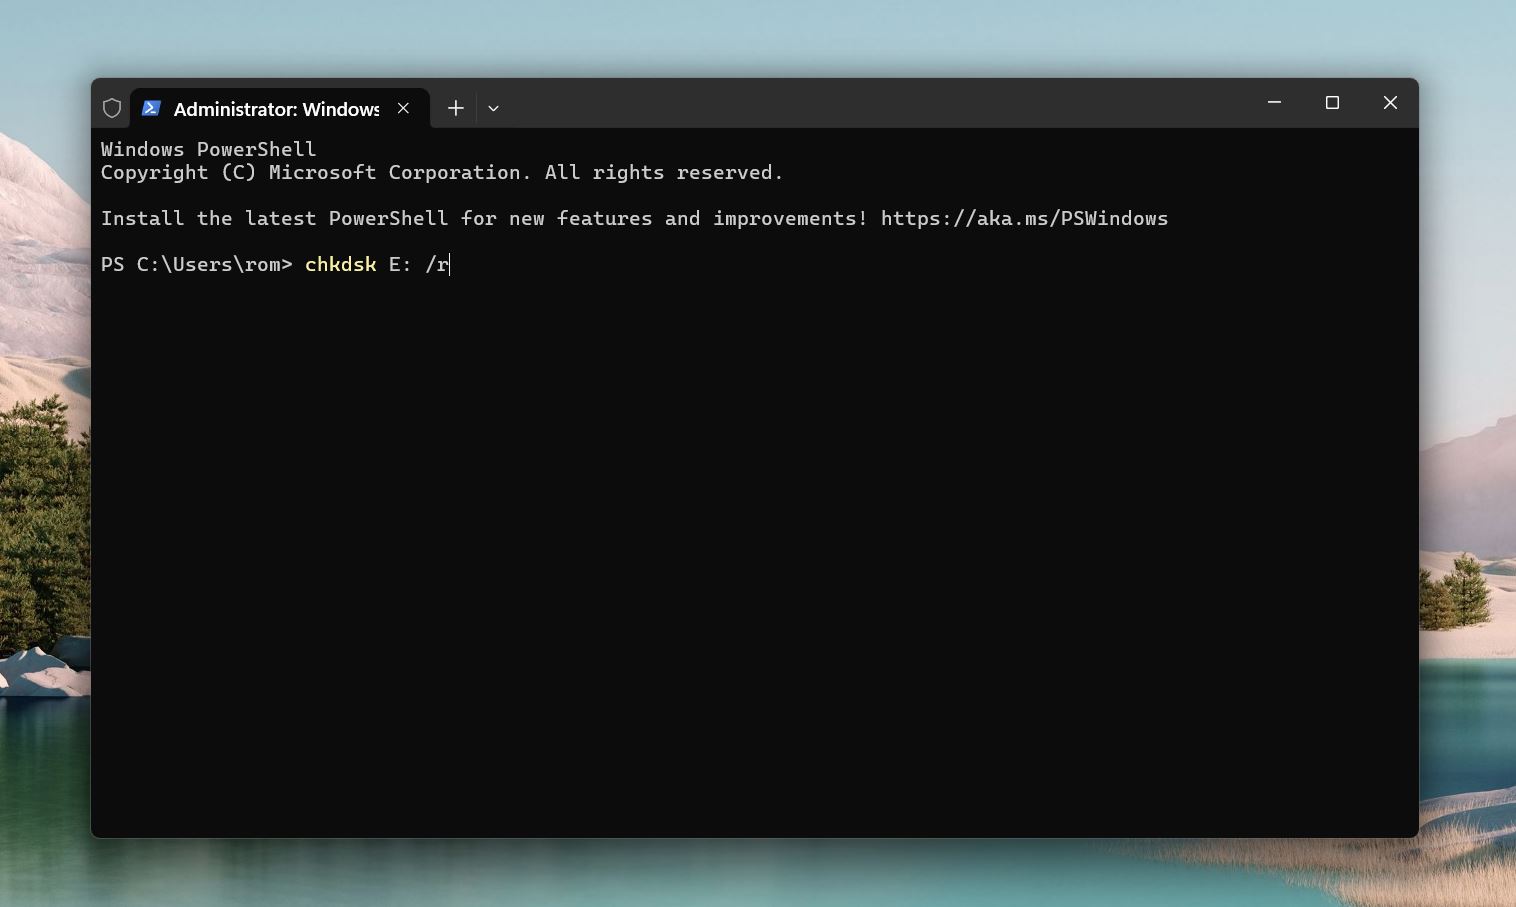 (replace E with your Hitachi drive’s letter as seen in File Explorer)
 - If the drive is in use, Windows will ask if you want to run CHKDSK during the next restart. Type Y and press Enter.
- Reboot your PC. CHKDSK will scan the drive during startup and fix any errors it finds.
- When CHKDSK finishes, it will show a summary of what it fixed. Open File Explorer to see if your Hitachi drive is back to normal.
An alternative way to run CHKDSK. Right-click your Hitachi drive in File Explorer, choose Properties, then go to the Tools tab. Click Check under Error Checking and select Scan and repair drive.
Option C: Use VictoriaHDD
When to use: Your Hitachi drive is slow, freezes during operations, or frequently disconnects; CHKDSK hasn’t fully resolved your drive issues.
Victoria is one of the most popular tools for hard drive diagnostics and repair. It’s been around since 2006 and has a strong reputation for handling physical drive problems, especially bad sectors. Unlike simpler tools like CHKDSK, Victoria digs deeper with advanced diagnostics and repair options.
What can VictoriaHDD do for your Hitachi drive:
- It scans your drive sector by sector to find slow or damaged areas.
- The tool tries to fix bad sectors or marks them as “unusable” so your system doesn’t touch them.
- Victoria reads detailed S.M.A.R.T. stats to give you a clear picture of your drive’s health.
Here’s how to use VictoriaHDD to fix your drive:
- Go to the official VictoriaHDD website and download the latest version. Extract the program files to a folder. VictoriaHDD doesn’t require installation—you run it directly from the executable file.
- Right-click the program file and choose Run as Administrator, so it has full access to the drive.
- From the list of connected drives, choose your Hitachi hard drive.
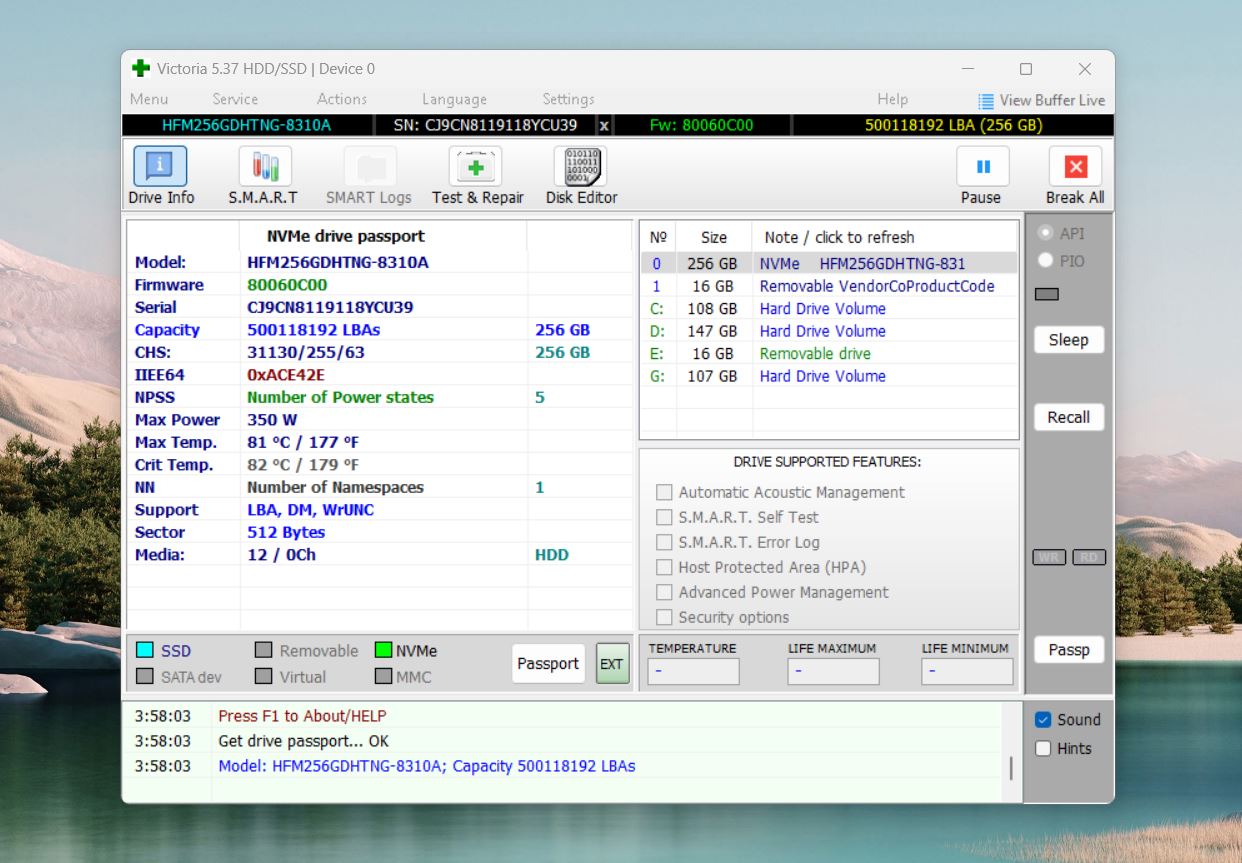
- Open the Tests tab and select Scan to begin analyzing the drive’s sectors. As the scan progresses, VictoriaHDD will display a map of your drive’s health, it marks sectors as good, slow, or bad.
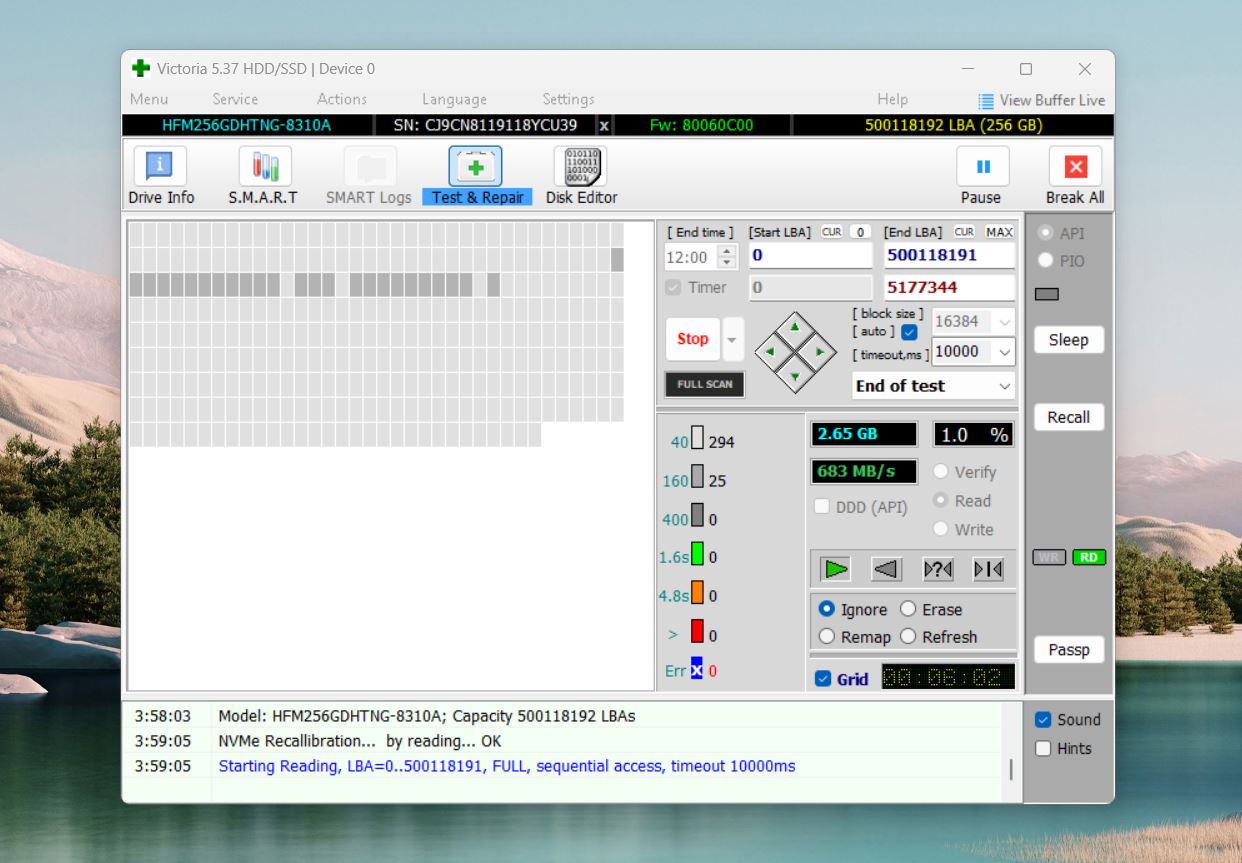
- If bad sectors are found, use the Remap option to reallocate them. This way the system will avoid writing data to these sectors.
Option D: Format Your Hitachi Drive
When to use: The file system is corrupted; the drive shows as RAW or unallocated in Disk Management.
Formatting is a last-resort option when your Hitachi hard drive is severely corrupted, and other repair methods haven’t worked. Formatting won’t help if your drive has physical problems. However, for non-physical issues, it’s often the best method. While this process erases all data on the drive, it can restore its functionality and make it usable again. If you don’t need the data on the drive or have already backed it up, formatting might be the quickest solution.
How to format your Hitachi drive on Windows:
- Open Disk Management, and select Create and format hard disk partitions.
- Find your drive in the list.
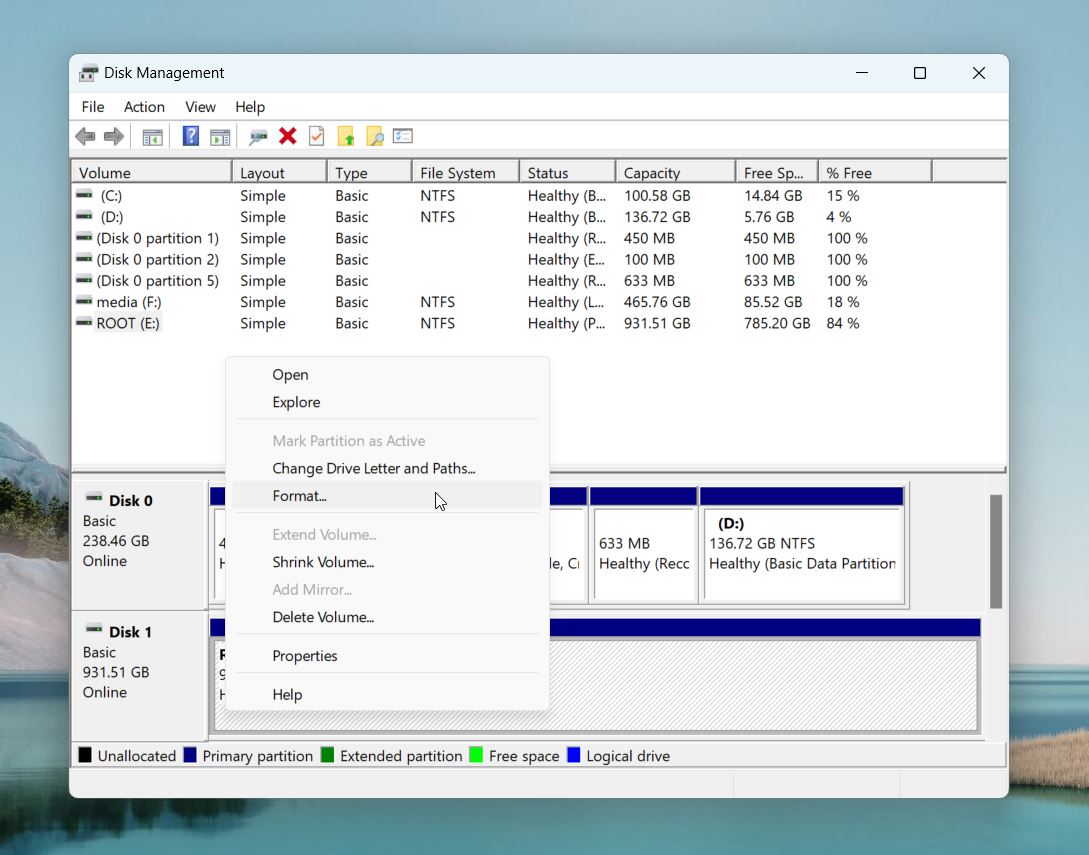
- Right-click the drive and select Format from the context menu.
- In the formatting options, select a file system: NTFS is best for Windows-based systems, and exFAT is compatible with many systems like Windows, macOS, and Linux.
- Give the drive a name (optional).
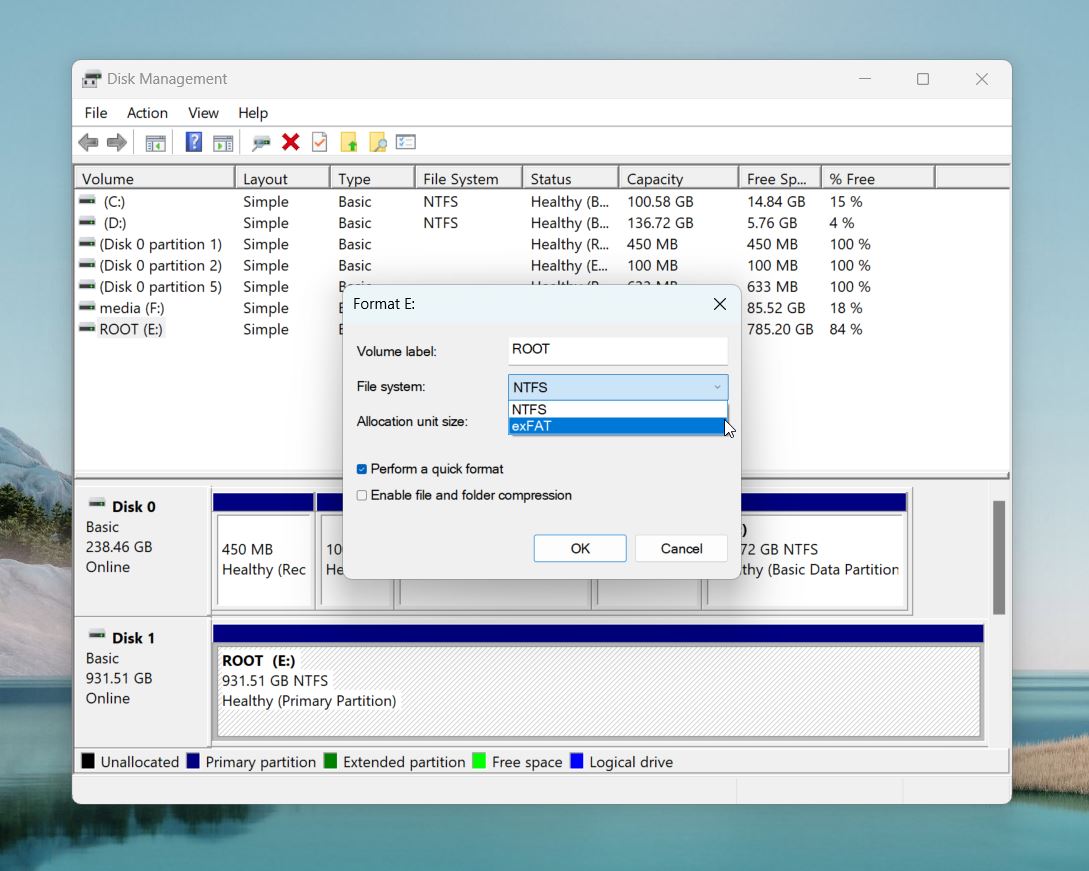
- Perform a Quick or Full Format. Quick format is faster because it skips the bad sector scan—it just clears the file system, so the drive looks empty, but the data’s still recoverable. Full format takes longer since it erases and overwrites everything and checks for bad sectors to make sure the drive’s good to go. If you deal with errors, want long-term reliability, or need to securely wipe data, uncheck Perform a quick format to go with a full format.
- Confirm the action, and Windows will format the drive.
Method 4: Contact a Data Recovery Service
When to use: The drive isn’t spinning, makes clicking noises, or shows visible damage; Software can’t detect or access the drive at all; You need to recover sensitive/irreplaceable files and do not want to risk it yourself.
Hard drives typically have a lifespan of around 3 to 5 years under normal use, though some can last longer with proper care. However, even the most reliable drives eventually fail, and since Hitachi hard drives were phased out by 2018 after being acquired by Western Digital, finding brand-specific support has become increasingly difficult. If your Hitachi drive stops working and DIY solutions don’t help, it might be time to contact a professional data recovery service. These services have the tools, cleanroom environments, and expertise to safely recover data from drives with physical or severe logical issues.
Top data recovery services to consider:
- SalvageData with a 96.7% success rate and 24/7 emergency services, excels in both personal and enterprise recovery.
- Ontrack known for its 35+ years of experience and global presence, offers great service with job status tracking.
- Secure Data Recovery is the only U.S. service with Class 10 ISO 4 cleanrooms.
- DriveSavers has been a trusted name in data recovery since 1985, specializing in data recovery from hard drives and other storage devices affected by crashes, mechanical failures, physical damage, and even catastrophic events.
Professional recovery costs depend on how complex the issue is. Logical damage typically runs between $300 and $1,000, while physical damage can go over $1,500. As you see, it’s not cheap, so it’s only worth it if the data on your Hitachi drive is important enough to justify the expense.
FAQ
Can old hard drives be recovered?
Whether an old hard drive can be recovered depends on whether it’s been physically damaged and whether it can still boot. If an old hard drive is physically damaged, a data recovery service might be of some help. Whereas if it still works like new, you can use data recovery software to get the files you need back.
How to fix Hitachi hard disk not detected issue?
This question is quite tricky as there isn’t a definitive answer to it. Here are some things you can do to try and fix the Hitachi hard drive not detected issue:
- Connect the faulty Hitachi hard drive to another desktop or a laptop.
- Enable Hitachi hard drive in bios.
- Update the Hitachi hard drive drivers.
- Run CHKDSK CMD and check whether any internal errors are making the Hitachi hard drive unrecognizable.
Can I recover data from a formated Hitachi hard drive?
Yes, you can often recover data from a formatted Hitachi hard drive, but the success largely depends on how the drive was formatted and what actions you’ve taken since the formatting. Here’s what you need to know:
- The type of format matters. Quick format removes the file system pointers but doesn’t overwrite the actual data. As a result, data recovery tools can often retrieve your files successfully. A full format not only removes the file system pointers but also scans for bad sectors and overwrites data, so recovery is usually impossible.
- Once you realize you need to recover data, stop using the hard drive immediately. If you use it after it can overwrite the areas where your data is stored, and reduce the chances of successful recovery.
- There are several reputable data recovery programs like Disk Drill, EaseUS Data Recovery Wizard, and Recuva that can help you recover files from a formatted Hitachi drive. These tools work best if the drive hasn’t been extensively used after formatting.
What are the best Hitachi hard drive repair tools?
Your best bet when it comes to Hitachi hard drive repair tools is to either use the official programs, which are outdated and might not work on your operating system, or check our article on the best hard drive repair software.
This article was written by Logan Tooker, a Contributing Writer at Handy Recovery Advisor. It was recently updated by Roman Demian. It was also verified for technical accuracy by Andrey Vasilyev, our editorial advisor.
Curious about our content creation process? Take a look at our Editor Guidelines.
