Considering how quickly most of us manage to fill up our hard drives and run out of storage space, it should be easy enough to completely and irreversibly delete that data as well, right? Wrong. Properly wiping your hard drive is not so simple—it takes time, the right tools, and the correct know-how. Lucky for you, once you’re through with reading this article, you’ll have all three at your disposal.
Why Bother to Wipe a Hard Drive Properly?
One man’s trash is another man’s treasure—this is especially true for your personal data. Not wiping a hard drive properly, exposes you to identity theft, and misuse of sensitive data. It can even land you in legal trouble if the drive was previously used for business purposes and is now being handed over to another business—some industries require adherence to specific data wiping and erasure standards.
What’s more, the damage isn’t just limited to you. Miscreants can use your data to glean contact information like email addresses, phone numbers, and names. They can then impersonate you, and send convincing phishing emails to these addresses.
Despite these potential dangers, 46% of hard drives contained residual data. This is according to a 2019 study, but I’m sure the number isn’t too better now. But why? Primarily because many users still consider disk formatting the holy grail of data erasure, which is simply not true.
Why Formatting Is Not the Best Way to Wipe Your Hard Drive
The average user can either perform a quick format, or a full format on their hard drive.
- Quick Format: A quick format is like throwing your data in a trashcan that reads, “Open Me” in red. Yes, the data won’t show up in Windows Explorer, or macOS’ Finder, but it’s still there on the drive—all one needs is a data recovery program to look for it.

I quick-formatted an HDD volume, and scanned it using a data recovery program. Here are the results:
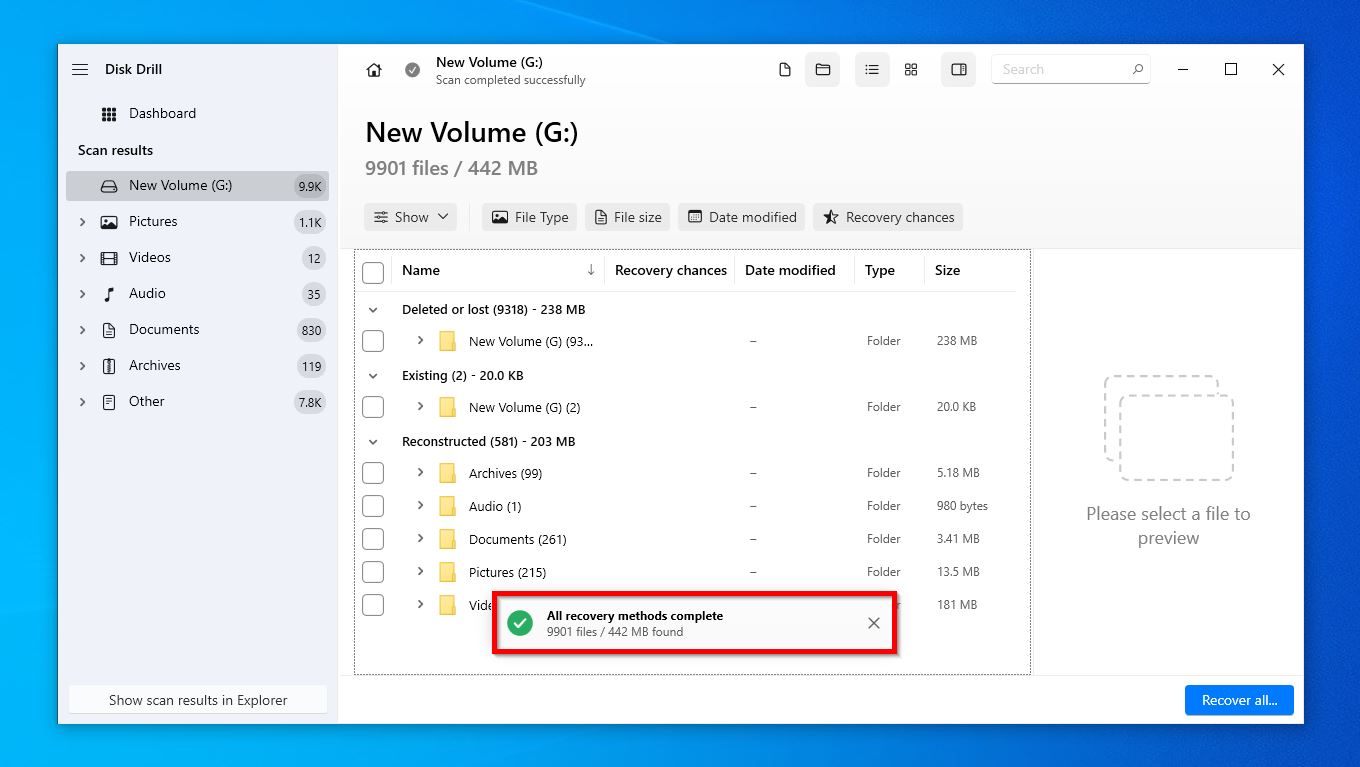
The volume originally contained 8 files of varying types—images, documents, and executables. In addition to the original files, the data recovery tool’s deep scan also discovered thousands of residual files. So yeah, a quick format isn’t great for data removal.
- Full Format: A full format fares better than a quick one, but not by much. It’s like throwing your data into a trashcan and then throwing the trashcan into a garbage landfill. It’ll be significantly more difficult to recover that data—one will need to sift through a lot of garbage to find it—but with enough resources and dedication, someone can recover part, or all of it.
Here’s the data recovery scan result after a full format:
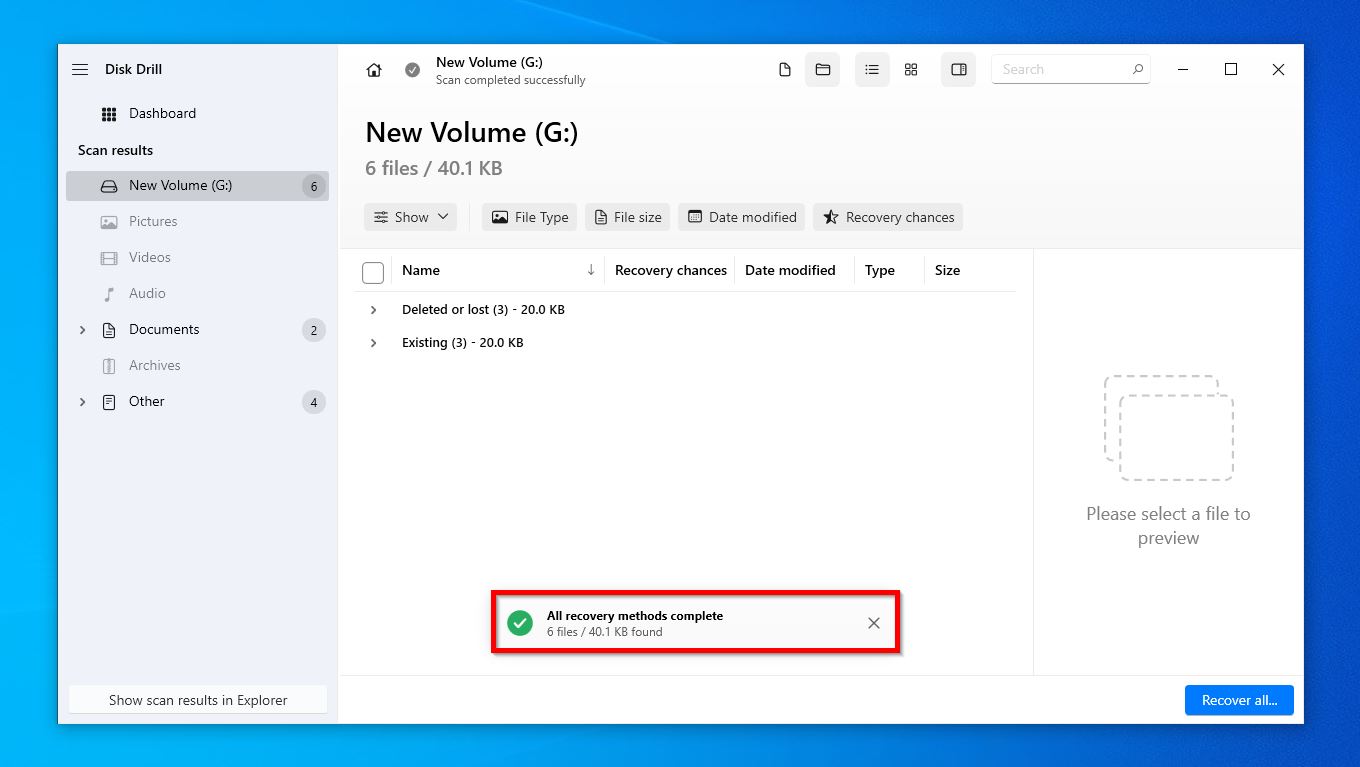
Only 6 files were discovered. Impressive, but remember, this scan was performed using a consumer-grade data recovery program, A data recovery expert can recover more data from a full-formatted hard drive.
So, is formatting completely useless? Well, no. A full format is usually sufficient when giving away your drive to someone you know and trust. In case you’re donating it to an organization, or someone you don’t know, I suggest using more potent ways to wipe your hard drive.
If Not Formatting, Then Who?
I recommend using data shredding tools if you plan to donate the drive. If the drive won’t be used anymore, physical destruction is the most sure shot (and the most fun) way to ensure none of the data is recoverable.
Third-party data shredding tools offer two significant advantages over traditional formatting:
- More Secure. These tools overwrite your data several times, instead of just once. While macOS’ in-built Erase feature, too, performs multiple passes when formatting, it’s still not as adept as specialized data shredding tools. Windows’ full format overwrites your data only once.
- Compliance and Verification. For business users, third-party data shredding tools ensure you’re complying with data erasure standards, and provide verification of the same.
Data shredding tools also let you format your boot drive, which is impossible to do using the in-built format options on your PC, unless you connect the drive to another PC as an external storage drive.
That’s all the boring stuff out of the way. Now, let’s look at some ways to wipe your hard drive so thoroughly, that nothing other than a time machine can get your data back.
Things to Do Before Wiping Your Hard Drive
Back up first, so you don’t regret it later.
I suggest you back up your personal files before wiping your hard drive—unless you’re triple, no quadruple sure that you won’t need them later on. Being a data recovery professional, I have seen my fair share of people who were sure they didn’t need that one PDF, and wiped their hard drive, only to discover they were wrong.
The next thing you should do is disconnect all unneeded storage drives, external or internal. Accidentally wiping the wrong storage drive is not a pleasant experience.
Lastly, keep a CD, or USB drive handy—most data shredding tools run from these. In case you’re wiping your primary boot drive, you’ll need to boot from a CD or USB.
Did I mention backing up your data before wiping your hard drive?
How to Properly Wipe a Hard Drive: 2 Methods
Traditionally, there are two main ways to wipe your hard drive on your PC—running a full format, or wiping it using a data shredder.
As I said earlier, full formats are a good option if you plan on donating the hard drive to a trustworthy person. Keep in mind that Windows won’t let you format the drive if it’s using the drive to boot.
Data shredding tools offer you the best of both worlds—they guarantee effective data removal, and they let you wipe boot drives as well.
Note: There are some ways to erase a drive while leaving the OS intact. DON’T do this. No matter how secure these methods claim to be, they won’t wipe all your personal data. Traces of it will remain along with the OS. Additionally, if you wish to format the C: drive (the partition where the OS is located), use the Reset this PC option, as Windows won’t let you format it using the steps below.
Method 1: Full Format (Windows, and macOS)
If you’re on Windows, here’s how to full format your hard drive:
- Connect the hard drive to your PC.
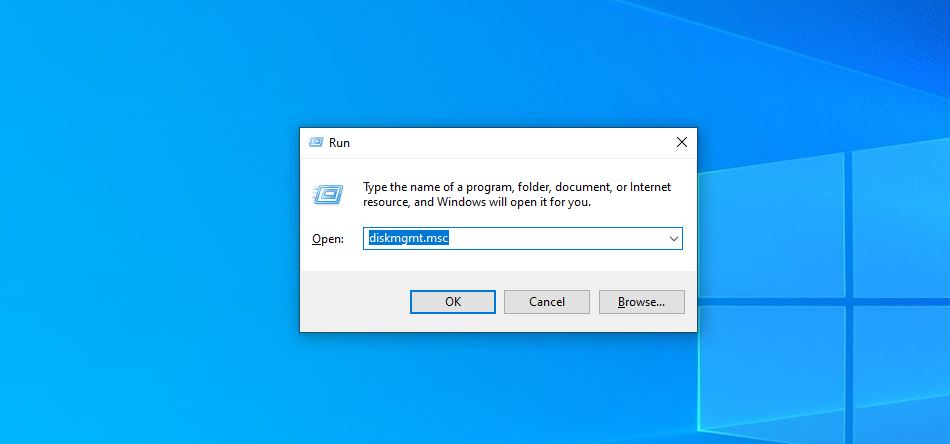
- Press Windows Key + R to launch the Run app. Type diskmgmt.msc in the text box and press Enter. This will launch Disk Management.
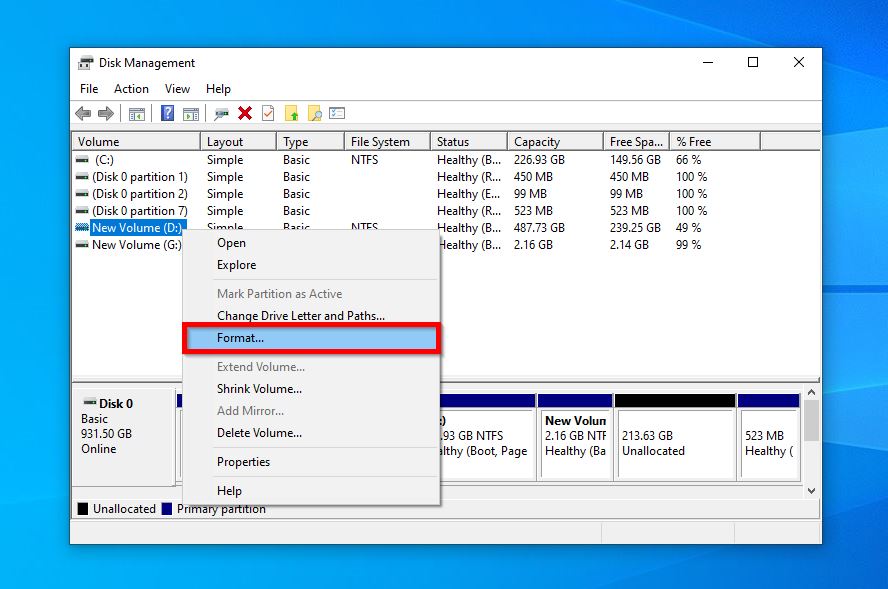
- Right-click on your hard drive partition in the disk list, and choose Format.
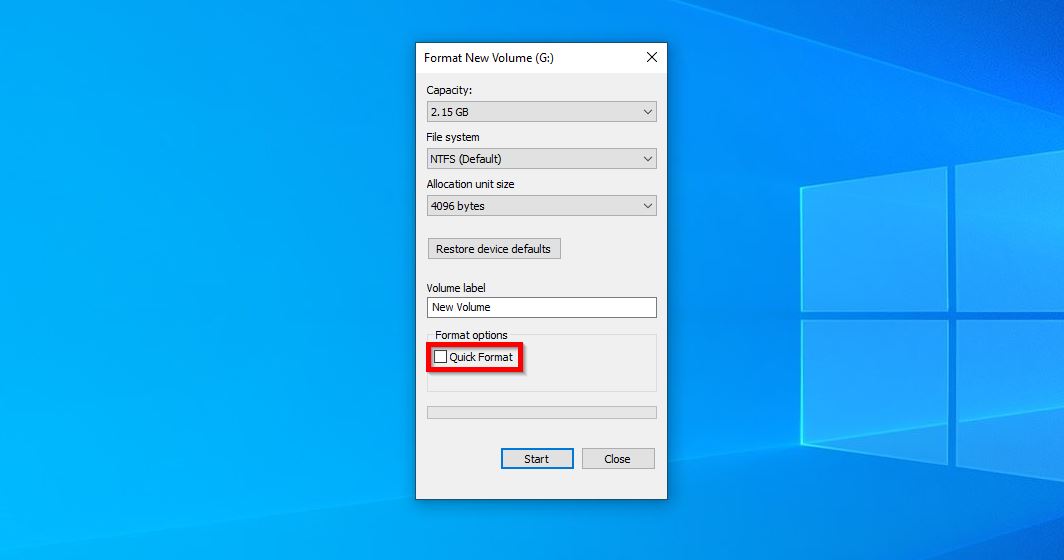
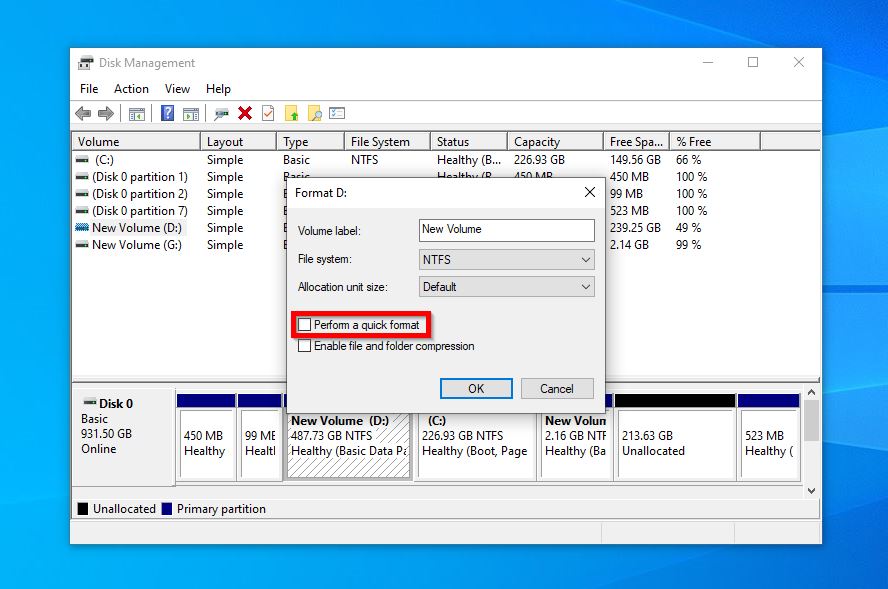
- Uncheck the Perform a quick format option and click OK.
- Perform steps 3 & 4 for all partitions on your drive.
- Windows will begin formatting your drive. This may take a while, depending on your drive’s storage capacity.
Bonus: If you are down to get your hands dirty in Windows Command Prompt, there’s a way to perform a full format with multiple passes. It can be done using a command-line utility called Diskpart. Refer to this answer by a Superuser forum user for more details.
Using macOS? Here’s how to full format your drive:
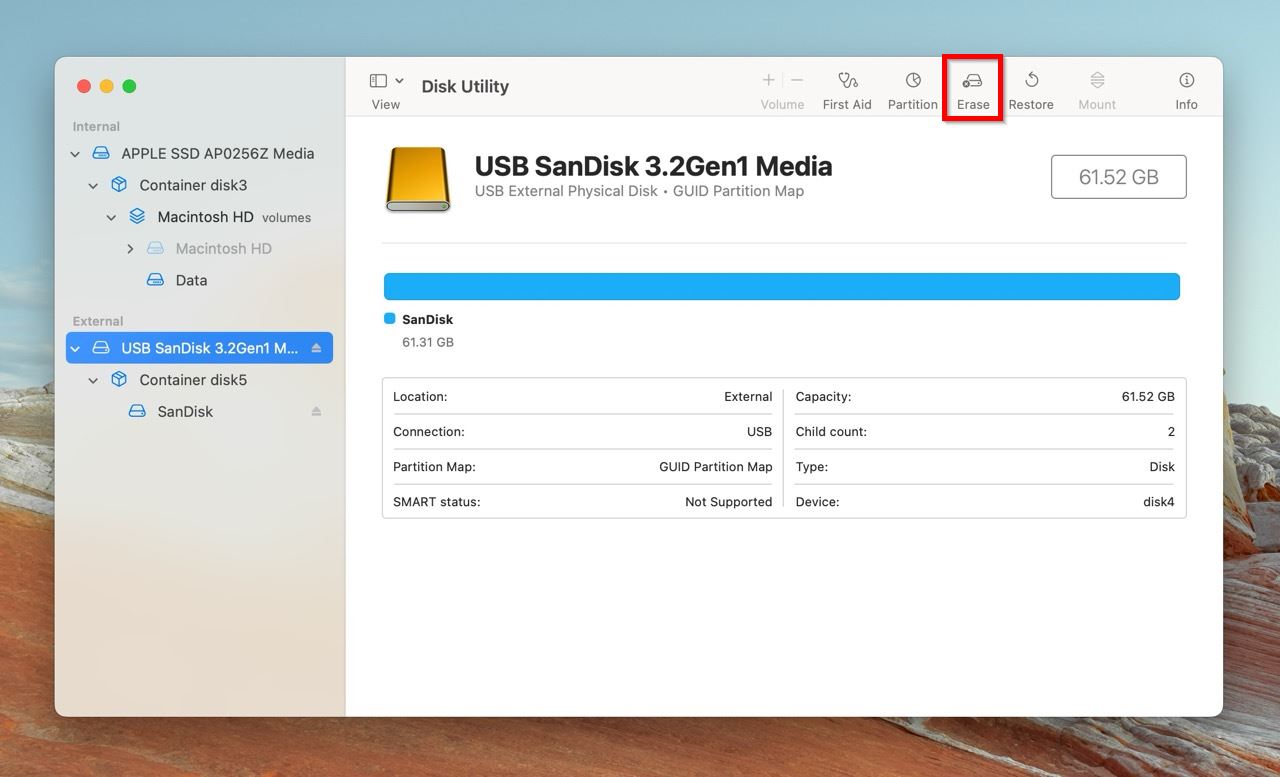
- Type “disk utility” in Spotlight Search (Command + Space), and click on Disk Utility from the search results.
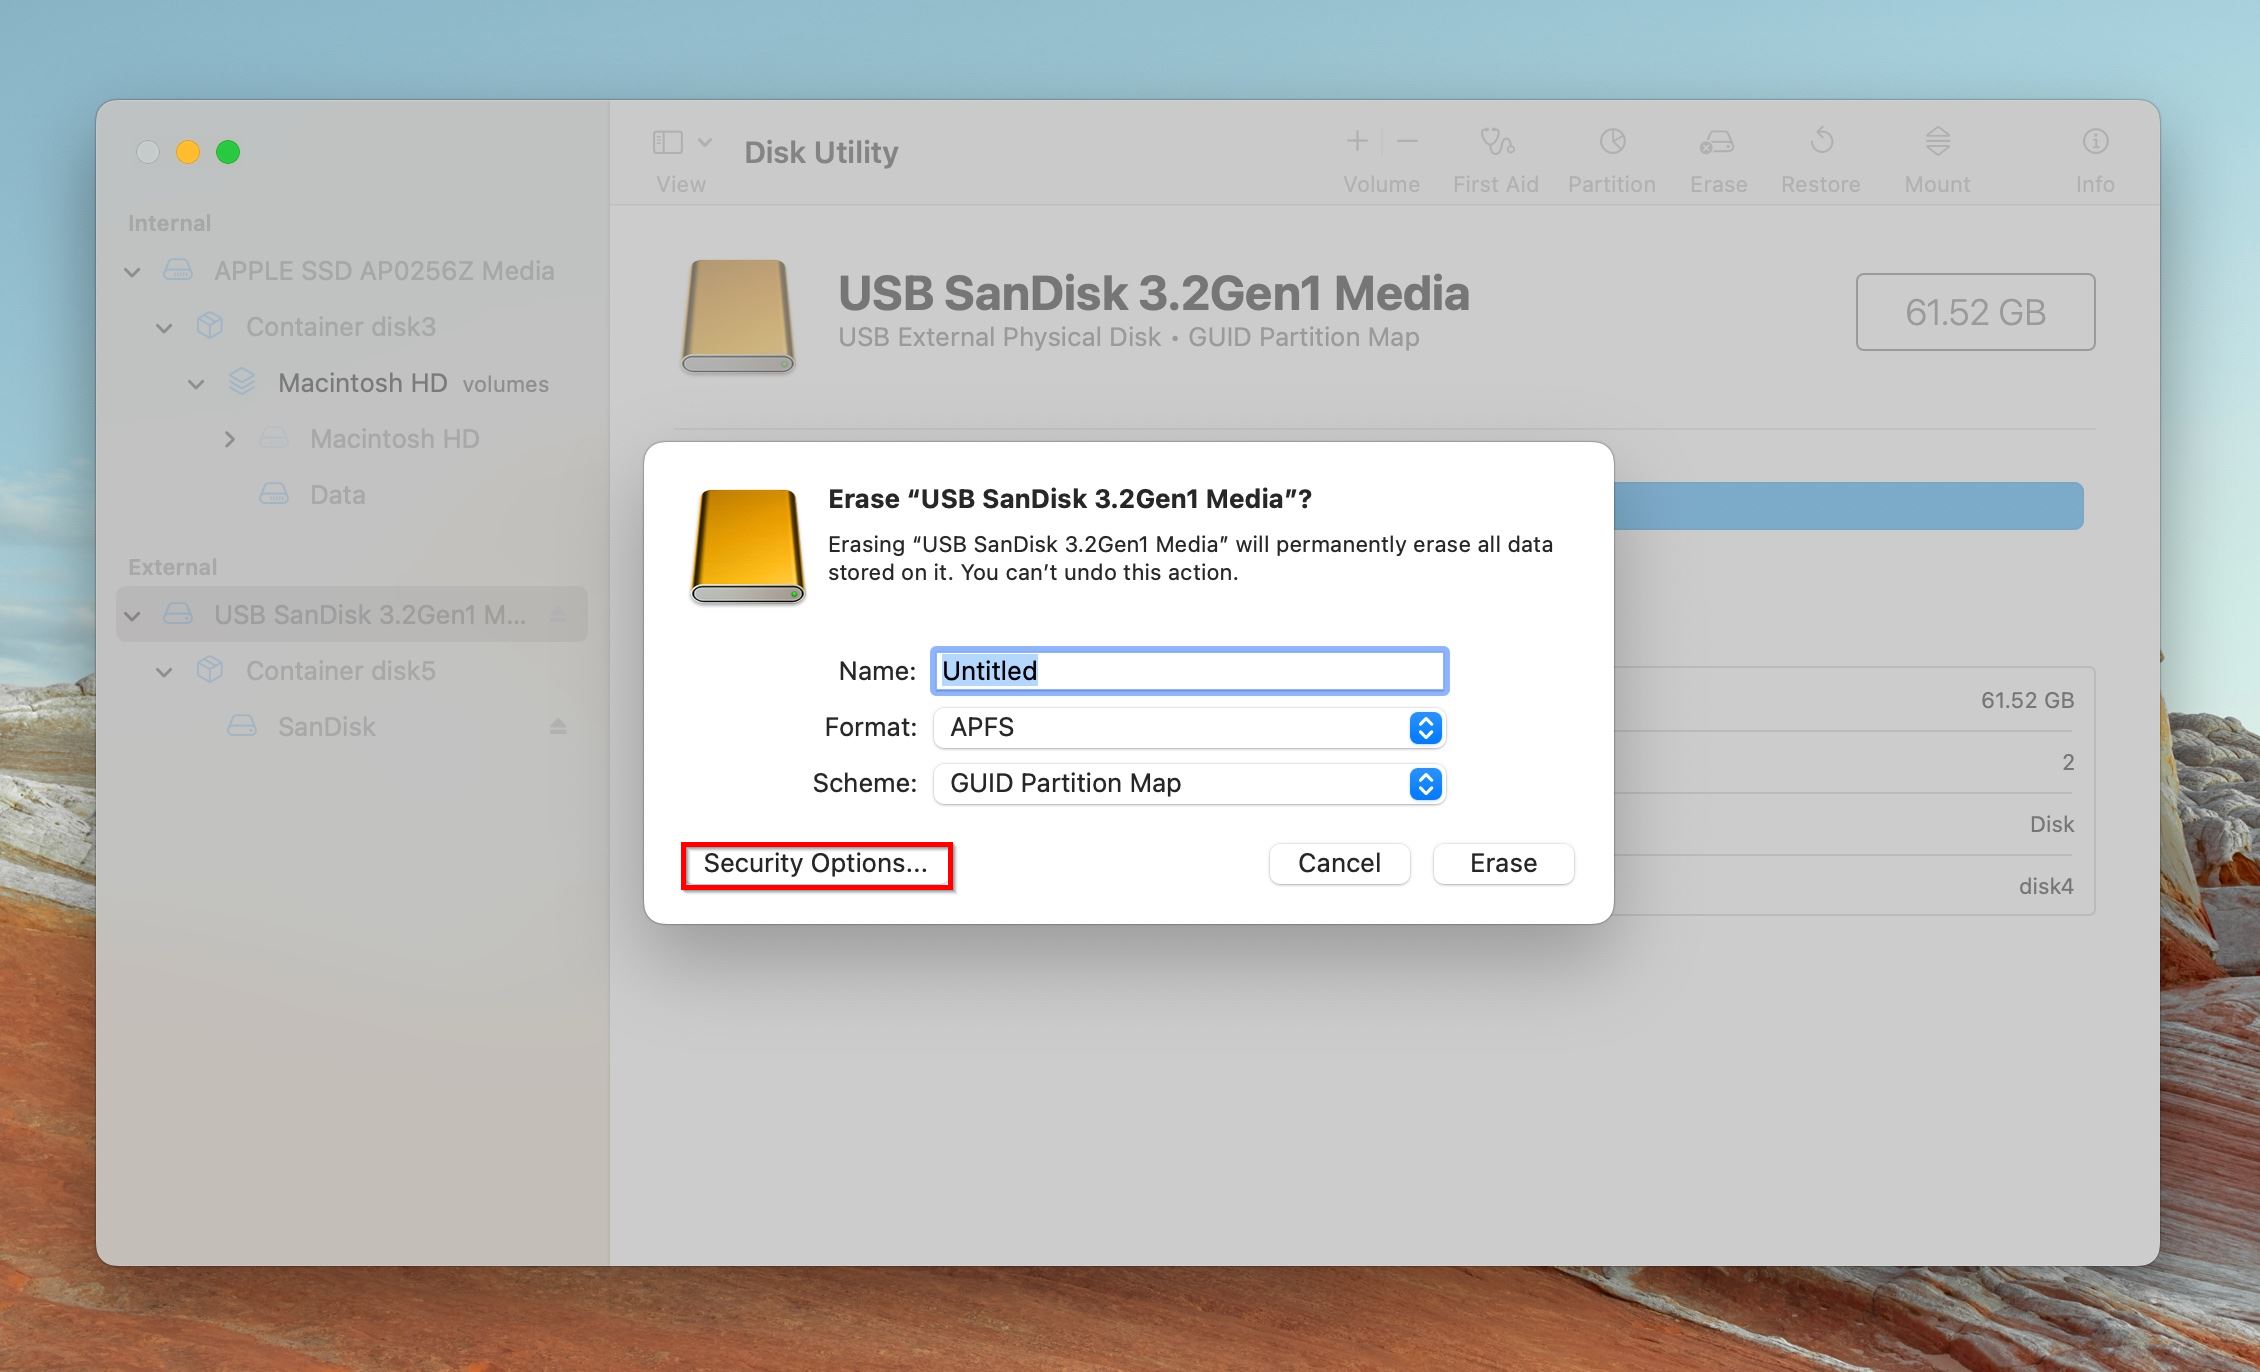
- Select your drive in the sidebar, and then click on Erase.
- Click on Security Options in the Erase dialog box.
- Move the slider to the Most Secure option.
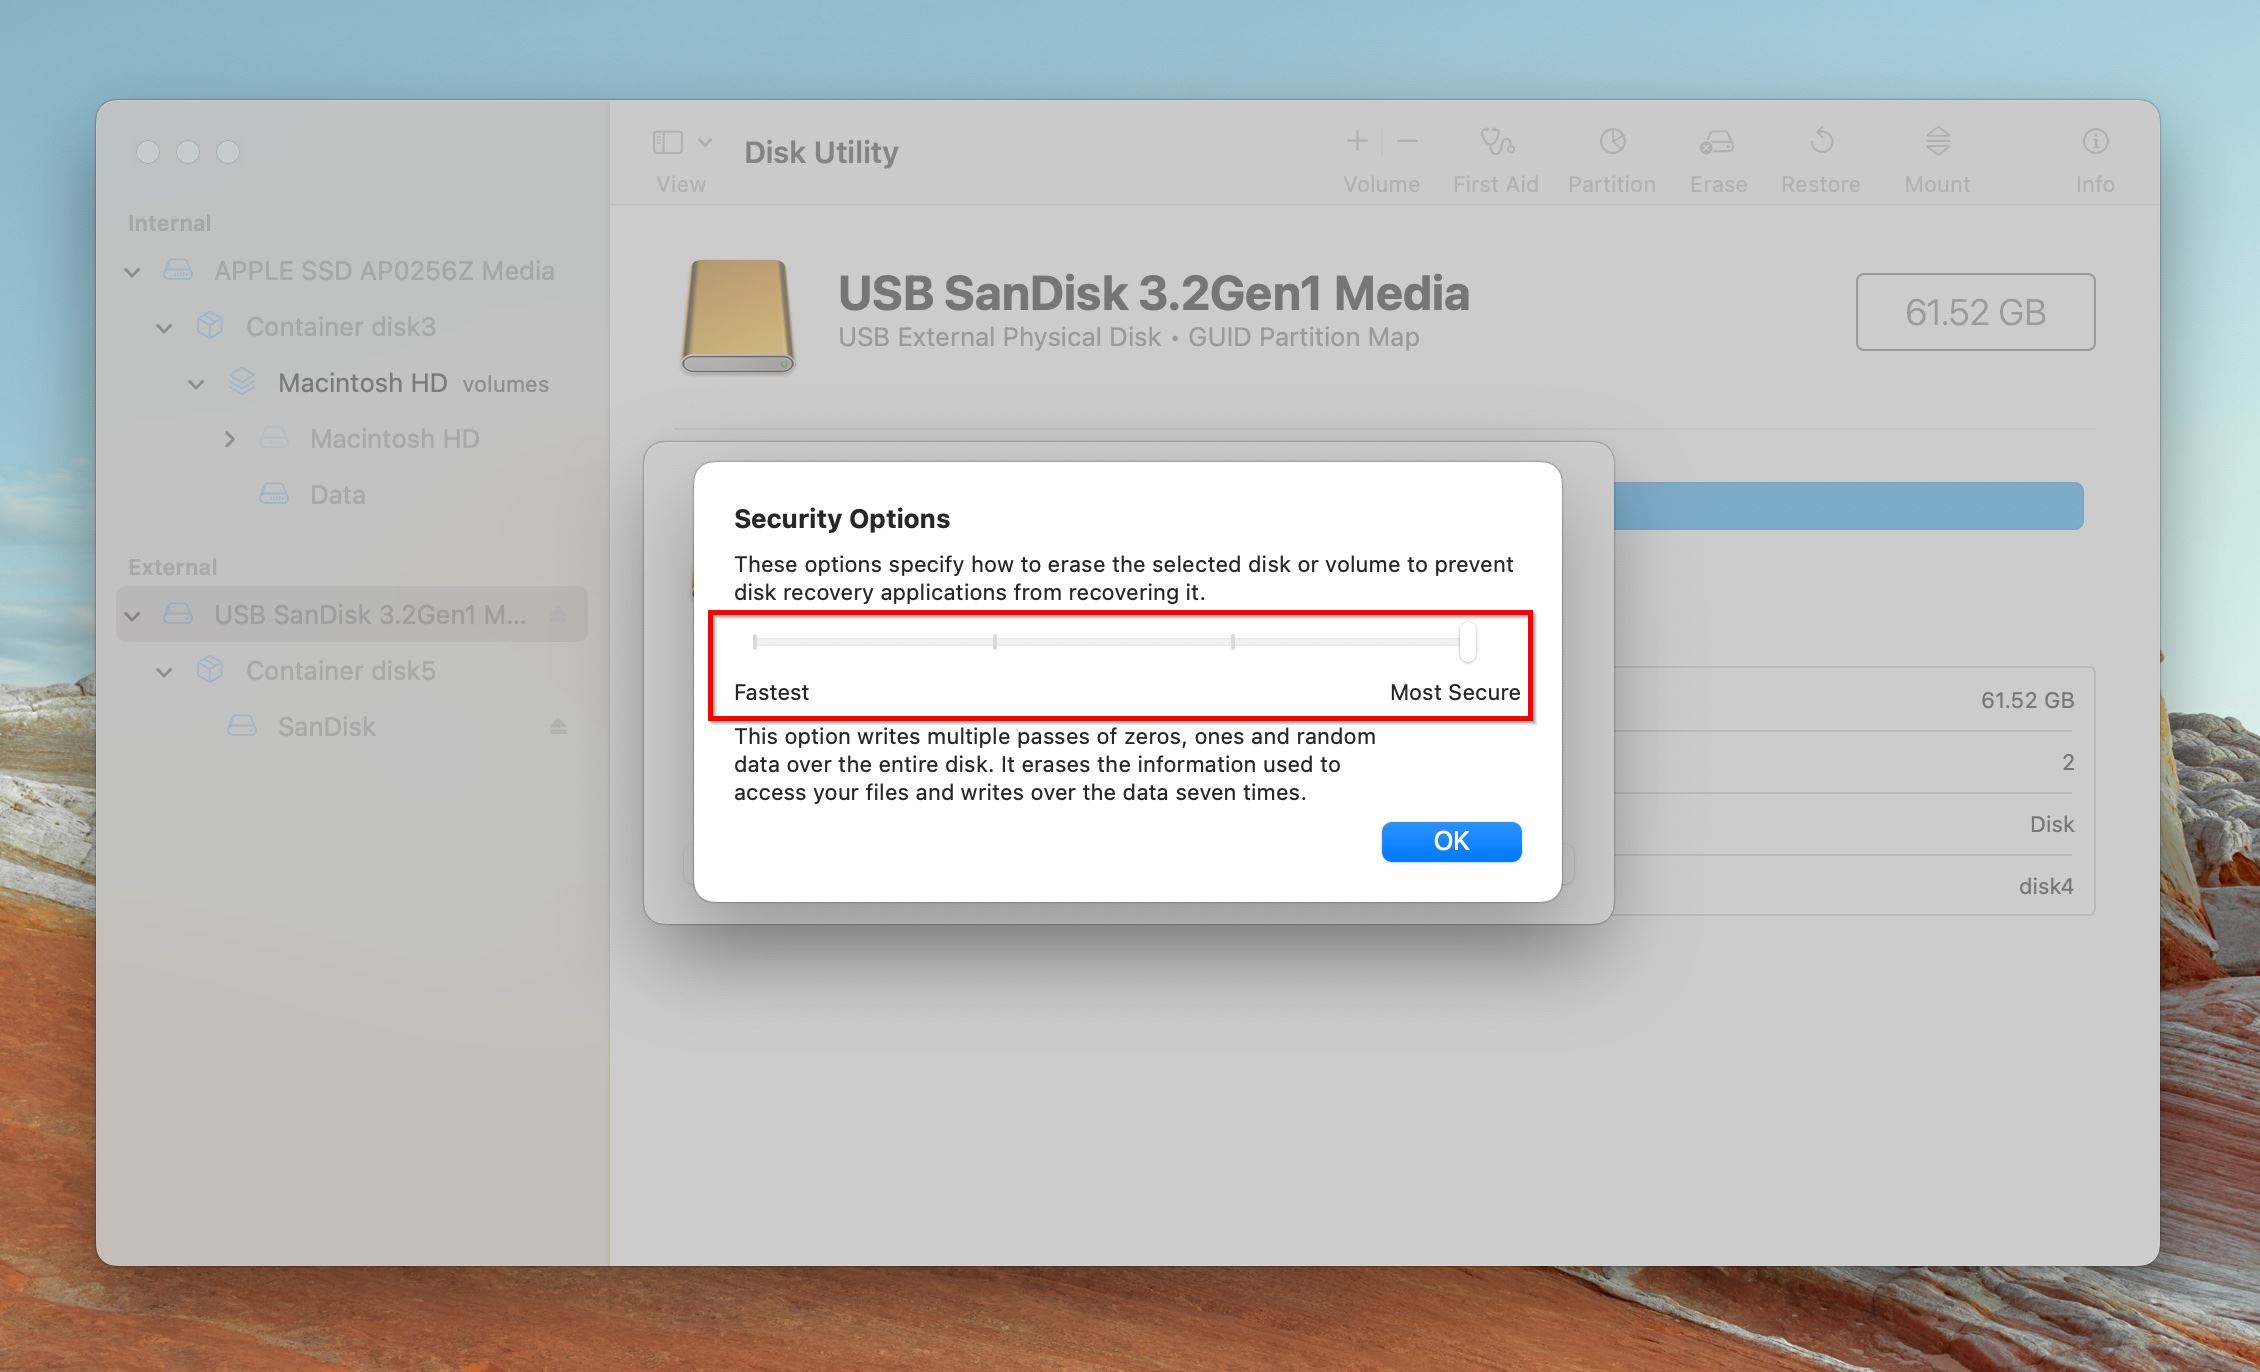
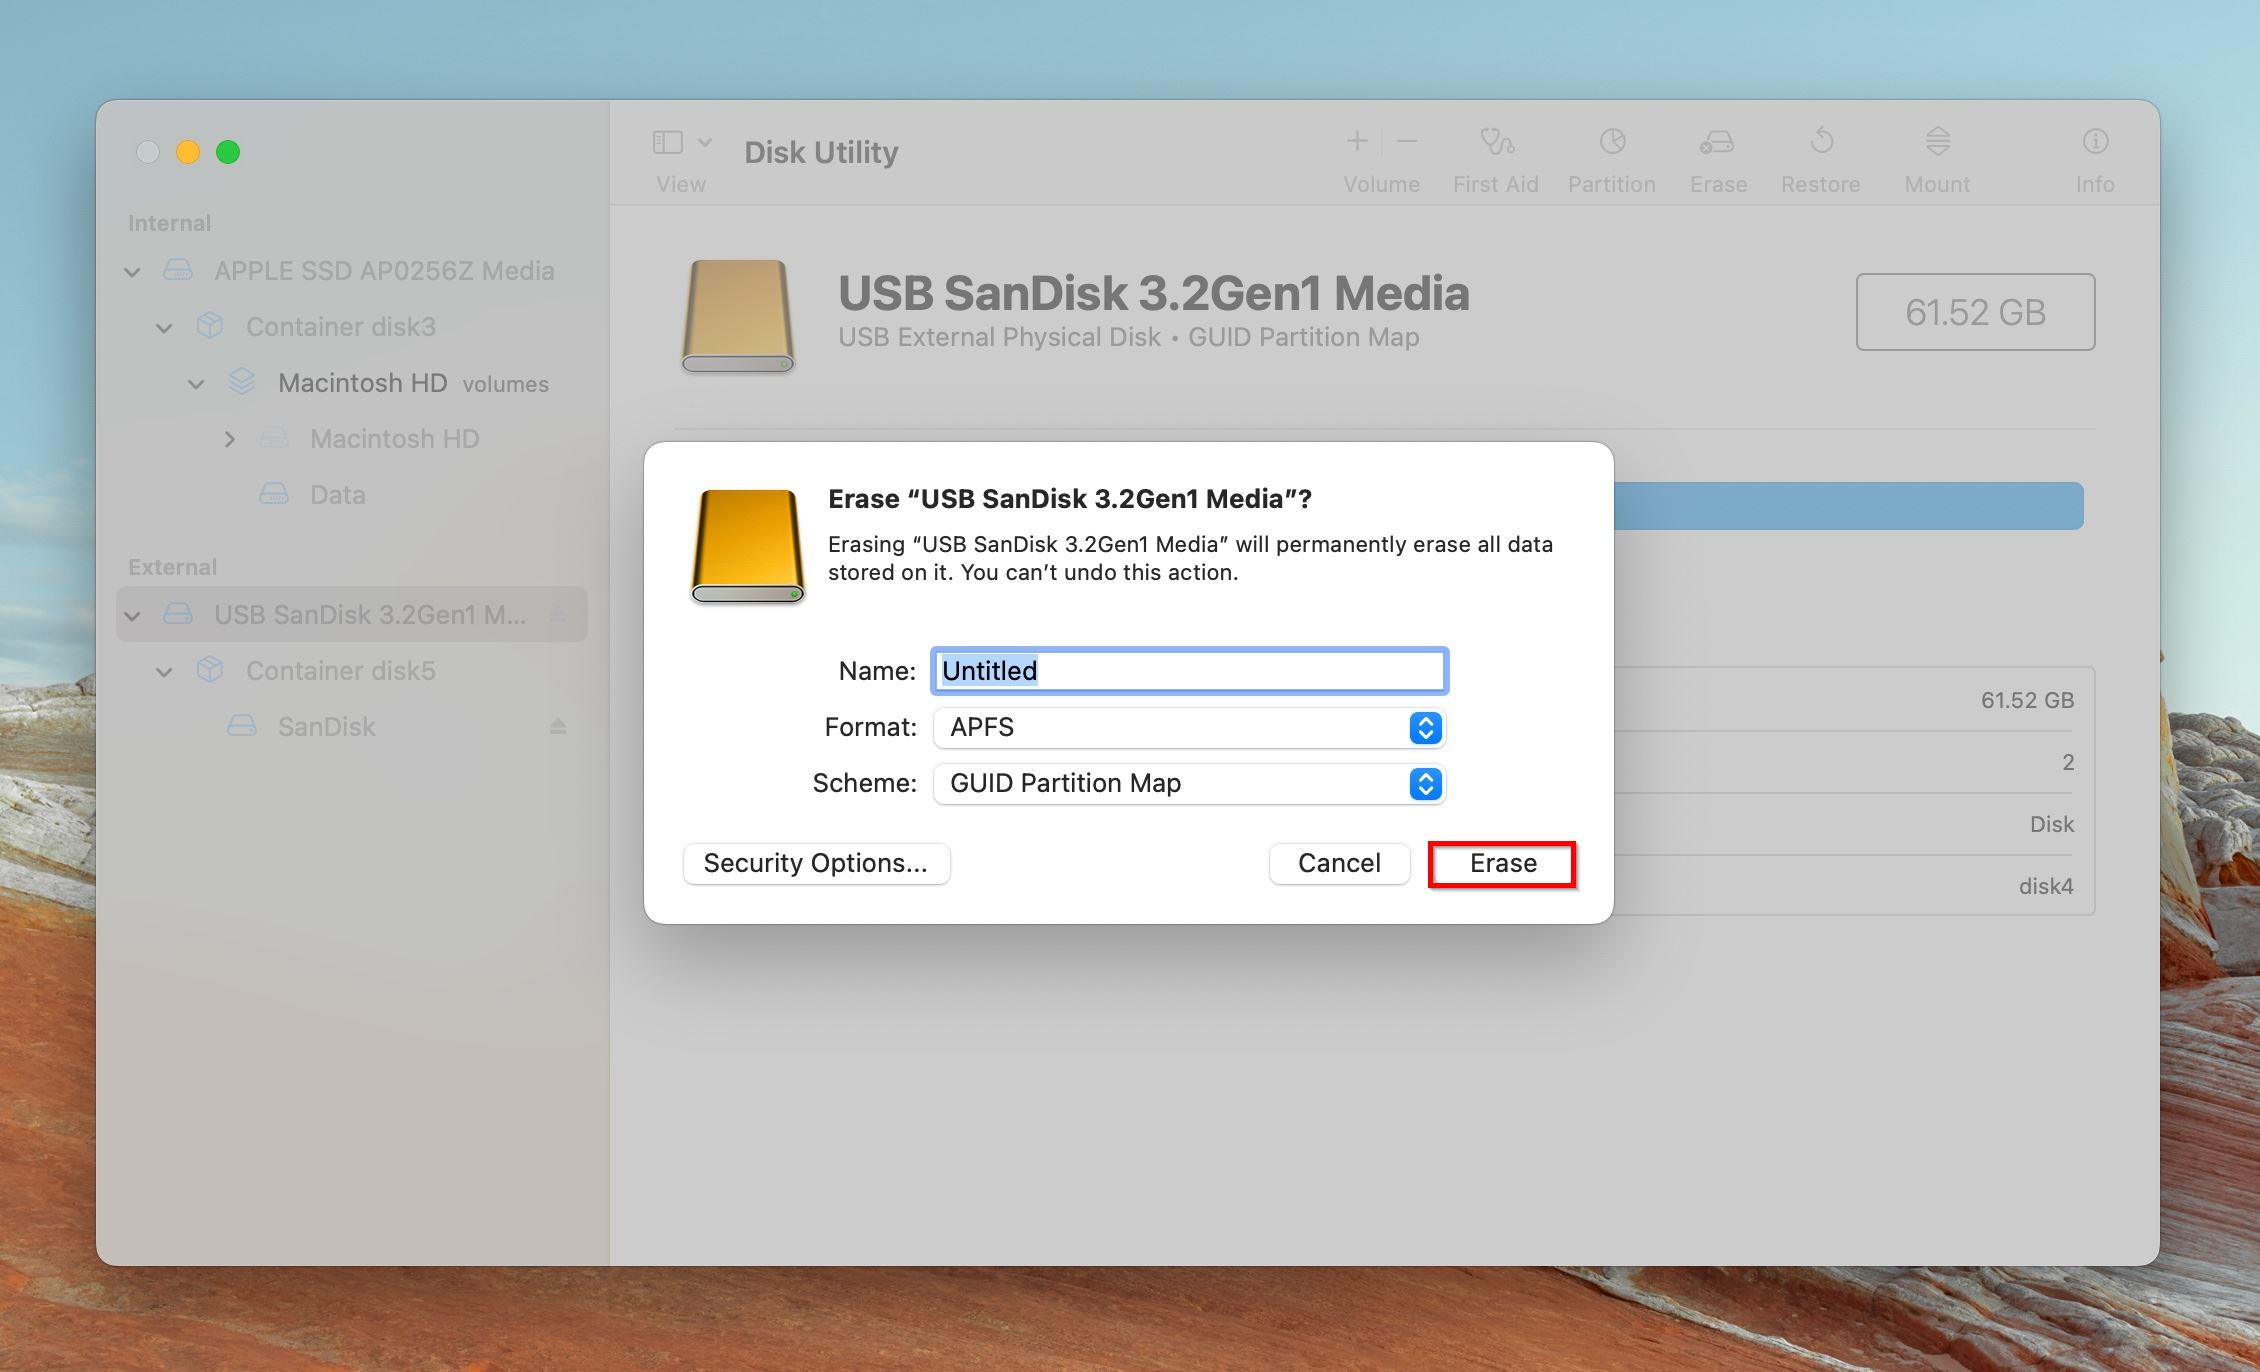
- Click on Erase. Your Mac will wipe the hard drive with multiple passes.
Method 2: Using a Data Shredder
Data shredding tools are to data, what a construction crew with a wrecking ball is to an old building.
There are plenty of data shredders on the web, paid, and free. A good, free tool that’s trusted by thousands of users over the years, is Darik’s Boot and Nuke (DBAN). The program is a little archaic, and not the most user-friendly. But, follow the steps below and you should be good:
- Download DBAN from SourceForge.
- Connect your CD, or USB drive to your PC. You’ll need these to create bootable DBAN media.
- If you’re using a CD, the process is quite straightforward: Right-click on the downloaded DBAN disc image, choose Show More Options, and then click Burn Disc Image. Choose your CD/DVD writer under Disc Burner, and click Burn. That’s it.
- If you plan to create a bootable USB drive, this Superuser answer contains all you need to know. You’ll need to download Universal USB Installer for this.
- Now, click on the Start button and then the Power button. While holding down the Shift key, click on Restart.
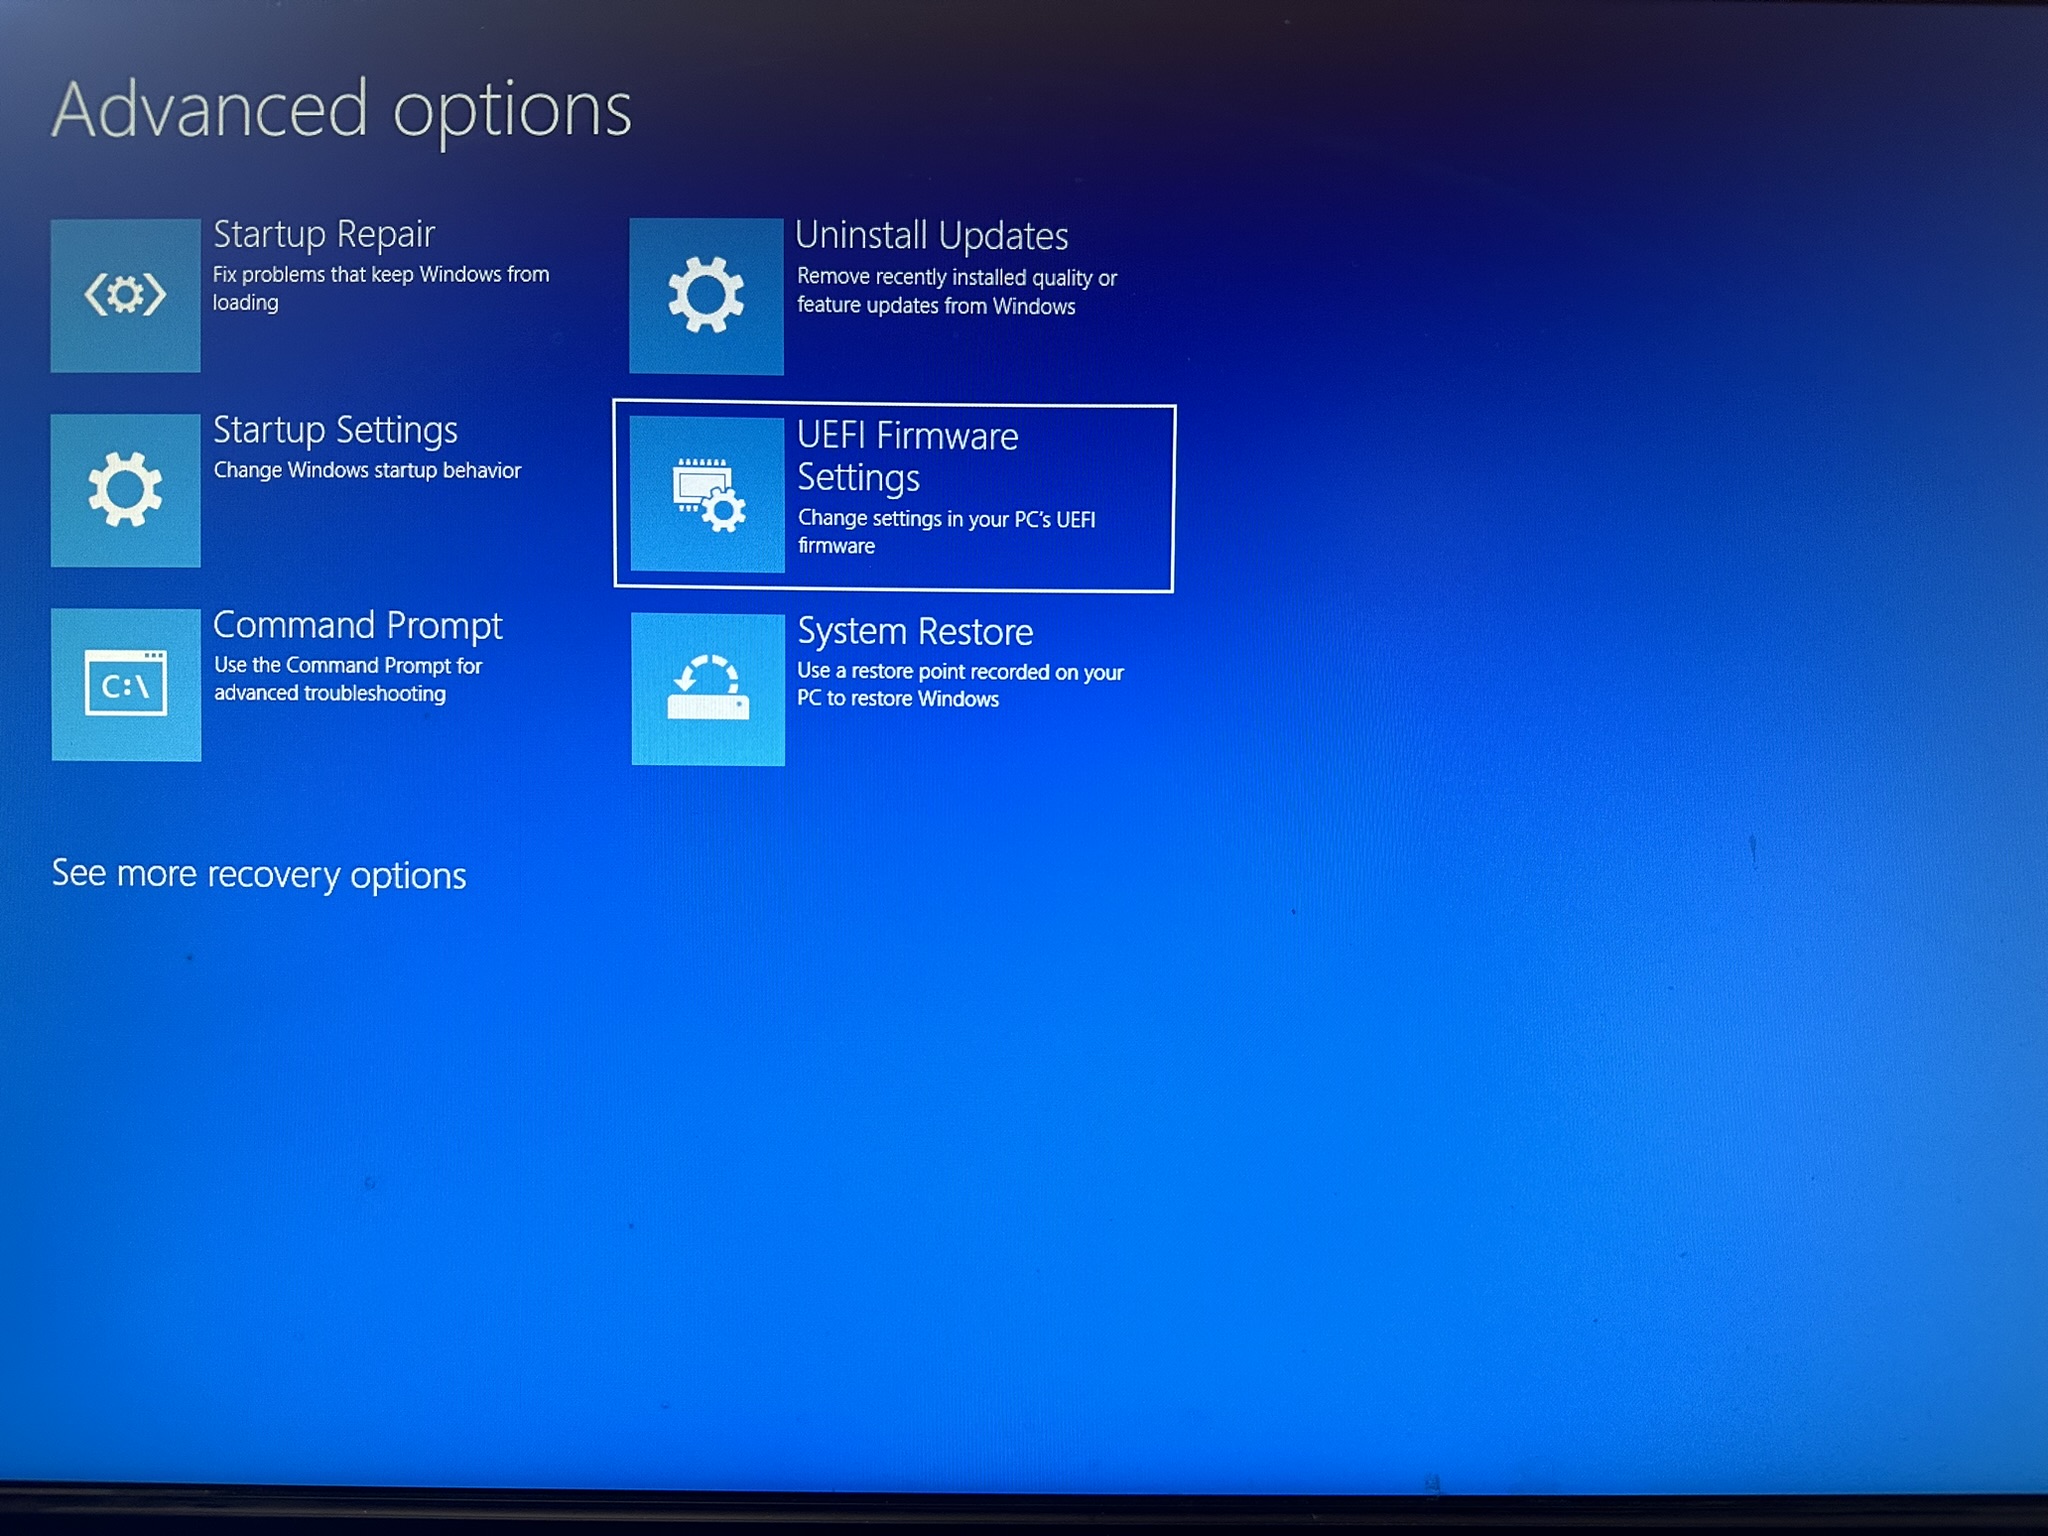
- You’ll boot into Windows Recovery Environment (WinRE) with a blue screen. Here, go to Troubleshoot > Advanced Options > UEFI Firmware settings. Your motherboard likely uses UEFI firmware, instead of a traditional BIOS. For DBAN to work, your motherboard should be booting in Legacy BIOS mode. In the UEFI firmware settings menu, look for an option to enable legacy BIOS mode. Once you’ve done that, pay a visit to the boot order settings in the UEFI firmware settings menu—make sure the CD, or USB drive is the first device in the list. Here’s a great resource to help you figure out the Boot Options on your motherboard. Save your settings, and reboot.
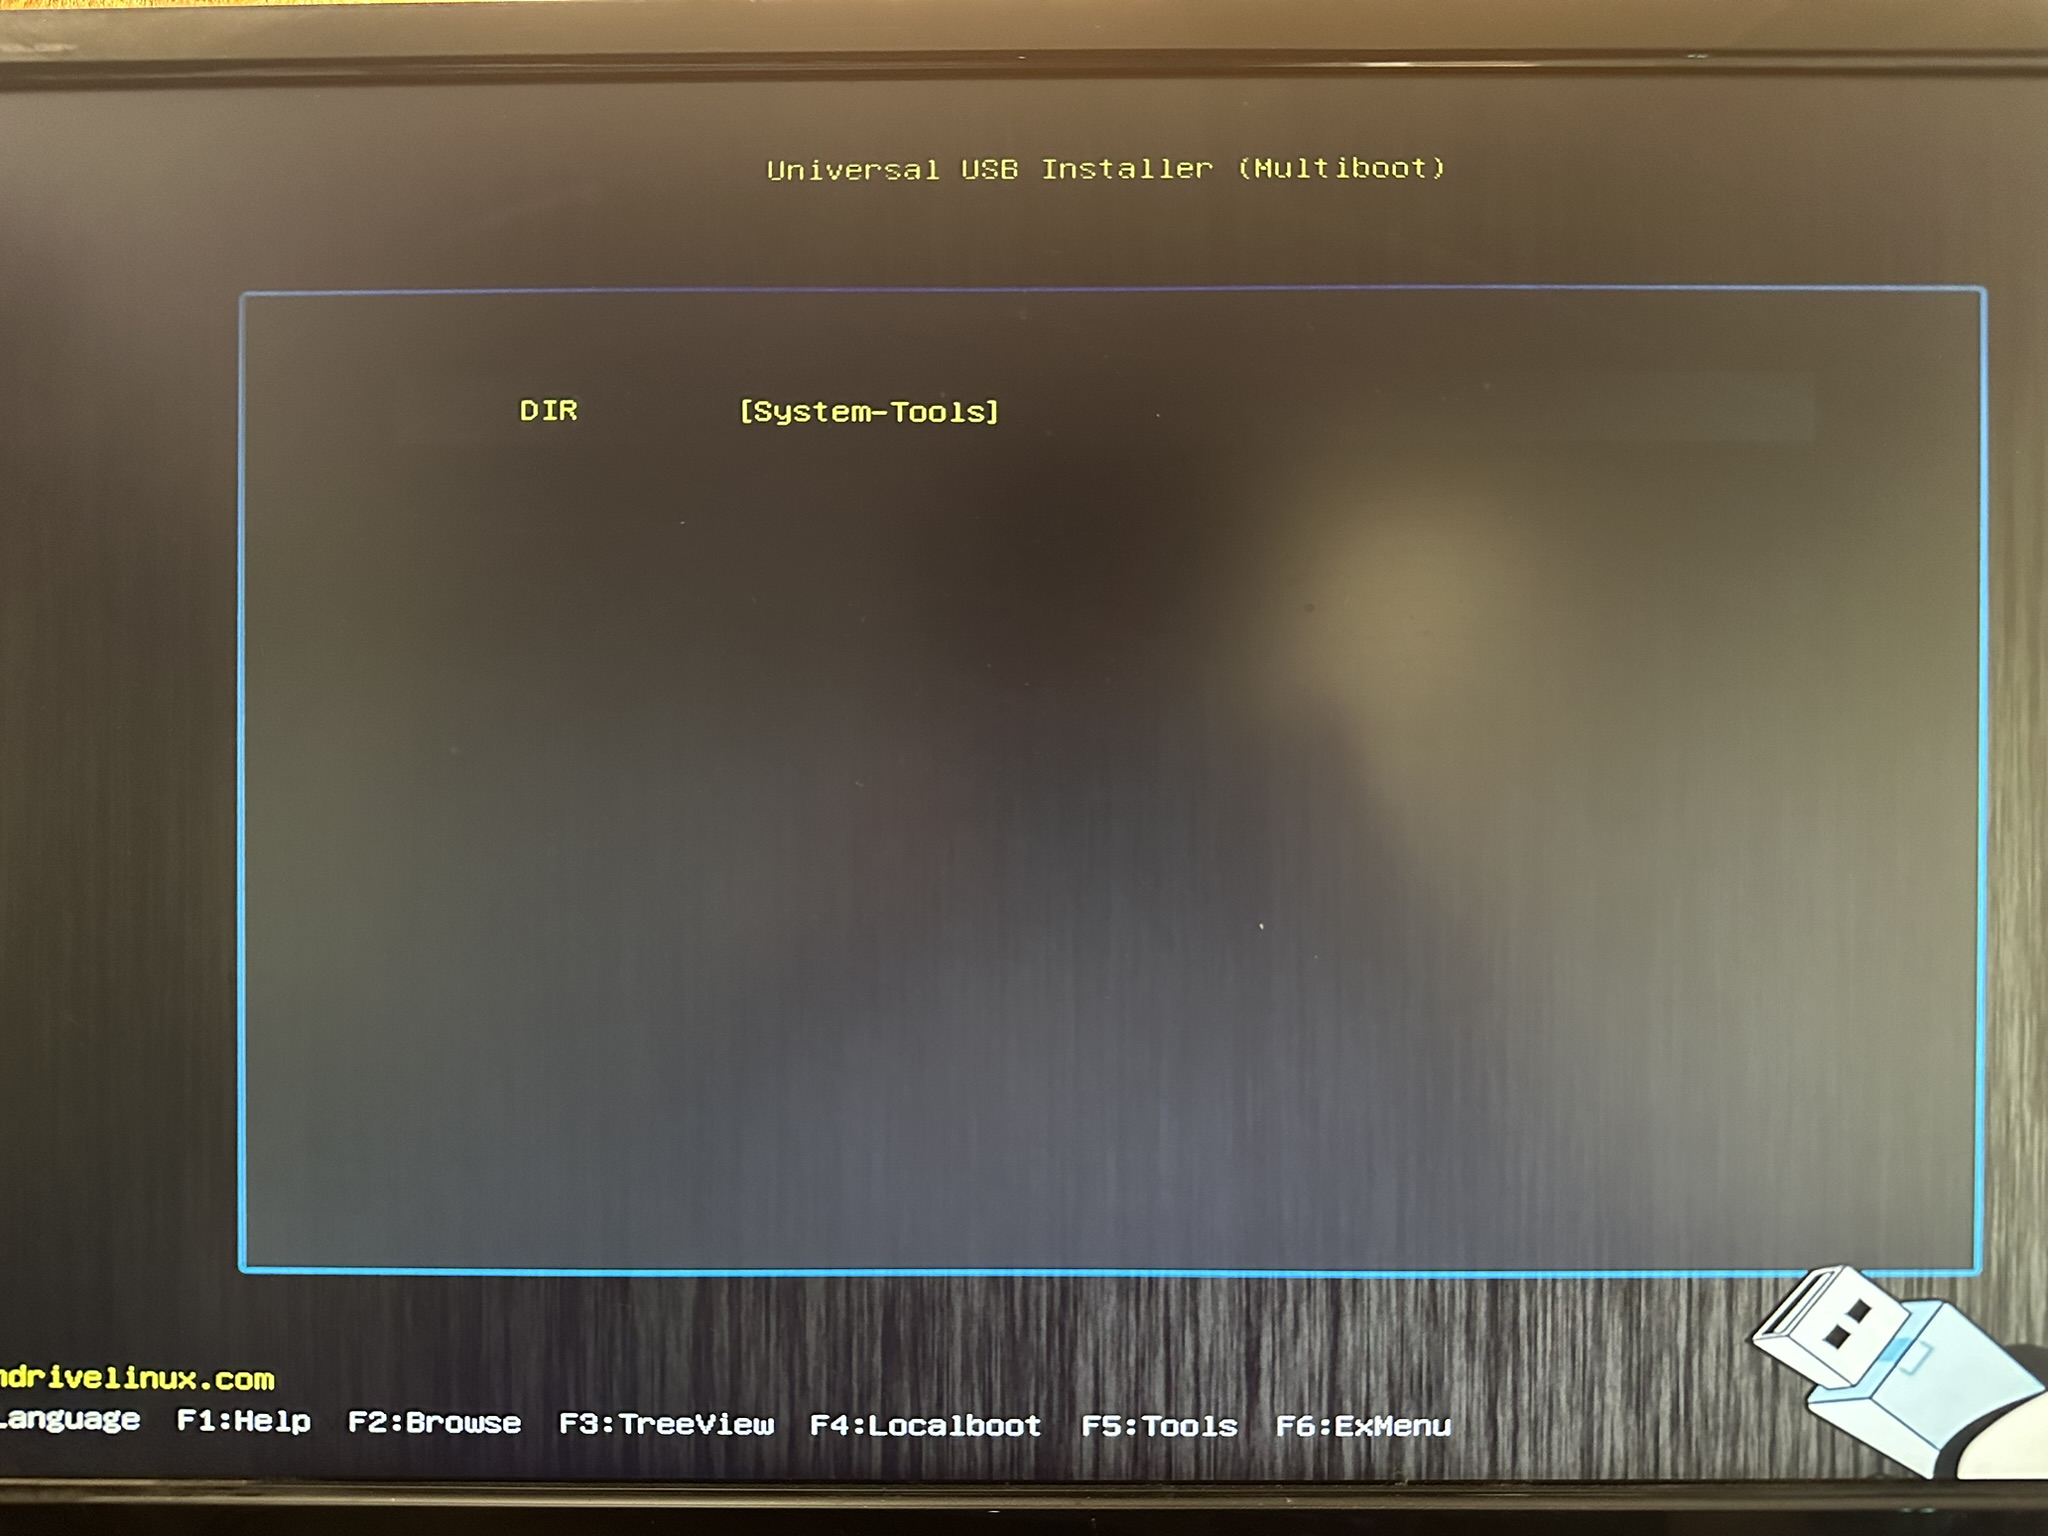
- If everything went well, you should see the screen below. Here, press Enter.
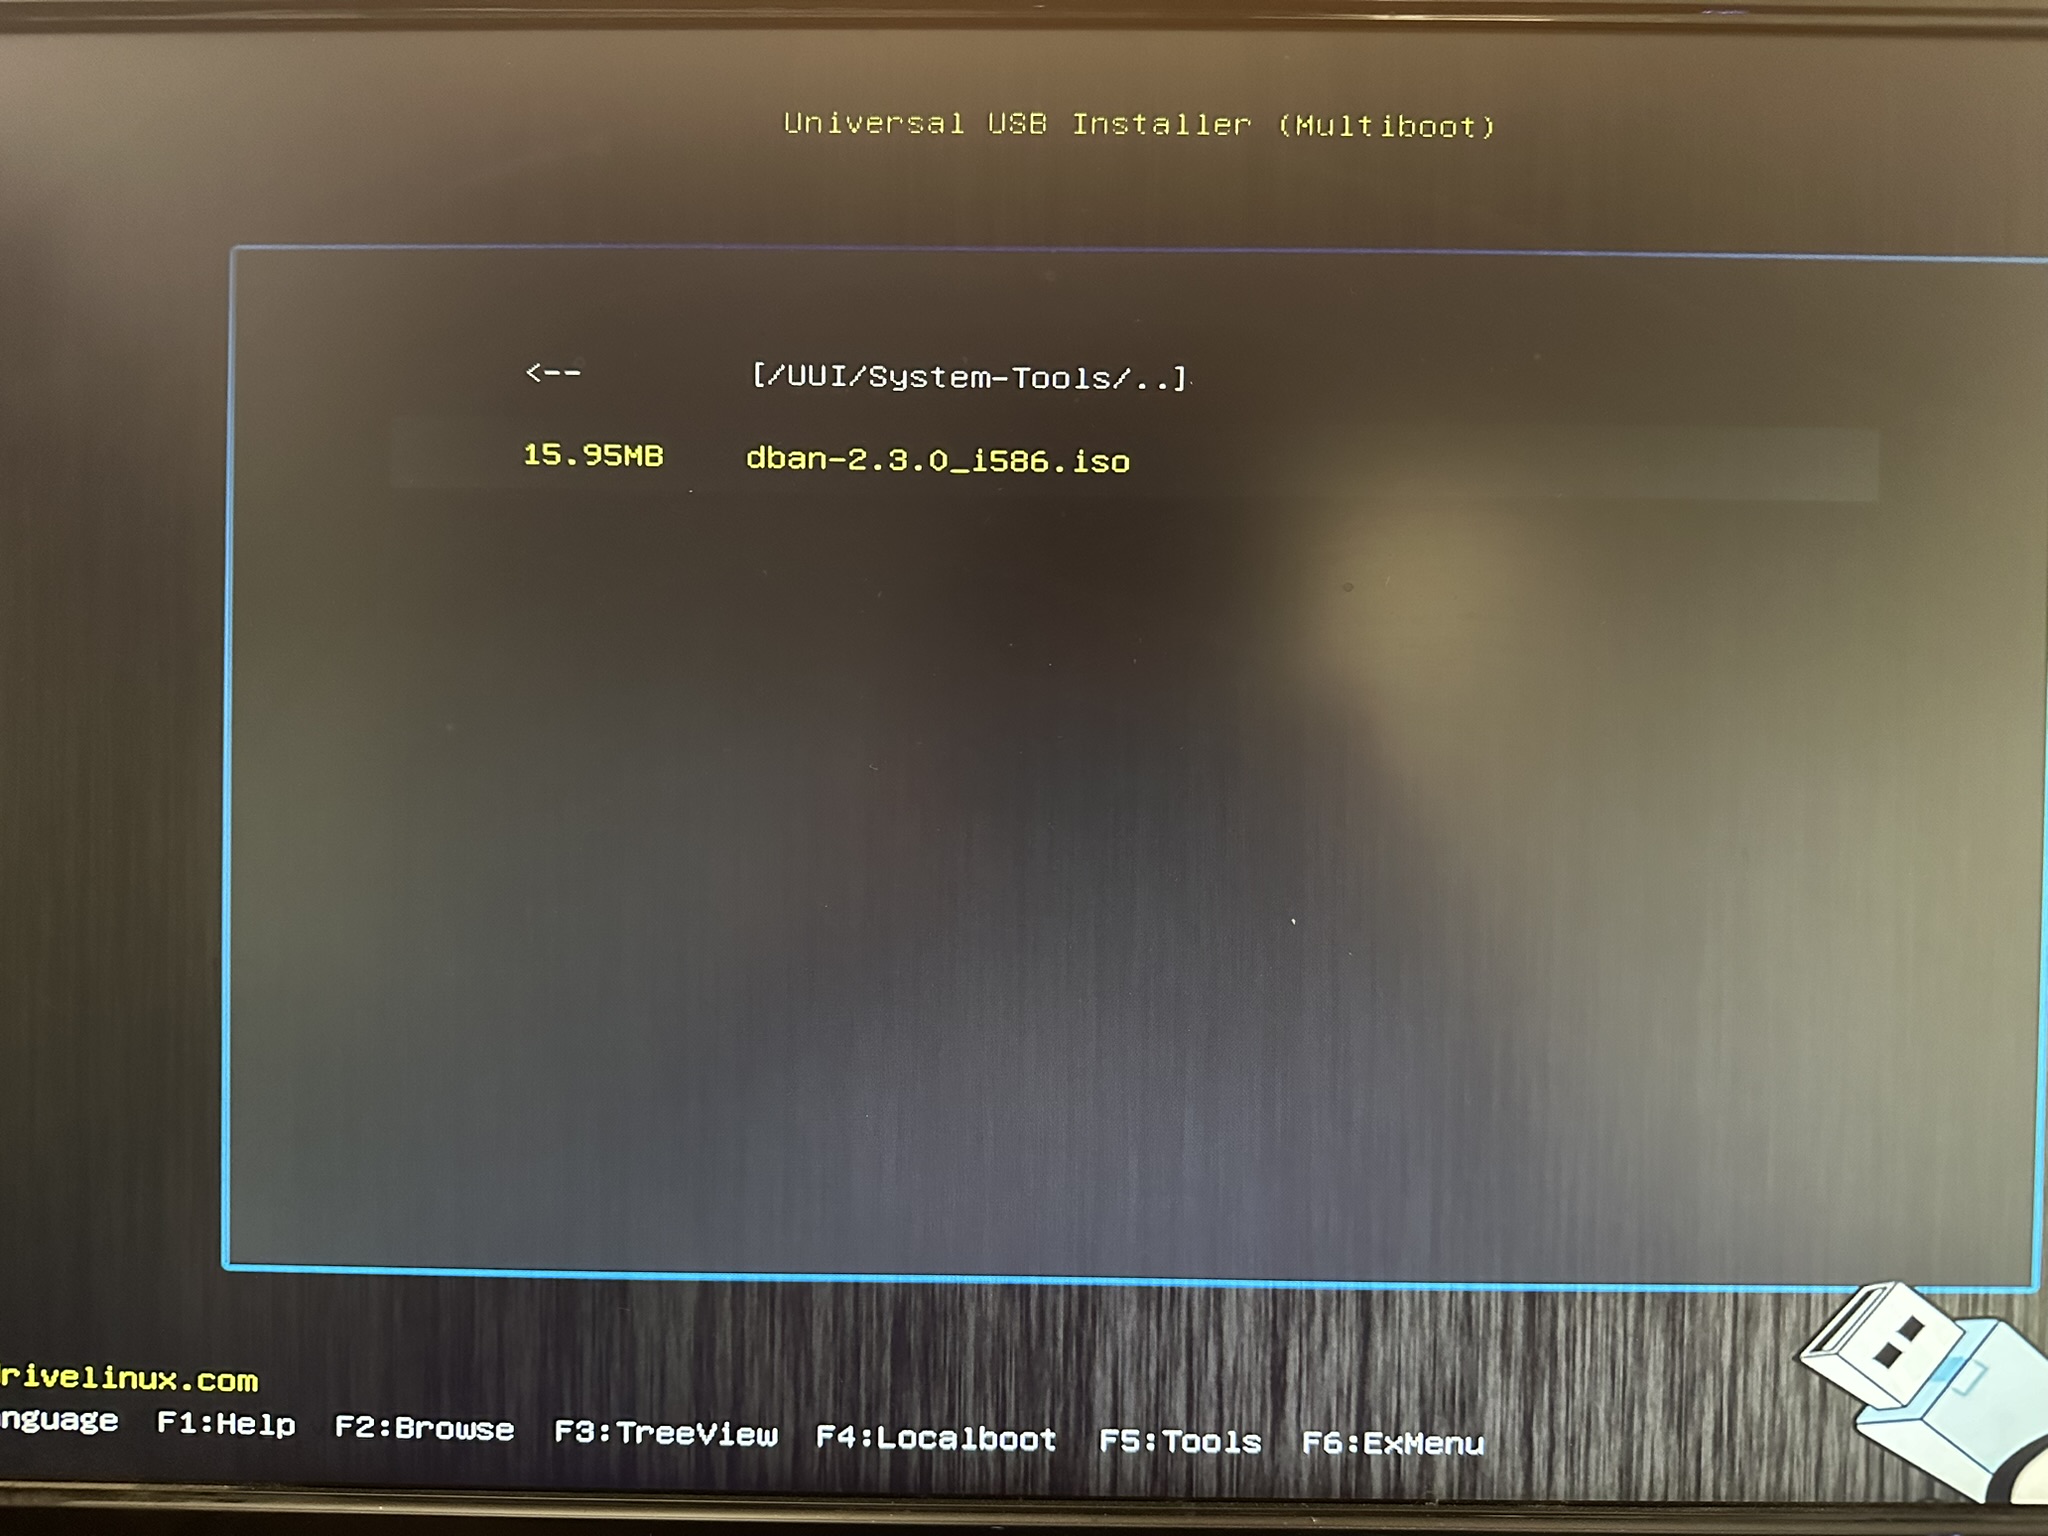
- Now, use the Arrow keys too select the DBAN ISO file as shown in the image below. Press Enter.
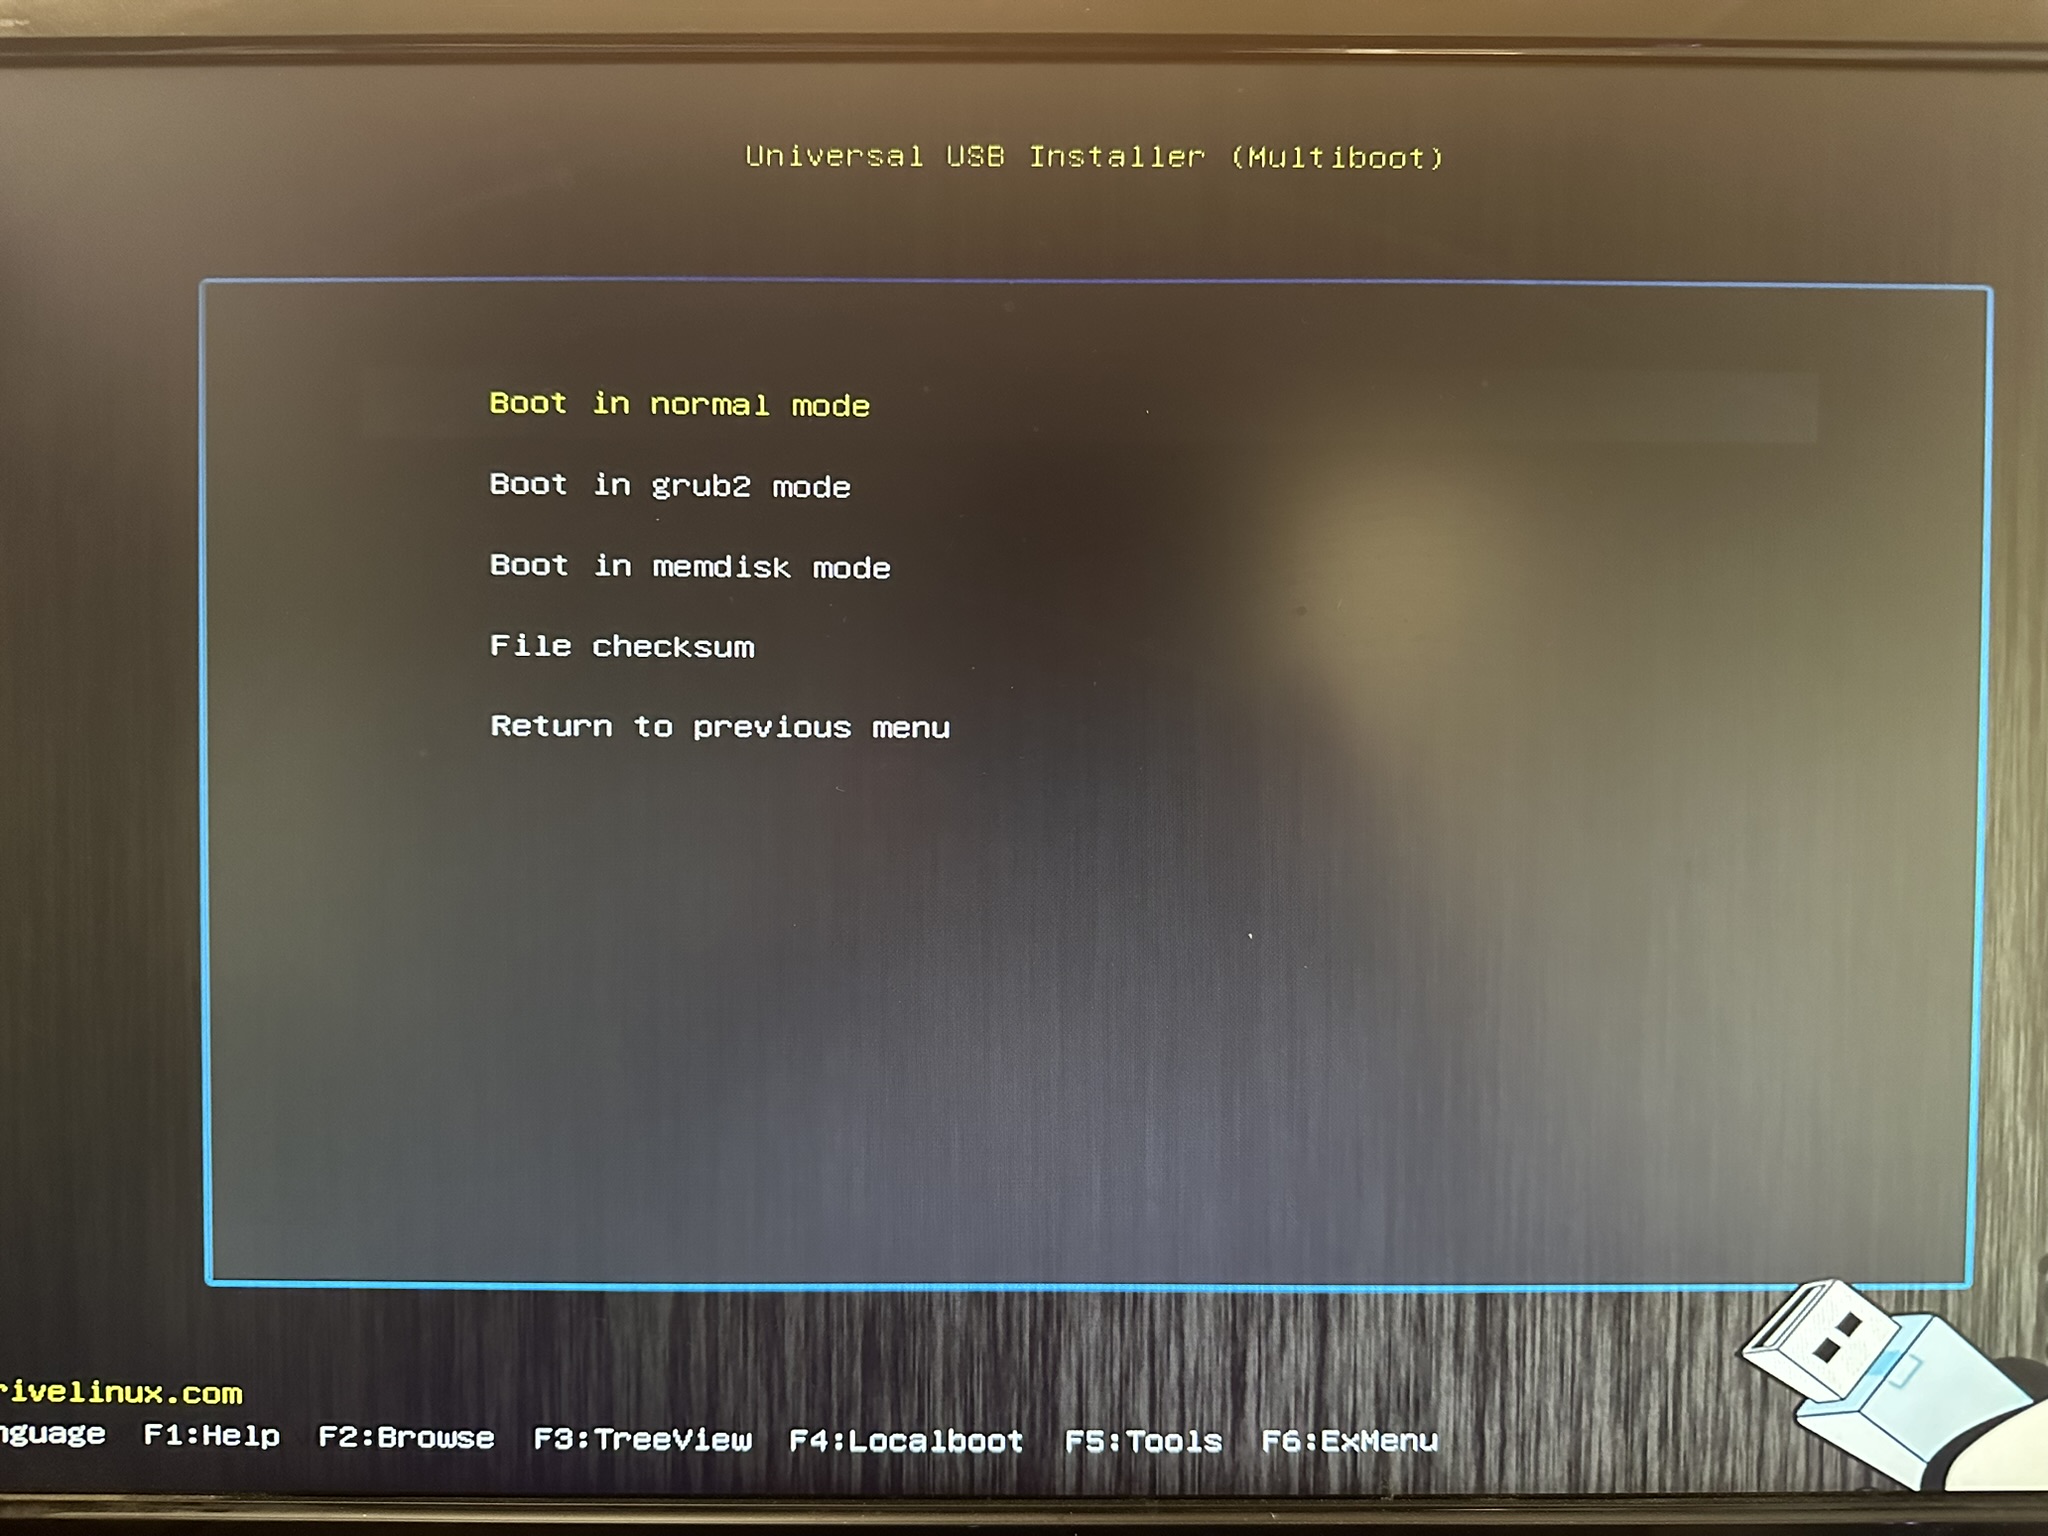
- Choose Boot in normal mode, and press Enter.
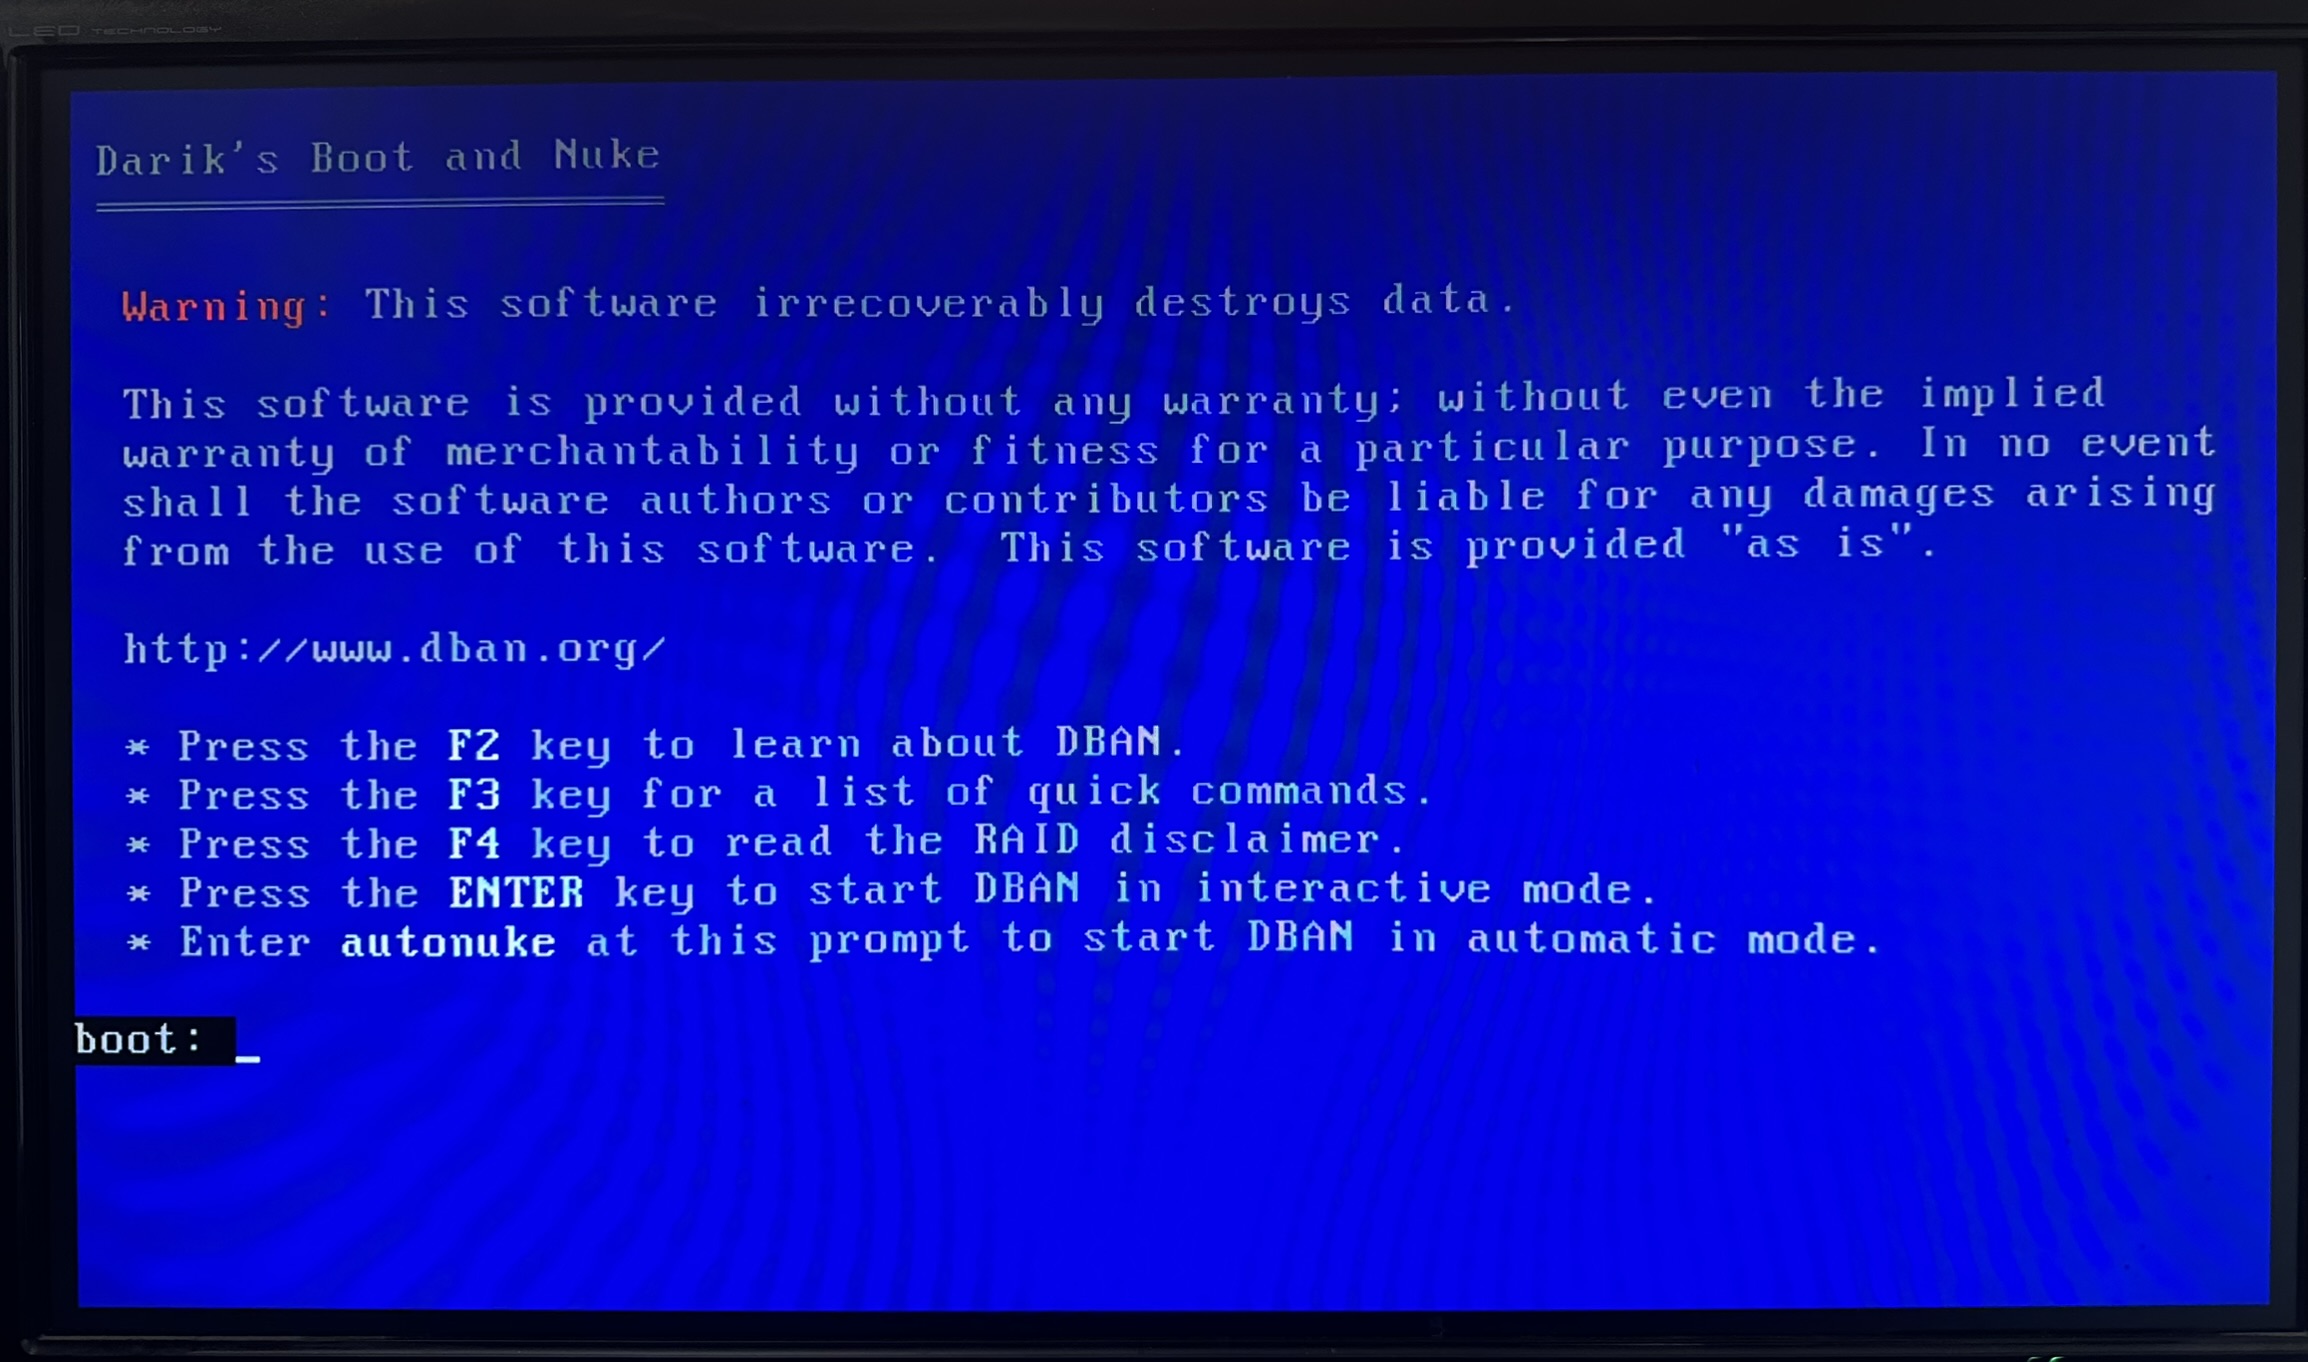
- You should boot into the DBAN menu. Press the Enter key in this menu to enable the interactive mode in DBAN, recommended for most users.
- Use the J and K keys to go up or down to the hard drive, and press Spacebar to select it. There are other options you can explore as well—pressing M allows you to view the wiping methods (the default one is good enough for most users).
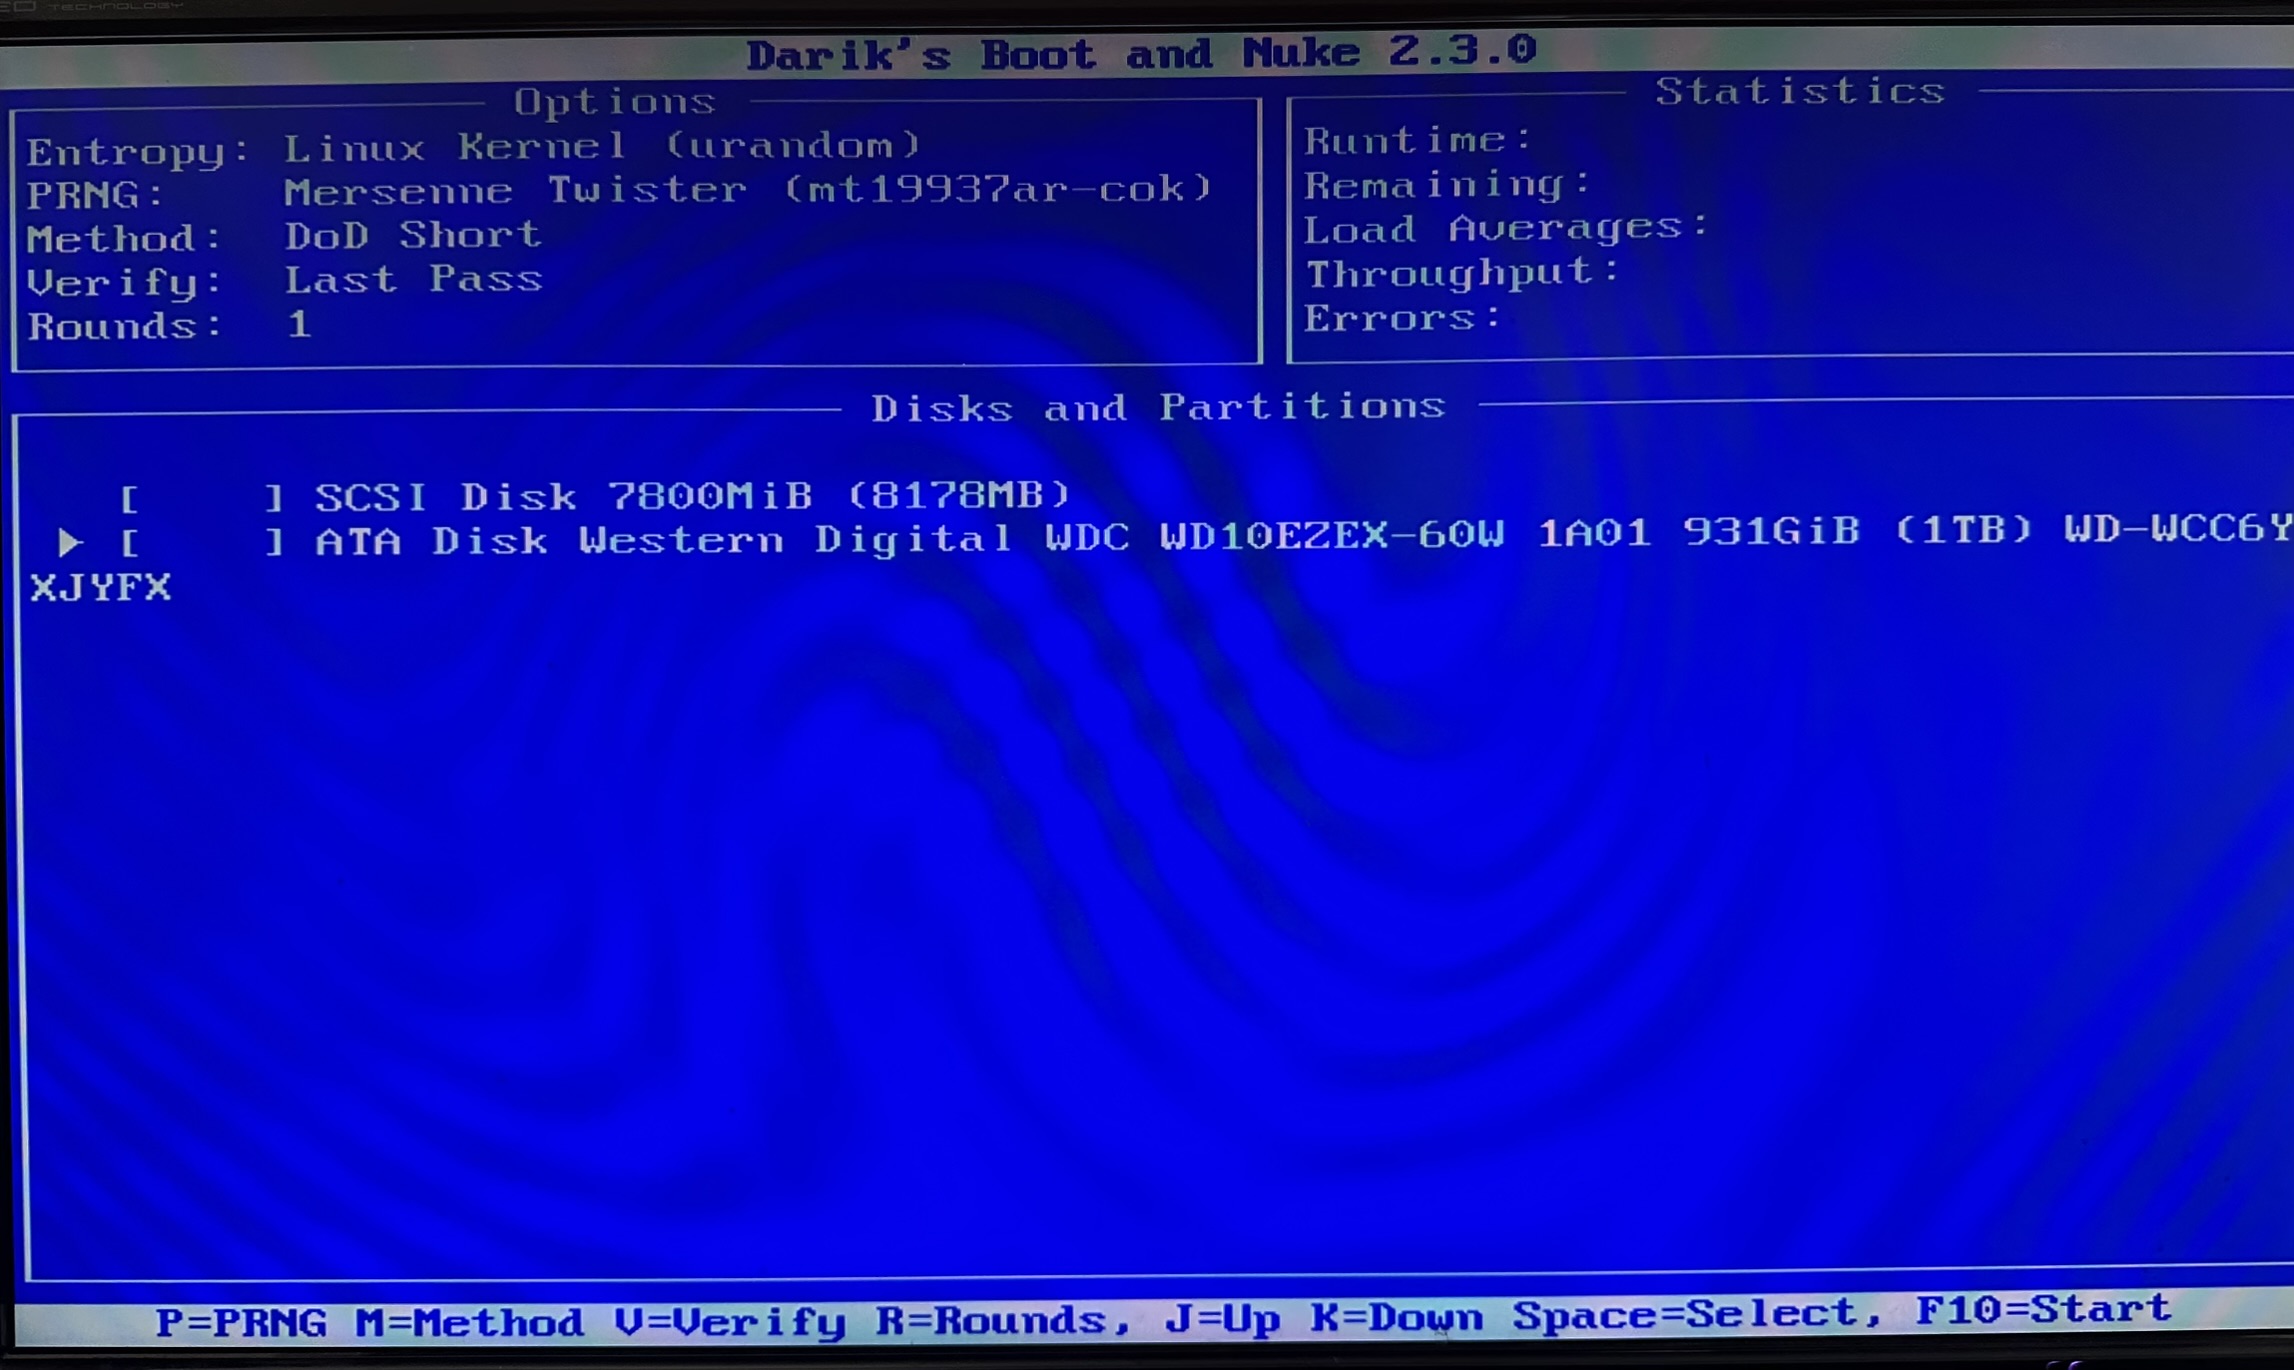
- Finally, to begin the wiping process, press the F10 key on your keyboard.
Potential problems you might face when executing the steps above (and how to fix them):
- The boot mode option in your motherboard settings is greyed out. To fix this, follow the instructions in this MakeUseOf article—disable Secure Boot, TPM, and Modern Standby.
- DBAN doesn’t load up, citing that it’s incompatible with UEFI, even after switching the boot mode to legacy (BIOS) mode. Go to the boot order page in your motherboard settings, ensure that the USB drive is first in the boot order, AND doesn’t have a UEFI prefix. Choose the same USB drive, listed without the UEFI prefix. Save the settings and reboot.
Bonus: Want to know more about DBAN, how to use it, and what the different options mean. This in-depth article by Lifewire should be right up your alley.
Additional Ways to Wipe a Hard Drive
What if I told you that wiping a hard drive isn’t the only way to “wipe” a hard drive? There are more creative ways of making sure your data doesn’t fall into the wrong hands.
Here are some of my favorites:
Physical Destruction: Wipe It Off the Face Of the Earth
Don’t plan on using the drive anymore, nor do you want anyone else to use it? Physically obliterate it—it’s fun, and it’s effective.
Important: Use protective equipment when physically destroying a hard drive, and ensure you do so in a safe environment. If you’re unsure about doing it yourself, there are dedicated HDD destruction companies that can do it for you.
Here are some ideas to get you started:
- Drill multiple holes all the way through the hard drive. Be sure to focus on the platter when doing this because that’s where all your files are stored.
- Crush it with a hammer. Again, the key is to focus on the platter and ensure it is destroyed.
- Shred the HDD. Yes, I’m talking about physically shredding the hard drive into little pieces. It’s best to send your drive to a hard drive destruction company for this.
- Incinerate the hard drive. Here, too, I recommend contacting a professional.
Besides what I’ve listed, you can use an acid bath, or an industrial-grade crusher to destroy your hard drive. Feeling adventurous? If the gun laws in your country allow it, you can…..shoot the hard drive to bits, like this guy did.
Degaussing: Kill it With Kindness
Magnetism is the fundamental principle behind storing data, and accessing it on hard drives. To put it simply, the platter is coated with a thin layer of magnetic material that’s responsible for storing data.
Do you know what magnetic surfaces hate the most? Strong magnets. So, how do you destroy a hard drive’s magnetism. Well, you use something called a degausser (and no, that’s not the name of a weapon from Quake). A degausser is a device that creates a strong magnetic field.
Degaussing not only destroys the currently stored files on an HDD, it also renders it unusable in the future. Keep in mind, degaussing only works on magnetic storage drives like hard disks, it’s ineffective against SSDs, and other types of flash storage media.
It’s also important to perform degaussing in a secure environment. Many electronic devices, like speakers, don’t take kindly to strong magnetic fields.
BitLocker Encryption: Lock It and Forget It
Encrypting your HDD using BitLocker will effectively muddle all its data and leave it inaccessible, unless someone has the recovery key. So, throw away the recovery key, and forget the recovery password after encrypting your drive.
Sure, if you’re doing this on a system disk, anyone with your login credentials can access the data. There’s an easy way around this—connect your system disk to another PC using a hard drive enclosure, and then encrypt the drive.
Note: BitLocker is only available in the Pro, Enterprise, and Education versions of Windows 10, and Windows 11. If you are running the Home version of Windows, you’ll need to connect your drive to a PC running the required edition of Windows 10/11.
Ready to encrypt your drive? Let’s get started:
- Connect your hard drive to a PC running Windows 10/11 Pro, Enterprise, or Education.
- Search for “control panel” in Windows Search (Windows Key + S), and click Control Panel from the search results.
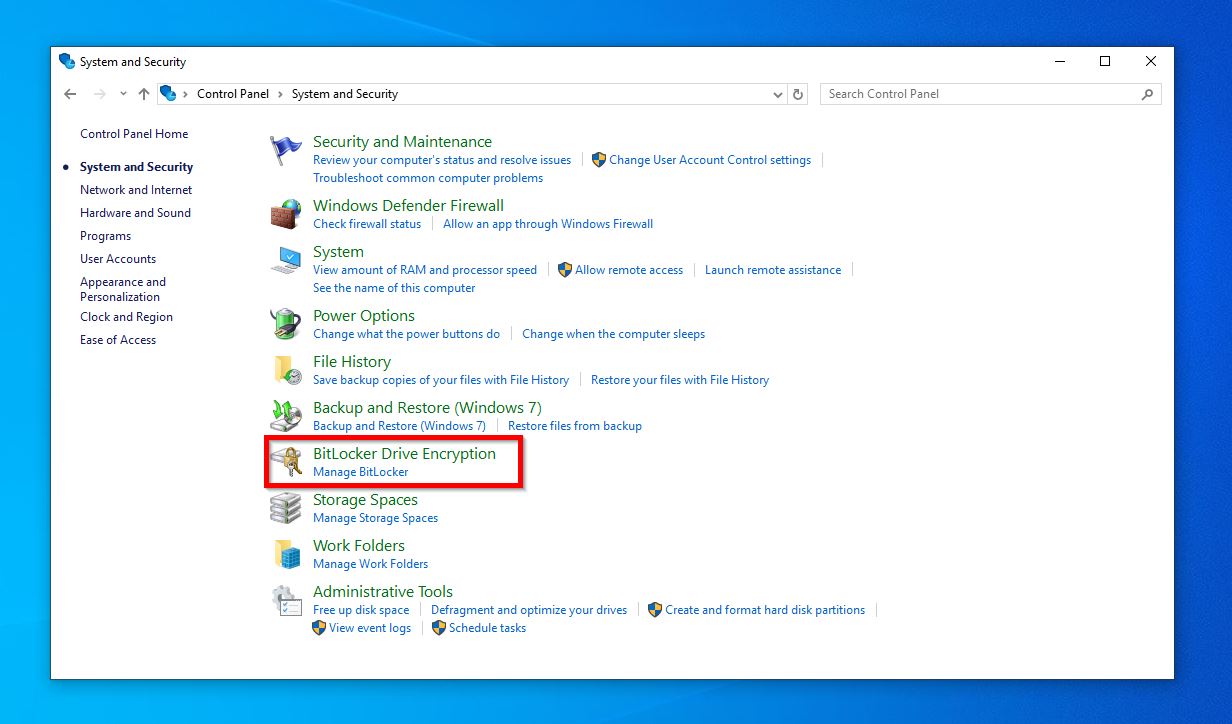
- Click on BitLocker Drive Encryption under System and Security.
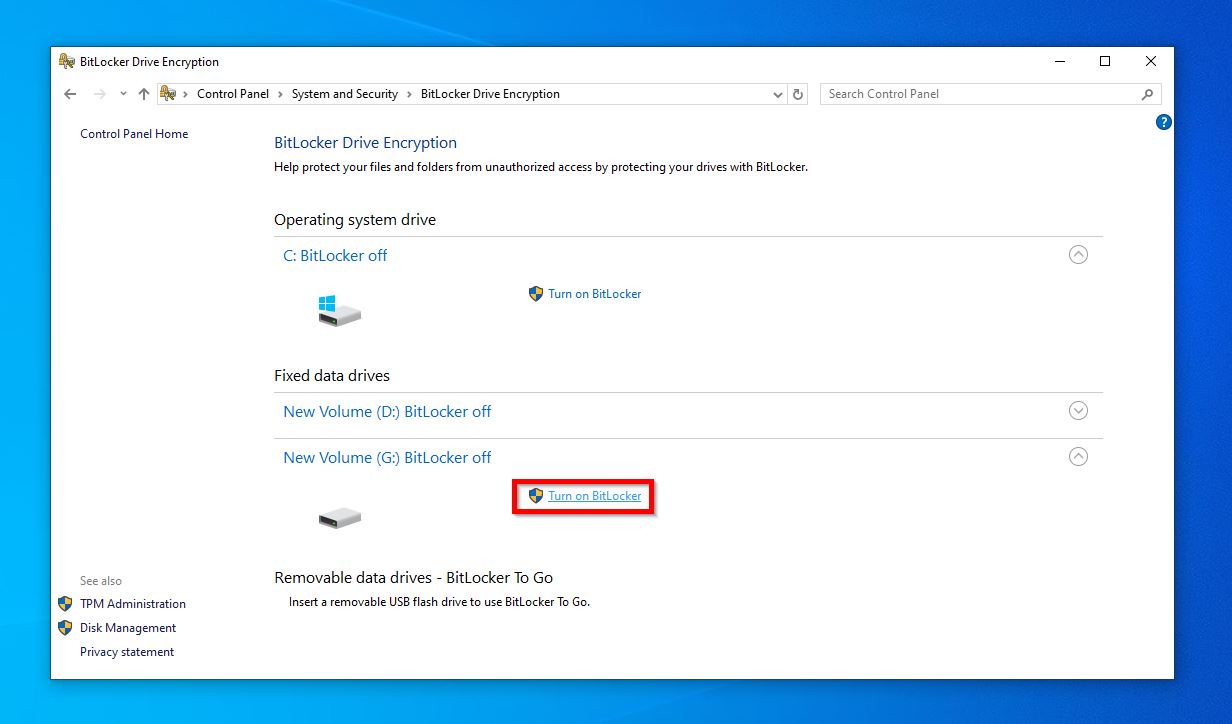
- Click Turn on BitLocker under the drive you wish to encrypt.
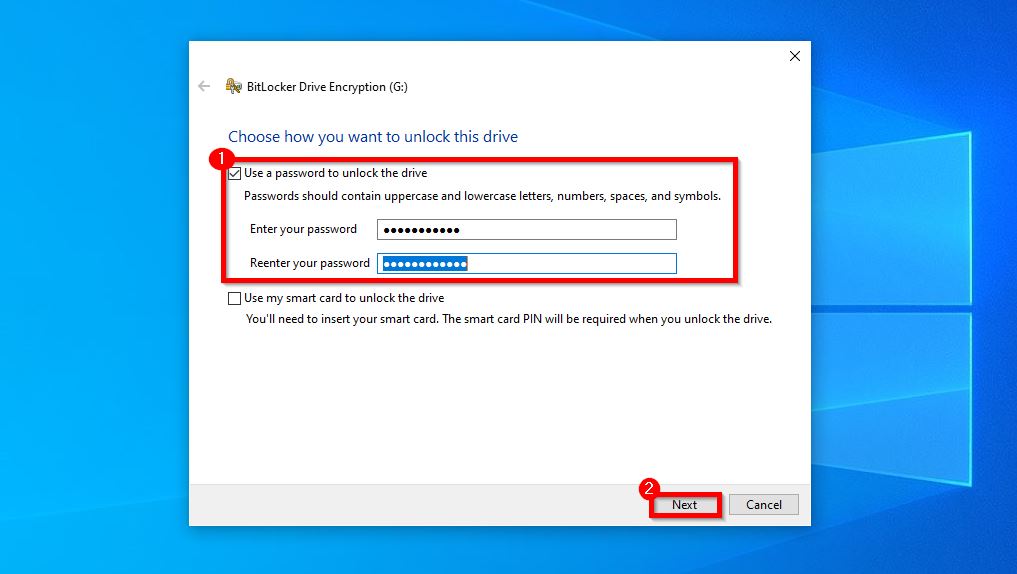
- Create the most forgettable yet strong password, confirm it, and click Next.
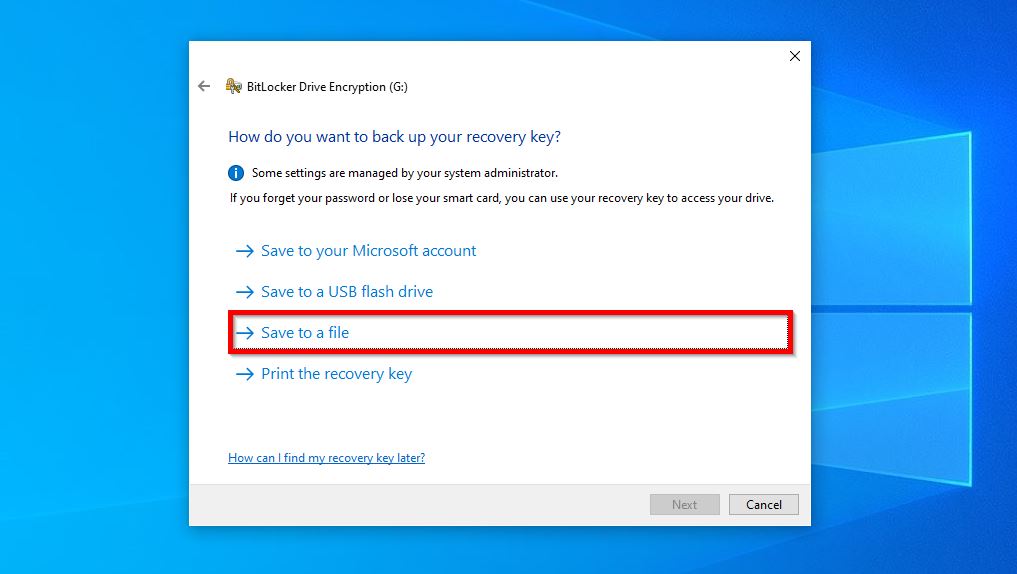
- Click on Save to a File when BitLocker asks you to save the recovery key. Save it to some other storage drive, not the drive you’re encrypting. Delete this file once drive encryption completes.
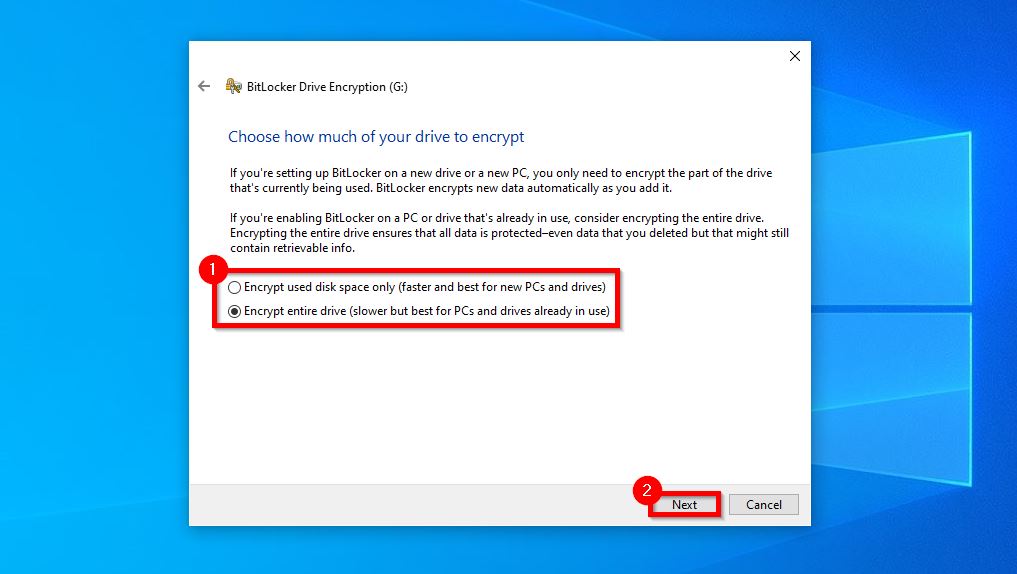
- Select the Encrypt entire drive option,and click Next. This is important.
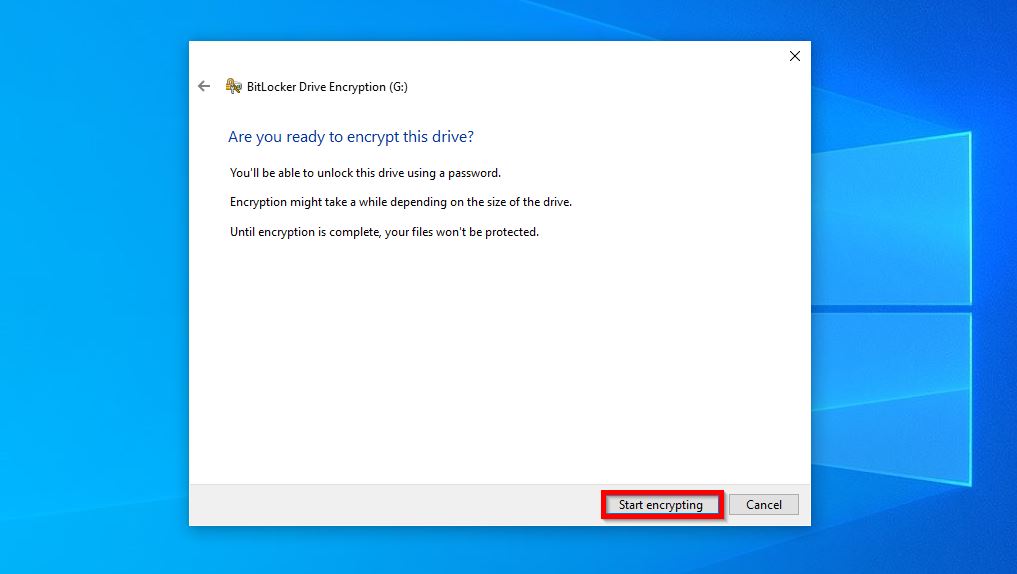
- Finally, click on Start Encrypting. The encryption process will take a while.
What If I Have an SSD?
Solid State Drives (SSDs) work differently than HDDs. Unlike hard drives, SSDs have limited write cycles—they degrade as you write to them. Okay, what about it? Well, full-formatting, BitLocker encryption, and data shredding all write to the entire drive. Now, this doesn’t mean that a perfectly fine SSD will simply die after a full format. But, it will certainly reduce the SSD’s lifespan.
SSDs have a feature, called TRIM, that actively clears up unused data blocks. Here’s how it works—you delete a file that was stored in cell A1 of the SSD. The file isn’t actually deleted, the SSD simply tells Windows that there’s nothing there in cell A1 and that new data can be written to it. Now, if it was an HDD, this would be the end of the story. In an SSD, the TRIM feature—when executed—actually pays a visit to cell A1 and clears the file that was there. This is why SSD data recovery is significantly more difficult than HDDs, and often, impossible.
So, you can’t, or more appropriately, shouldn’t format an SSD. What do you do instead? Well, you have three options:
- Use Secure Erase: Most motherboards that support SSDs have a Secure Erase feature. To execute it, you’ll need to go into your motherboard’s BIOS/UEFI settings, and find the Secure Erase option. Refer to your motherboard manufacturer’s website, or user manual for exact instructions, as the steps may vary across different vendors.
- Delete All Partitions: While it’s not as effective as a disk wipe, deleting the partitions on your SSD will significantly complicate data recovery, making it almost impossible. To do this, open Disk Management on Windows, right-click on each SSD partition one-by-one, and choose the Delete Volume option.
- Use Vendor-Specific Software: All major SSD manufacturers have dedicated disk management and formatting tools you can download. Check your SSD vendor’s website, and if available, download the program. Launch the program and look for options to erase your SSD.
Conclusion
Wiping your hard drive is not exactly rocket science. The method you choose depends on what you plan on doing further with the hard drive. Giving it away to someone close? Full format it and forget it. Are you donating it to an organization? Data shredders should be your go-to option. The hard drive will no longer be used? Nothing beats good old physical destruction.
This article was written by Manuviraj Godara, a Staff Writer at Handy Recovery Advisor. It was also verified for technical accuracy by Andrey Vasilyev, our editorial advisor.
Curious about our content creation process? Take a look at our Editor Guidelines.