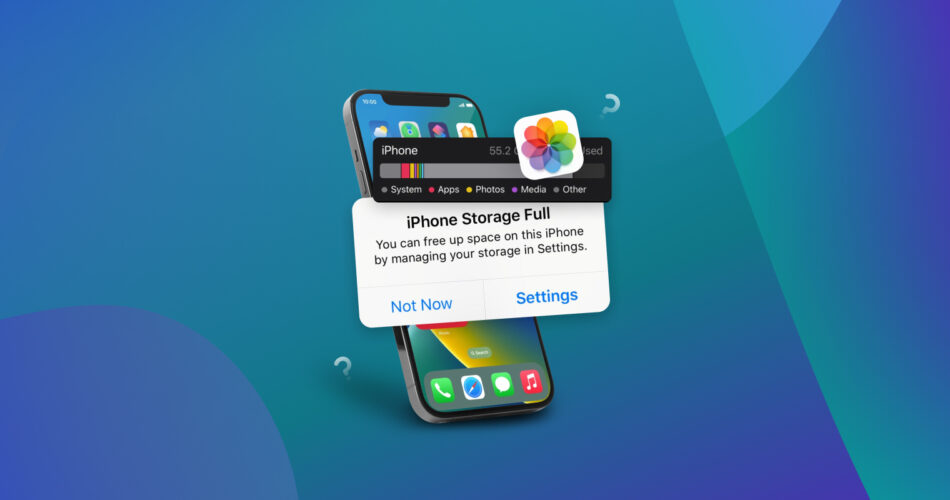
Are you currently dealing with the situation where your iPhone storage is full after deleting photos? You’re not alone. It’s a very common issue that affects many iPhone 11, 12, 13, 14, 15, 16 users across iOS 13, 14, 15, 16, 17, 18. We will examine why this problem happens and offer 8 foolproof methods to solve it once and for all.
Why Is iPhone Storage Full Even After Deleting Photos?
You’ve deleted a bunch of pictures, but your iPhone storage is still full after deleting photos. This annoying problem can happen for several different reasons. Let’s take a closer look at the top 4 most likely culprits:
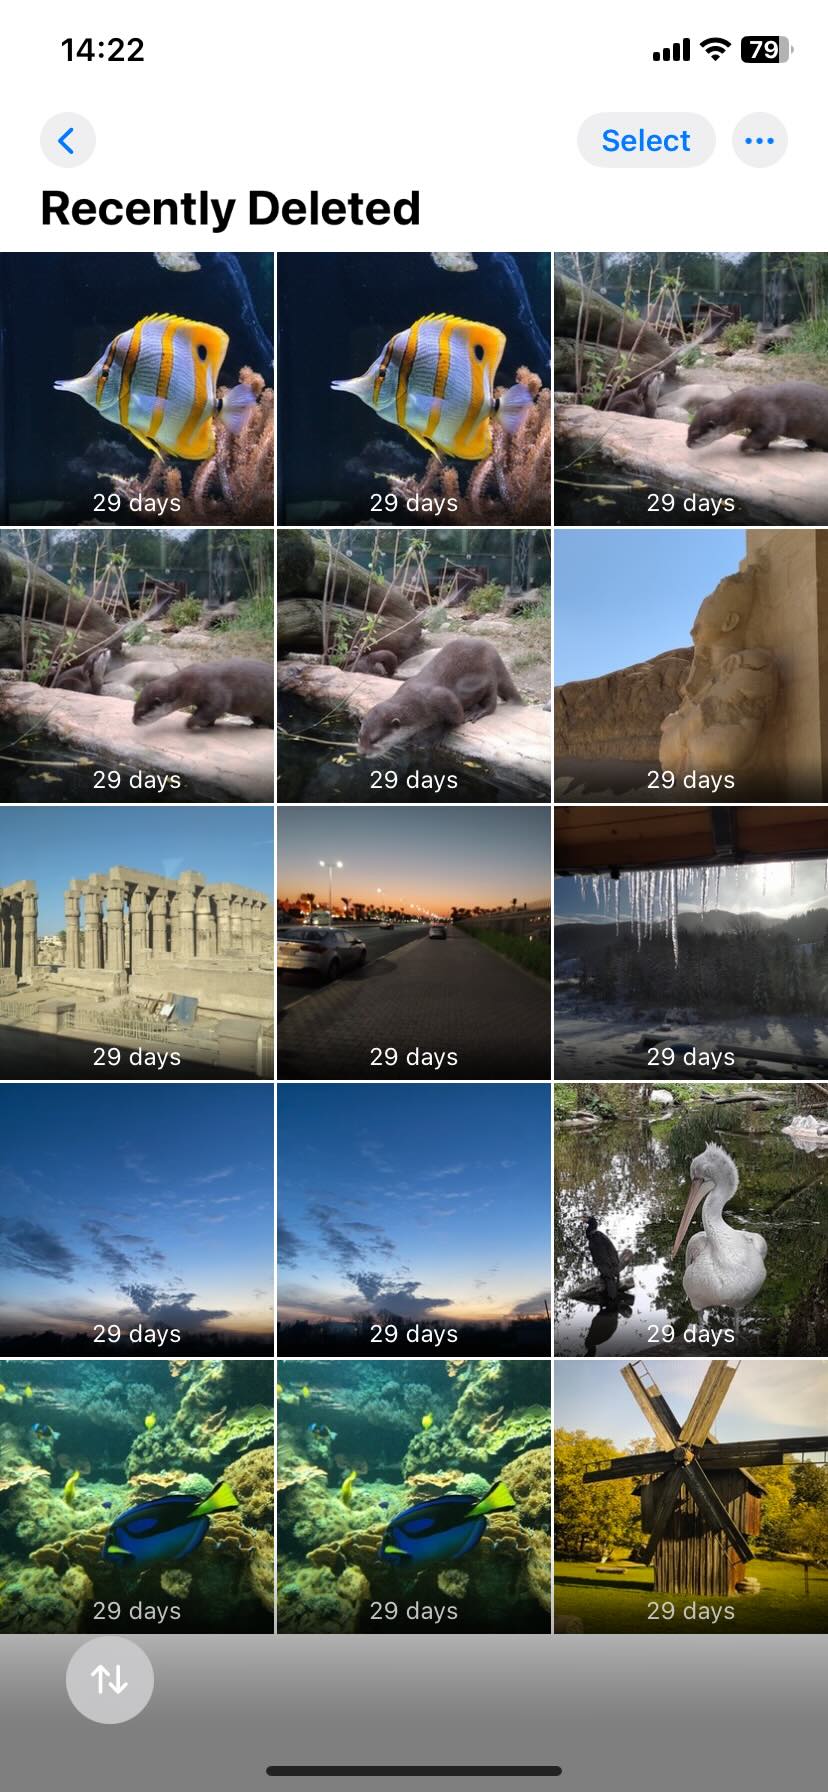
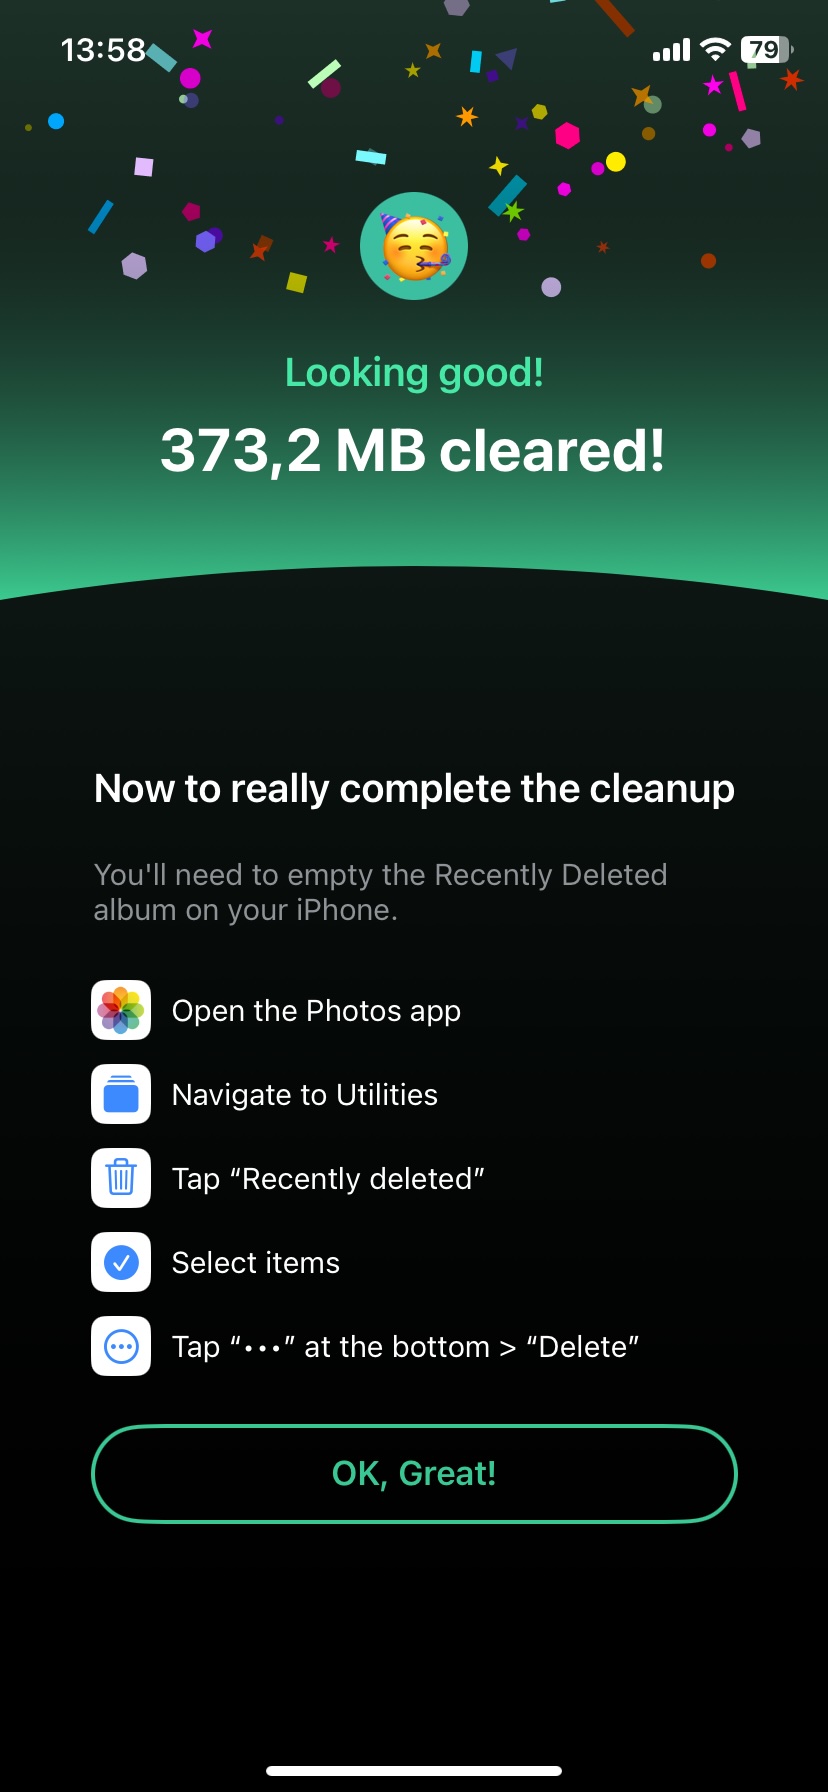
- The Recently Deleted album hasn’t been emptied. When you delete pictures on your iPhone, they aren’t immediately gone. They first move to a Recently Deleted album and stay there for 30 days. So, even though you’ve hit Delete, your storage isn’t freed up yet.
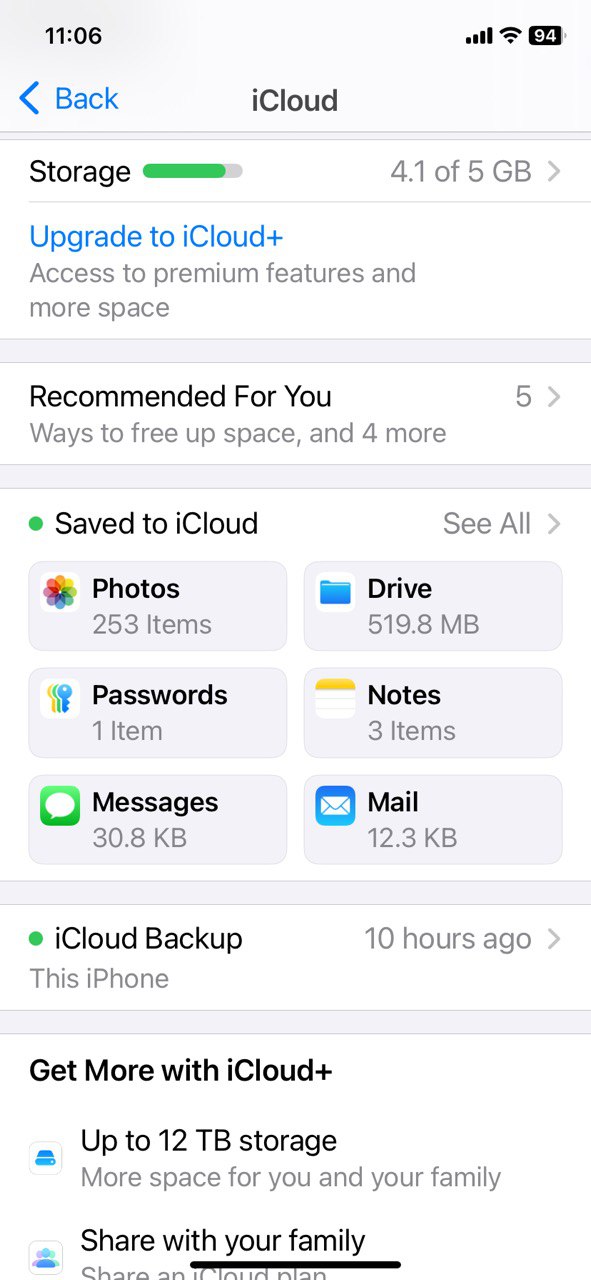
- The photos have been downloaded from iCloud. If iCloud Photo Library synchronization is turned on, photos you thought you deleted might make a comeback, especially when multiple devices are involved. That’s exactly what happened to this Reddit user.
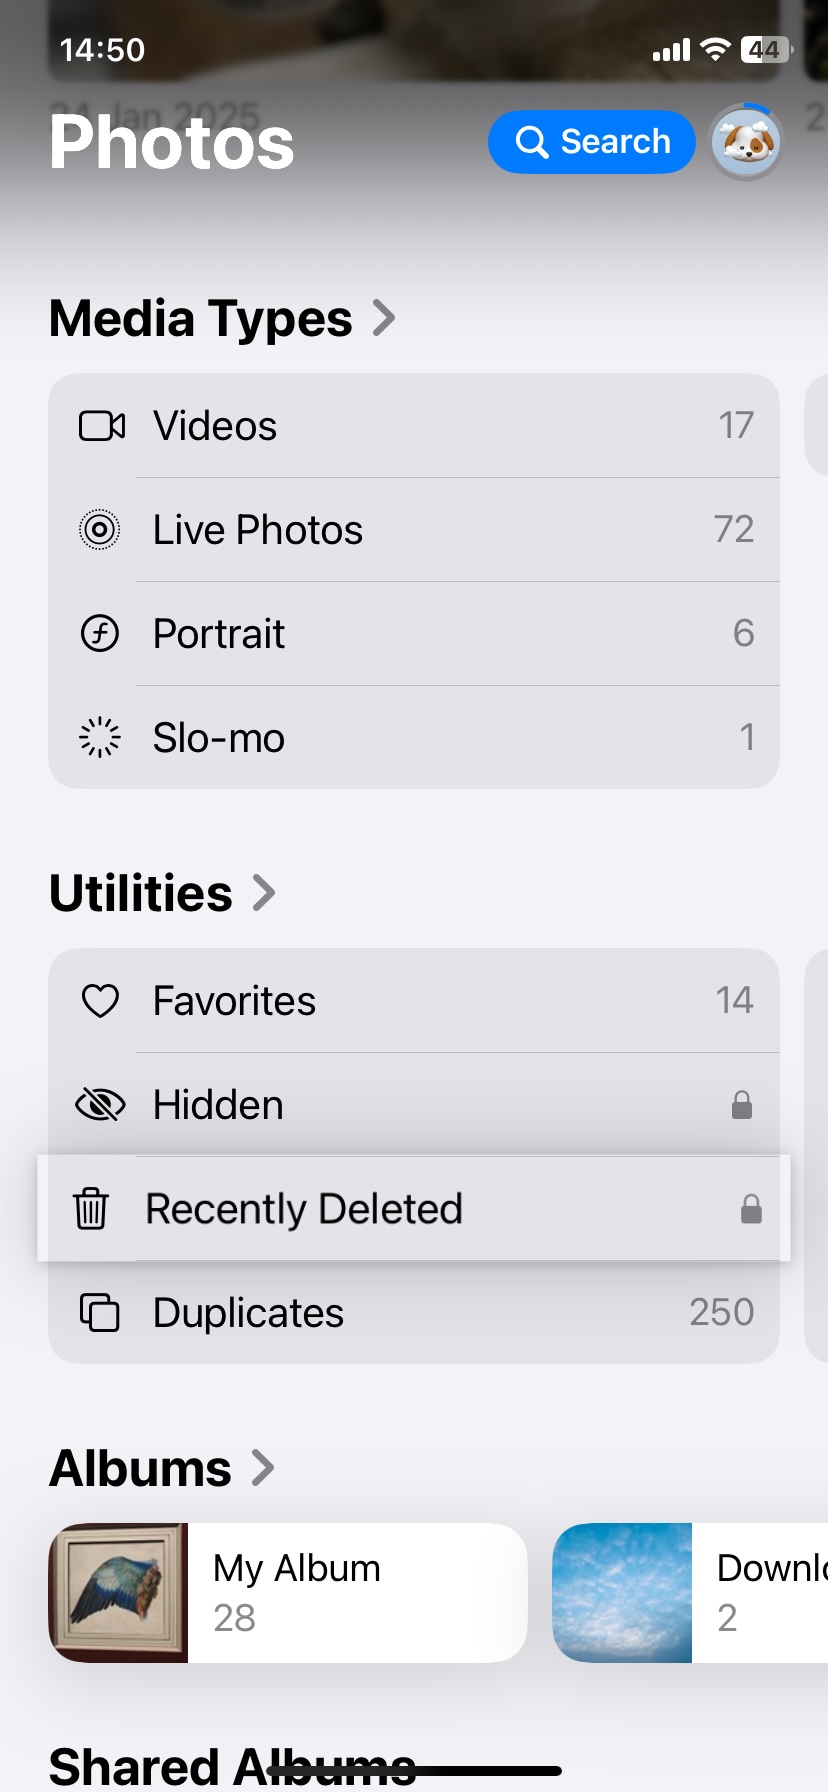
- Hidden and Shared albums still store photos. The Hidden album allows users to conceal photos instead of deleting them. The Shared Albums feature also keeps copies of images shared with others, even if they were deleted from the main library. These albums often go unnoticed, but we’ve seen cases where they held gigabytes of forgotten photos.
- An unpatched software bug affected the deletion process. iOS is a well-optimized operating system that frequently receives software patches that fix known issues. However, it’s also incredibly complex, and that leaves room for occasional bugs and glitches.
Again, these are just the top 4 most common reasons you might face this issue. Describing all possible causes would be beyond the scope of this article. However, we can certainly cover most possible solutions.
How to Resolve iPhone Storage Still Full After Deleting Photos
So you’ve figured out why your iPhone storage is full even after deleting photos. What’s next? Trying out the solutions, of course! We’ve compiled a list of 8 methods, and we’re convinced that at least one of them can help you.
Method 1: Clear the Recently Deleted Album
Let’s start with a straightforward method that can instantly reclaim some of your iPhone storage. As we’ve already explained, deleted pictures on iOS are moved to the Recently Deleted album, where they stay for a month before they are automatically removed. If you don’t want to wait that long for your storage space to be freed up, manually clearing this album is your best bet.
Important. Make sure to carefully review the contents of the Recently Deleted folder before you go ahead and empty it. Once you delete these images, there’s no turning back—they’ll be gone for good.
To clear the Recently Deleted album manually, you need to:
- Launch the Photos app.
- Navigate to the Albums tab.
- Scroll down and open the Recently Deleted album.
- Tap the Select button in the top-right corner.
- Select all images you want to permanently delete.
- Tap the circle with three horizontal dots in the bottom-right corner.
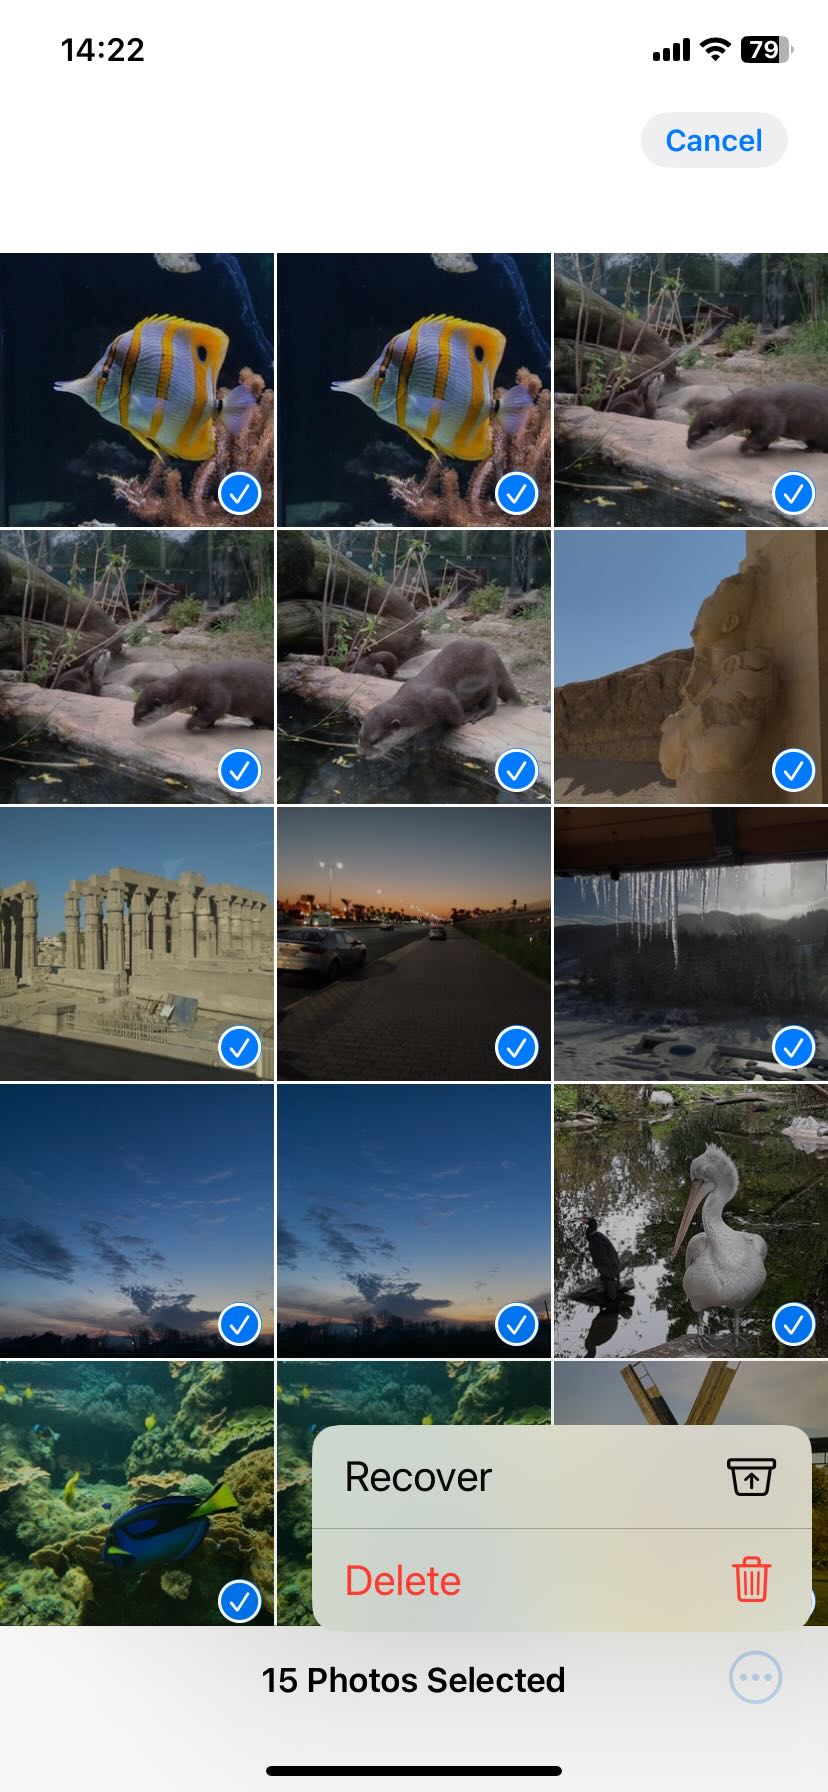
- Select the Delete option.
Don’t forget about Hidden and Shared albums! To check, open Photos, scroll down to Hidden under Utilities, and remove any unnecessary files. For shared photos, go to Albums, find Shared Albums, and delete images manually. After that, make sure to clear out the Recently Deleted album, as we covered above, to free up storage completely.
Method 2: Manage Photos Using Third-party Tools
As an iPhone user, you don’t have to rely solely on the built-in Photos app to manage and delete your pictures. The built-in Photos app has its limitations when it comes to photo management. While it can detect exact duplicates, it often fails to catch similar-looking photos that take up unnecessary space. And that’s not all. As of iOS 18, there’s still no way to sort files by size, so it’s difficult to quickly identify and delete large videos—which are often the biggest storage hogs.
This is why many users turn to third-party tools from the App Store. We recently tested a new free cleaner app called Clever Cleaner: iPhone Storage Cleaner. It’s developed by CleverFiles and it offers several (4) tools to keep your photo library tidy. We will use this app for this method because it proved to be a very capable cleaner, and it’s completely free—not the usual “free for 3 days” trial, but ACTUALLY FREE with no restrictions or hidden paywalls. You can try it yourself with no strings attached to see how these kinds of apps work.
Here’s how to use Clever Cleaner to remove duplicate and similar photos:
- Search for “Clever Cleaner” in the App Store or go straight to its page using this link.
- Open the app and go to the Similars tab.
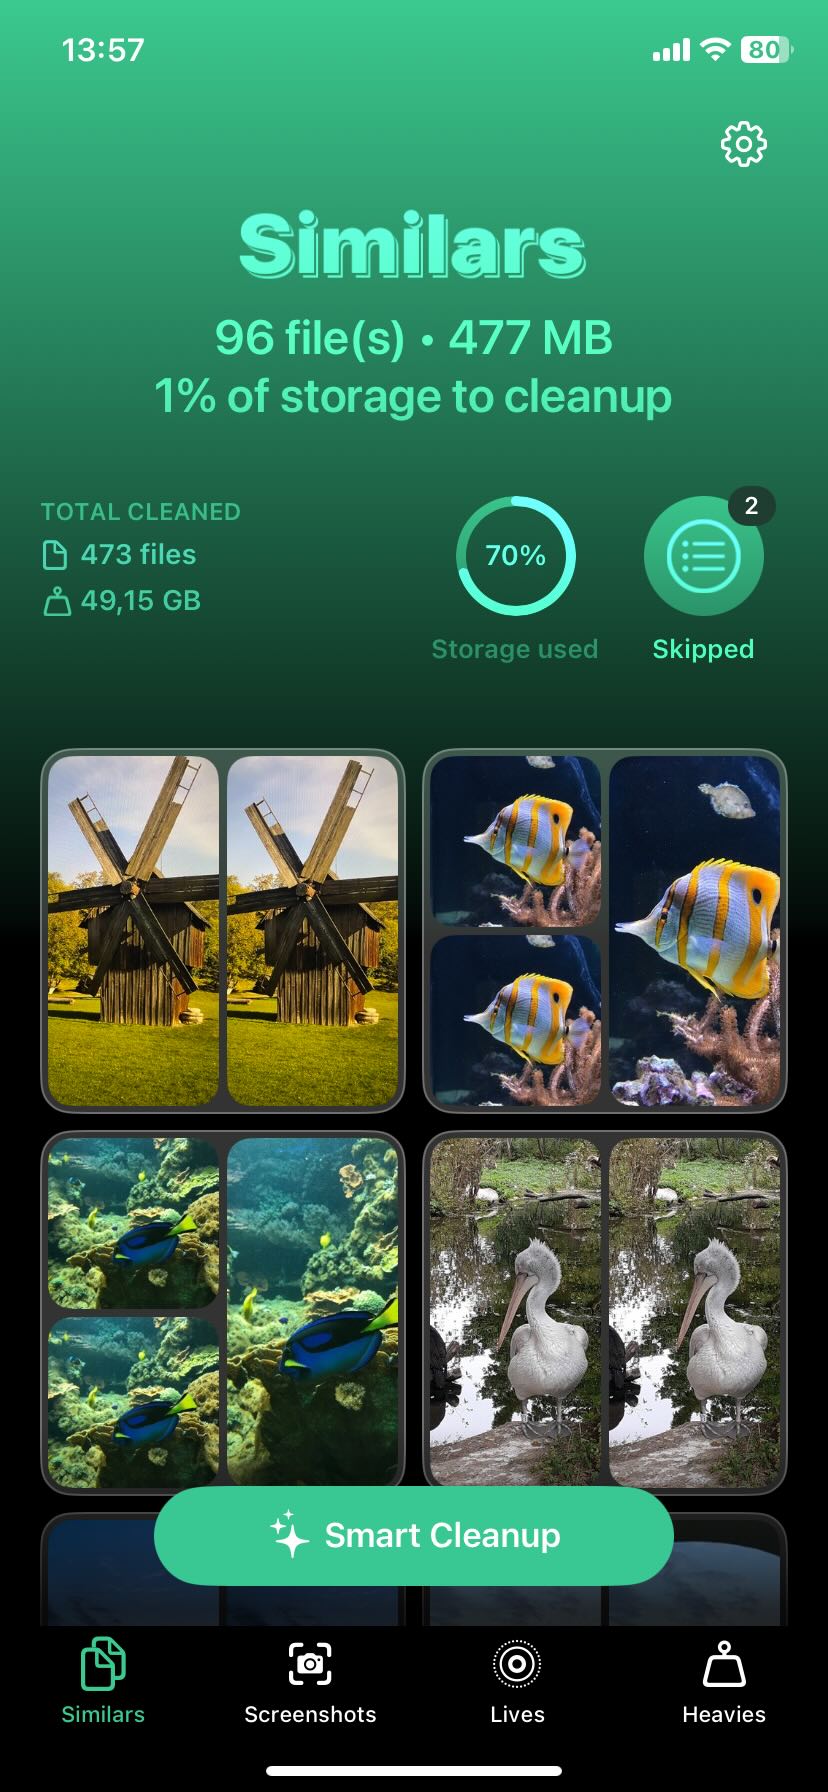
- If you prefer a one-tap cleanup tap Smart Cleanup, the app’s AI will identify near-identical photos, so you can remove them in one go.
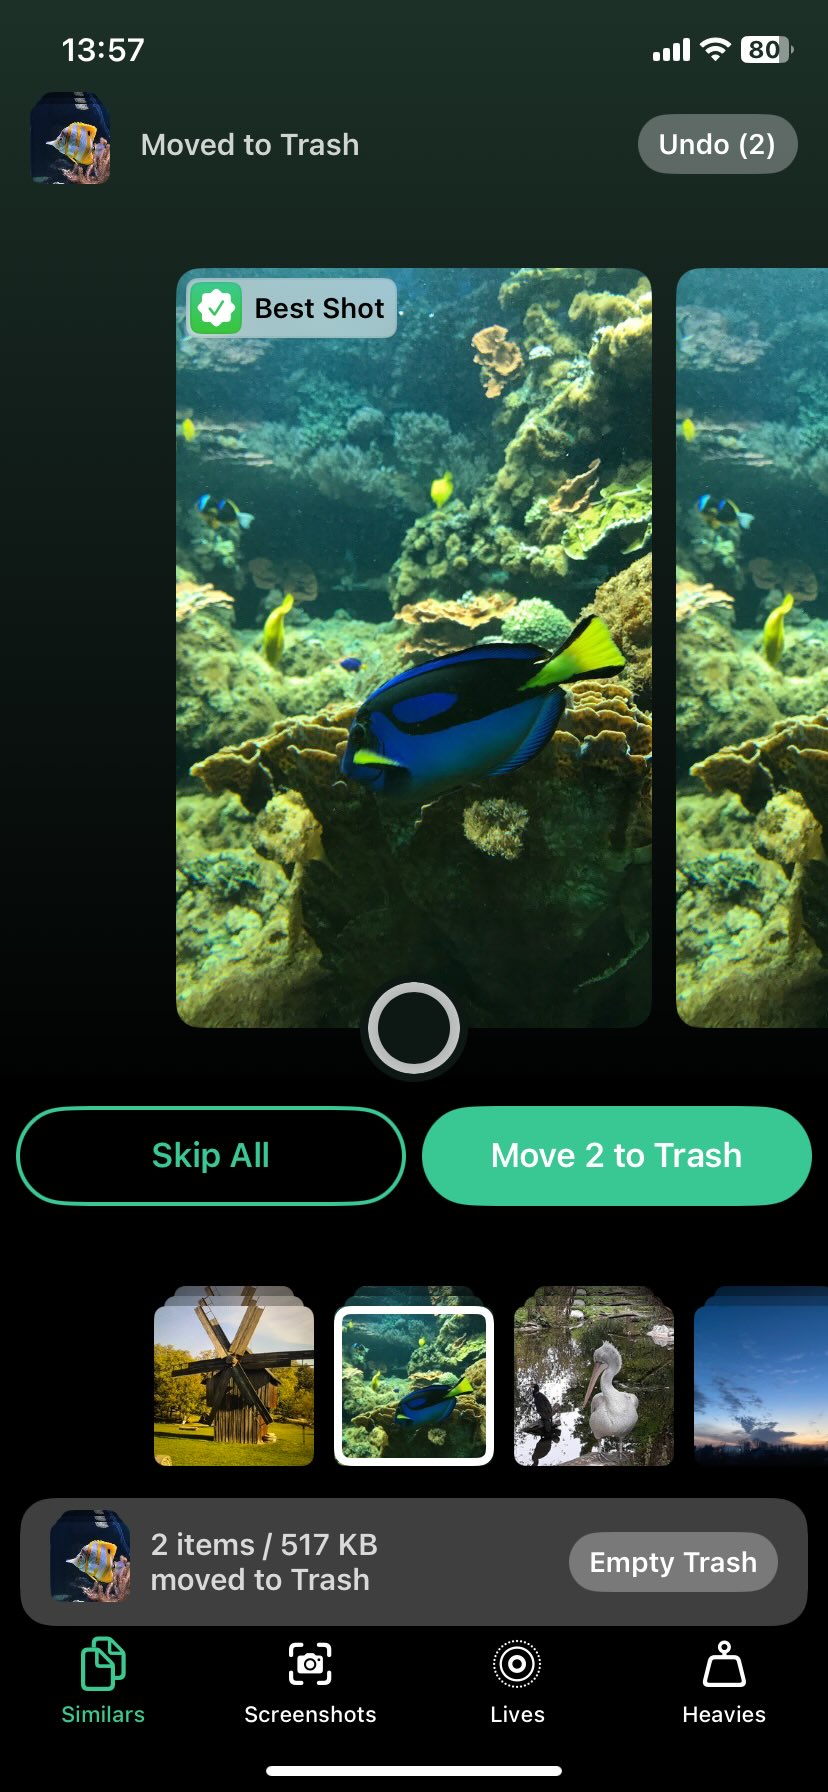
- If you want full control, tap on a group of similar photos, choose which to delete, and confirm.Clever Cleaner pre-selects duplicates, with AI marking the best shot as “Best Shot” to keep. You can leave it as is or select a different one if you prefer. The AI is usually pretty accurate with its suggestions.
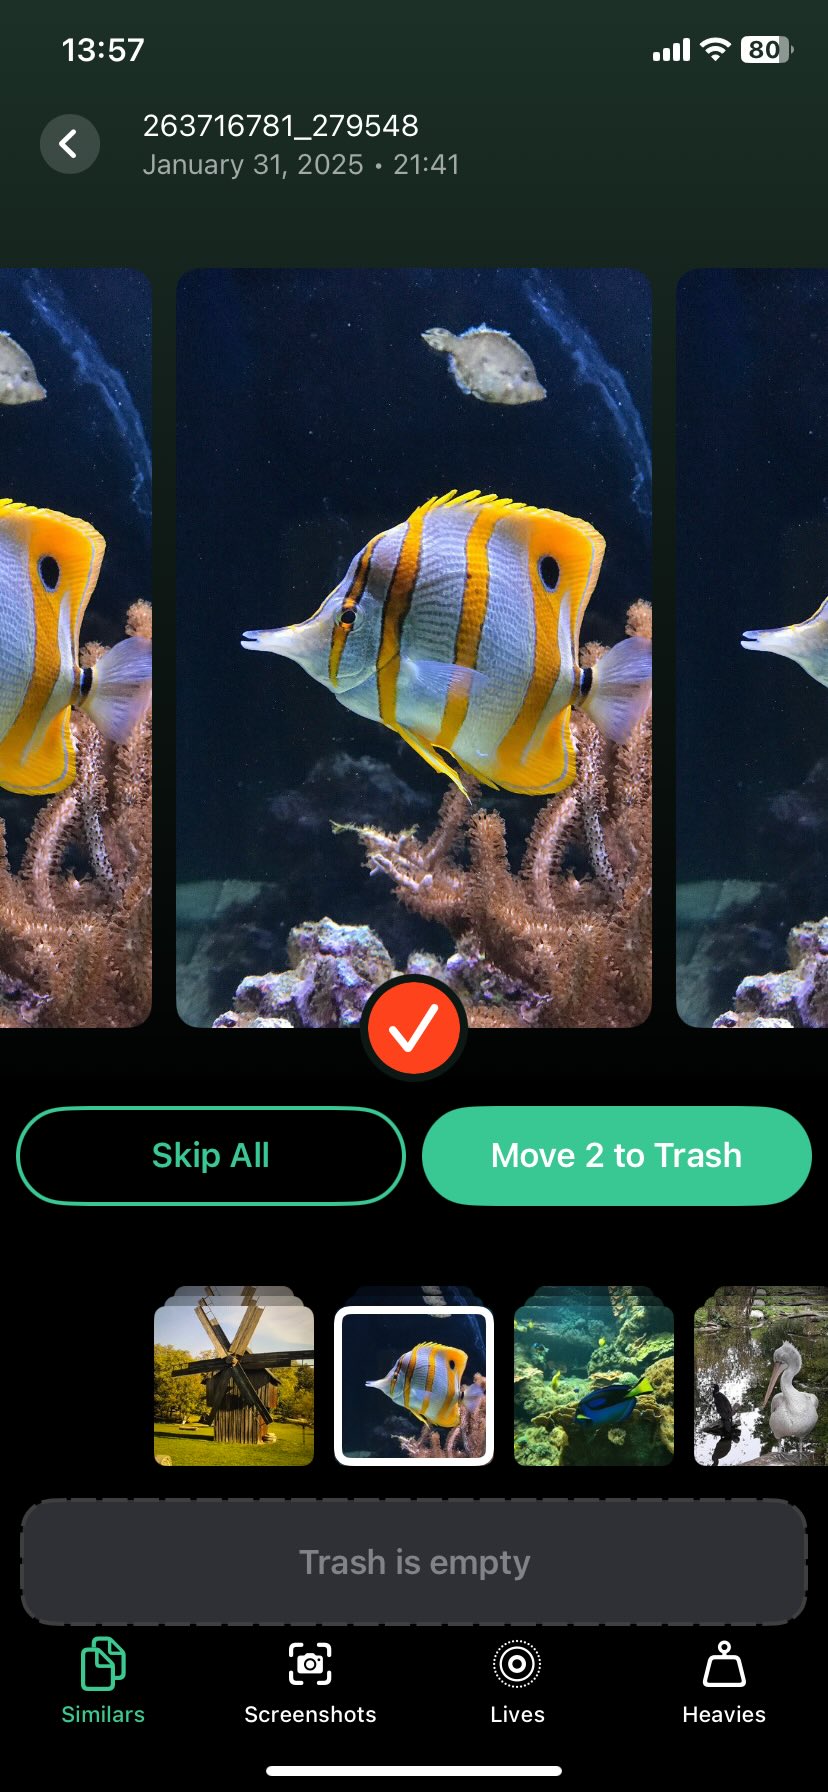
- Once you’ve made your selection, tap Move to Trash. The app immediately shows the next batch of similar photos for review.
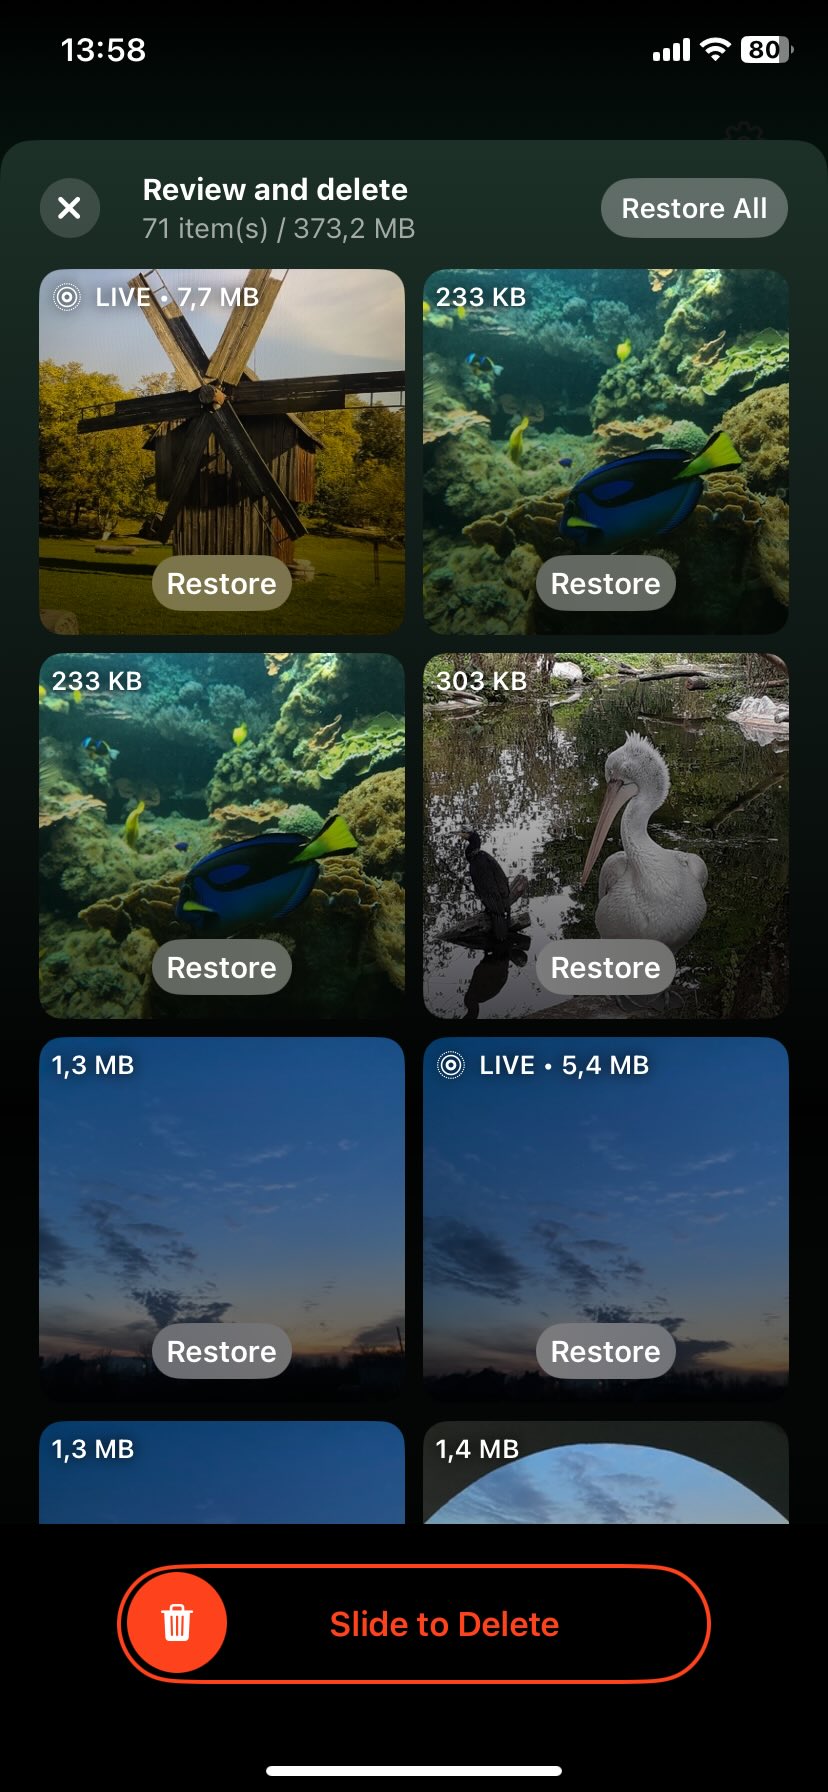
- If you went for Smart Cleanup, the app will display all the duplicates and similar images it suggests for deletion. You can review/restore them or use Slide to Delete to remove everything in one go.
- The app will also ask for permission to delete the photos from iCloud Photos.
The app will remind you, that just like with any other photos, to completely delete these from your device, go to the Recently Deleted folder and remove them from there.
The Similar Photos feature isn’t the only cool tool in Clever Cleaner. There are three more cleaning tools, all available for free with no ads or paywalls. On its official Clever Cleaner cleanup app page, CleverFiles promises that users can “enjoy lifetime access for free. Early users will never be asked to pay for upgrades or new features.” We remember them using this same distribution model for Disk Drill (their data recovery tool), so it might be a smart move to keep this app on your phone for future cleanups. The same is confirmed in the official launch video:
As to other features, they are:
- Screenshots – The app detects all the screenshots. With one tap, you can delete them all, or if you prefer, review and remove them individually.
- Lives – Clever Cleaner can compress Live Photos, turning them into regular still images without losing quality.
- Heavies – This tool helps you quickly find and delete the biggest videos in your library. Clever Cleaner sorts everything from largest to smallest, you can decide what to keep and what to remove.
We’ve tested a bunch of photo cleaners—some use AI to sort everything for you, and some take a more hands-on approach, check out our full list. Clever Cleaner also made the top as a free app that can compete with other advanced AI cleaners, most of which cost money. Additionally, if you want better ways to keep your photos organized, take a look at our list of the best photo organizers—it’s worth checking out.
Method 3: Disable iCloud Synchronization
Normally, when iCloud Photos is on, deleting a photo removes it from all your devices. But sometimes, sync bugs can cause deleted files to come back, creating a confusing loop that makes your iPhone storage still full even after deleting photos. This becomes more complex when you’ve got multiple devices under the same iCloud account.
Fortunately, the solution is simple: you just need to disable iCloud synchronization. Here’s how:
- Open the Settings app on your iPhone.
- Tap your name at the top to access iCloud settings.
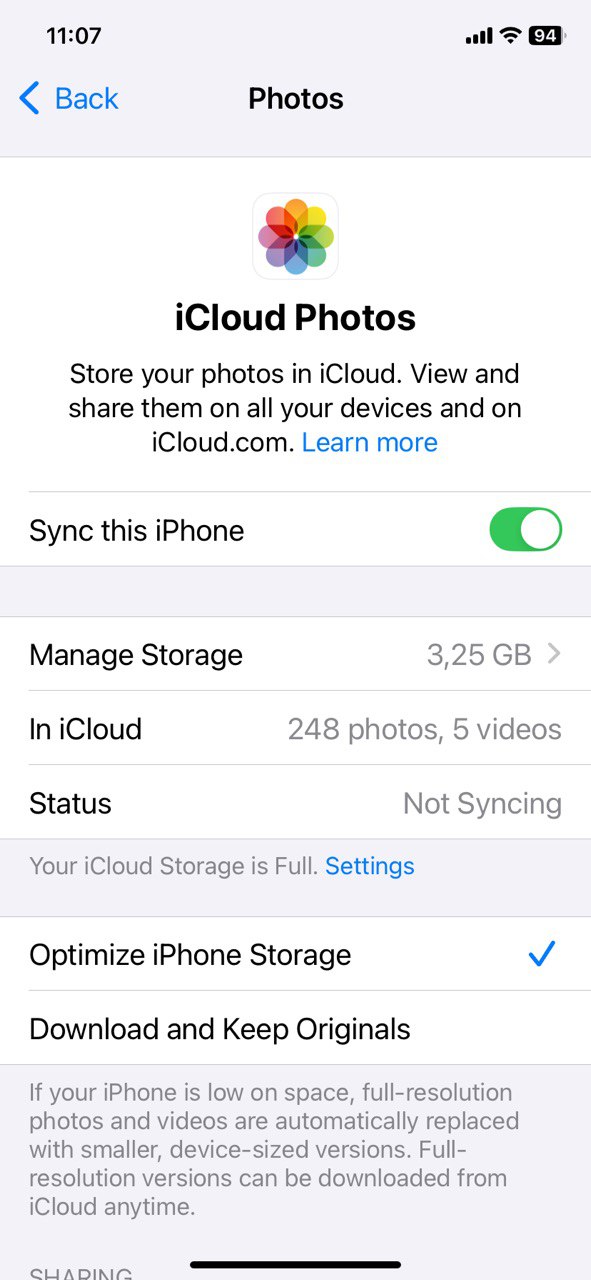
- Go to iCloud and then Photos.
- Select Download and Keep Originals. This will make sure that all your original photos and videos are stored on your device rather than just in iCloud.
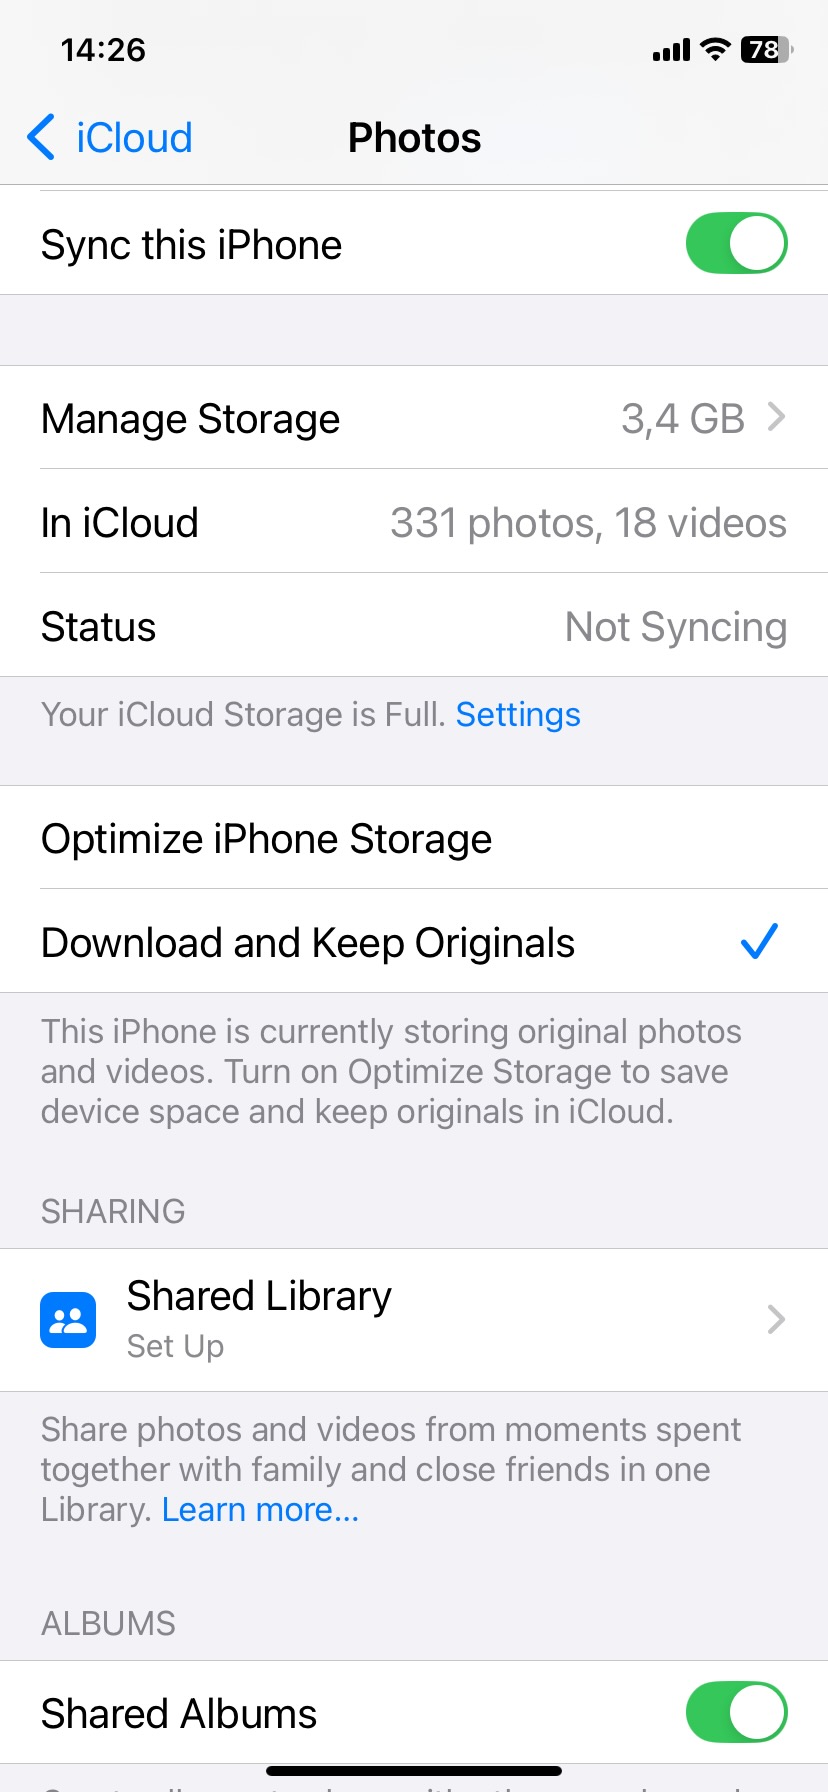
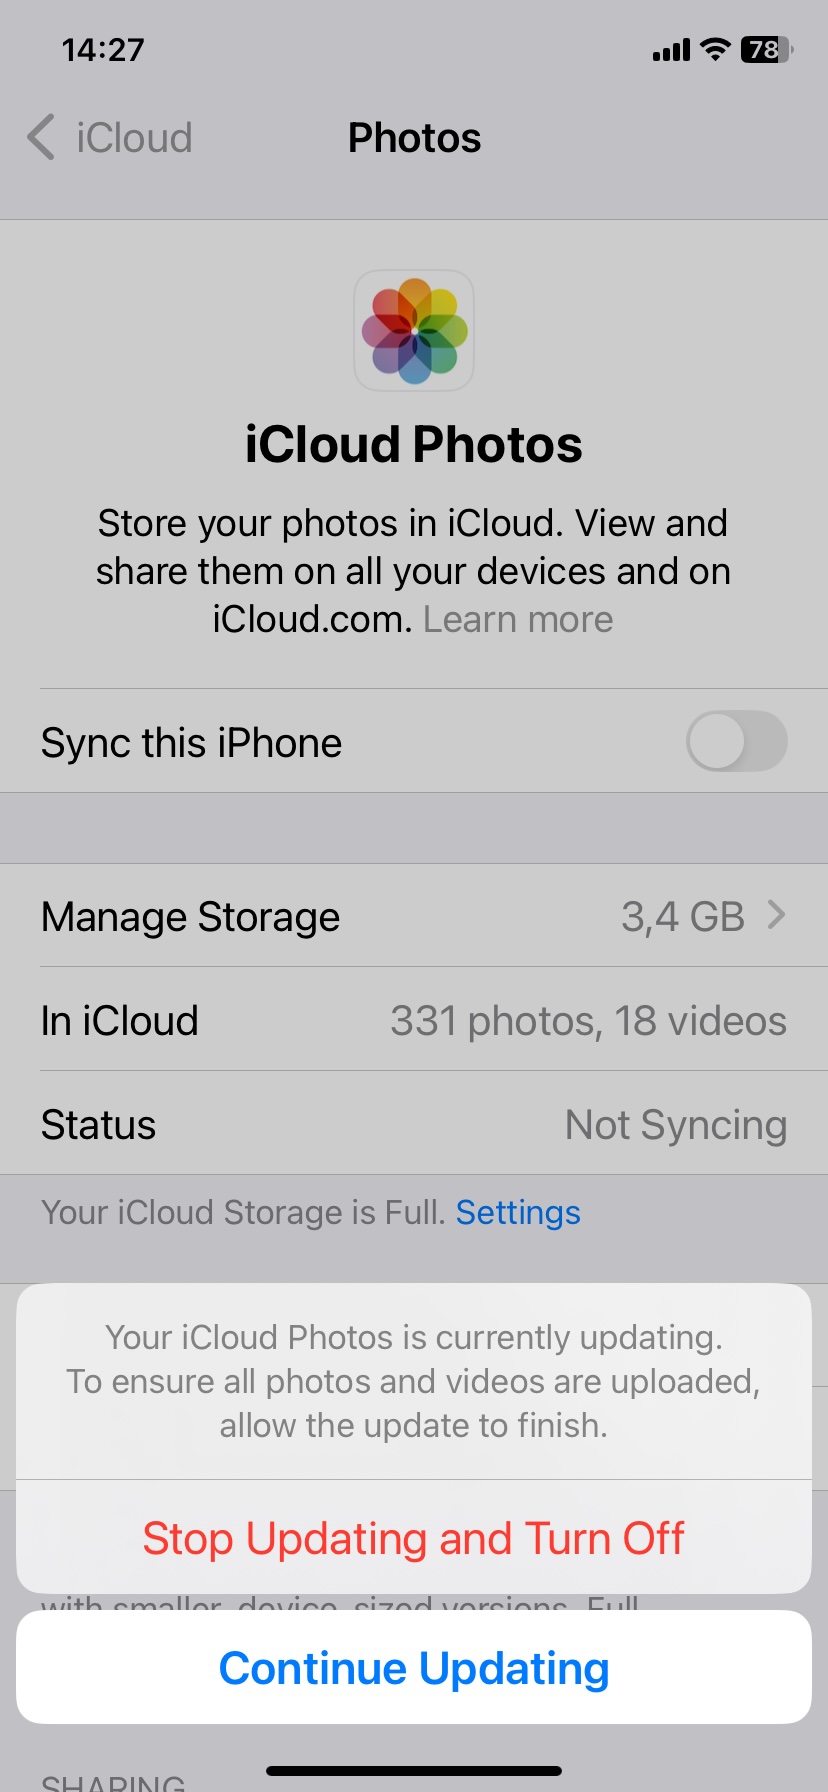
- Stay connected to power and the internet while the download process completes. This could take some time, depending on the number of photos and videos you have in iCloud.
- Toggle off the iCloud Photos or Sync this Device option, depending on your iOS version.
Important: Disabling iCloud Photos means your new photos won’t automatically be uploaded to the cloud anymore. That means if your device is lost, stolen, or damaged, those precious photos could be gone for good unless you have another backup solution in place.
Method 4: Optimize Photo Storage
If you rely on iCloud to back up your photos and videos, another effective strategy to tackle the issue of iPhone storage keeps getting full after deleting photos is to use the Optimize Photo Storage feature. This feature can automatically replace full-resolution pictures and videos with smaller versions, freeing up precious storage space on your device without making it more difficult for you to access your photo album.
Here’s how to enable the Optimize Photo Storage feature:
- Open the Settings app on your iPhone.
- Tap your name at the top to access your Apple ID settings.
- Navigate to iCloud and then Photos.
- Select the Optimize iPhone Storage option.
Note: It may take some time for the Optimize iPhone Storage feature to finish doing its job, especially if you have lots of photos on your device. To speed things up, you should be connected to a fast Wi-Fi network and have plenty of juice left in your battery.
Method 5: Free Up Other Storage
Have you tried all the above-described methods but are still struggling with storage space issues? Then it might be the right time to switch your attention to other common iPhone space hogs, such as unnecessary apps and cached data.
Specifically, removes apps you don’t use often but keeps their data by taking advantage of the Offload Unused Apps feature and get rid of browsing remnants by clearing the Safari cache. These two actions can go a long way in reclaiming lost space and improving the performance of your device.
To offload an unused app:
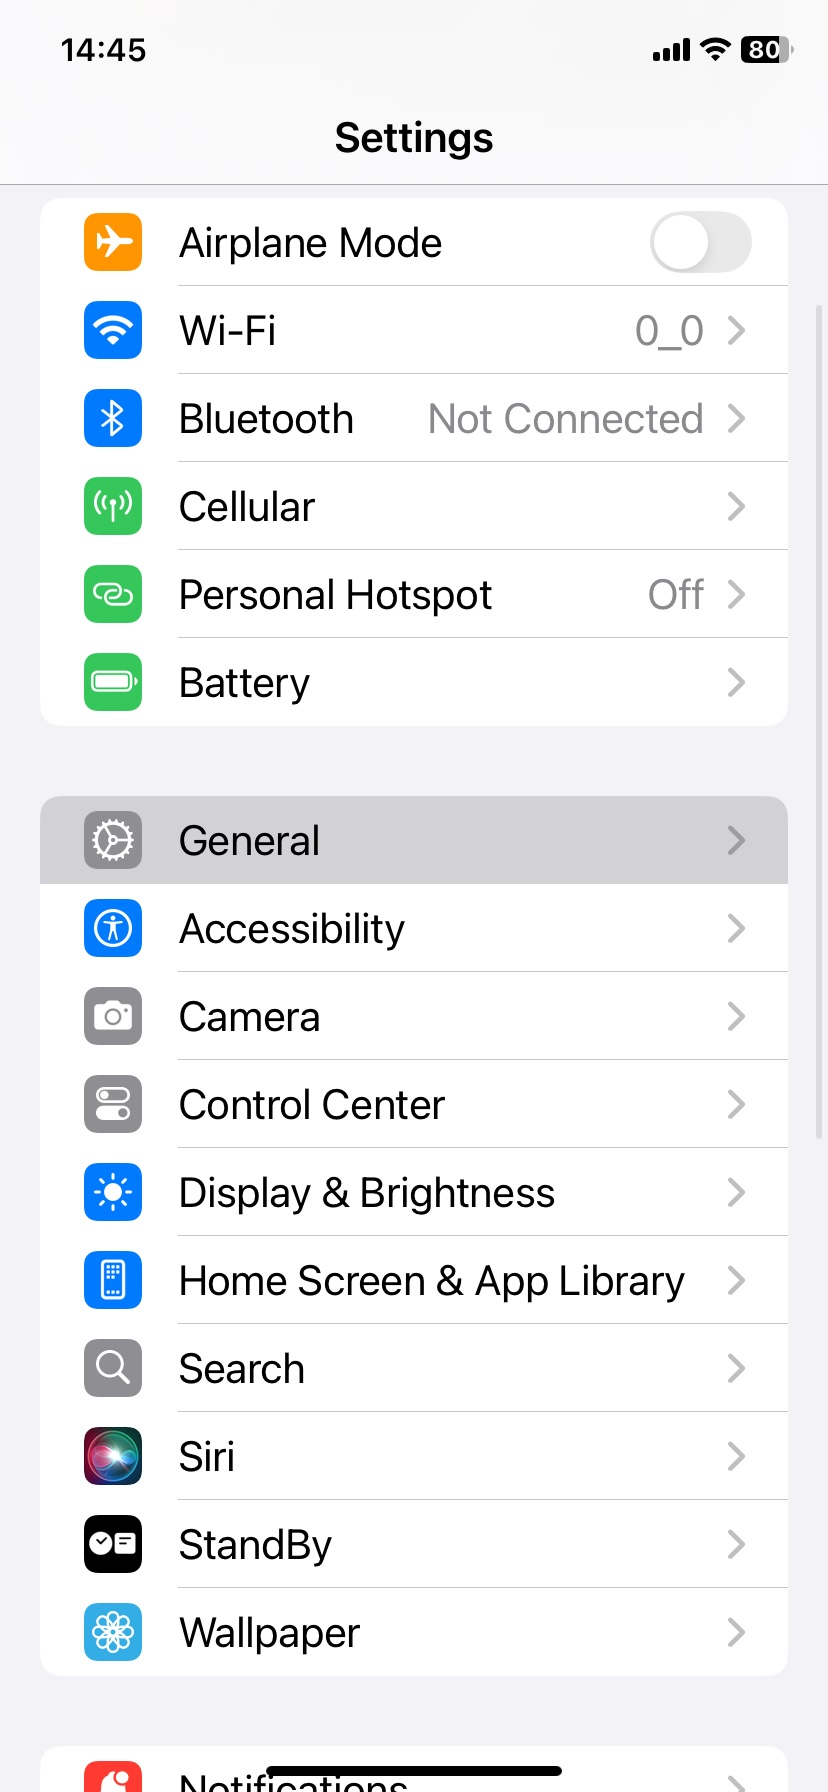
- Open the Settings app.
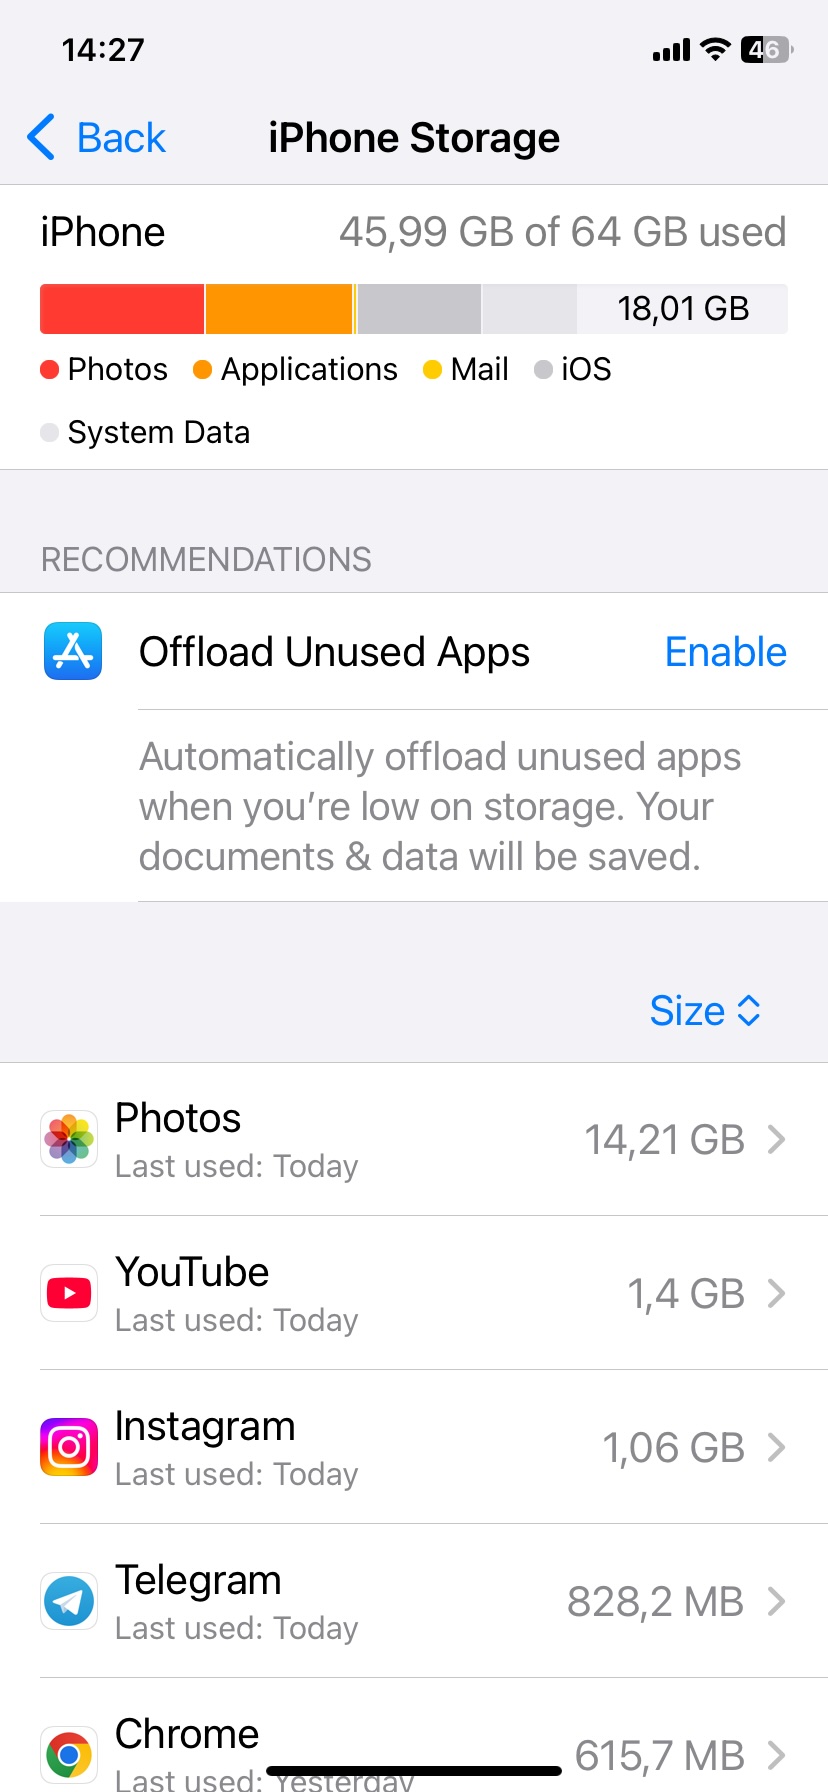
- Go to General and then iPhone Storage.
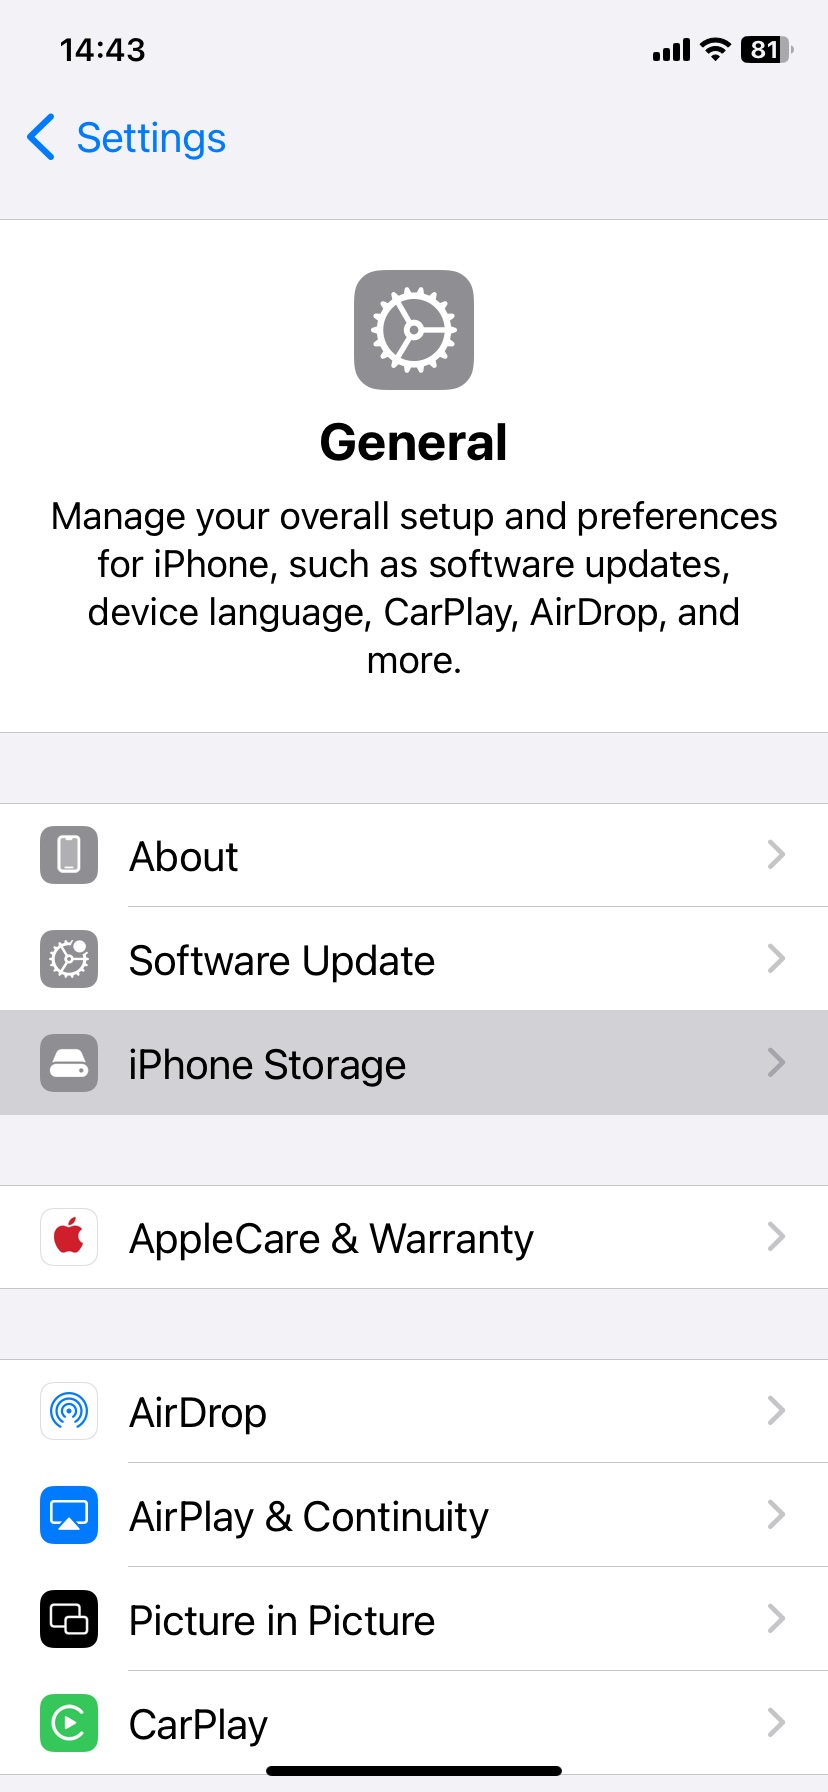
- Enable the Offload Unused Apps feature.
To clear your Safari cache:
- Open the Settings, then select Apps.
- Scroll down and tap on Safari.
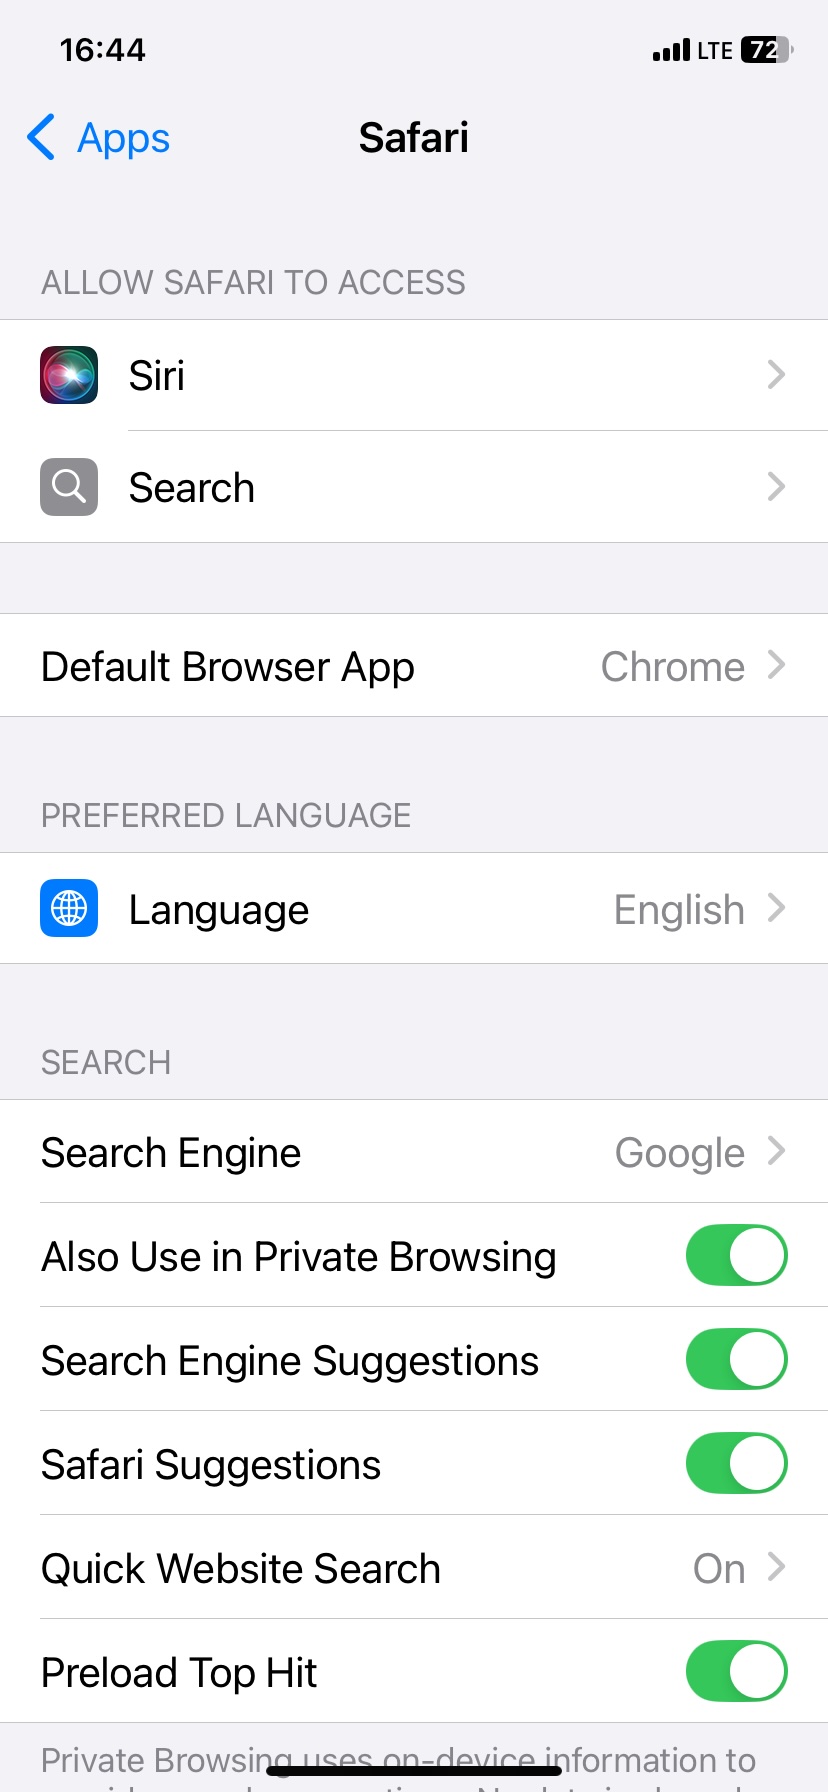
- Scroll down and select the Clear History and Website Data option.
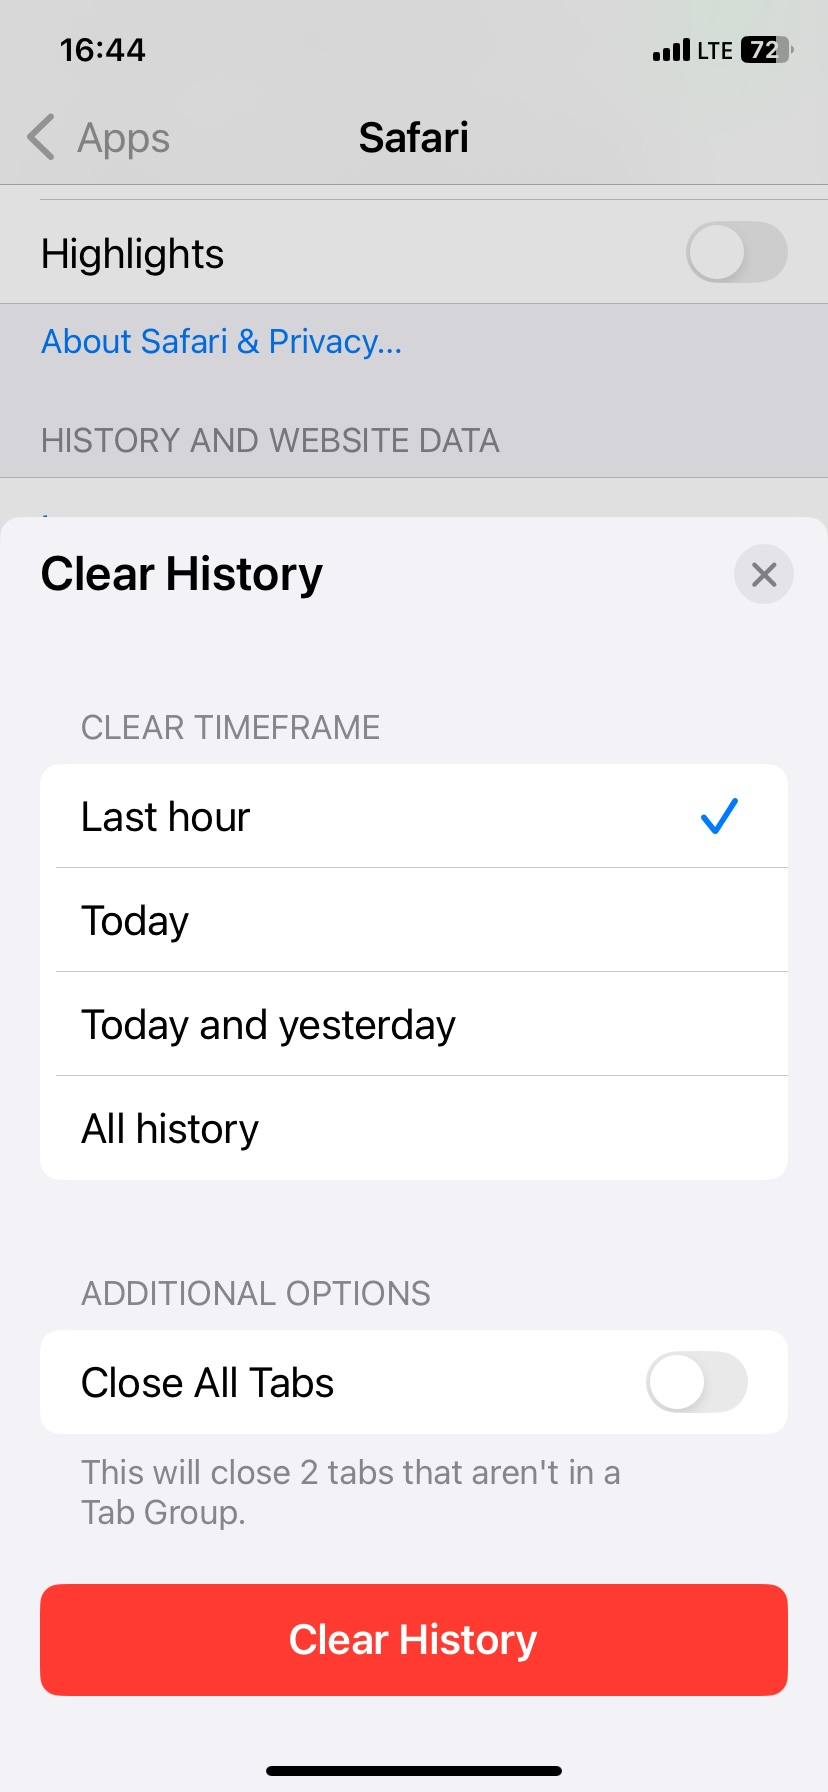
- Confirm your decision to clear Safari data.
Method 6: Adjust Your Date & Time
As bizarre as it sounds, manipulating the time settings can help resolve the annoying issue where your iPhone storage keeps getting full after deleting photos. As explained by this post on r/Apple, this method essentially tricks your iPhone into performing a storage clean-up, including that iCloud Photo Library that just won’t let go of deleted pictures.
Follow these steps to adjust your iOS date & time settings:
- Open the Settings app on your iPhone.
- Tap on General.
- Navigate to Date & Time.
- Toggle off the Set Automatically option. This will allow you to manually adjust the date and time.
- Set the date to 14 days into the future.
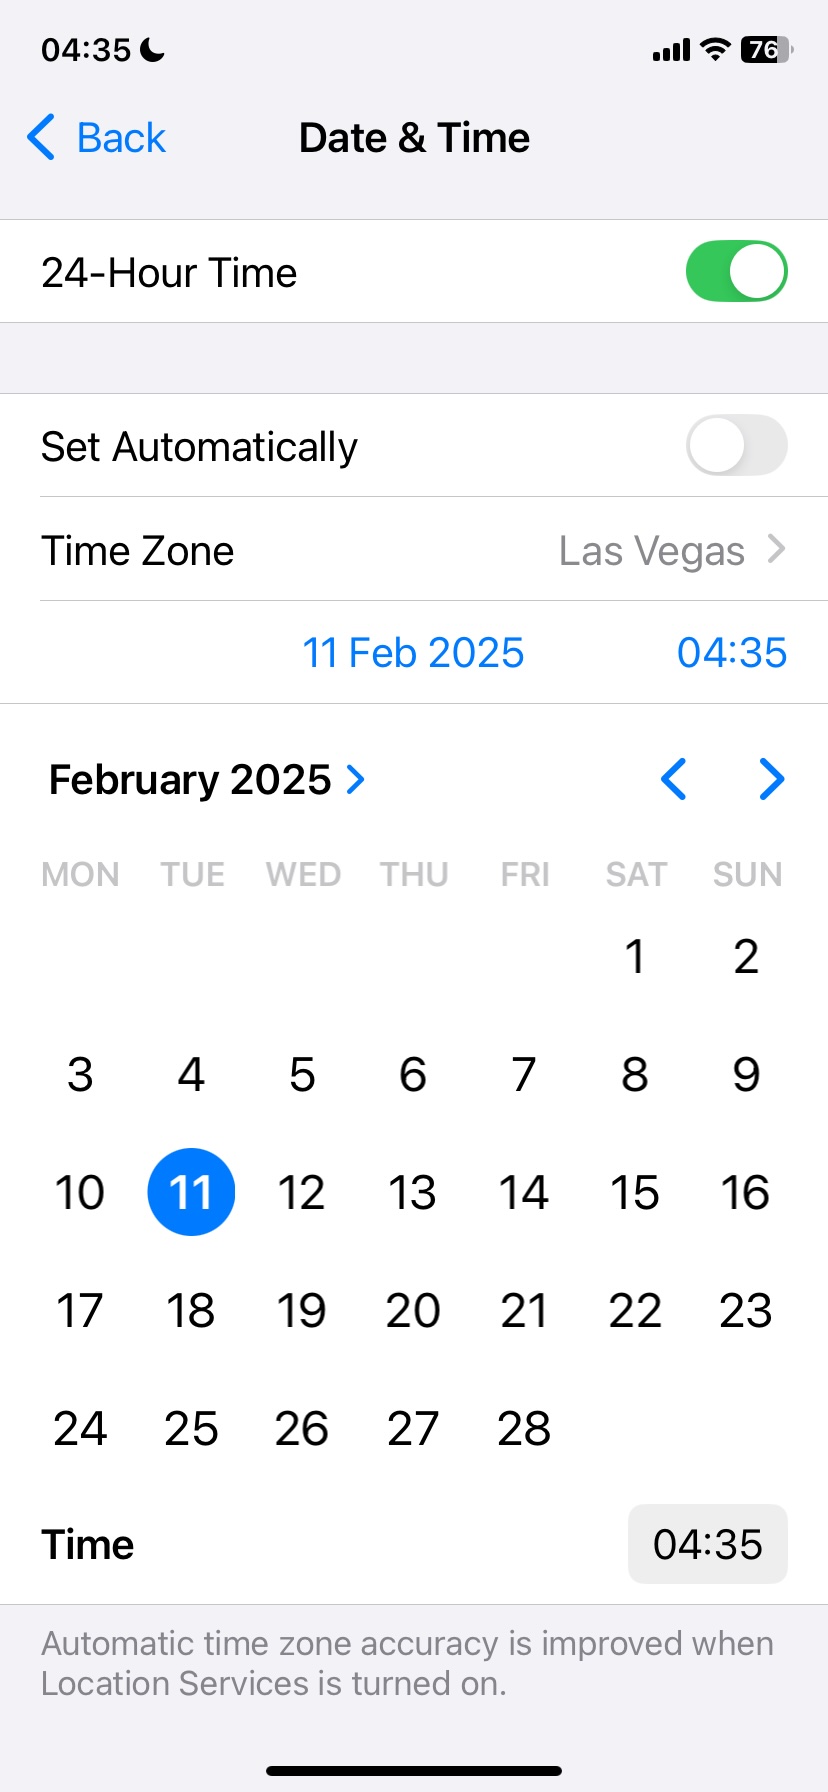
- Wait for a bit and then go to check your Storage & iCloud Usage. Do this multiple times to ensure that the clean-up has indeed taken place.
- Revert back to the current date once you’re satisfied that some storage has been freed up. To do this, simply toggle on the Set Automatically option again in the Date & Time settings.
Important: Setting your iPhone’s date and time to the future can interfere with how certain applications function. You may find that some apps don’t work correctly or don’t work at all. So don’t forget to revert to the correct date and time settings once you have confirmed that storage has been cleared.
Method 7: Restart Your iPhone
Restarting your iPhone can do wonders for solving issues you never thought were related to a simple reboot. So, why does it work for the iPhone storage keeps getting full after deleting photos problem? Because it clears the system’s cache and shuts down all running applications. As such, this simple action can correct minor software glitches that could be causing your iPhone storage to show as full, even when it shouldn’t be.
If you haven’t restarted your iPhone in a while, here’s a quick reminder on how to do it using the settings:
- Launch the Settings app on your device.
- Navigate to the General section.
- Scroll all the way down and tap the Shut Down button.
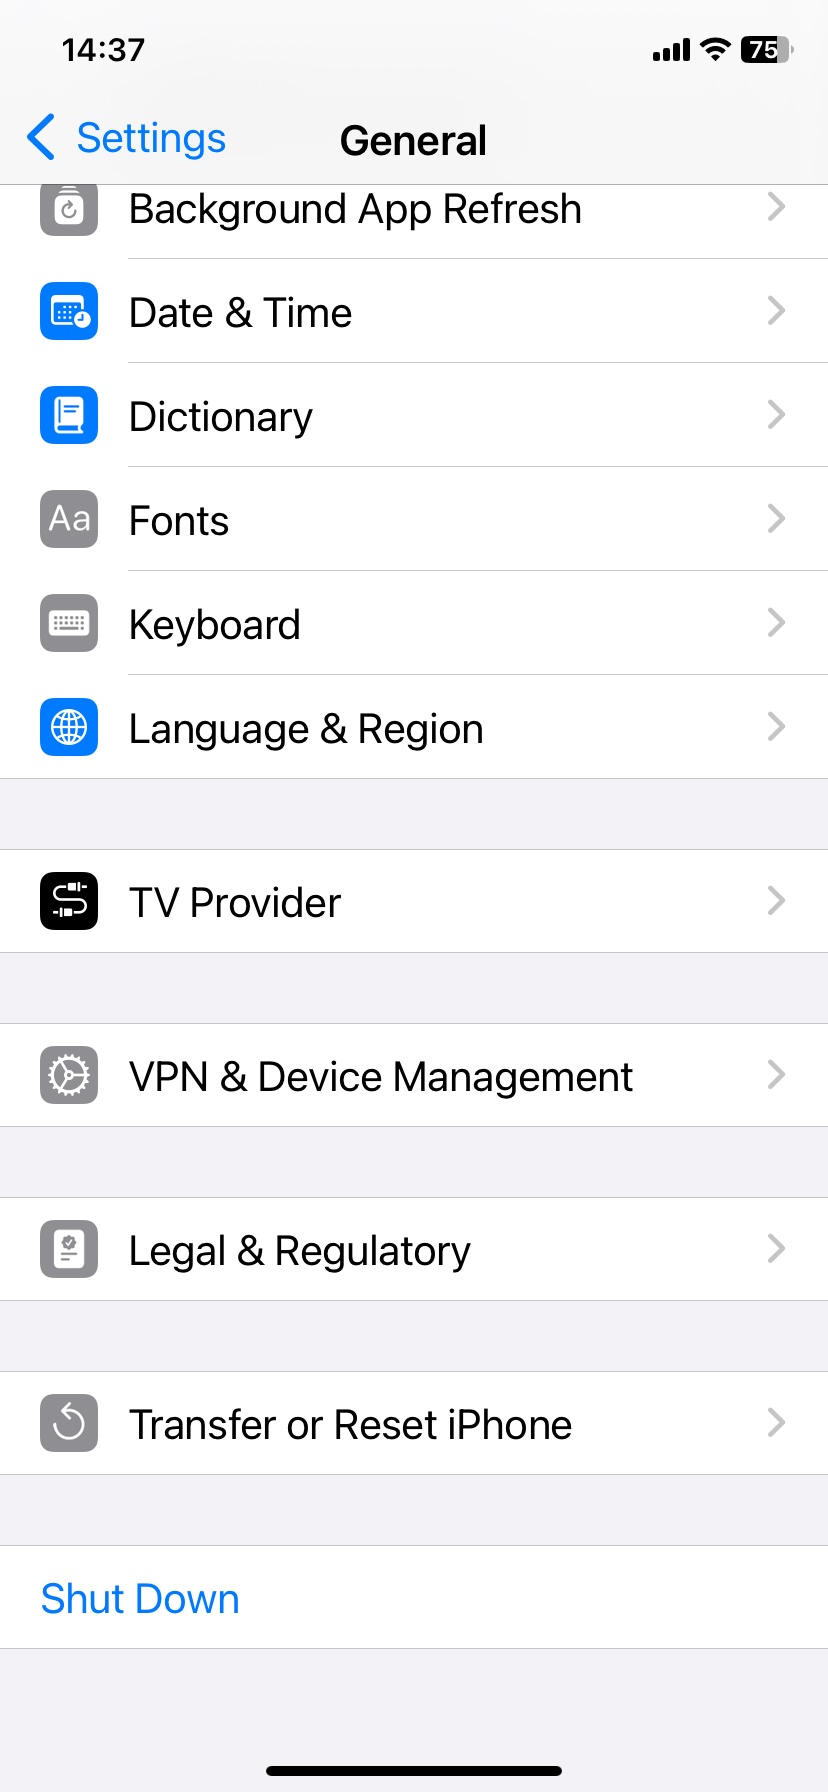
- Swipe the slider to power off the device.

- Hold the power button for at least 15 seconds or until the Apple logo appears on the screen to turn your iPhone back on.
Tip: Alternatively, you can restart your iPhone using the hardware buttons. The process varies depending on your iPhone model, but you can find specific instructions on how to do so on Apple’s official support page.
Method 8: Perform a Factory Reset
This method is for particularly stubborn cases. If your iPhone storage is still full after trying everything else, a factory reset might be the only solution. But before going through with it, check the other storage-reclaiming tips in the Final Tips section—you might be able to free up space in other ways. Only use this method if you’ve exhausted all other possibilities.
If none of the previous methods worked, a factory reset might be the only way to fix your storage issue. We’ve seen cases where storage errors, lingering files, or unpatched iOS glitches caused the issue, and a reset was the only thing that actually freed up space.
Resetting your iPhone erases everything—photos, apps, settings, and cached system data—essentially a fresh start. So don’t forget to back up anything you don’t want to lose.
Here’s how to “factory reset” your iPhone:
- Back up your data to iCloud or a computer.
- Open Settings and go to General.
- Tap Transfer or Reset iPhone.
- Select Erase All Content and Settings.
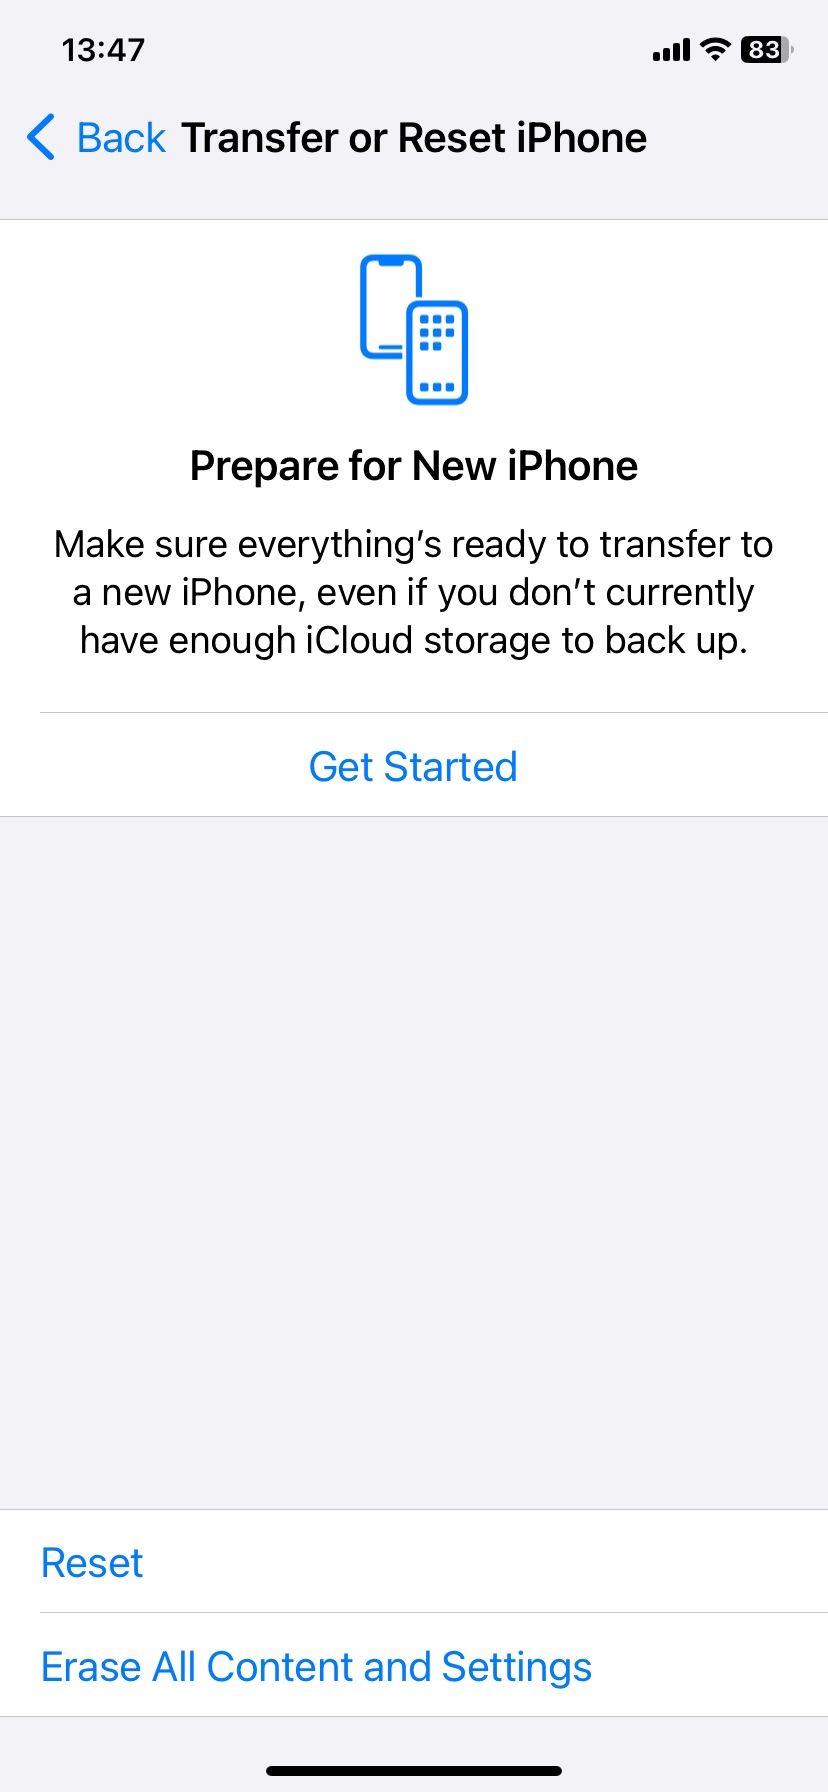
- Enter your passcode if prompted and confirm the reset.
- Wait for the process to complete—your iPhone will restart.
- Set up your iPhone again, either restoring from a backup or setting it up as new.
Tip: Make sure your iPhone has enough battery (at least 50%) or keep it plugged in during the reset to avoid interruptions.
Final Tips
If you scrolled straight to the end and saw that the final solution for an iPhone still showing full storage after deleting photos is a “Factory Reset,” don’t panic! A factory reset is rarely necessary—there are plenty of other ways to free up space before taking such a drastic step.
First of all, Photos aren’t the only thing filling up your storage. Yes, they’re usually the biggest offender, along with apps and their stored data, but there are other places that, when combined, can still waste a lot of free space unnecessarily. We won’t repeat ourselves about apps—you can check out our detailed guide on app data here. But aside from photos and apps, there are several other areas worth a look.
Here’s a list of hidden storage hogs and step-by-step guides on how to clear them:
- Junk files – System junk, failed downloads, and other clutter can add up. Here’s how to remove it: Clean Junk Files on iPhone
- Documents & Data – Some apps hold onto unnecessary files that eat up storage. Find out how to delete them: Delete Documents and Data on iPhone
- Temporary files – These files are meant to be removed automatically, but sometimes they stick around. Clear them manually: Clear Temporary Files on iPhone
- Downloaded files – PDFs, videos, and other downloads can take up more space than you think. See how to remove them: Delete Downloads on iPhone
FAQ
Why I have deleted all my photos but it still says storage full?
There are three main reasons for this issue: 1) Your photos may have moved to the Recently Deleted album and are still occupying space. 2) Your device could be storing cached data that hasn’t been cleared. 3) iCloud synchronization may be causing storage discrepancies between your device and the cloud storage.
Why is my storage not going down after deleting a lot of photos?
Your deleted photos might still be stored in the Recently Deleted album, which could be why you’re not seeing an immediate increase in available storage. To free up the storage space, you need to empty the Recently Deleted album.
Why do my photos keep coming back after I delete them from my iPhone?
iCloud synchronization might be to blame. When iCloud Photos is turned on, it syncs your images across all connected devices. Deleting a photo from your iPhone may not remove it from iCloud, causing the photo to reappear on your device.
This article was written by David Morelo, a Staff Writer at Handy Recovery Advisor. It was recently updated by Roman Demian.
Curious about our content creation process? Take a look at our Editor Guidelines.