Have you accidentally deleted files from your Lexar card? Deleted them intentionally but then changed your mind? Formatted the card? Or maybe you just can’t access the files anymore? Although Lexar SD and CF cards are popular choices among photographers, videographers, and other professionals who need reliable data storage, you still run the risk of losing your data due to the issues described above. Fortunately, data recovery from Lexar memory cards is often achievable without professional help.
In this article, we’ll explain how to recover lost files from Lexar memory cards using trusted tools. We’ll also share essential steps to improve your chances of a successful recovery and offer alternative methods for situations where software tools aren’t enough. We’ve tested the methods below and can confirm they work. Even in its earlier versions, this article has already helped hundreds of people with Lexar SD card recovery, and with the latest update, we’ve made it even better.
Is There A Way to Recover a Lexar SD Card?
The answer to this question is complicated as it entirely depends on the reason for the data loss and the type of damage sustained by your Lexar SD card. Let’s look at a few scenarios to see if it would be possible to perform Lexar card recovery.
- ⚠️ Accidental Deletion: When a file is deleted, it does not magically disappear. Instead, your operating system marks its address as empty so that new data can be stored in the same position on the drive. Unless that address is overwritten, it is entirely possible to recover deleted files from SD card. However, writing is not a linear process, as any new data introduced to your storage unit will be divided into chunks, and there is no way to tell where that chunk will be stored. Hence, it is recommended to recover accidentally deleted files as quickly as possible before it gets overwritten.
- ⛔ Formatted SD Card: There are two ways to format any storage drive, including a Lexar SD card, namely quick format and deep format. While it is tough to recover files from an SD card that has been deep formatted, you can easily recover your files from your SD card if you have put it through a ‘quick format.’ It can be done by using data recovery software such as Disk Drill, without needing a professional background.
- 👾 Corrupted SD Card: If you’re unable to access your Lexar SD card and encounter error messages like “You need to format the disk before you can use it” or “The file or directory is corrupted and unreadable,” you might still be able to recover your data. These errors often indicate logical corruption, which means the file system is damaged, but your files may still be intact. In such cases, it is recommended to create a byte-to-byte copy (disk image) of the card. This method protects the existing data and the memory card from further damage because the recovery software scans the disk image instead of the physical card. A byte-to-byte copy bypasses errors and issues associated with the corrupted card and increases the likelihood of successful data recovery using specialized software. Even though it may sound hectic and technical, you can easily recover files from a corrupted SD card by using third-party data recovery software at home.
- 🚫 Damaged SD Card: Physical damage to an SD card, such as cracks, bent connectors, or signs of wear, must be handled carefully. Attempting DIY recovery in these situations can worsen the damage. It is advisable to contact an SD card recovery service to assess and potentially recover data from a physically damaged card.
How You Can Increase Lexar Memory Card Recovery Chances
To maximize the likelihood of successful data recovery from your Lexar memory card, consider the following steps:
- If you continue to use the card after data loss, you risk overwriting the sectors where your lost data resides. This action makes recovery impossible. Remove the card from your device to prevent any further write operations.
- Although you might feel inclined to fix the memory card yourself, attempts on physical repairs can cause further damage. It is advisable to leave physical repairs to professionals who possess the proper equipment and expertise.
- If the system prompts you to format the card due to corruption, avoid proceeding with the format. Formatting will erase your data and decrease the chances of successful recovery.
- Now that you are aware of the risks, use specialized software to create a sector-by-sector copy of the memory card. This disk image allows you to work on the copy rather than the original card, preserve its current state and prevent further potential damage during recovery attempts. We will provide detailed instructions on how to do this in the next section.
How to Recover Data From a Lexar SD Card
Once you have identified the source of your problem and weighed your chances of recovering your data, you can move on to particular data recovery steps. We will demonstrate how this can be done using different data recovery software that focus on specific tasks.
Option A: Disk Drill
Disk Drill is a freemium data recovery software that is well-renowned for a multitude of reasons. But most importantly, it is easy to use and features an extremely simple-to-understand GUI that makes the tool ideal for casual users who do not have a background in data recovery.

What sets Disk Drill apart is its ability to recover a wide range of photo and video formats, including RAW files. This feature is particularly beneficial for Lexar memory card users involved in professional photography and videography. Furthermore, Disk Drill can scan and recover data from corrupted Lexar SD and CF memory cards that prompt you to format them or prevent access to your data. In such cases, it is recommended to create a byte-to-byte copy, as it allows you to recover your data safely without a risk of further damage to the original card.
Here’s how to use it to recover data from Lexar memory card:
- Download Disk Drill from the official website.
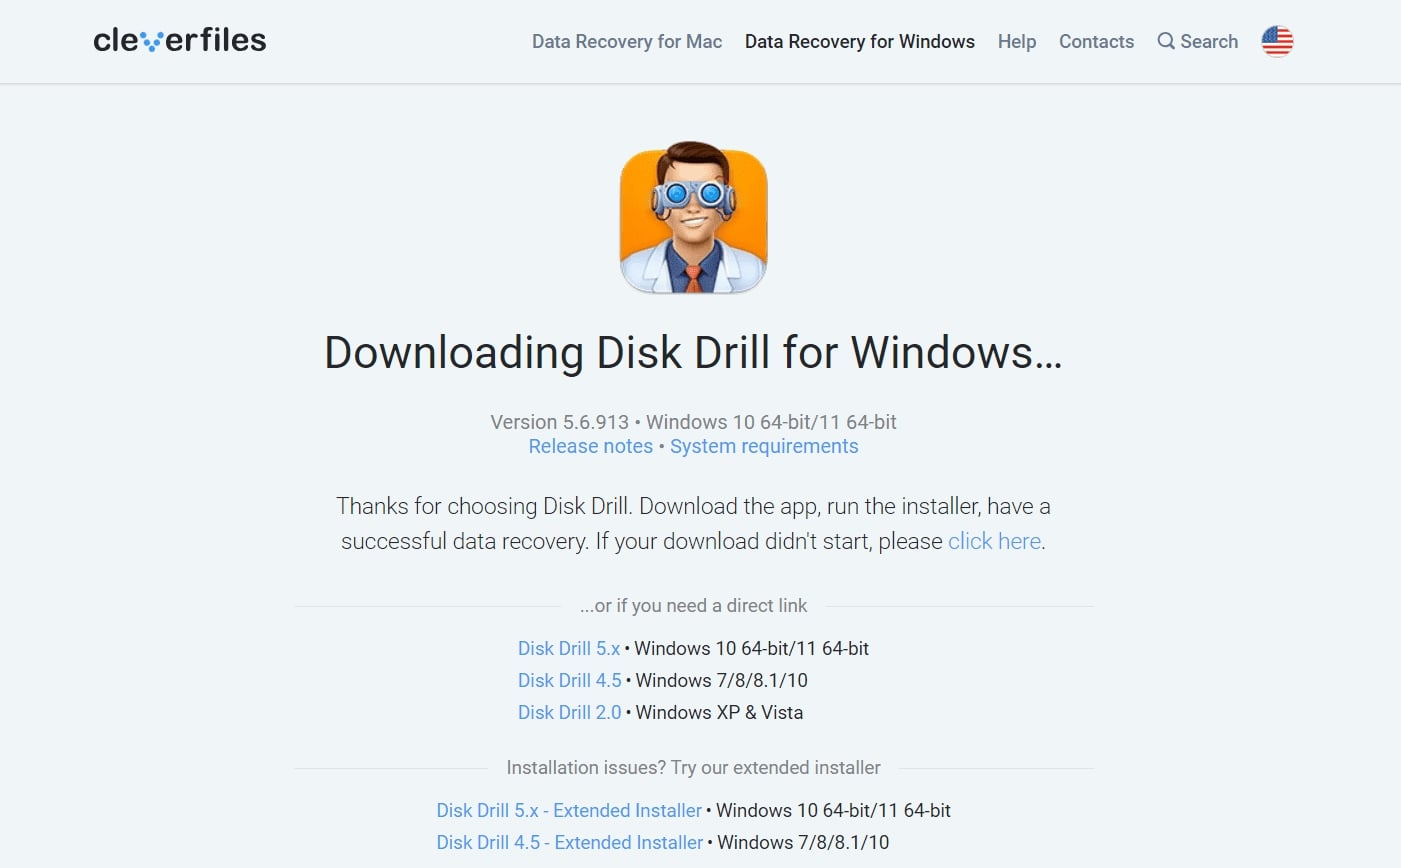
- Now, click on the Install button to begin the installation. Be patient, as this process may take a few moments.
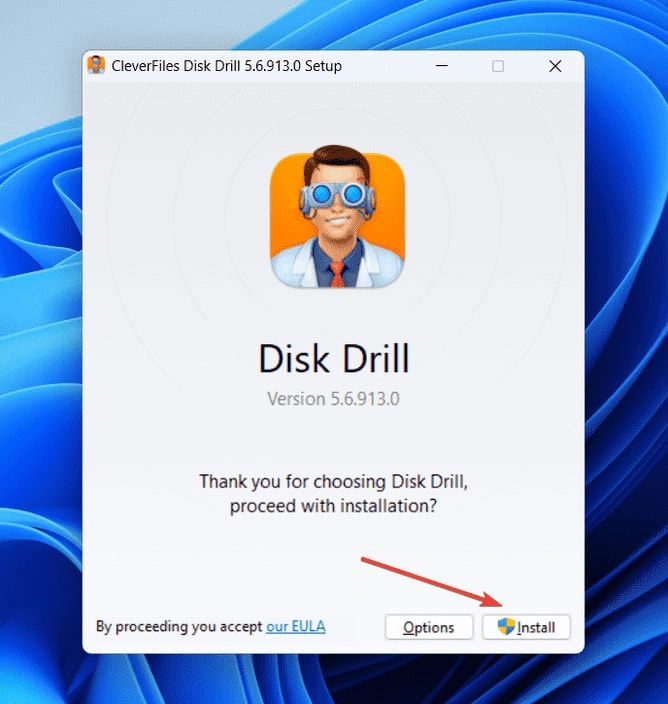
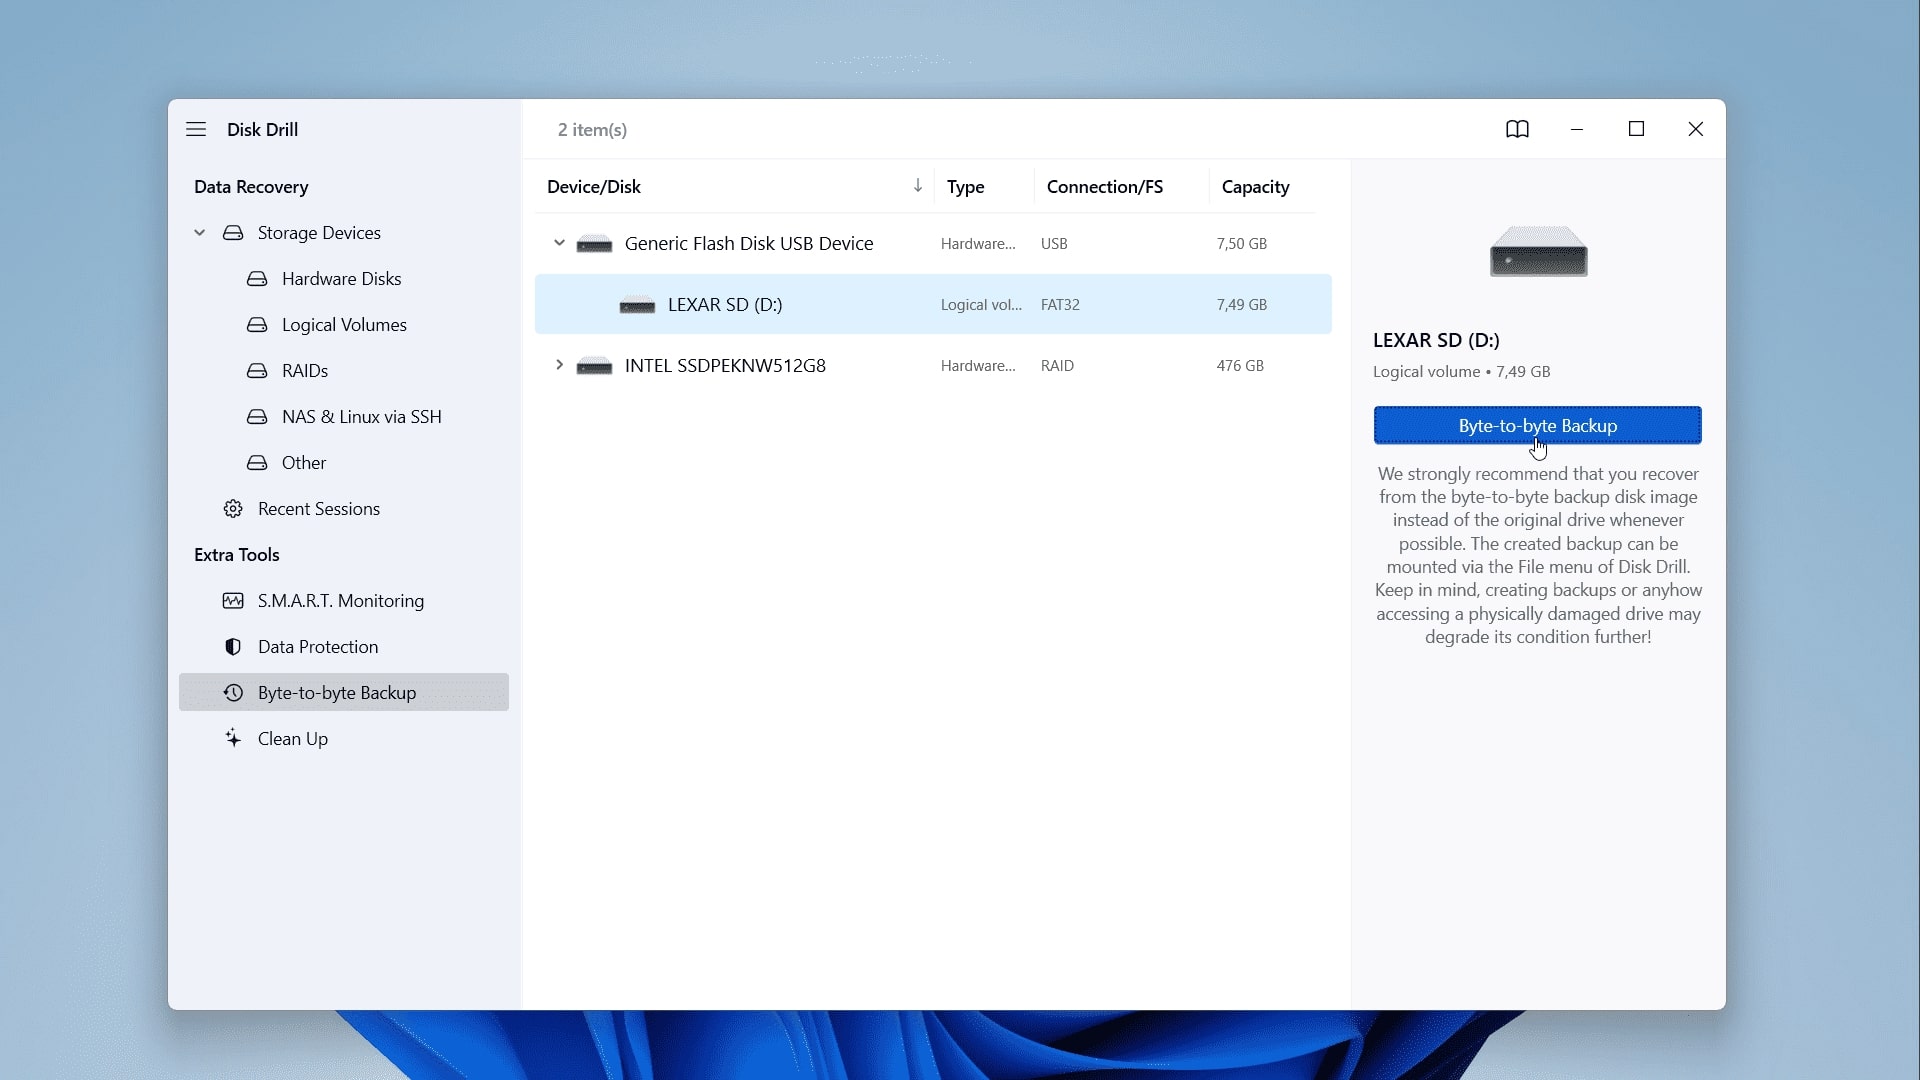
- Once you’re on the Disk Drill home screen, click on Byte-to-byte backup to continue.
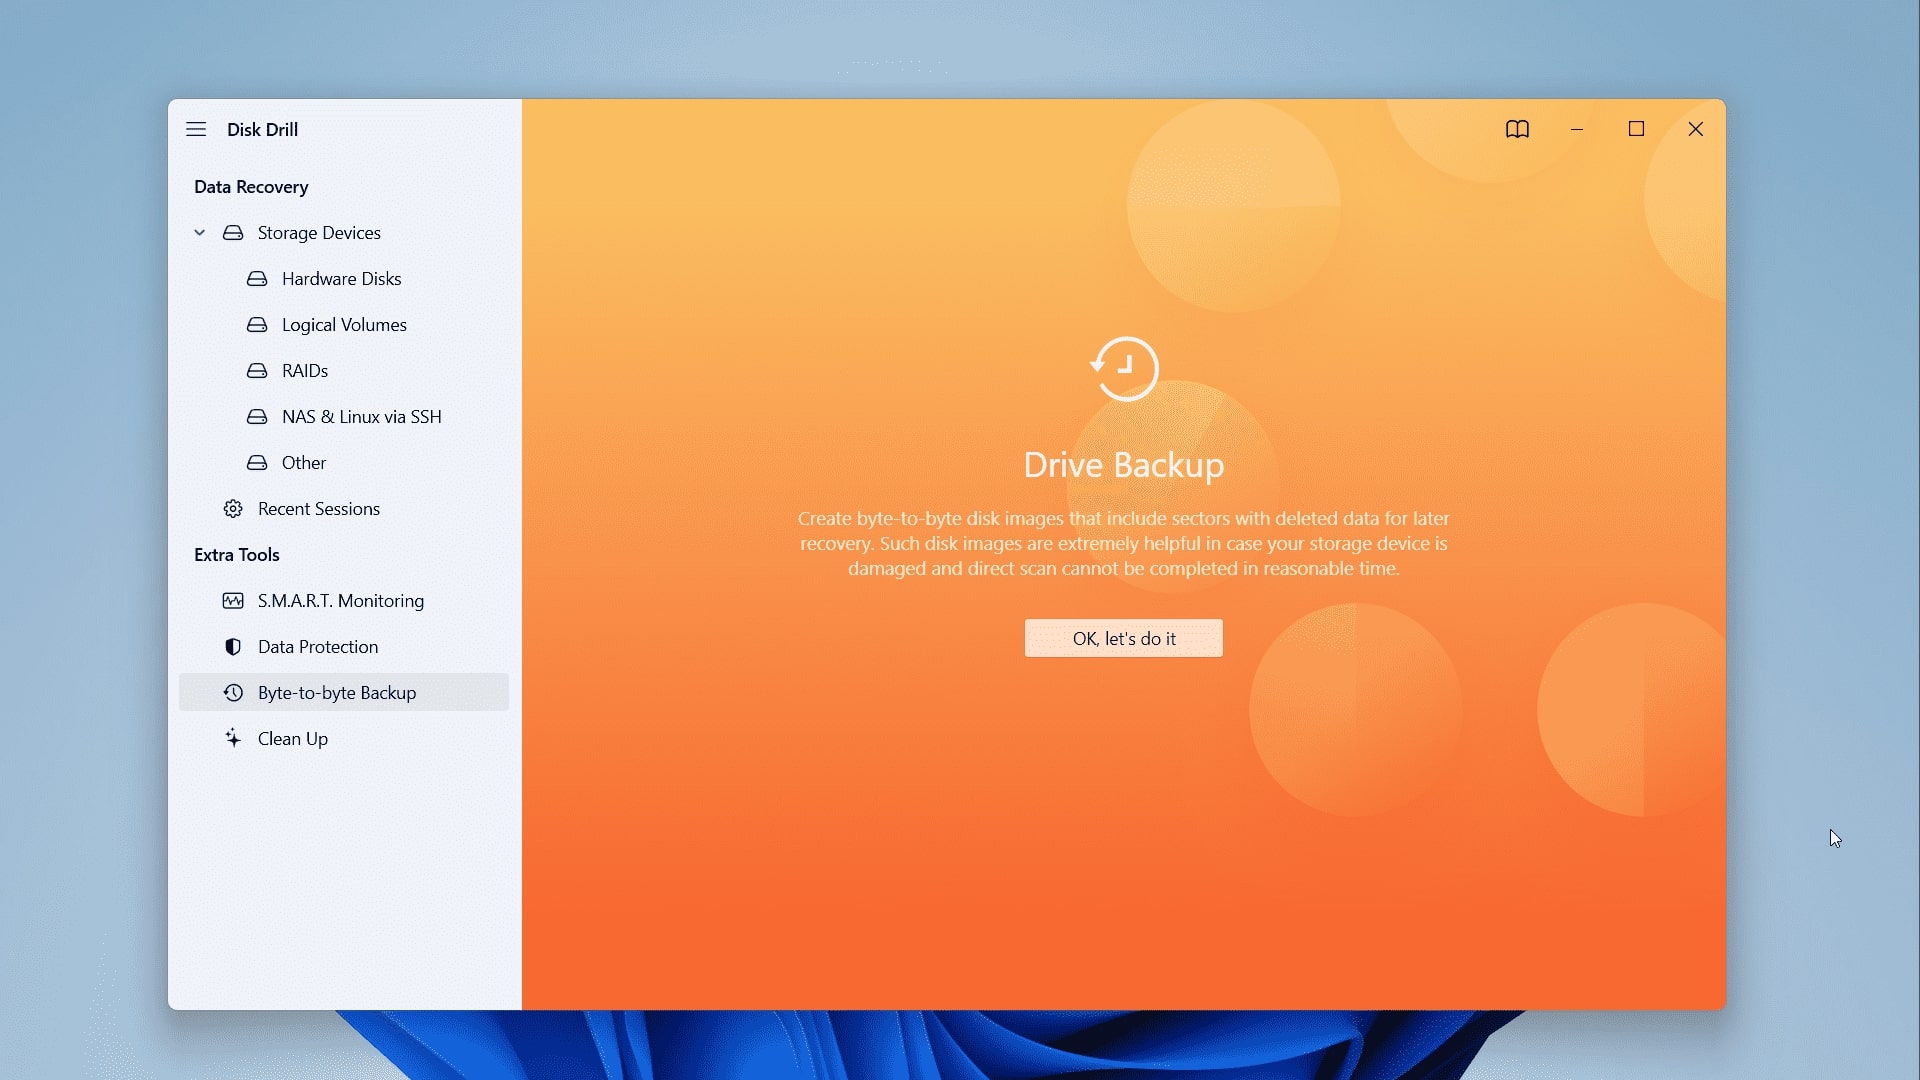
- Next, you’ll want to create an SD card backup before recovering data. Select your Lexar SD card from the list of available devices and click on Byte-to-byte backup.
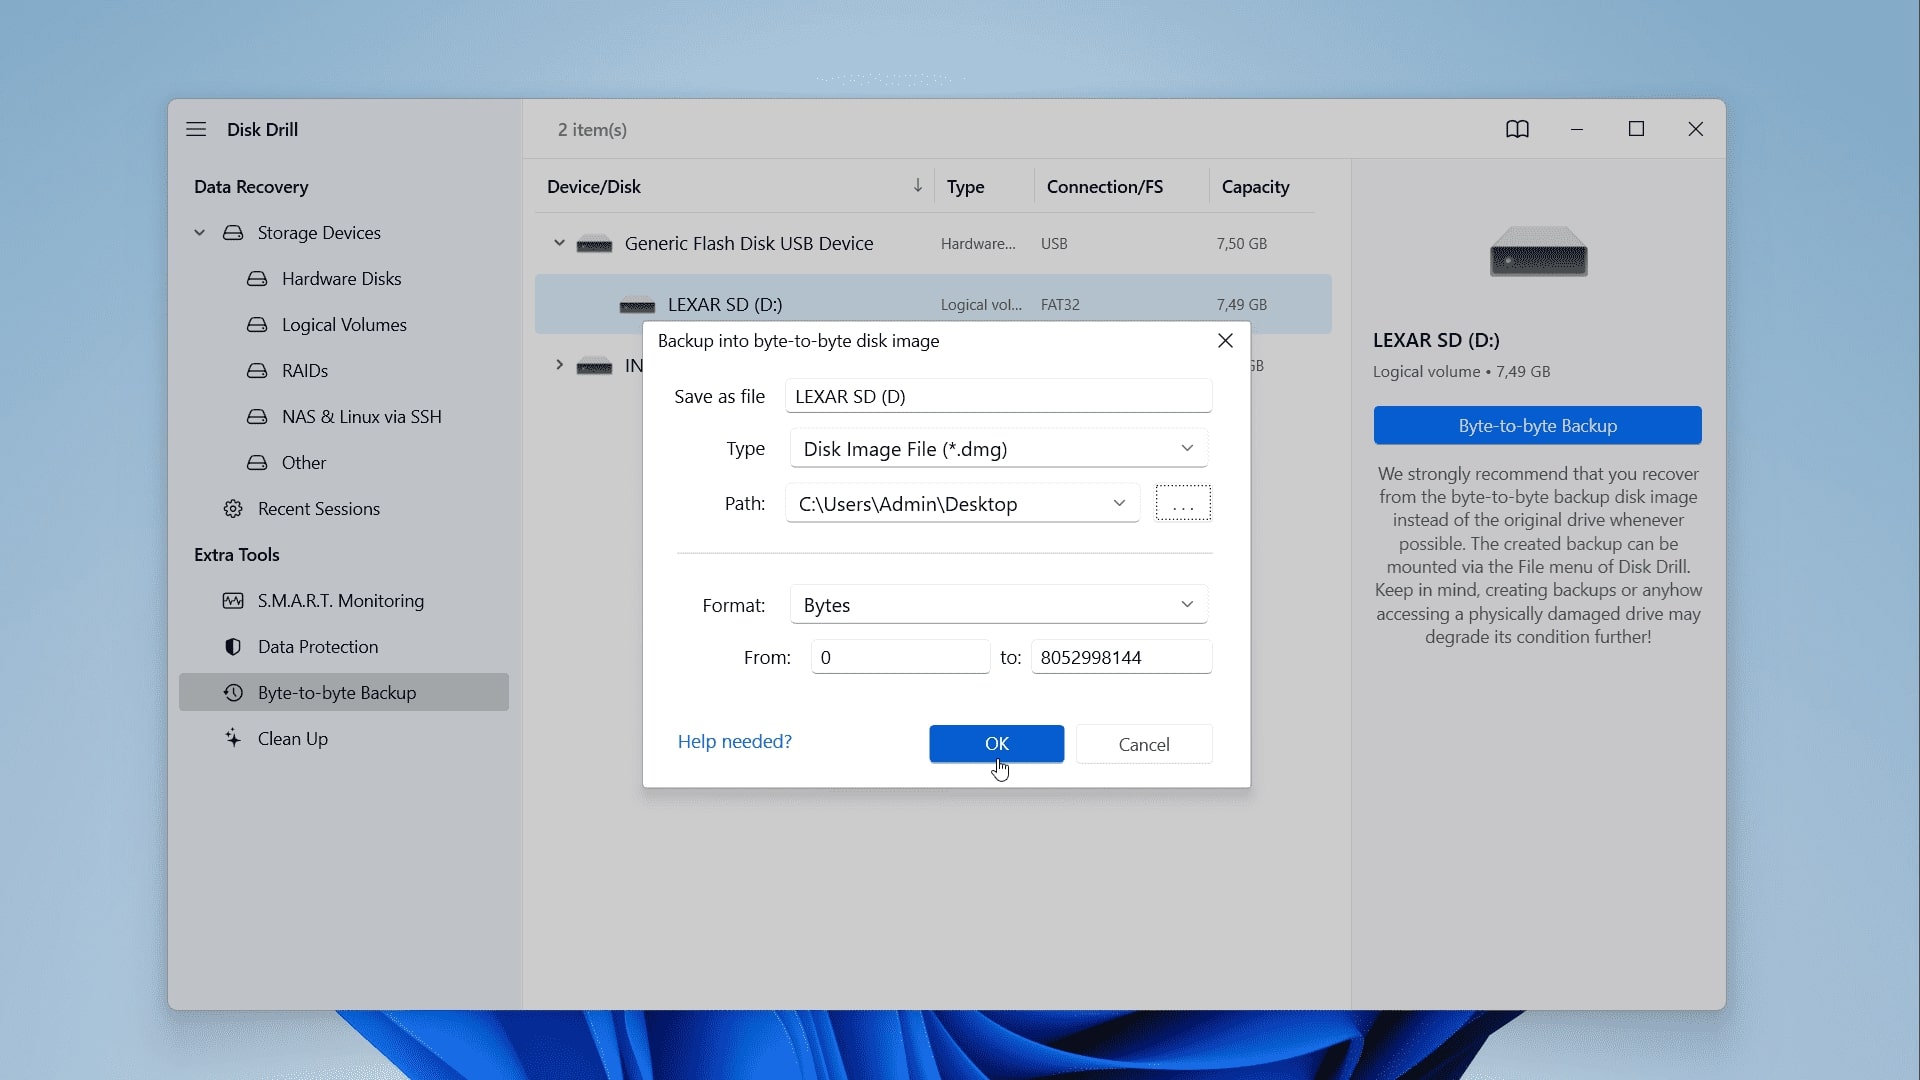
- A dialogue box will appear on your screen where you can rename the backup file, select file type and destination folder. Once you’re all set, click on OK to proceed.
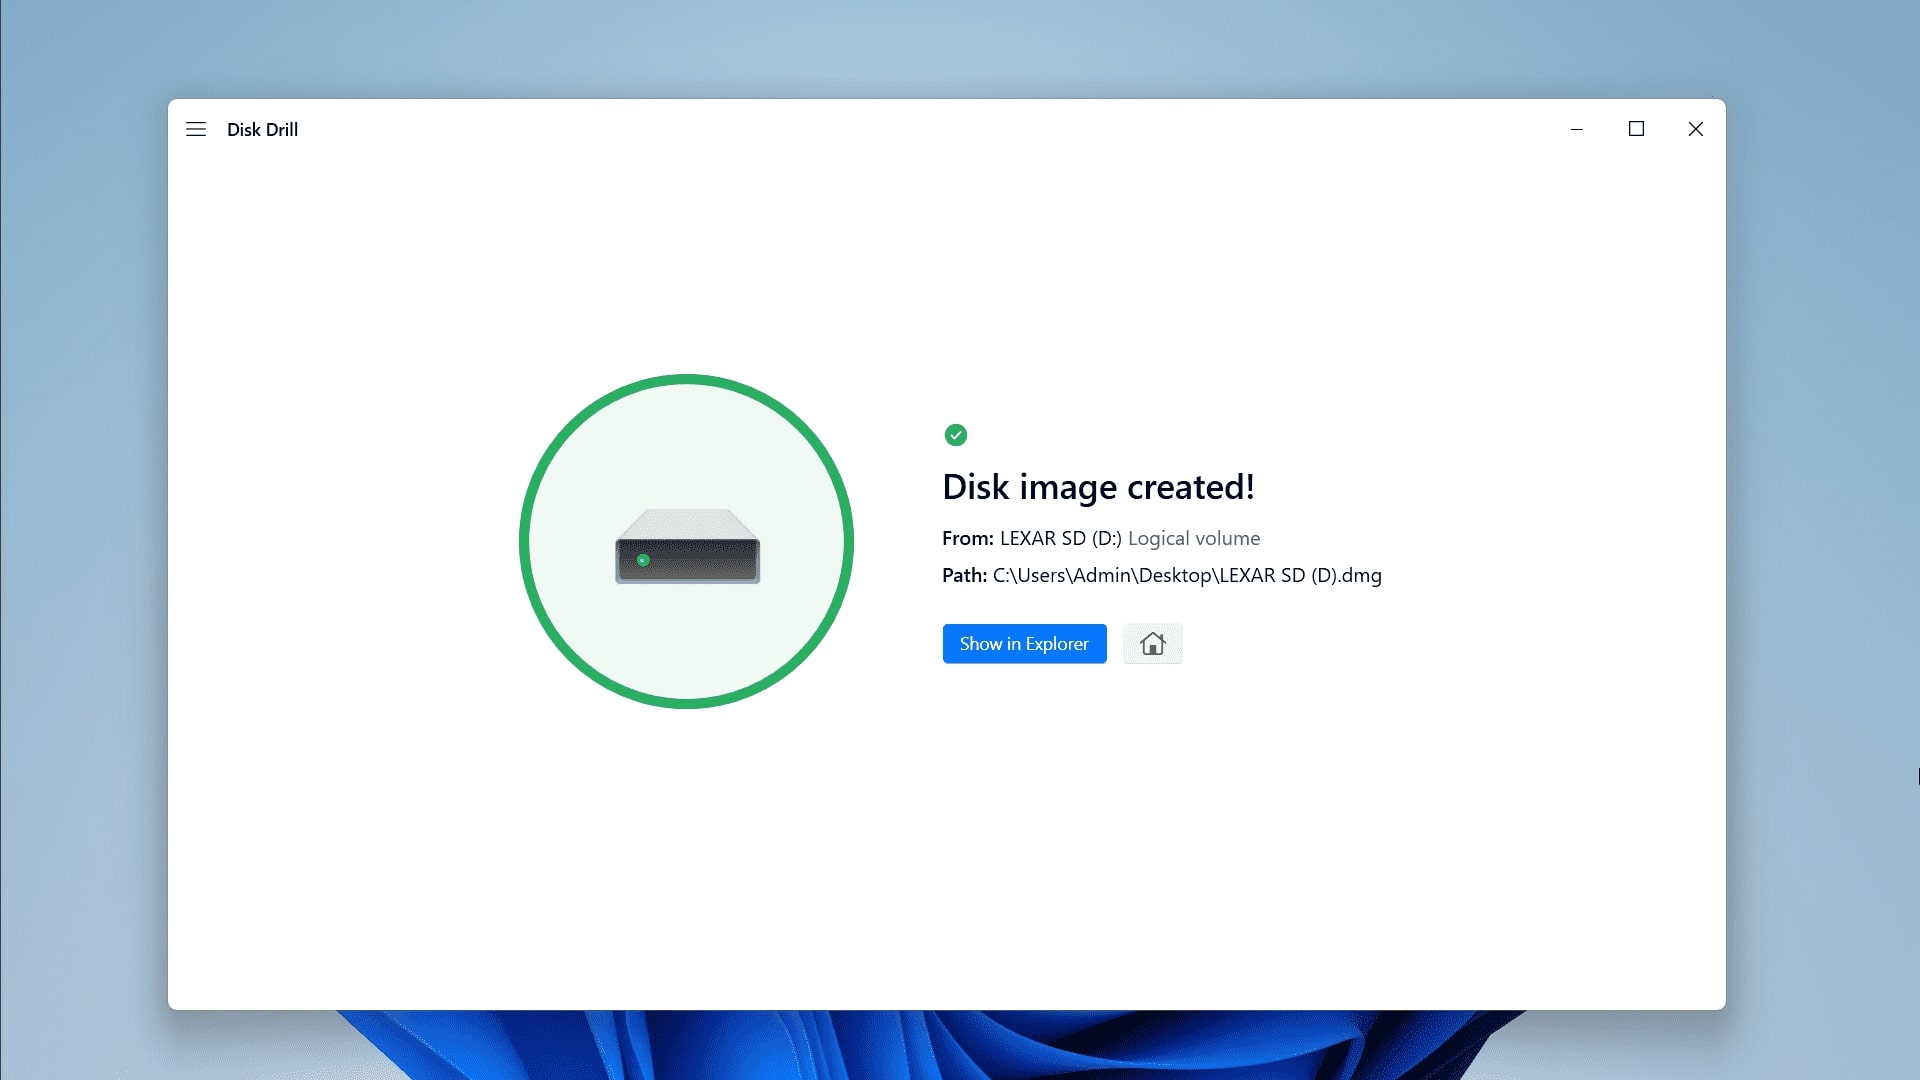
- Be patient as Disk Drill creates a backup of your Lexar SD card. The time may vary depending on the size of your drive.
- Once the process is complete, head to the destination folder where you saved the backup. You will find a folder with a .dmg extension.
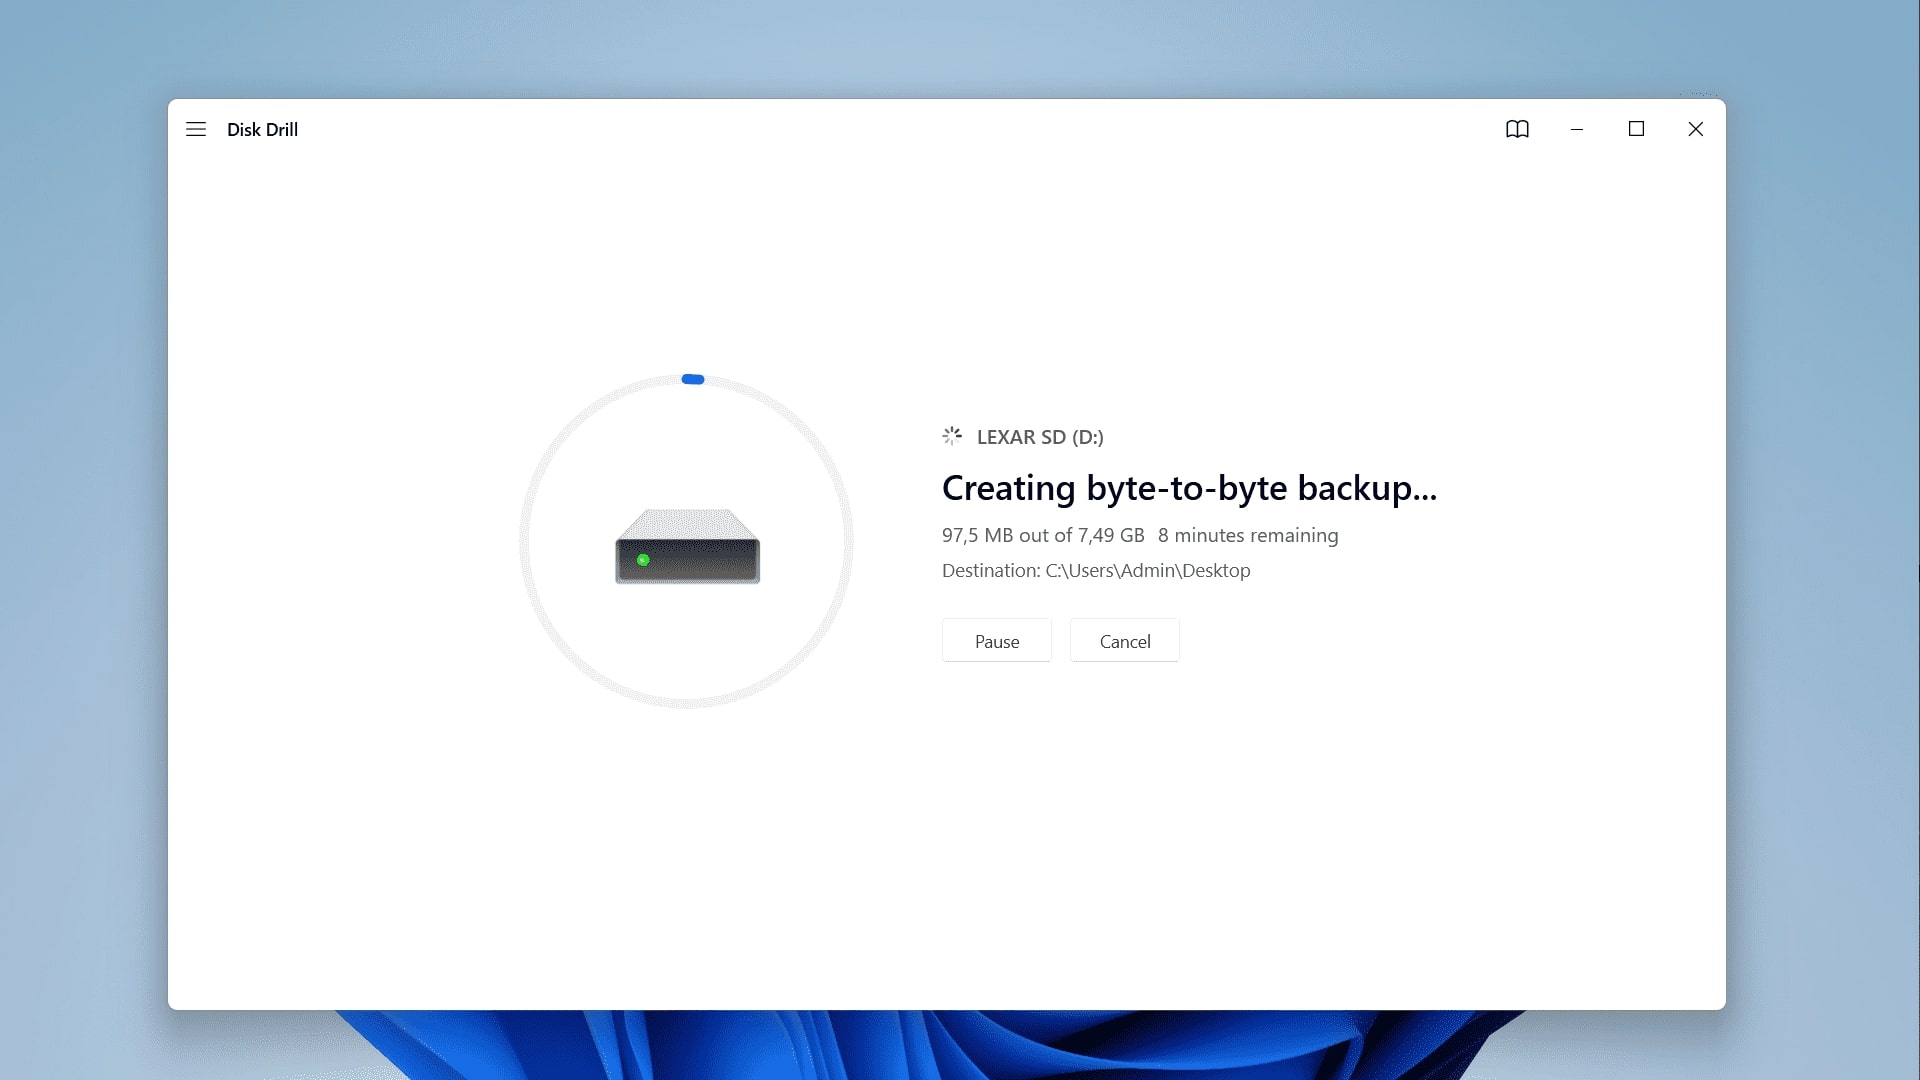
This folder is a byte-to-byte copy of your original drive, and you can interact with it as you would with a physical drive. Naturally, you can use this disk image for data recovery using Disk Drill.
- Now, go to the Disk Drill homepage and click on Storage devices on the left-hand side of your screen. Click on the ‘three-dot icon’ on the right-hand side of your screen, and select Attach disk image… and Open it.
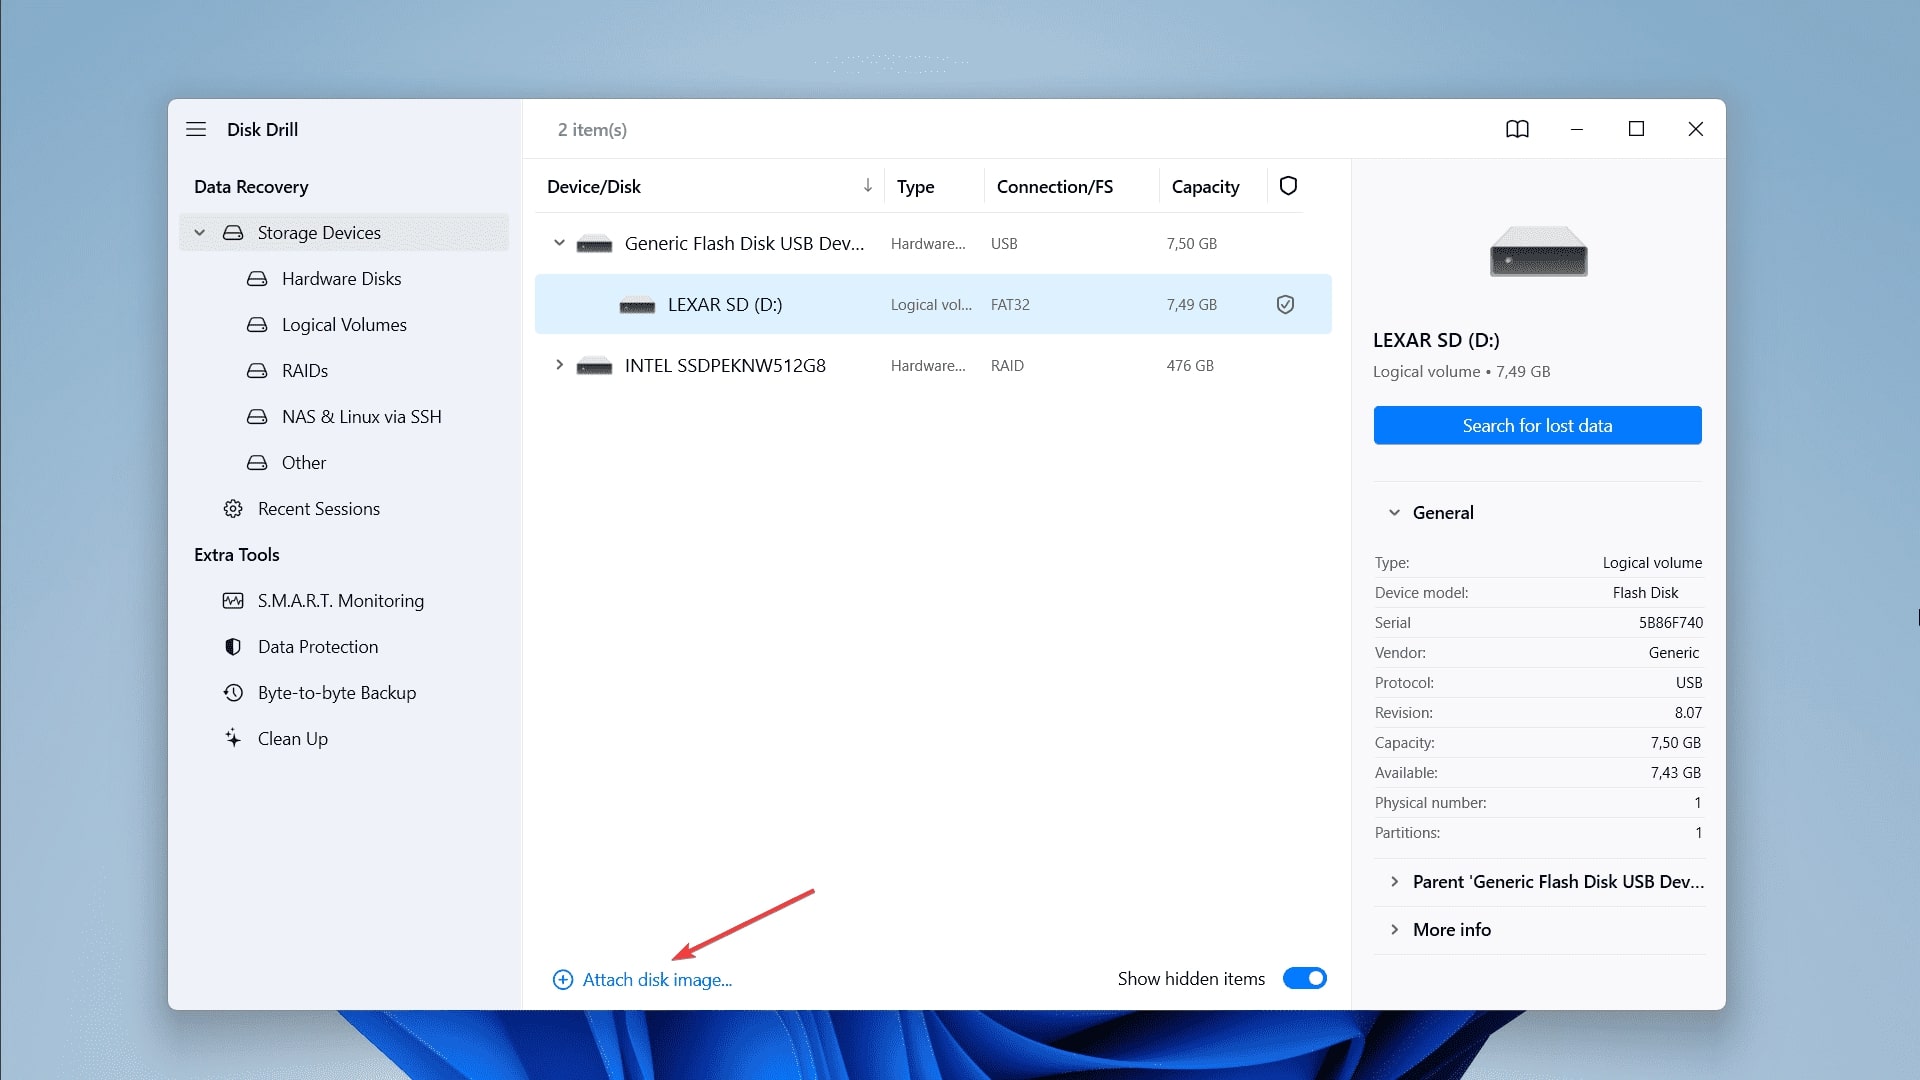
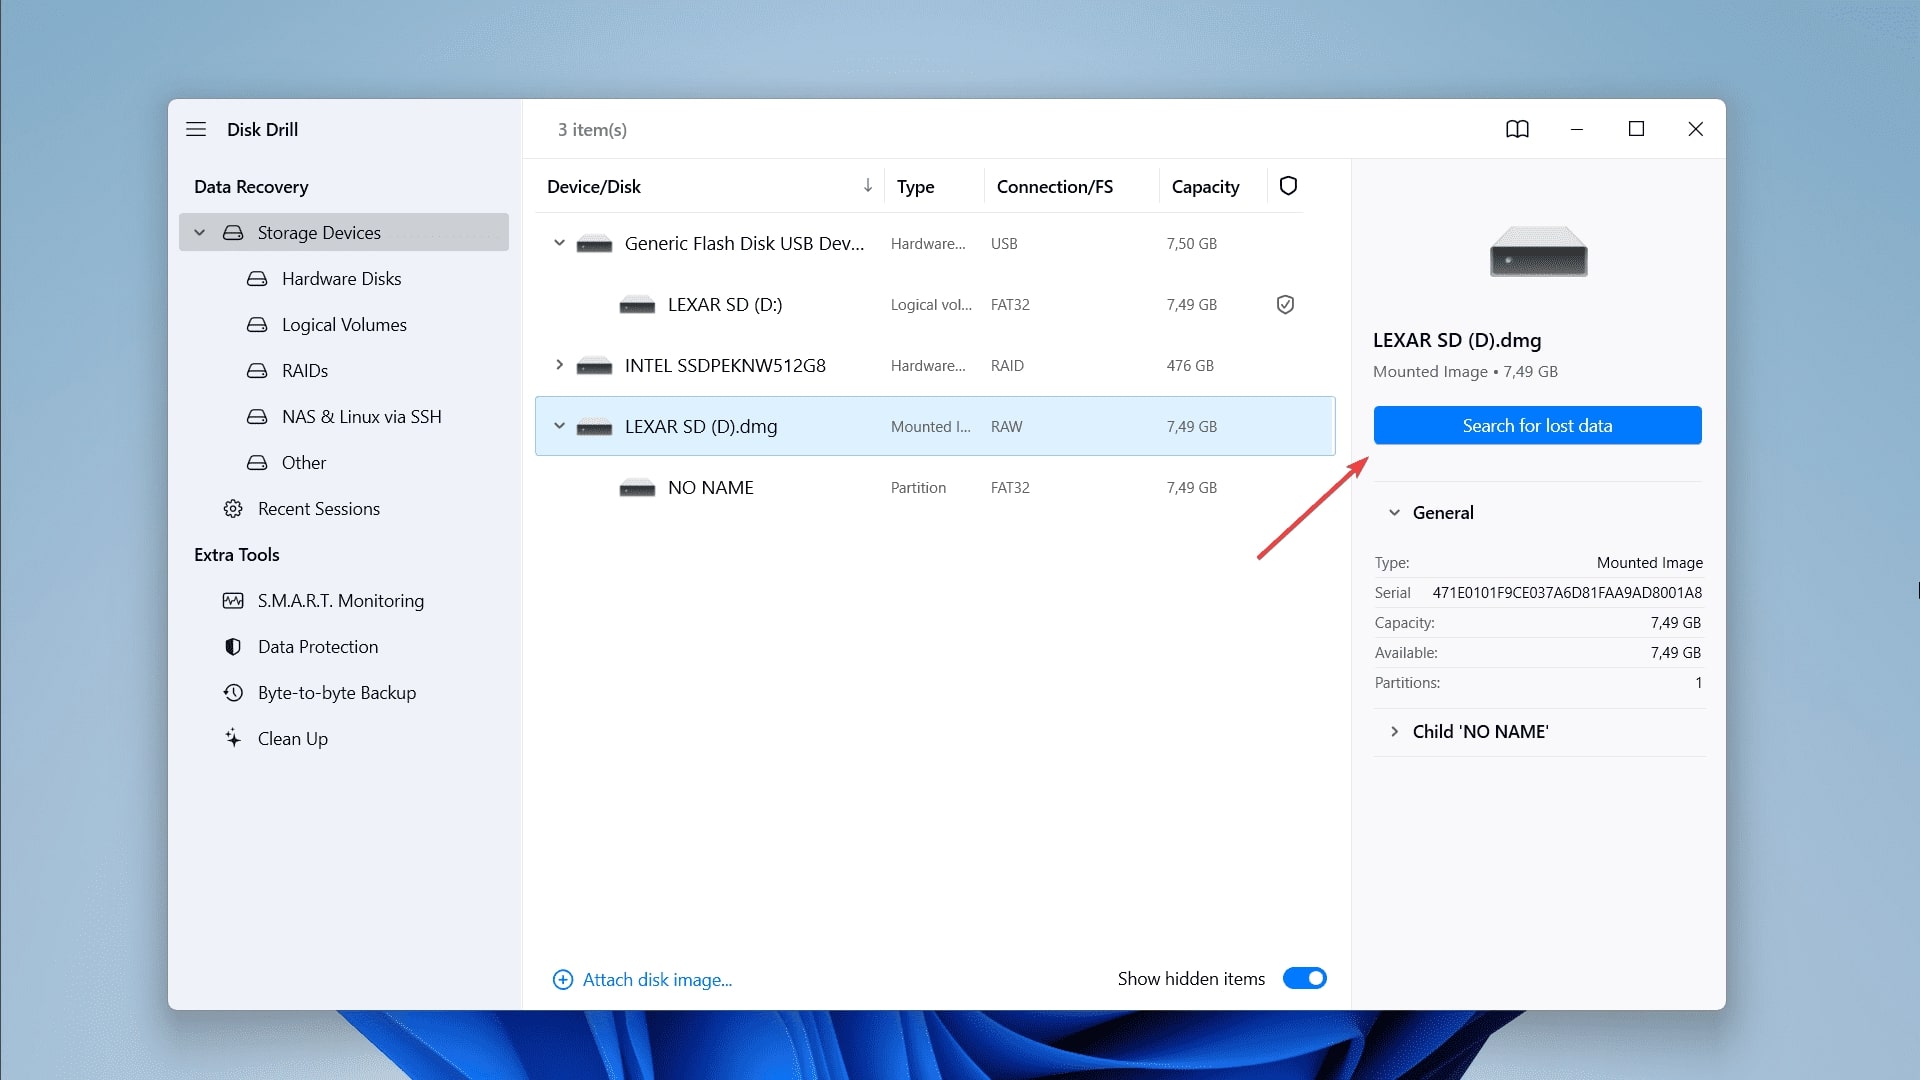
- Select your image of the Lexar SD card on the middle screen and click on Search for lost data button on the right to run a recovery process on the disk image.
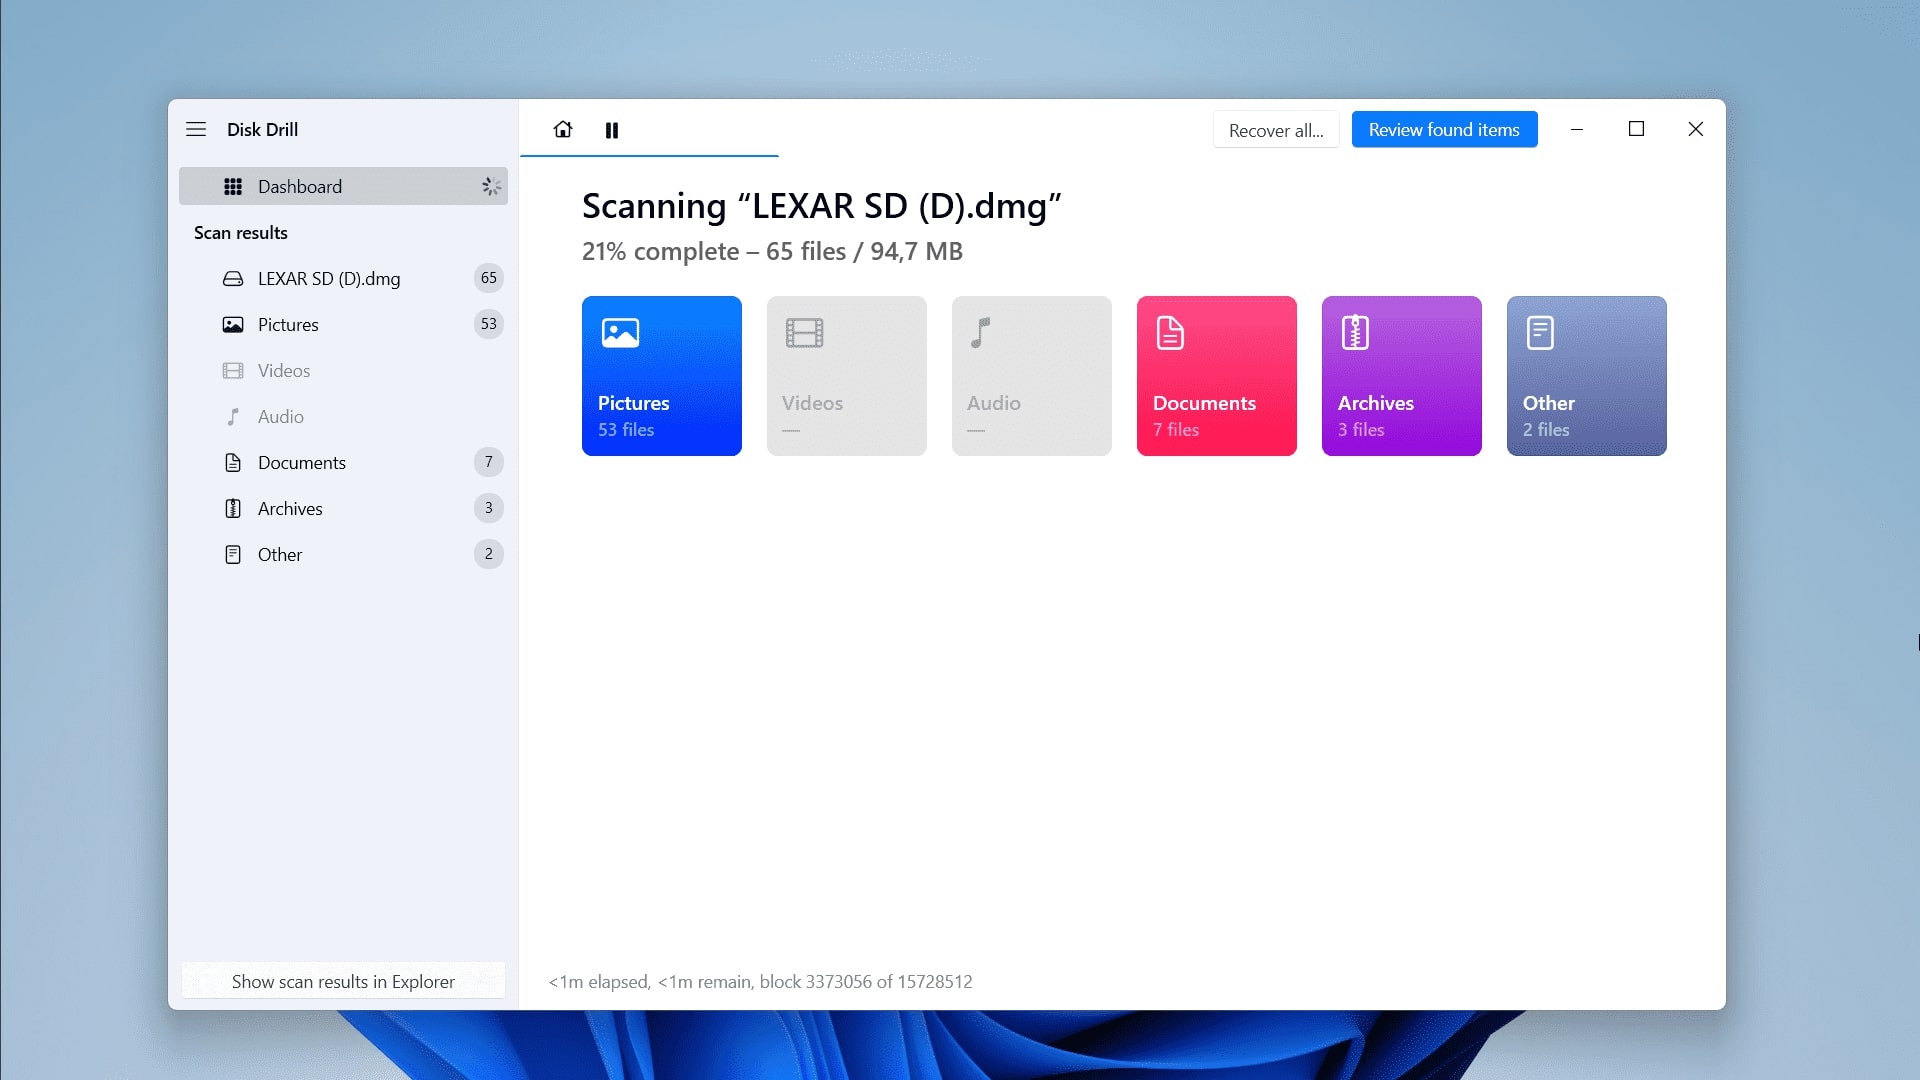
- Disk Drill will begin the scanning process. You will see like files begin to populate on the screen in the different categories. You can browse them in real-time, however, we suggest to wait till scanning process finishes.
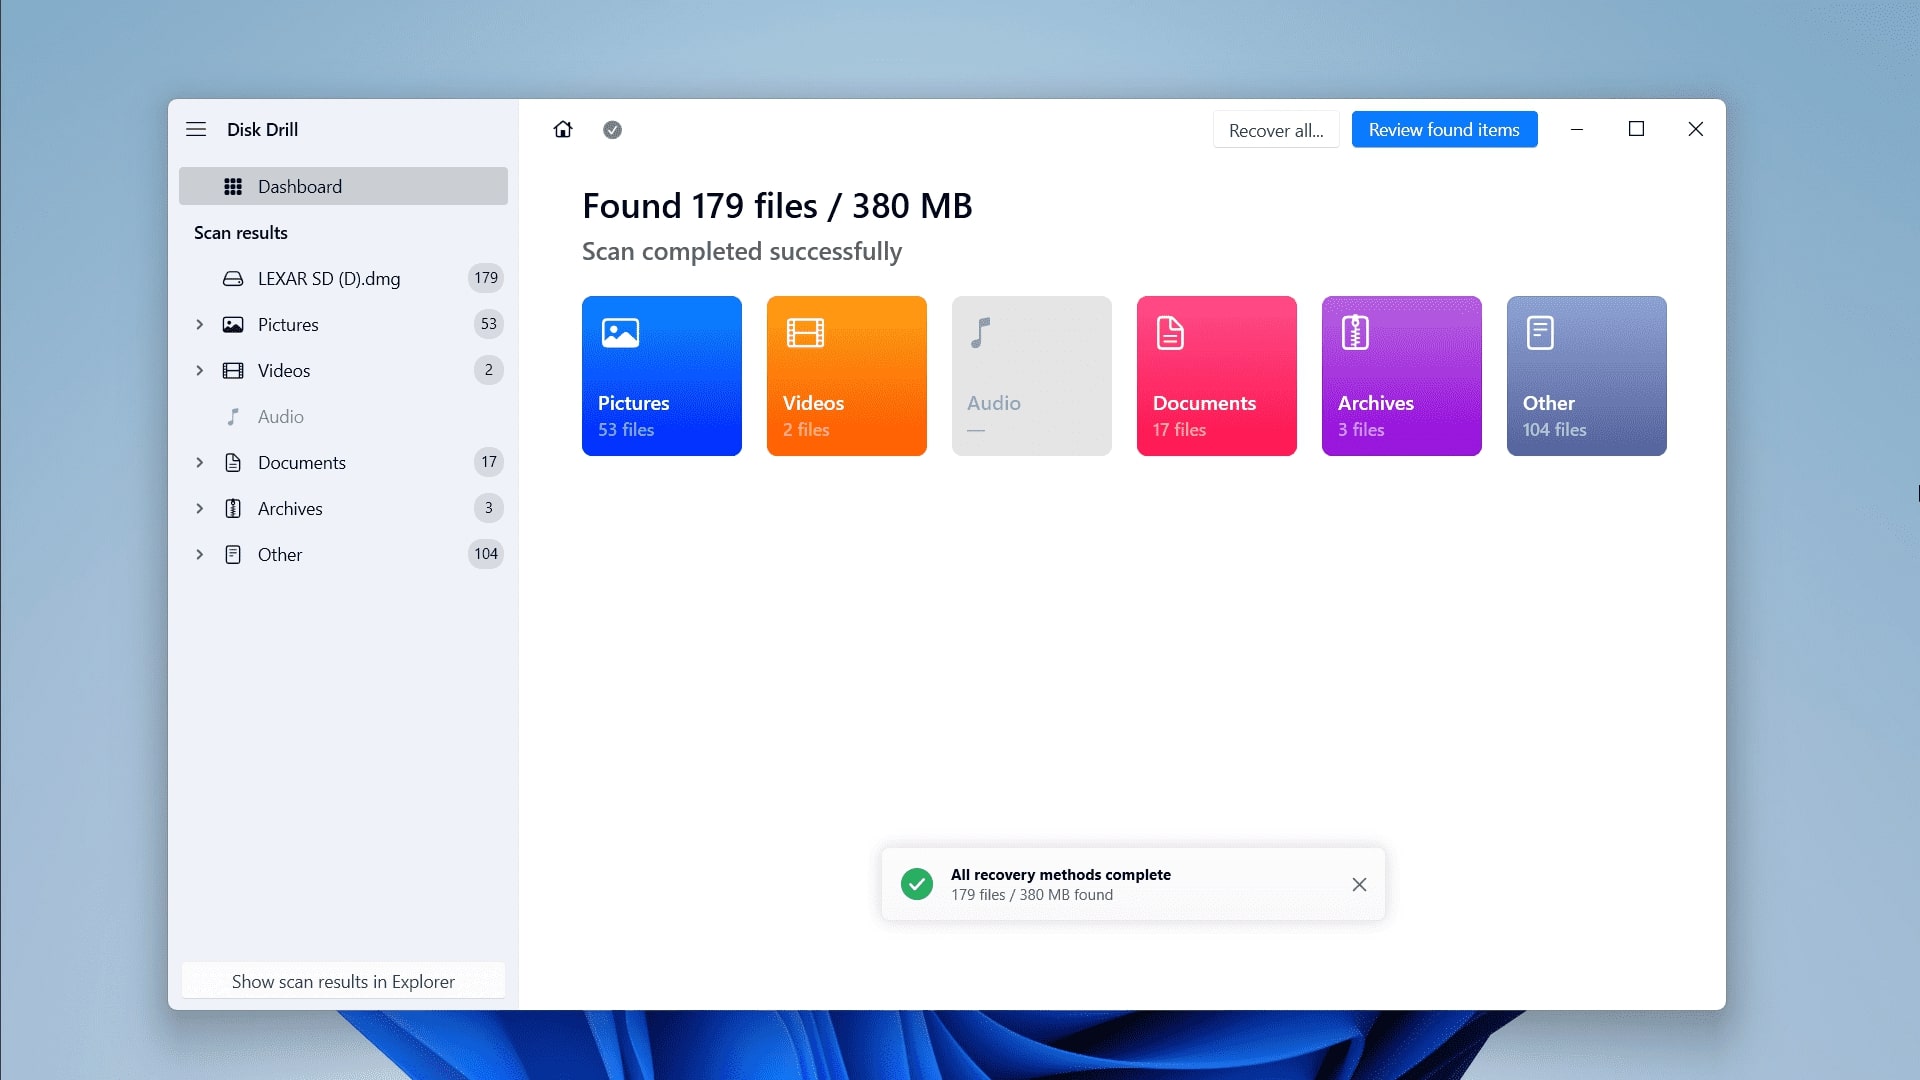
- Once the recovery process is complete, click on Review found items.
- You can browse through recovered files using different filters and view mods. You can also find files you need using search. It’s possible to review found files to ensure they can be recovered.
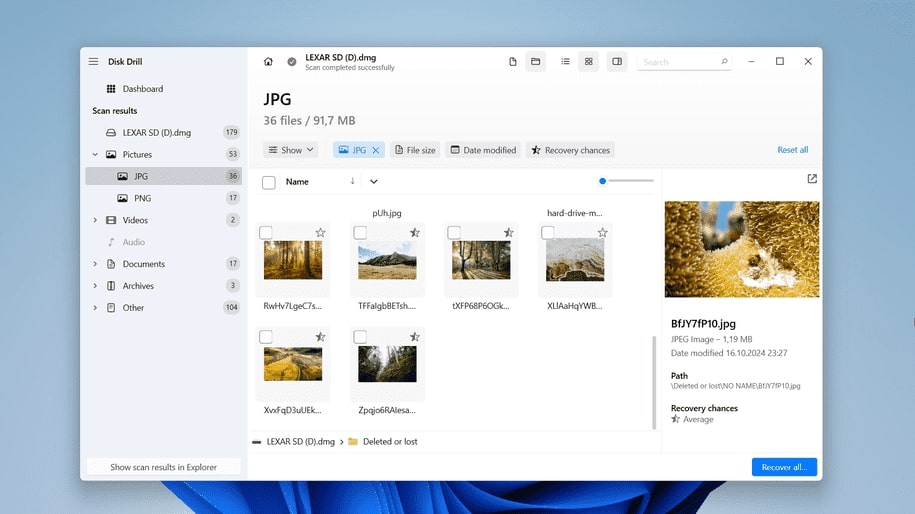
- You can click the Recover all… button on the bottom right or select files one-by-one. Once you selected all files you want to recover, select a destination for all your recovered files and click on Recover to save them.
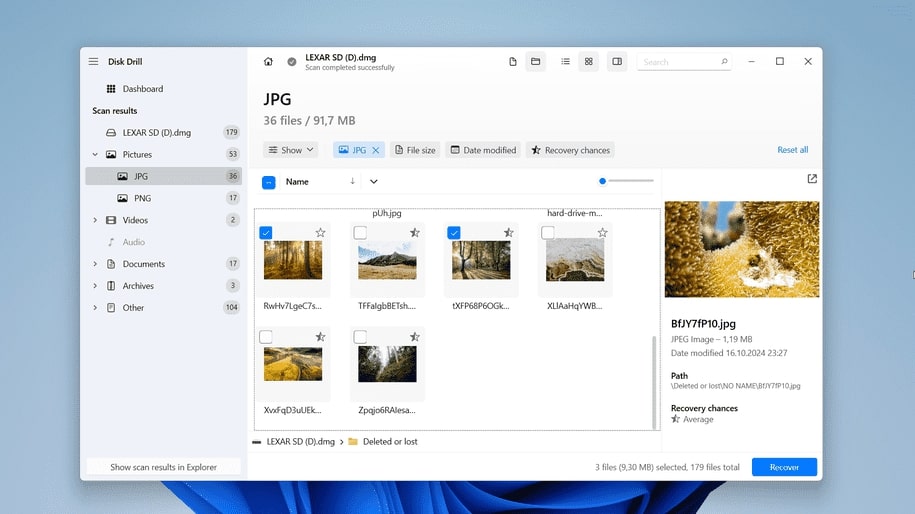
Once you’ve recovered all your important files and folders, if needed, you can format the SD card to solve the issue and later transfer the data back to it. We’d also like to point out that we have a comprehensive review of Disk Drill, as well as a separate article dedicated to analyzing its safety. We think you’ll find them interesting if you’re curious about this software.
Option B: Lexar Recovery Tool
Unlike other SD card manufacturers, Lexar provides a dedicated tool to recover files from Lexar SD cards. Similar to Disk Drill, the Lexar recovery tool is a free SD card recovery software that also features an easy-to-understand user interface and a quick and easy data recovery process. What’s best about this option is that it is tailor-made specifically for Lexar SD cards so you can never go wrong with it.

Here’s how to use it to perform Lexar SD card recovery:
- Download the Lexar recovery tool from the official website.
- Open the Downloads folder and navigate to the Lexar recovery tool compressed folder. Inside the folder, you will find the application. Run it.
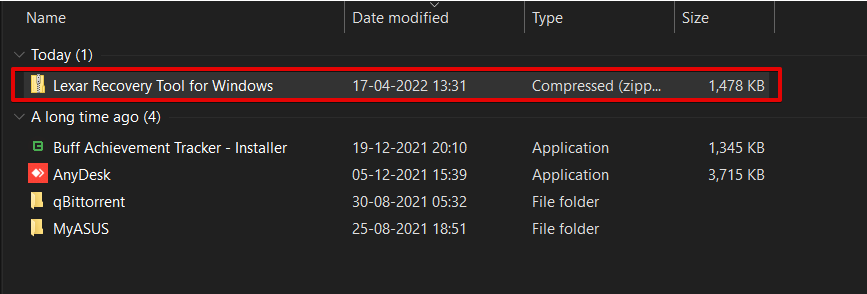
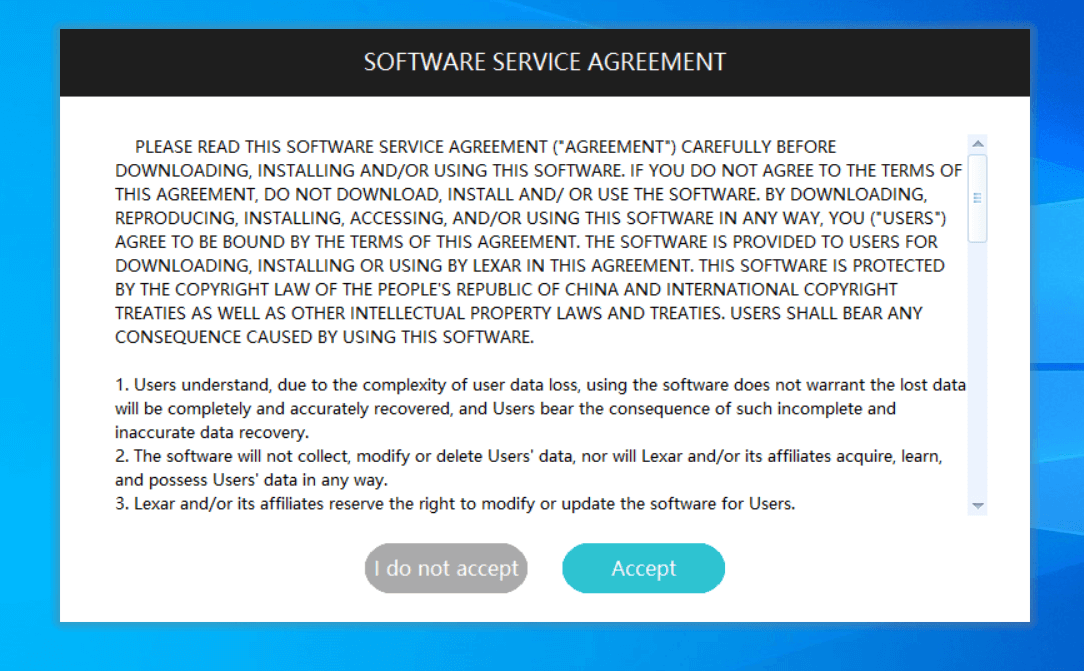
- Once the installation is complete, agree to the software service agreement.
- On the app home screen, select your SD card.
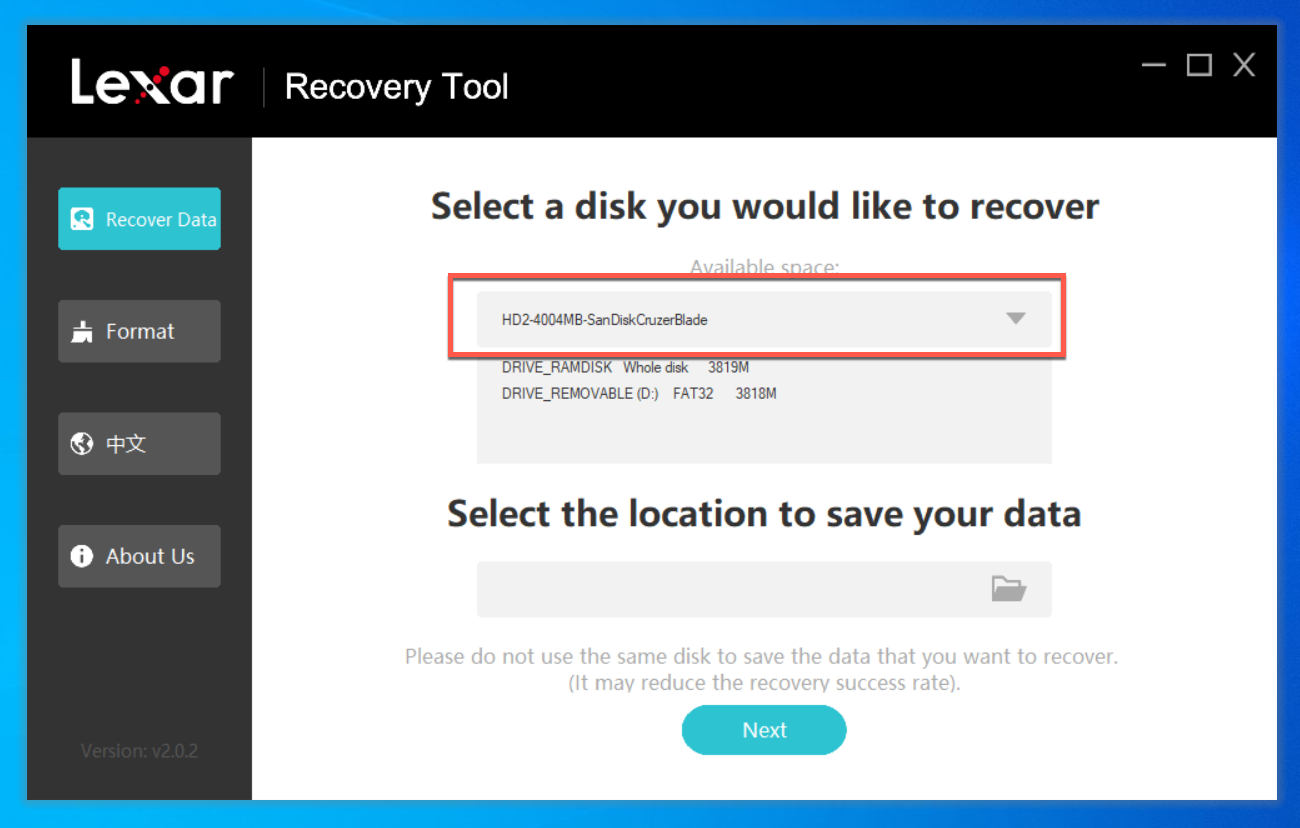
- Now, select a destination for the recovered data.
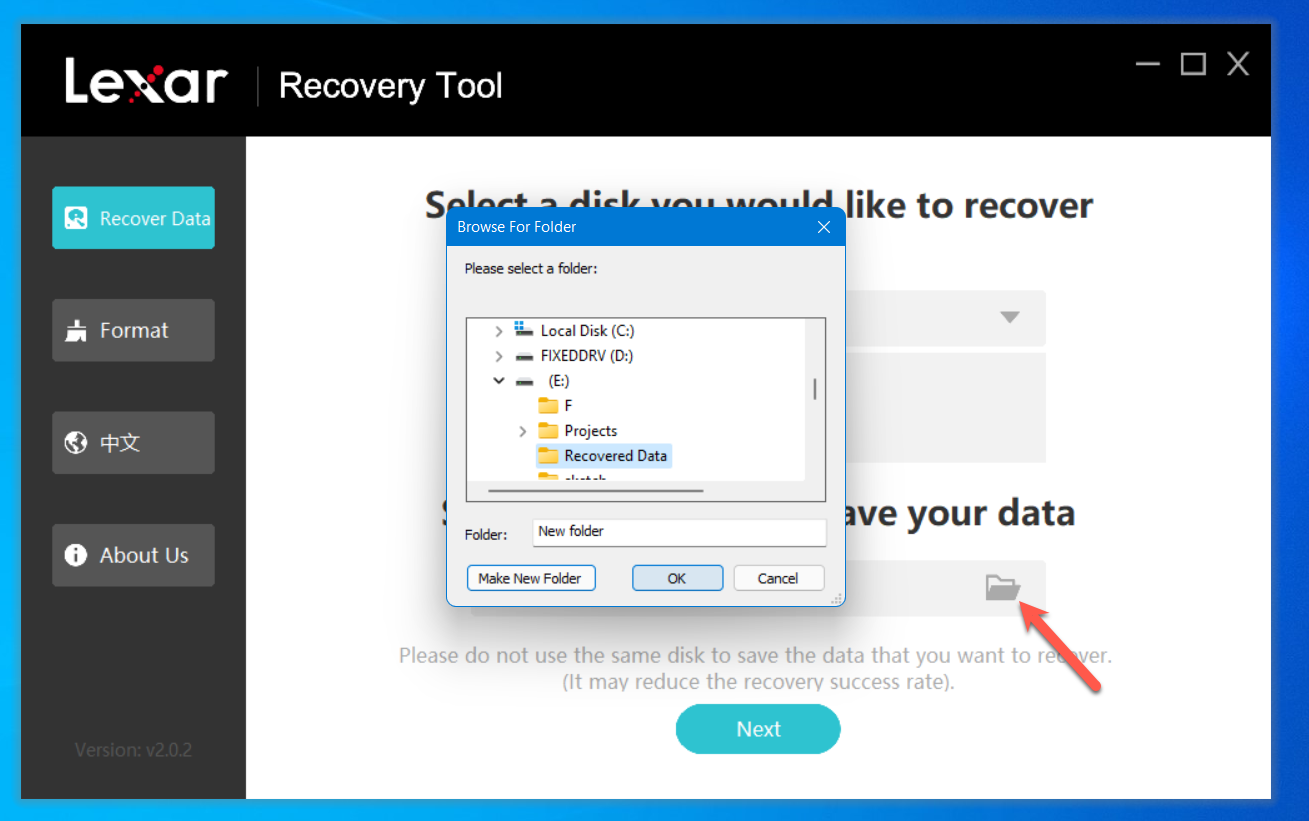
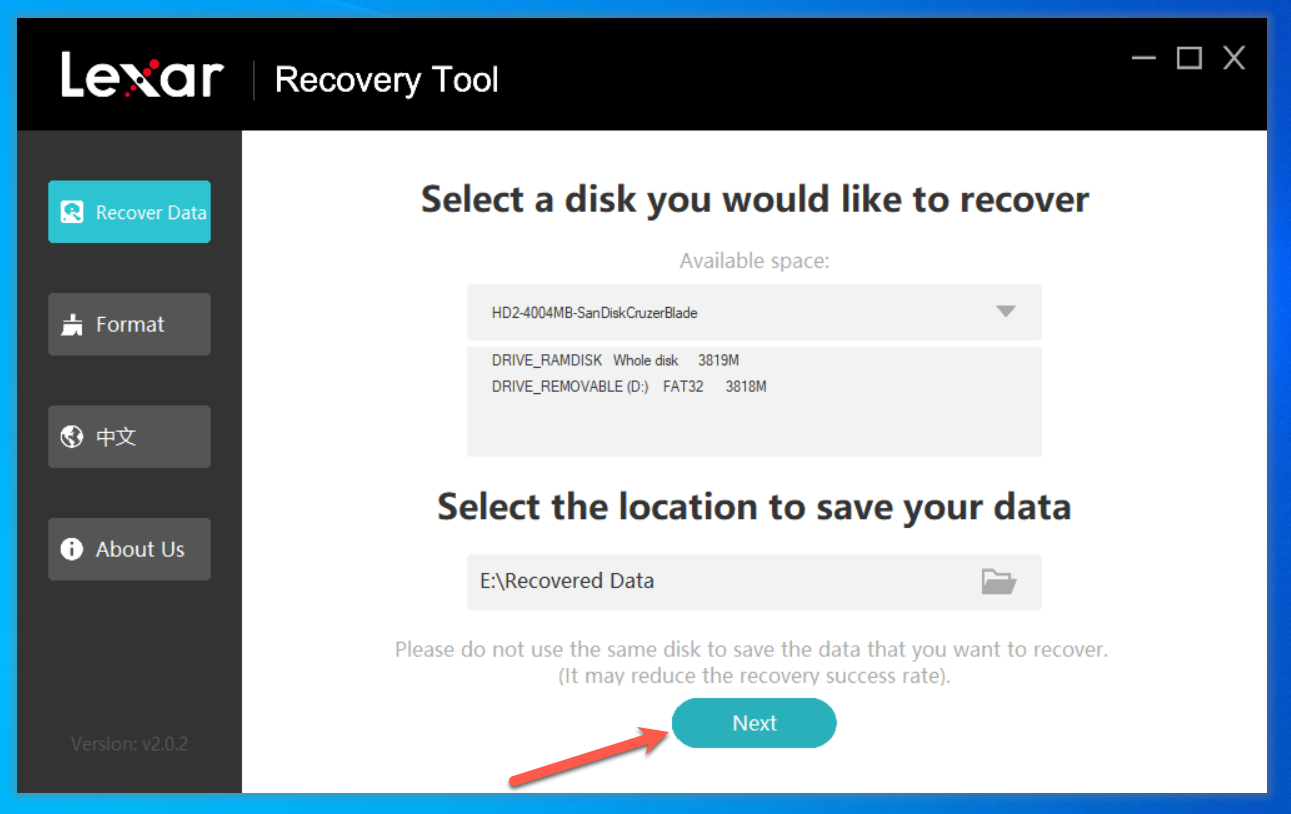
- Then, click on Next to proceed with your Lexar SD card data recovery.
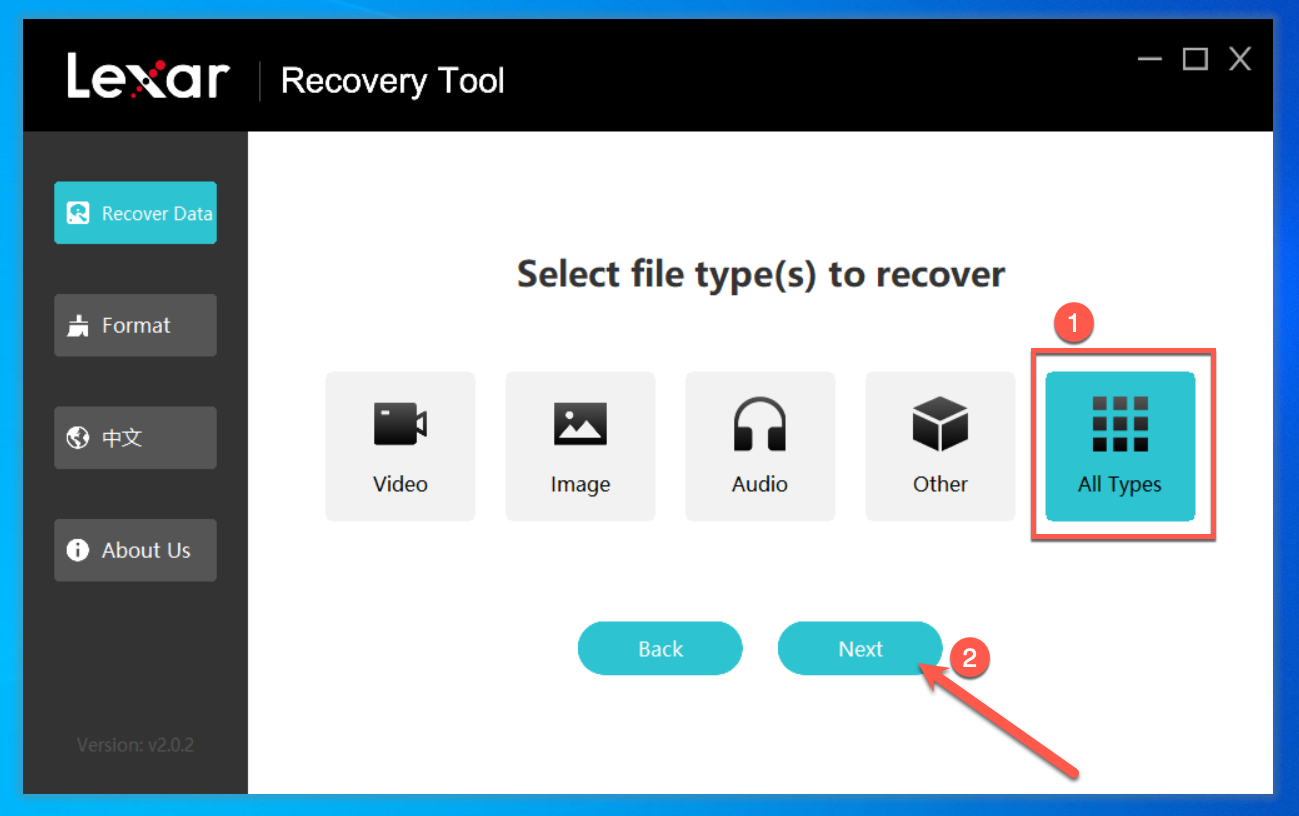
- On the next screen, you’ll be asked the types of files you want to recover. Click on All Types and then Next.
- The Lexar recovery tool will now scan your SD card.
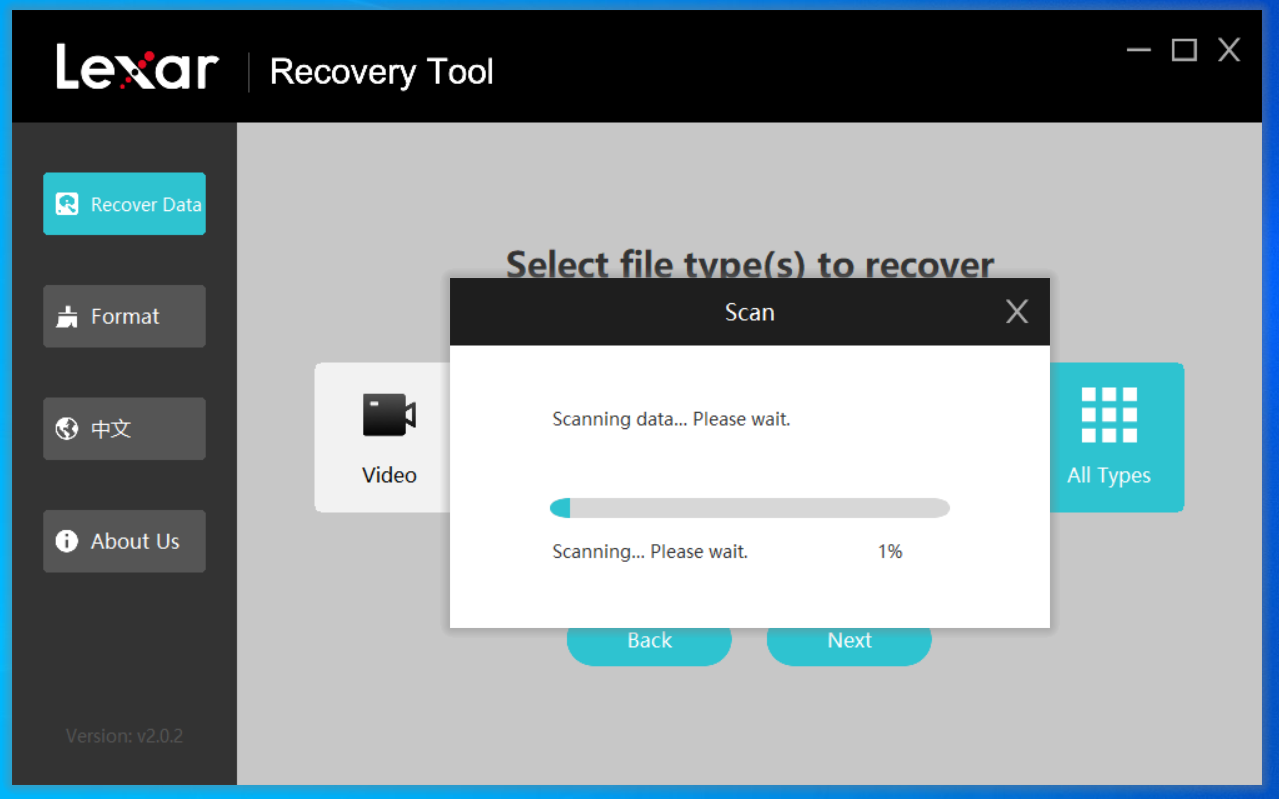
- Wait patiently for the scan to finish.
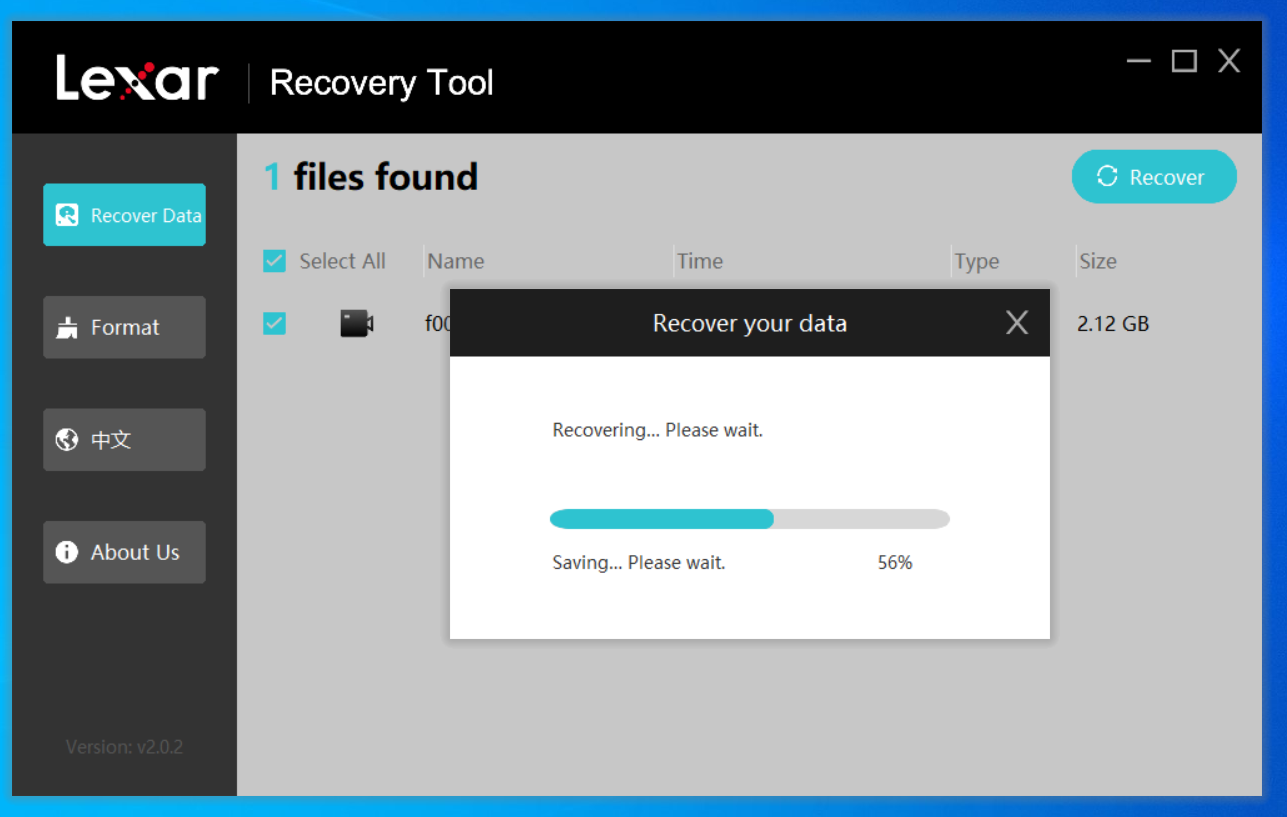
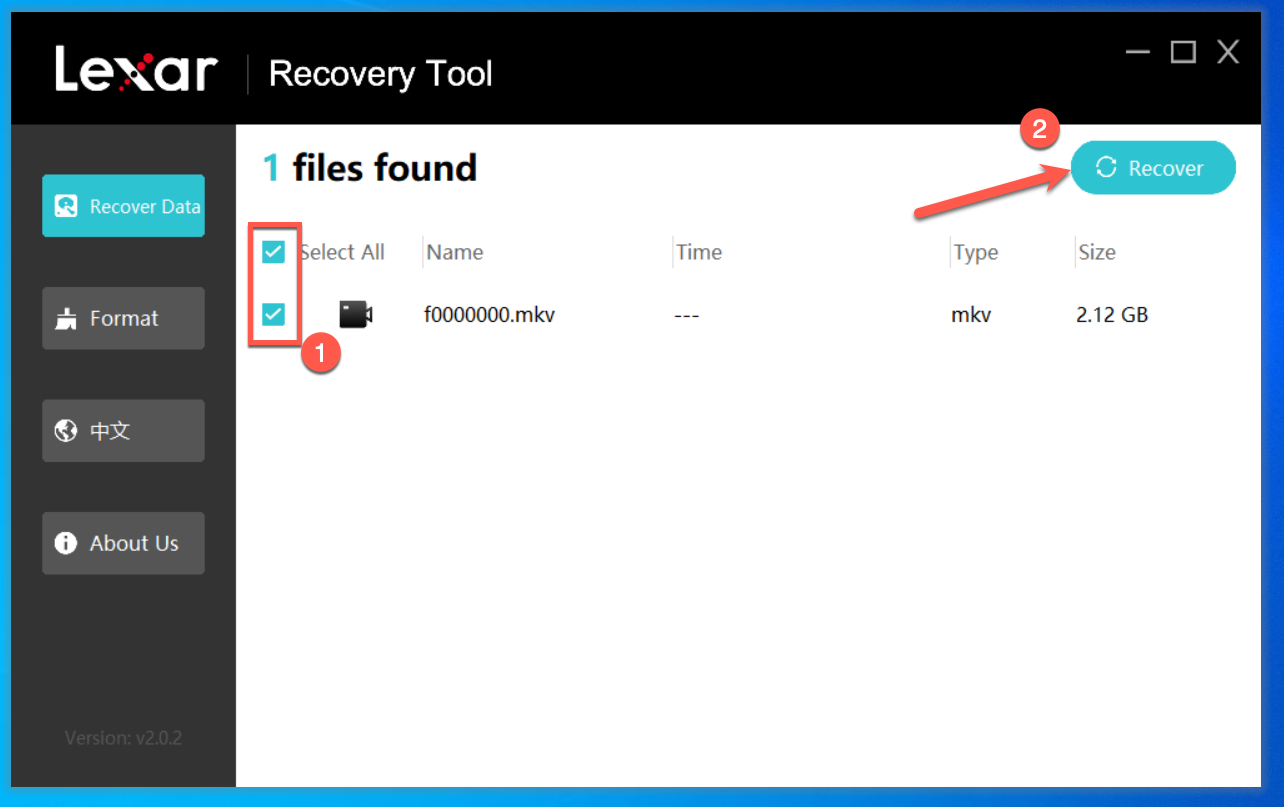
- Once the tool has found all the files, you can handpick the ones you want to recover. Once you’re done, click on the Recover button located on the top-right side.
- Wait patiently for the recovery process to finish. You’ll get prompted with a pop-up indicating that all the files have been recovered.
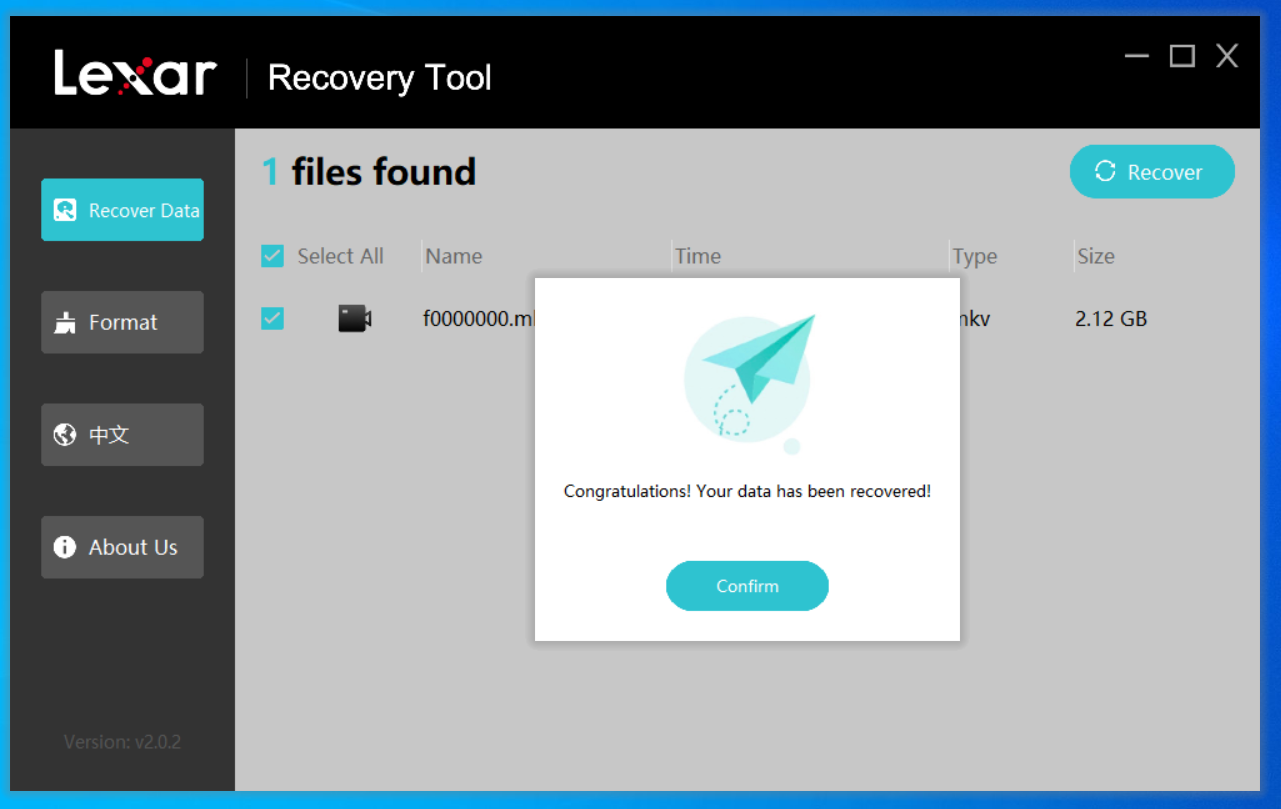
- Close the Lexar data recovery program.
Option C: TestDisk (For Corrupted Partitions)
TestDisk is a good alternative to other tools when you know that you deal with corrupted file system on your Lexar memory card. It is a free, open-source data recovery software that can recover lost partitions and make non-booting storage bootable again. Despite its command-line interface, TestDisk is powerful and effective for data recovery.

Here’s how to use TestDisk to recover a corrupted partition on your Lexar memory card:
- Visit the official TestDisk website to download the software. Since TestDisk is distributed as a portable application, there is no installation required. Download the ZIP file suitable for your operating system.
- After downloading, extract the ZIP file to a location on your computer where you can easily access the TestDisk executable. Navigate to the extracted folder and run the TestDisk executable. This action opens a terminal or command line window.
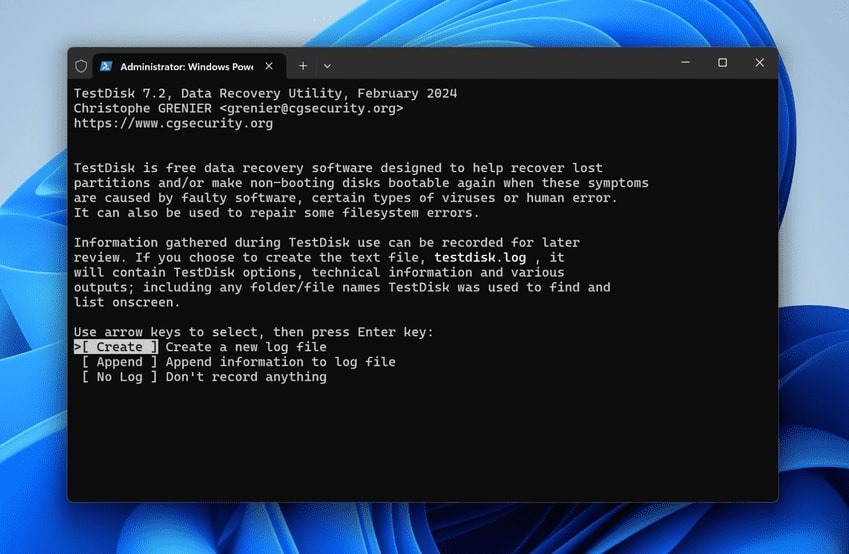
- When TestDisk launches, it asks how you want to log events. For most purposes, select “Create” and press Enter to proceed with the default logging option.
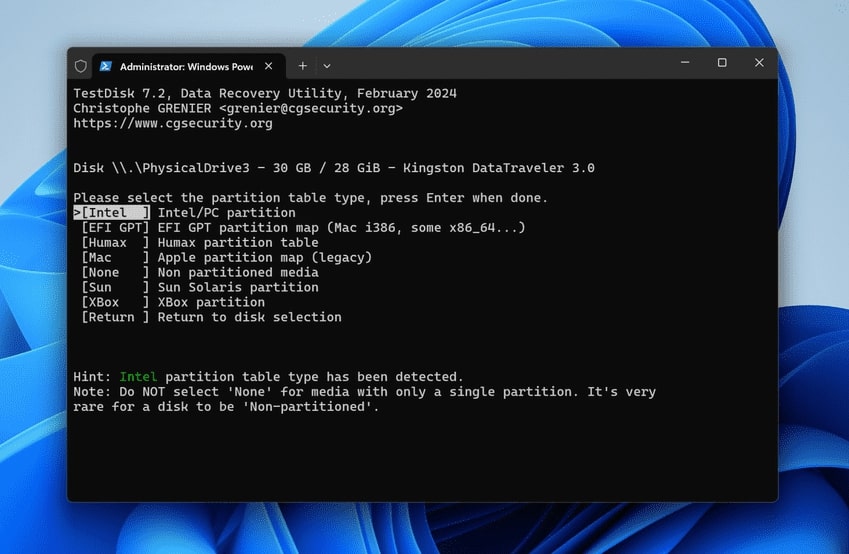
- TestDisk displays all drives connected to your computer. Use the arrow keys to navigate to your Lexar SD or CF card and press Enter to select it. TestDisk automatically detects the correct partition type for your memory card. Accept the pre-selected partition type and press Enter to continue.
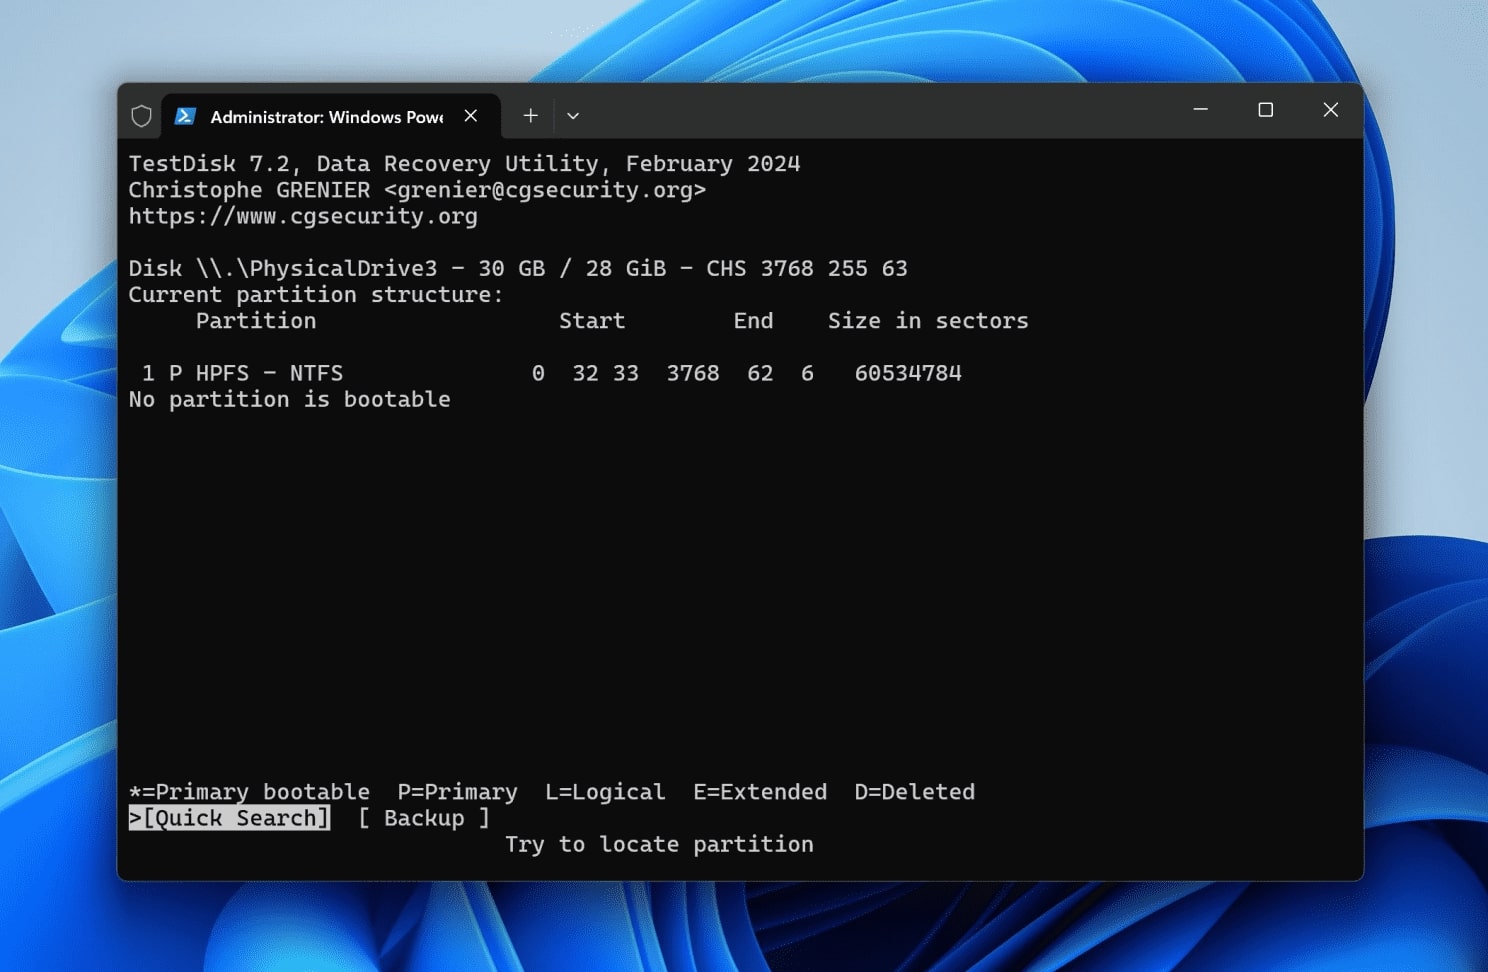
- Select “Analyze” to start the search for lost or corrupted partitions on your Lexar card. After selecting “Analyze,” you see the current partition structure. Press Enter to begin the scan for hidden or corrupted partitions.
- If the initial search does not reveal your lost partitions or you are unsatisfied with the results, you have the option to perform a “Deeper Search” for a more exhaustive scan. Select “Deeper Search” and press Enter to continue. Once the scan completes, TestDisk displays the partitions it found. Use the arrow keys to navigate through the list and review the information to ensure it matches your lost partition.
- TestDisk prompts you to confirm the write operation. Type “Y” and press Enter to proceed. TestDisk then writes the new partition table to the disk. After the write operation is complete, TestDisk advises you to restart your computer.
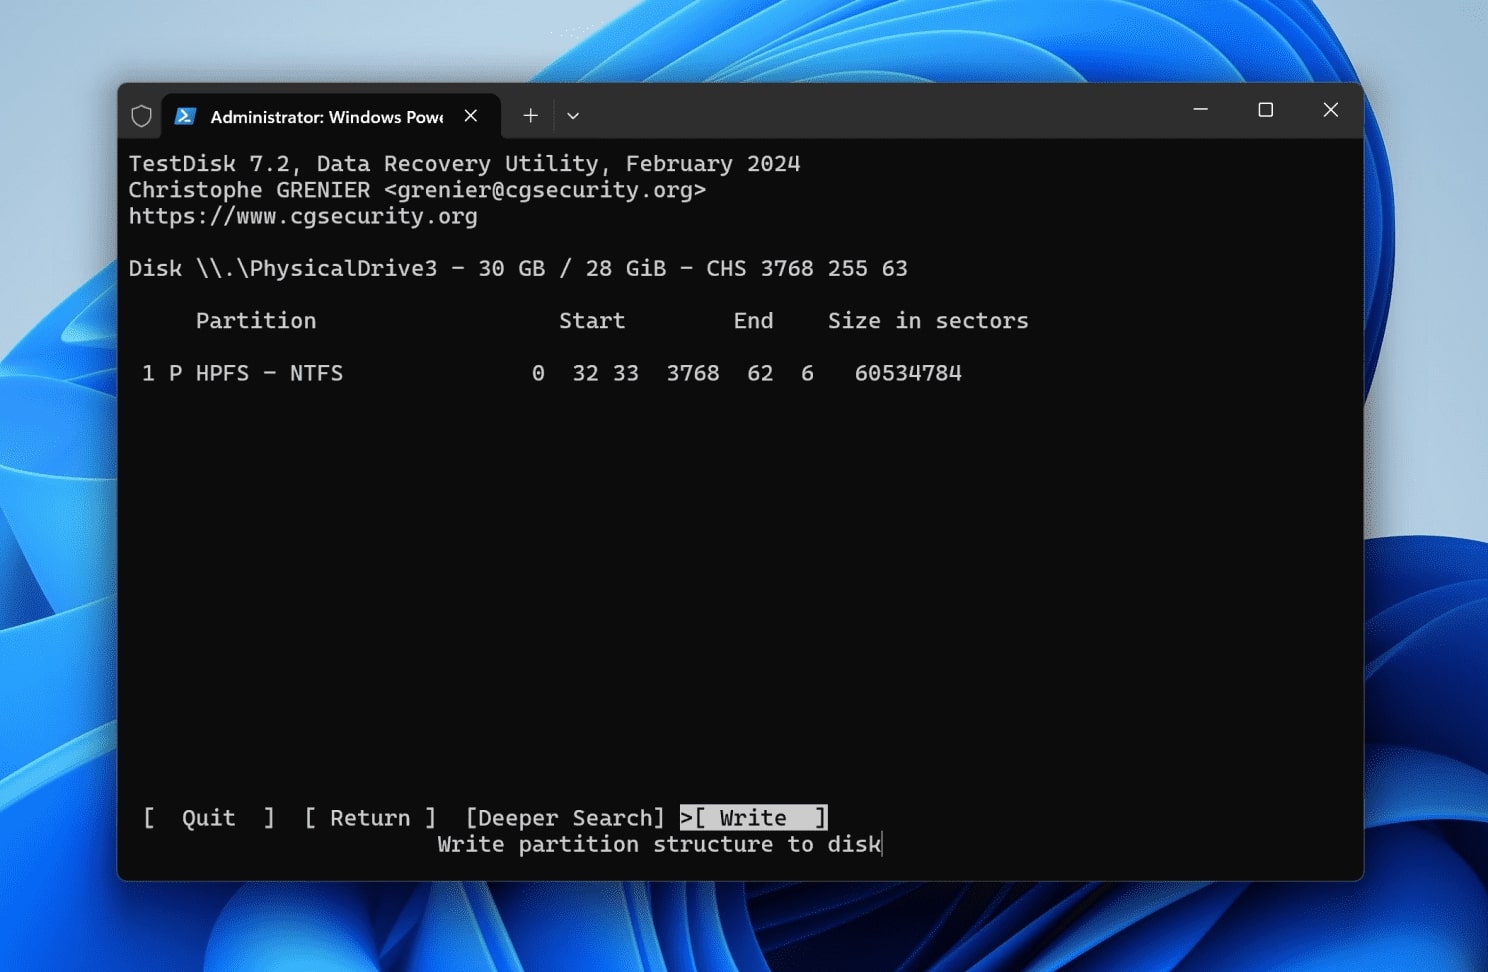
- Close TestDisk and reboot your system to apply the changes.
Once the process is complete, you will be able to access your data on the memory card. TestDisk is a good alternative to data recovery software when you know that the source of the problem lies in file system corruption and are not afraid to use CLI tools. By the way, we also have a review of TestDisk.
How to Fix Corrupted Lexar SD or CF Card
Previously, we examined the causes behind Lexar SD and CF card corruption and underscored the importance of data recovery before you initiate any repair procedures. Now that you have secured your valuable files, we will explore methods to fix a corrupted Lexar memory card. These solutions, such as error checking and formatting, can restore your card’s functionality and help prevent future data issues.
Run CHKDSK to Fix Errors on Memory Card
CHKDSK is a handy built-in Windows utility that can help detect and repair file system errors on your Lexar SD or CF card. It scans and repairs file system issues, so you have a chance to resolve corruption or restore access to your data without the need to format memory card.
Here are the steps:
- Insert your Lexar SD or CF card into the computer using a card reader. Open Command Prompt as an administrator. Search for “Command Prompt” in the Start menu, right-click on it, and select “Run as administrator.”
- Enter the CHKDSK command. Type chkdsk E: /f (replace E: with the drive letter assigned to your Lexar card) and press Enter. The /f parameter instructs CHKDSK to fix any errors it finds.
- Wait for the process to complete. After CHKDSK finishes the scan, check if your card is now accessible and if your data is recoverable.
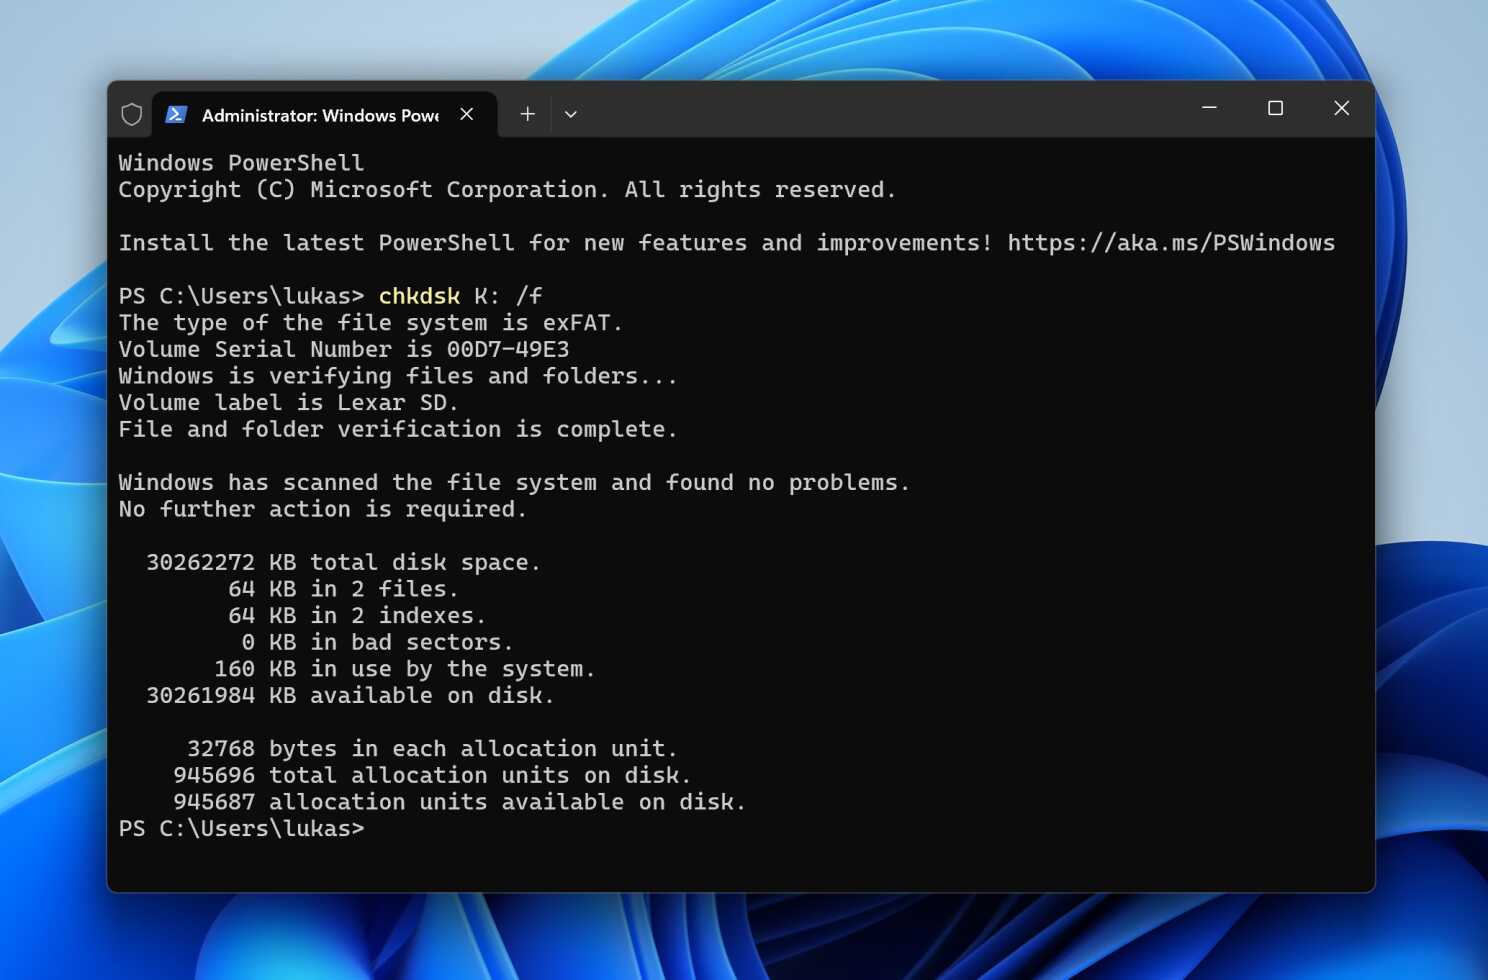
Be cautious. There have been numerous cases where CHKDSK has caused data loss or got stuck at one of its stages. Take our warning about data safety very seriously.
Format Memory Card
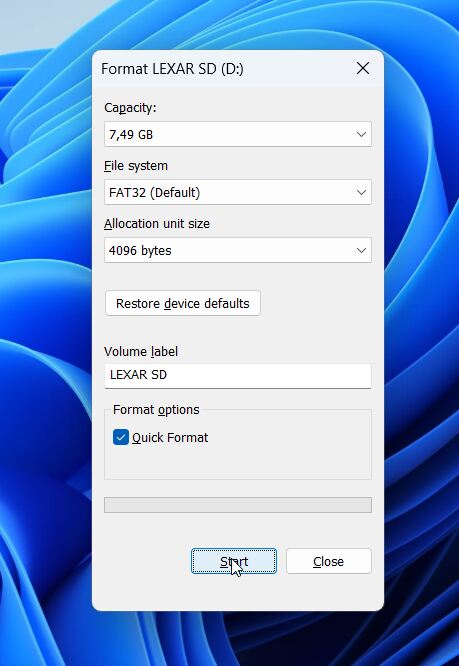
If previous methods have not resolved the issues with your Lexar SD or CF card, formatting the memory card may restore its functionality. Formatting erases all data on the card, so make sure you have recovered your important files before you proceed.
It’s also worth mentioning that the use of full formatting will eliminate bad sectors from use and potentially improve the performance of the memory card.
Here is how to format your Lexar memory card:
- Use a card reader to connect your Lexar SD or CF card to your computer.
- Press Win + E to open File Explorer and navigate to This PC.
- Find your Lexar memory card under Devices and Drives.
- Right-click on the memory card and choose “Format…” from the context menu.
- Select the desired settings. Click on “Start” to begin formatting. A warning message will appear, informing you that all data will be erased. Click “OK” to proceed.
What About Damaged/Broken/Not Working Lexar SD Cards?
Data recovery software such as Disk Drill and Lexar Recovery are excellent tools that are capable of recovering data from a dead SD card that is not showing up in file explorer. But will they work on damaged/broken SD cards? Well, it depends on the amount of damage sustained by the memory card.
If the damage is minor, you might be able to recover your files without any issue or even get your SD card repaired at the nearest Lexar service. Or, if your SD card has water damage, you can let it dry overnight before plugging it back in. However, if your memory card is severely broken, it could be hard for even the best data recovery services to recover any data from it. In such cases, it’s best to replace it with a new one.
FAQ
How do I recover files from my Lexar SD card?
In order to recover deleted photos from an SD card or even recover deleted videos from an SD card, download the Lexar Recovery Tool from the official website. Then, follow these steps:
- Launch the Lexar Recovery Tool.
- Select your Lexar SD card.
- Scan your SD card.
- Preview the files you want to recover.
- Select a landing destination and click on Recover to continue.
What is Lexar Recovery Tool?
Lexar Recovery Tool is a free data recovery software designed specifically for Lexar storage devices such as SD cards. It is available on both Windows and macOS and has an easy-to-understand application that follows a minimal-step procedure to recover files that have disappeared from your SD card.
There are two ways to format your micro SD card. Once you’ve plugged in your SD card to your PC, you can either use the Windows formatting tool to quick format it, or a third-party tool to get the job done.
How do I get my dead Lexar SD card to work?
Here’s how to get your dead SD card to work:
- Connect your SD card to your PC.
- Download Disk Drill data recovery.
- Create a byte-to-byte backup of your SD card and save it as a .dmg folder.
- Mount the drive image you’ve just created on Disk Drill.
- Use this SD card image to perform data recovery.
- Retrieve your files at a safe location.
Conclusion
As mentioned earlier, SD cards are fragile storage units. Thus, you should either keep them safely stored or plugged into a device at all times. Doing this will avoid the chances of physically damaging it. However, if you’re dealing with an unreadable or a corrupt SD card, you can use data recovery software like Disk Dril, Lexar Recovery Tool or even TestDisk to easily recover all your data without needing a professional background in data recovery.
This article was written by Ojash Yadav, a Contributing Writer at Handy Recovery Advisor. It was also verified for technical accuracy by Andrey Vasilyev, our editorial advisor.
Curious about our content creation process? Take a look at our Editor Guidelines.
