To migrate Windows from your old HDD to a new M.2/NVMe SSD is an ideal solution when you want to avoid the hassle of reinstalling everything from scratch. By migrating the OS, you’ll save time and prevent losing all your settings and applications. Plus, there’s the obvious benefit of significantly boosting your computer’s performance, given that SSDs are much faster than HDDs.
What’ll you get out of this migration? For starters, faster boot times, quicker application loading, and better system responsiveness. That being said, you must approach this migration process carefully to avoid data loss. If you’ve ever migrated your OS before, you’ll know that a proper migration of the Windows OS involves more than just copying files; you’ll need to backup data and use some tools to make sure everything transfers correctly and functions as expected on your new drive.
Preparing For The Migration
Before we get into the exact details of completing the migration, let’s look at some preliminary steps you should take to prepare your data and ensure everything goes smoothly.
- Backup your Data: Migrating your Windows OS to a new SSD will be a pretty significant change to your system’s storage situation, and even though this process is generally safe, there’s always a risk of losing data. Back up your data to give yourself peace of mind that all your personal files are protected in a disaster scenario. There’s no wrong way to back up your data- you can use external storage devices, cloud services, or even dedicated backup software like Backblaze. Just remember to follow the 123 rule for data backups: 3 copies of your data on 2 separate mediums, with 1 stored off-site!
- Check Compatibility: You need to be certain that the new SSD is compatible with your system in terms of motherboard support/necessary slots. A desktop is usually simpler, as they have extra disk bays that will fit your SSD, and you won’t need to replace the HDD. However, laptops, with their smaller form factor, will usually need you to make space for the M.2/NVMe SSD. Check your motherboard’s manual or the laptop manufacturer’s website to verify that it has the necessary slots and supports your new SSD’s form factor and interface.
- Tools Needed:
- Cloning Software: Software like Acronis True Image and Macrium Reflect lets you create an exact copy of your current drive, including the operating system, programs, and any custom settings. These software simplify the entire migration process and are a great beginner-friendly option, too. We’ll show you how to use one in the upcoming steps.
- Screwdrivers: Depending on your laptop’s design or your desktop’s case, you may need a small Phillips-head screwdriver to open the case to physically install the SSD.
- M.2/NVMe Screws: Some motherboards might include screws for securing your M.2/NVMe SSD, but if yours does not, you can purchase them separately from Amazon or find them at a local computer repair store.
- USB Drive: If you’re planning on doing a clean installation of Windows, you’ll need a bootable USB drive with the Windows installation files on it for re-installing the OS on your SSD. If you’re not sure how, this official Microsoft guide on Bootable installation media will guide you.
- Extra External HDDs: You can use these as temporary storage or to create system images, in case you decide to use the Windows Backup and Restore approach that we’ll discuss ahead.
And now, if you’re done with some basic prep, let’s move on to the actual methods for migrating Windows.
Approach 1: Using Cloning Software
Cloning software lets you create an exact copy, or “clone,” of your existing hard drive, including all files, custom settings, and the operating system. You won’t need to re-install Windows as all the content is duplicated. Some Reddit users on tech forums, however, are against cloning. This seems to be because these users have faced buggy installations and crashes after cloning their OS. In any case, this is the best beginner-friendly option, so let’s have a look at using Macrium Reflect to do the same. (We recommend this as it comes with a free 30-day trial with most features and is well-rated).
Macrium Reflect is a pretty versatile software for cloning your disk and migrating data. With it, you can create exact disk images, but you can also clone individual partitions within it. It also has good backup and restore capabilities that will help with the easy migration of data from your HDD to the new SSD.
Here’s a brief guide:
- Download and install Macrium Reflect from their official website.
- You’ll now have to install the new M.2/NVMe SSD into your system and ensure that it’s properly connected and recognized by your BIOS/UEFI (you can usually do this by pressing F2/DEL/ESC during start-up and then navigating to the Boot or Storage section. If all went well, your newly installed SSD should show up in the list of connected drives.)
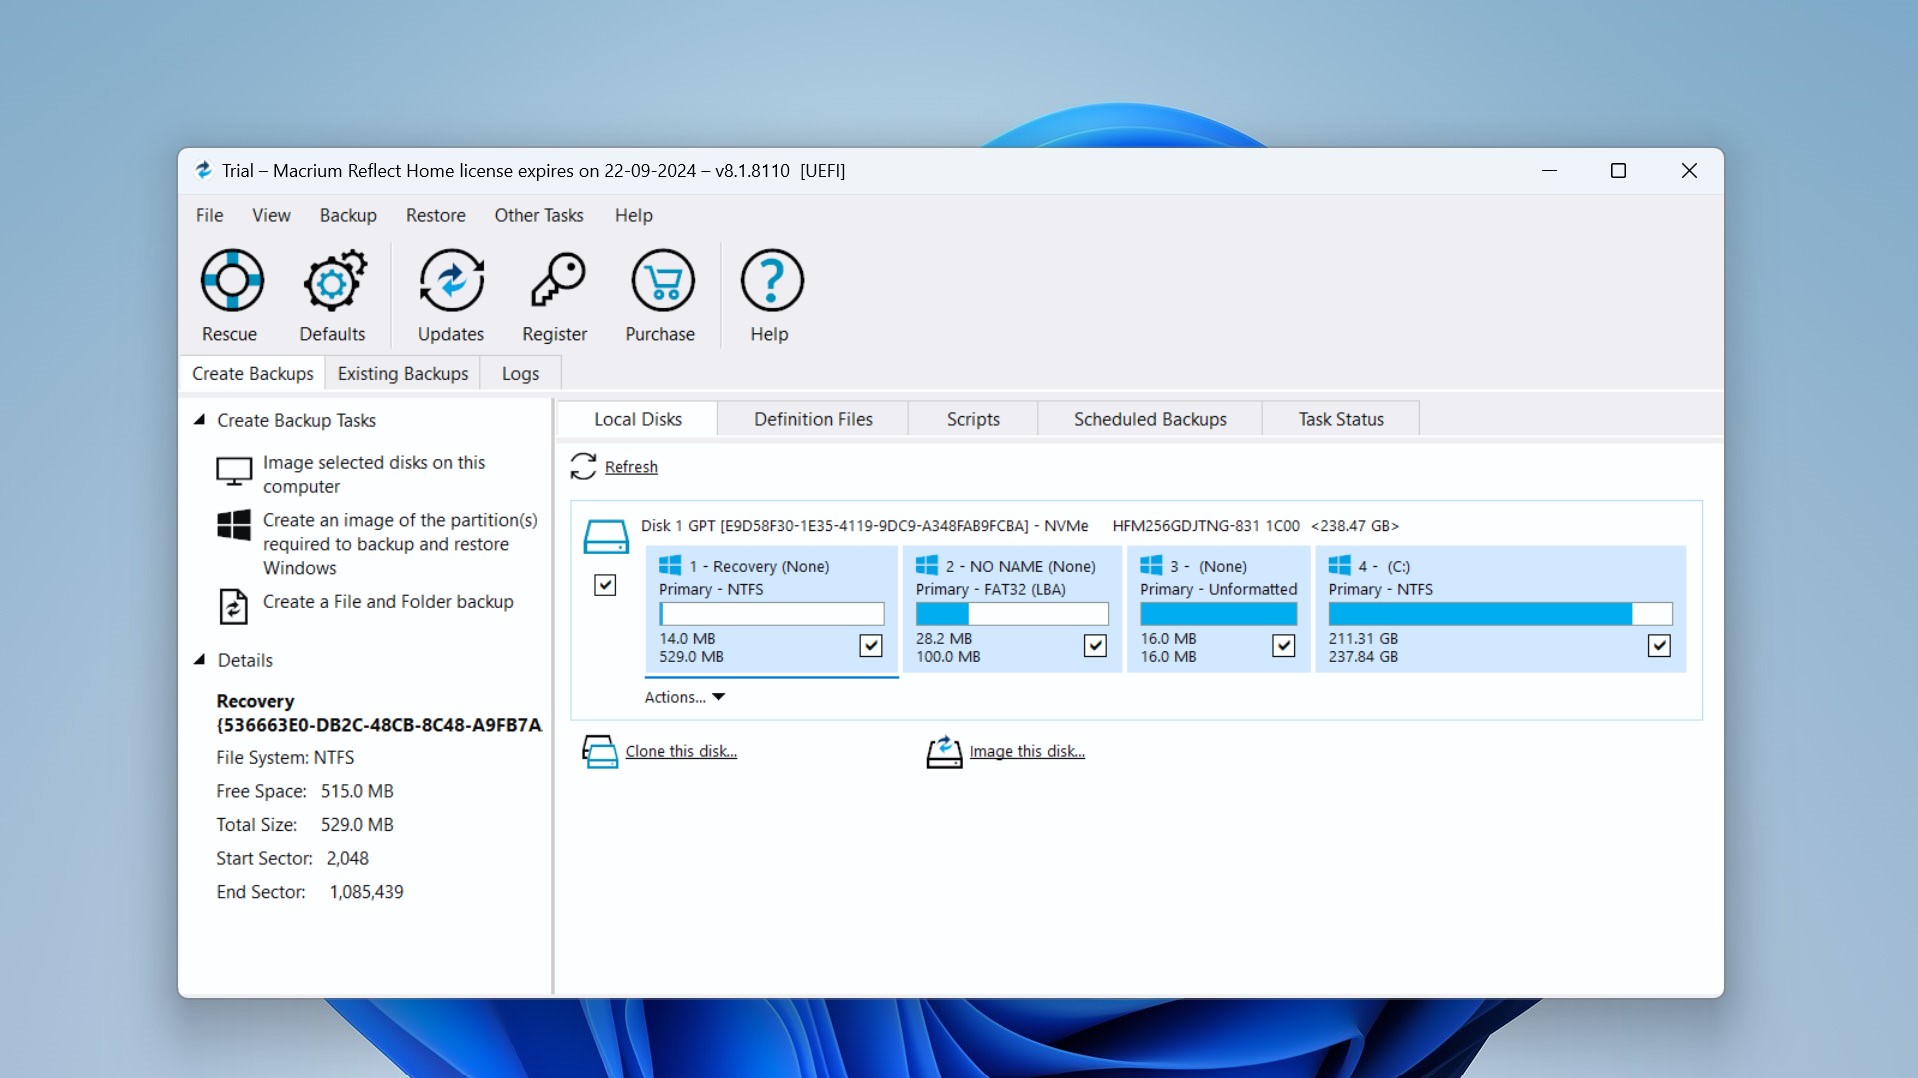
- Now you can launch Macrium Reflect, and you’ll see all your current drives listed in the main interface as such:

- Next, you must choose the disk you want to clone (in this case, your old HDD). Select it and hit the “Clone this disk” button underneath.
- This opens up the cloning wizard, where you should now select your new SSD as the destination disk. (If your new SSD is a different size, you may need to adjust the partition sizes. Drag and drop partitions to resize them as you need.)
- Once you’ve seen the summary of the operation and everything looks good, click on “Finish” to start the cloning process.
- Once the cloning is complete, you’ll need to reboot your system. You can once again press F2/DEL/ESC while starting up to navigate to boot order settings. Here, select the SSD as the primary boot drive. If you now save your changes and exit, the OS should boot up from the new M.2/NVMe SSD!
If you need more detailed instructions, here’s the official Macrium Reflect guide we found on their website, which includes dealing with dynamic disks. And if the endless text is too much for you, here’s a handy YouTube video showcasing the same cloning process.
Pros:
- Quick and easy, beginner-friendly, and preserves all data and settings.
Cons:
- The paid version is relatively expensive and does not have cloud backup options.
Approach 2: Using Windows Backup and Restore
You might have heard of Windows Backup and Restore, which is a built-in feature that allows you to create a full system image of your current installation, which can then be restored onto your new SSD! This method is fairly reliable and does not require you to download any third-party software. The only possible downside is that it takes more time and requires an external storage device for the backup.
Here’s how to go about it:
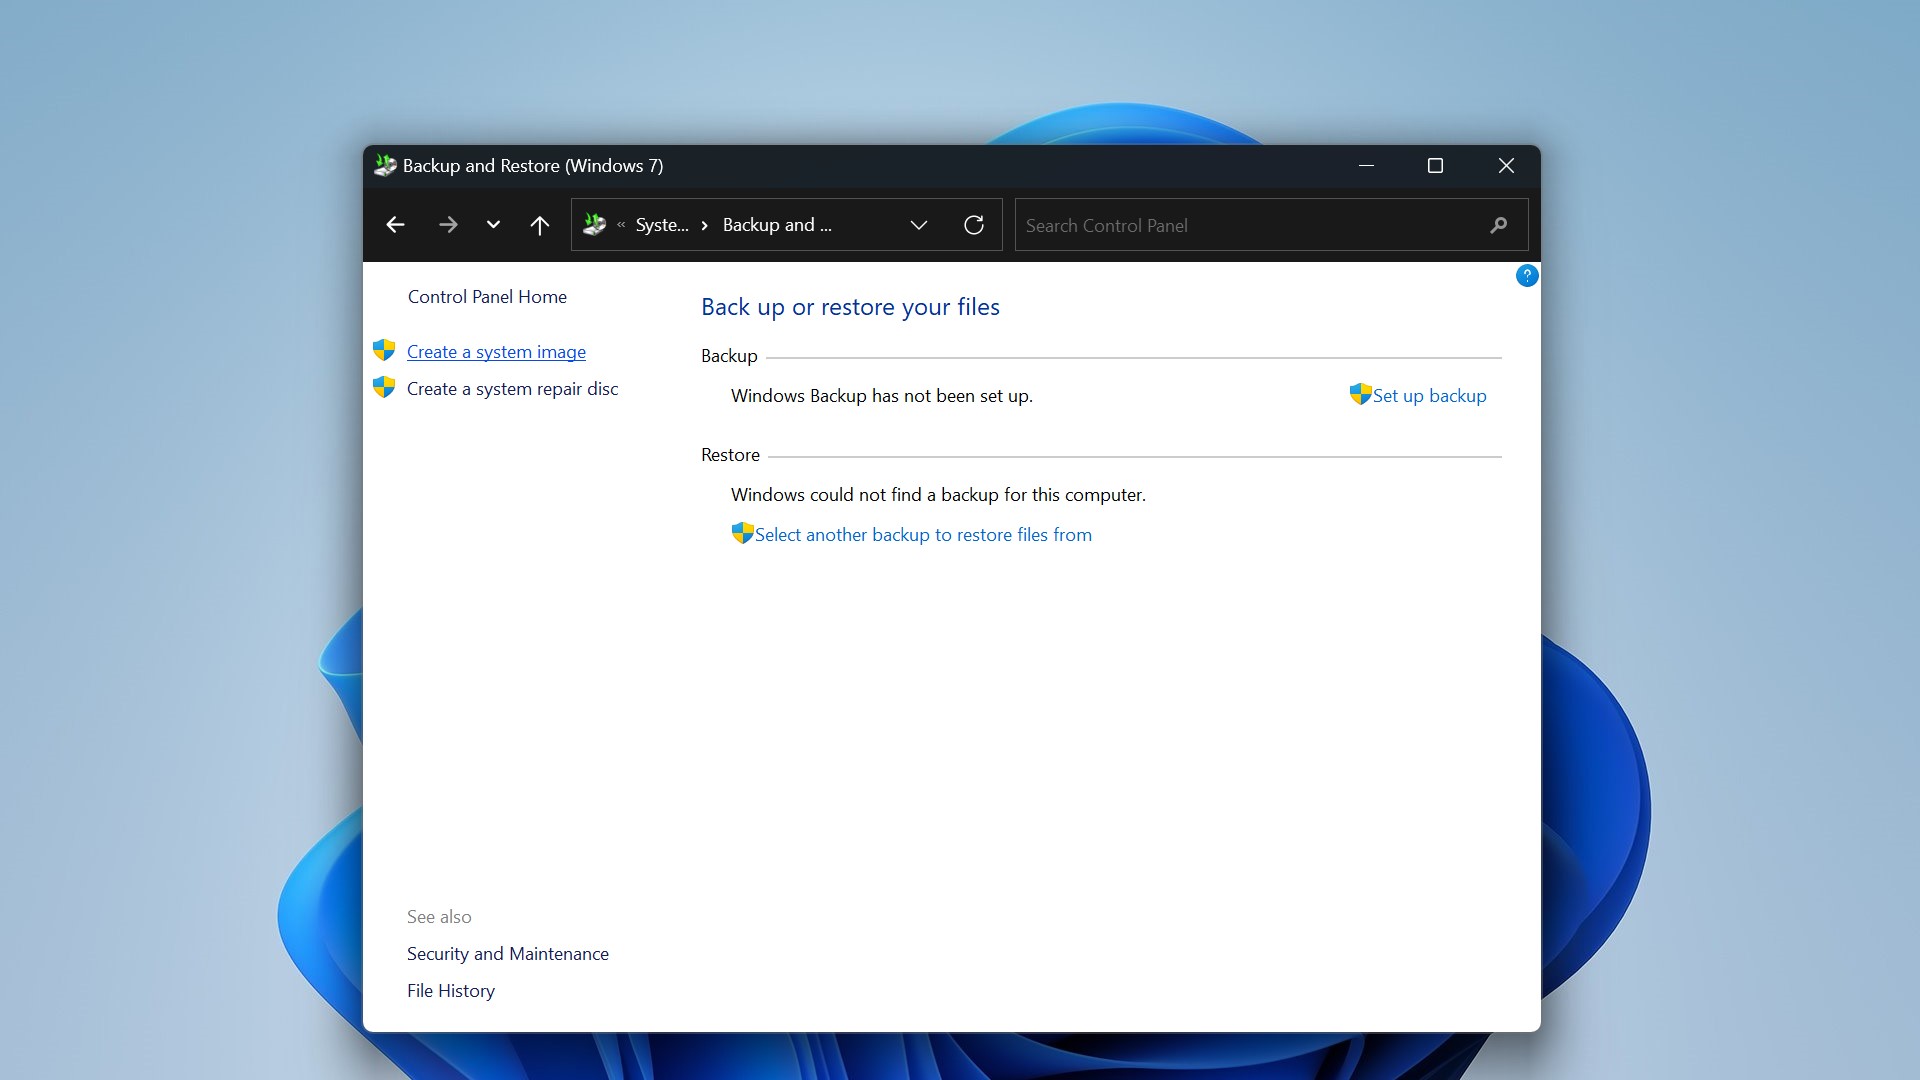
- Start by creating your System Image Backup. For this, you’ll need to connect an external drive with enough space. Once you’ve done that, go to Control Panel>Backup and Restore (Windows 7). You’ll see the following:

- Now click on “Create a system image,” and choose the external drive as your backup destination. Make sure you select the drives you want to include in the backup, ensuring your OS drive (the HDD) is selected. Now, start the backup process.
- Once finished, shut down your computer and physically install the new SSD into your PC or laptop. Open the boot menu and check that it’s recognized in the BIOS/UEFI (similar to what we did in the cloning process).
- You now need to restore the System Image we just created to the new SSD. This can be done by booting again with a Windows installation USB or DVD (refer back to the preparation section for the creation process) and then selecting “Repair your computer”on the setup screen. This should open the WinRE environment, where you choose Troubleshoot>Advanced options>System Image Recovery. Now, it’s simply a matter of selecting the system image you created earlier and starting your restoration process! If you access the BIOS/UEFI and set the SSD as the primary boot device, you’ll find that Windows will now boot from the SSD.
This Microsoft forum discussion on system images should help out if you get stuck on any part.
Pros:
- Utilizes built-in Windows tools, so there is no need for third-party software.
Cons:
- More time-consuming and requires a separate storage medium for the backup.
Approach 3: Clean Installation of Windows
A clean installation of Windows means you’ll be installing the operating system from scratch on your new SSD. If you want to start fresh without carrying over any issues, clutter, or unwanted software from your old system, this is the way.
Here’s what you’ll need to do:
- Start by backing up all your important files and data to an external drive or cloud storage. You can also use cloning and migrating software, as we discussed above.
- Now visit the official Microsoft website and use the Windows Media Creation tool to create your bootable USB installation media. This article on Microsoft’s page has detailed instructions.
- Now power off your PC and install the new M.2/NVMe SSD into the appropriate slot on your motherboard. Check that its securely connected; otherwise, it may not show up in the list of drives.
- Now, we essentially follow the same steps as before- power on your PC and enter the BIOS/UEFI settings (yep, you got it; hit the F2/DEL/ESC during startup). In the BIOS, set the boot priority to boot from the USB drive. Now, you can save and exit.
- Your PC should now boot from the USB drive, leading you to the Windows installation screen. Simply follow the prompts to begin the installation process.
- When the prompts ask you to choose where to install Windows, select the new SSD. (It may ask you to format the drive first, which will erase any existing data on the SSD, so be wary!).
- You can now go do something else but leave your system on charge, as this process will take some time, and your PC may restart several times during installation.
- Once Windows is installed, reinstall any of your necessary applications and you can now restore your personal files from the backup you created earlier.
The Clean Install process has been discussed on a Microsoft forum post before, and is a helpful guide with screenshots to perform the same.
Pros:
- Fresh installation removes any potential issues from your old system.
Cons:
- Time-consuming, and it requires reinstallation of programs and reconfiguration of settings.
Post-Migration Steps- What Next?
Once you’re done with all of the above steps, there are a few things you can do to troubleshoot in case of any hitches.
- ✅ Verify your installation: Restart your computer and check if it boots correctly from the new SSD. If any issues come up, double-check the BIOS/UEFI settings to confirm the SSD is the primary boot device. Another good step is to go through all your files, applications, and settings to confirm that everything was migrated correctly and nothing is missing.
- ⚡ Optimize the SSD: You can consider enabling TRIM/AHCI mode for SATA, and configure the power settings to get optimal performance from your SSD. In simple terms, TRIM helps maintain SSD performance over time by cleaning up unused data blocks. To enable it, you’ll need to open the Command Prompt as an administrator and then type in ‘fsutil behavior query DisableDeleteNotify.’ If this command returns 0, TRIM is enabled, and if 1, it’s disabled. If disabled, you can enable it by typing ‘fsutil behavior set DisableDeleteNotify 0’. You can also enter BIOS/UEFI settings and double check that the SATA mode is set to AHCI, which is optimal for SSDs (Keep in mind, AHCI and TRIM can be enabled separately).
- 💾 Reinstall programs: Some software may require you to enter their product keys again, so keep those handy! You can copy over your backed-up data and restore personal files to your SSD once the migration is complete.
Conclusion
Depending on your level of technical comfort, either of the methods we’ve outlined above should work just fine for migrating your Windows system from an old HDD to a new M.2/NVMe SSD.
This guide should hopefully give you the confidence you need to make the switch because it really isn’t all that complex and will significantly enhance your computer’s performance. Faster boot times (the difference is actually quite staggering, as you’ll see!), along with a faster, more responsive system, are guaranteed.
Whatever method you choose, whether that’s to clone your existing drive or perform a fresh installation, be sure to properly back up your data beforehand.
This article was written by Vihaan Jain, a Staff Writer at Handy Recovery Advisor. It was also verified for technical accuracy by Andrey Vasilyev, our editorial advisor.
Curious about our content creation process? Take a look at our Editor Guidelines.
