I’m a relatively new adopter of SSDs—I got one in 2021. And while SSDs have come a long way since their introduction, they’re not immune to logical corruption, and physical damage. I found this out the hard way. Recently, my Windows computer refused to boot up, confusing me because there was no error message, just a black screen.
After attempting several restarts, reseating the RAM, checking the power supply, and more, I discovered that the issue lay with my SSD—it was dead. More accurately, my PC could no longer recognize it because the SSD’s file system got corrupted somehow. My priority was to recover data from this “dead” SSD as soon as possible, and this is how I did it.
When Is It Possible to Recover Data from a Dead SSD?
It all depends on what you mean by “dead”…
If the SSD is physically “dead” due to water damage, overheating, power surges, and blunt force—there’s little you can do except contact a professional data recovery company. Attempting DIY data recovery will only complicate things further. Assuming it’s connected properly, a physically damaged SSD won’t show up in Windows Disk Management, or the BIOS device list.
However, like in my case, if your SSD is logically “dead,” i.e., the damage is limited to the software level, you can attempt DIY data recovery. A rule of thumb—if the drive shows up in Windows Disk Management, the damage is usually logical.
Note: The aforementioned advice applies to both internal and external SSDs. However, when dealing with internal SSDs containing your OS, you’ll need another working computer to attempt data recovery.
Here’s how you can confirm this:
- Type “disk management” in Windows Search (Windows Key + S). Click on Create and format hard disk partitions from the search results. This will launch Disk Management.
- In the lower half of the Disk Management window, look for your SSD. If it’s there, you can safely attempt data recovery. If it isn’t there, double-check that it’s connected properly, and then check again. SSD still didn’t show up? It’s likely physical damage.
Additionally, if your drive shows up in Disk Management with its space “unallocated” or labeled as RAW, it means the file system is damaged beyond recognition. Don’t let it deter you from attempting data recovery, as most data recovery programs can recognize and recover data from RAW drives. In fact, this is what happened to me, and I still recovered all my files.
How to Recover Data from a Dead SSD
When attempting SSD failure recovery, you can use one of two approaches—recover the data from the damaged file system using a data recovery program, or fix the file system and regain access to your data.
I chose the first approach—because more often than not, recovering data from a damaged file system is easier, and you can always fix the file system later on, without worrying about your data. On top of that, fixing a dead SSD’s file system may involve formatting it, which is a destructive process.
Note: If you’re dealing with a dead internal SSD, connect it to another working computer for data recovery. The most convenient way to do this, is by using an SSD enclosure.
Here’s how you recover data from a dead SSD:
Method 1: Use a Data Recovery Program
A good data recovery program can recover data from SSDs with a damaged, or missing (RAW) file system. The key word being, “good,” because the internet is littered with programs that falsely claim to do this.
To be safe, I opted for Disk Drill, thanks to its excellent track record, and popularity. Being a long-time Disk Drill user, I can vouch for the program’s ease-of-use, and rich feature set. Some highlights include a usable preview feature, multiple file filtering options, and blazing fast scan speeds.
Note: The TRIM feature on SSDs usually makes data recovery impossible. However, since you’re dealing with a dead SSD, this command won’t be executed, which actually increases your data recovery chances. It’s a silver lining if I ever saw one. On external SSDs, it’s even less likely that the TRIM command will be executed.
Here’s what the data recovery process in Disk Drill looks like:
- Download Disk Drill and install it.
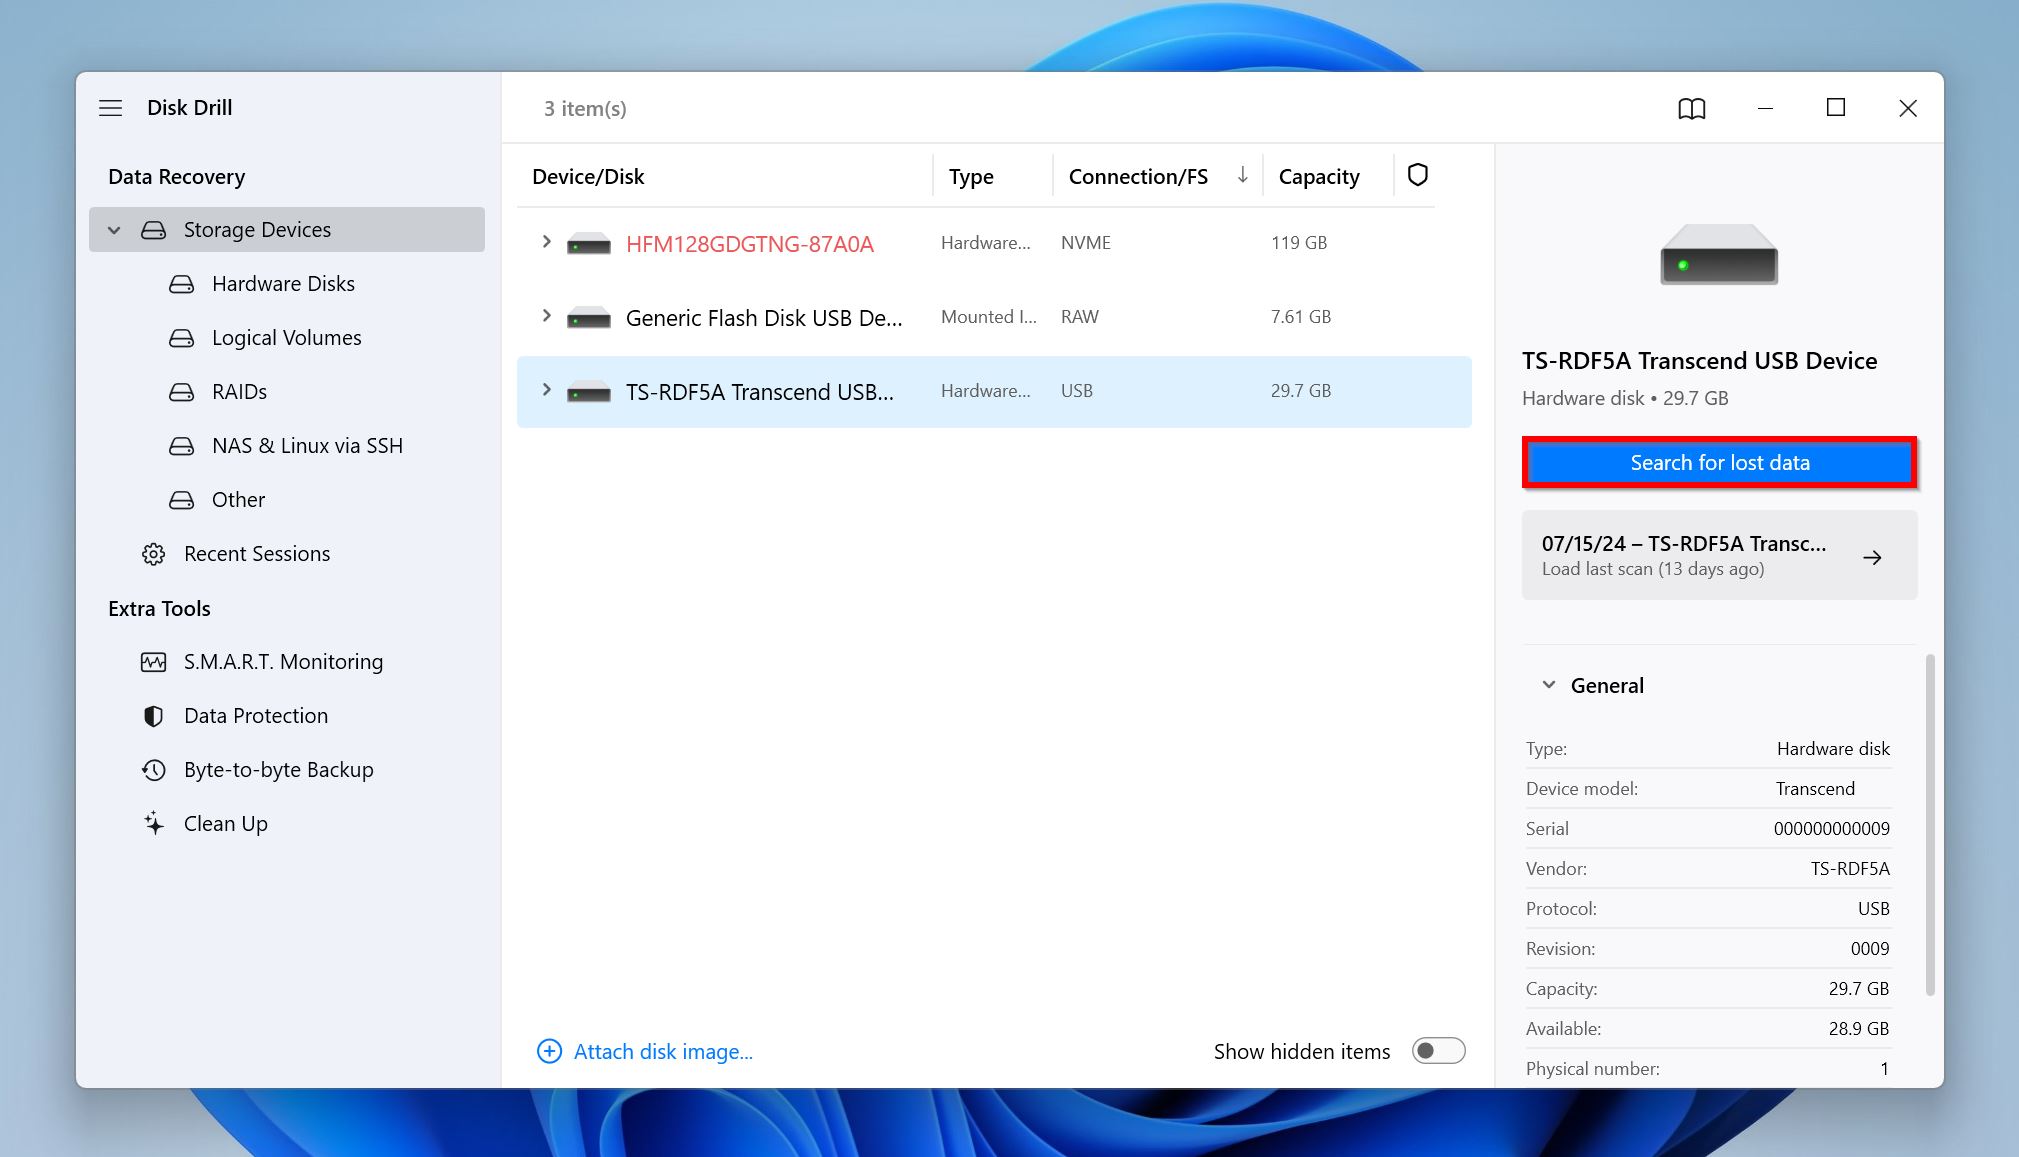
- Open Disk Drill, select the SSD, and click on Search for lost data.
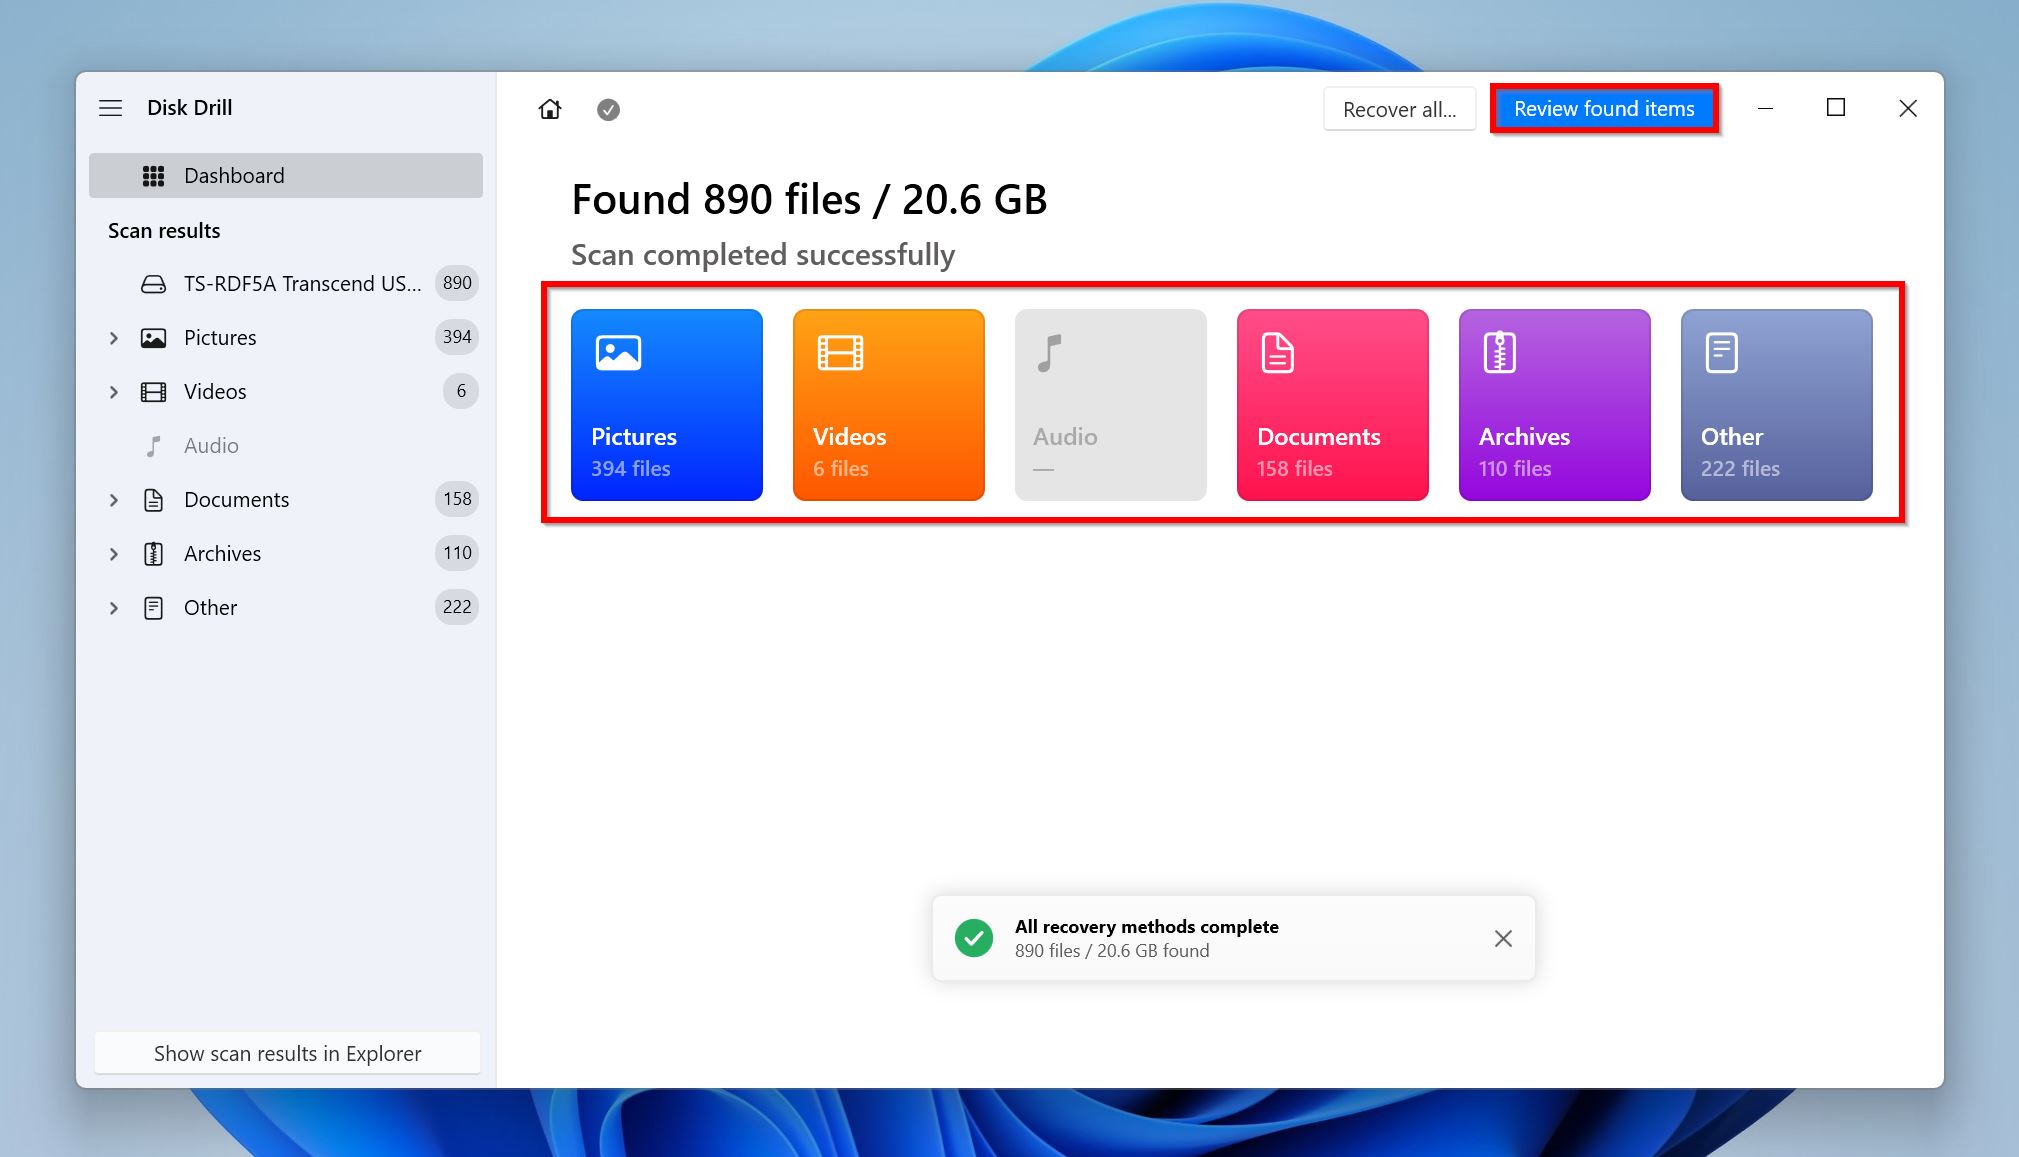
- Click Review found items once the scan completes. If you’re looking to recover a specific file type, click on the relevant file type tile instead (Pictures, Videos, Audio, Documents, Archives, and Other).
- Expand the Deleted or lost and Reconstructed sections to view deleted files that are recoverable. To view existing files on the SSD, expand the Existing section.
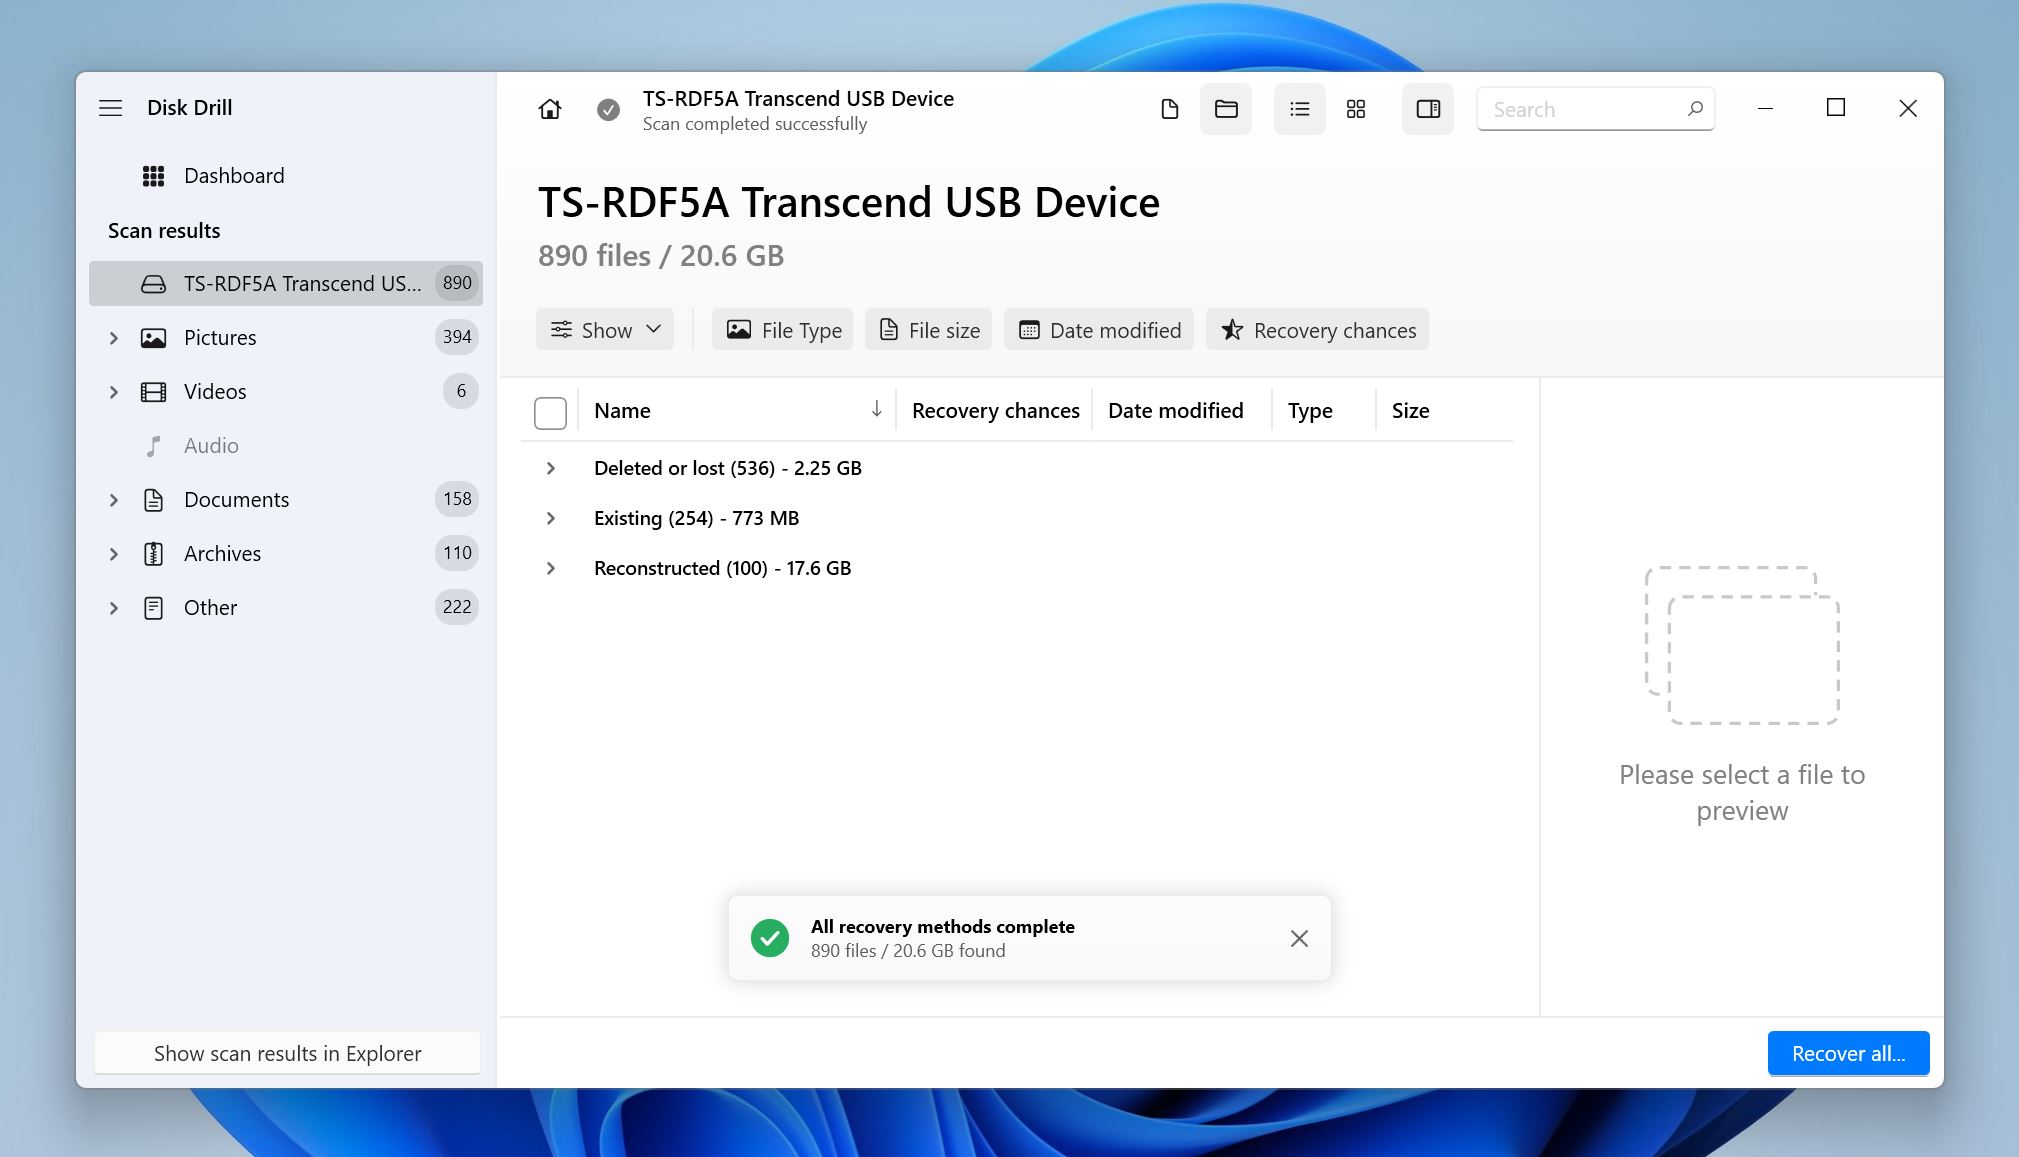
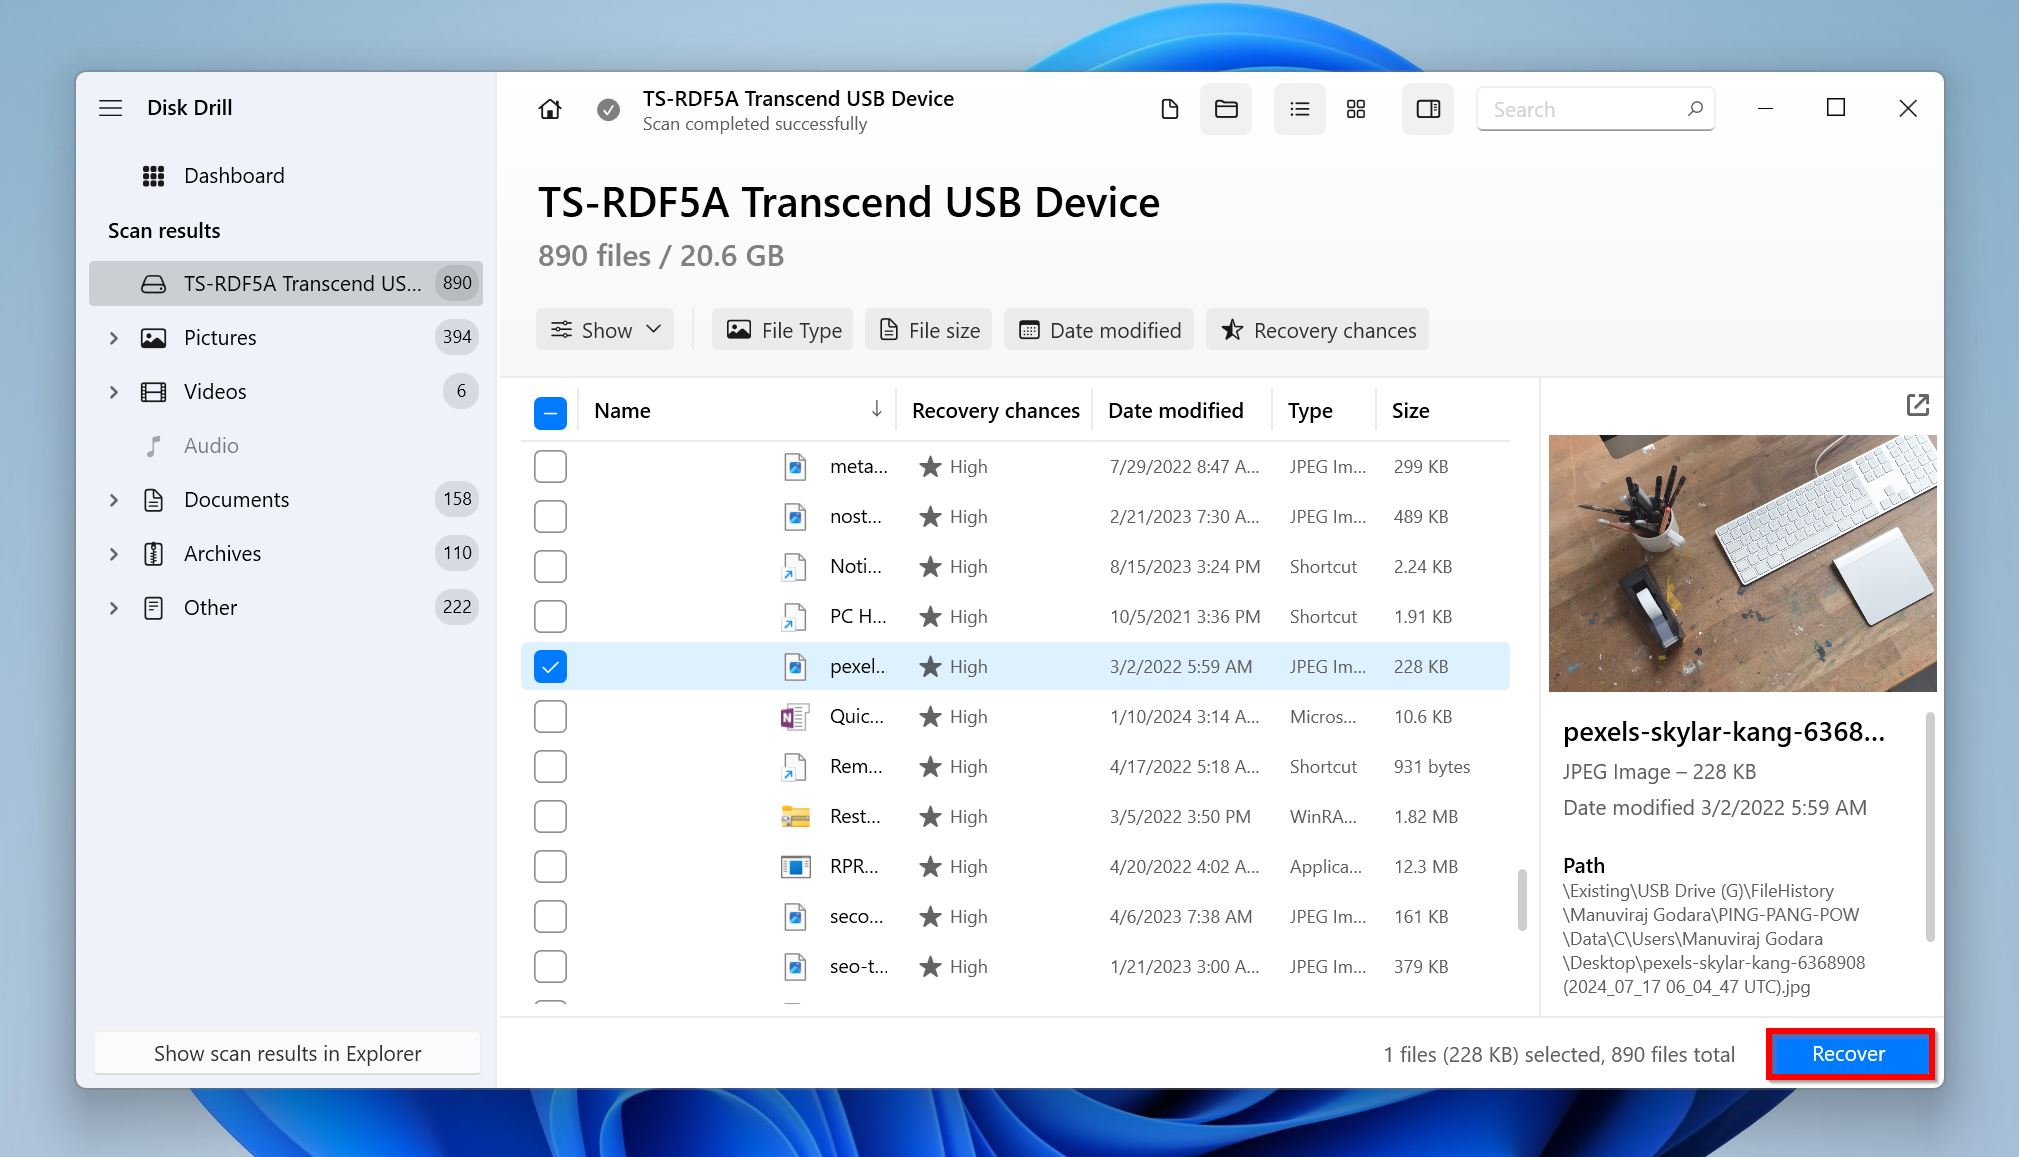
- Select the files you wish to recover, and click Recover. Disk Drill displays a preview of the currently selected file automatically, but you can manually preview any file by clicking the eye icon next to its filename.
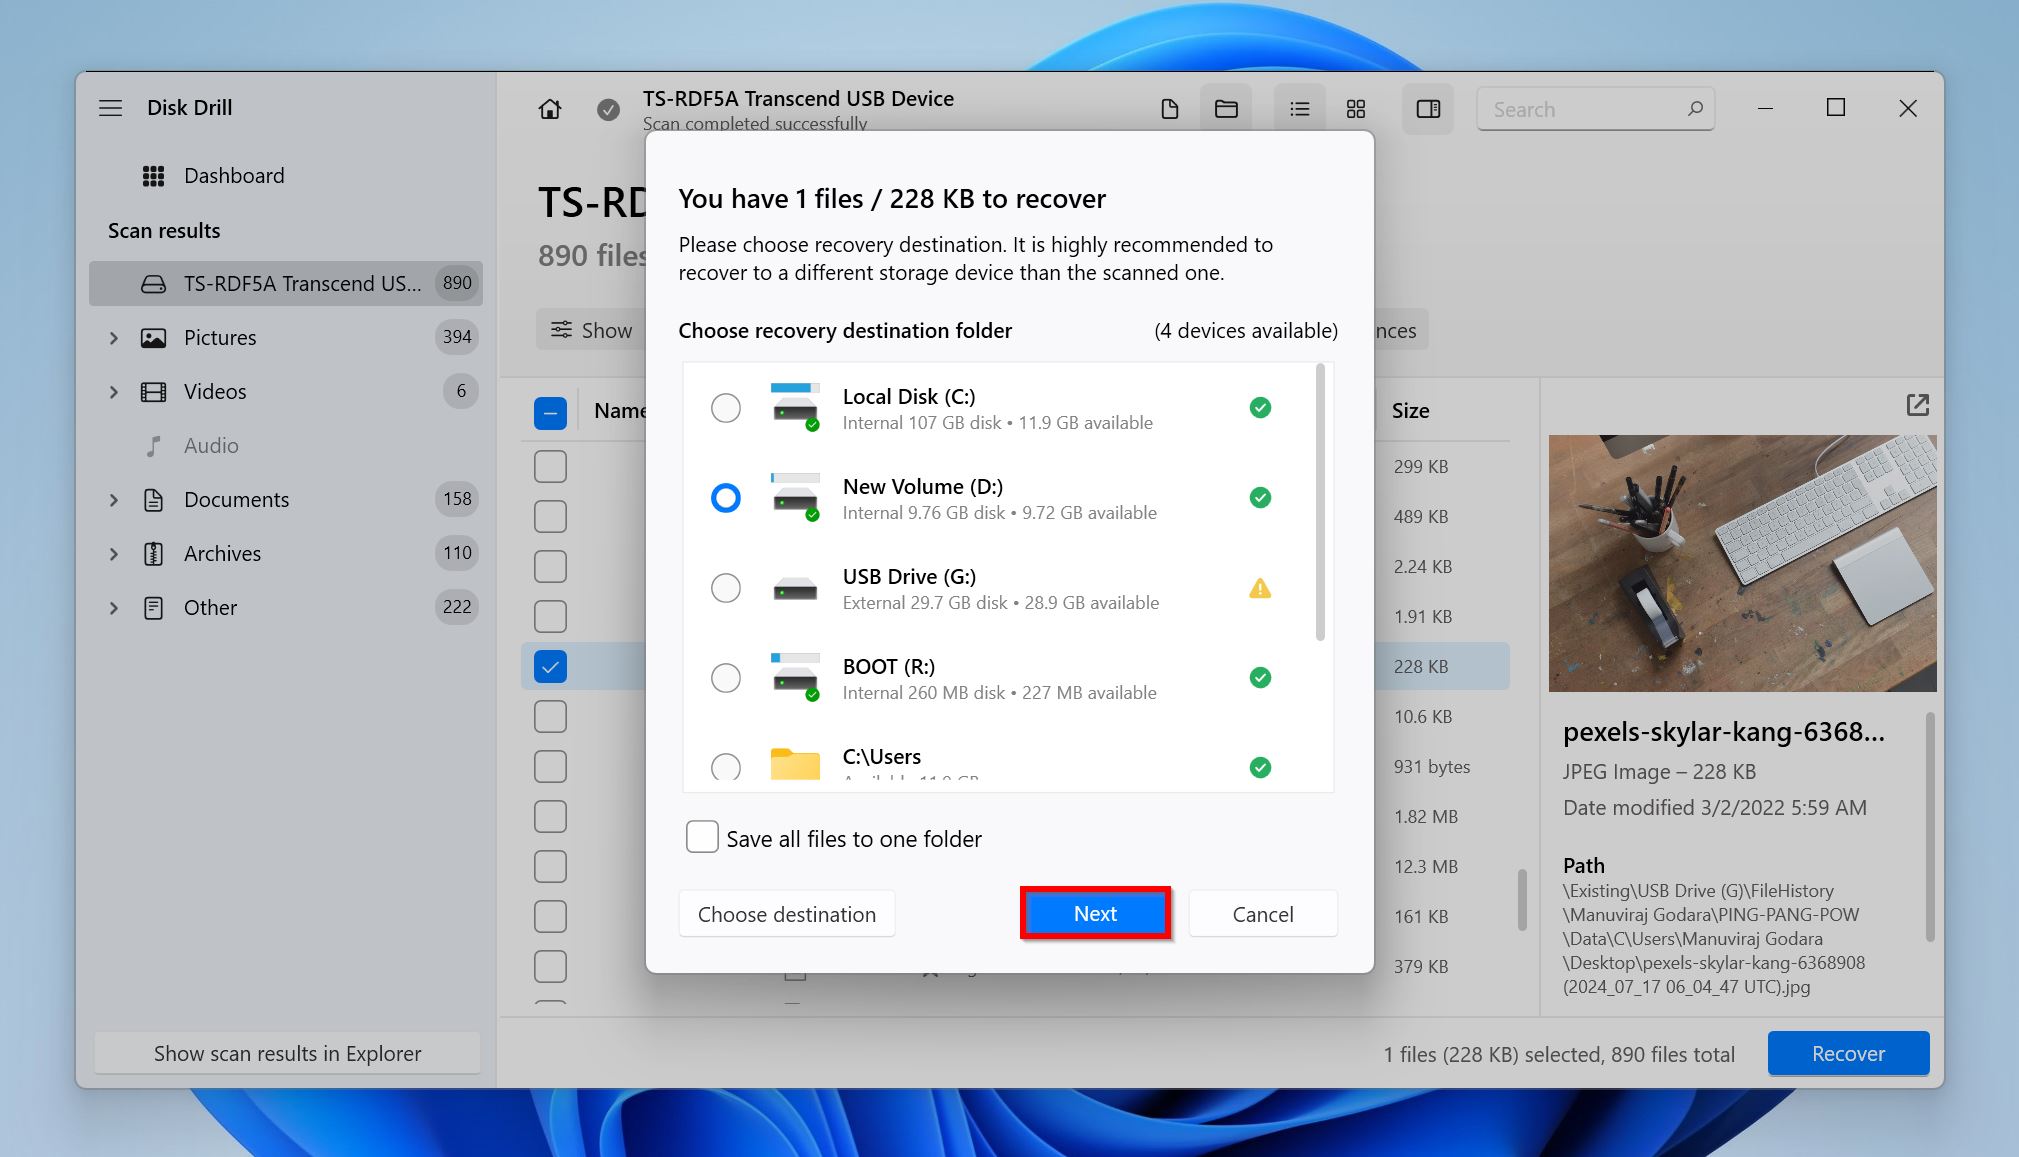
- Choose a recovery destination for the files, and click Next.
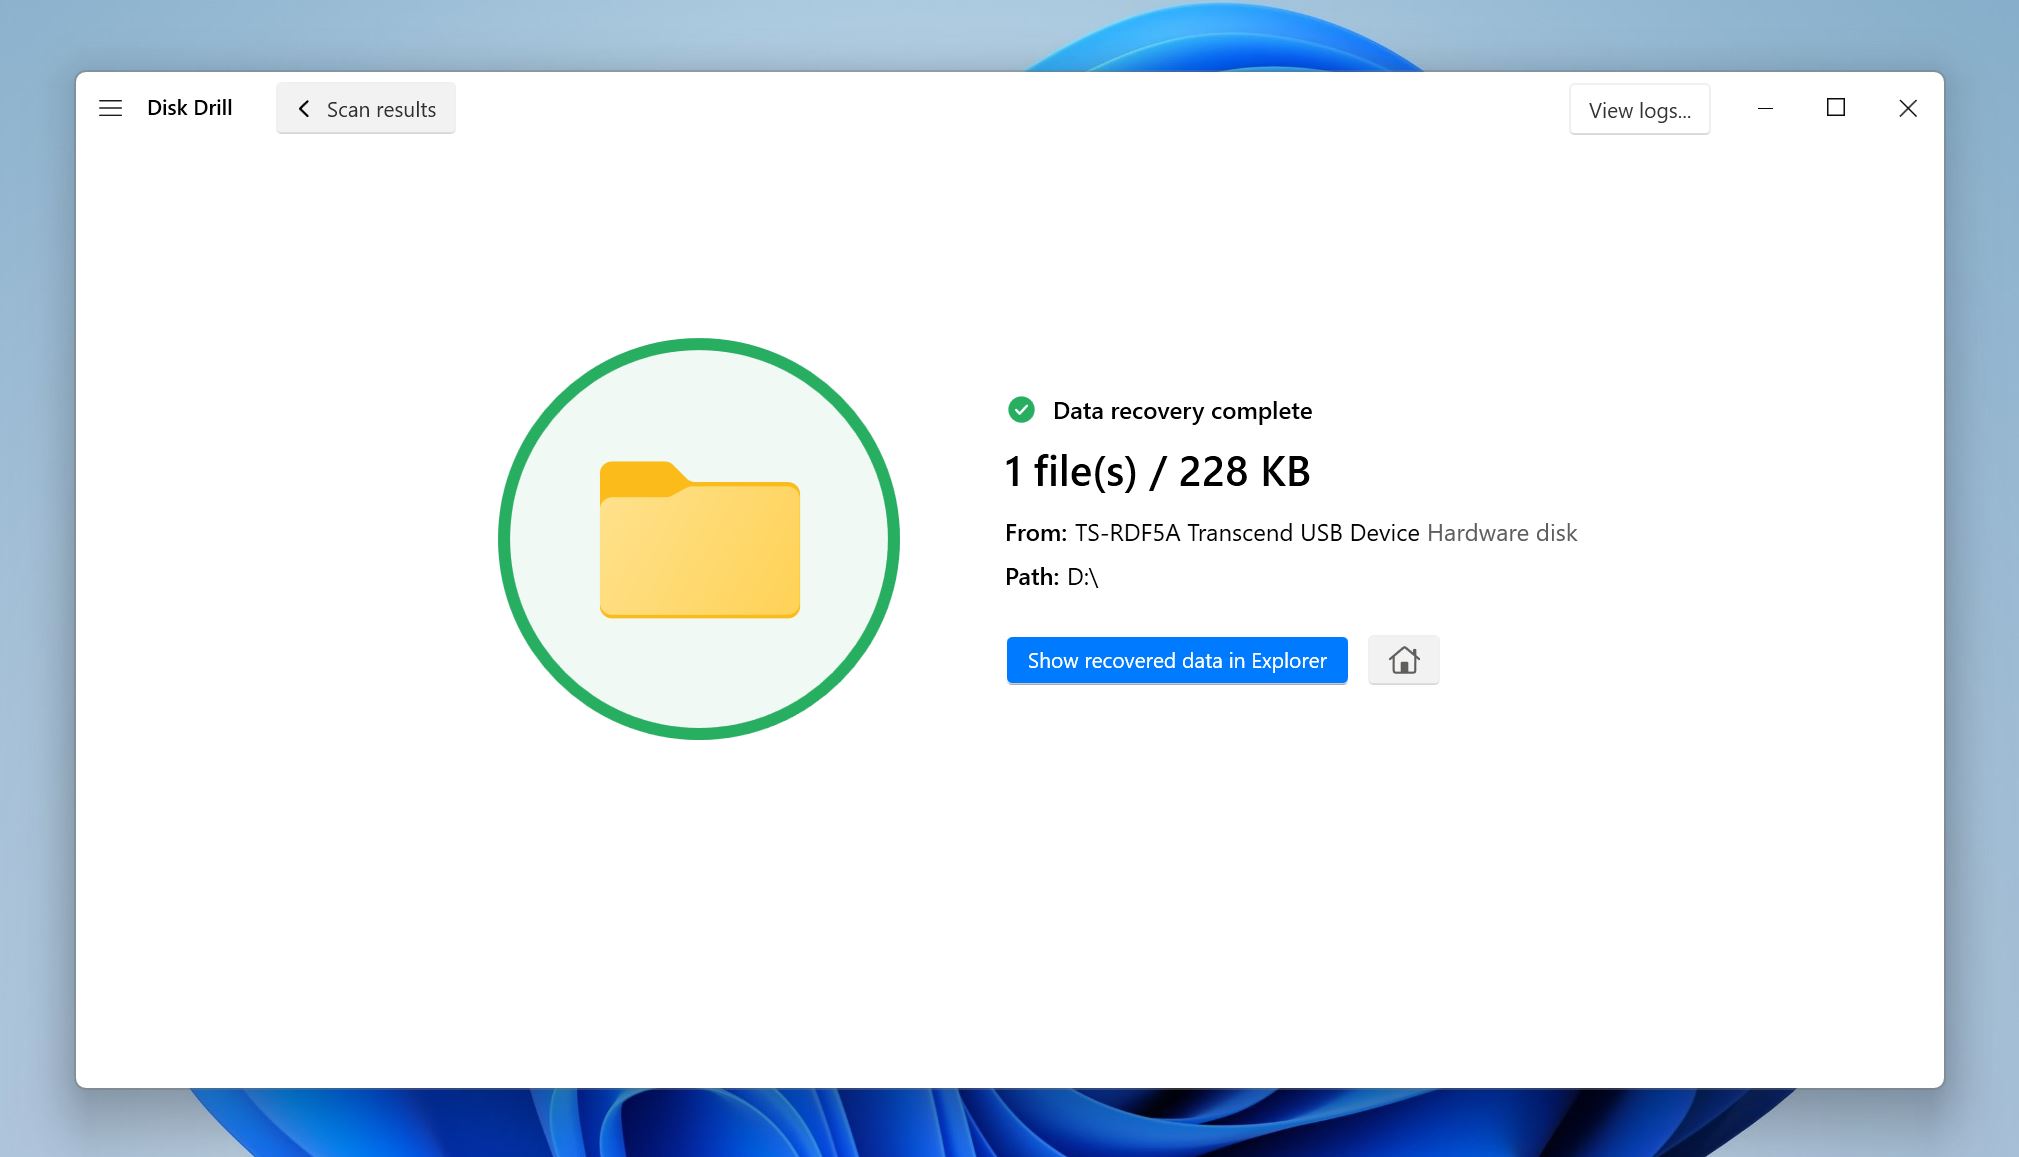
- Disk Drill will recover the selected files.
Method 2: Fix the File System and Regain Access to your Data
Full disclosure—my SSD was so far gone that fixing the file system wasn’t an option. I wanted my data back, which I did, using the previous method. However, you can recover a dead SSD and fix the file system corruption using a program like TestDisk. Essentially, your SSD’s partition will be restored to its previous state, with all your files intact.
Hint: You can attempt this method after recovering your files using a data recovery program for added peace of mind.
Using TestDisk can be a bit of a hassle because of its lack of a graphical user interface (GUI). Here, the extensive TestDisk documentation is a godsend. Navigation and selection duties will be handled entirely using your keyboard—the Arrow keys to navigate, and the Enter key to select.
TestDisk lets you rebuild your SSD’s boot sector, and recover lost partitions. Depending on what caused you to lose access to your data, doing one of these will help you recover it.
Here’s how to recover data from a failed SSD using TestDisk:
Part 1: Rebuild the Boot Sector
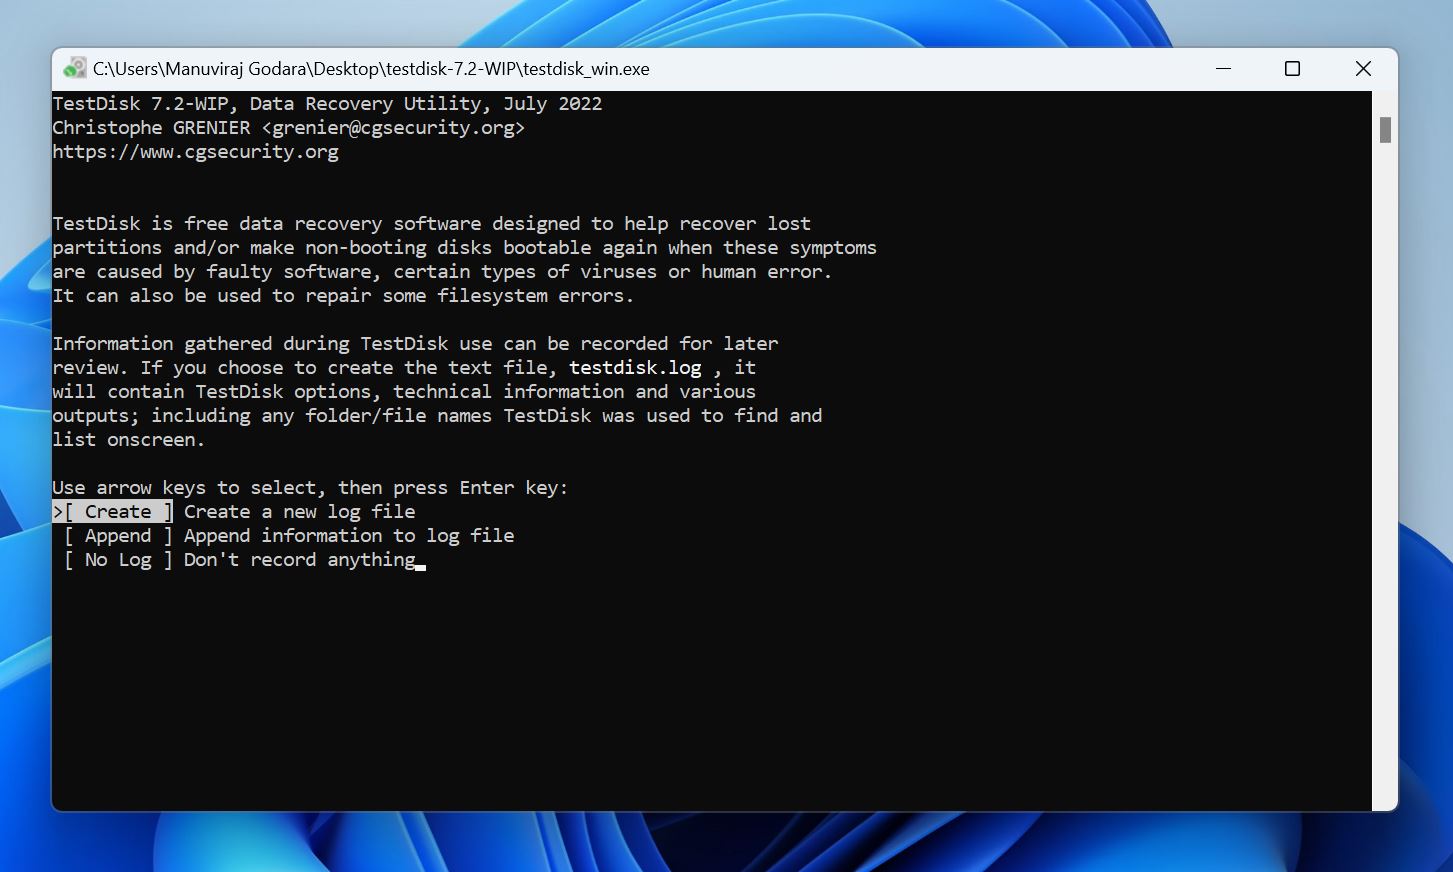
- Download TestDisk, extract the files, and run testdisk_win.exe from the extracted folder.
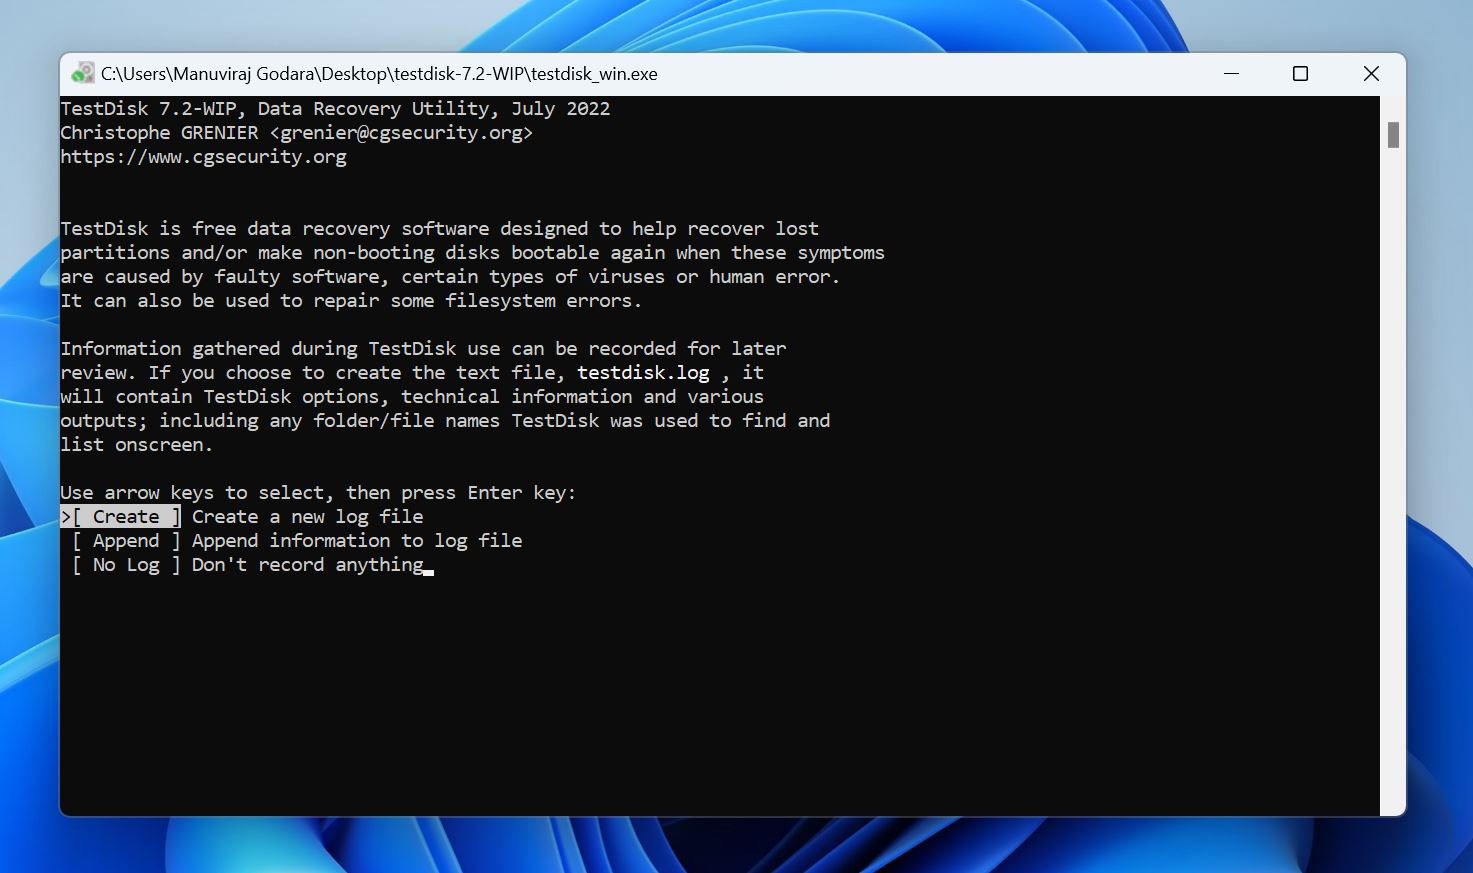
- Choose whether you want to create a log file or not, and press Enter.
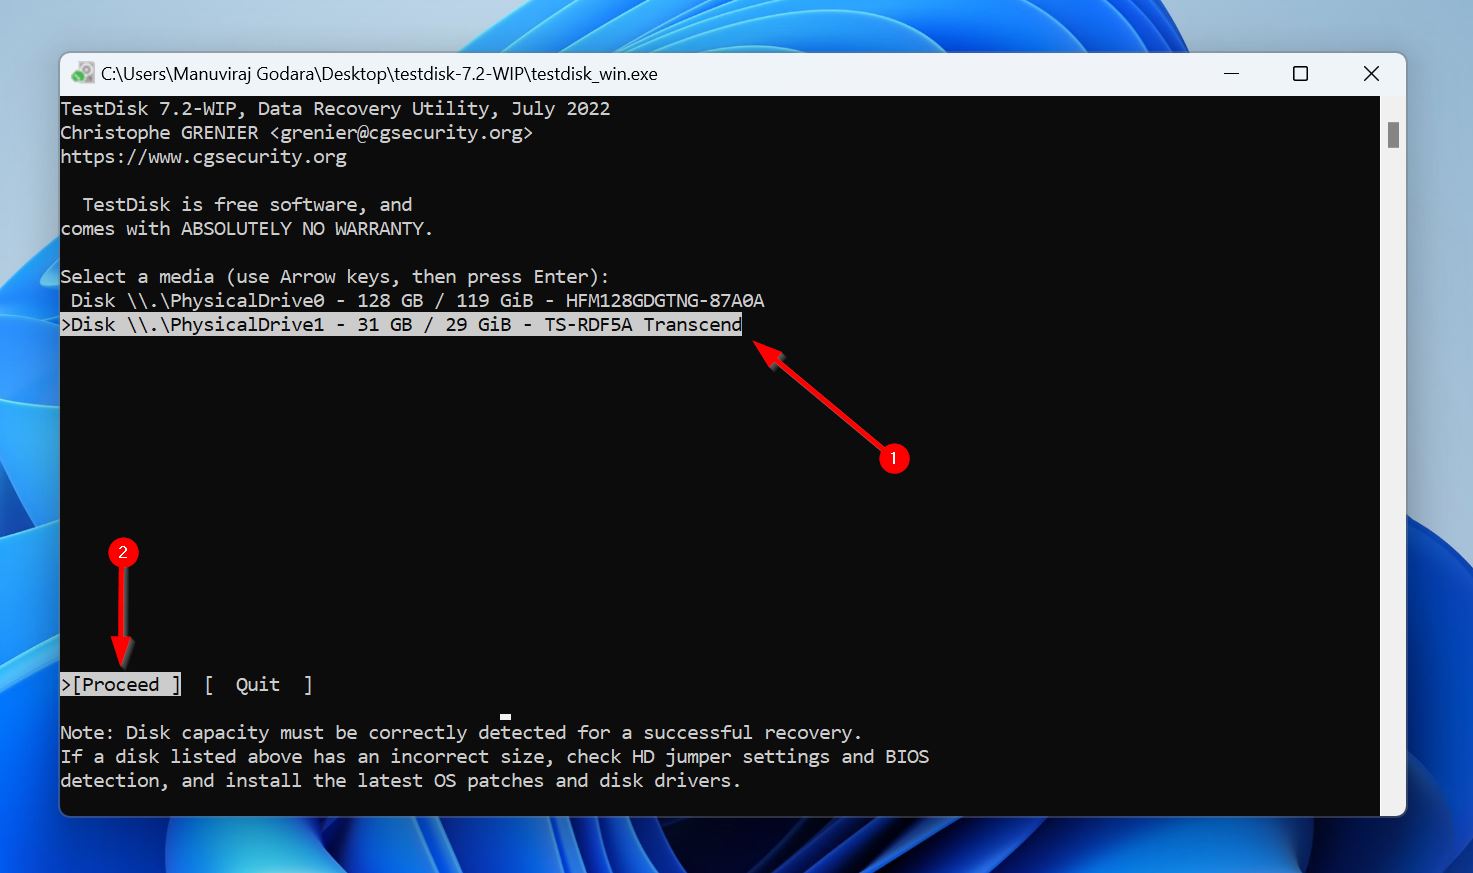
- Select your SSD and press Enter.

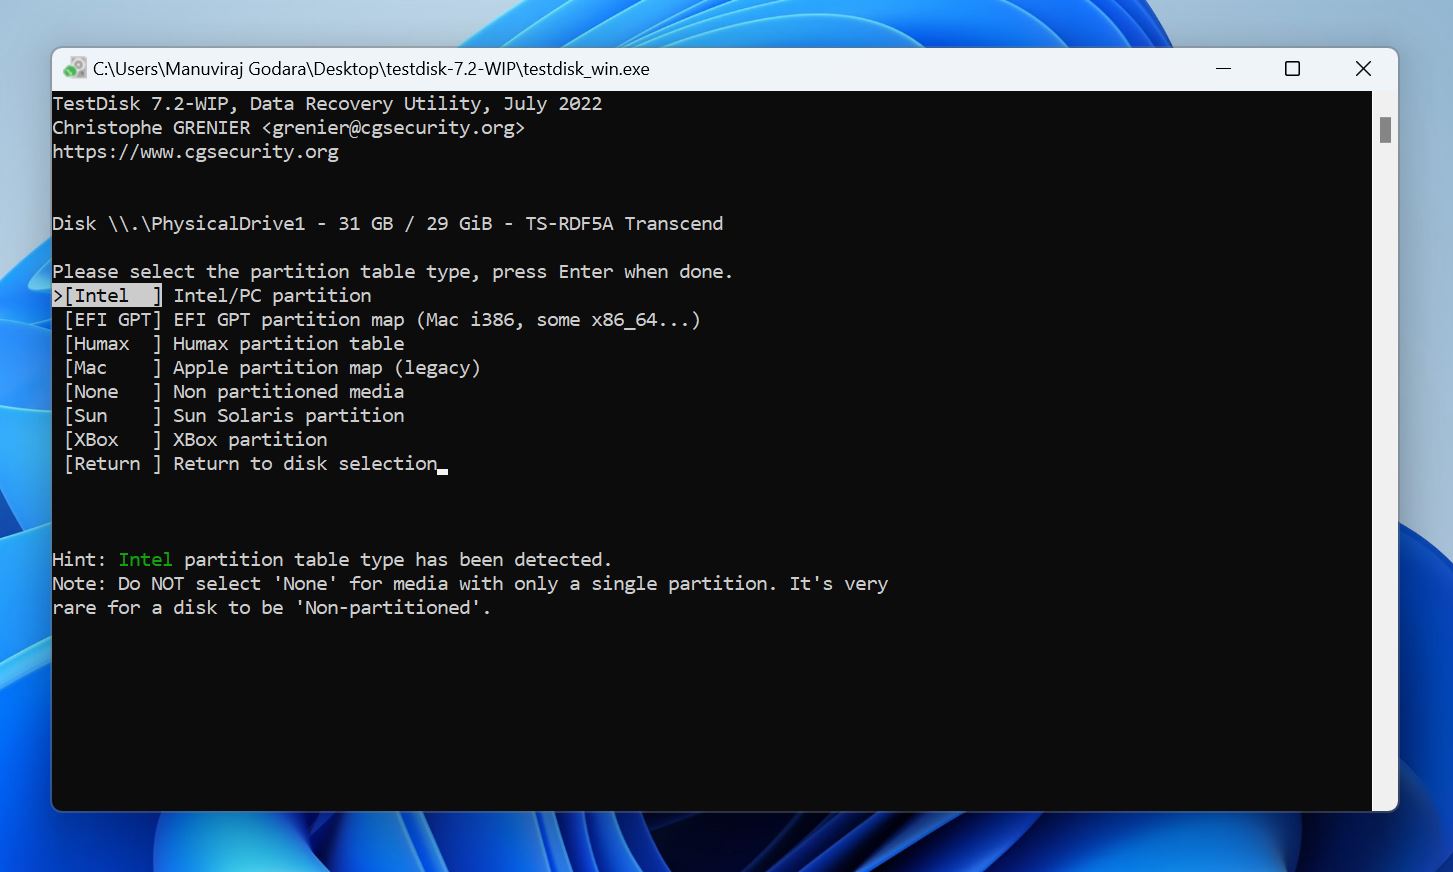
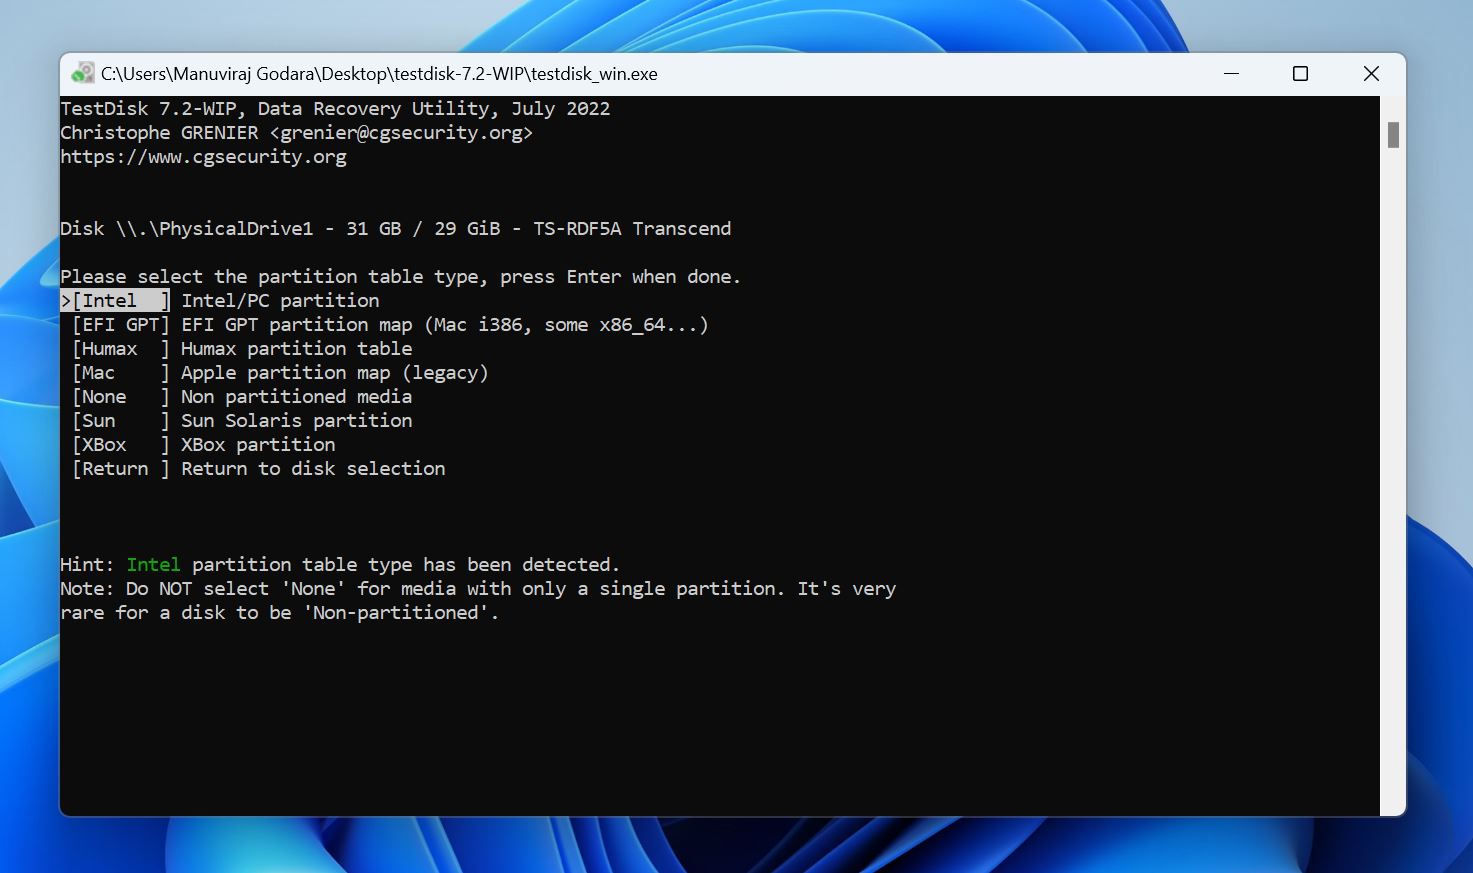
- Select the partition table type and press Enter. TestDisk auto-detects this, so it’s best to simply press Enter on this screen, unless you’re sure the partition table is different.
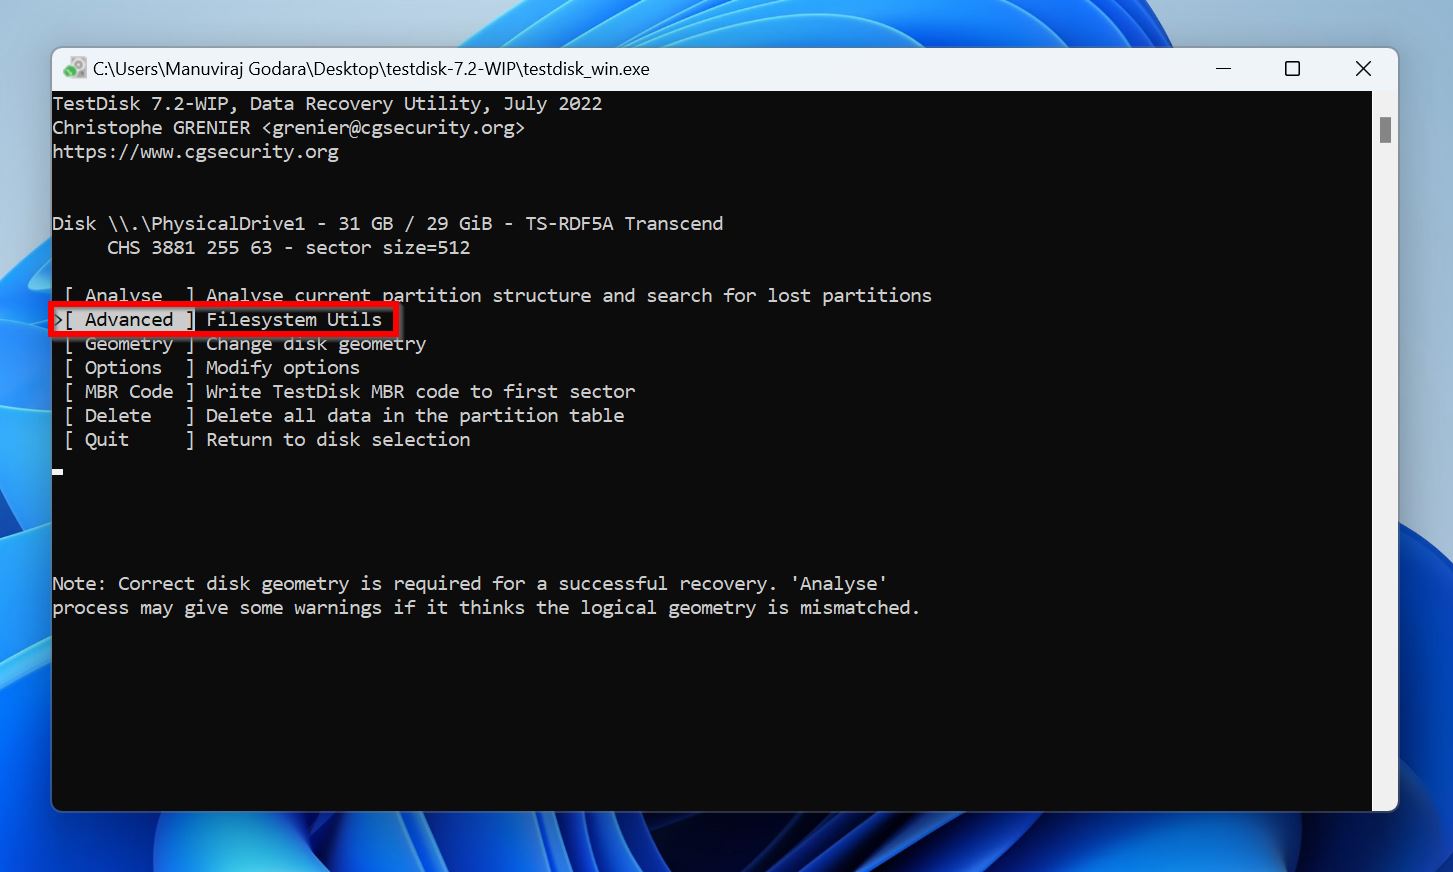
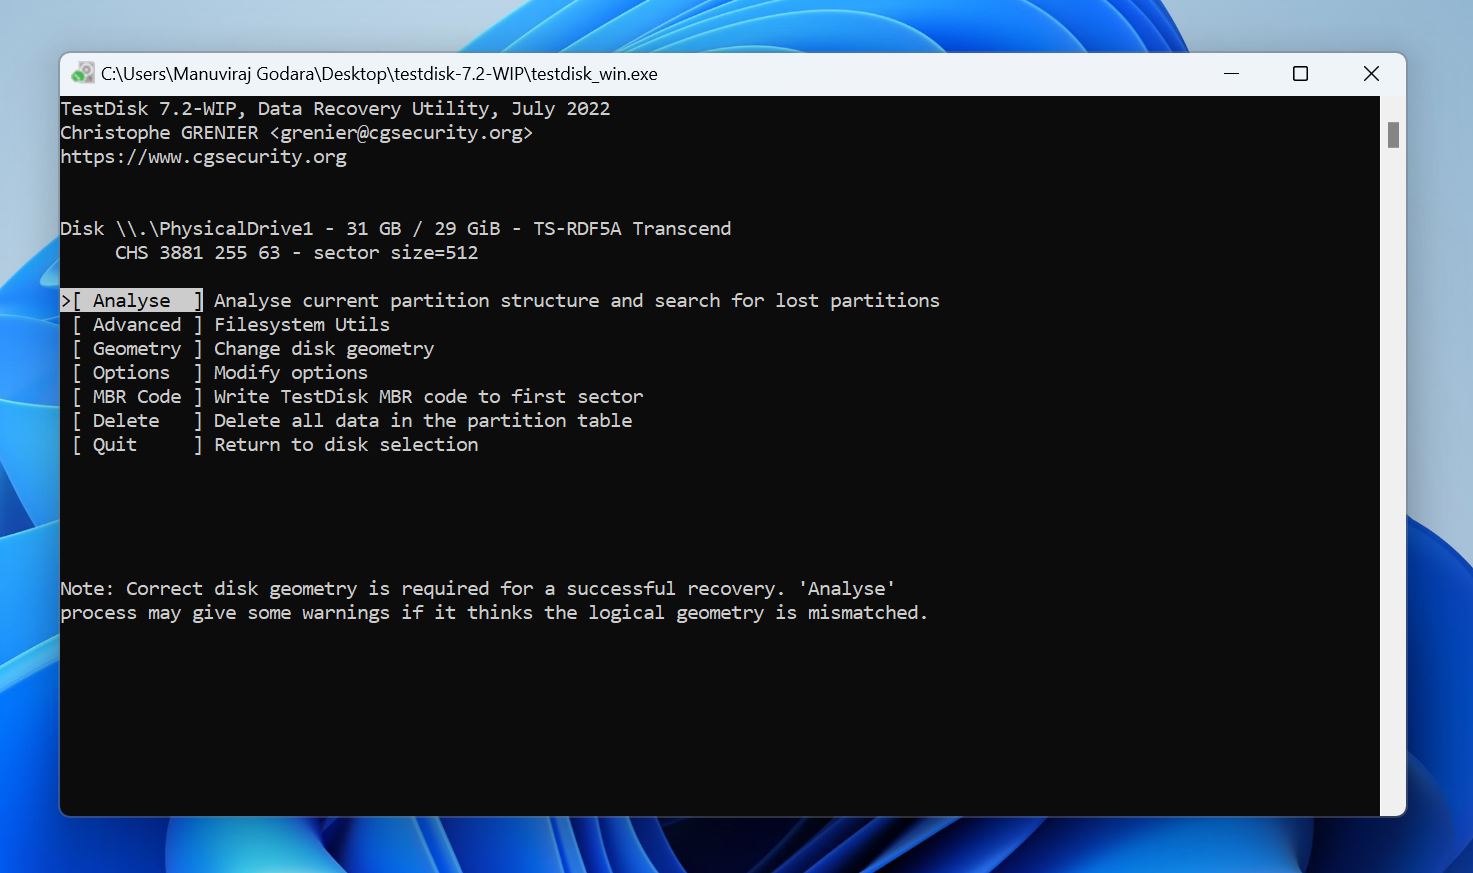
- Choose Advanced and press Enter.
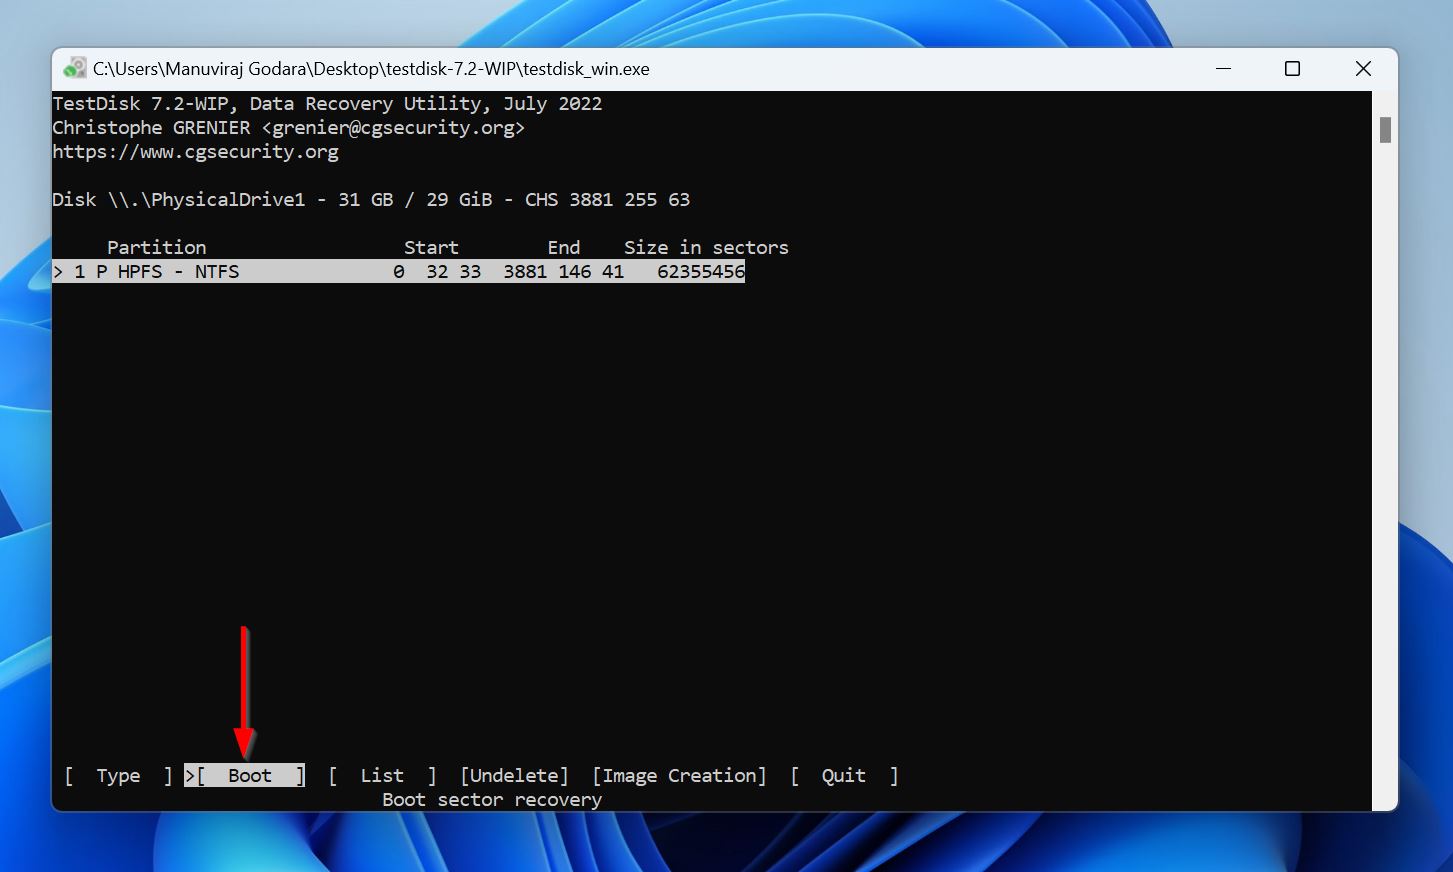
- Choose Boot and press Enter.
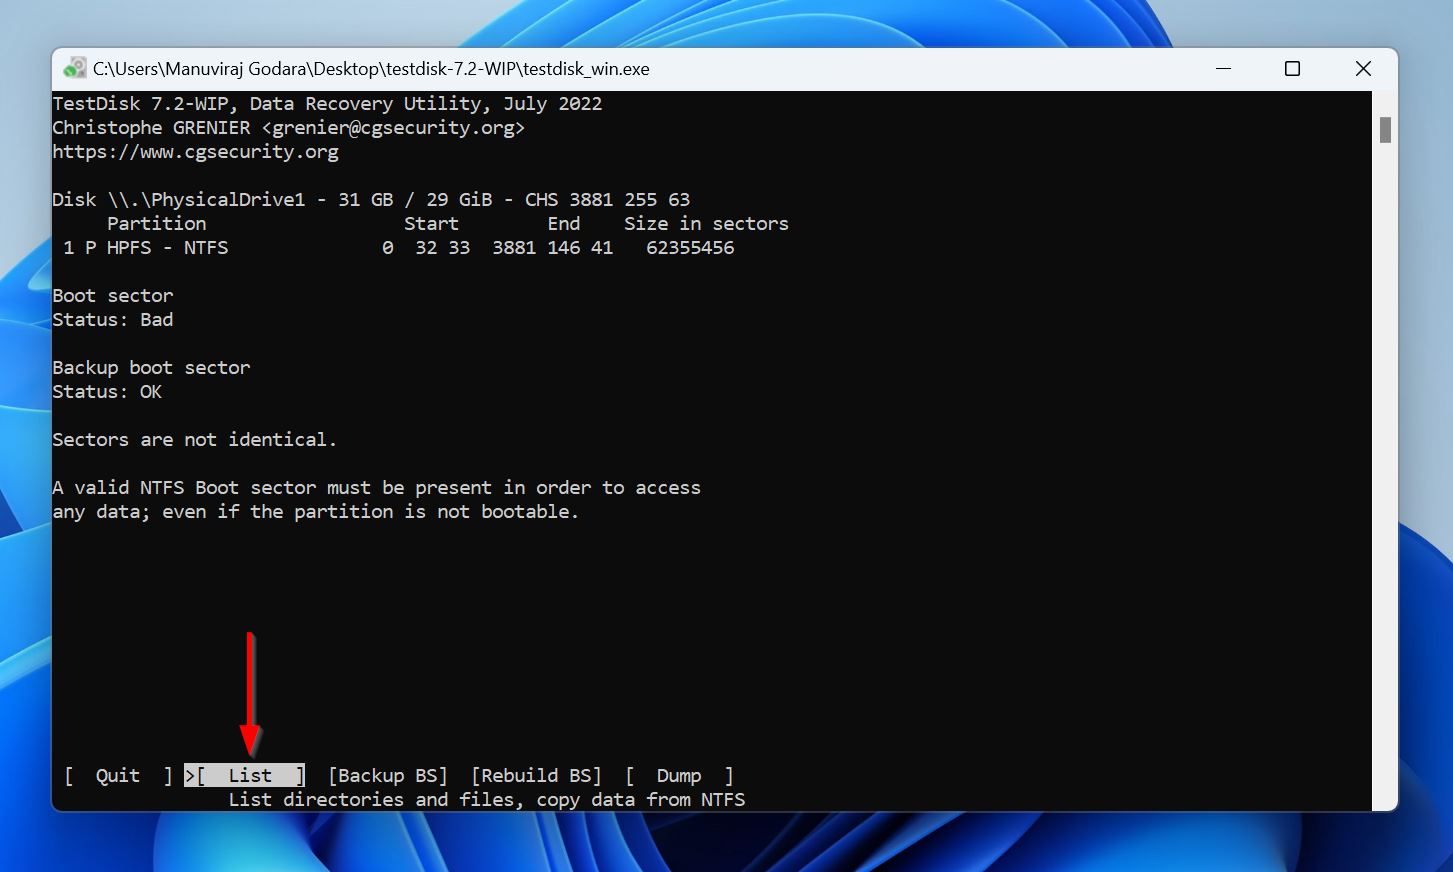
- Pick List and press Enter to list the files on your SSD. I suggest selecting and copying them to a secure location. To select a file, highlight it, and press “:” (the Shift + ; key). Alternatively, you can select all your files by simply press the A key. Once you’ve selected the files, press C (capital) on your keyboard. Go up and down directories by using the left and right arrow keys, respectively. Once you’ve navigated to the required directory, press C on your keyboard. Press Q to go back.
- Select Backup BS and press Enter.
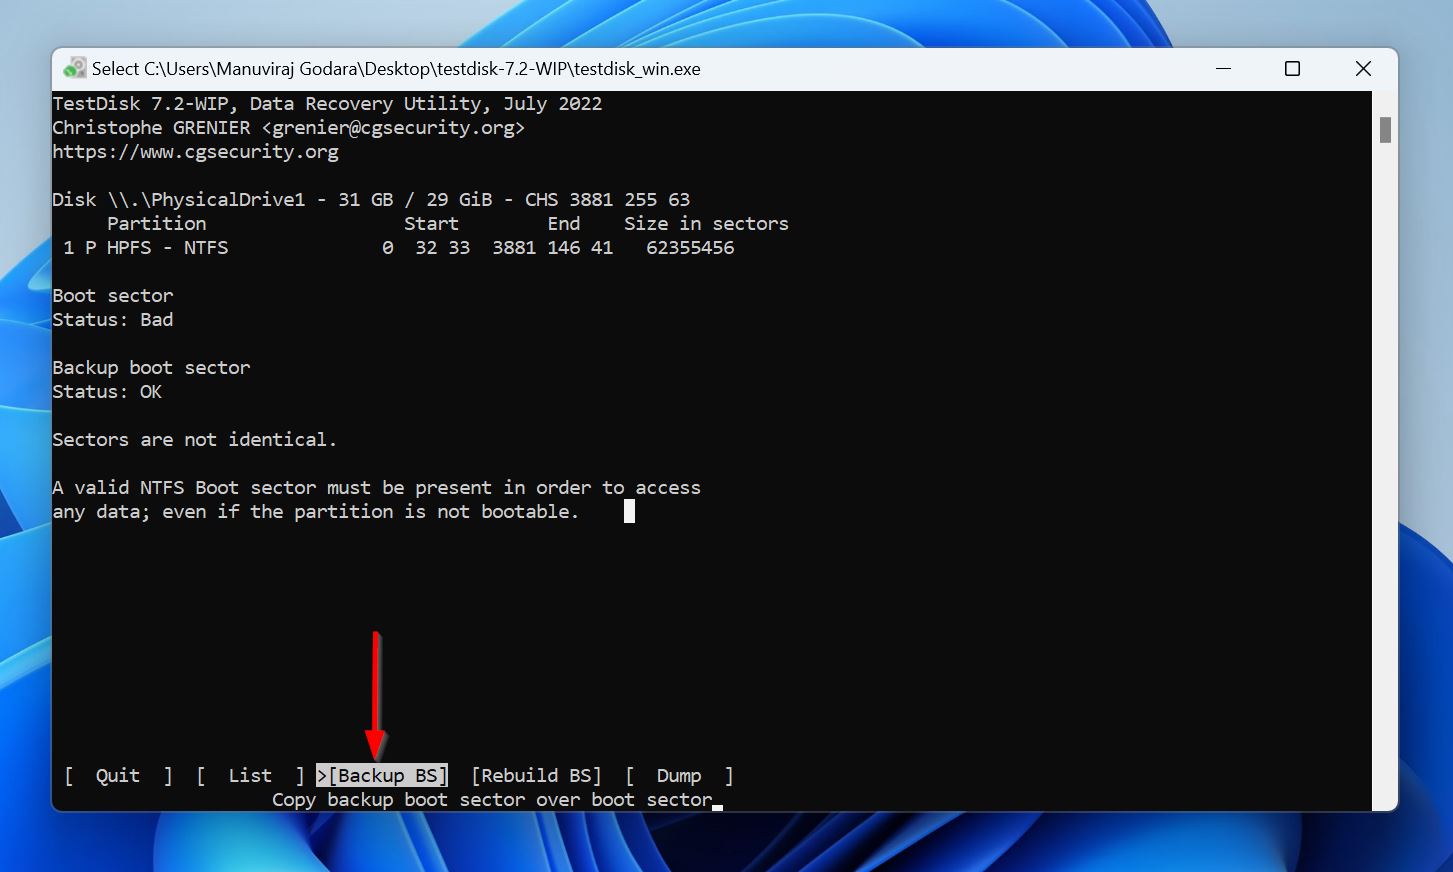
- Press Y on the confirmation screen.
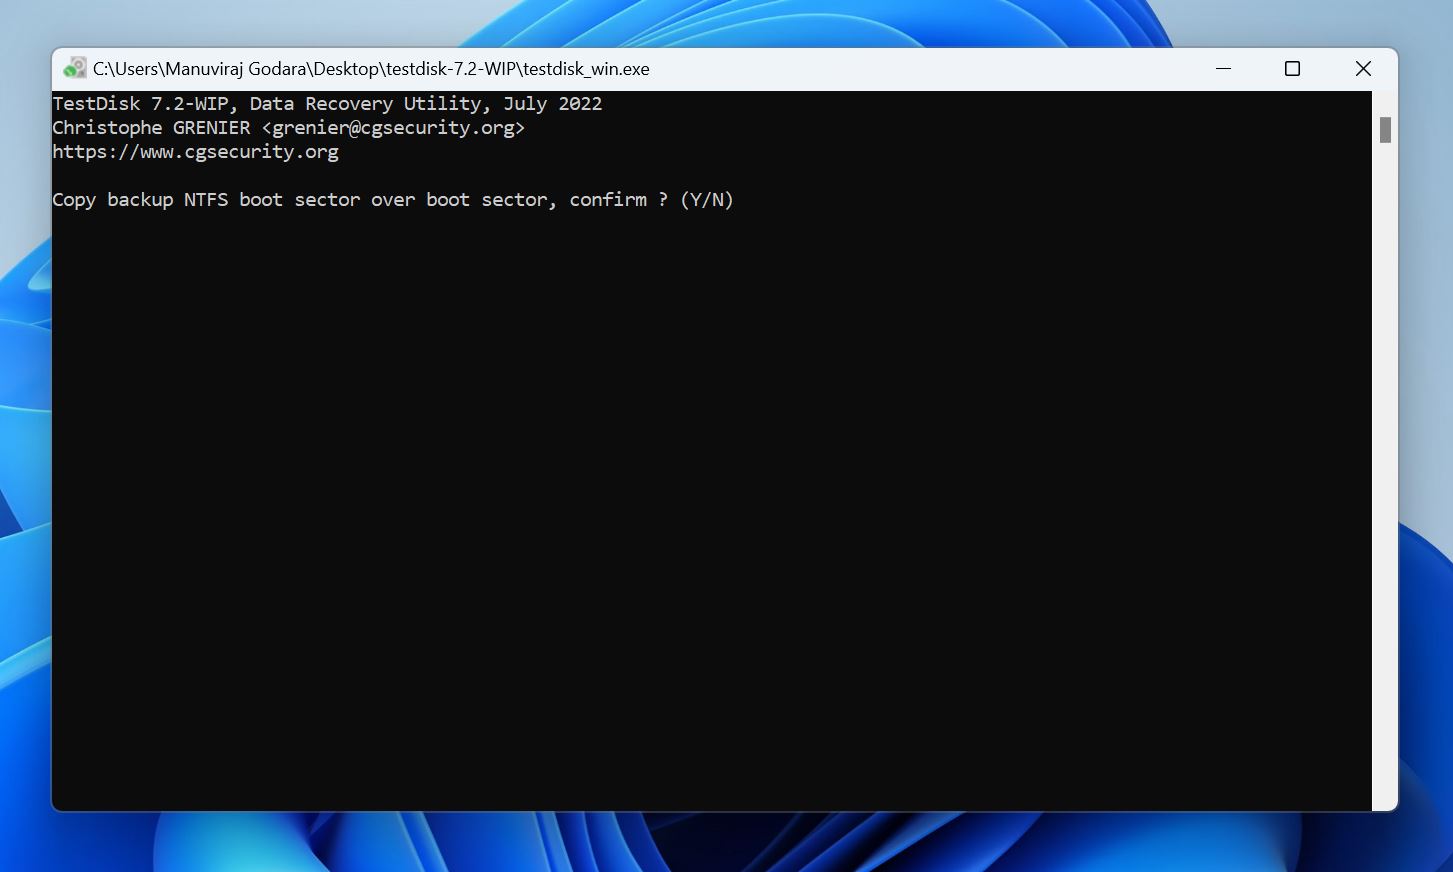
- TestDisk will repair the filesystem.
- Reboot your PC.
Part 2: Recover a Deleted/Lost Partition
- Launch TestDisk.
- Decide if you want to create a log file or not.
- Select your SSD, and press Enter.
- Select the partition table type. TestDisk auto-selects this, so it’s best to simply press Enter on this screen.
- Select Analyse and press Enter.
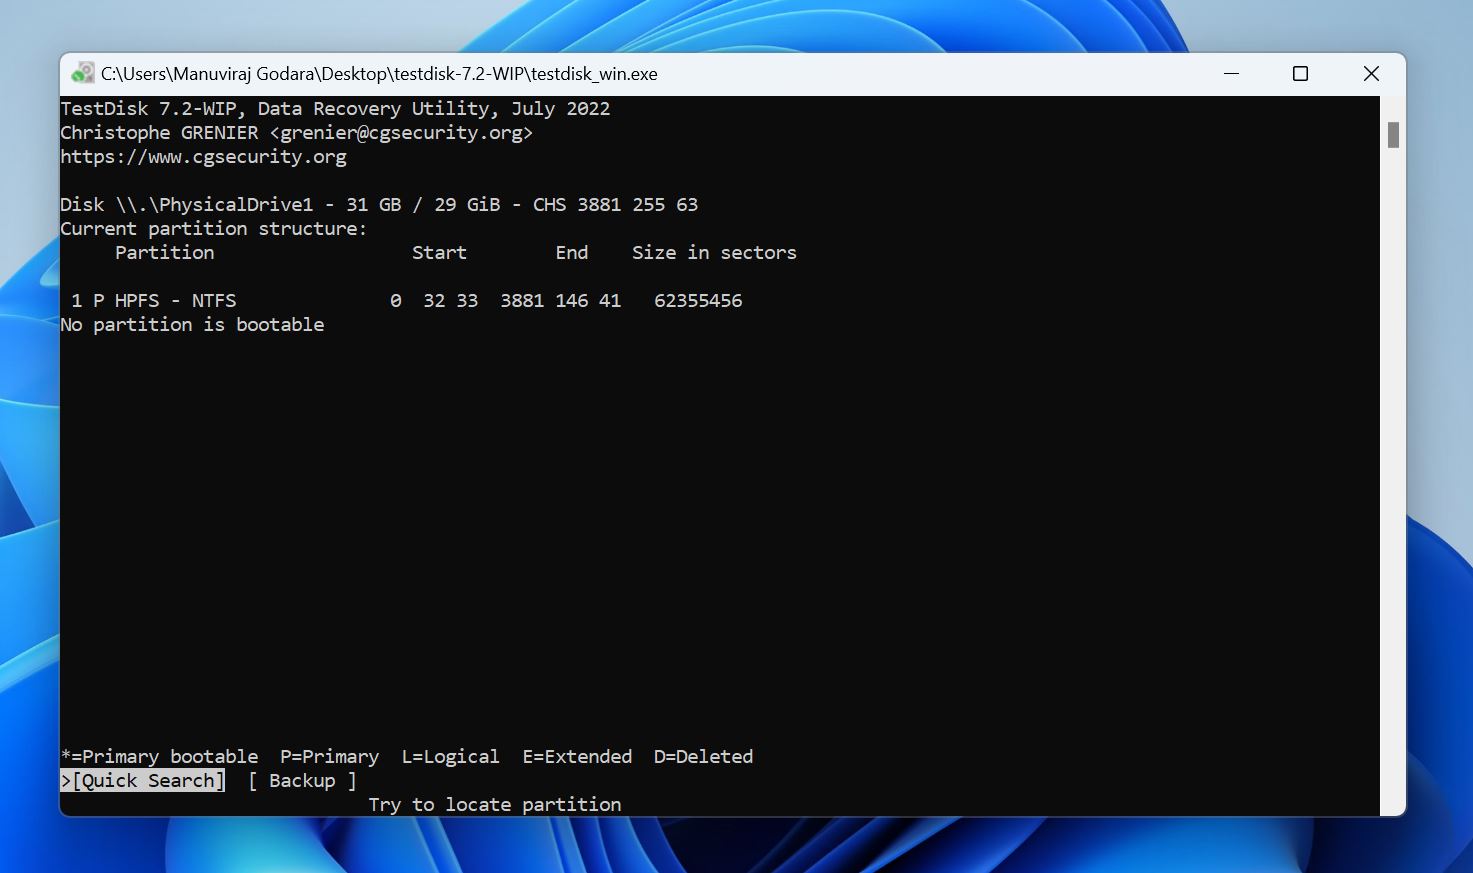
- Select Quick Search and press Enter. TestDisk will list the recoverable partitions.
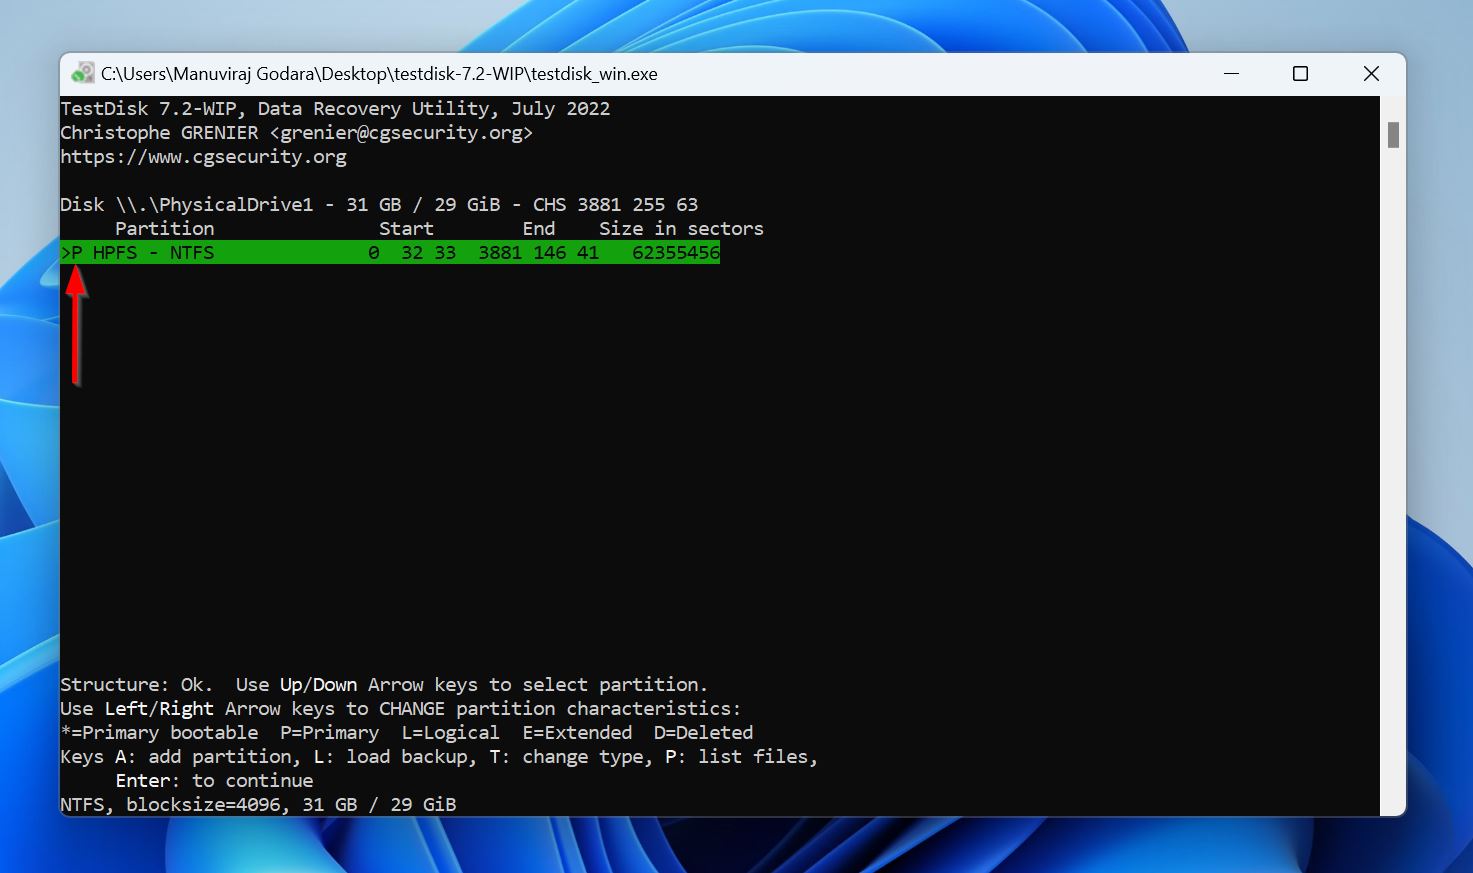
- To view the files on a partition, select it, and press P on your keyboard. Press Q to go back.

- Each partition will have a prefix before it—P (Primary), D (Deleted), E (Extended), L (Logical), and * (Primary bootable). If you wish to recover a partition, ensure it has a P prefix before it—you can cycle through prefixes using the left and right arrow keys. Once you’ve done this, press Enter.
- If the previous screen didn’t list the required partition, you can select Deeper Search for a more thorough lost partition search, and follow Step 8 again.
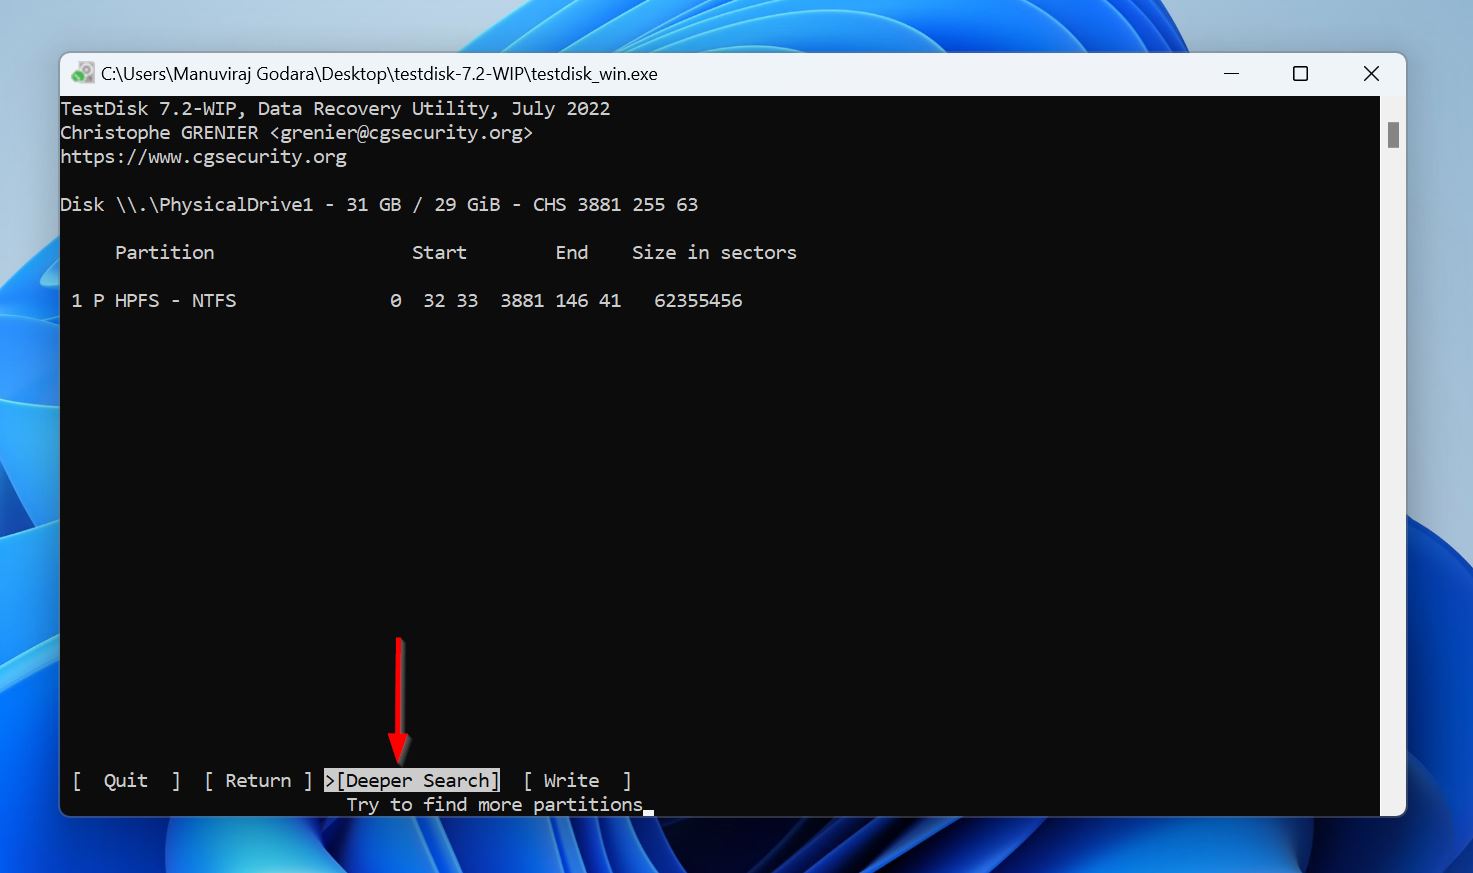
- Select Write and press Enter.
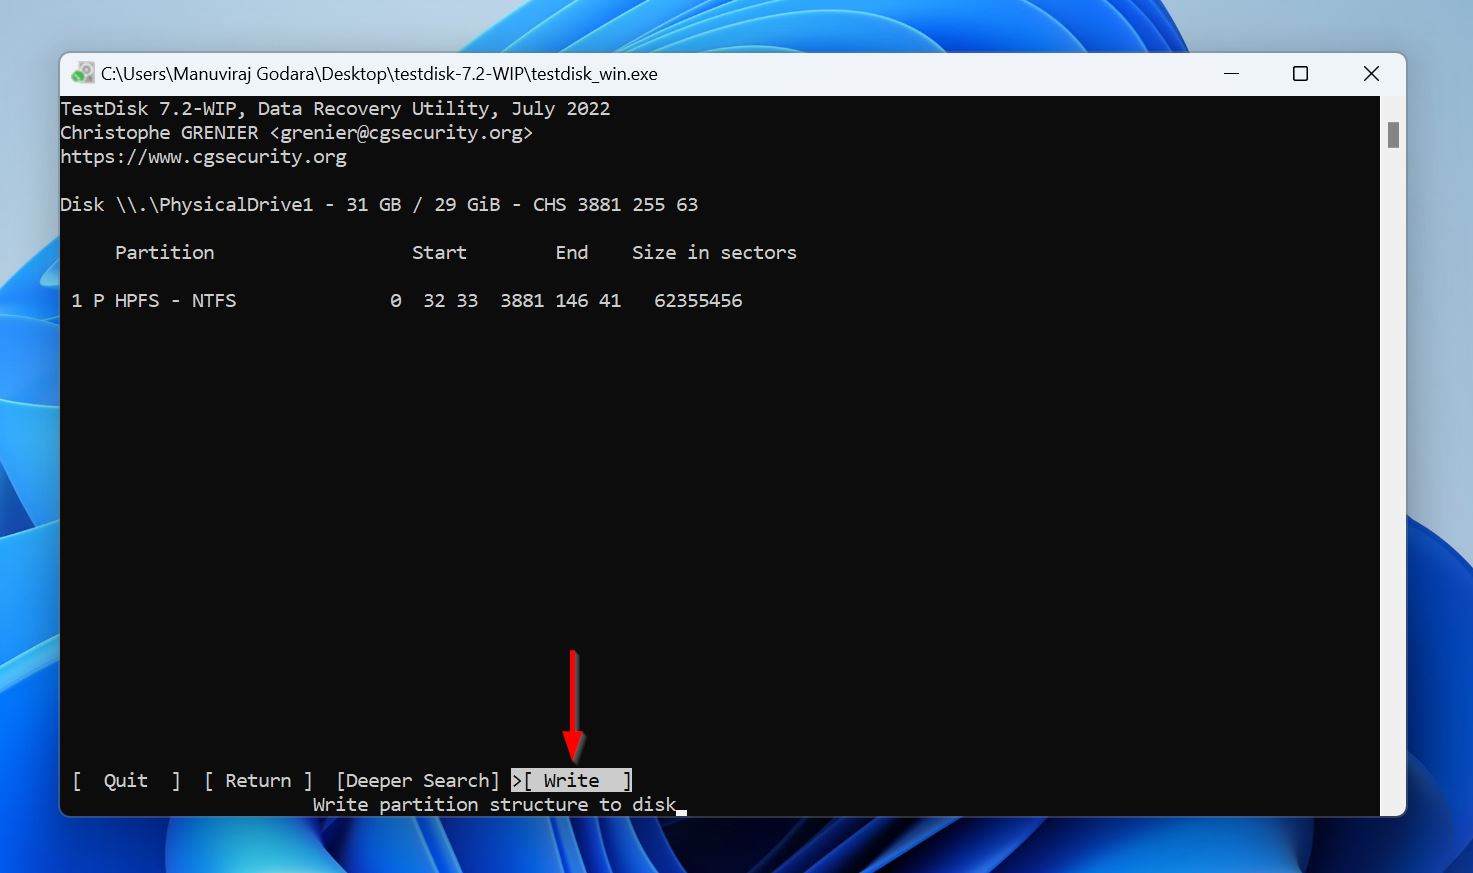
- Press Y on the confirmation screen.
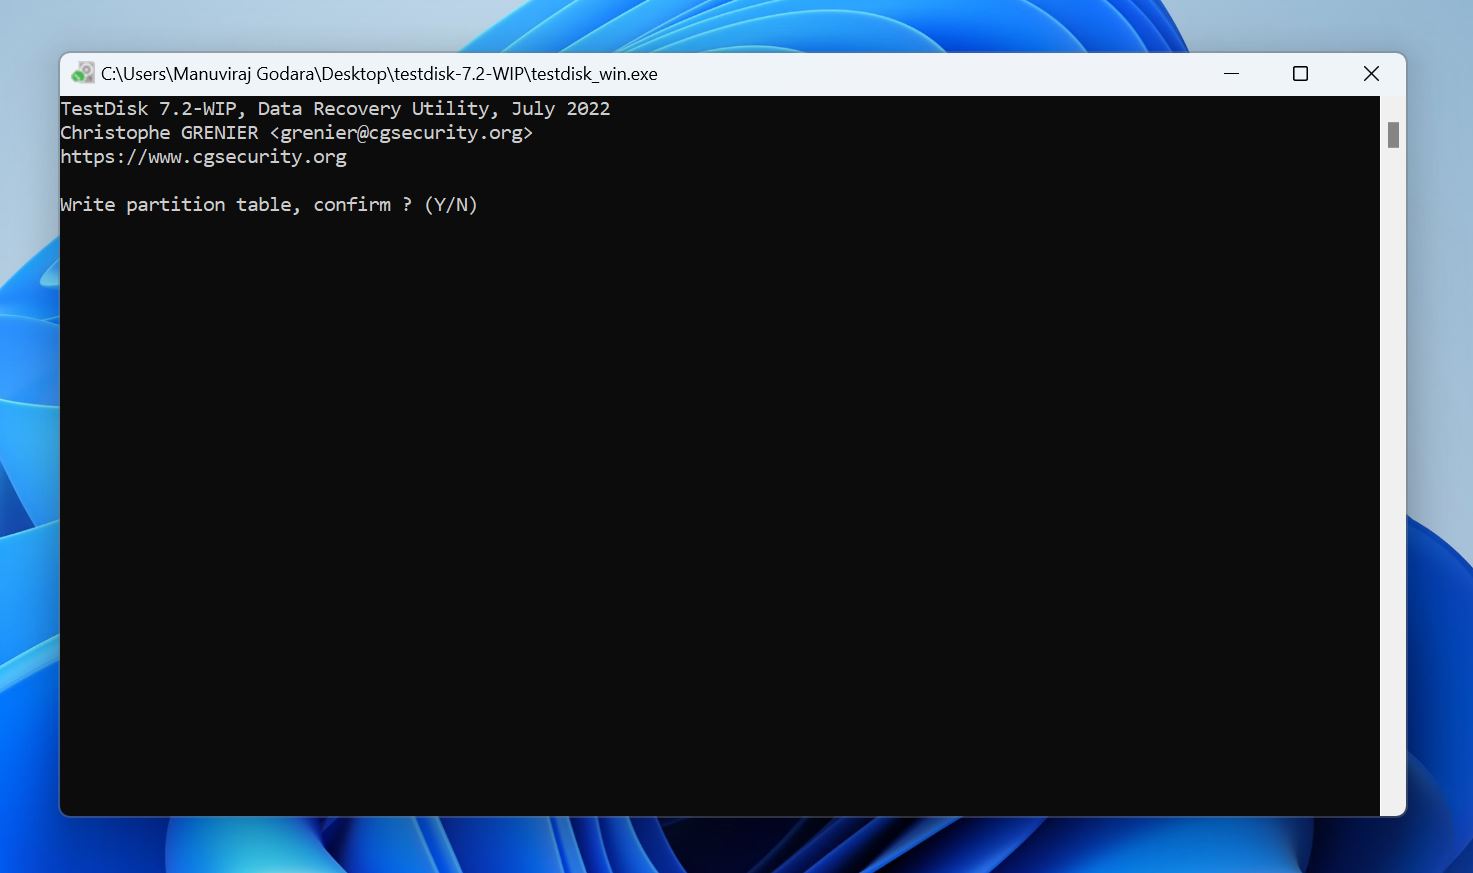
- Reboot your PC.
What to Avoid During Dead SSD Data Recovery
I came across a horde of useless, and often, harmful advice on the internet about dead SSD data recovery. After a thorough critical evaluation of it, I discovered that—at best, it’s just generic, unhelpful advice that lists common troubleshooting methods that don’t even apply to dead SSDs. At worst, it’s advice that can significantly reduce your chances of data recovery, and even harm your SSD.
Avoid doing these things when dealing with dead SSDs:
- Running CHKDSK: The CHKDSK utility doesn’t work on RAW drives, so it’s just unhelpful advice. Additionally, CHKDSK can cause data loss, and is best avoided unless you’ve already recovered your files. In case you already ran CHKDSK and faced data loss, here’s a super helpful guide on how to get it back.
- Assigning drive letters: Again, just unhelpful, and unlikely to work.
- Updating drivers: Drivers are usually updated automatically along with Windows. If your OS is updated, so are your SSD drivers.
- Attempting data recovery regardless of the SSDs physical state: Just, no. If the SSD is not showing up in Windows Disk Management, contact a professional data recovery service.
Conclusion
I had an easy time recovering data from my dead SSD, because I followed a few simple tips. First, I checked if my PC detects the SSD—it should show up in Windows Disk Management. Then, I used a capable data recovery program—Disk Drill—to recover my data. Alternatively, you can use TestDisk to fix the SSDs file system and regain access to your data (this doesn’t always work).
There are two main cases where you should avoid DIY recovery and contact a professional data recovery service instead. One, if the SSD is physically damaged, or it doesn’t show up in Windows Disk Management. Two, if the data is invaluable, and you need to recover it at any cost.
FAQ
Can data be recovered from a physically damaged SSD?
Yes, but only by a professional data recovery service. In most cases, a physically damaged SSD won’t show up on your PC, and data recovery programs are unlikely to detect it. Even if your PC detects the SSD, attempting DIY recovery should be avoided as there’s a high chance of worsening the situation.
What should I do if my SSD fails?
Here’s what you should do when your SSD fails:
- Stop using it—don’t write any new files to the drive.
- Check if your SSD shows up in Disk Management. If it does, create a disk image of the SSD, using a program like Disk Drill. Then, recover data from the disk image.
- In case the SSD doesn’t show up in Disk Management, leave it be and contact a professional data recovery service for data recovery. Avoid the DIY data recovery route.
How to recover SSD data from a dead laptop?
You have two options:
- Open the laptop, disconnect the SSD, connect it to another PC using an SSD enclosure, and run a data recovery scan using a capable third-party data recovery tool.
- If the SSD is soldered on to the motherboard, your only option is to contact a professional data recovery service.
How can I prevent data loss from an SSD?
To prevent data loss from an SSD, follow these tips:
- Backup, backup, backup. Backing up your data regularly is the only sure-shot way of preventing data loss. Use Windows File History, or a third-party backup tool to automate the process.
- Use a good quality surge-protector, or a UPS to prevent power surges. SSDs are particularly sensitive to this.
- Use a S.M.A.R.T. monitoring tool like CrystalDiskInfo to keep a check on your SSD’s health.
- Avoid shutting down your PC abruptly. A UPS can help out here by providing backup power.
How do I fix a dead SSD?
Fixing a dead SSD should only be attempted if it’s logically corrupted, and not physically damaged. As for fixing it, you could:
- Repair the file system using a tool like TestDisk.
- Recover your data, then format the SSD.
- Run CHKDSK, if the file system is still recognized and doesn’t show up as RAW.
How many years do SSDs last?
There’s no fixed answer to this, as SSDs wear and tear primarily depends on how many read/write cycles it goes through. In most cases, you can expect an SSD to last 5 years, or more.
This article was written by Manuviraj Godara, a Staff Writer at Handy Recovery Advisor. It was also verified for technical accuracy by Andrey Vasilyev, our editorial advisor.
Curious about our content creation process? Take a look at our Editor Guidelines.