You believed the hype, got a Steam Deck, and realized why everyone’s praising it: it’s compact, it looks and feels good, and it’s also effortless to use, allowing you to play almost any game ever released for PCs while on the go.
But why did your favorite game’s saves disappear, and can you recover them to avoid losing the hours you’ve invested in it and start from scratch?
Can you “fix” the mangled files of a game that keeps crashing?
Or, for the power-users among us, is there any chance to recover lost documents from Steam Deck’s Desktop mode?
After living with the Steam Deck for over a year, and using it both for gaming and as a PC alternative for work, I, too, had to deal with the occasional lost files, data corruption, or “broken” games. Here are all the ways I’ve used to deal with such problems – and more.
What Types Of Data Can You Lose From Your Steam Deck, And How?
The Steam Deck is presented as a portable gaming console. Still, it’s actually a full-blown PC powered by a customized Linux operating system.

This enables its use both as an advanced gaming console and a standard computer. However, its hybrid nature also multiplies the ways you can lose data on it.
Steam Deck’s Gaming Mode
The Steam Deck’s gaming mode is the device’s default mode of operation. When you start up your Steam Deck, it boots into game mode. Valve’s Steam client serves as the primary user interface, granting you seamless access to your game library on Steam. In this mode, “normal” PC functionality is concealed behind the Steam client to make the device easy for users who don’t care about computers, desktops, or diving into configuration files.
The most common instances of data loss in Steam Deck’s game mode include:
- 🎮 Accidentally deleting installed games.
- 🕹️ Losing game saves (due to data corruption or user error).
- 👾 Manually deleting game-related extra data, such as shader cache and Proton compatibility layer files (which make playing Windows games on Linux possible).
- 💾 Absent-mindedly formatting your filled-with-data external SD card or internal M.2 drive.
Steam Deck’s Desktop Mode
Many users will be fine never visiting it. Still, those who want to take advantage of everything the Steam Deck offers, perform advanced customization, or use it as an actual computer must venture into its desktop mode.
In desktop mode, the Steam Deck works almost identically to a laptop running SteamOS, a heavily tweaked version of the popular Arch Linux distribution.
This mode grants complete access to the Steam Deck, including all devices and file systems, but also multiplies the ways you can unintentionally lose data on the device.
So, on top of the data loss scenarios that apply to the Steam Deck’s game mode, its desktop mode also makes it possible to:
- ❌ Delete downloaded apps and files in your download folder.
- 🗃️ Remove or modify files essential for the Steam Client, “breaking” the Steam Deck’s default game mode.
- 🖥️ Delete other files you might need for the apps you use on your Steam Deck’s desktop mode.
- 💽 Format any storage device connected to the Steam Deck.
How to Recover Games and Saves on the Steam Deck
The Steam Deck might also be useful as a typical PC, but most people use it for its primary function: gaming. Thus, the most usual “stuff” one can lose on it are the games themselves and their saves. Can you recover them, or is your Civilization empire forever lost in data loss history?
How to Restore Your Lost Steam Saves on Your Steam Deck
You were playing an offline game or weren’t connected online, or the game didn’t have time to sync its saves with Steam Cloud, or you had Steam Cloud disabled. Then, you somehow broke your latest save file or would like to undo your latest progress. Is it possible? Yup!
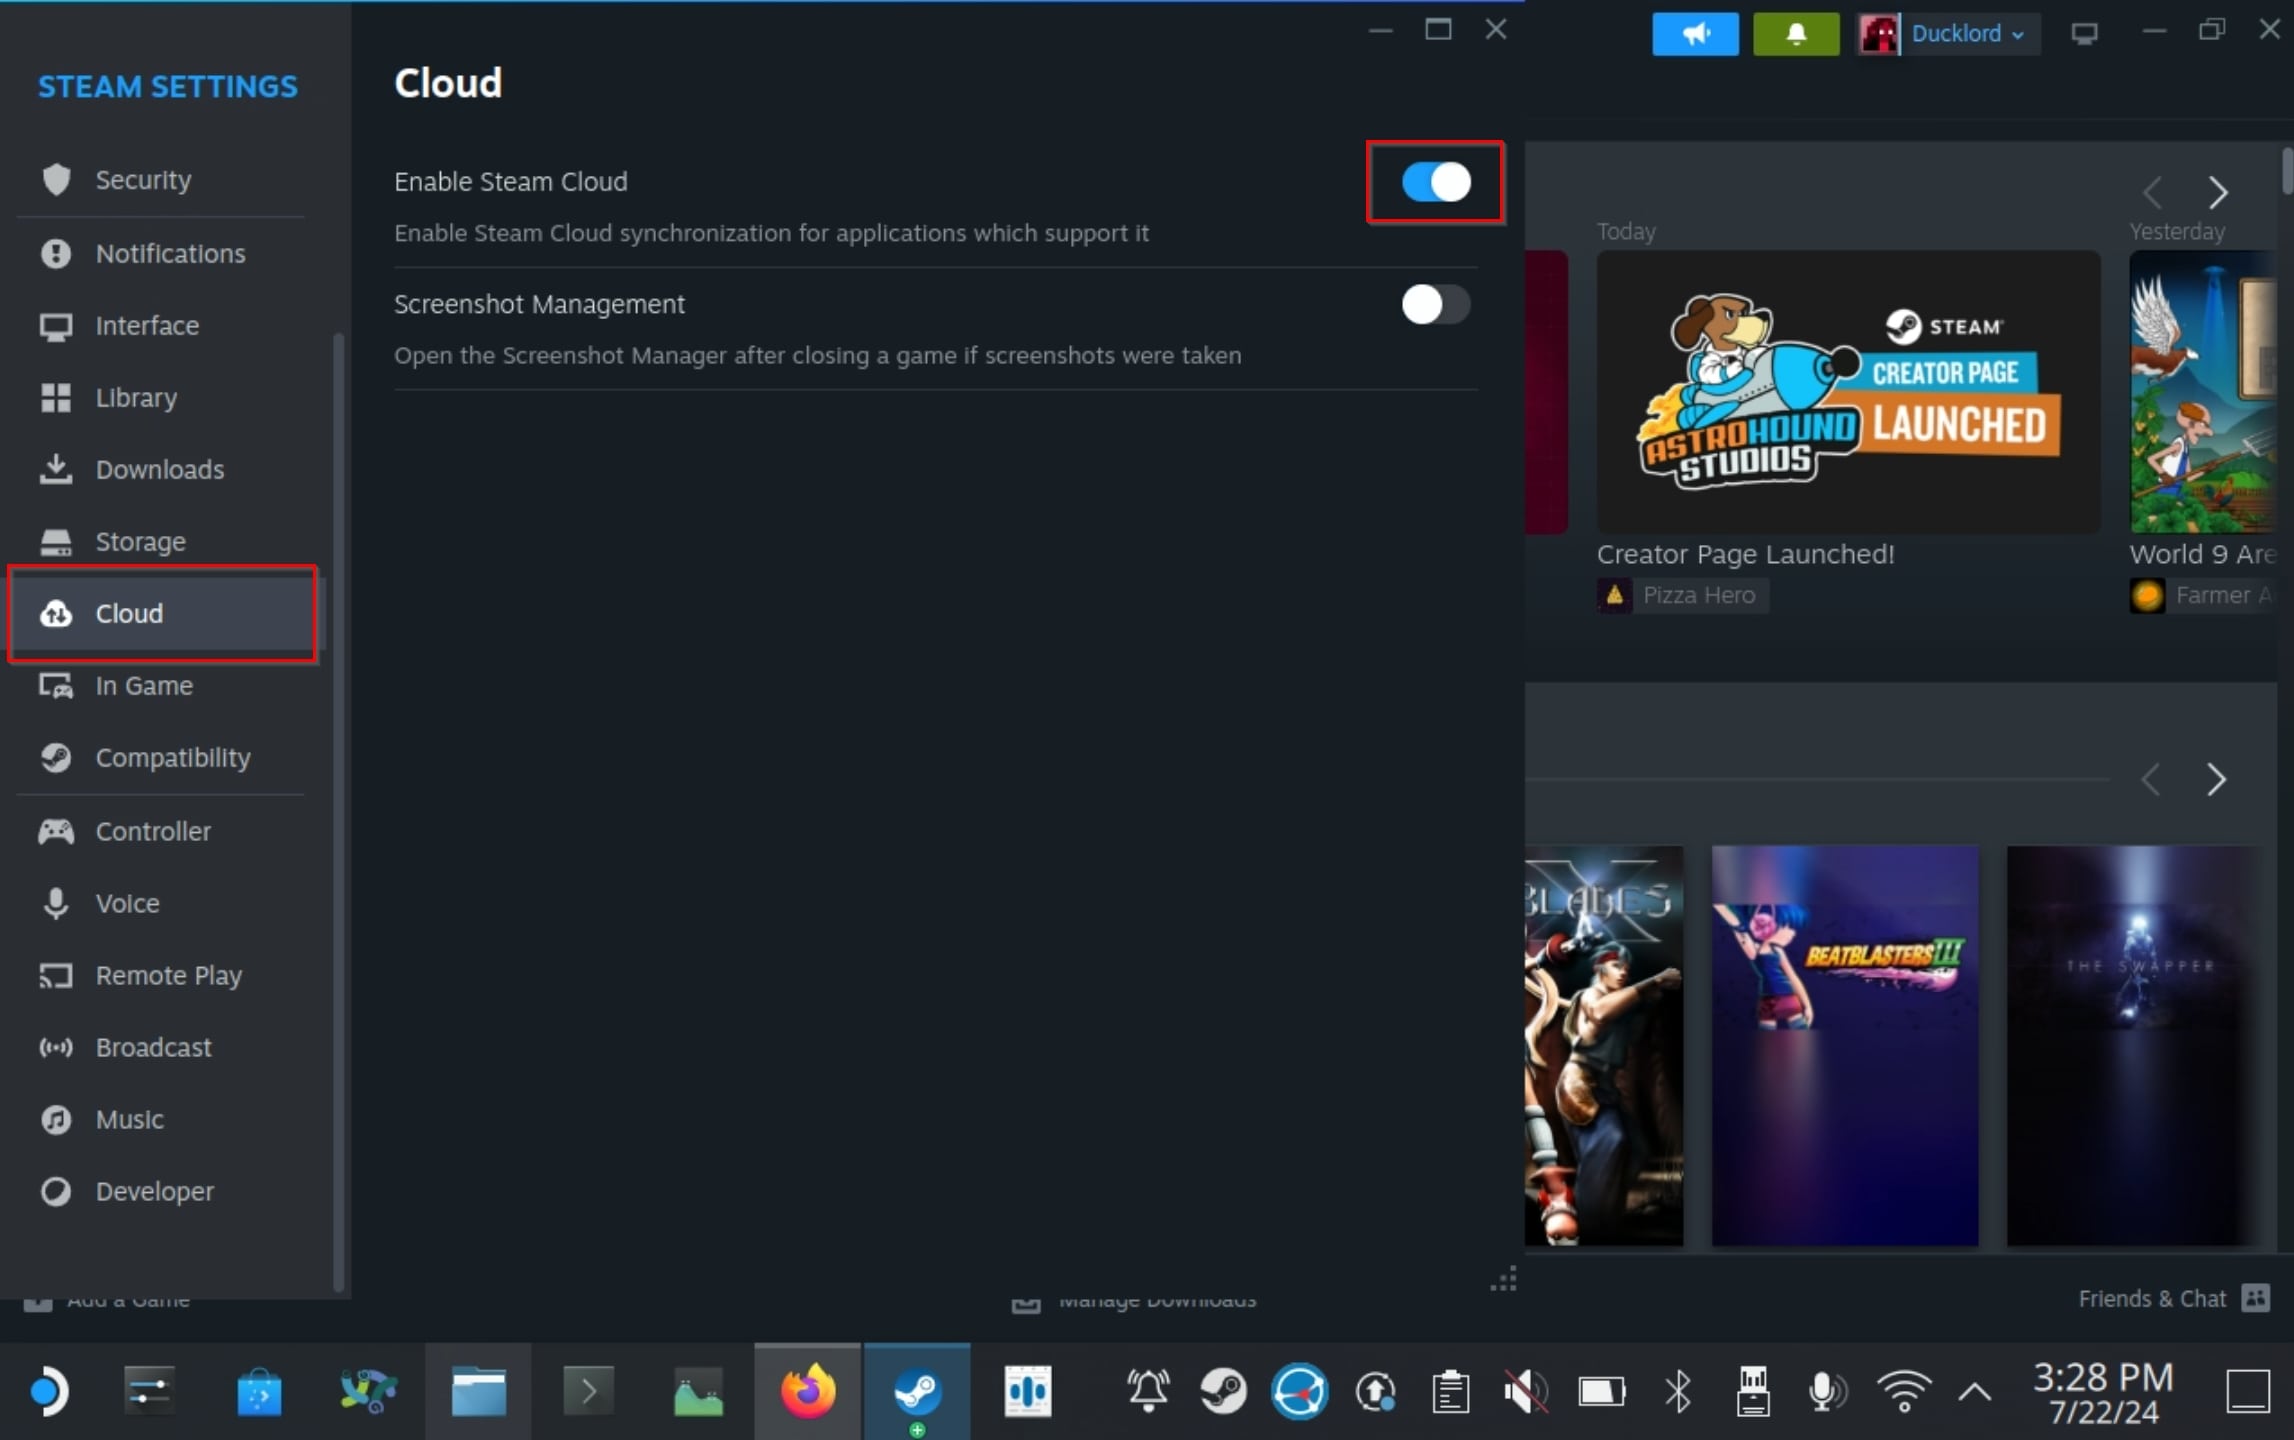
To restore your games from Steam Cloud:
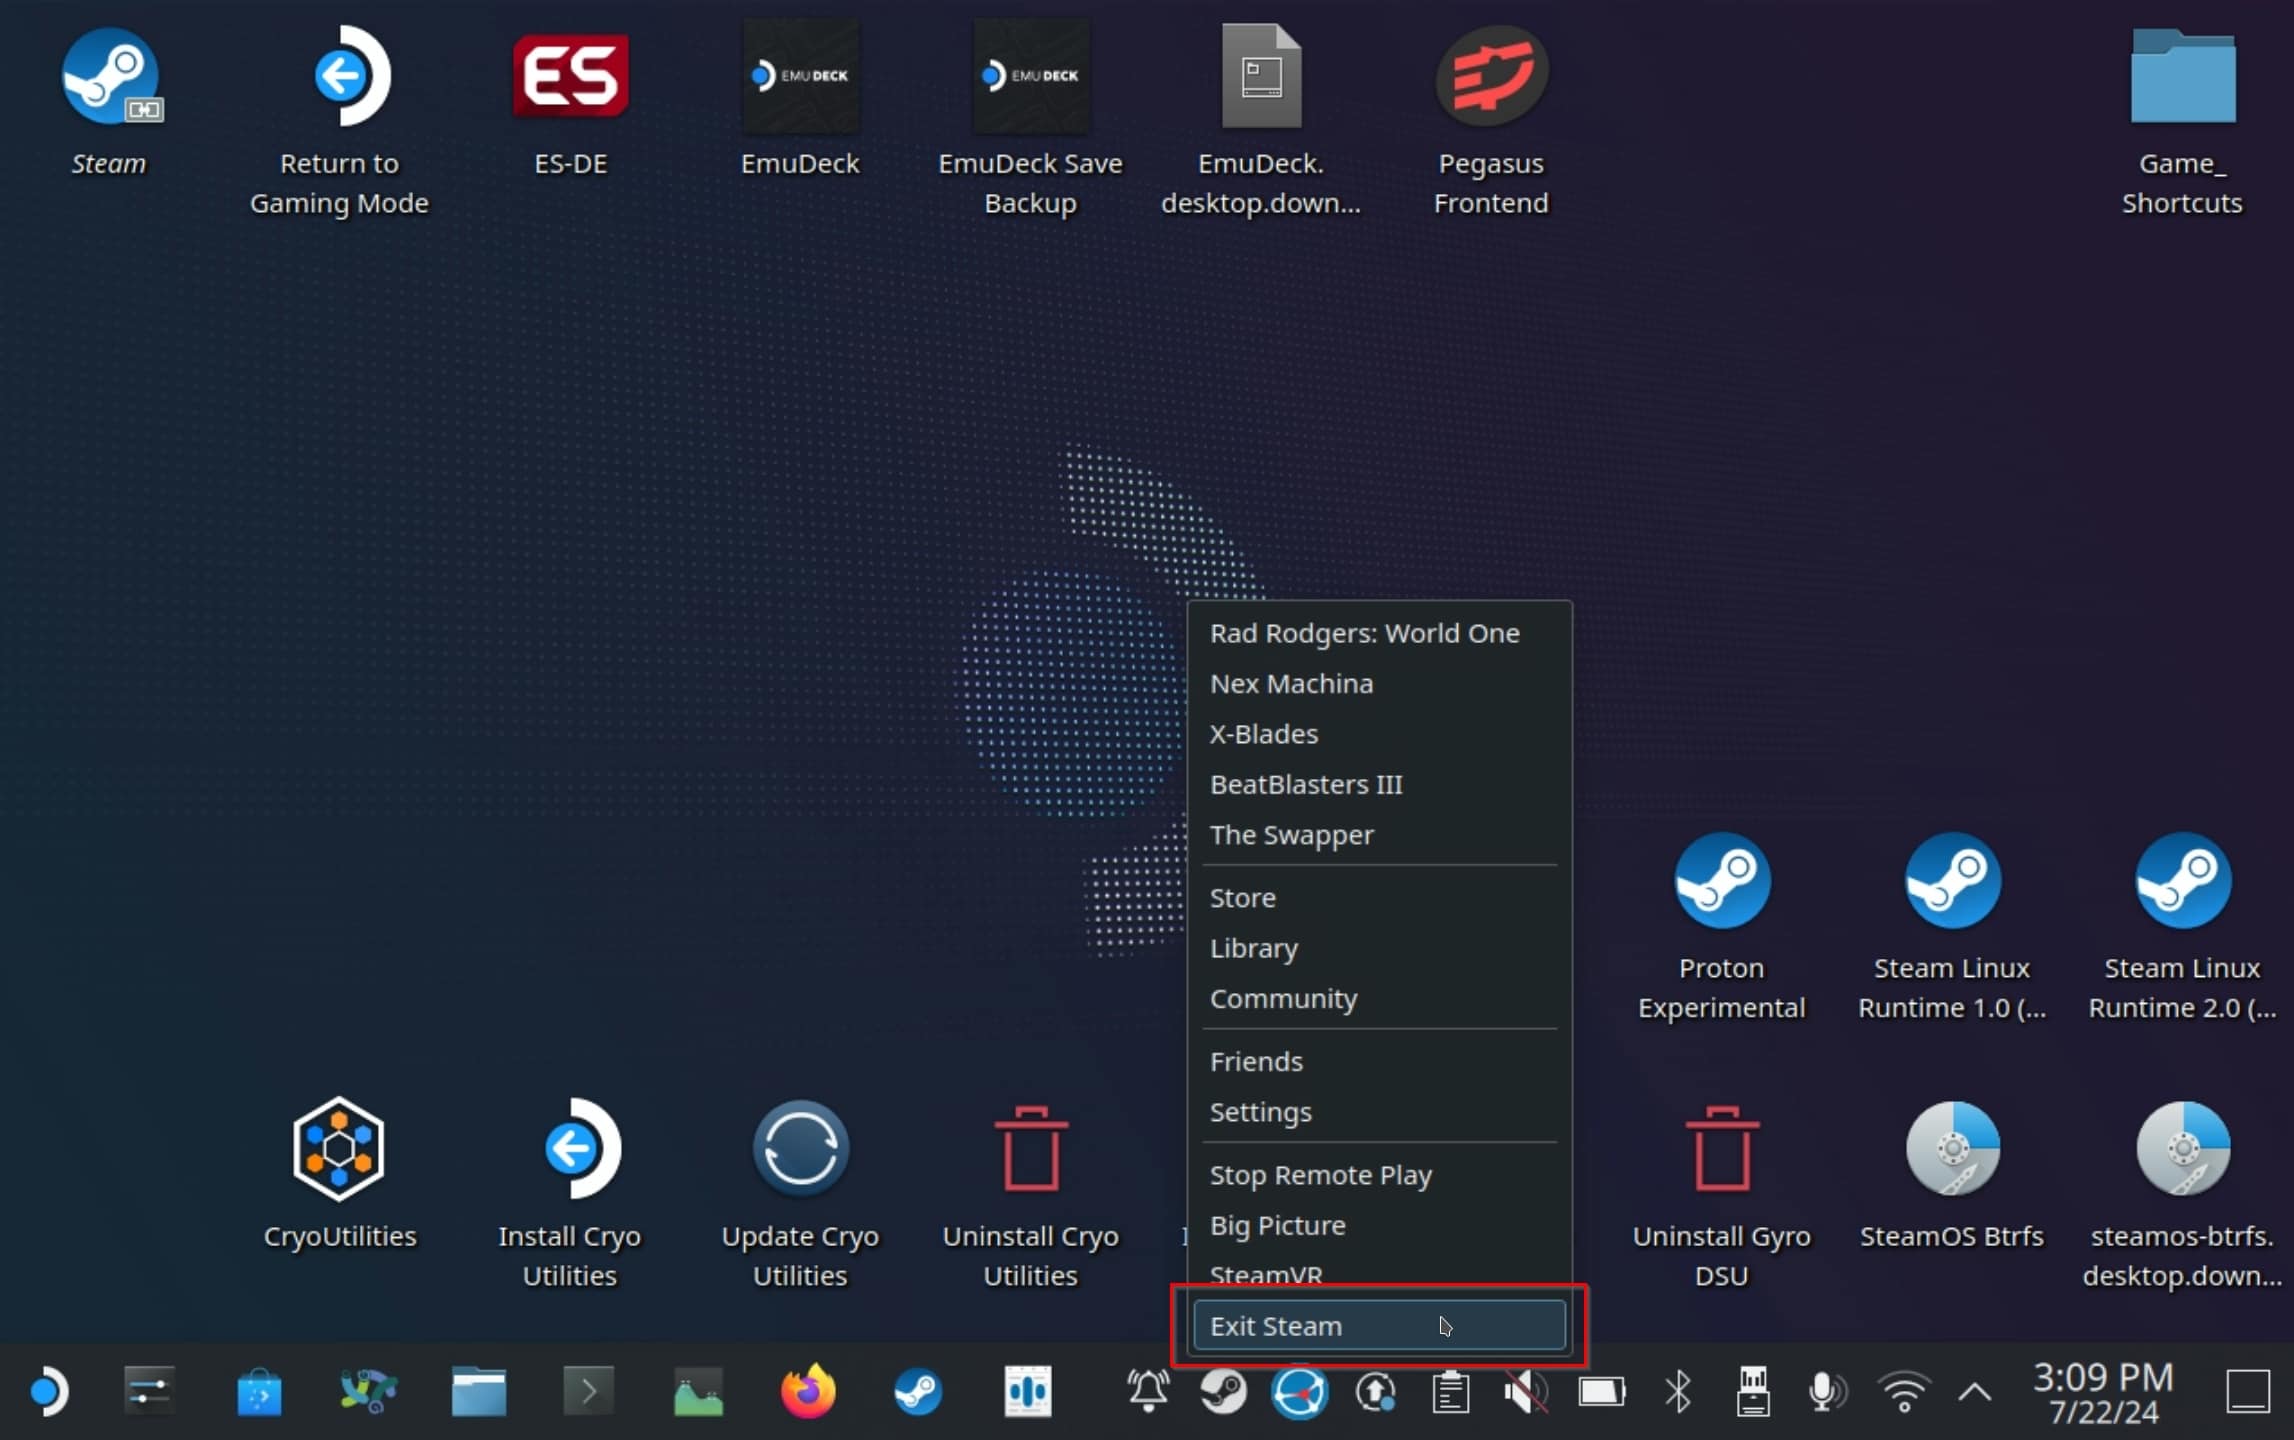
- Reboot your Steam Deck into Desktop Mode and terminate the Steam Client immediately after it launches automatically. The last version of your saves might still be available on Valve’s Steam Cloud online storage!
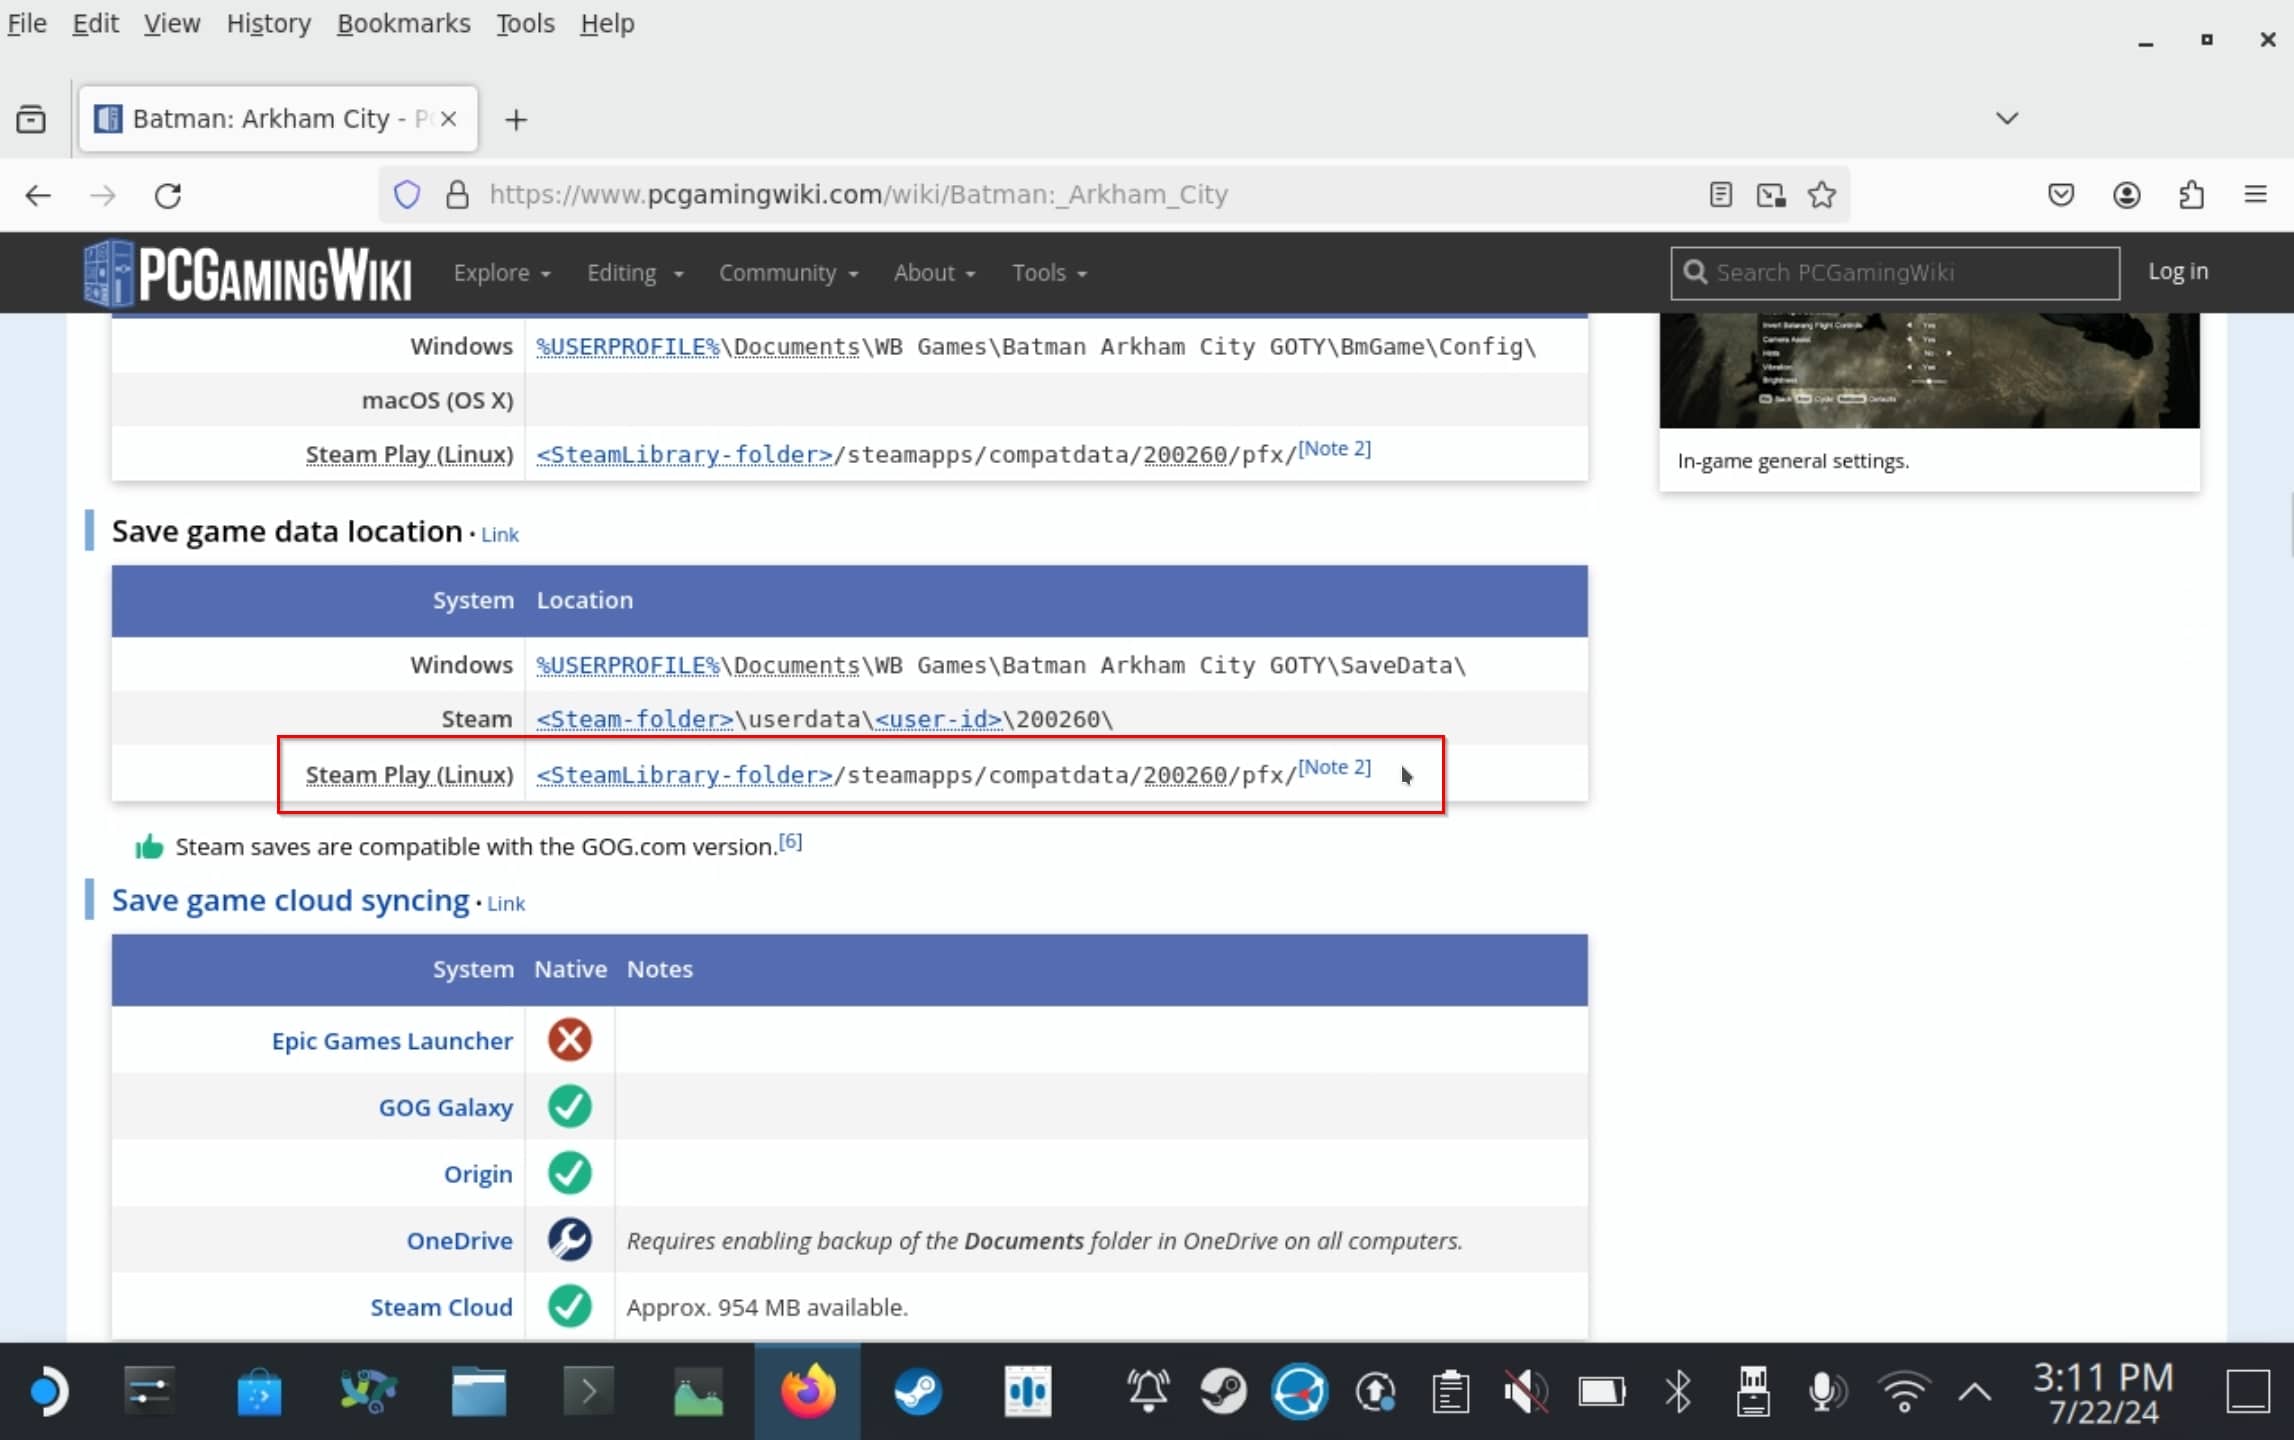
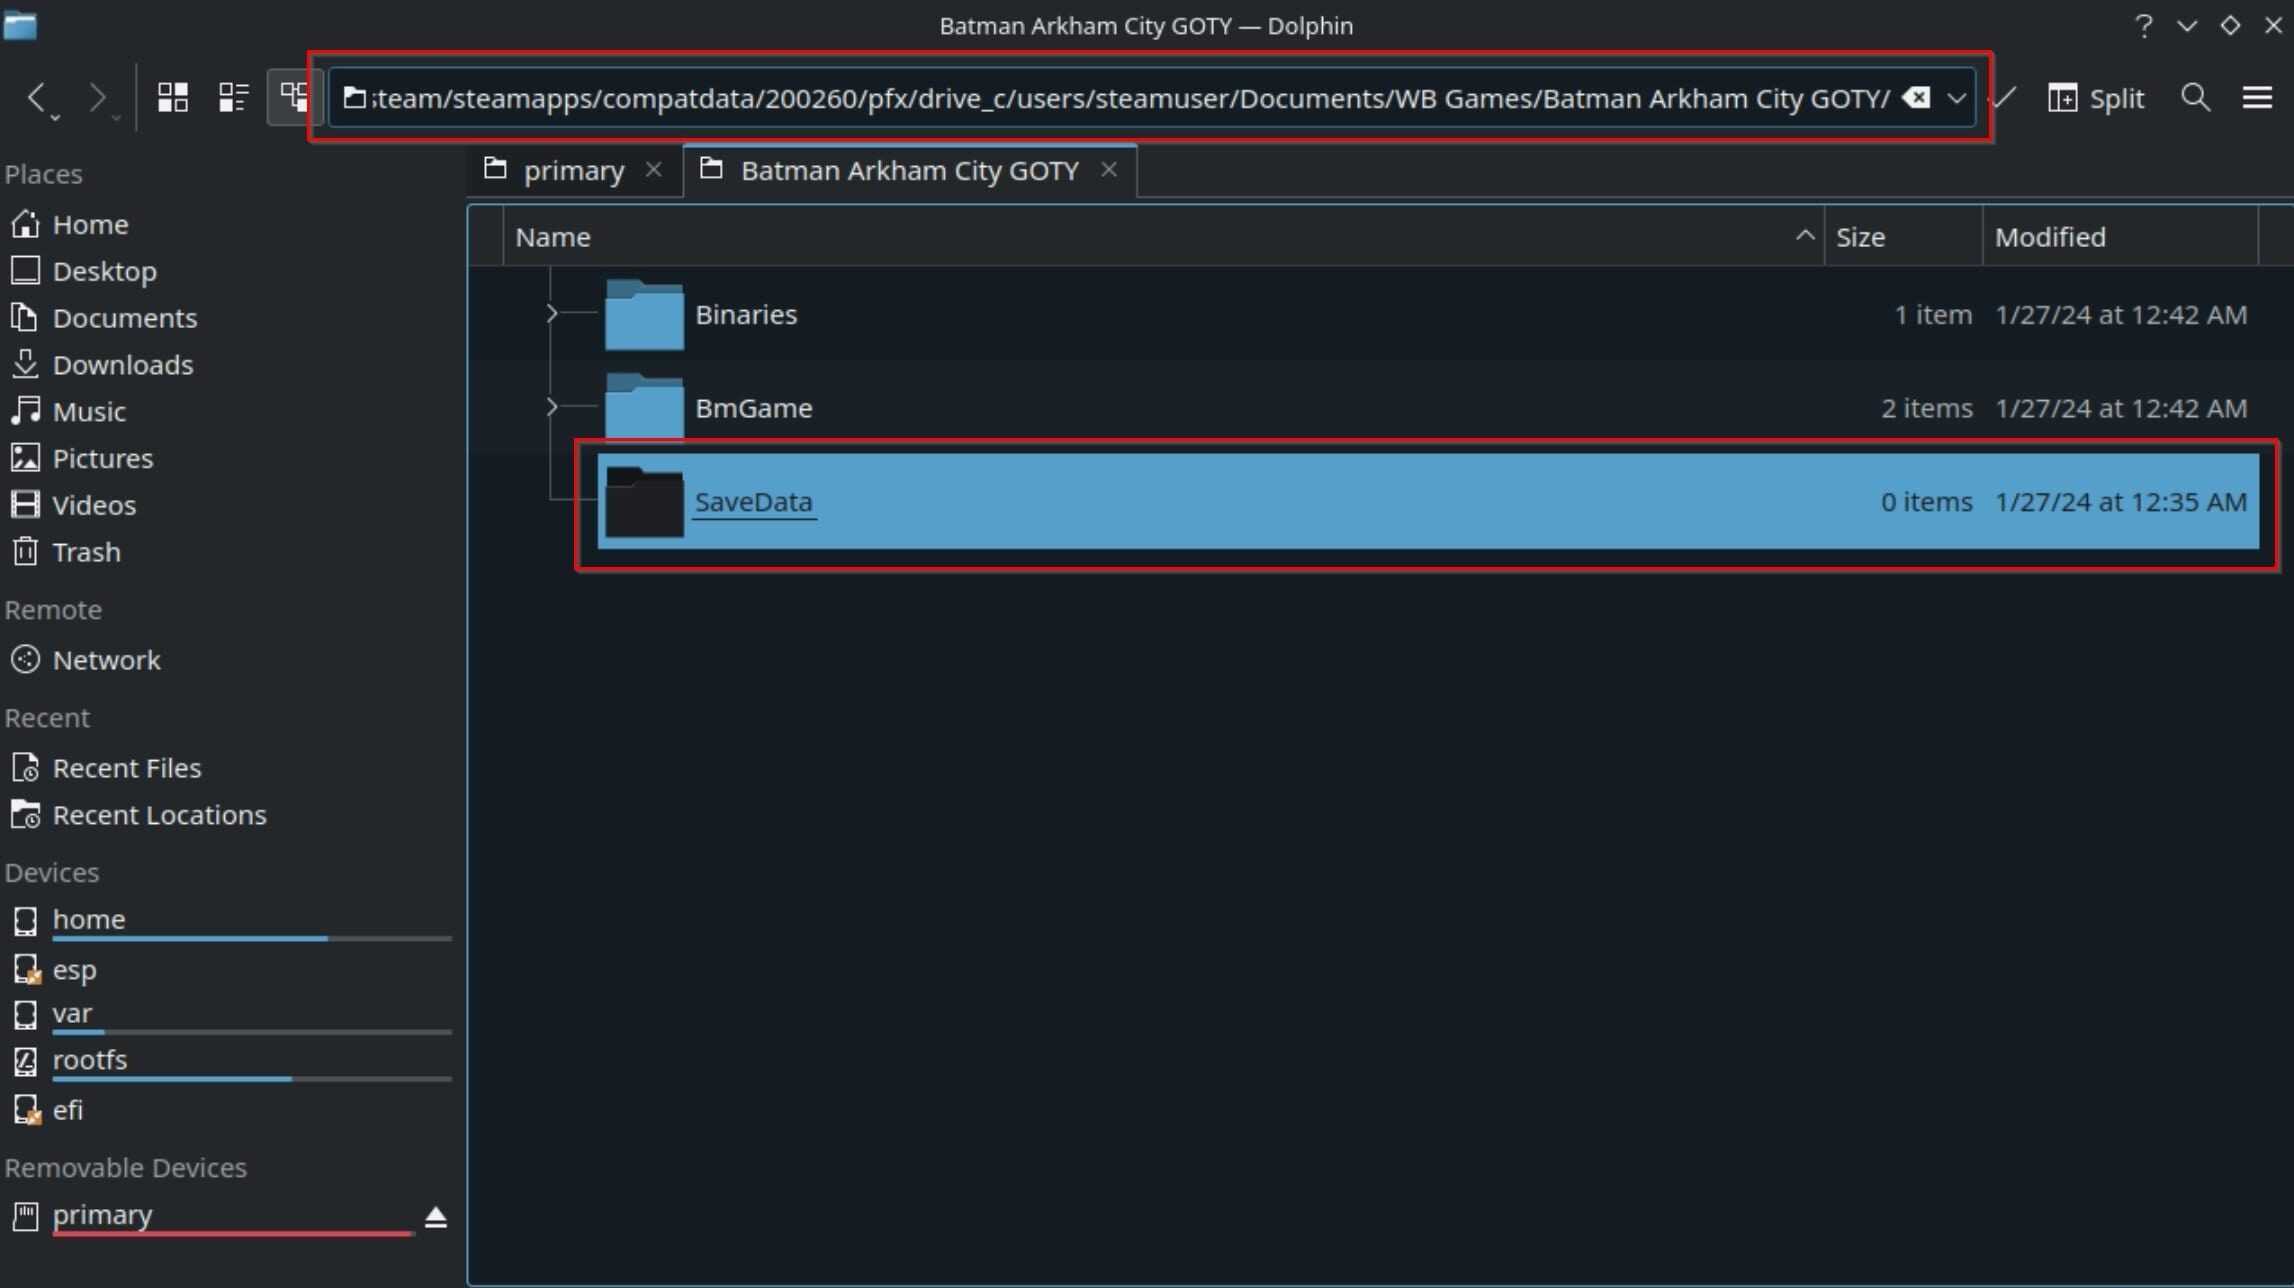
- Fire up any web browser you’ve got installed on your Steam Deck, and pay a visit to PCGamingWiki. There, seek the game for which you want to restore your saves. Move to PCGamingWiki’s Save game data location section, and if it is a native Linux game, take note of the path where the game stores its save files on Steam Play (Linux). Copy the part of the path after “SteamLibrary-folder” to the Clipboard. Launch the Dolphin file manager and visit /home/deck/.steam/CLIPBOARD, where “CLIPBOARD” is the path for the game you copied from PCGamingWiki. For Windows games, though, it gets more complicated, and you need both the Linux and Windows paths. In such cases, after visiting the Linux version path, you should return to PCGamingWiki’s page and also copy the Windows version’s path. Then, return to the Dolphin file manager. The Steam Deck’s Proton compatibility layer will have created an emulated Windows environment for your game, whose folders you should traverse to locate the actual game’s files. Add to your existing path: /drive_c/users/steamuser/CLIPBOARD, where this time “CLIPBOARD” is the Windows version’s path you copied before. Finally, you’ll be looking at your game’s actual files.
- Backup all files you’ll find there to another folder, and then delete them. This way, your local saves won’t be sent to the Steam Cloud, overwriting the last ones that were synced and you want to get back.
- Relaunch the Steam client and enable syncing with the Steam Cloud if the feature is disabled. Try to launch your game. If all goes well, it will notice its save files are missing and will try to “pull them” from Steam Cloud.
If the above doesn’t work, you can try downloading the files manually from your personal Steam Cloud page, then replace the ones in your local saves folder (as mentioned on PCGamingWiki) with the downloaded versions.
How to Recover Your Deleted Games on Your Steam Deck
Did, for any reason, a game get corrupted, or did you accidentally remove some of its files while tinkering with your Steam Deck?
Repair Corrupted Installation<
If a game’s installation files get corrupted, the Steam Client can fix the issue.
To repair a corrupted game installation on your Steam Deck:
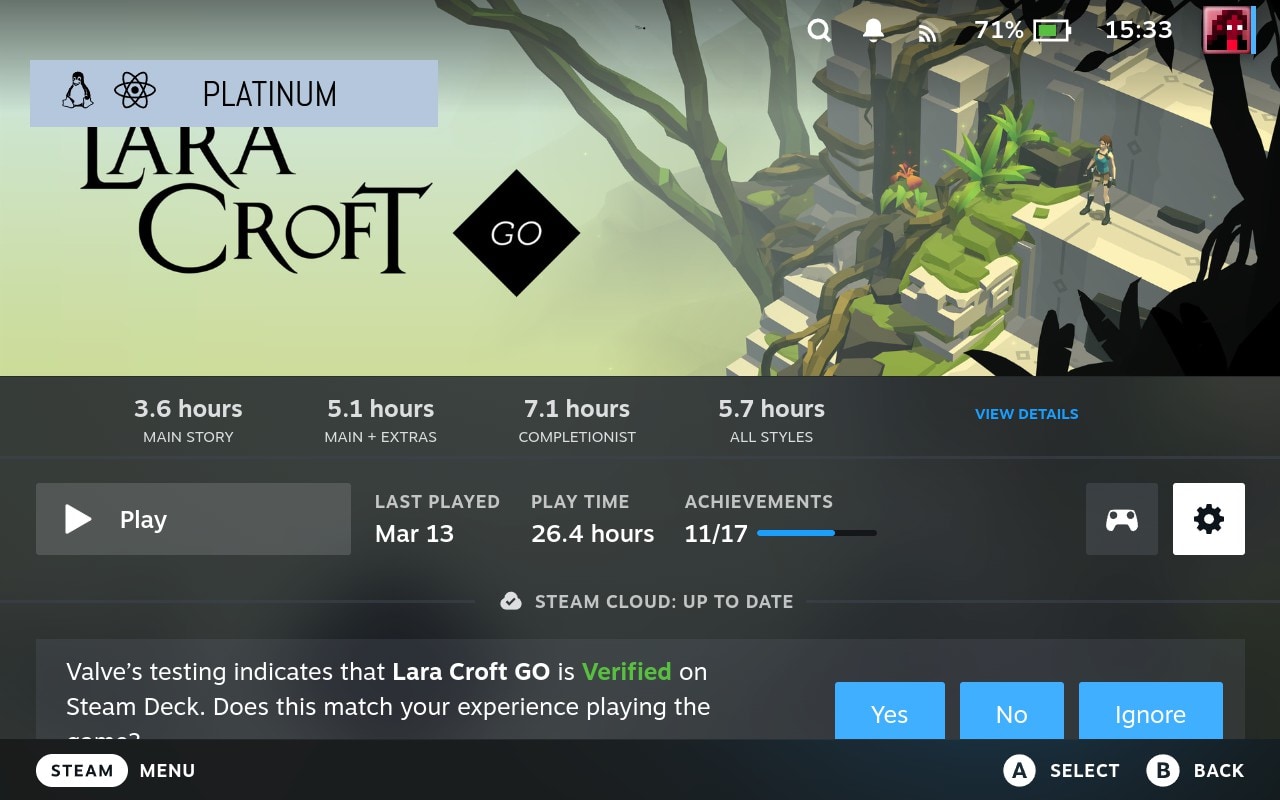
- Find the game’s entry in your game Library and select it.
- Instead of choosing to Play the game, select the button with the cog icon, on the right of the screen.
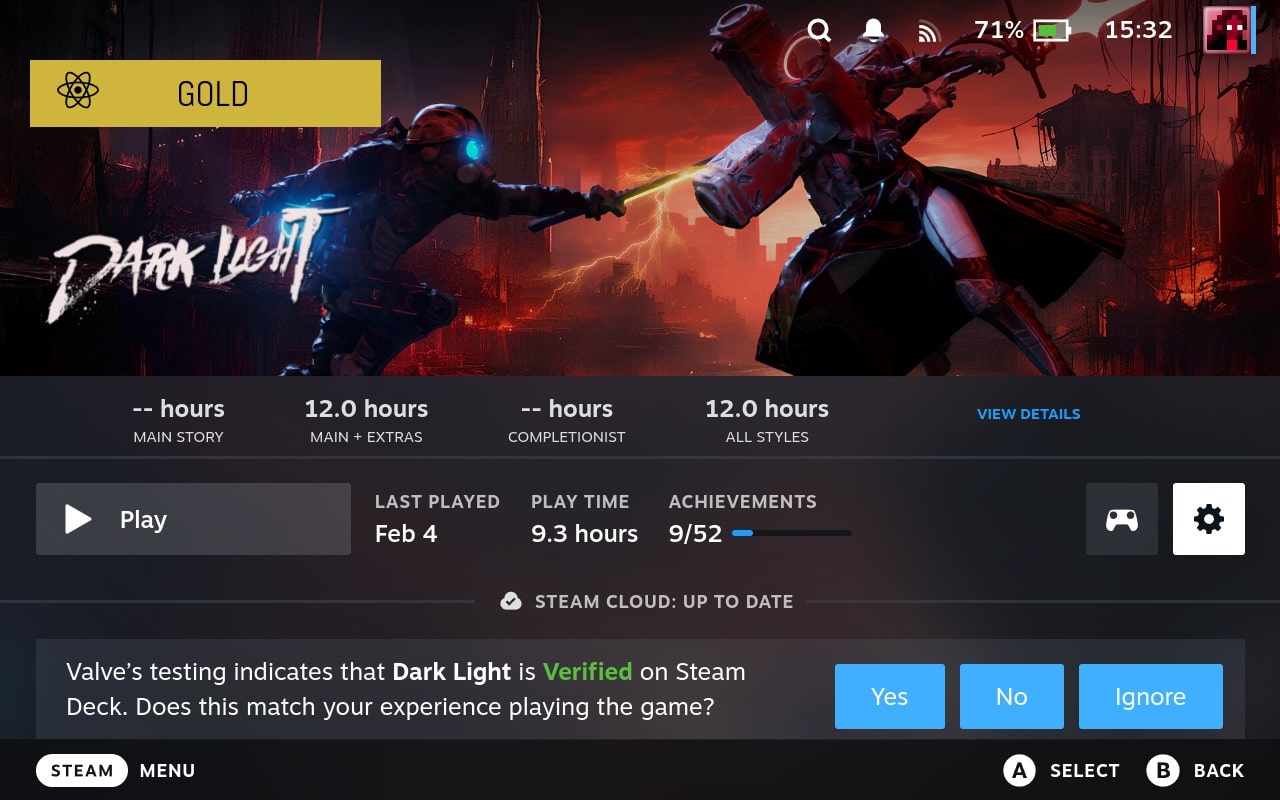
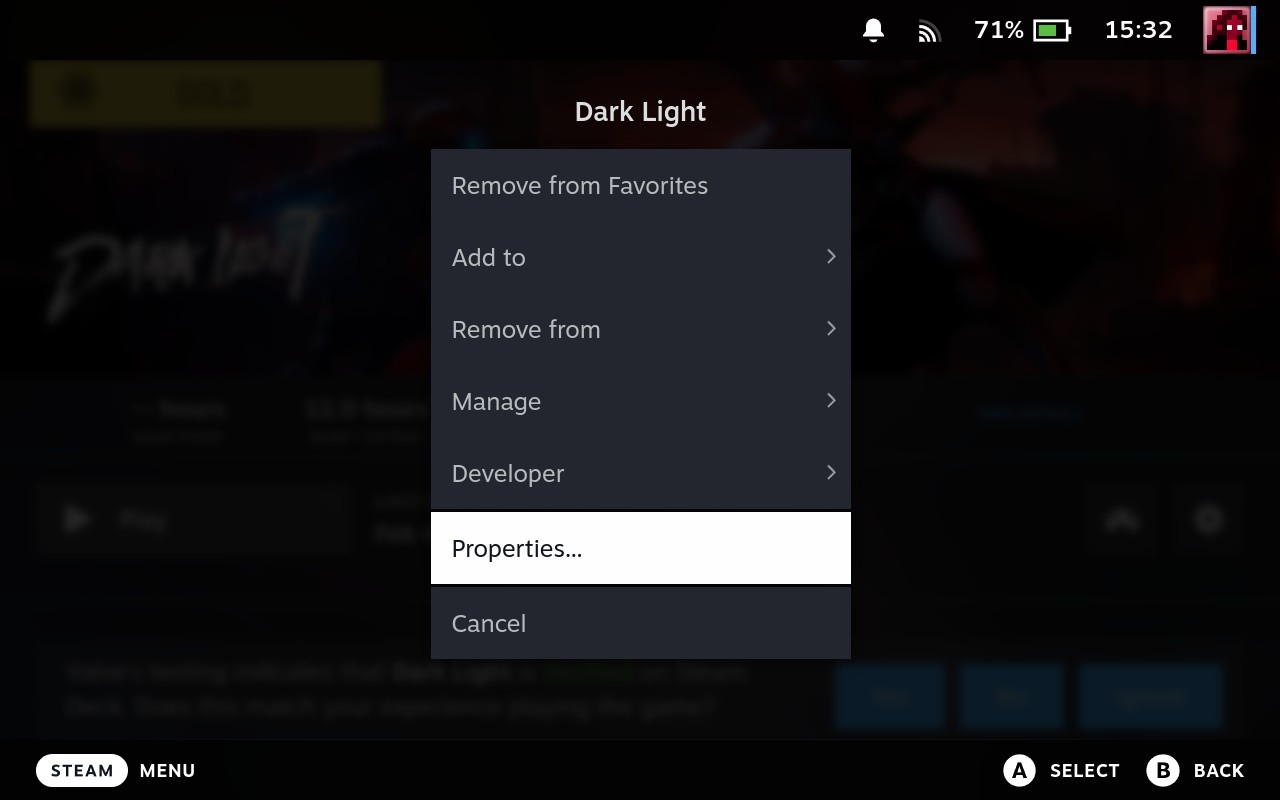
- Select Properties from the menu that pops up, and navigate to the Installed Files tab.
- Move to the main part of the page, on the right, and select Verify integrity of game files.
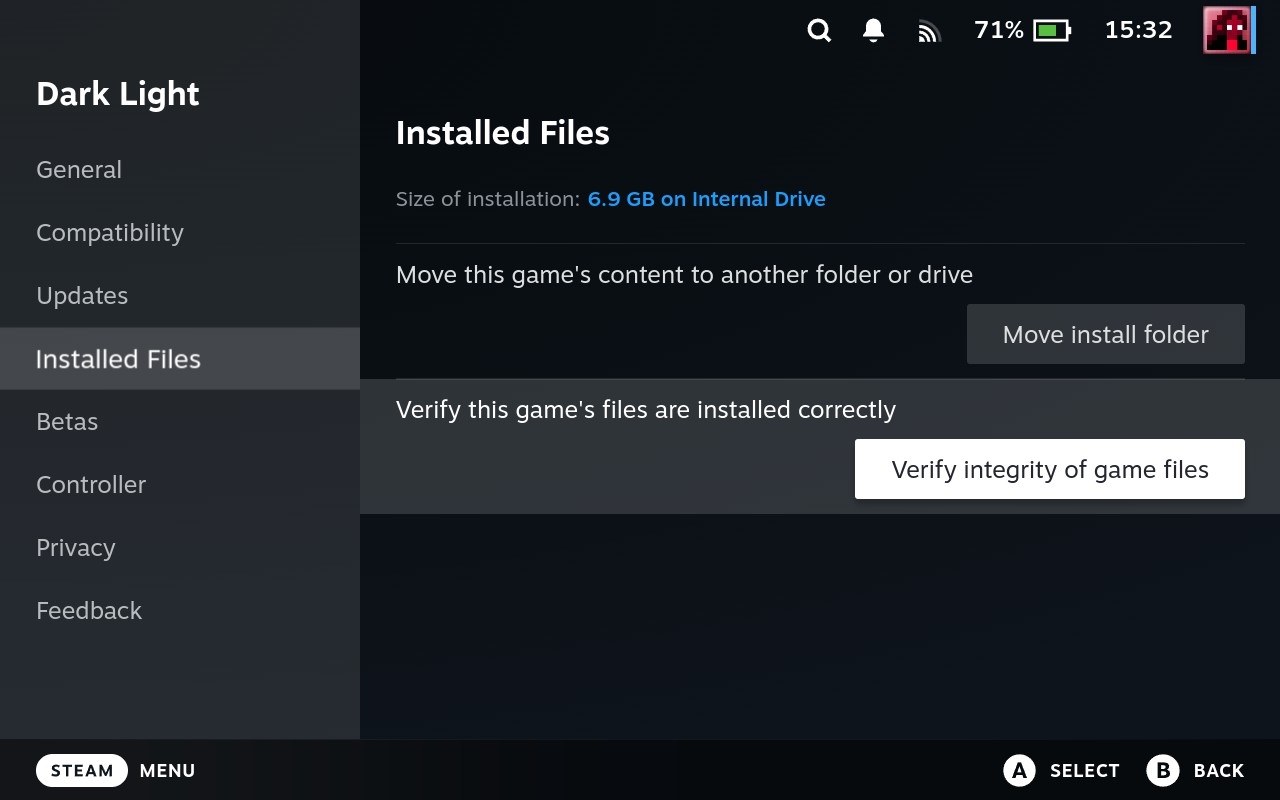
The Steam Client will check each file, compare it against a hash (“a fingerprint”) to see if it matches, and if it doesn’t, deem it corrupted and redownload it.
Reinstall Games to the Steam Deck from Steam
If repairing a game’s installed files didn’t solve your issues, or you’ve accidentally uninstalled it from your Steam Deck’s local storage, you can always redownload it from scratch.
To uninstall a game:
- Find its entry in your games Library and select it.
- Tap the button with the Cog icon on the right of the screen.
- Move to Manage from the menu that shows up.
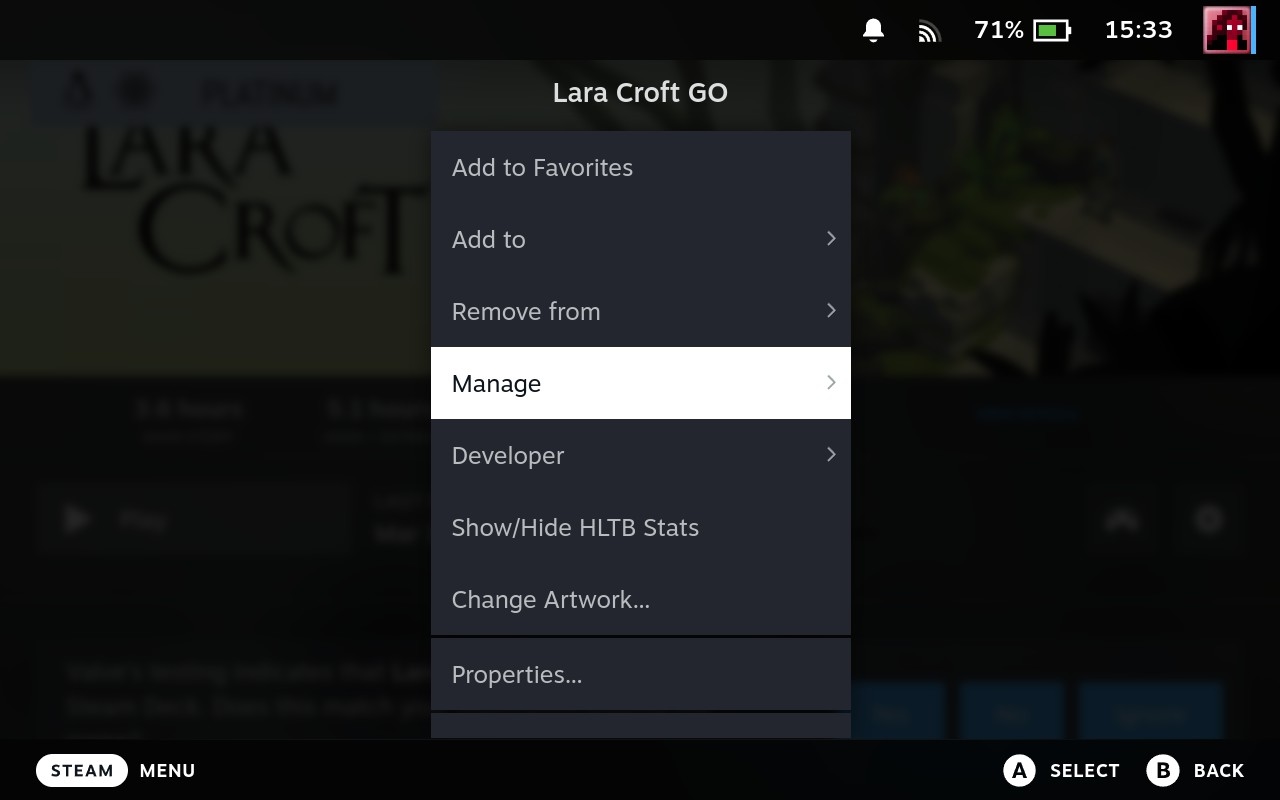
- Select Uninstall from its entries.
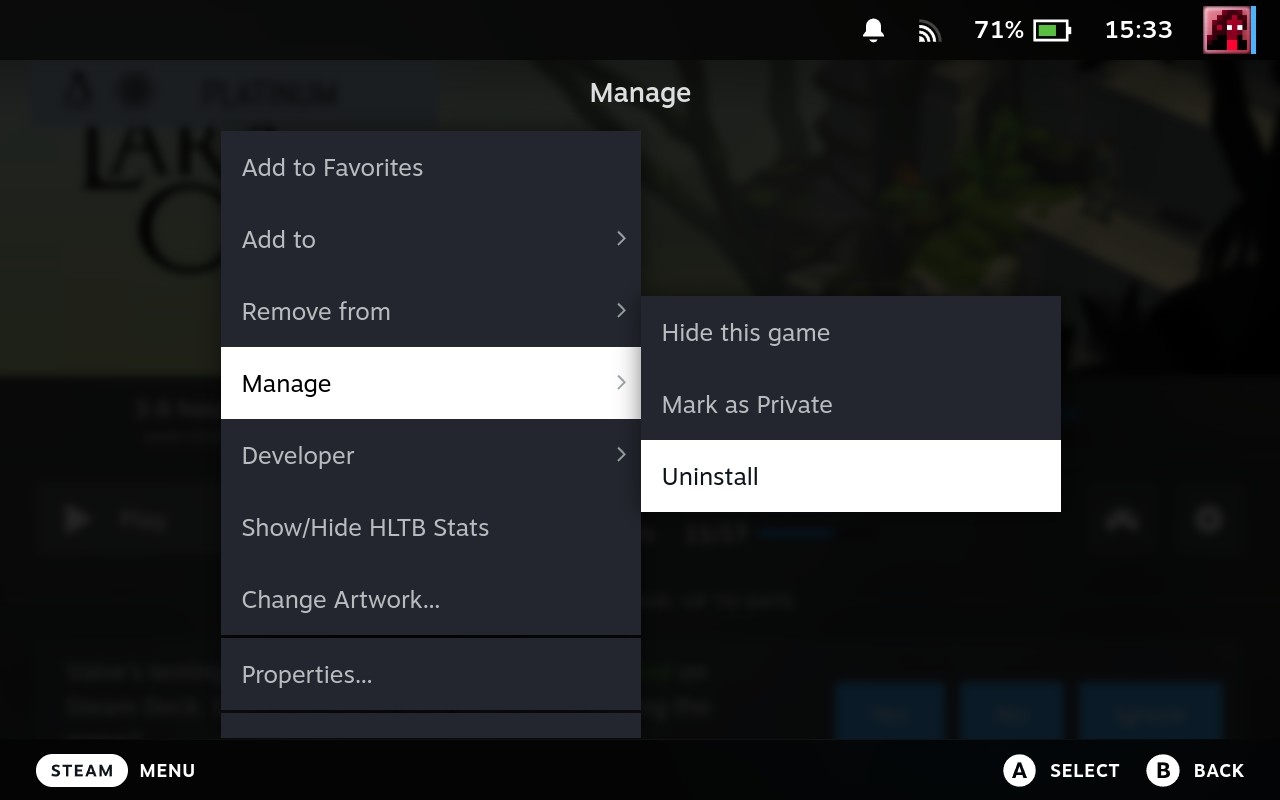
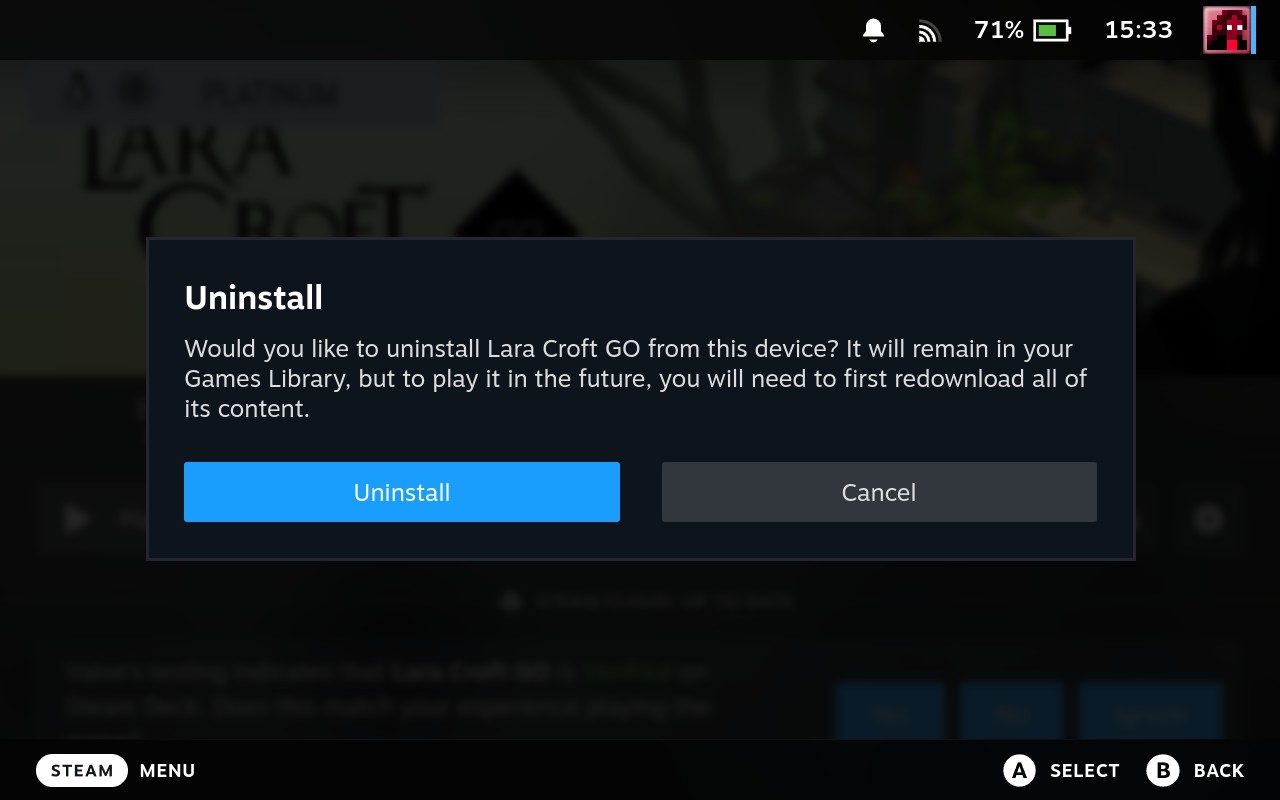
- Choose Uninstall again when asked if you’re sure you want to remove the game from your Steam Deck.
Was a game accidentally uninstalled, or you’ve followed the above steps to manually remove it from your games Library?
To (re)install a game:
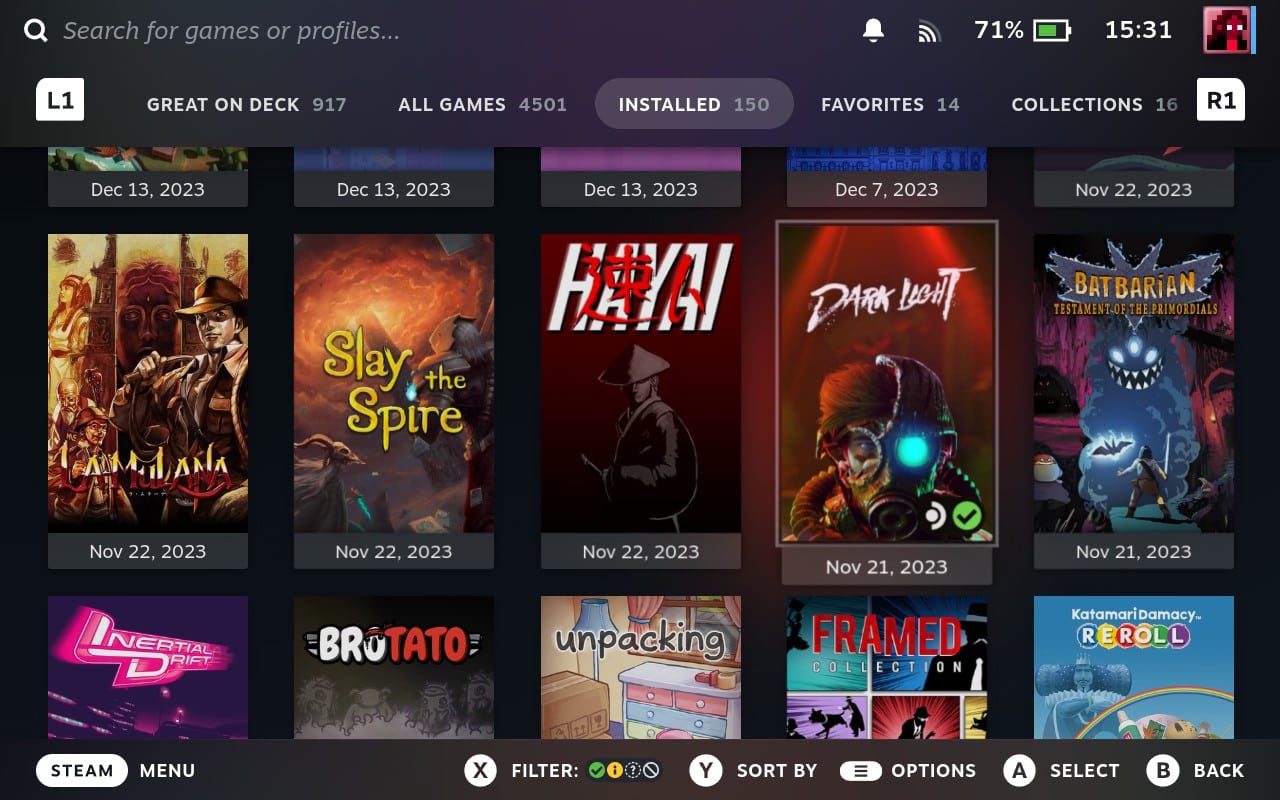
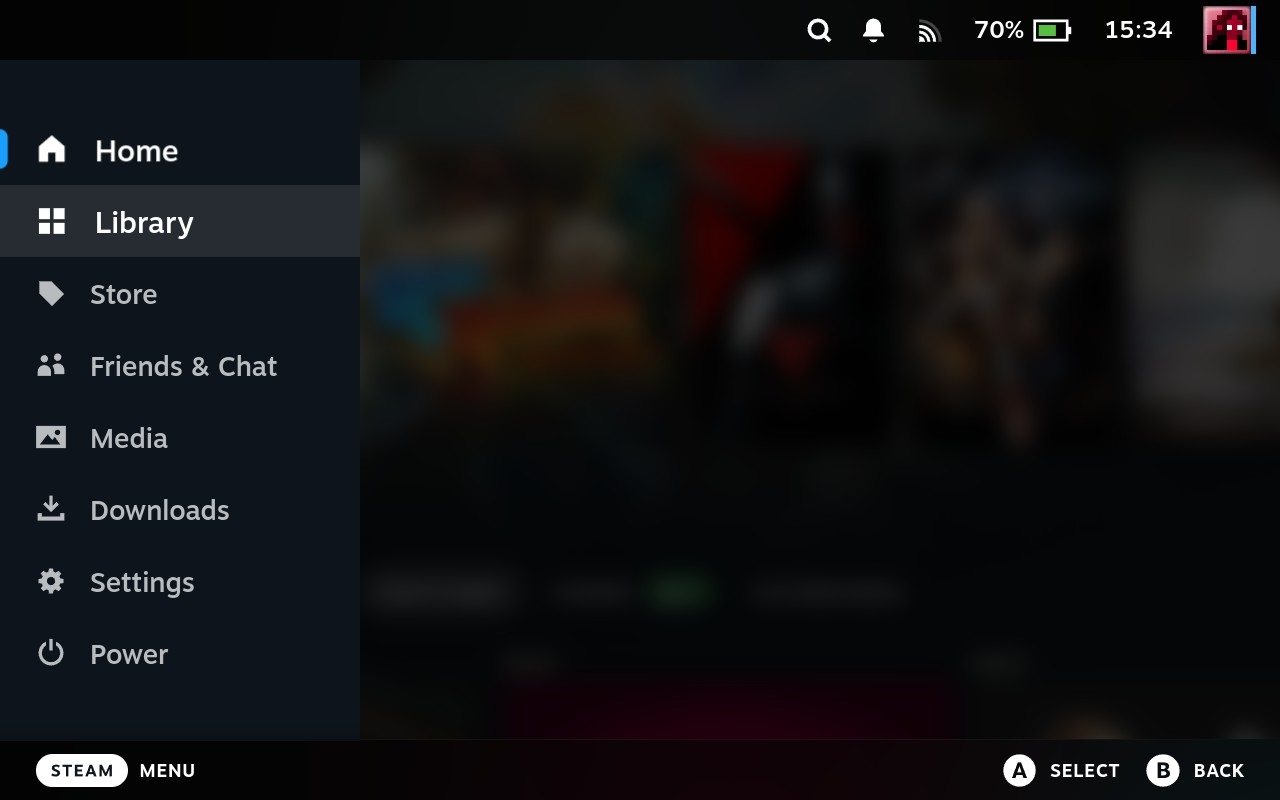
- Press the Steam button on the left of the Steam Deck and select the Library entry.
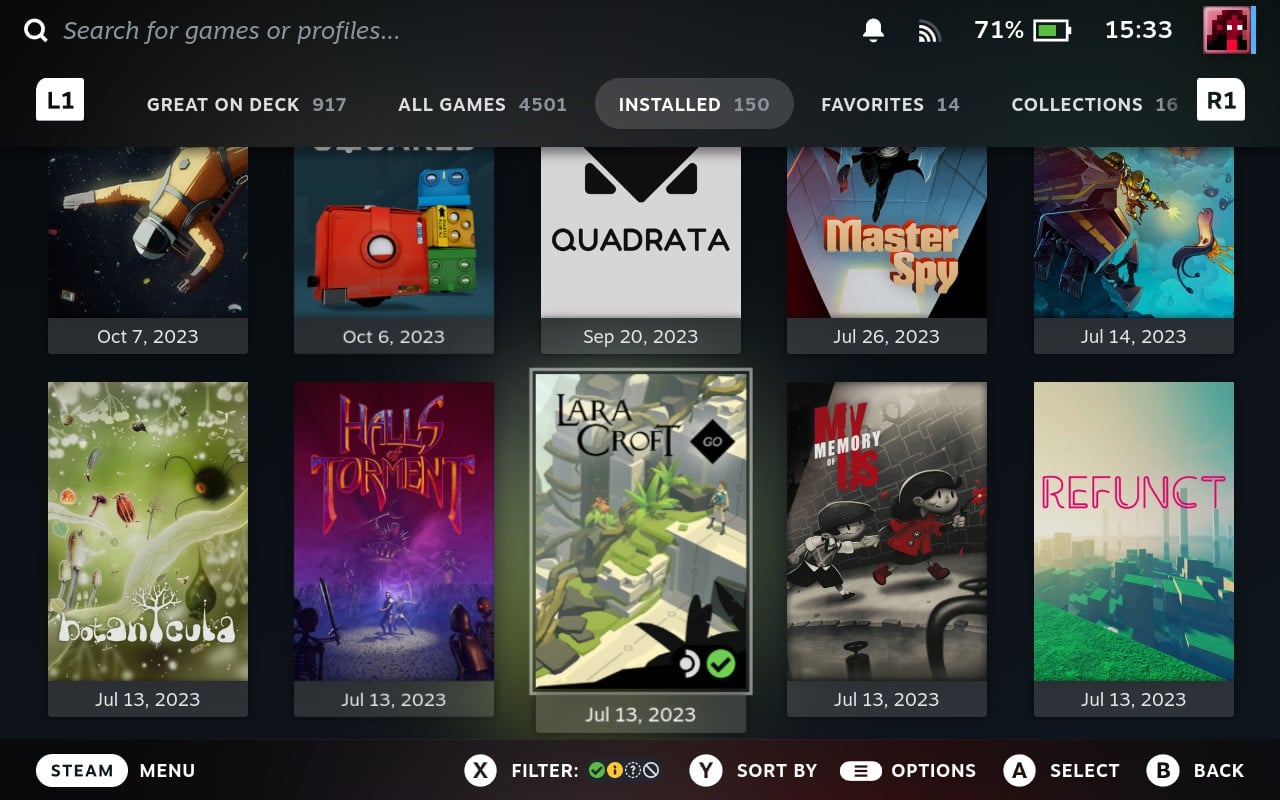
- Use the Steam Deck’s bumper buttons (the ones above the primary triggers) to navigate to the All Games page of your games Library. There, you can see all the games in your Library, even if they aren’t currently installed. Find your game among them.
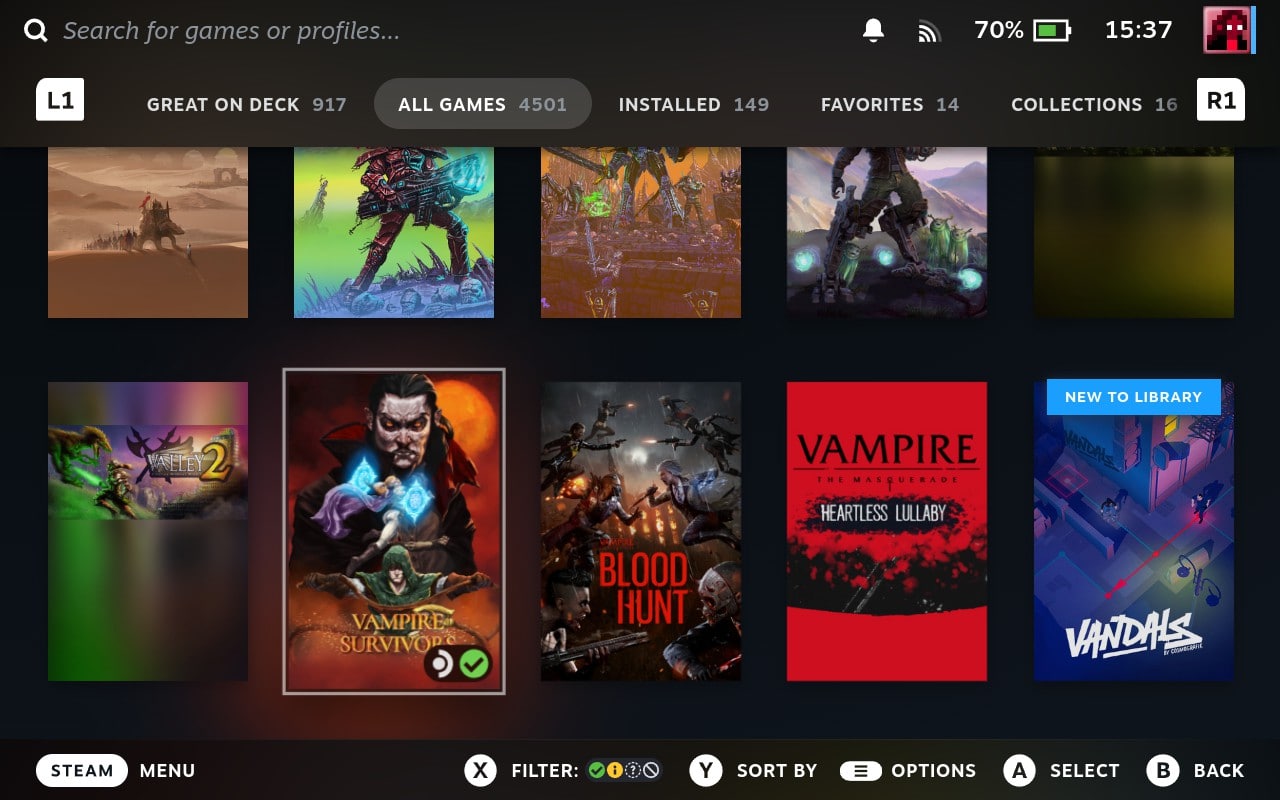
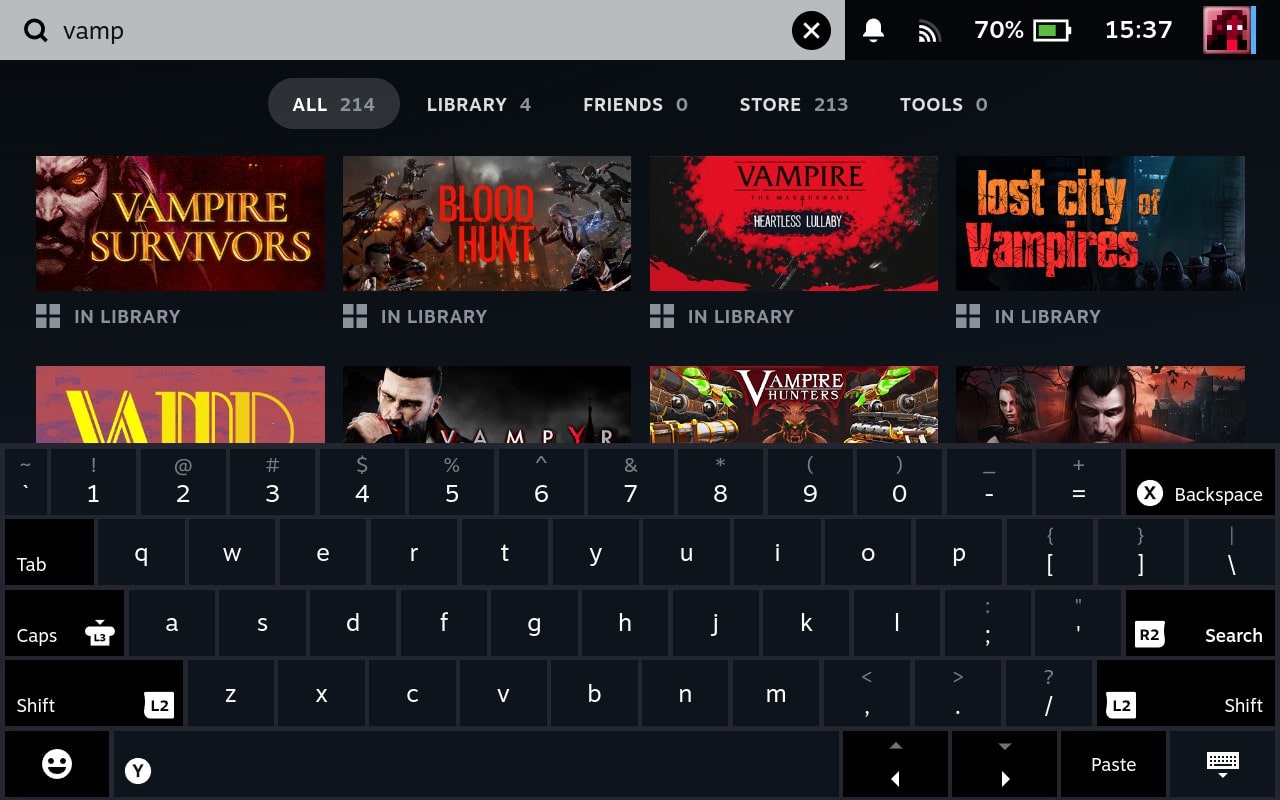
- Alternatively, you can hit up the cross to select the search field on the top left of the screen (stating “Search for games or profiles”), then use the on-screen keyboard to type your game’s name.
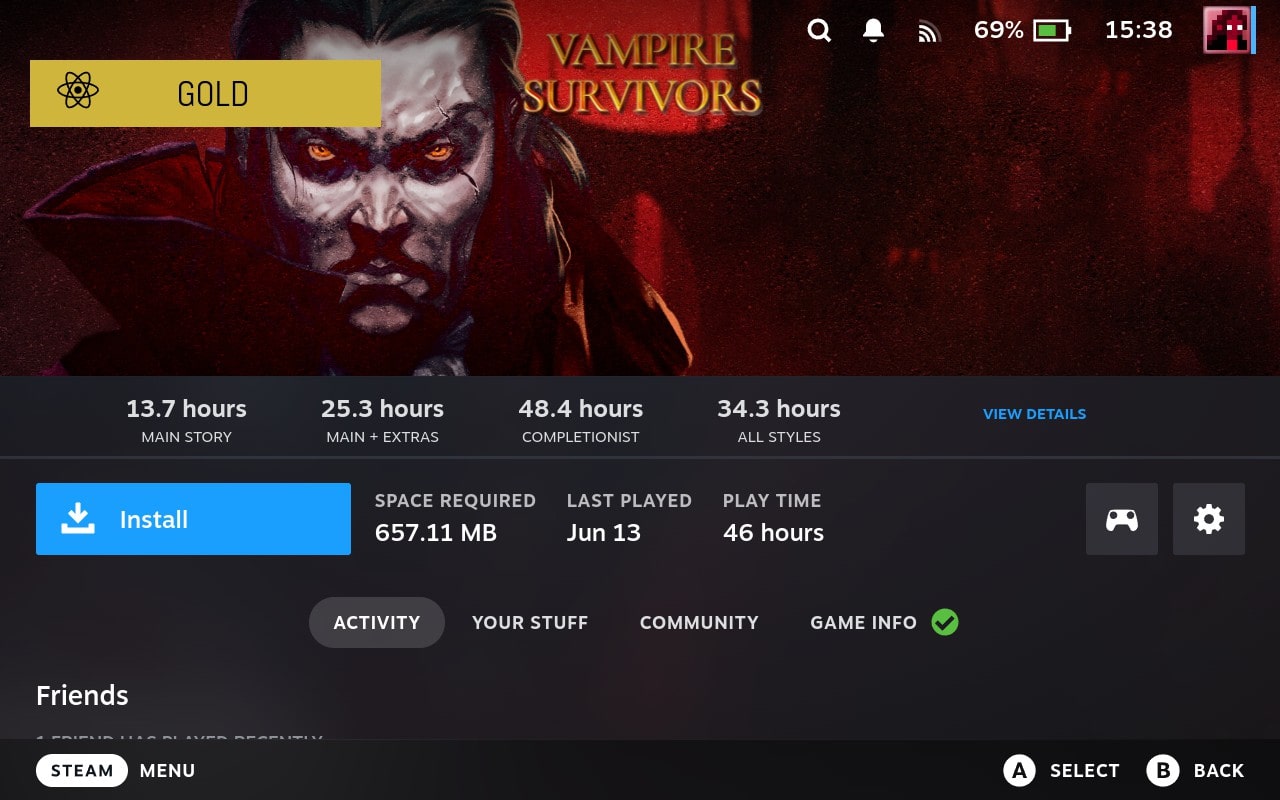
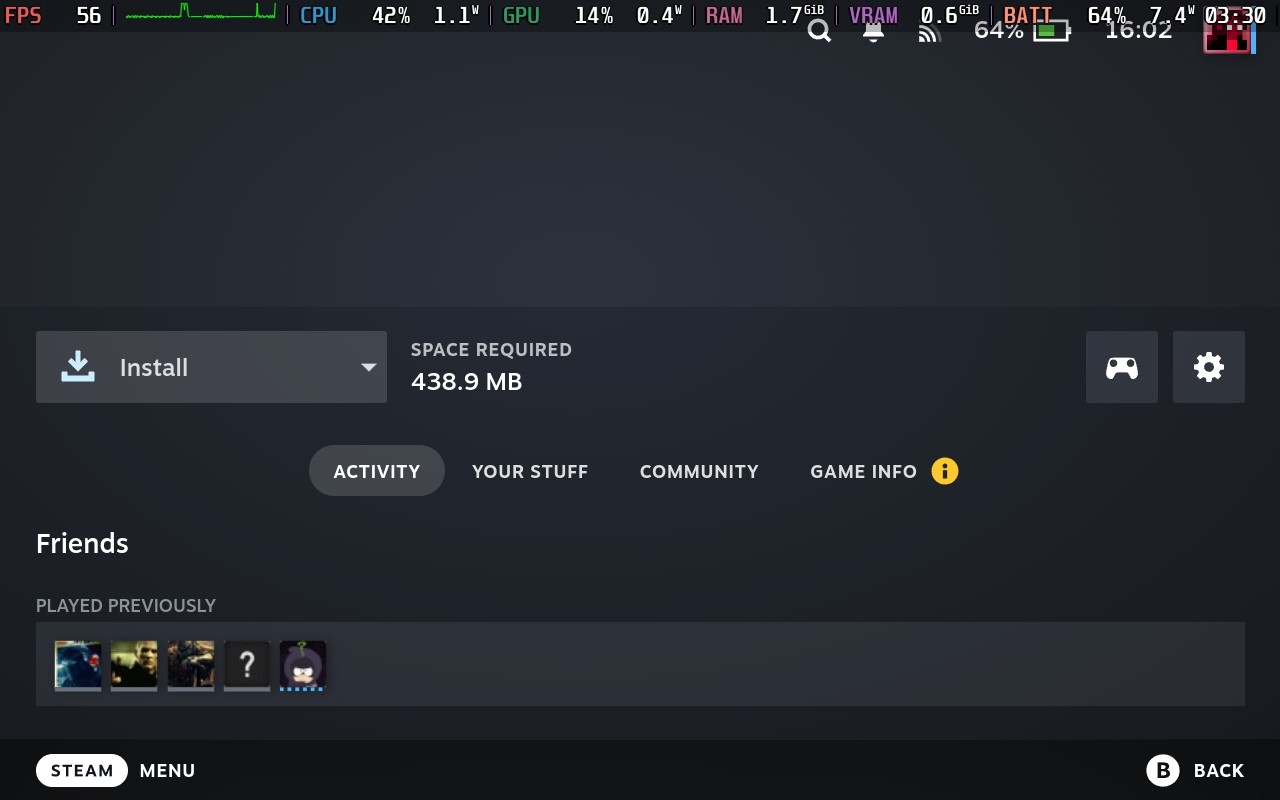
- After selecting your game, the primary option on its page will be to Install it. Select that and follow any extra steps presented to return the game to your Steam Deck’s local storage.
Copy Installed Files from Another PC to the Steam Deck
Most Steam Deck owners already have a PC and a game collection on Steam. For them, the Steam Deck is simply an extension to their PC gaming experience; their existing game collection granted the gift of portability.
So, why redownload the games you already have installed on your PC?
Valve knows this like they know there is often more than one PC in a modern household. That’s why they’ve added support to their Steam Client for copying files off other PC’s storage, as long as you’re logged in to the Steam Client using the same credentials on all of them and they’re connected to the same Wi-Fi or Local Area Network. Still, you might have to manually activate the related functionality on a “static” PC and your Steam Deck.
To enable local network file transfers between your PC and Steam Deck:
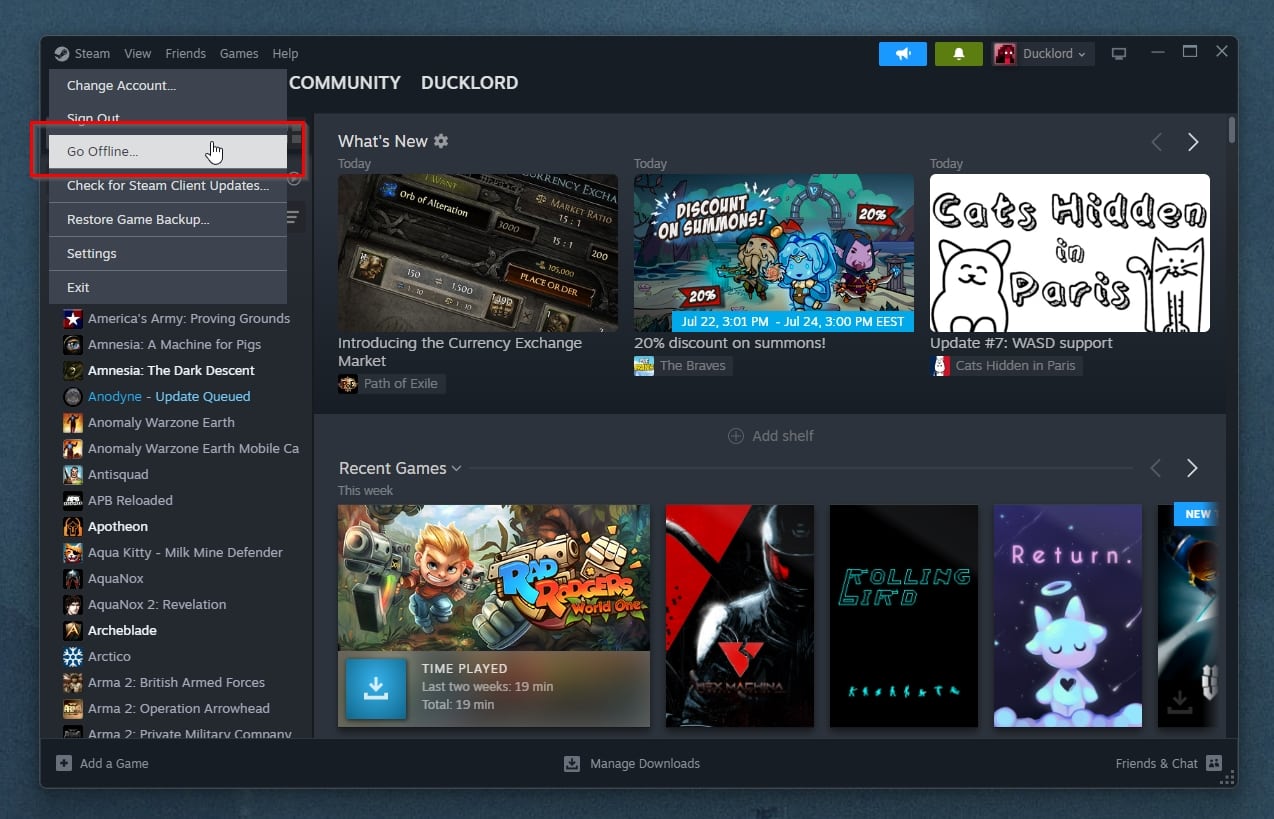
- Start on your PC, running the Steam Client and ensuring you’re logged into your account, and it’s not set to Offline mode: you should see “Go Offline” when clicking on the Steam menu on the top left. If you see the option to “Go Online” instead, use it.
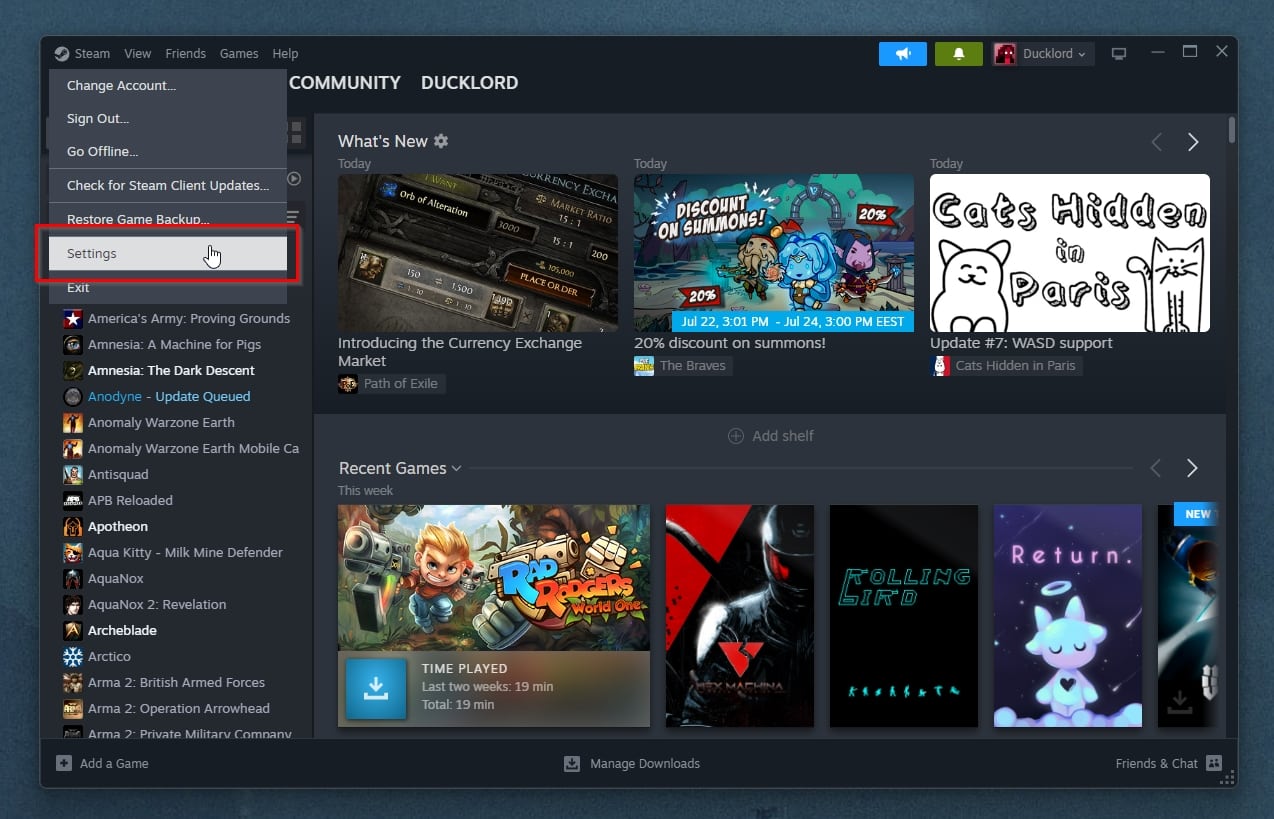
- From the same menu, choose Settings.
- Move to the Downloads tab and ensure Game File Transfer over Local Network is enabled.
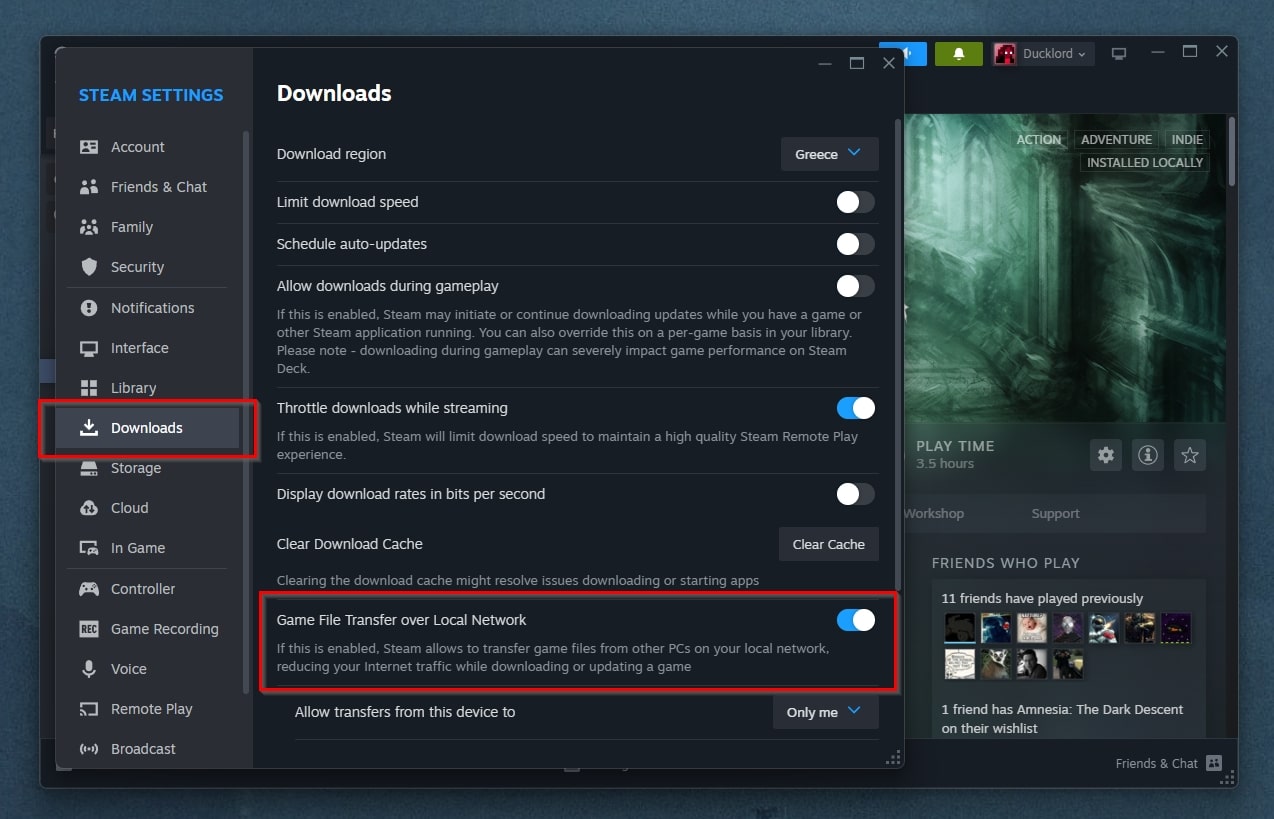
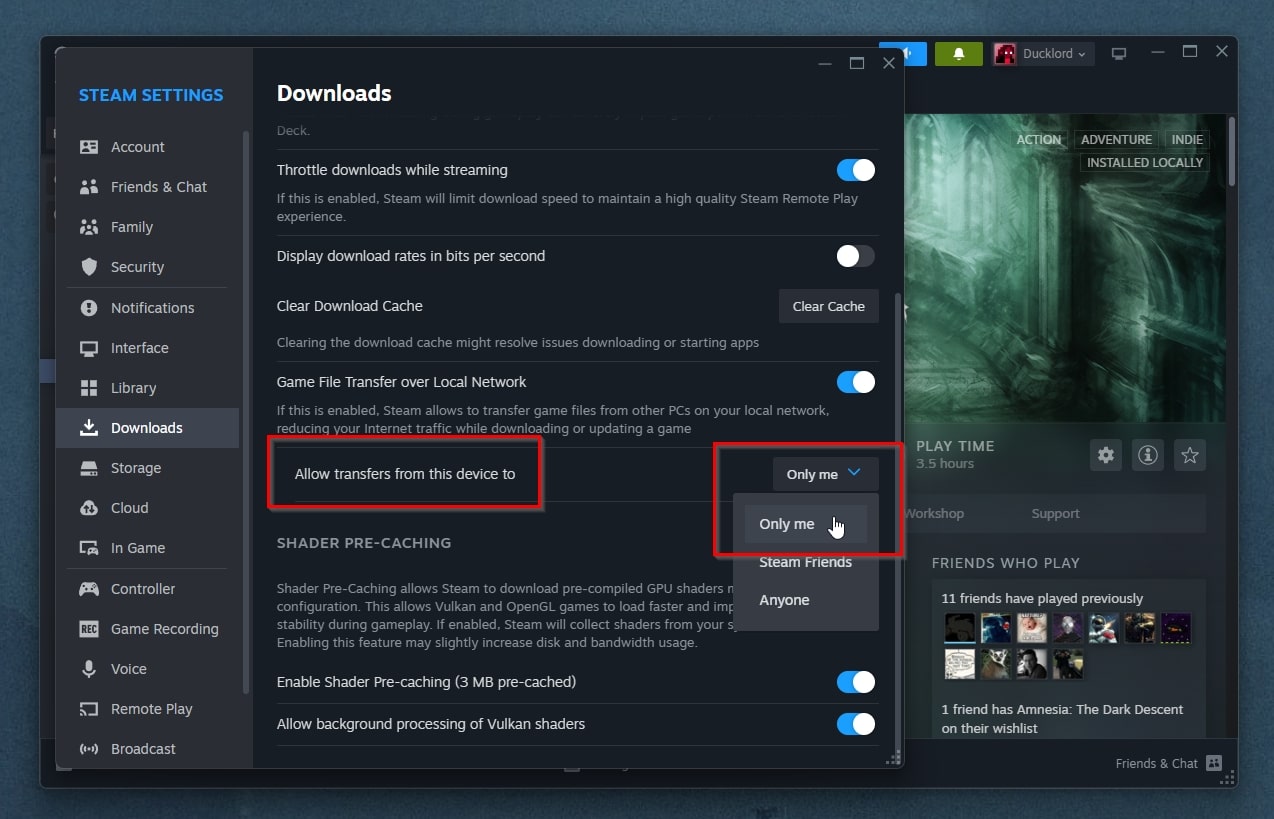
- For additional security, also ensure Only me is selected on the drop-down menu directly underneath.
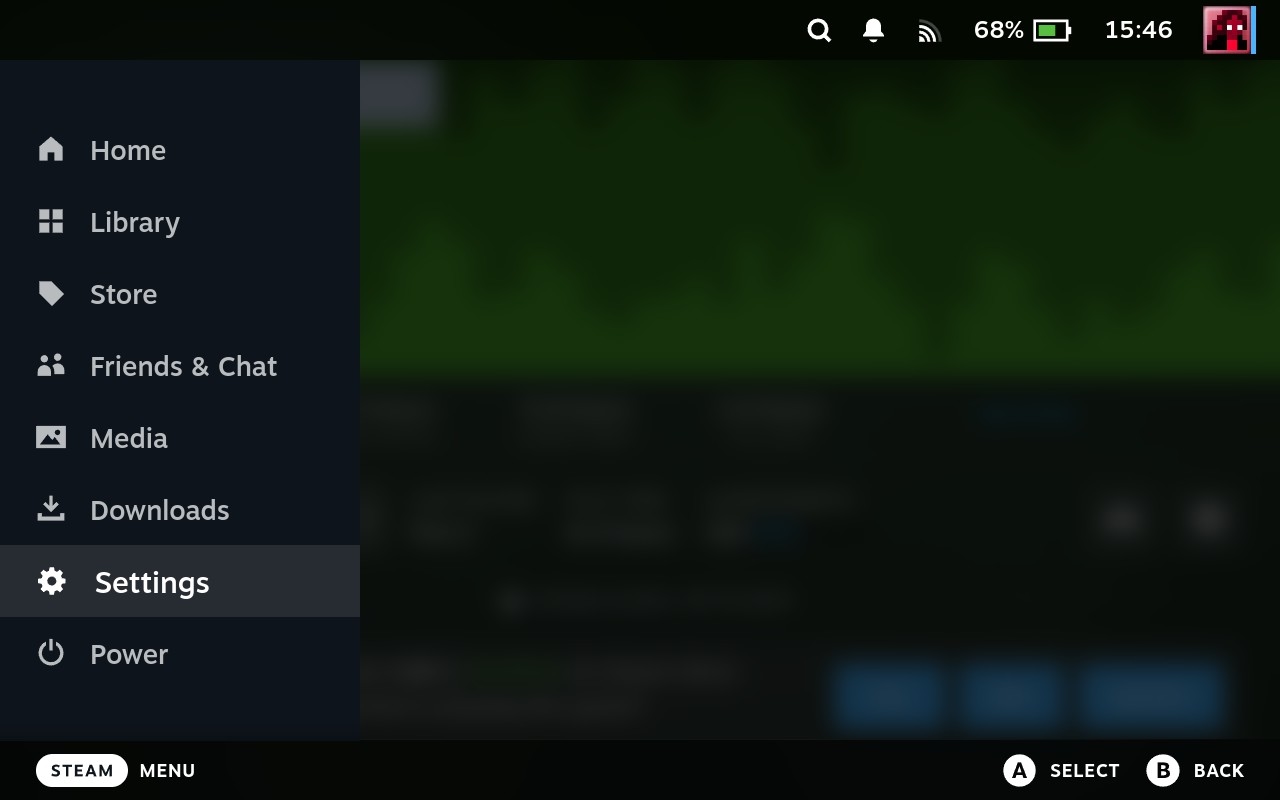
- Transfer your attention to your Steam Deck. Ensure you’re logged in using the same account as on your PC. Press the Steam button on the left and select Settings.
- Move to the Downloads tab and ensure the options are configured like on your PC: Game File Transfer over Local Network should be enabled here, too, and Allow transfers from this device set to Only me for increased security.

With the above set, when you try to install a game on your Steam Deck, if it’s also installed on your PC and your Steam Deck can access it, your little portable wonder will “pull” as many files for the game as it can directly from your PC through your local network. The process should be much quicker than downloading the files from Valve’s servers using a typical Internet connection.
Still, the Steam Client might occasionally pause the process to check some of the files, and there’s an even quicker solution than transferring through a local network – think up to ten times faster. However, it’s somewhat “hacky”, as we’ll see next, more complicated, and expects you to be using an SD card on your Steam Deck and have an SD card reader on your PC.
To rapidly tranfer multiple games from your PC to your Steam Deck’s SD card:
- If you’re using an SD card on your Steam Deck, you’ve probably already set it to work as a secondary storage for your games Library.
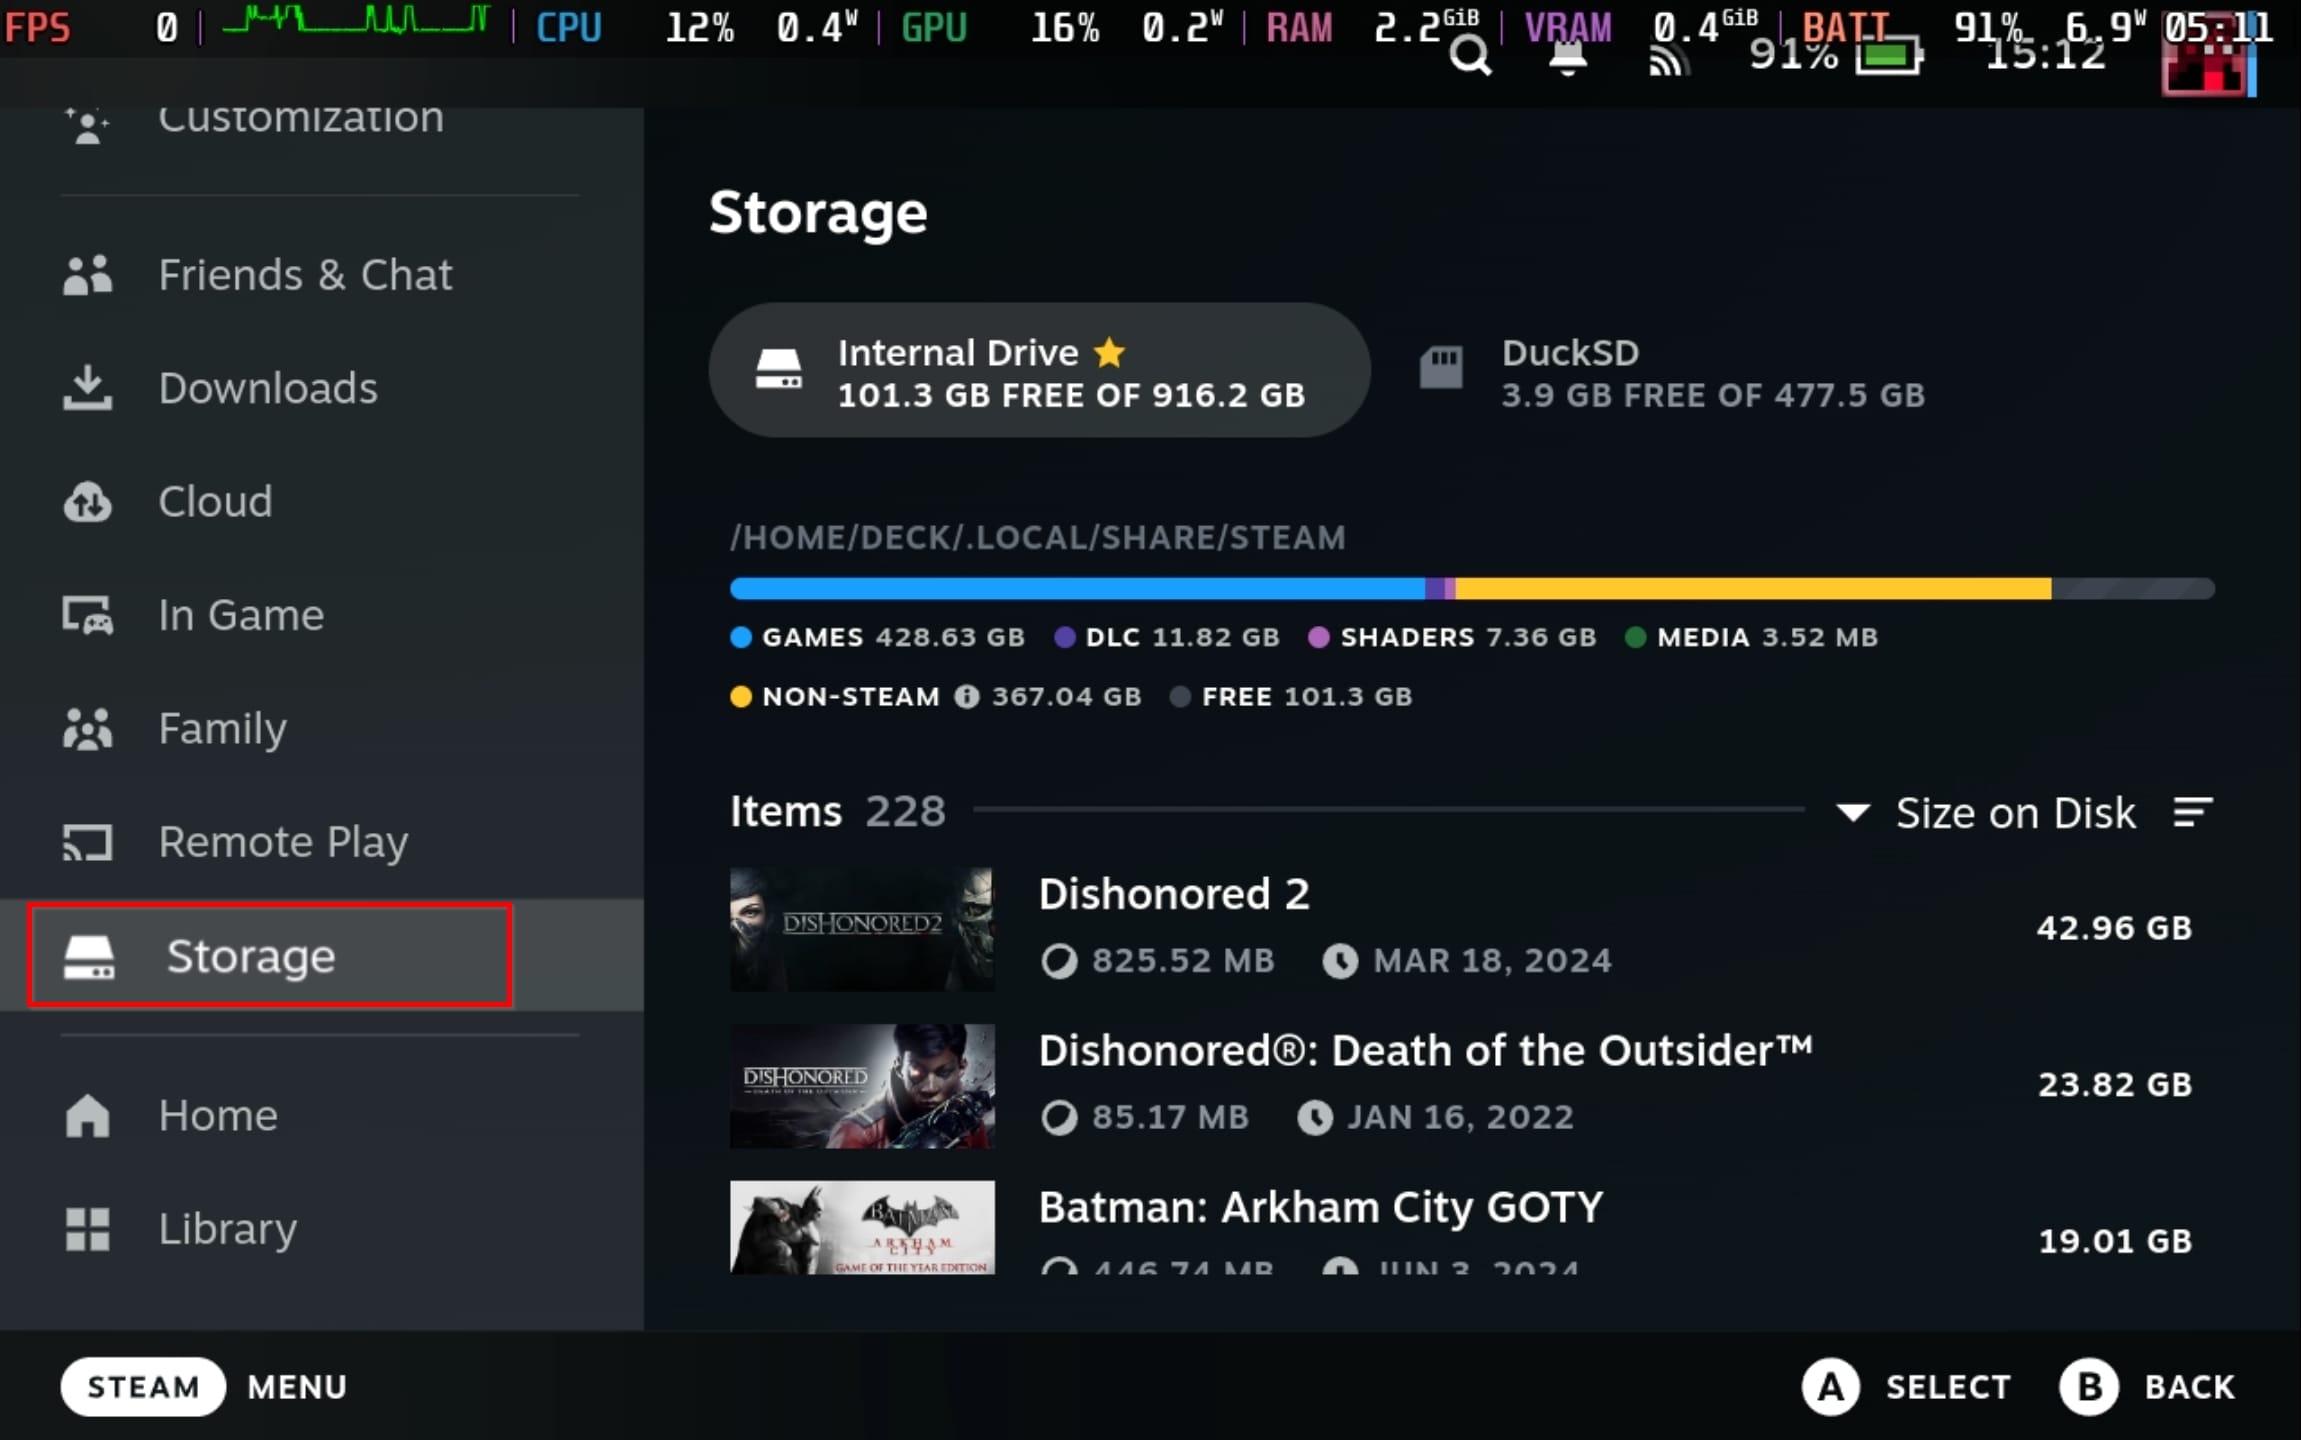
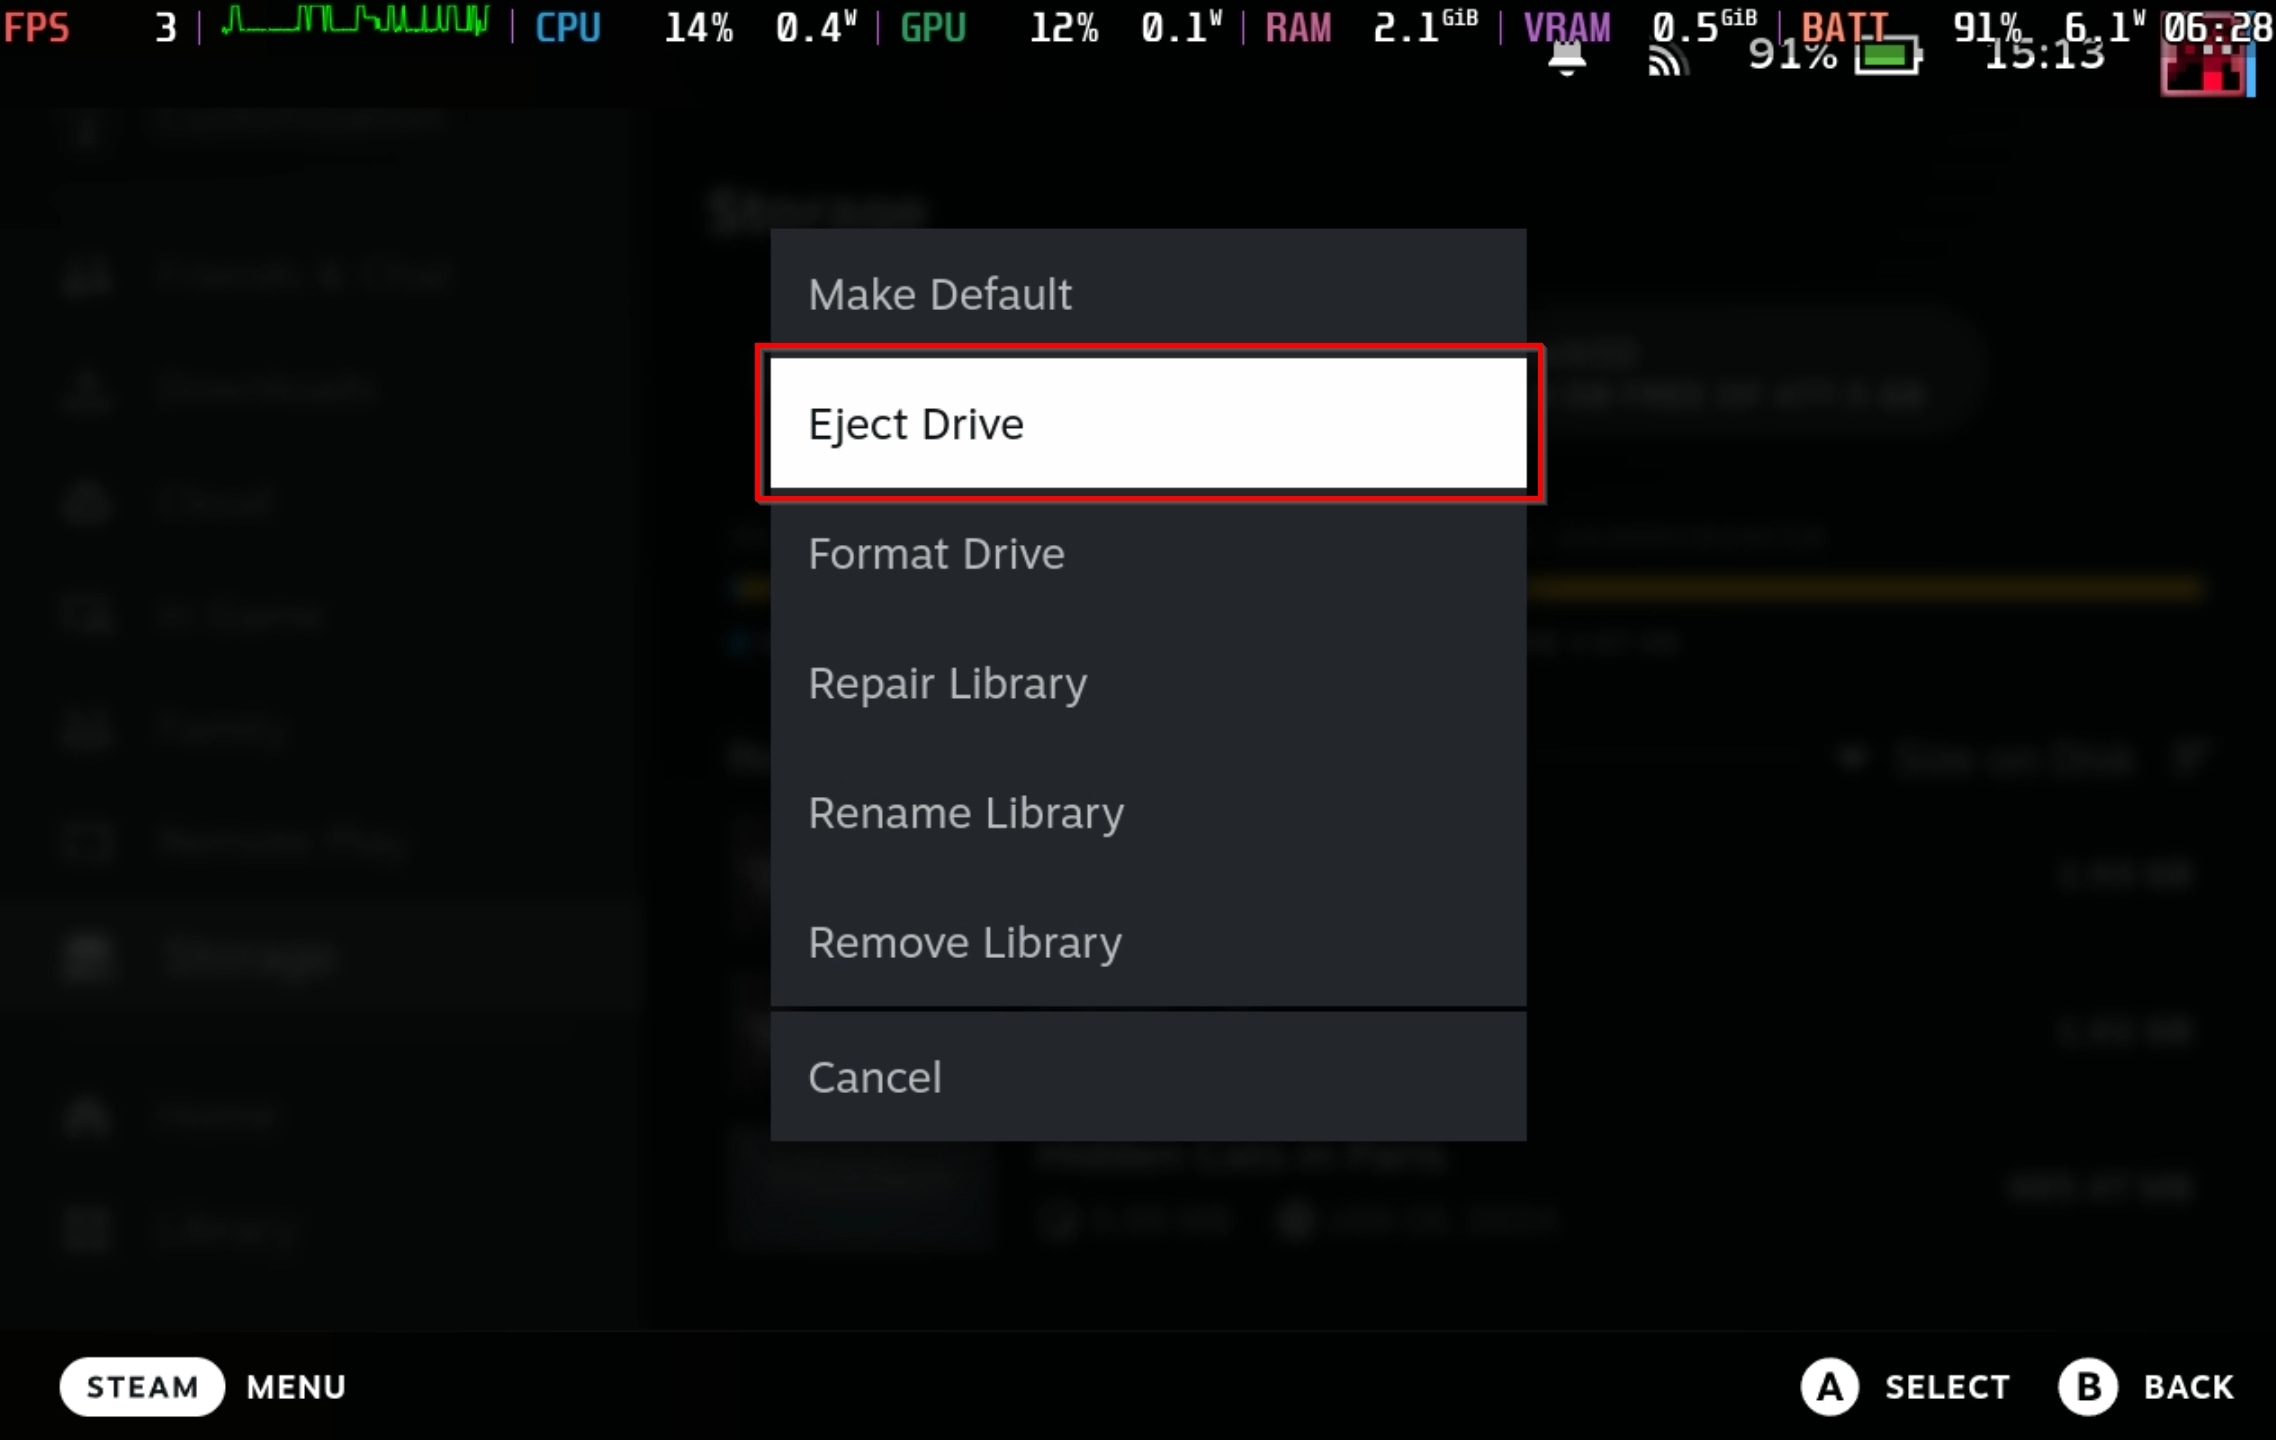
- If not, hit the Steam button on the console’s left and move to Settings > Storage from the Steam Client’s main menu. Highlight your SD card from the options at the top, hit the Y face button on the right of the Steam Deck, and choose Format Drive. Follow the next steps to format your SD card as extra storage for your games Library. We must emphasize that you SHOULD NOT perform this step if you’re already using your SD card this way and have games stored on it, and instead move to the next step.
- Either choose to Eject Drive from the same menu or shut down your Steam Deck. Then, unplug your mini SD card from it and stick it in your SD card reader on your PC.
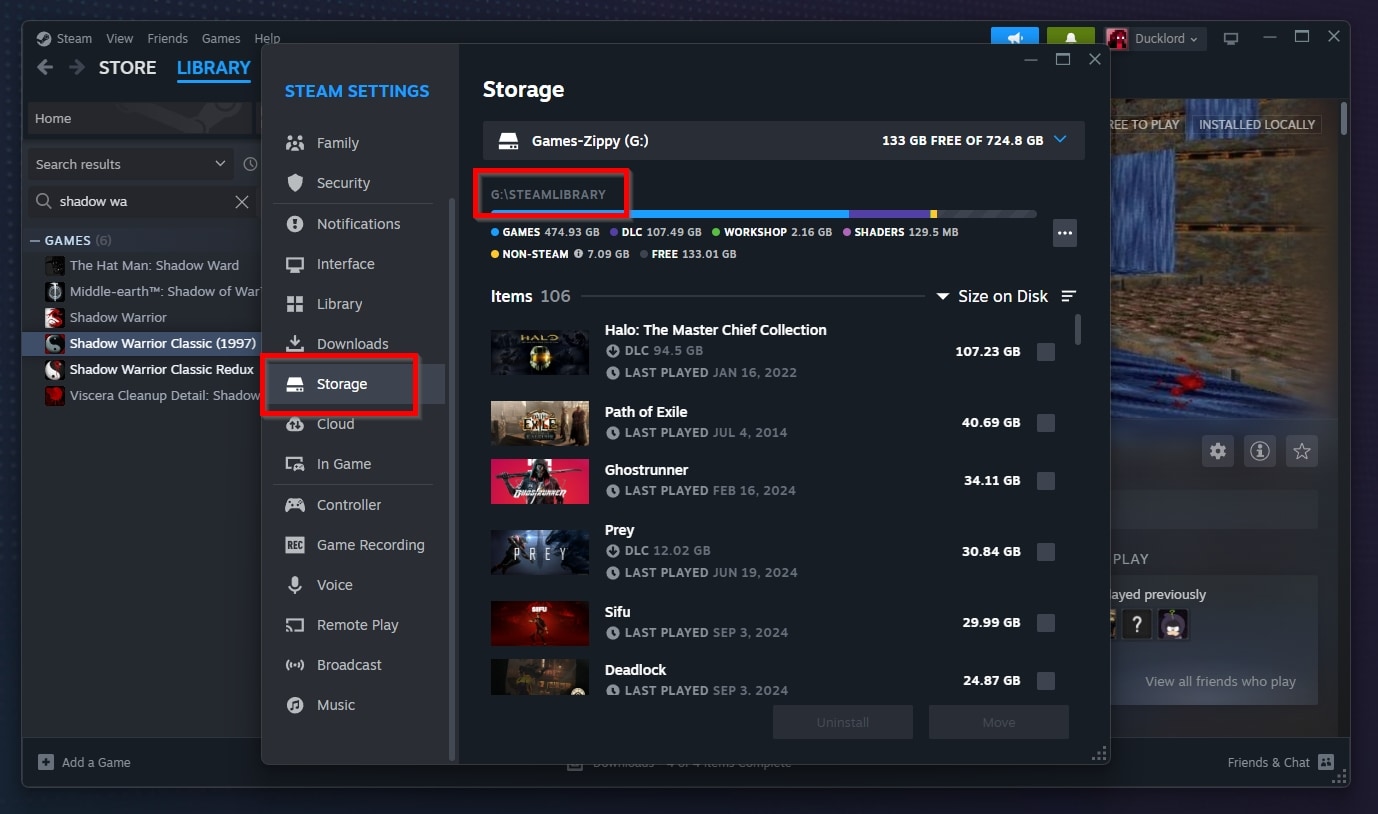
- For ease of use, open two windows of your favorite file manager and place them side-by-side (or use a dual-pane file manager, like Directory Opus, Double Commander, etc.). Use one as your “source”, navigating to your local Steam Library’s folder. If you don’t remember its location, run the Steam Client, select Steam > Settings > Storage, and notice its path at the top of the window under the selected drive. If you’re using more than one drive for your Steam Library on your PC, you can find each library’s path using the pull-down menu at the top to go through all your drives.
- With one window of your file manager showing the contents of your Steam Library, enter its steamapps > common subfolder.
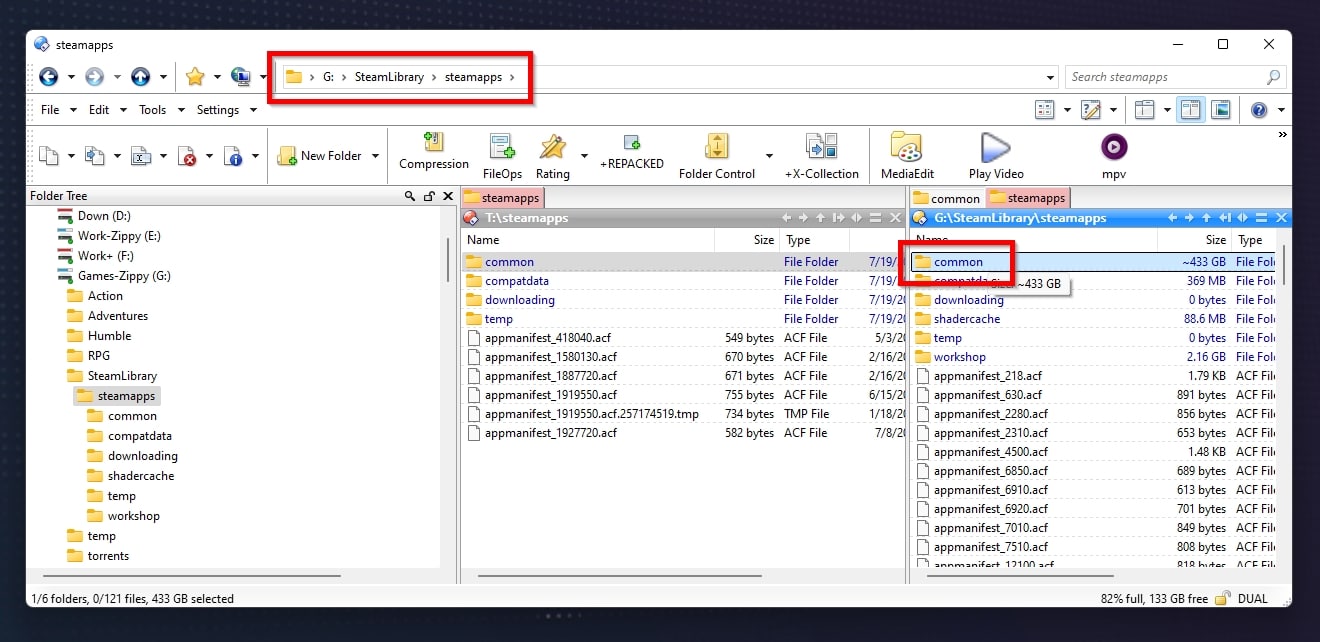
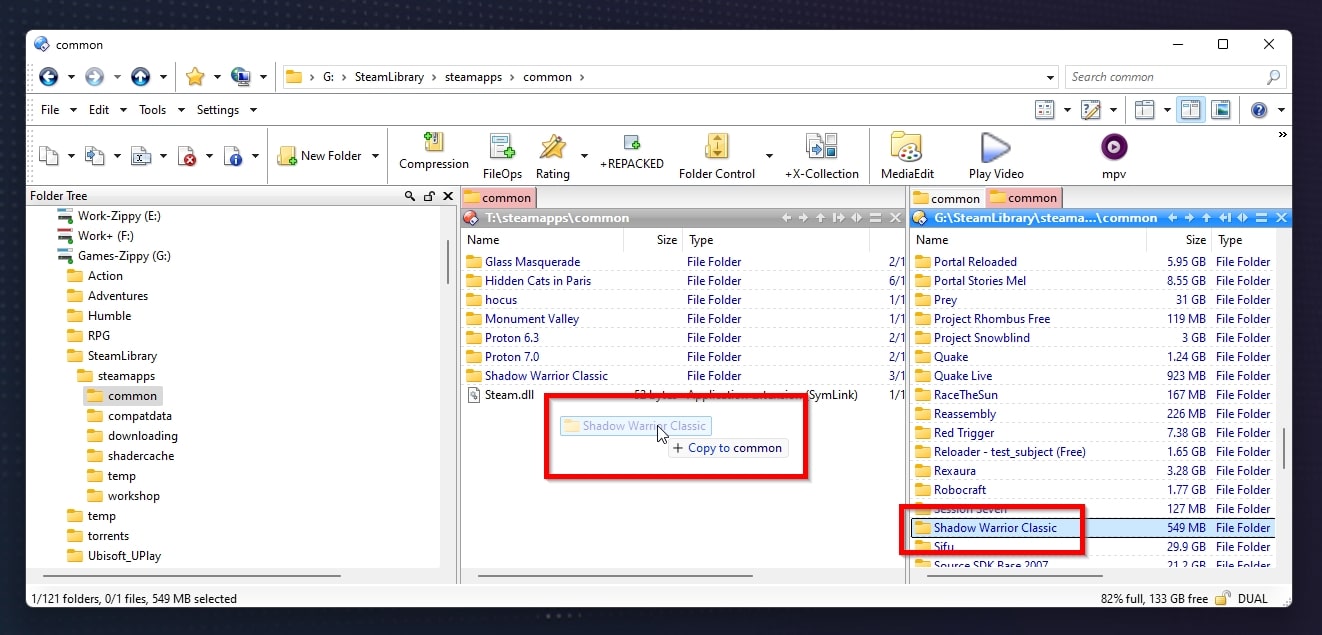
- Visit your mini SD card on the other file manager’s window. Finding your way to a similar folder there will be relatively easy. Select any game’s folder from your “source” file manager window and drag and drop it to your Steam Deck’s mini SD card storage on the “destination” file manager window to copy it there. You can repeat the process for all games you want to transfer or select multiple games’ folders and copy them in one move.
- When the process completes, eject your Steam Deck’s mini SD card from your PC. Plug it back into your Steam Deck.
- Turn on your Steam Deck. Use the Steam button on the left to access the console’s main menu and navigate to Storage. Ensure your SD mini card is detected, “mounted”, and recognized by the Steam Client.
- Return to the Steam Client’s main menu on your Steam Deck and select your Library. For small libraries, you can use the bumper buttons to navigate to the All Games page and look around until you find it. For more extensive game libraries, it’s easier to use the search field at the top left of the interface to seek each game you transferred by name.
- Since the Steam Client doesn’t have the games you transferred registered as “installed” nor automatically notices the files you’ve added to your Library, it will offer the option to install every game. That’s normal, and you should select that option.
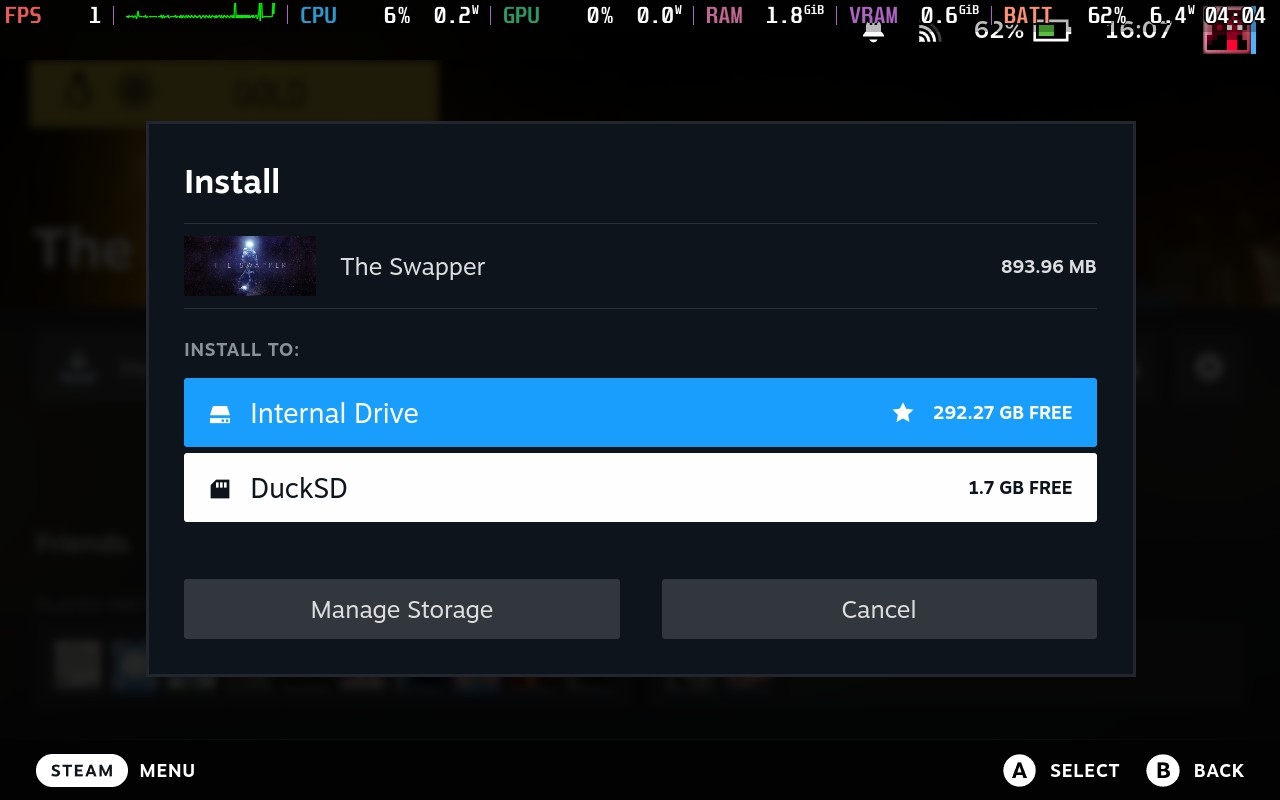
- When asked where you want to install the game, choose your SD card instead of the internal storage.
- As you’ll notice, instead of Transfer the game’s files, the Steam Client will jump directly to the Validating stage.
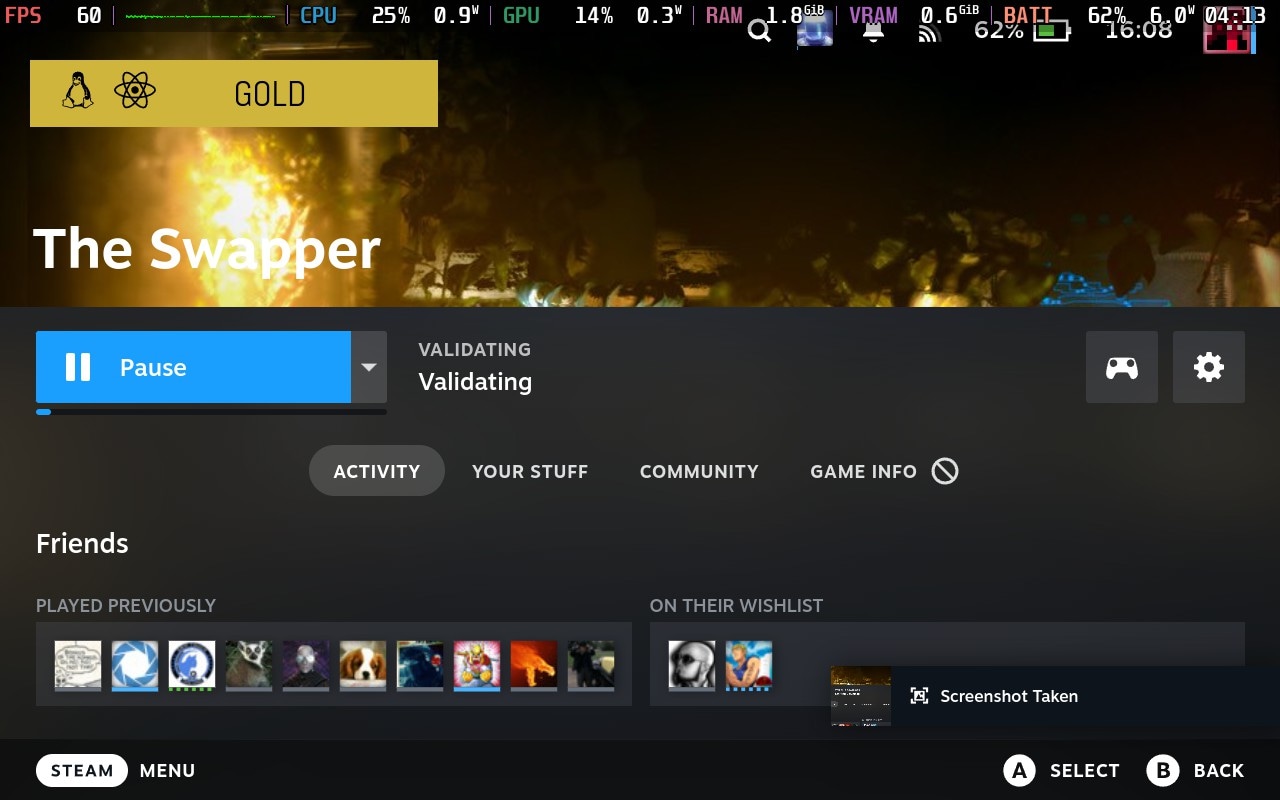
Congratulations! You’ve practically skipped the whole downloading process and skipped directly to the stage where the Steam Deck only has to validate your files. Still, this, too, requires some time, which also depends on your SD card’s speed. Also, remember that the Steam Deck is not an ultra-powerful workstation. The more data the Steam Client has to validate, the longer the process will take. It can even take hours if you’ve filled your SD card with hundreds of gigabytes of modern AAA games.
How to Recover Your Work Files from Steam Deck’s Desktop Mode
Are you also using your Steam Deck as a desktop replacement? I do, too, and thus, know how annoying it is to lose your work-related files on it. Still, the fact the Steam Deck is primarily a console doesn’t mean your files are lost. Their recovery is (usually) possible and not much different than what you’d do on a “normal” PC running Linux.
Look in the Steam Deck’s Trash Folder
Like on most modern desktops, a typical deletion doesn’t send any files to oblivion but to a temporary trip to a Recycle Bin — in this case, called Thrashcan. They remain there until more incoming deleted files overflow the Thrashcan’s available space or for a specific timeframe (by default, around 30 days). After that, they’re removed from the Trashcan, but even then, it’s often possible to get them back, as we’ll see in the following sections.
As long as your deleted files are still in the Thrashcan, though, you can get them back as follows:
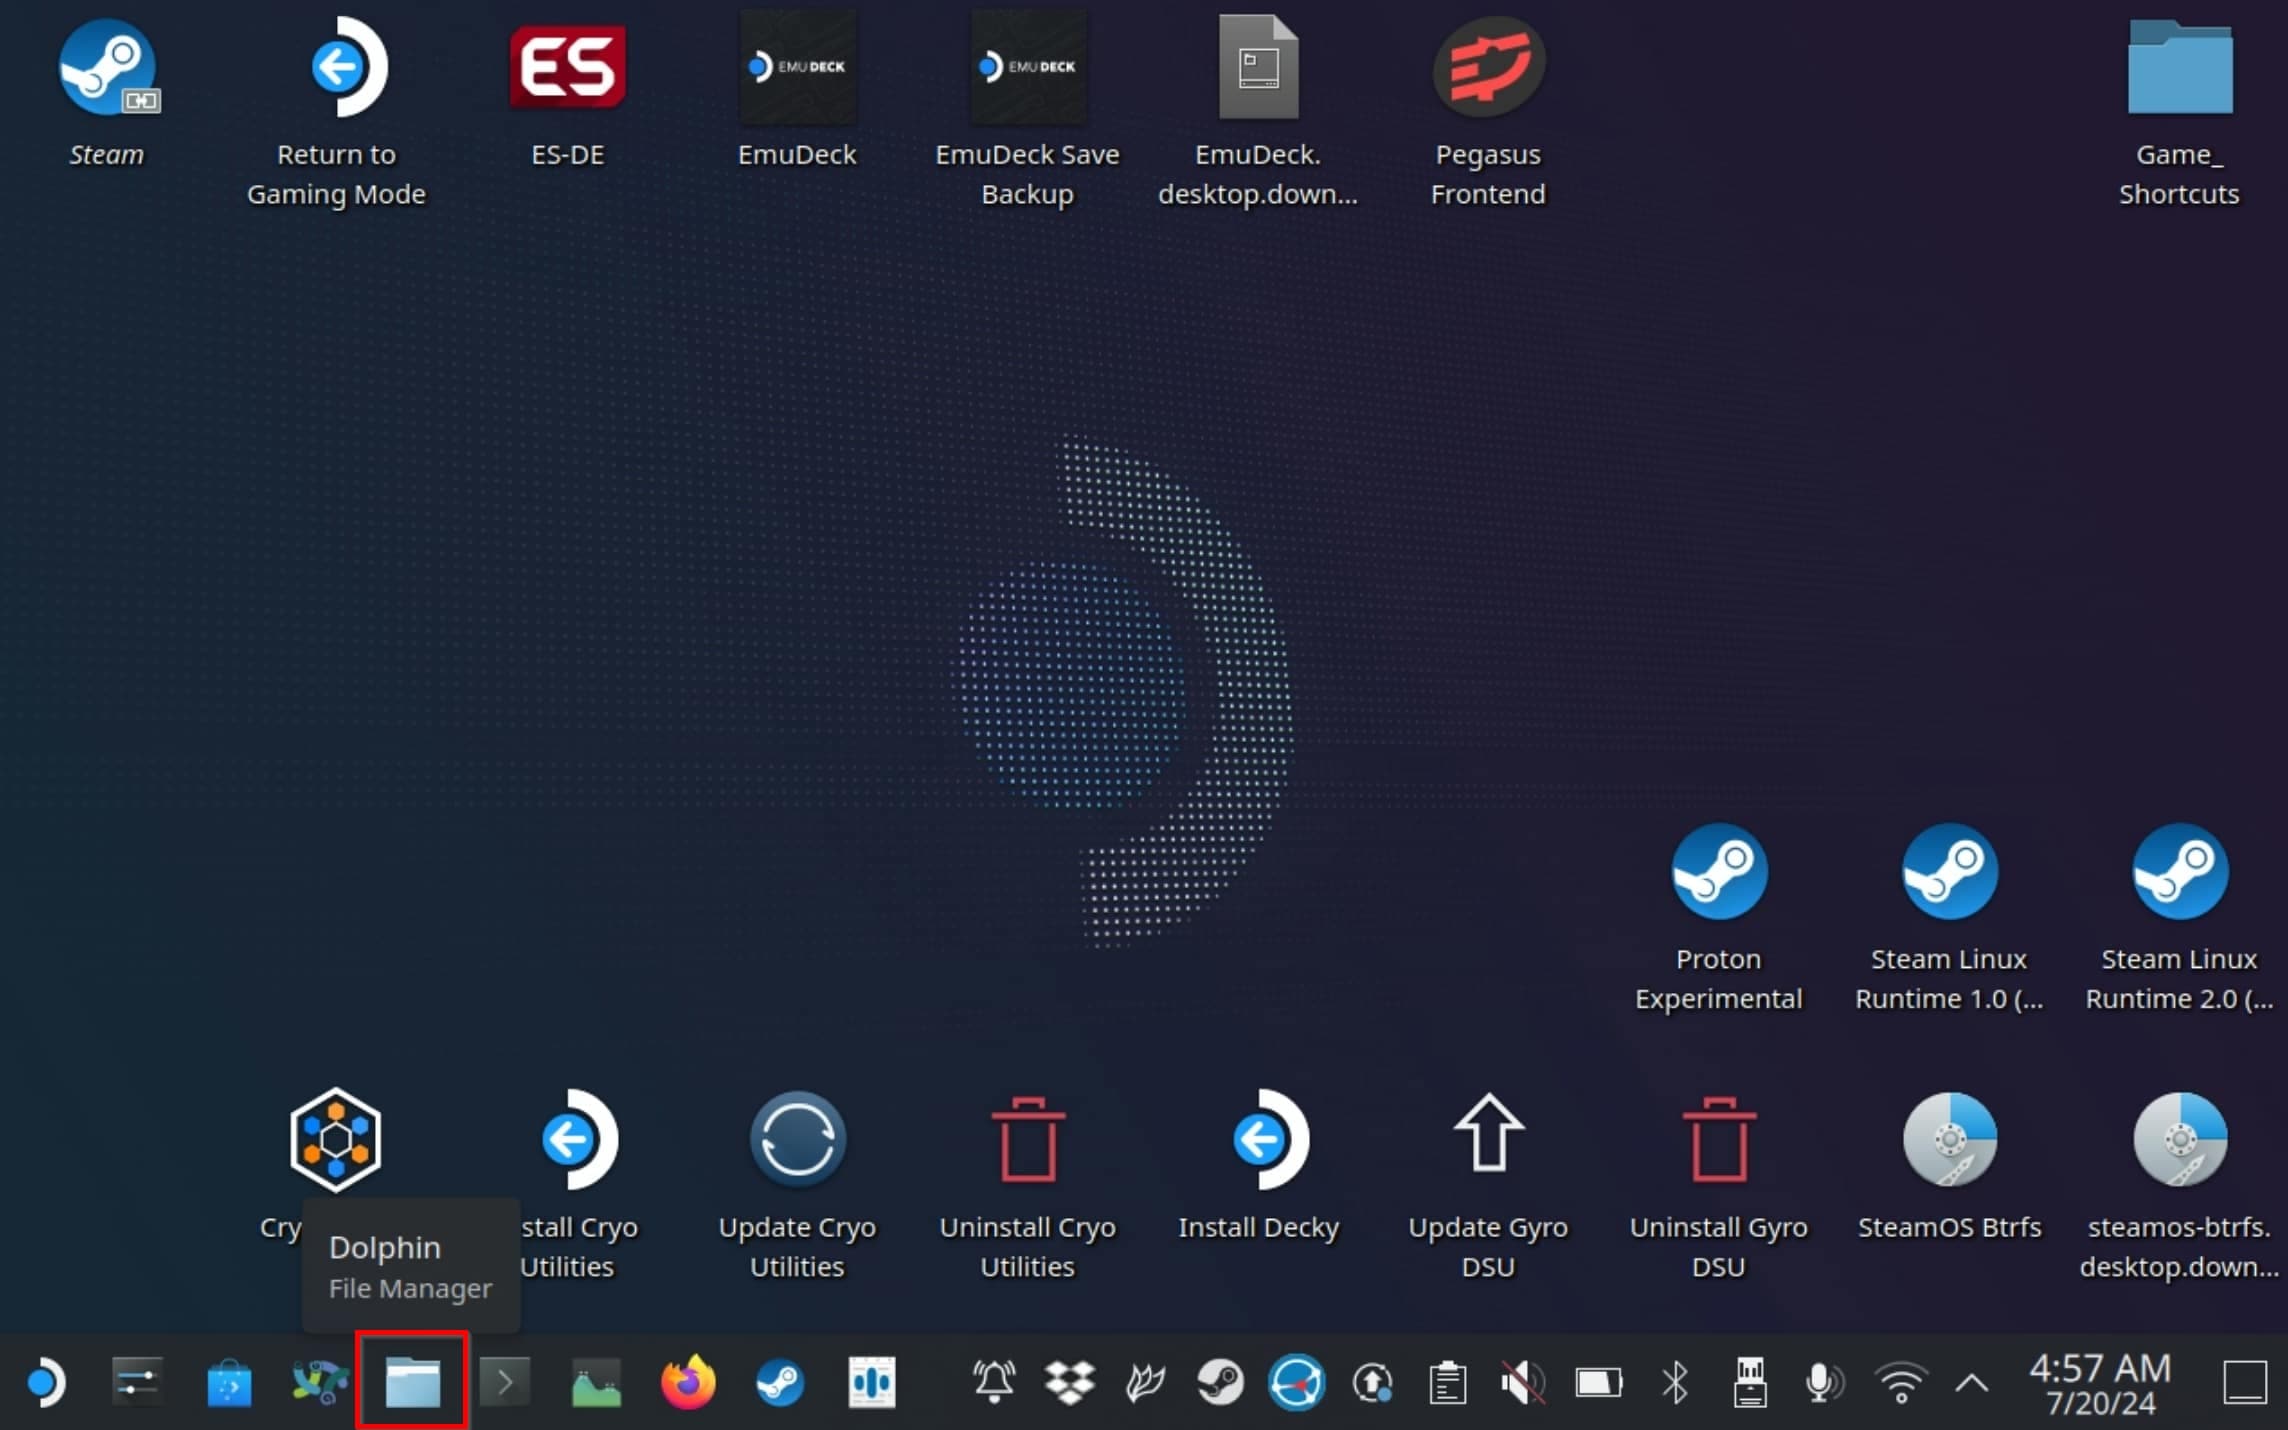
- With the Steam Deck booted into its Desktop Mode, click on the Dolphin file manager’s icon on SteamOS’s taskbar. If you removed its icon from the taskbar, the app should still be available unless you’ve uninstalled it. Seek it by clicking the Application’s Launcher button on the left end of the taskbar and typing its name (“Dolphin”) in the search field at the top. Then, select it to launch it.
- Ignore the initial folder displayed by Dolphin and look at its Places list on the left. Select the last of those, Thrash.
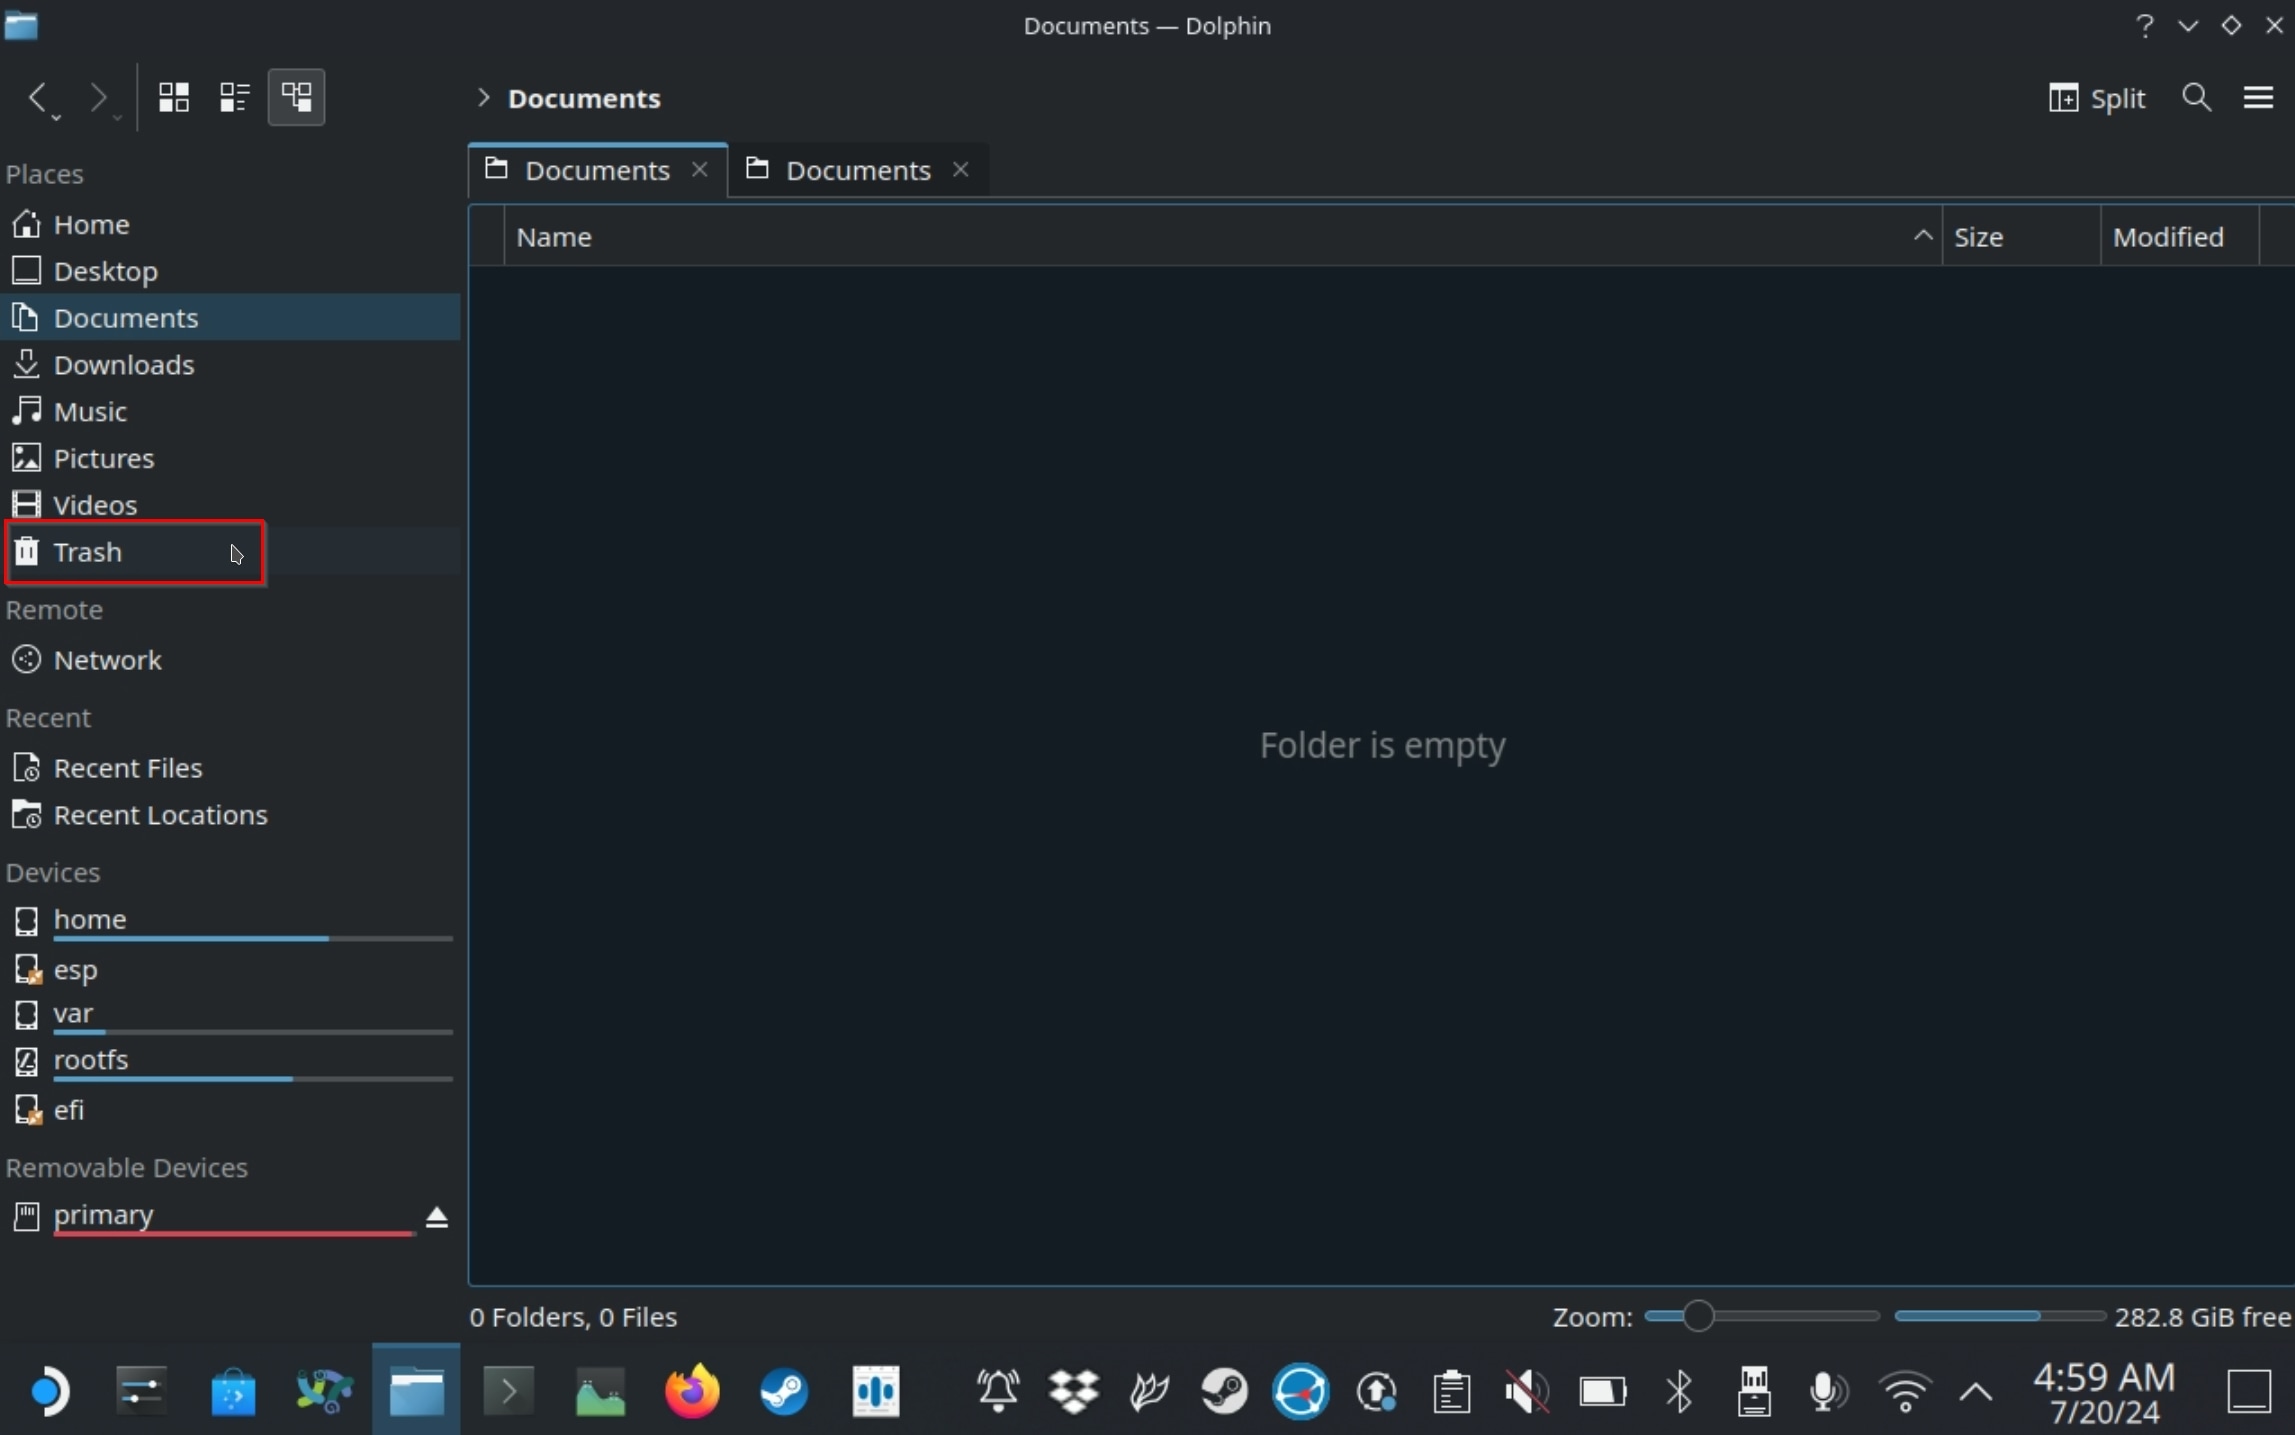
- You should now see the contents of the Thrashcan folder on the right, among which should be the deleted files and folders you want to get back. Select the ones you want to undelete, right-click on them (or, if using the Steam Deck’s controls, press the left trigger), and select Restore.
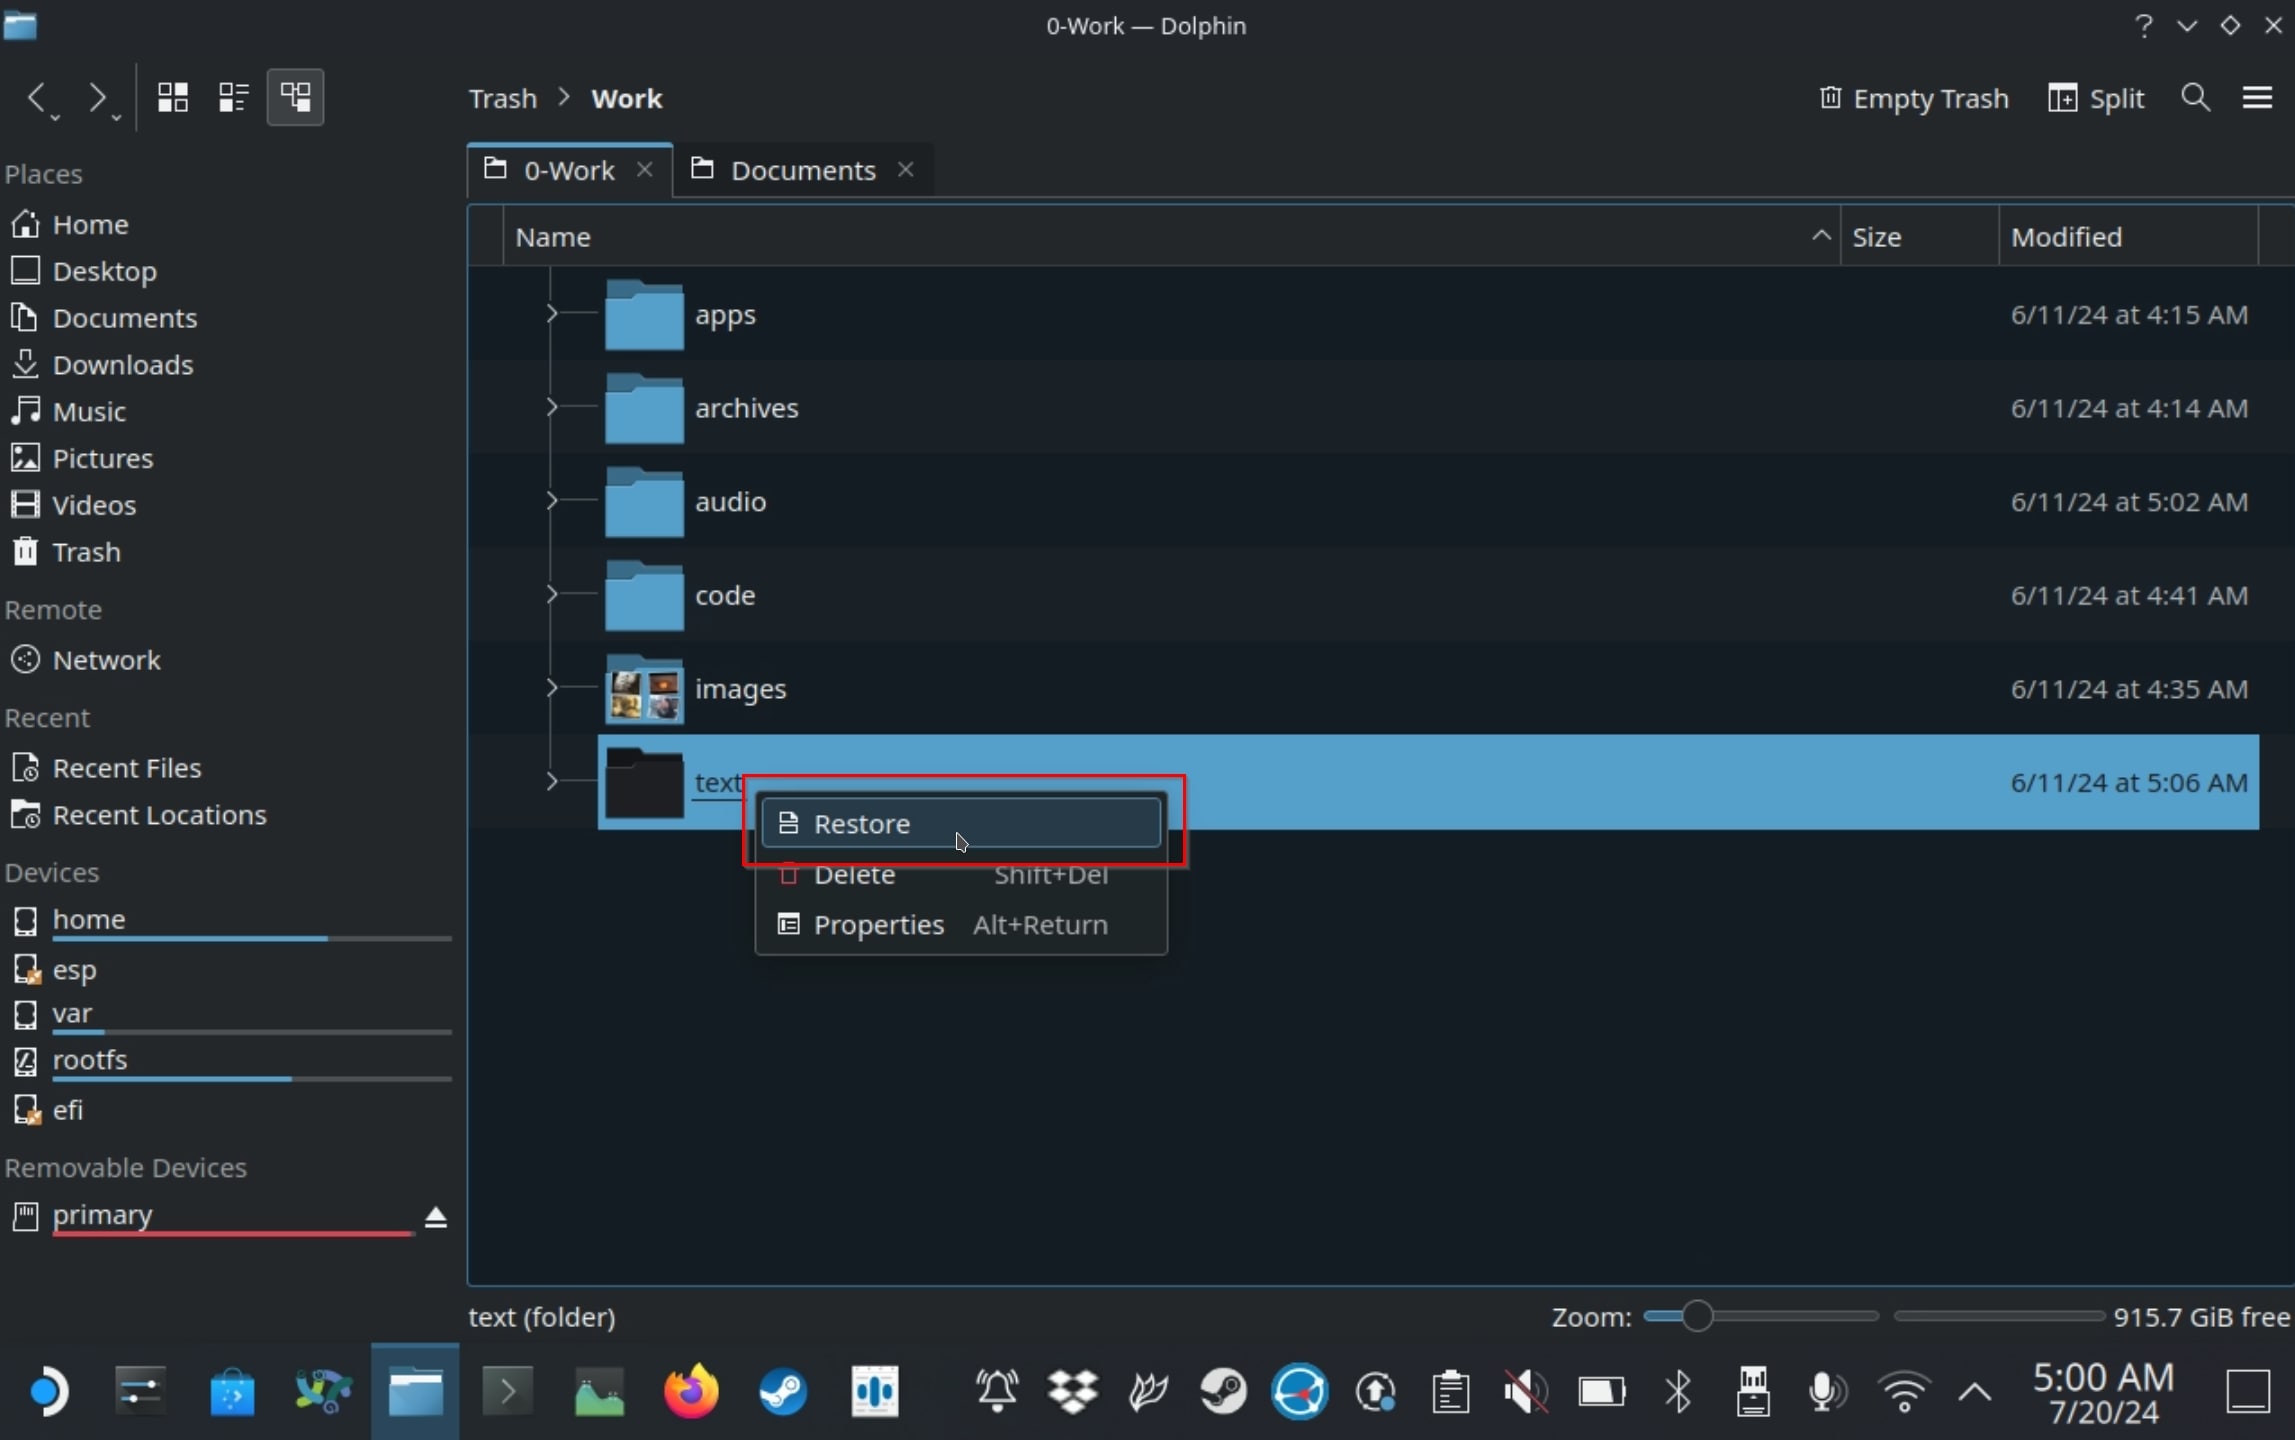
Your files should be back where you last left them before their deletion.
Recover Your Files from Cloud Solutions on the Steam Deck
Were you using a cloud solution with your Steam Deck to easily sync your local files and share them with other computers and gadgets? Then, your deleted files can probably still be found there, from where you can get them back on your Steam Deck.
Dropbox
The most prominent cloud storage solution on the Steam Deck is Dropbox. It’s popular and effortless to install and use compared to the alternatives. Thankfully, it’s also easy to get back deleted files from it, as long as you visit its online version.
To restore your synced files from the online version of Dropbox:
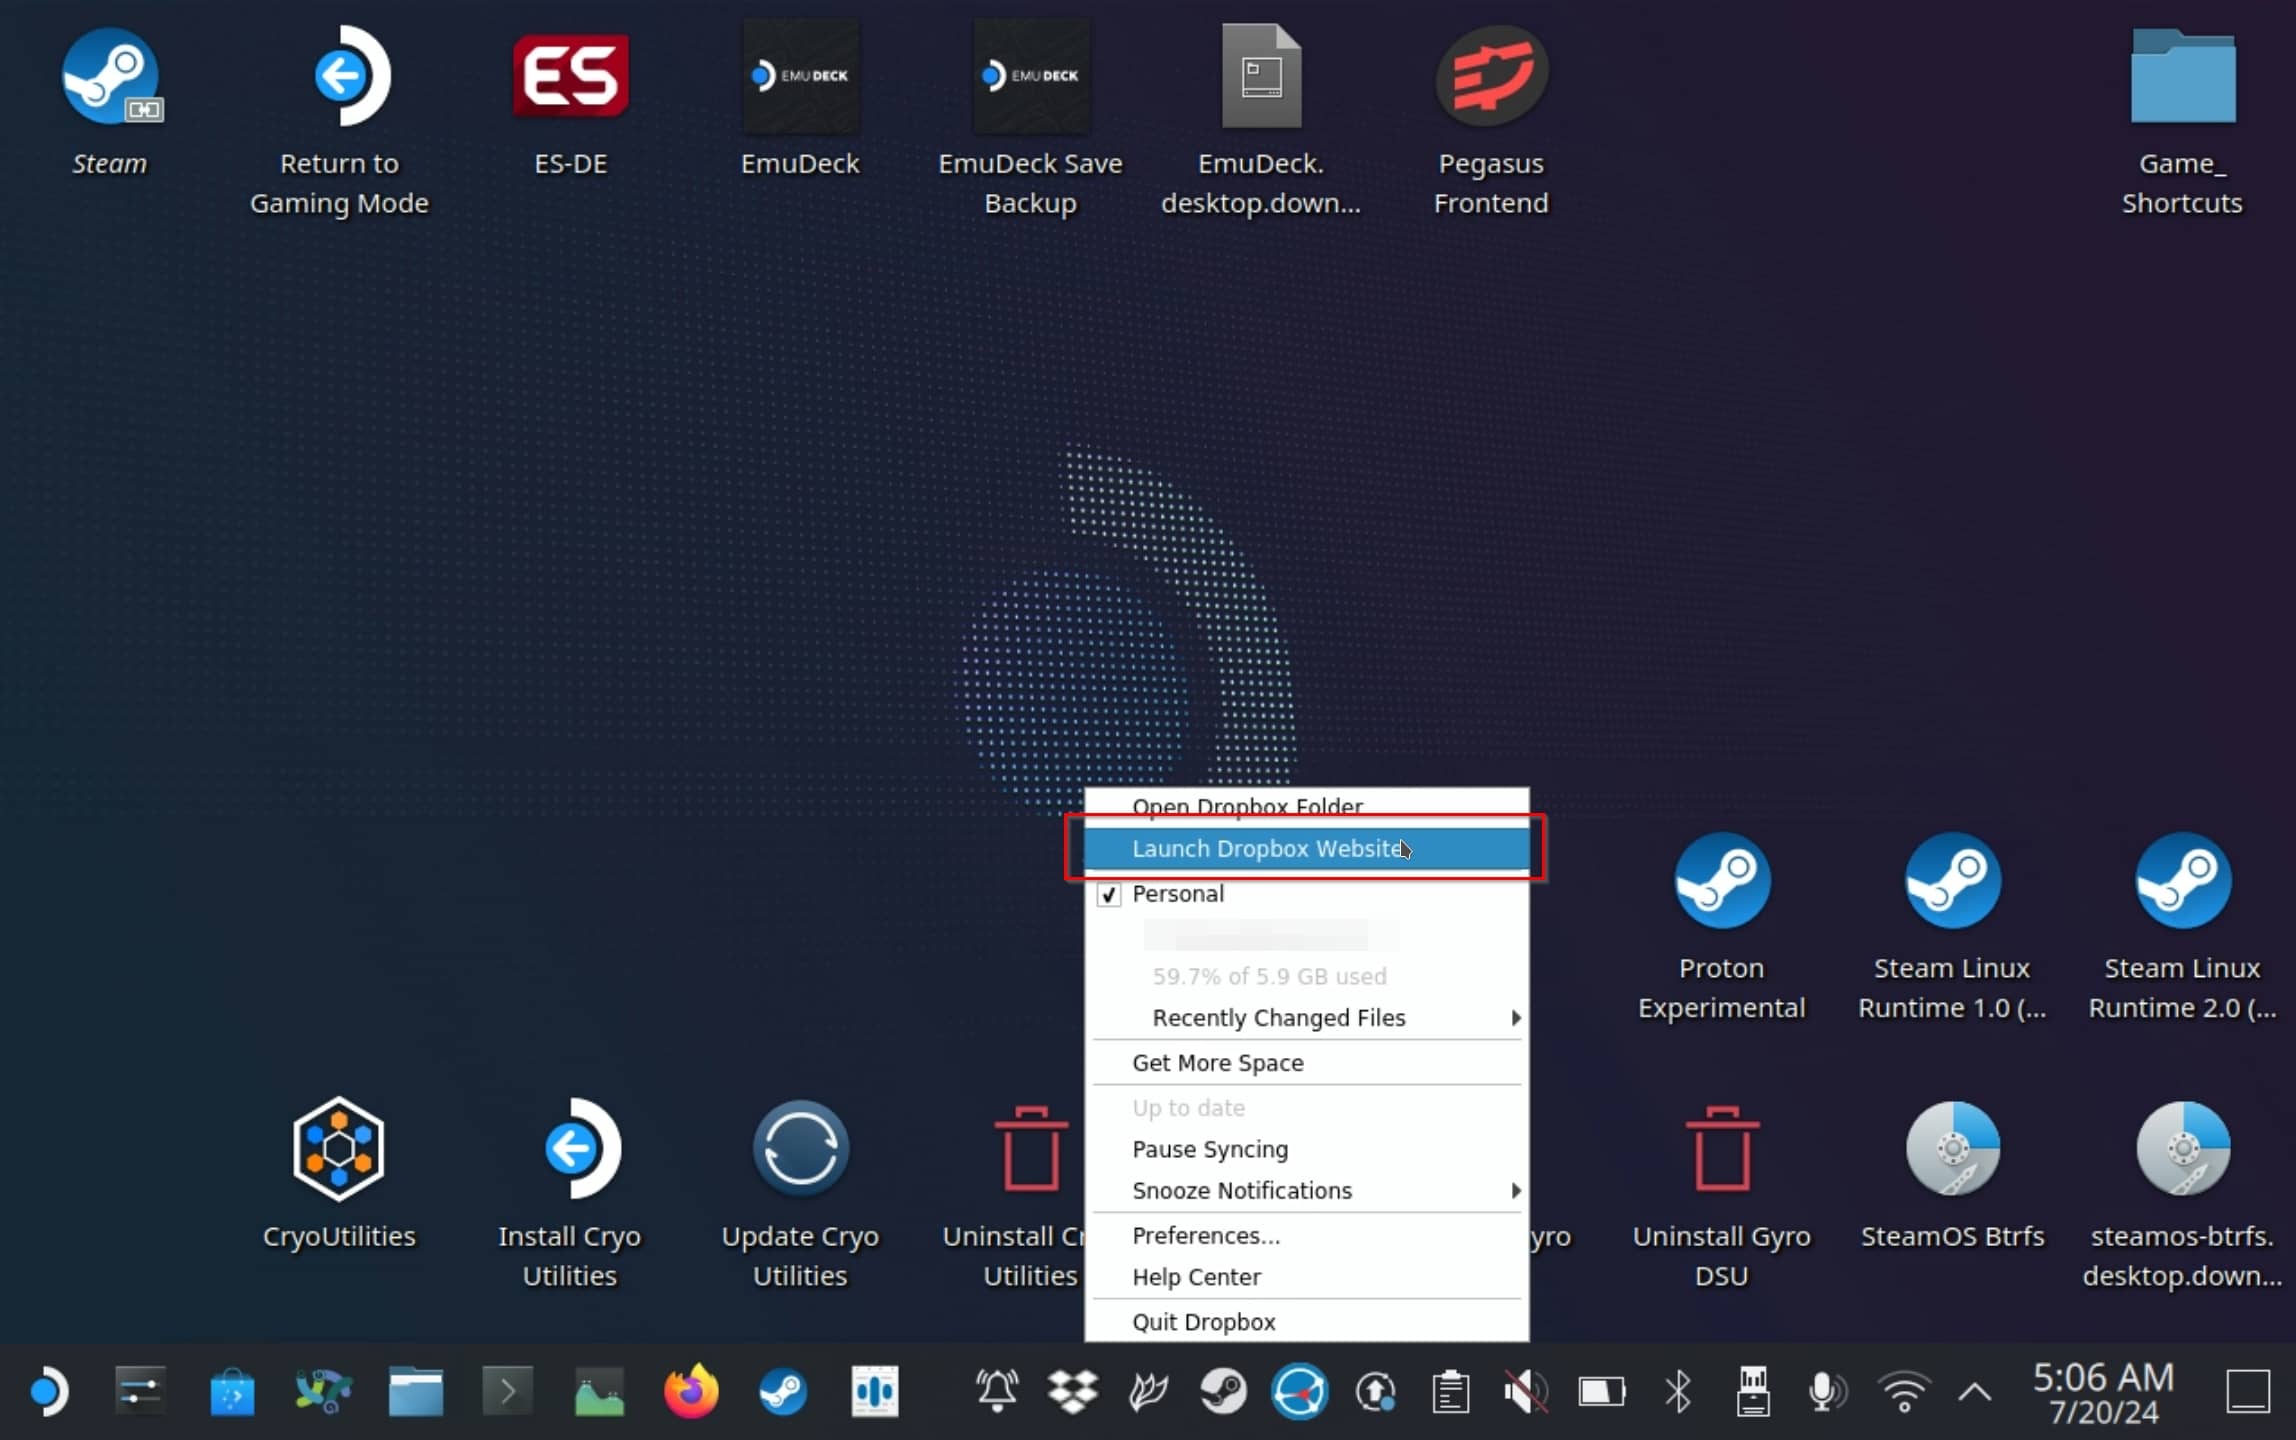
- Either “manually” visit Dropbox’s site in your browser or, with Dropbox running, click on its icon on the taskbar and select Launch Dropbox Website from the menu. If you use multiple accounts with Dropbox, ensure you’re logged in to its online version on your browser’s window with the same account you’re using on your Steam Deck.
- Select Deleted Files from the menu on the left.
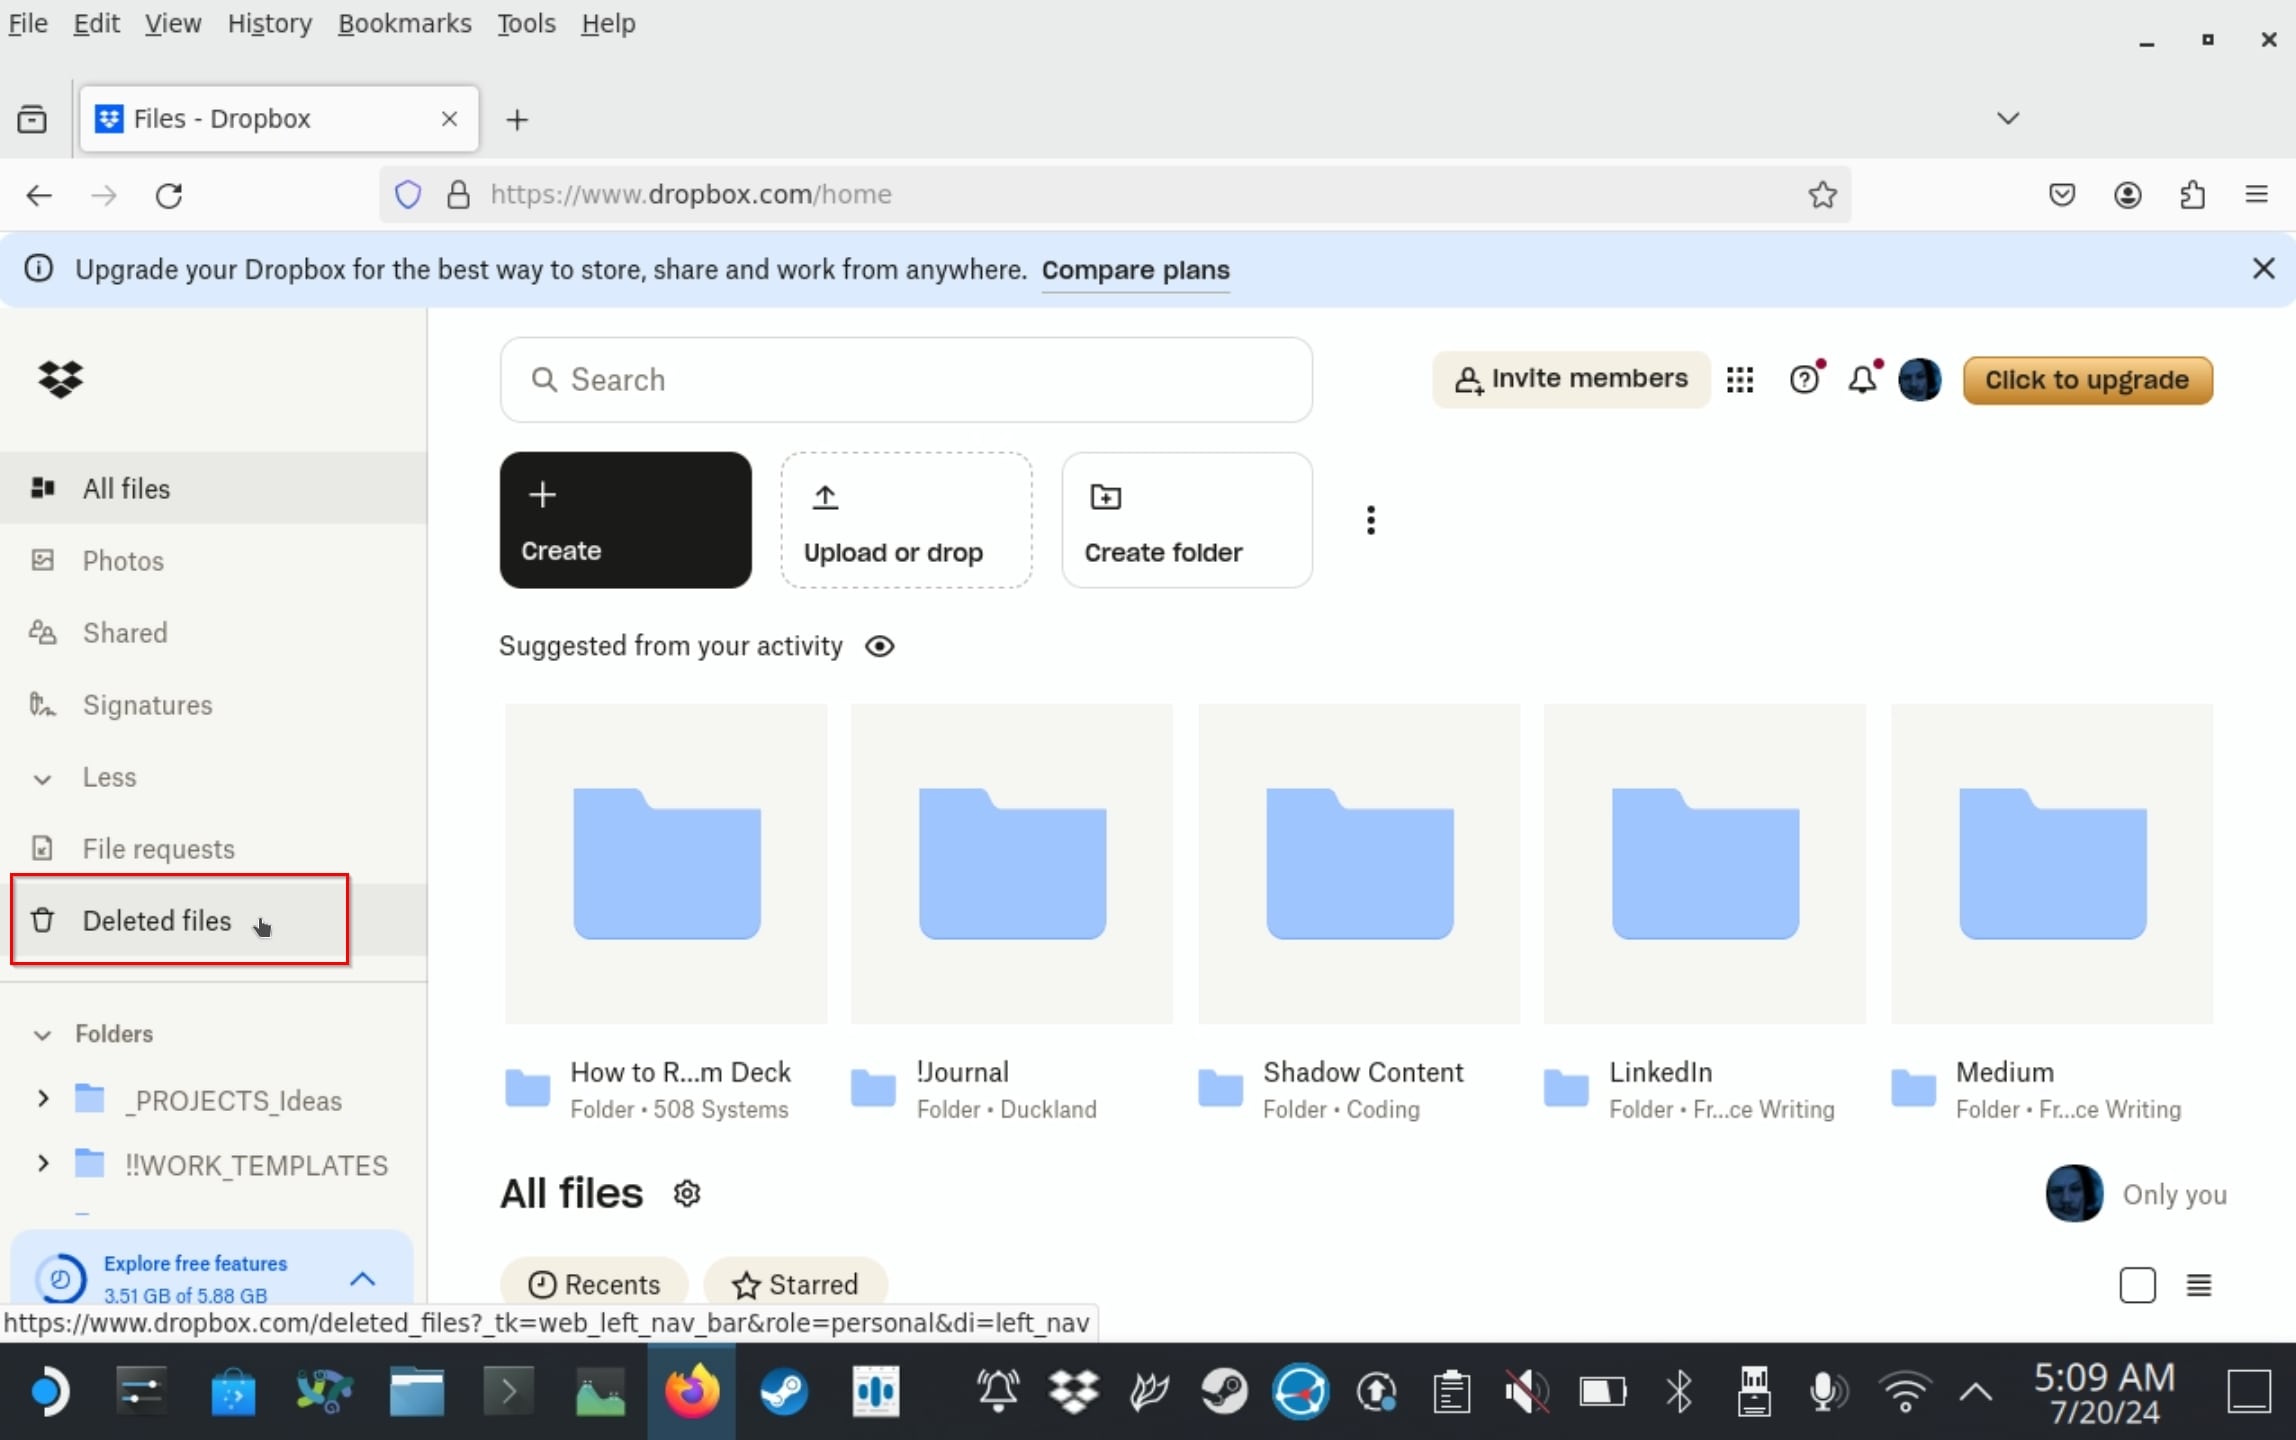
- Select the file you want to get back.
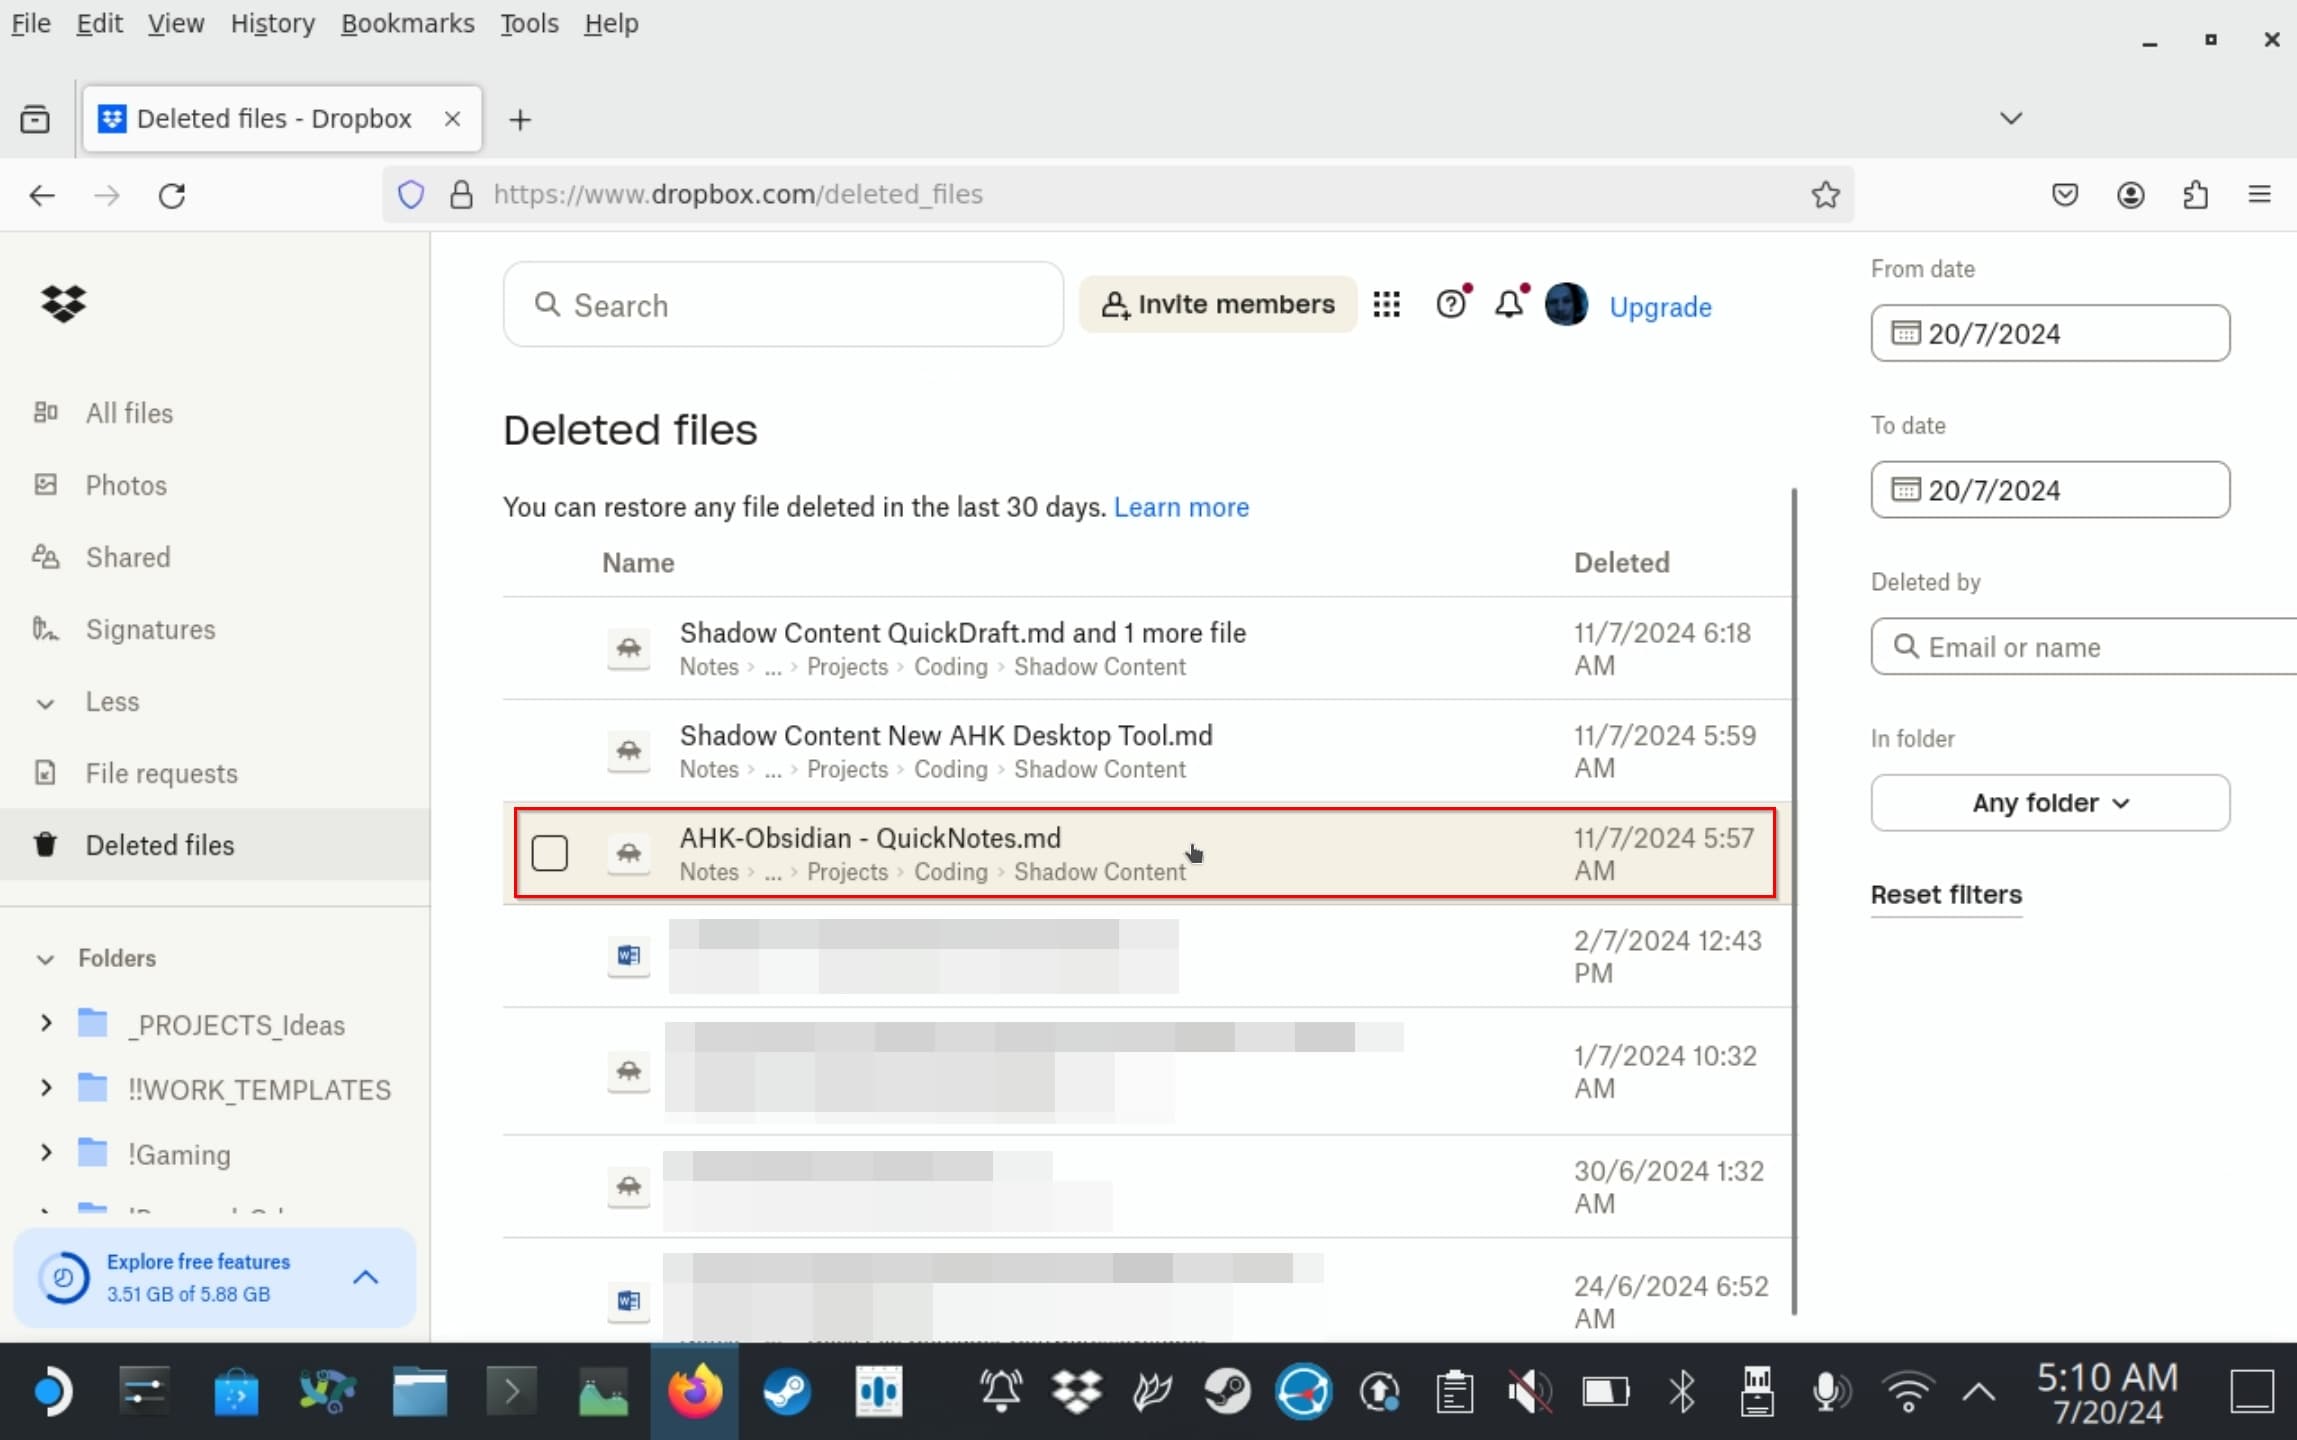
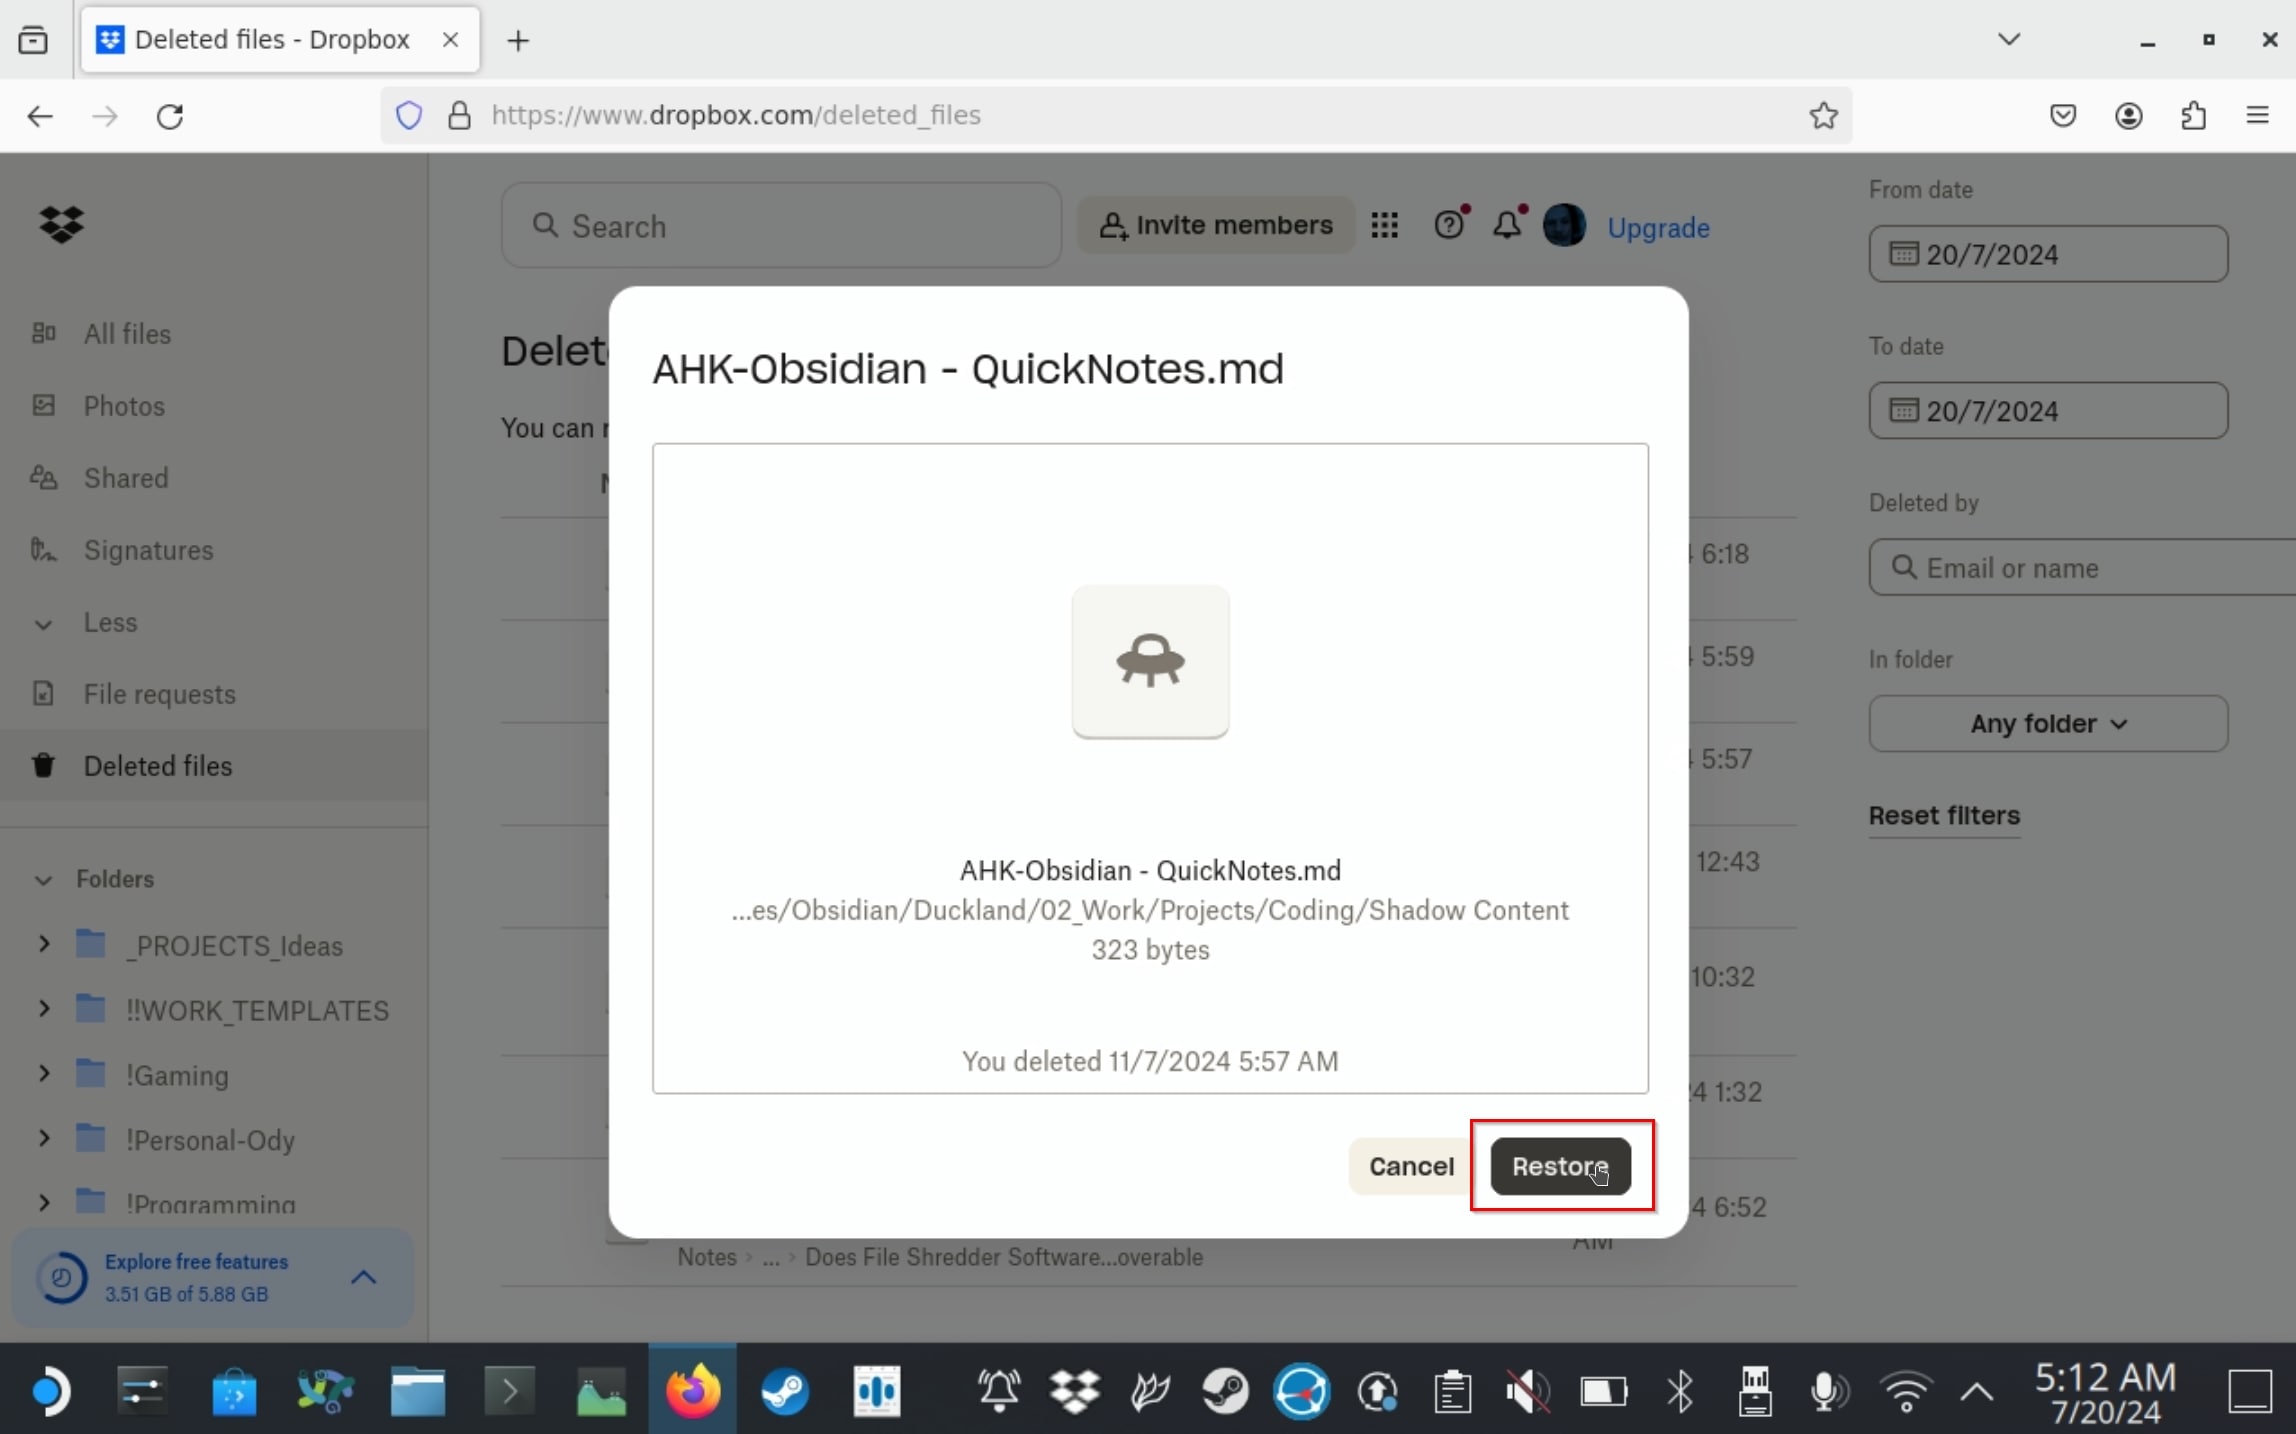
- Dropbox will show you a panel with the file’s properties. Select Restore to undelete the file, restoring it to its original location.
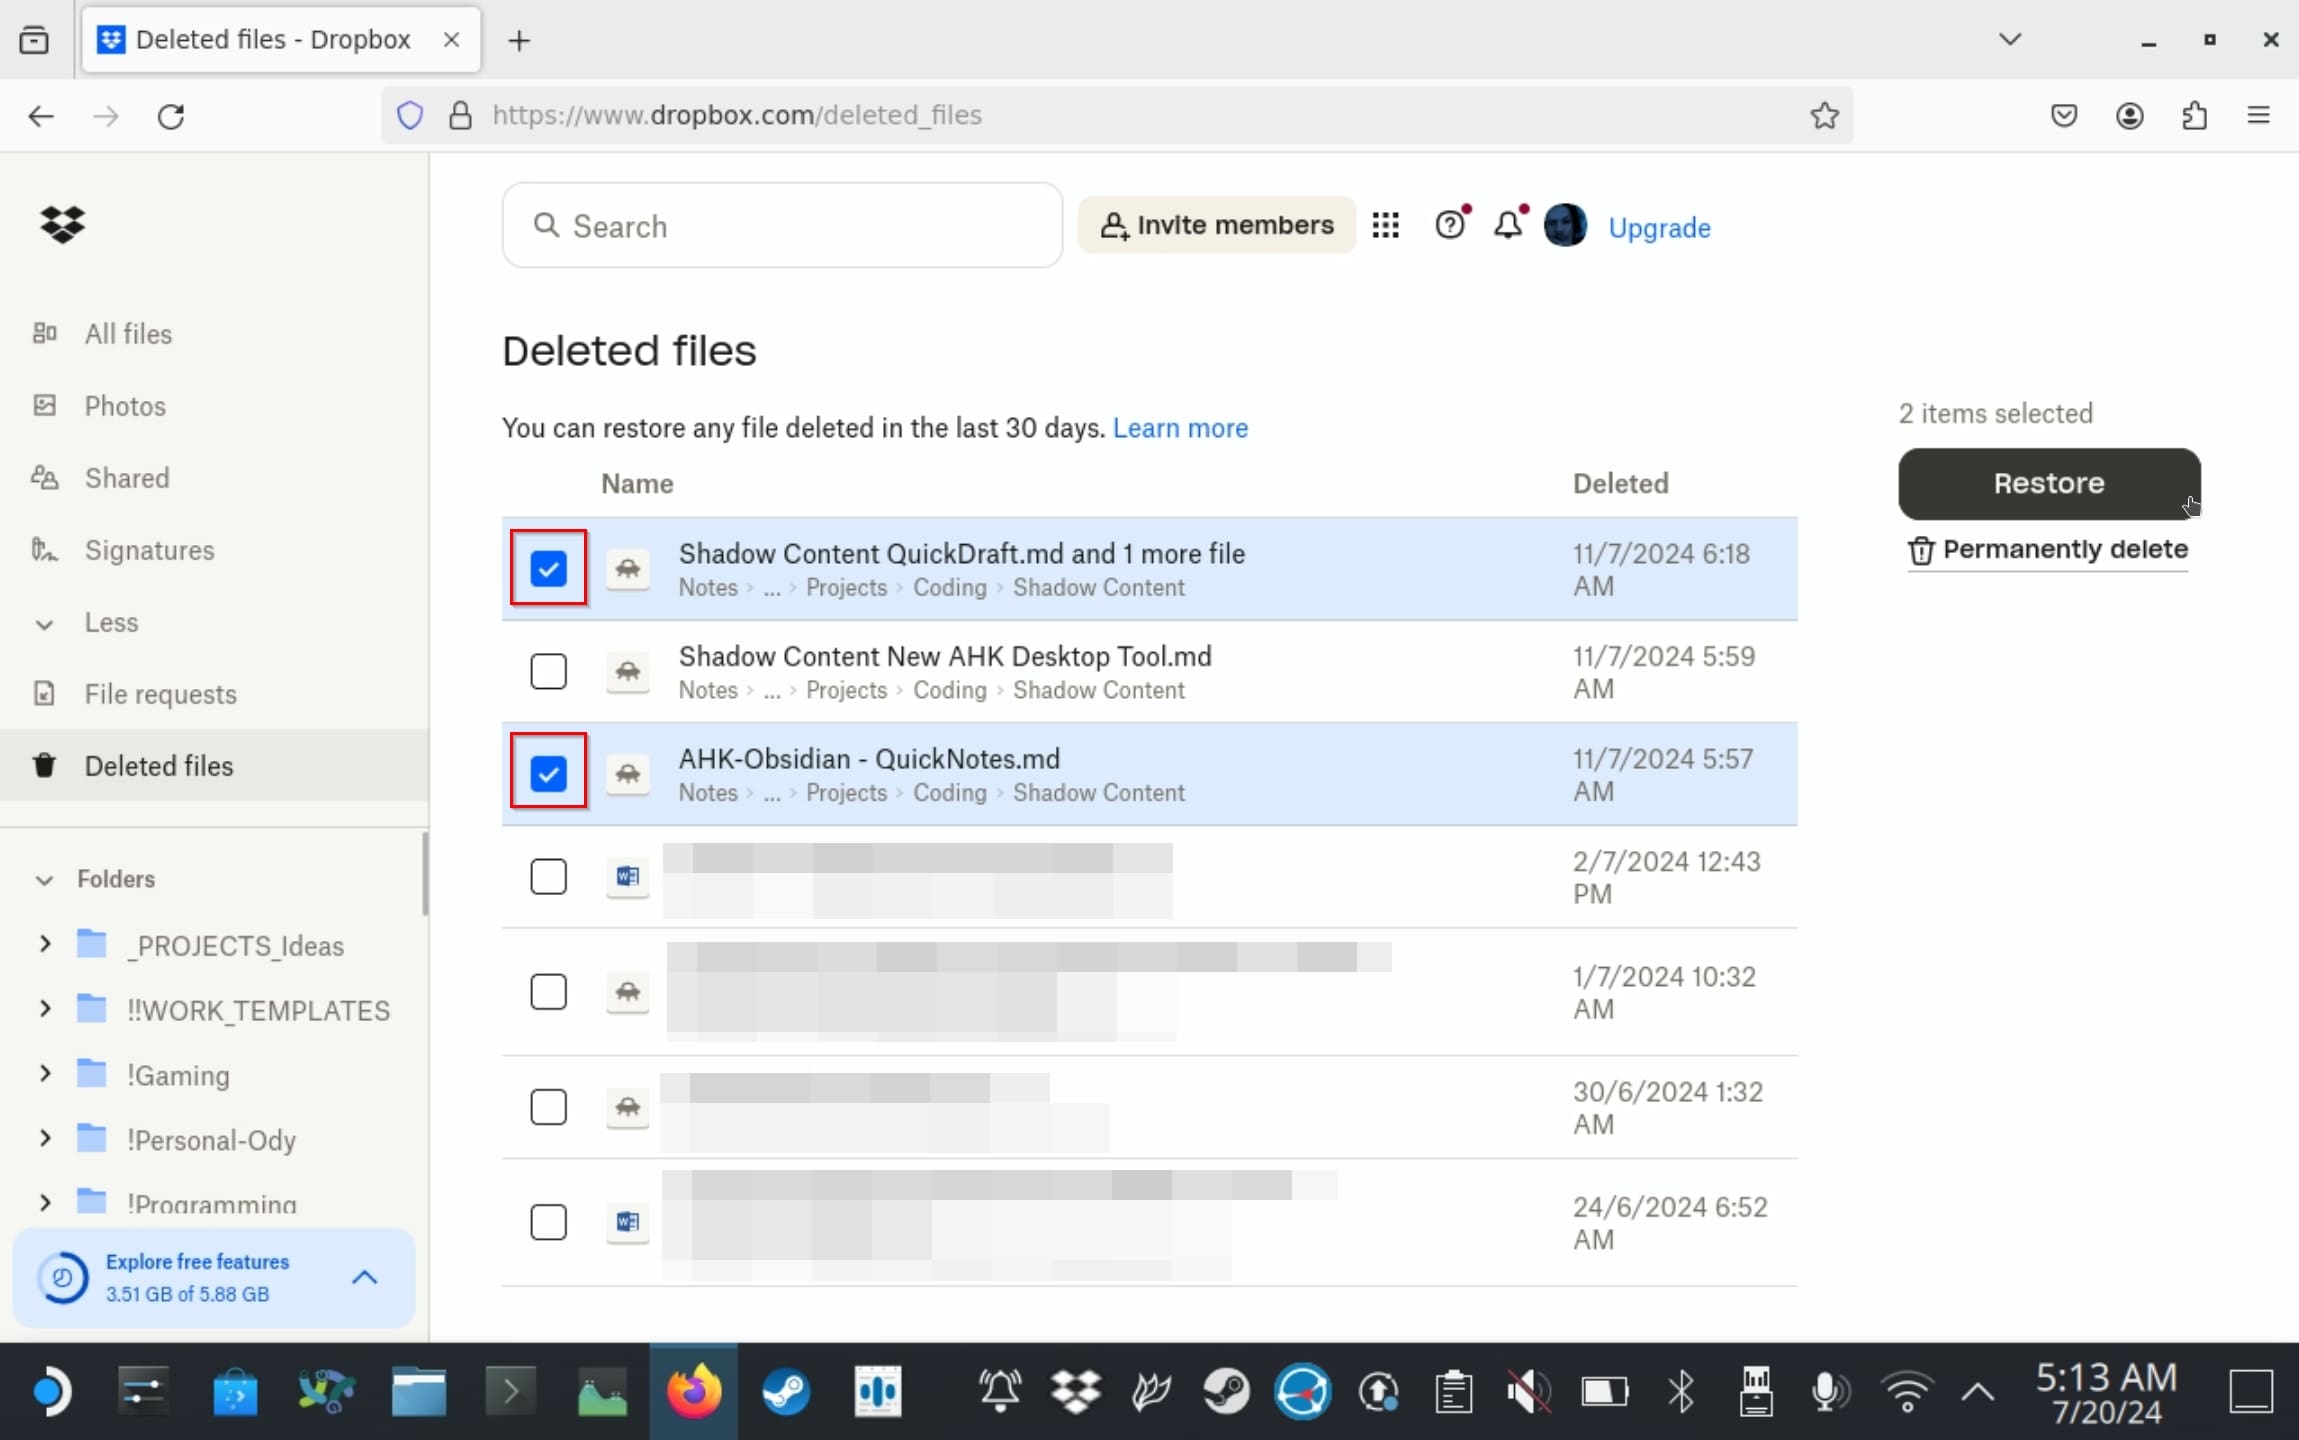
- If you want to undelete multiple files and folders in one move, place a checkmark on their left to select them, and then click on Restore on the right.
Other Cloud Storage Solutions for the Steam Deck
Were you using another cloud storage solution, through an unofficial client? Most also offer the equivalent of a Trashcan/Recycle Bin/Deleted Files folder. Thus, it’s possible to get your lost files back similarly.
Let’s see some examples:
- Google Drive: Visit Google Drive’s site and log in with the same account you used on your Steam Deck. Move to the Trash folder. Select one or more files or folders you want to get back, and choose the Restore icon, or right-click on them and choose Restore from the menu.
- Mega: Visit Mega’s site and log in with the same credentials you were using on your Steam Deck. Visit the Rubbish bin, and select the files and folders you want to recover. Either click on the icon with the three dots or right-click on them and choose Restore.
For other cloud services, follow the same steps: don’t try recovering your files directly on your Steam Deck. Instead:
- Visit their site and log in with the credentials you were using on your Steam Deck.
- Move “into” their Recycle Bin/Trashcan/Deleted Files folder.
- Select the files and folders you want to get back.
- Choose to Restore/Recover/Undelete them.
Restore Your Lost Files from Steam Deck Backups
If you haven’t configured a backup solution on your Steam Deck, well, you should, since that way, you can always be sure your most precious files will never disappear. If you have, rejoice; you can restore your lost files from one of the backups.
Let’s see how you can set up a backup solution if you haven’t, and how to recover your files from its backups.
Backups (Deja Dup) on the Steam Deck
Unsurprisingly, the leading solution for taking backups of your precious files on the Steam Deck is called Backups. If it’s not installed on your Steam Deck, you’ll still find it using its old name, Deja Dup Backups, on the Discover Software Center.
To restore your files from a Backups backup:
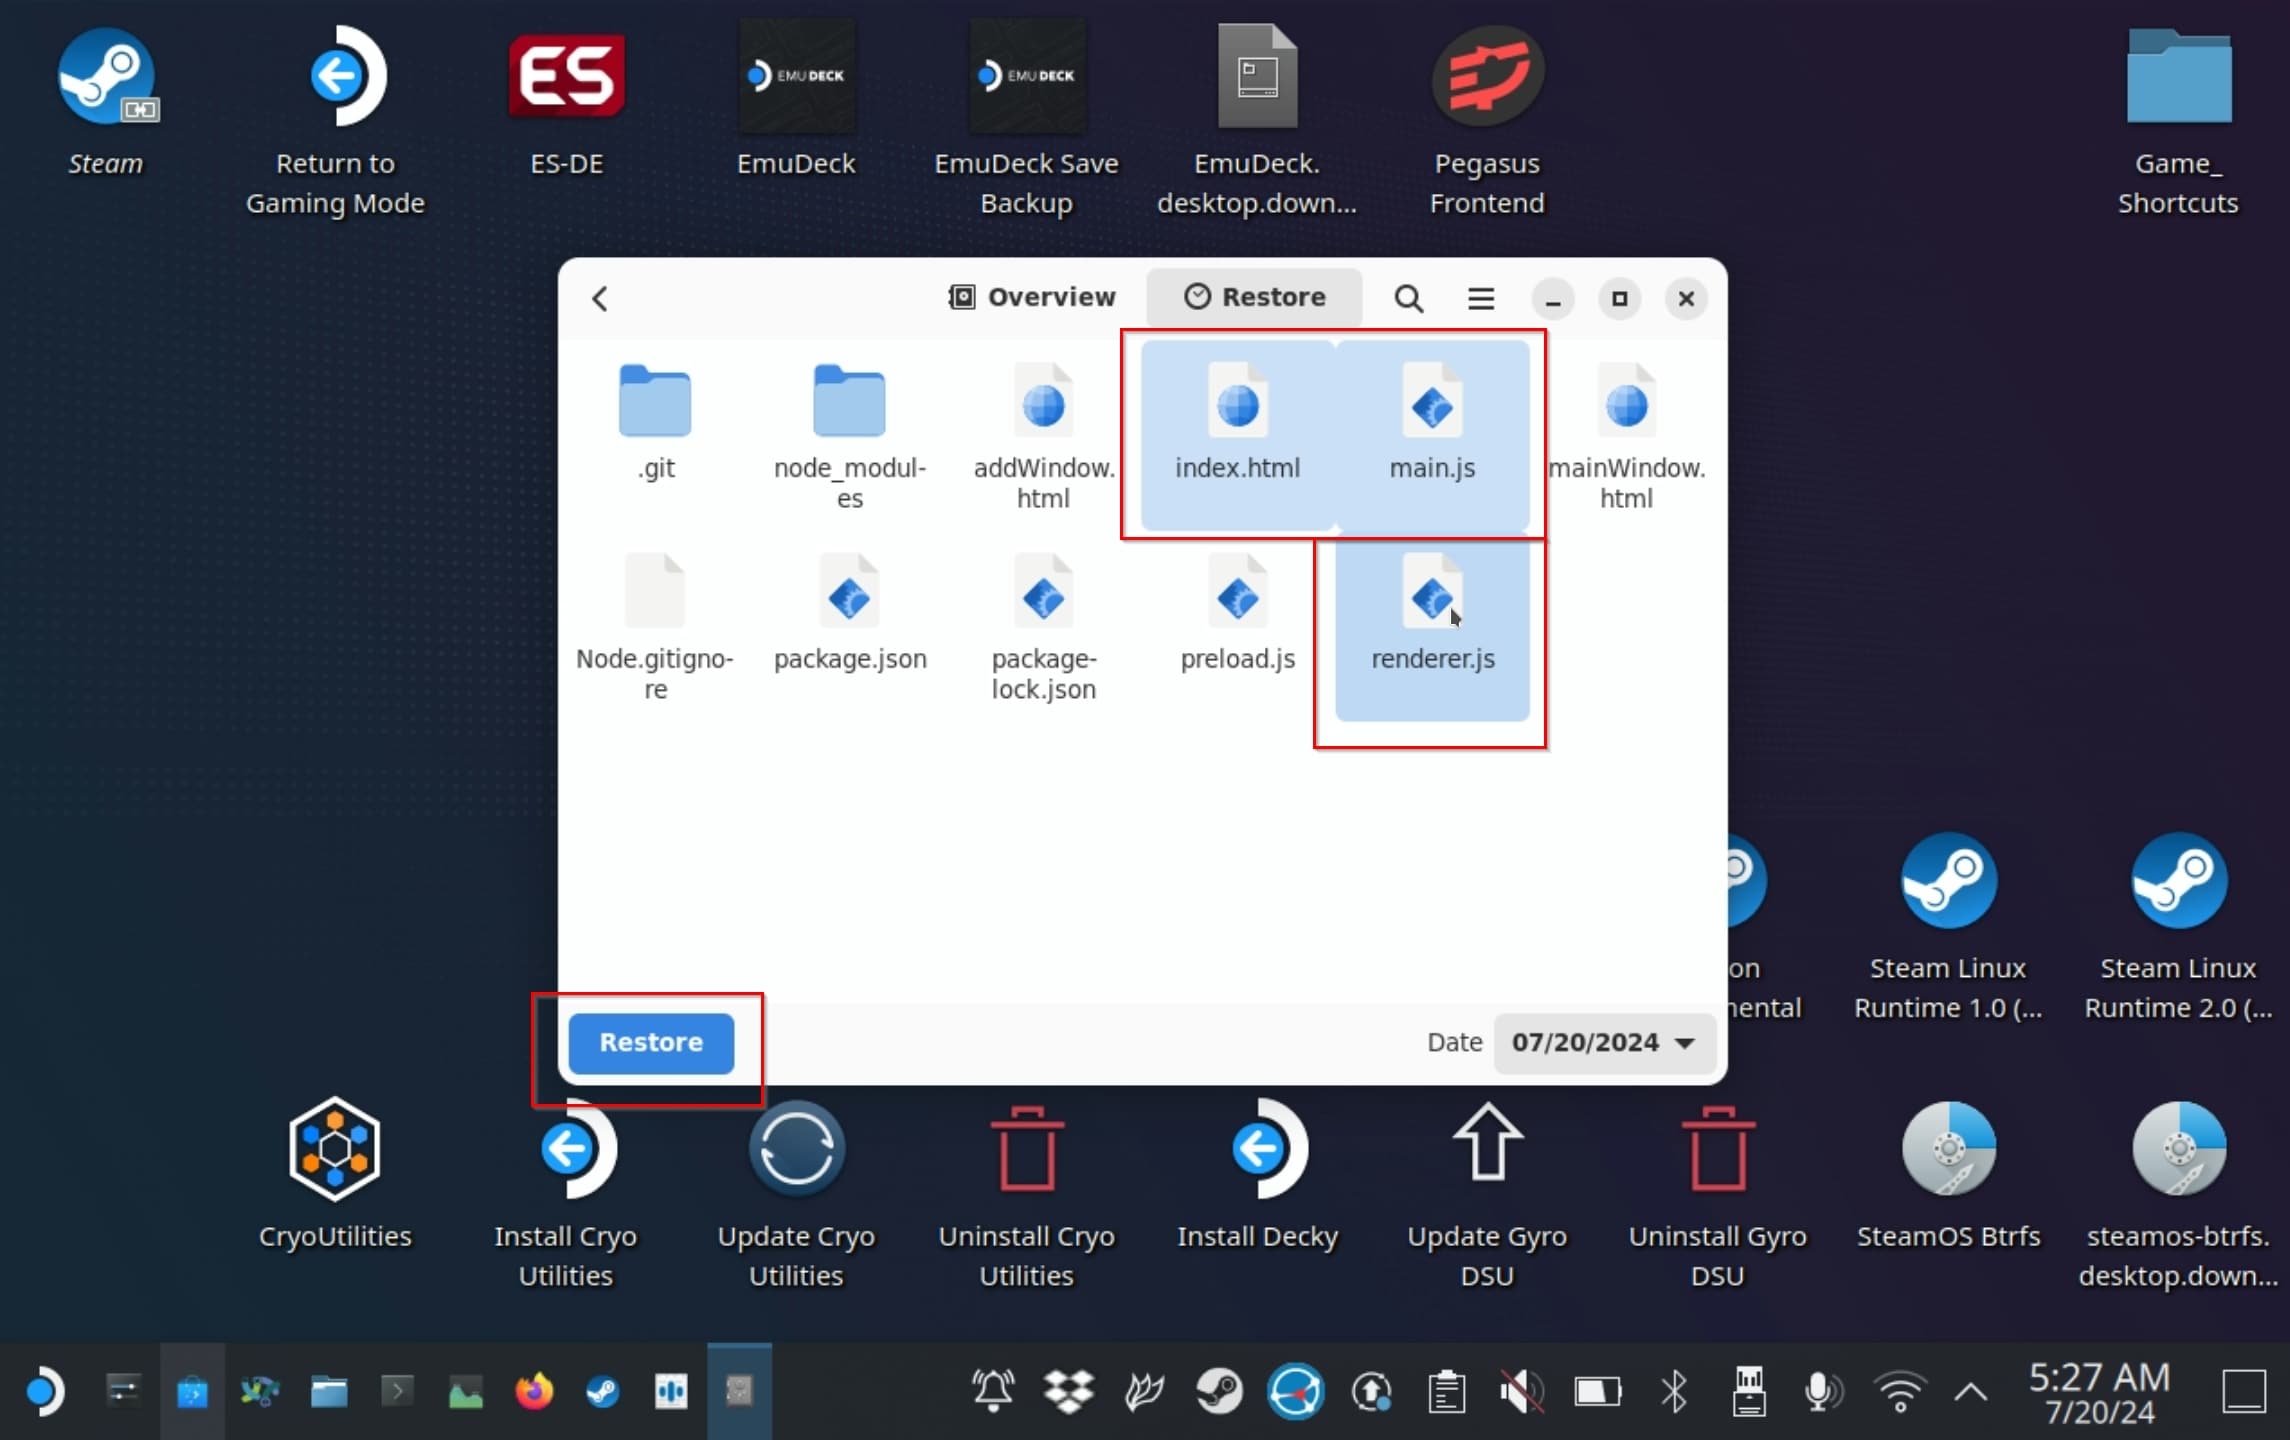
- Launch Backups, and if a backup is available, you’ll see it on the app’s initial Overview page. Select Restore to fish out your backed-up files out of it.

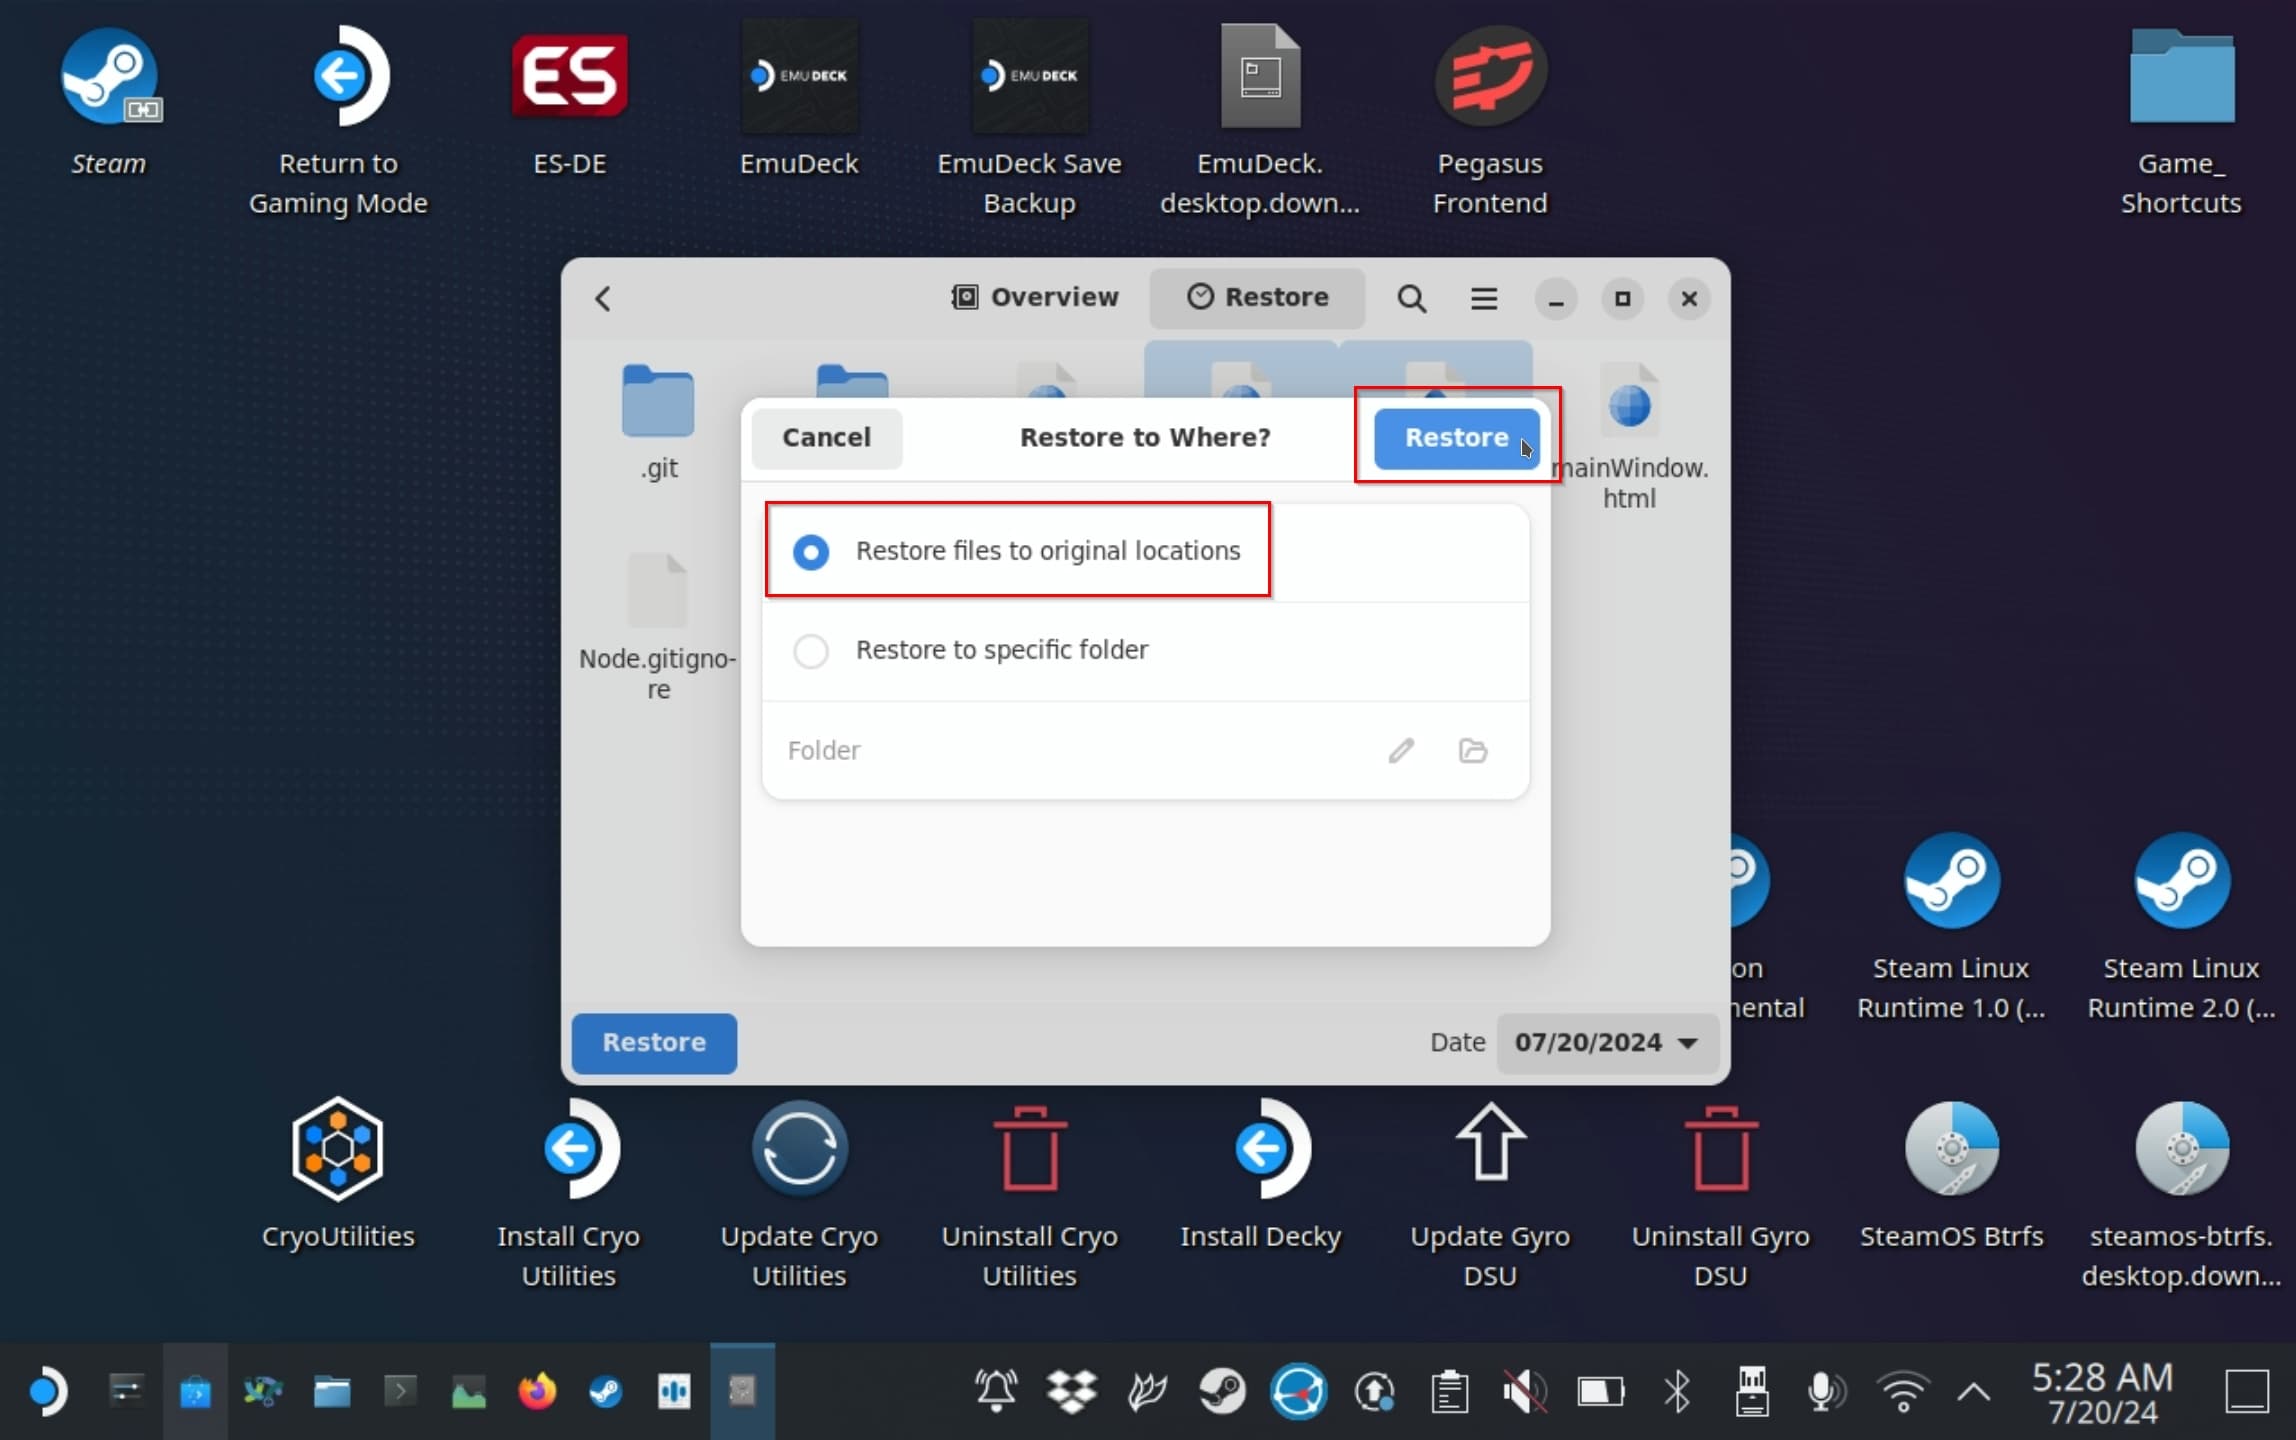
- Backups will show you the contents of the latest backup. If more than one is available, you can switch between backups using the drop-down menu with the date on the bottom right of the app. To recover your files from a backup, select them (you can keep CTRL pressed while clicking on them to select multiple files or Shift to select a range of files), and then hit Restore on the bottom left of the window.
- The app will give you the option to Restore files to original locations (which we chose for this article) or Restore to specific folder (which will allow you to select where you want to store the recovered copies of your backed-up files). Click or tap Restore to proceed to the next step.
- If you had encrypted the backup with a password, you’ll have to type it to enable decryption. Then, go Forward one last time.

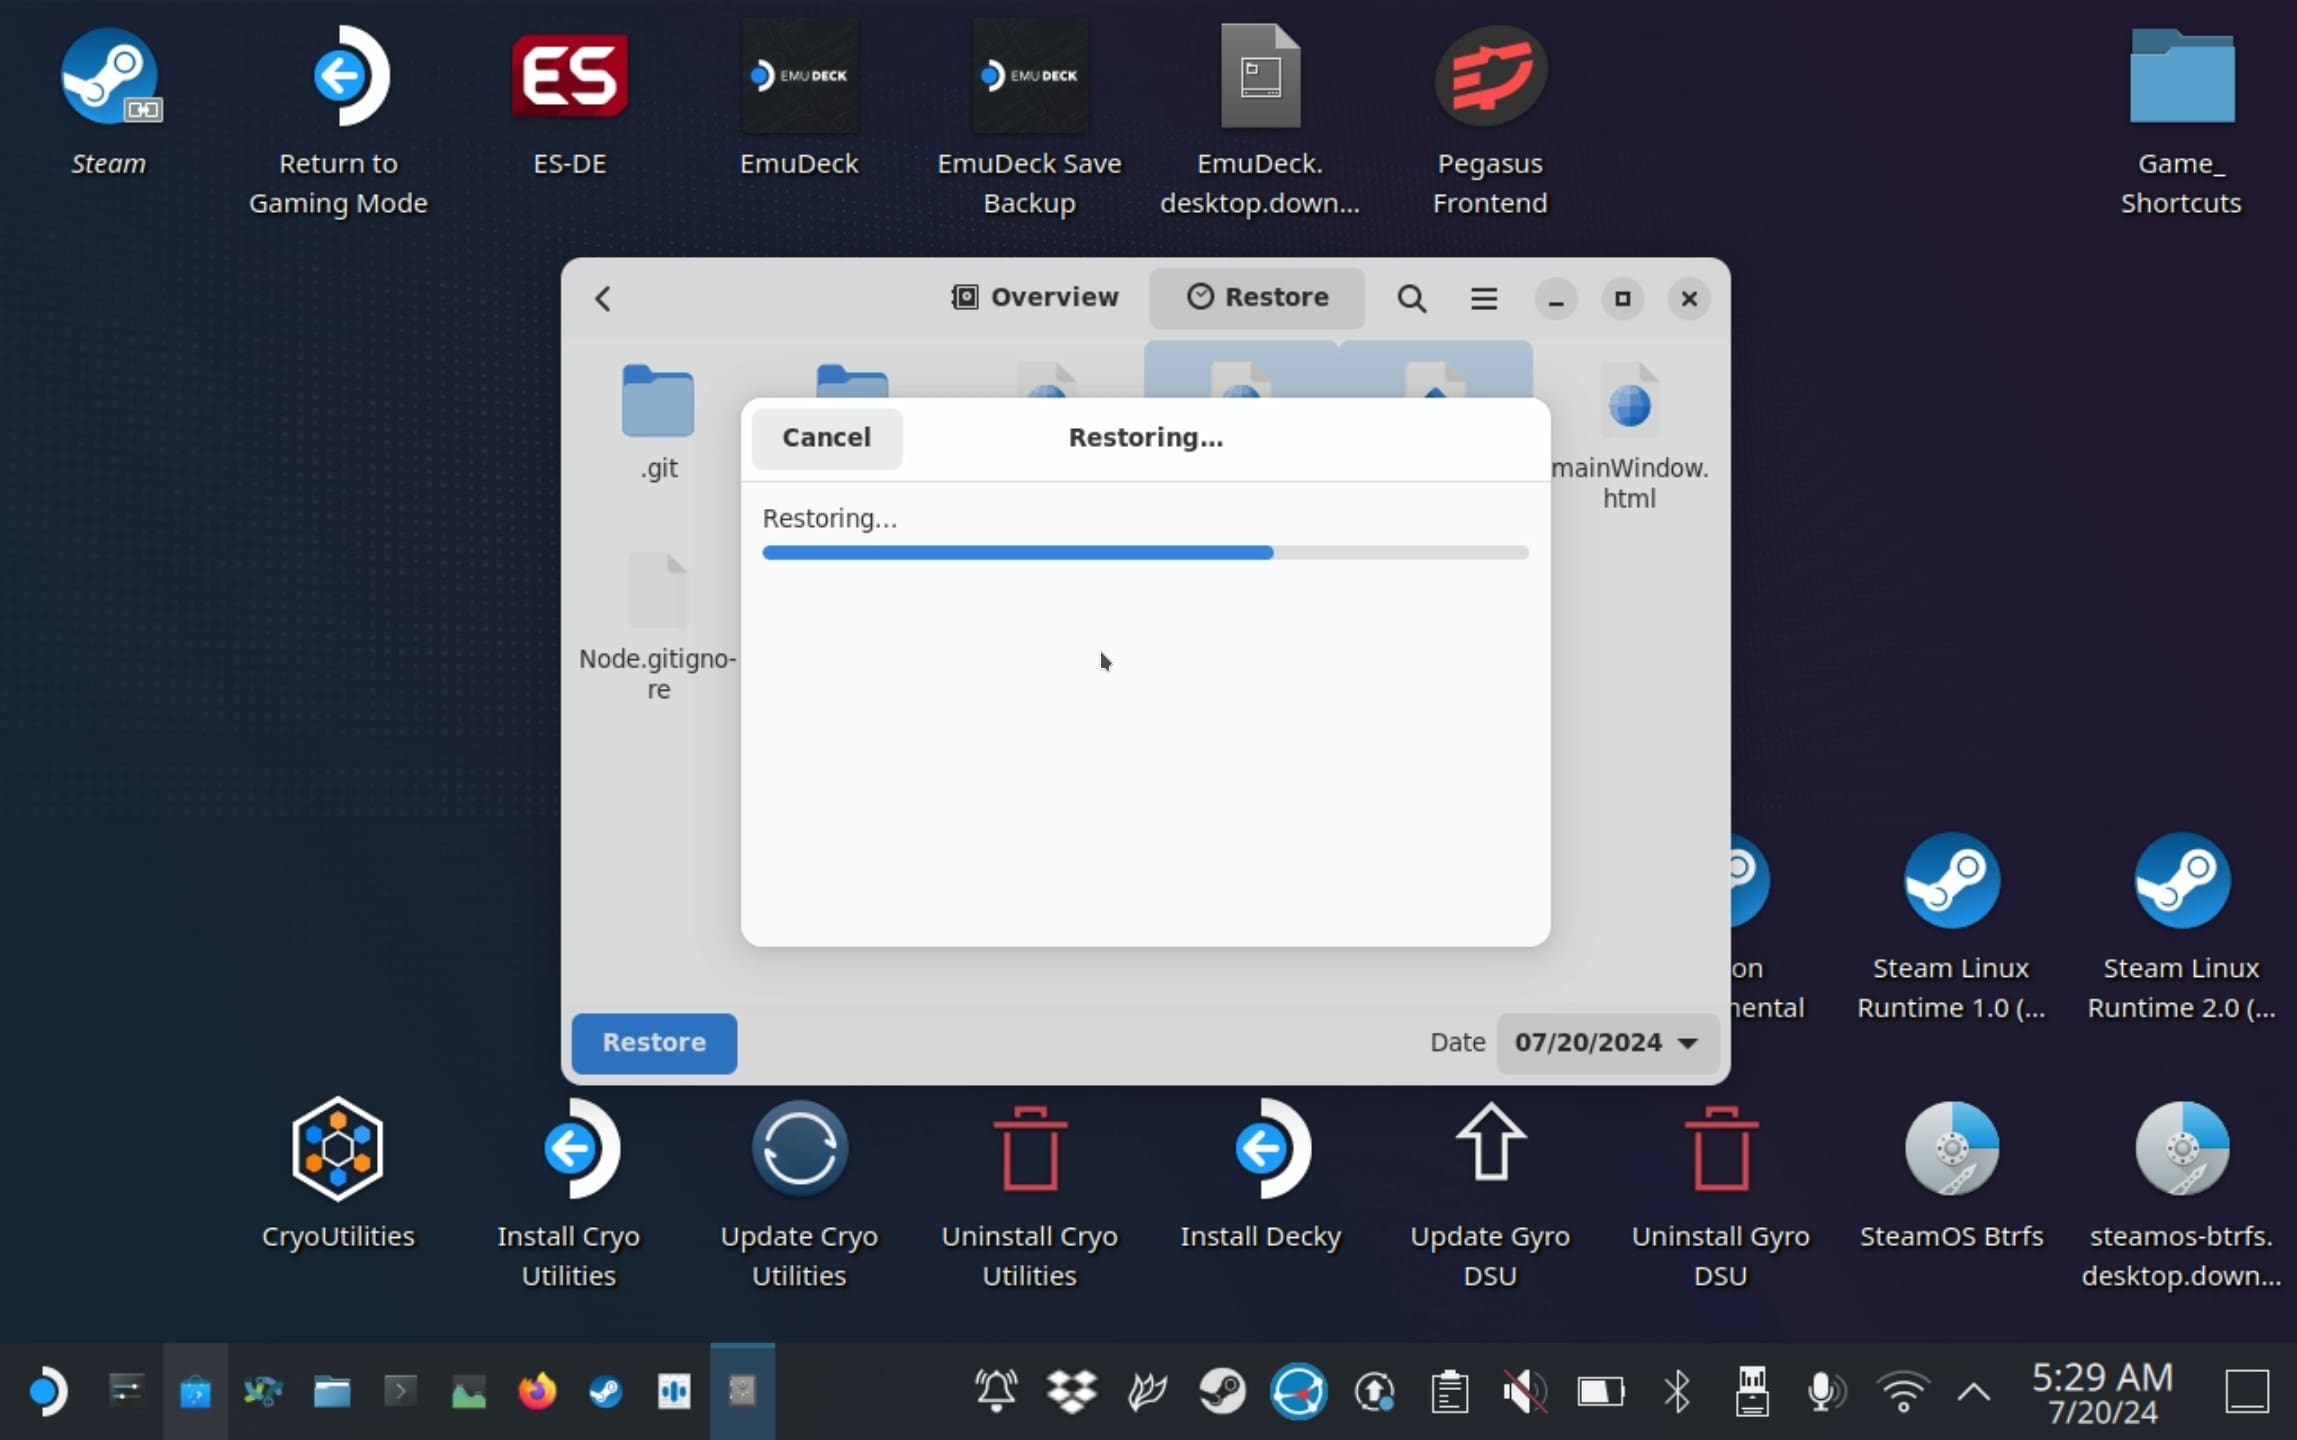
- Backups will begin recovering your files to their original spot or your chosen folder. You may be asked if you want to overwrite any existing files.
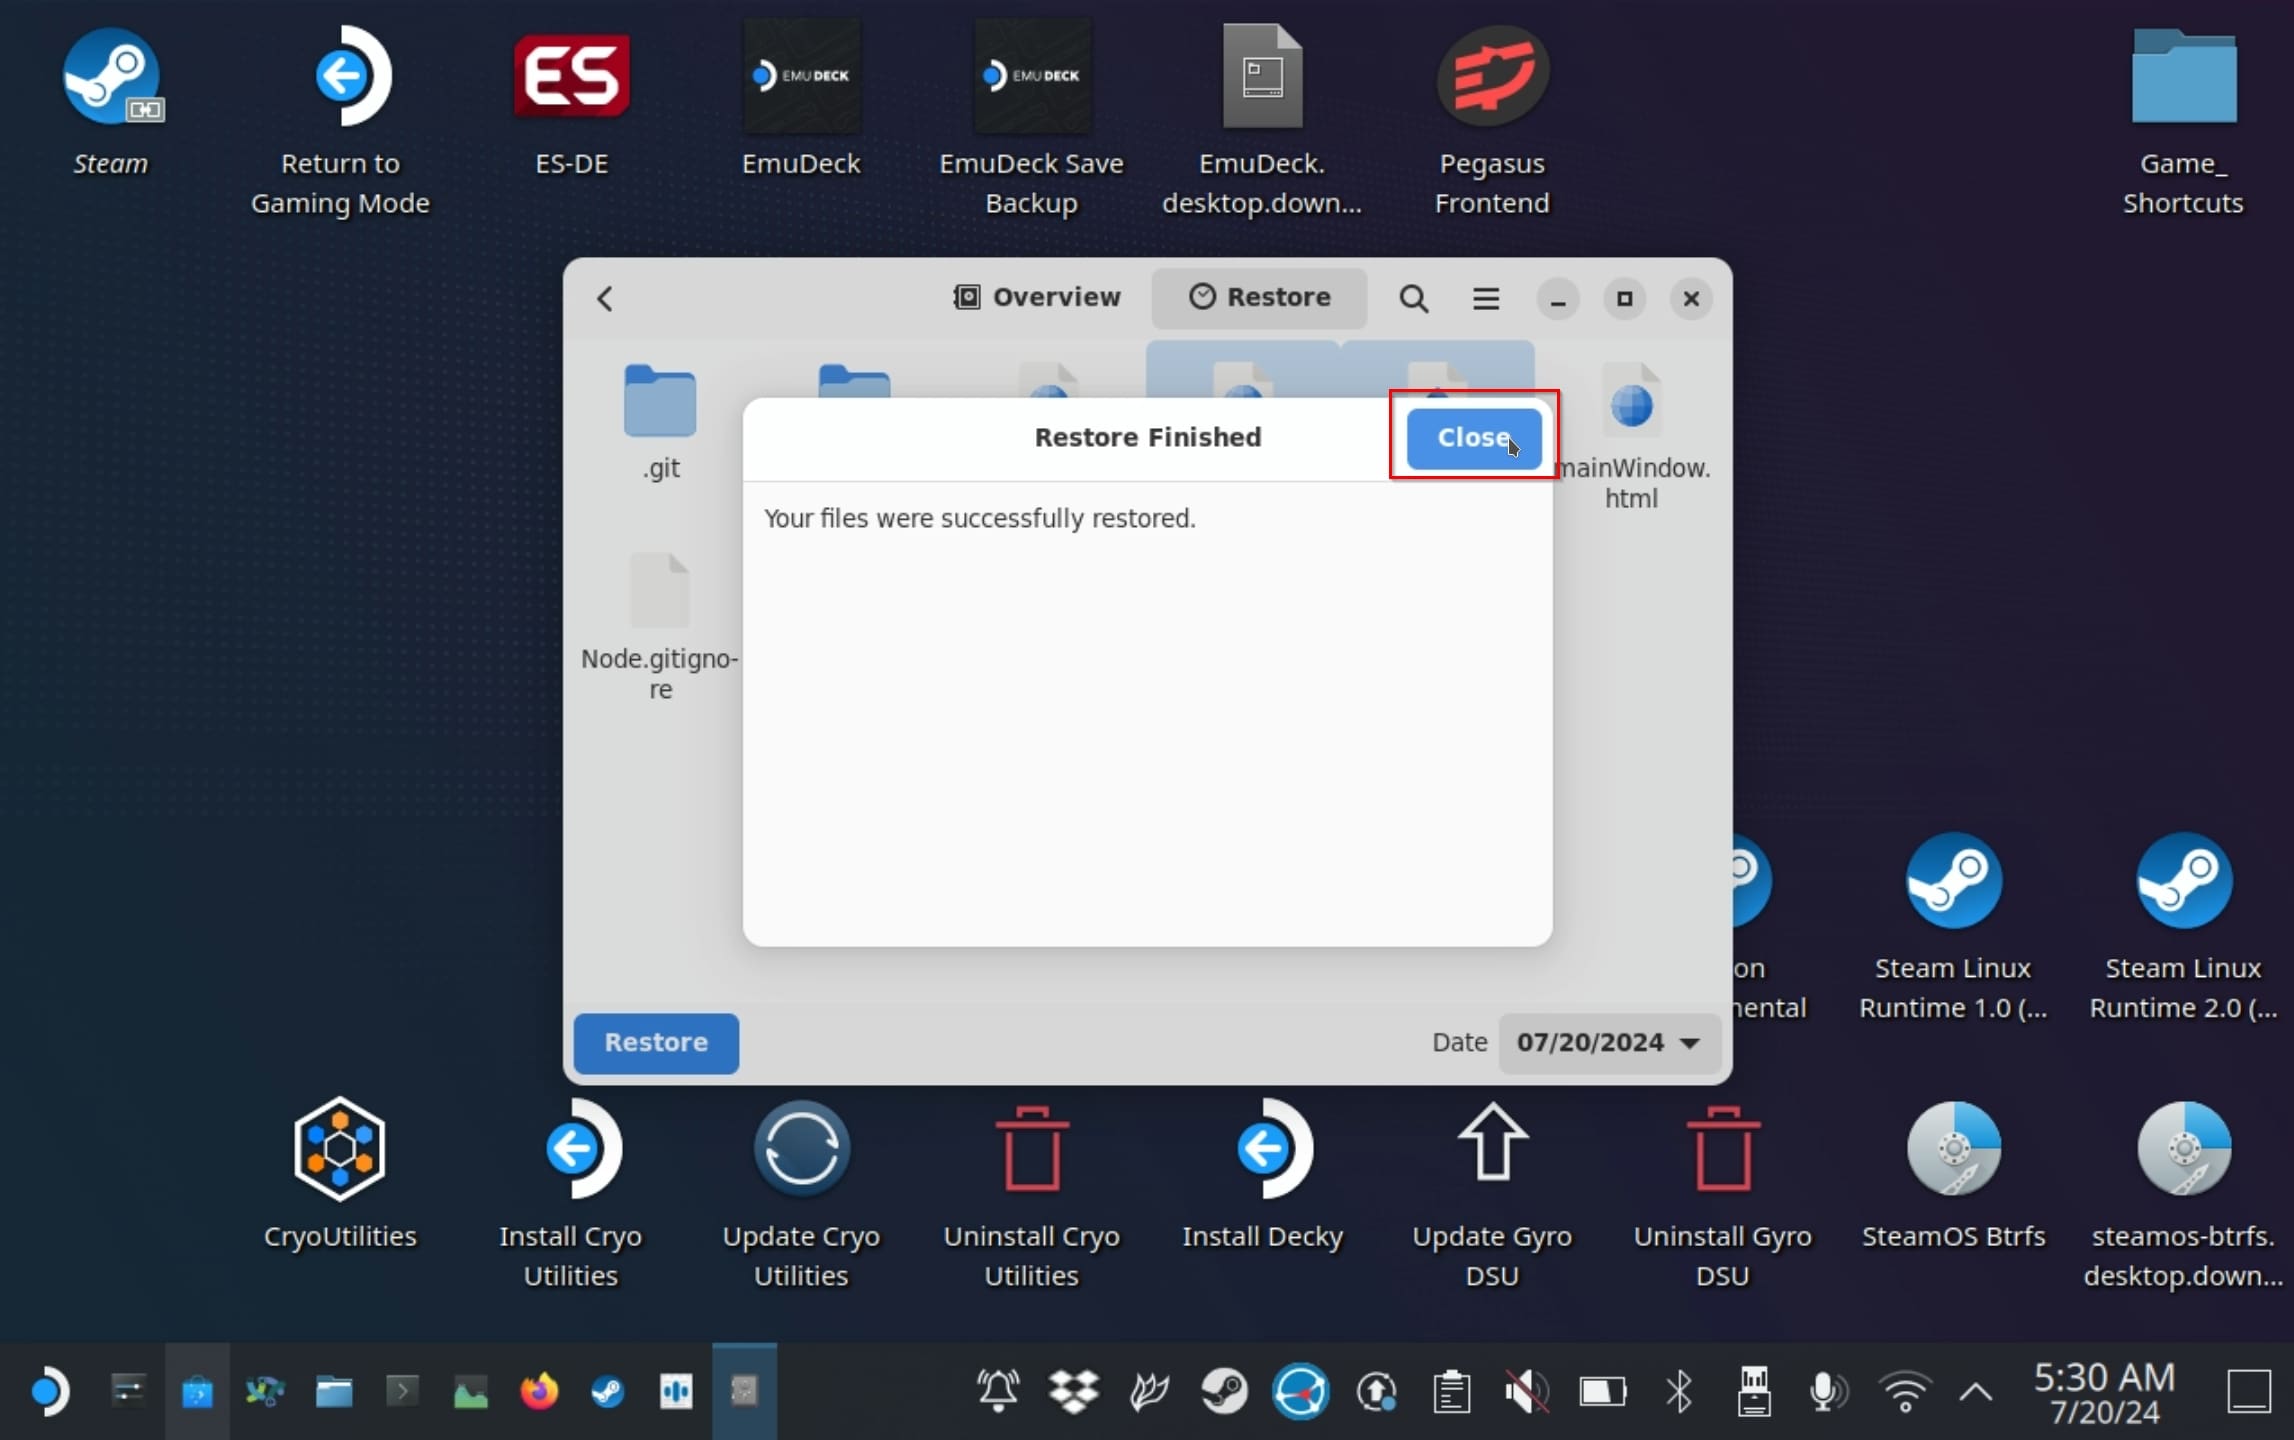
- Backups will show a last Restore Finished screen when the process completes, and you’ll have your files back.
You haven’t been using Backups to keep safe copies of your files? Then, unfortunately, you’ll have to try one of the other solutions we see to get them back. Still, to ensure you won’t lose precious files again in the future, it’s better late than never to start using it.
Backing up your files with Backups can be as easy as:
- Find Backups using the Applications Launcher button (the equivalent of the Windows classic “Start button”) and run it. Then, select Create Your First Backup.

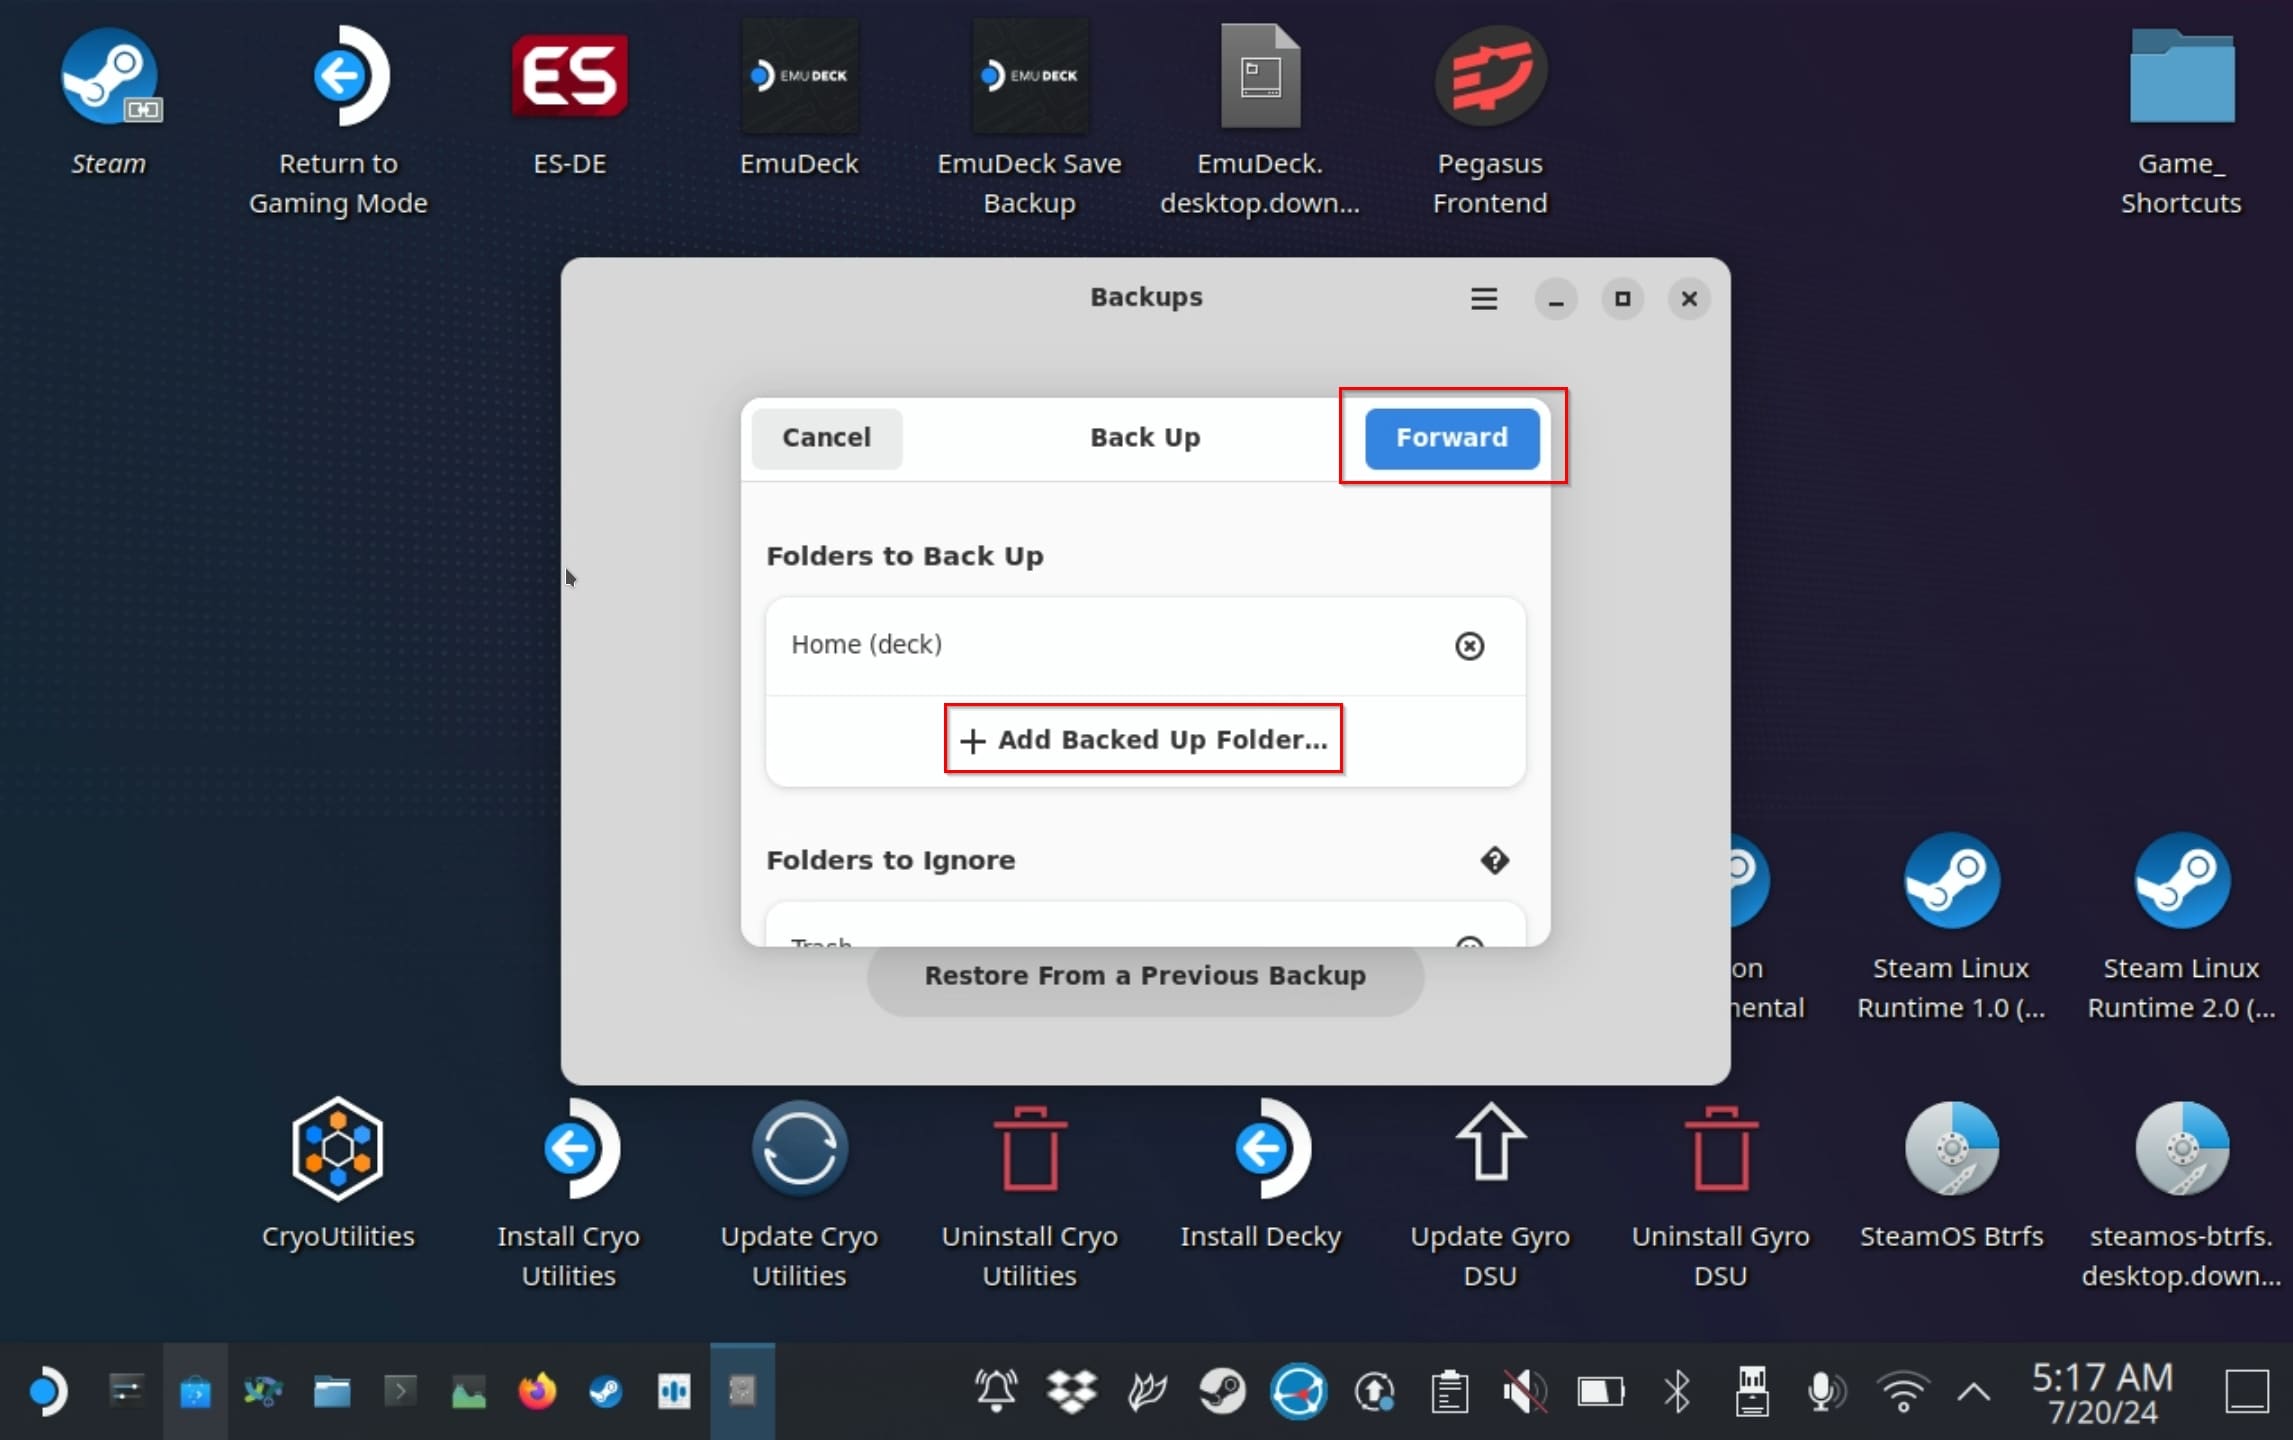
- By default, Backups is set to back up the contents of your Home folder. The Arch OS-based SteamOS on your Steam Deck stores all your personal files and most app-related configurations there. To include more files or folders in your backups, select Add Backed Up Folder and choose any folder you wish. When ready, select Forward.
- Choose the Location where you want to store the backups from the respective drop-down menu under Storage. Although it theoretically supports Google Drive, Microsoft OneDrive, and Network Servers, for this article, we went for a Local Folder on the mini SD card we’re using with our Steam Deck.
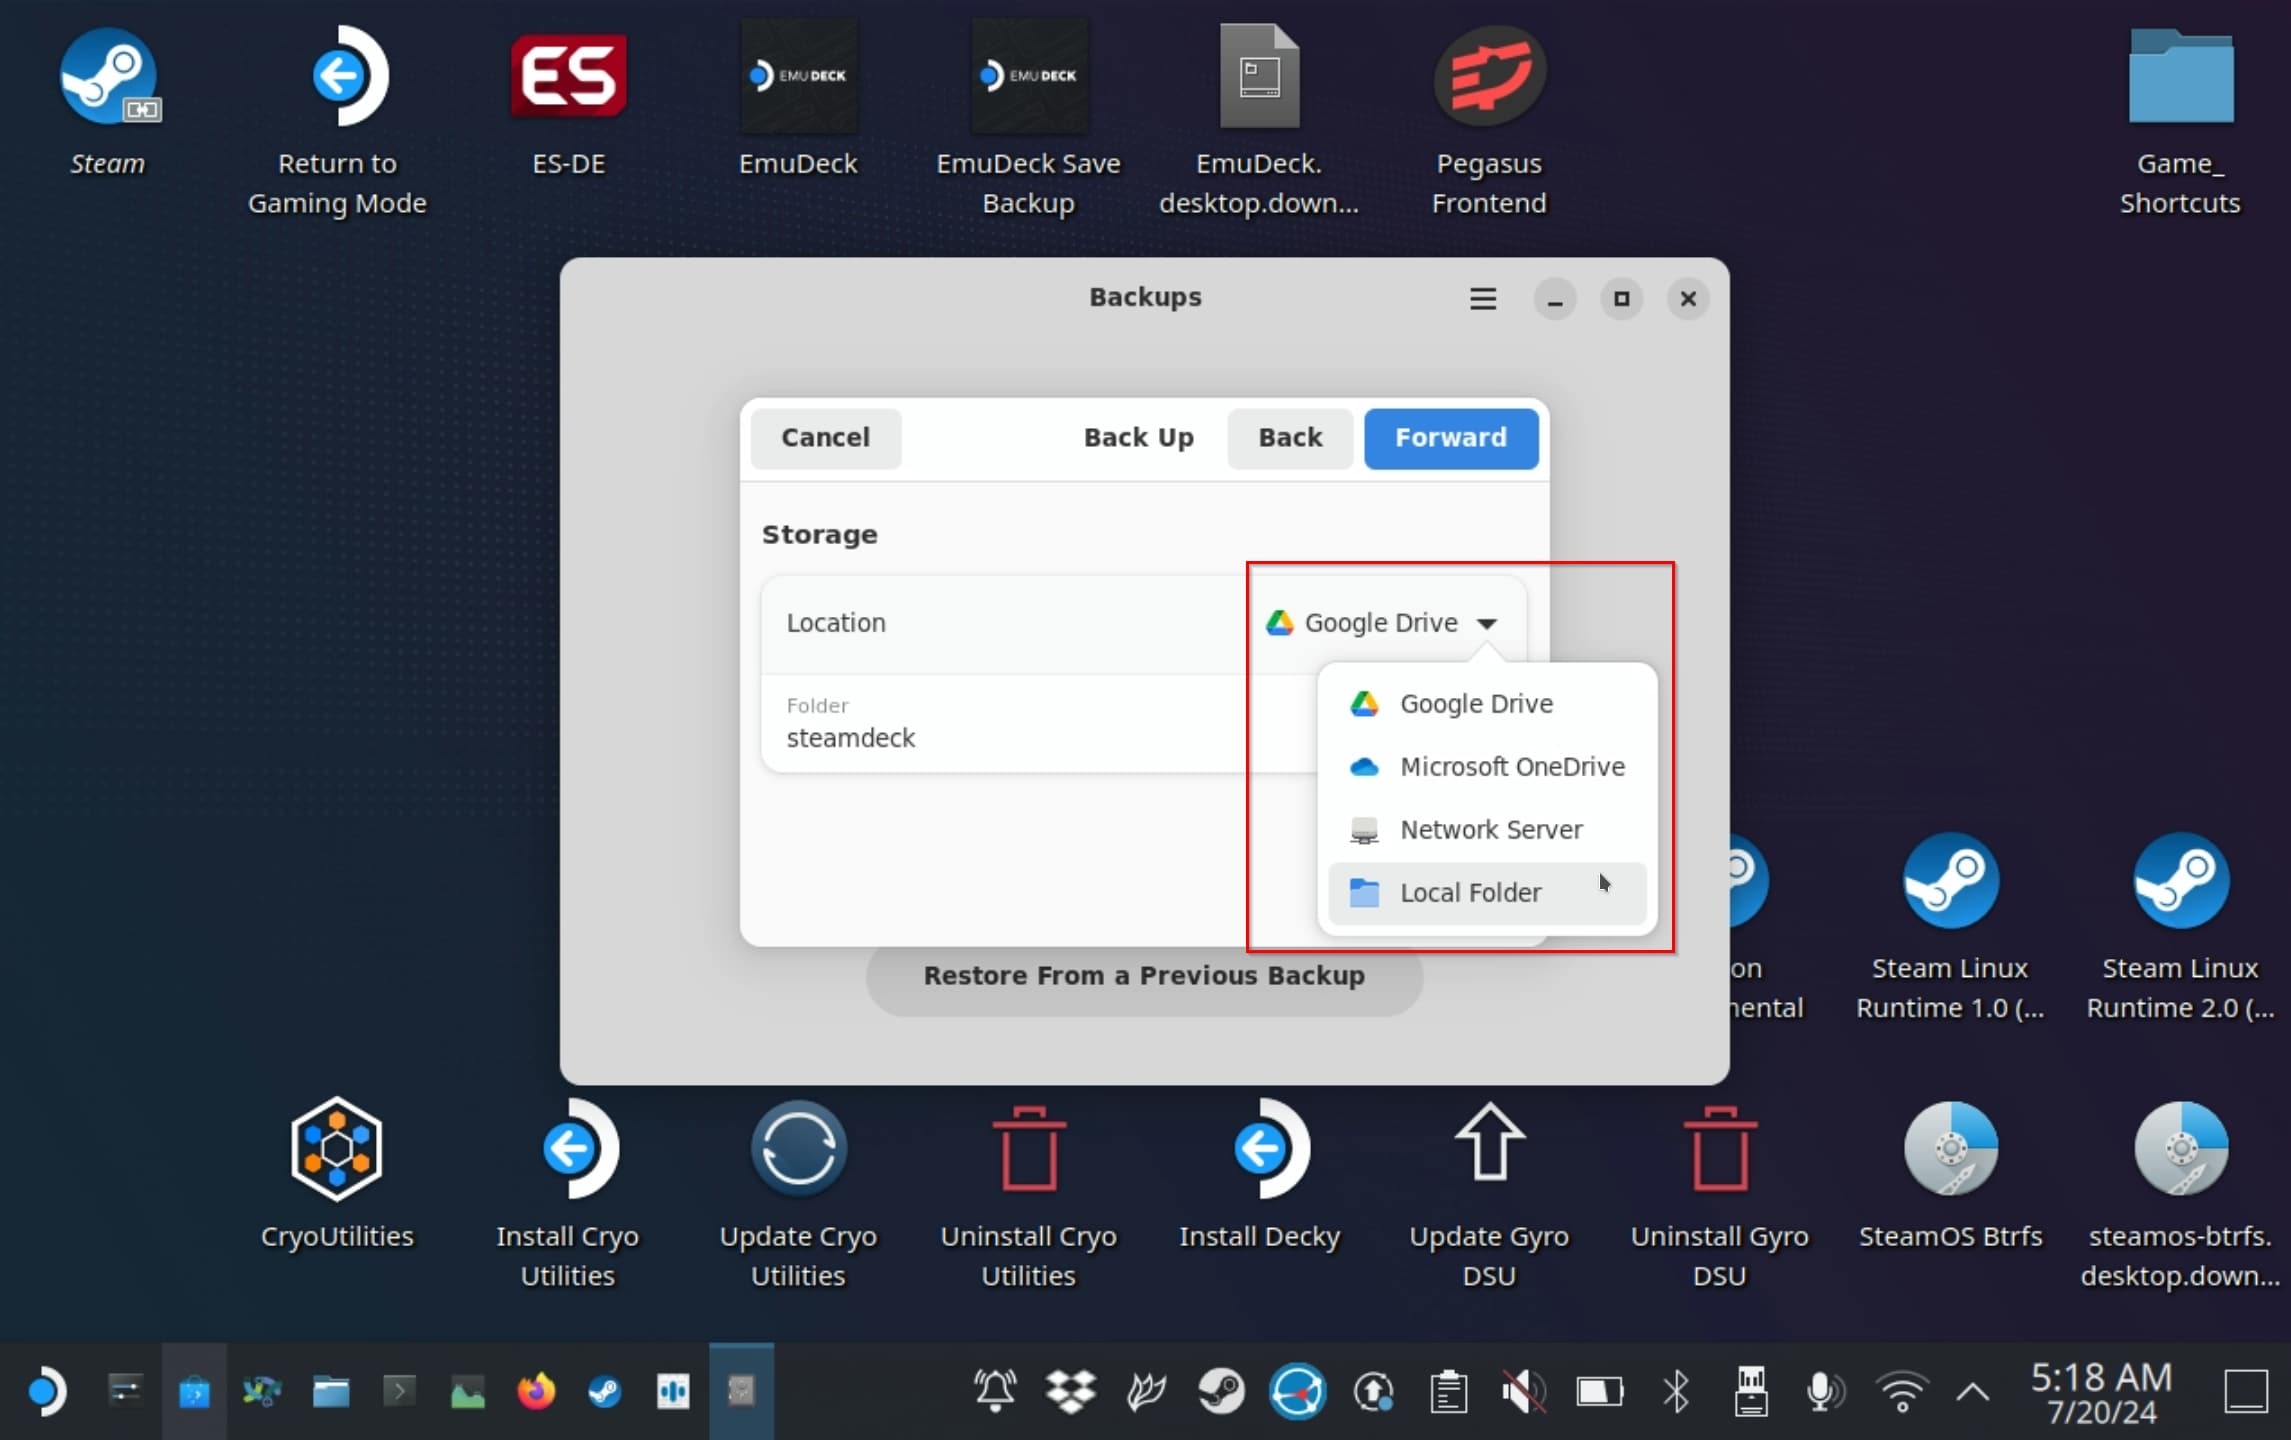
- Backups will choose a name for the backups folder based on the PC’s name, which happens to be “steamdeck” for everyone using the console. If you want to change its name or location, use the two buttons on its right, with the pencil and folder icons. When done, select Forward again.

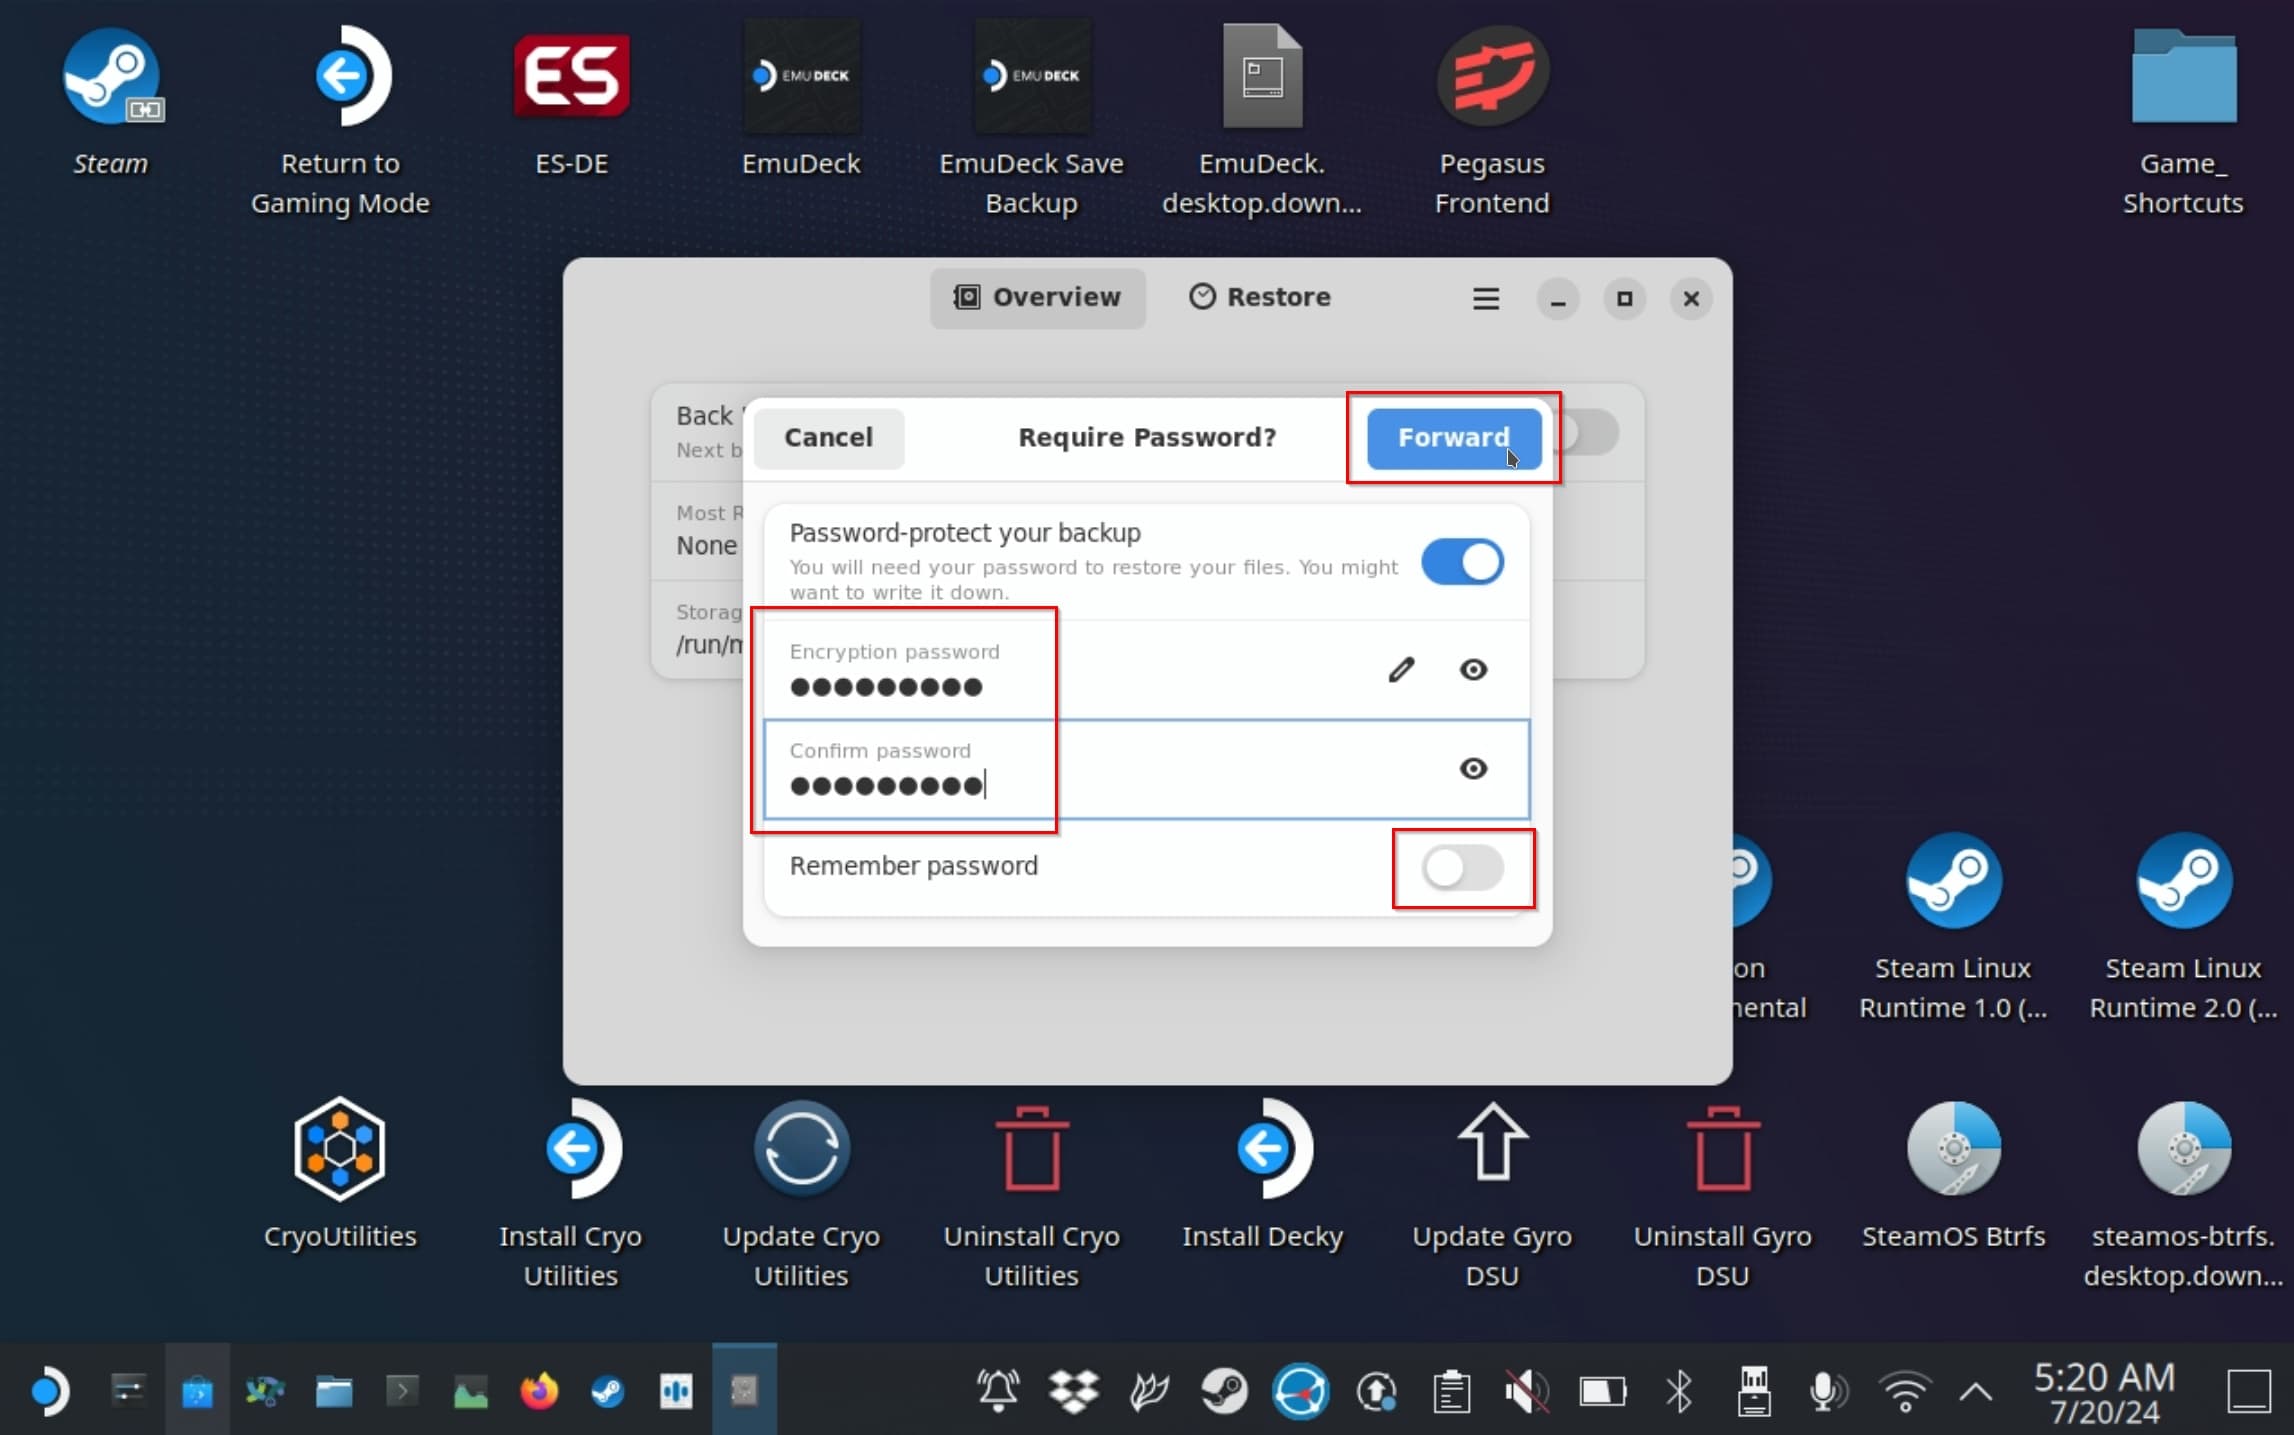
- You can add a password to encrypt the contents of your backup, which is most useful when using a cloud/network destination for your backups. We’ve used the option solely to include a screenshot with it in this article, for, in practice, encrypting our data wouldn’t be helpful. If someone got their hands on our Steam Deck, the files in our backups would also be accessible in their original folders. Select Forward for one last time when ready.
- Backups will start scanning and backing up your files. The process can take a while, especially if you’re backing up many large files.

Pika Backup on the Steam Deck
Were you using the other major backup solution available on Steam Deck’s default repositories, Pika Backup? Then, allow us to skip going over it since it works almost the same way as Backups.
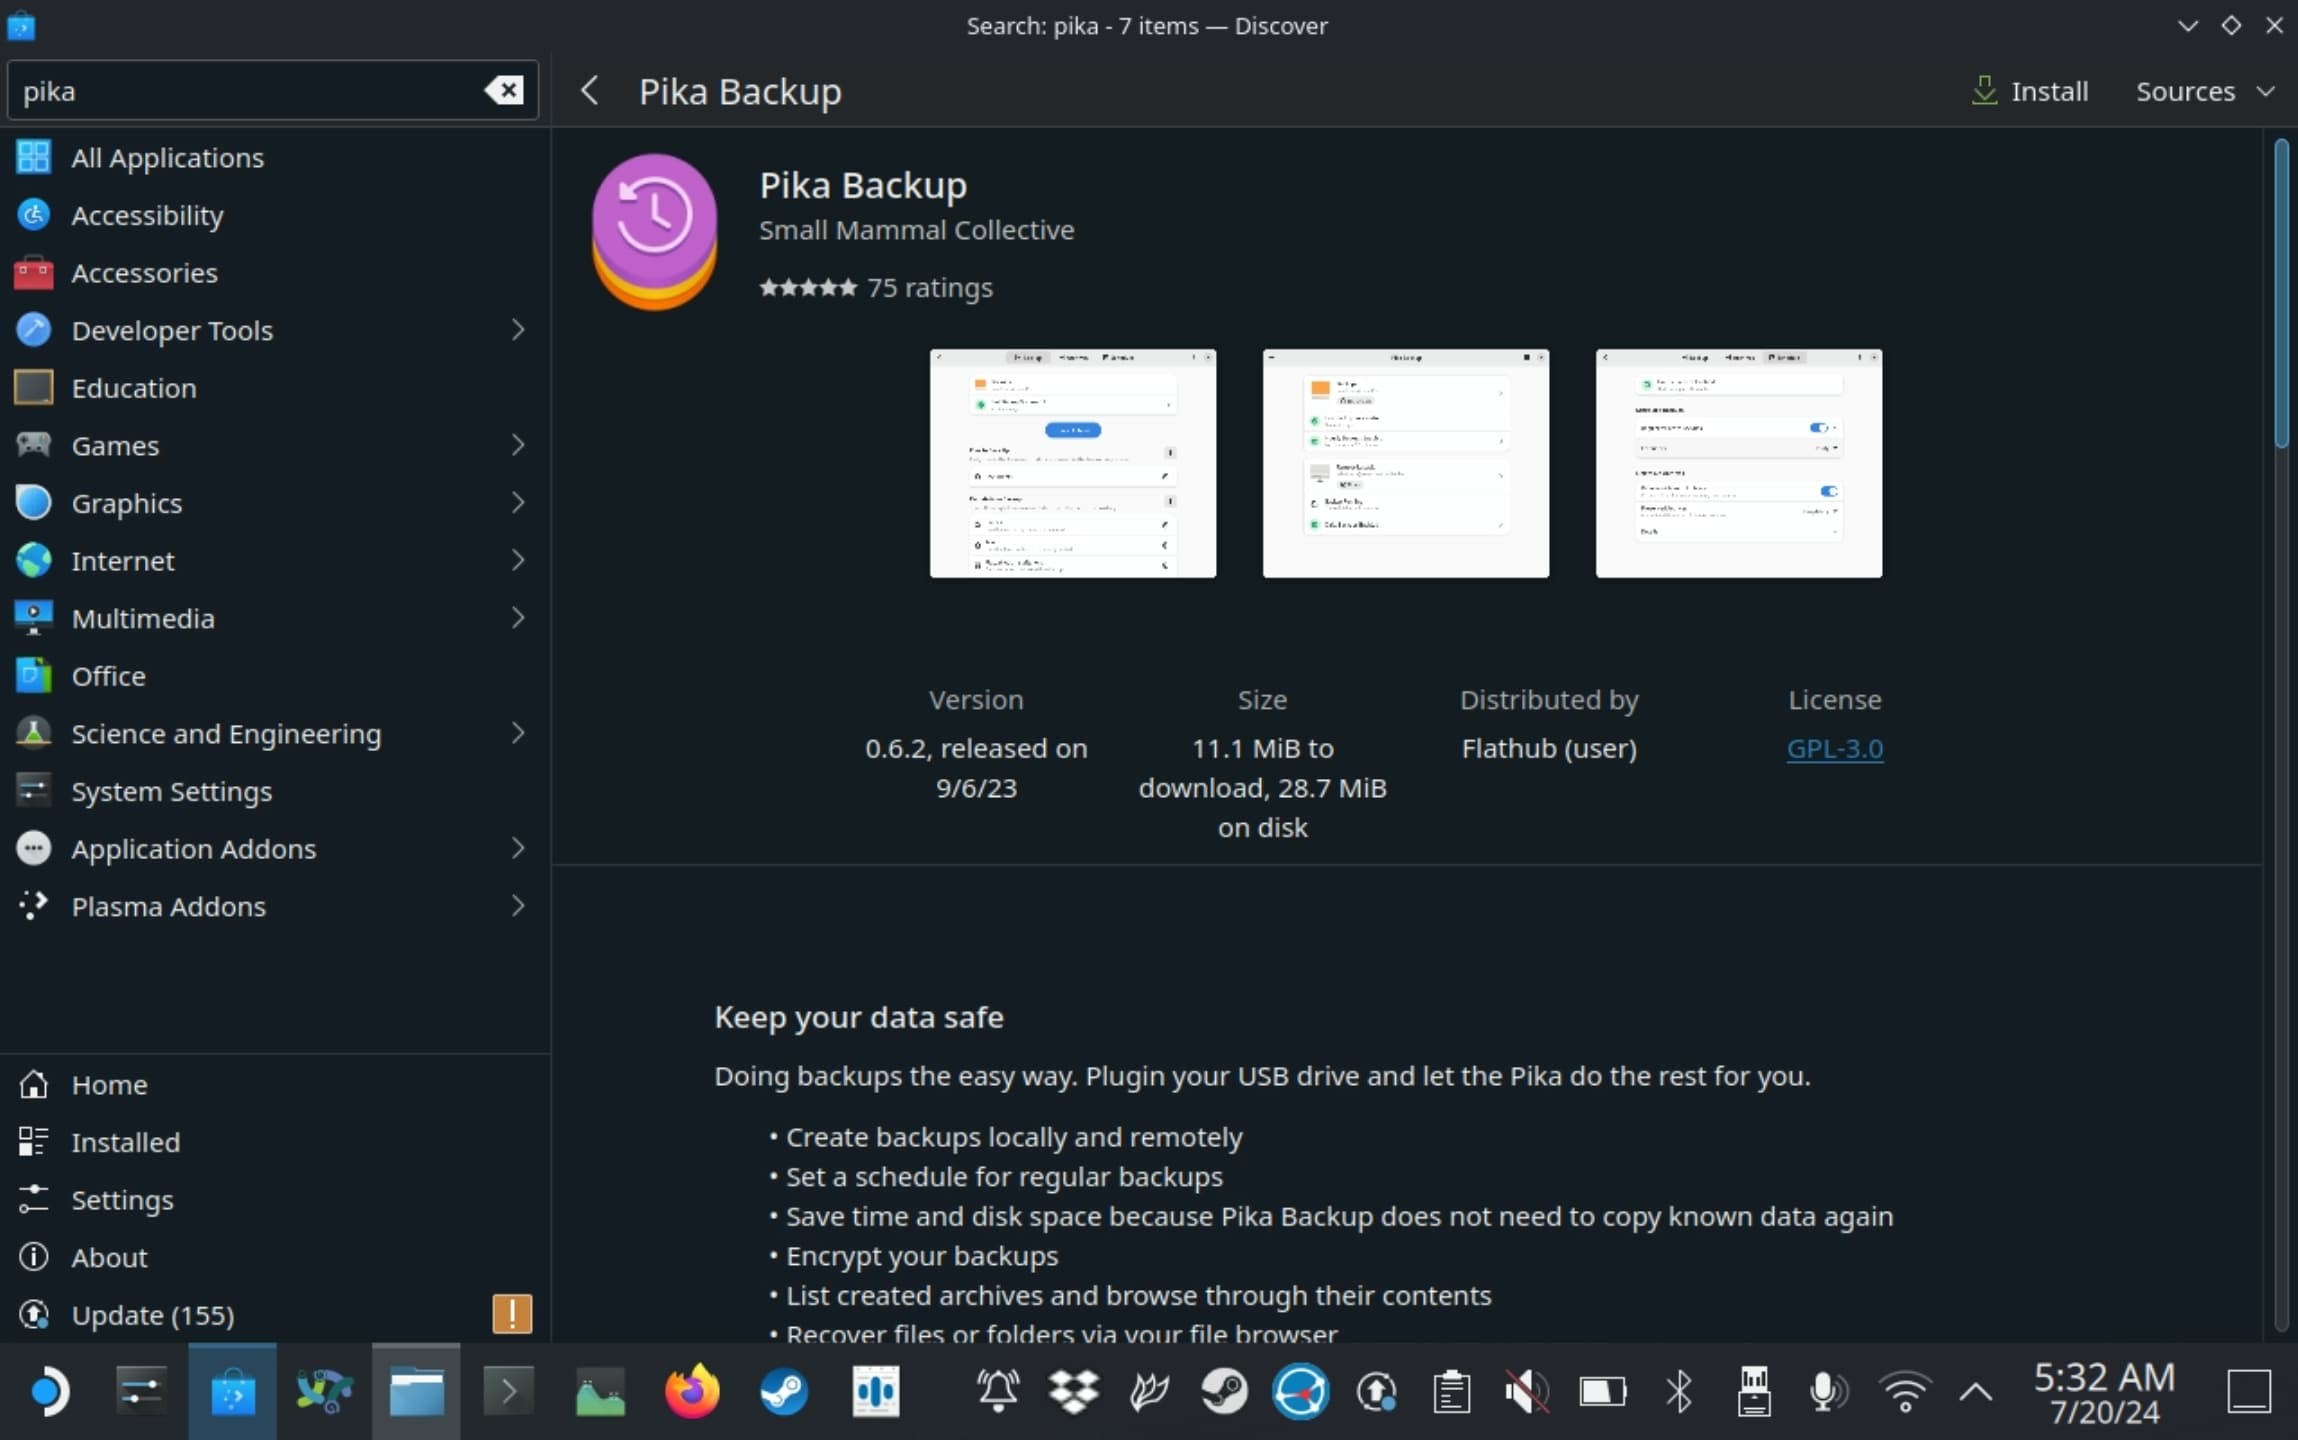
So, follow the same steps as with Backups we saw above, replacing Backups for Pika Backup.
Recovering Data From Decky-Based Backup Solutions
Decky is one of the best third-party add-ons for the Steam Deck, but it’s also best only for power users and tinkerers since it can often “break” after a Steam OS update. Still, if you were already using one of the many available solutions for it that allow you to back up your files in various ways, you could recover them from those copies.
Since Decky acts as a “platform” for other solutions, with dozens of add-ons already available for it, we’ll only quickly cover the basics for some of the most popular ones.
- Steamback: The easiest and most direct backup solution on the Steam Deck automatically grabs “snapshots” of your game’s save files. Since that’s all it does, and there’s nothing more to configure, recovering your files from it is equally straightforward: Visit Decky’s side panel, and select Steamback from the installed add-ons. Then, highlight the version of the save files you want to Revert to and press the A face button to select it.
- Decky Cloud Save: Since it comes with built-in support for OneDrive, Google Drive, and Dropbox, and can also be configured to use even more cloud services, recovering files from Decky Cloud Save depends on the Cloud Provider you were using. In most cases, though, you can visit the cloud service’s site using a browser on your computer or Steam Deck’s desktop mode, and after logging in with the same credentials you were using “through” Decky Cloud Save, find your files there in a dedicated folder. If you can’t see them, check the section above about how to recover your files from cloud solutions.
- Syncthing: If you were using Decky’s Syncthing add-on to synchronize your saves or other files with other devices on your local network, don’t power up or try using your Steam Deck before getting your files back. This could also “synchronize” your files’ accidental removal or corruption with your other devices. Instead, visit the folders synchronized with your Steam Deck on your other devices. Locate your lost files and folders there, and copy them elsewhere. Then, power up your Steam Deck, let the folders re-synchronize, and move your files back to their original spot.
Recover Your Lost Steam Deck Files with A Windows PC and Disk Drill
If, like most Steam Deck owners, you also have access to a PC, you can use it to significantly increase the chances of getting back any file you lost on your Steam Deck. All thanks to data recovery software specializing in getting deleted or “lost” files back.
For this article, I’ll go over how to use Disk Drill. I consider it by far the best option for recovering data using a PC & Steam Deck setup, since:
- 💵 Its free version allows you to test if it can bring back the files you lost. Spoiler alert: it usually can.
- ✅ It’s compatible with both the Steam Deck’s internal M2 drive, which you can connect directly on an M2 port on your PC or using an enclosure that turns it into an external drive, as well as the mini SD card you might be using with your Steam Deck to extend its storage.
- 💾 It supports both the “default” FAT32 format used by most SD cards and Steam Deck’s native and preferred EXT4 format.
- 🎨 Its interface is well thought out and expertly designed to allow everyone to recover their lost files, even if they have never tried recovering lost data.
Since Disk Drill is a third-party solution, you won’t find it preinstalled on your computer. So, the first step is to download it from its official site, install it, and run it.
Disk Drill is available for Windows PCs and Macs, but I’m using its Windows version for this article, since I don’t have access to a Mac. Still, if you’re a Mac owner, the steps we’ll see are identical on both app versions.
Do you want to recover data from your Steam Deck’s internal drive? Unfortunately, there’s no easy way one-step solution to disconnect it and plug it into your PC. However, the process isn’t too complicated. You only have to:
- Unscrew a handful of screws from the console’s back side.
- Pull it out.
- Disconnect the battery cable (ceramic tweezers can help).
- Disconnect the M2 drive.
- Connect it directly to one of your PC’s M2 ports, or if none are available, use an external enclosure and plug it into a USB port.
Valve has collaborated with iFixit to provide tinkerers with replacement parts, enabling them to fix their Steam Decks on their own. That’s worth mentioning because you don’t have to rely on the instructions we just provided to take apart your Steam Deck and disconnect its M2 drive: instead, check iFixit’s detailed video on how to do it.
Were the files you want to recover stored on a microSD card? Then, you don’t have to go through such a process: turn off your Steam Deck, unplug the mini SD card, and stick it into an SD card reader plugged to your PC.
To recover your files from either of those devices with Disk Drill:
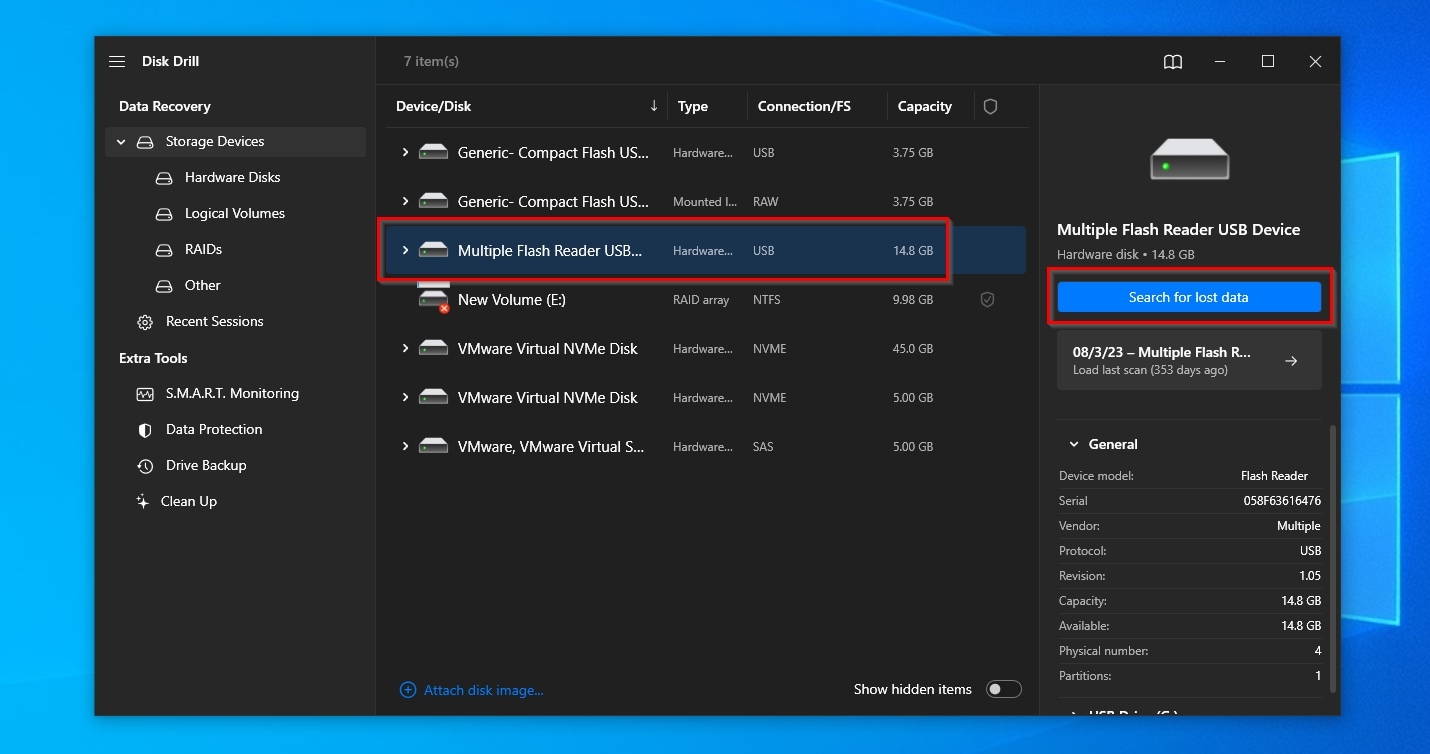
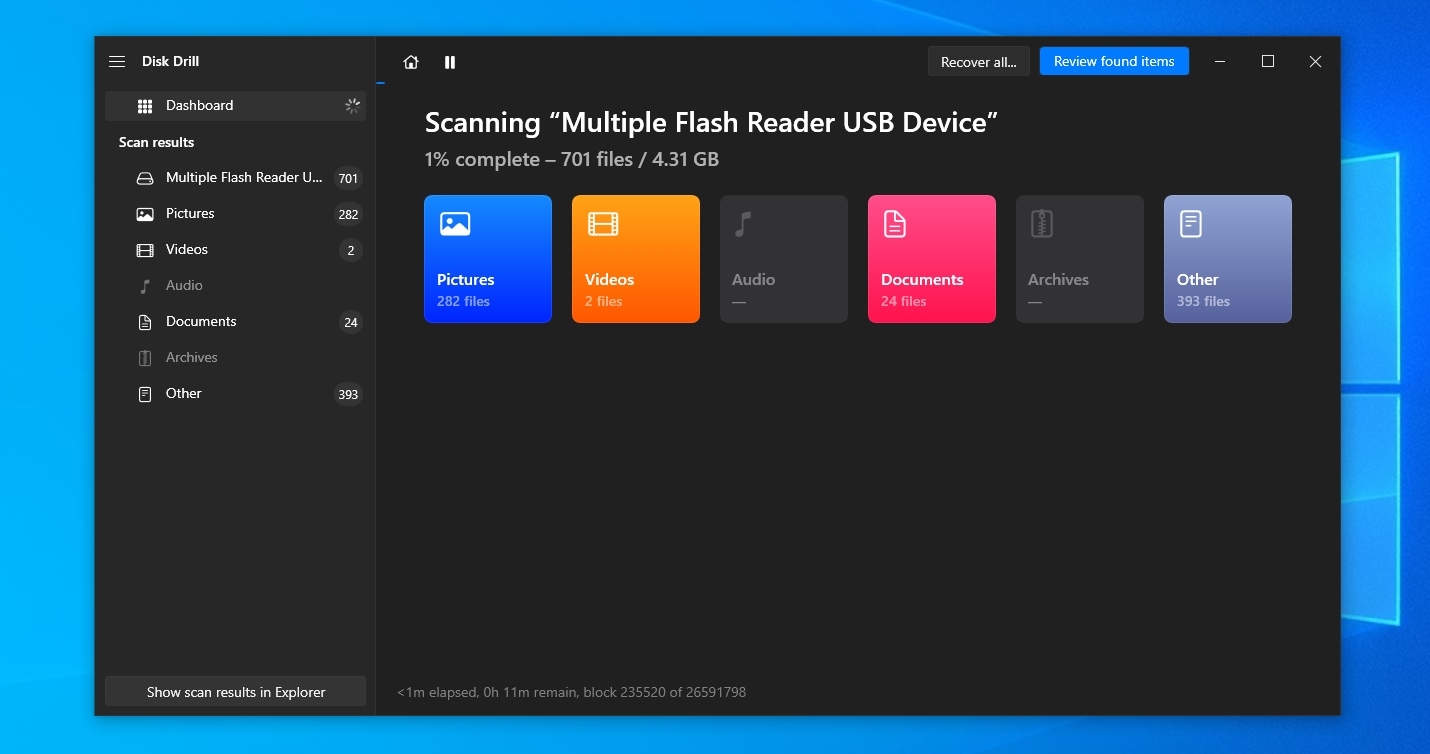
- Your PC should have detected the Steam Deck’s M2 drive or miniSD card as another storage device. Select it from Disk Drill’s Device/Disk list, and click Search for lost data.
- Let Disk Drill’s scan run its course.
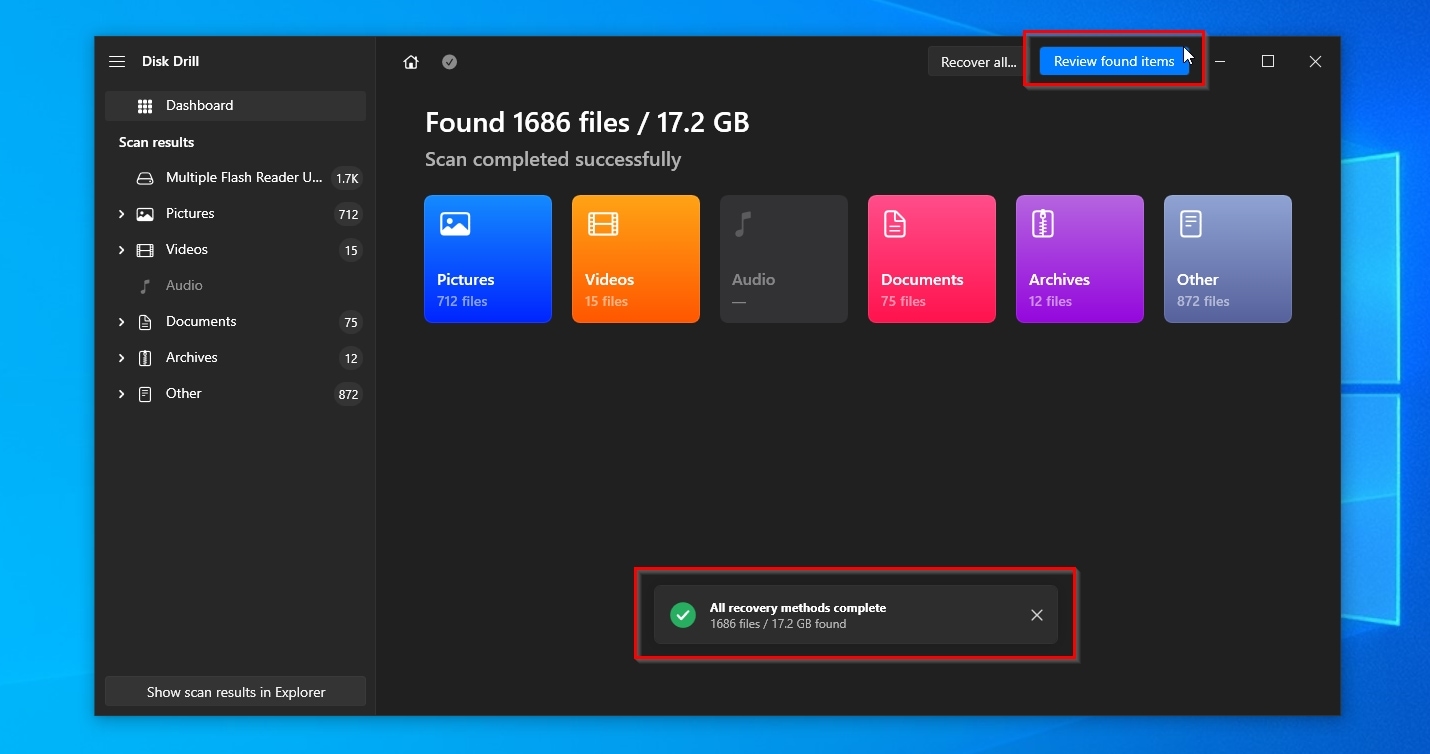
- When done, Disk Drill will inform you that “All recovery methods (are) complete” with a pop-up window. Feel free to close it and click on Review found items to see all the files Disk Drill found.
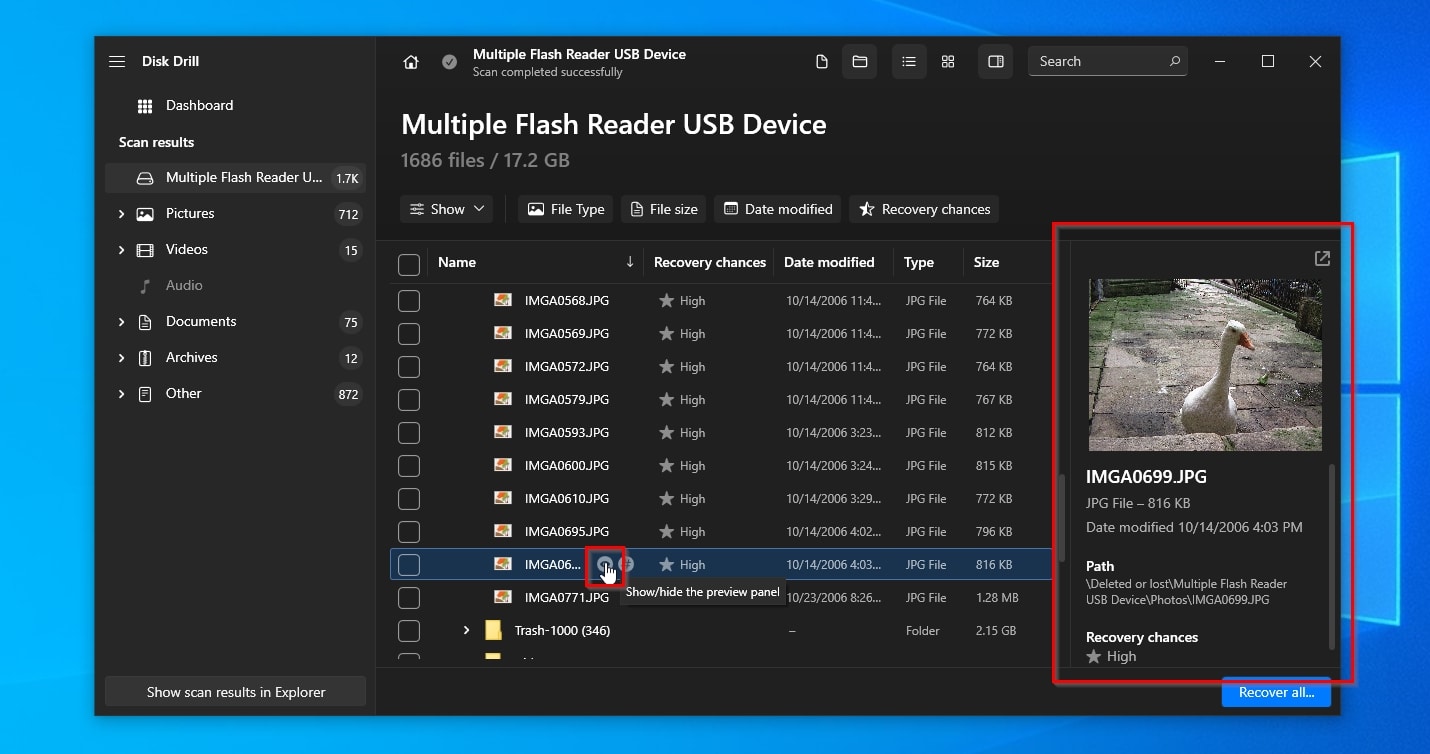
- Check Disk Drill’s scan results to find the files you want to recover. If you can’t tell if they’re the ones you want based on their name, click on the little icon with the eye that appears when you hover the mouse cursor over them or right-click on them and choose Preview to do precisely that. Disk Drill lets you preview the contents of many types of files, like text documents, JPG images, and more.
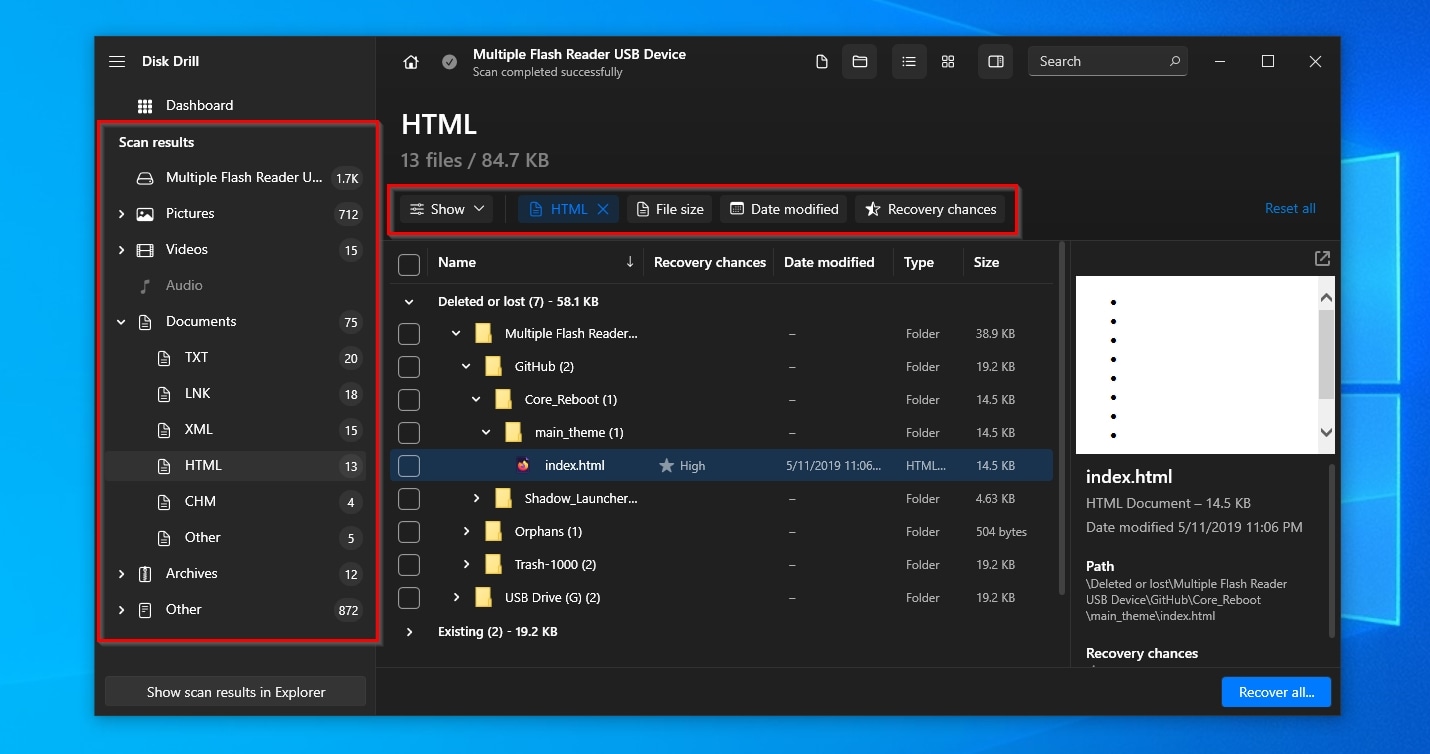
- You can also use Disk Drill’s categories (on the left) and filters (above the results list) to narrow down the results based on factors like their type (TXT documents, PNG images, last date of modification, file size, etc.).
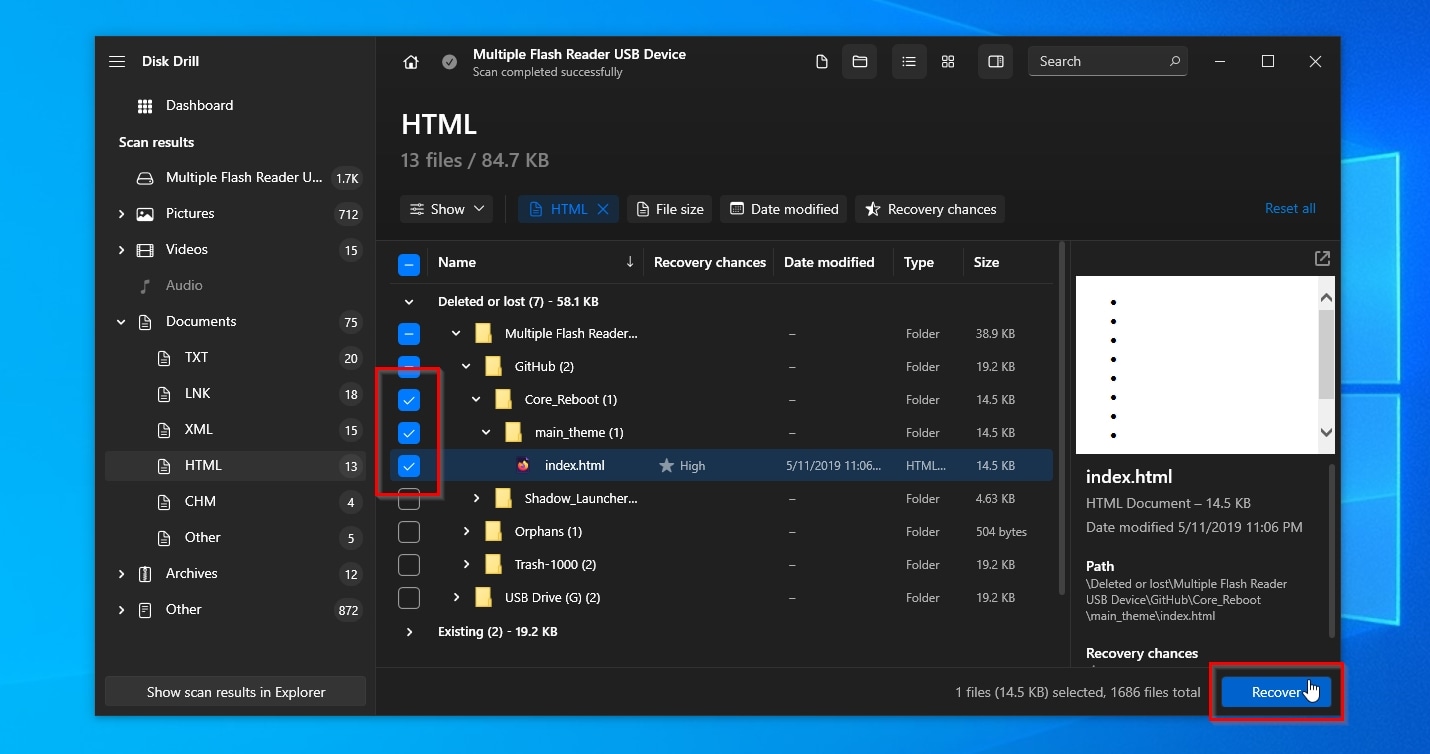
- When you’ve located the files you want to get back, place a checkmark on their left to mark them for recovery. Then, click Recover on the bottom right of Disk Drill’s window.
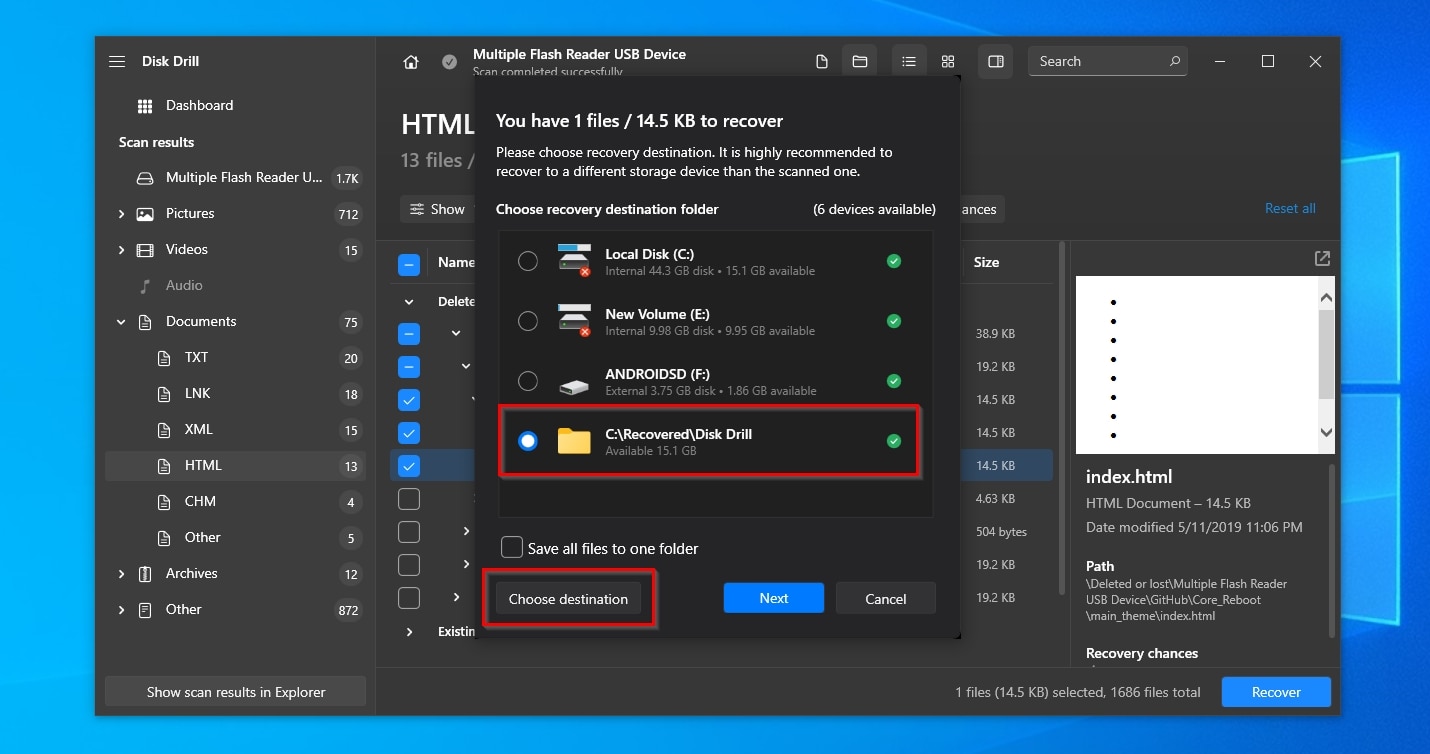
- Choose the destination folder where you want to store the recovered files. Make sure to select a destination on a different storage device than the one from which you are trying to recover files to ensure that the data you are trying to retrieve doesn’t get overwritten. Then click Next.
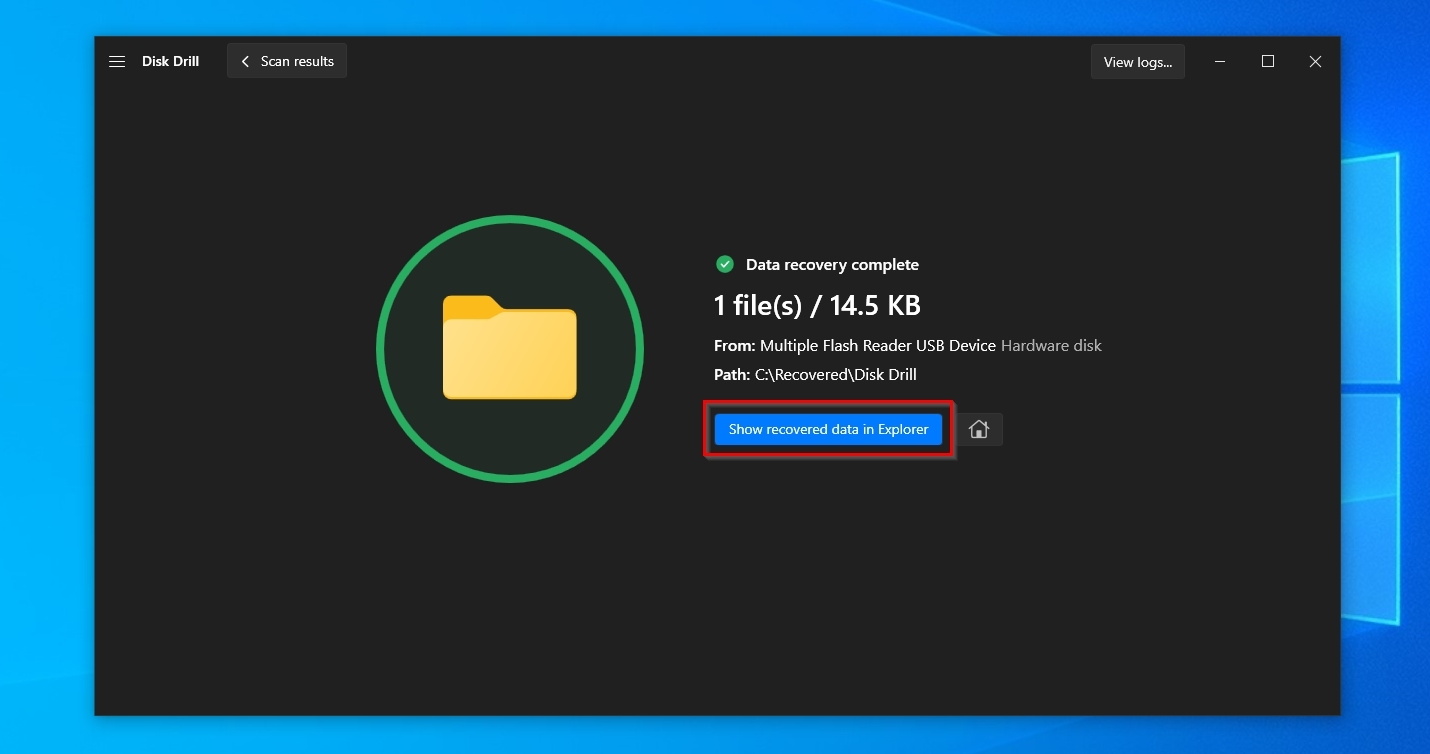
- Soon after, Disk Drill will have recovered all the files you mapped with a checkmark. You can check them using your operating system’s default file manager by clicking Show recovered data in Explorer.
If your files were on your Steam Deck’s M2 drive, your console will be inoperable without it. So, don’t try turning it on before reversing the steps we saw above. First, reconnect your M2 drive to your console and put it back together again.
Conclusion
As I’ve covered in this guide, there are many ways you can get back your lost games, saves, and any other type of files on your Steam Deck. The approach you will take depends on the type of files you want to get back. In rare cases when none of them work, you can always turn to a specialized solution like Disk Drill.
So, you can stop worrying about data loss and enjoy your portable PC gaming with your Steam Deck!
This article was written by Odysseas Kourafalos, a Editor-in-Chief at Handy Recovery Advisor.
Curious about our content creation process? Take a look at our Editor Guidelines.