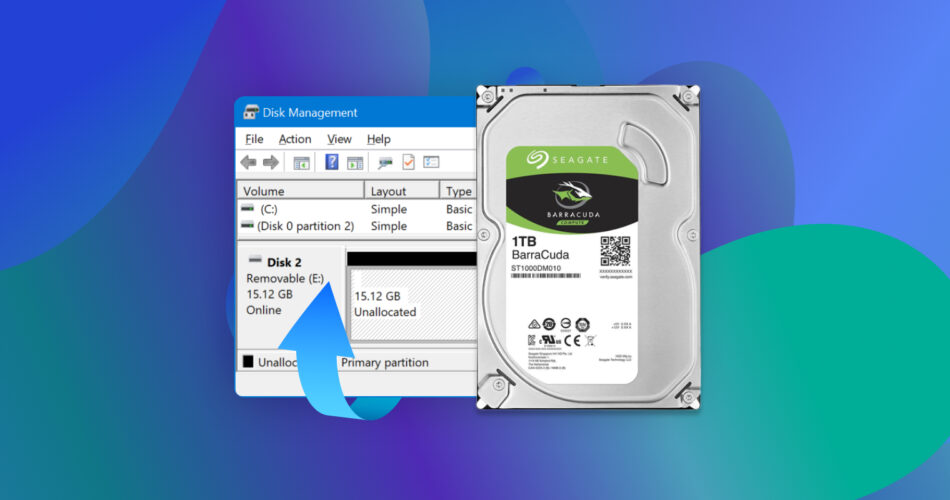
Picture this—you open File Explorer and see that your partitions’ combined storage size is significantly less than your drive’s total advertised storage capacity. This wasn’t the case earlier. Naturally, you open Disk Management, just to see that some portion of your drive’s storage space, or all of it, shows up as “unallocated.” If you modified your partitions recently, this could be explained by that. If you didn’t, the unallocated space could signal an issue with your drive. What about the data that’s gone missing? How do you even recover data from an unallocated drive? The sections below will answer these questions in detail.
While you can skip to the recovery guide by clicking here, we strongly recommend reviewing the information on unallocated disk recovery below.
What Are the Reasons Behind Unallocated Disk Space?
Unallocated disk space is storage space that can’t be used to store data—it isn’t formatted, and thus doesn’t have any file system. Since it isn’t part of any partition, and is basically “raw” space, it doesn’t have any drive letter either.
If you install a new copy of Windows, or connect a brand new drive to your PC, it will have unallocated space. This is completely normal, and you can simply use the unallocated space to create a new partition, or extend existing ones.
However, if you didn’t do any of the above—install Windows, or a brand new drive—and still notice unallocated space on your drive, it could be a sign of something more serious. This could happen due to:
- Interruptions During Data Transfer: Interrupted data transfers from one partition to another due to an error, system freeze, or power loss, can cause storage space to become unallocated. This can also happen when disk cloning, or disk migration is interrupted.
- Partition Table Corruption: Abrupt power loss, malware, and certain disk errors can corrupt the partition table, resulting in data loss and unallocated disk space.
- Deleted Partitions: Deleting a partition—whether intentionally, or unintentionally—marks the space it previously occupied, as unallocated.
Unallocated Disk Recovery Navigation
Since disk space can become unallocated due to numerous reasons, it can be confusing to decide which solution to use in each case. To help you out, here’s a table that outlines almost all possible reasons, and the recommended solution for each one:
Cases |
Solutions |
I forgot to allocate space when I installed Windows. |
Use Disk Management to allocate the space–either expand an existing partition or create a new one. |
I need to allocate disk space after Windows Update. |
Again, you can use Disk Management to shrink a volume and allocate the space to another partition, or use the Diskpart command line utility to do the same. |
I accidentally deleted the partition. |
Use data recovery software to perform unallocated partition recovery easily and safely. Use TestDisk to repair the partition table after recovering data, or allocate the space in Disk Management. |
I’ve unplugged my drive improperly. |
Check Windows Backup & Restore for an existing backup. If not available, use Disk Drill to perform unallocated disk recovery. Use TestDisk (if the partition structure is damaged). |
I experienced an unexpected power outage. |
Here too, it’s wise to check if Windows has an existing backup, then use data recovery software to recover the unallocated partition. If the partition structure is corrupted, TestDisk can help rebuild it. Alternatively, fix the unallocated hard drive using Diskpart or Disk Management. |
I reinstalled Windows, and now my other storage drive shows up as unallocated. |
Use TestDisk to recover the partition with your files intact. If that doesn’t work, use Disk Drill to recover data from the unallocated disk. Do NOT format the drive, or create a new partition before recovering your data. |
I was transferring a volume from one partition to another, and the process was interrupted. |
Use Disk Drill to recover data from the unallocated space. |
My disk space became unallocated because of file system corruption. |
Use TestDisk to recover the partition. If that fails, use Disk Drill to recover data from the unallocated disk space. After data recovery, create a new simple volume from the unallocated disk space, and format the drive. |
Partition management software messed up my partitions, and now the disk space is unallocated. |
Use Disk Drill to recover data from the unallocated disk space, and then create a new partition. |
As you can see, regardless of the reason behind your drive’s unallocated state, the first and most important step is to recover any data from that space. The fixes required to make the unallocated space usable will erase any data from it in the process. Only after you’ve secured your files should you proceed with making the drive “allocated” again. We’ll cover data recovery first. If, however, you don’t need any data that might still reside on the unallocated partition, feel free to skip ahead to the fixes.
How to Recover Data From an Unallocated Hard Drive
We selected three options to help you recover data from the unallocated drive—use a third-party data recovery program, recover the partition using TestDisk, restore a backup, or contact a professional data recovery service.
Option #1: Recover Files from Unallocated Space Using Recovery Software
Files stored on unallocated disk space aren’t accessible using traditional methods like the File Explorer. However, as long as the files weren’t overwritten by new data, a capable data recovery program can find those files and recover them for you. Don’t choose just any data recovery program, we suggest picking an option from our curated list of the best data recovery apps.
Note: The TRIM feature on SSDs can complicate the data recovery process. It’s best to keep your expectations low when recovering data from SSDs.
In our case, we picked Disk Drill as our program of choice to recover data from an unallocated hard drive. The app ticks all the boxes of a good data recovery tool—it is reliable, easy-to-use, and fast. Its data recovery algorithm can find both deleted, and existing files on unallocated disk space. Additionally, Disk Drill supports data recovery from RAW, and corrupt partitions too.
In case you suspect your hard drive is corrupt, we recommend creating a disk image of the drive, and scanning this disk image for recoverable data. This has two advantages—one, the present state of the disk is saved so you’re protected against further data loss, and two, it prevents additional stress from a data recovery scan on your already damaged hard drive.
Here’s how you create a disk image, and recover data from an unallocated drive using Disk Drill:
Part 1: Create a Disk Image (Optional)
- Download Disk Drill, and install it. Do this on a separate drive, not the one you wish to scan.
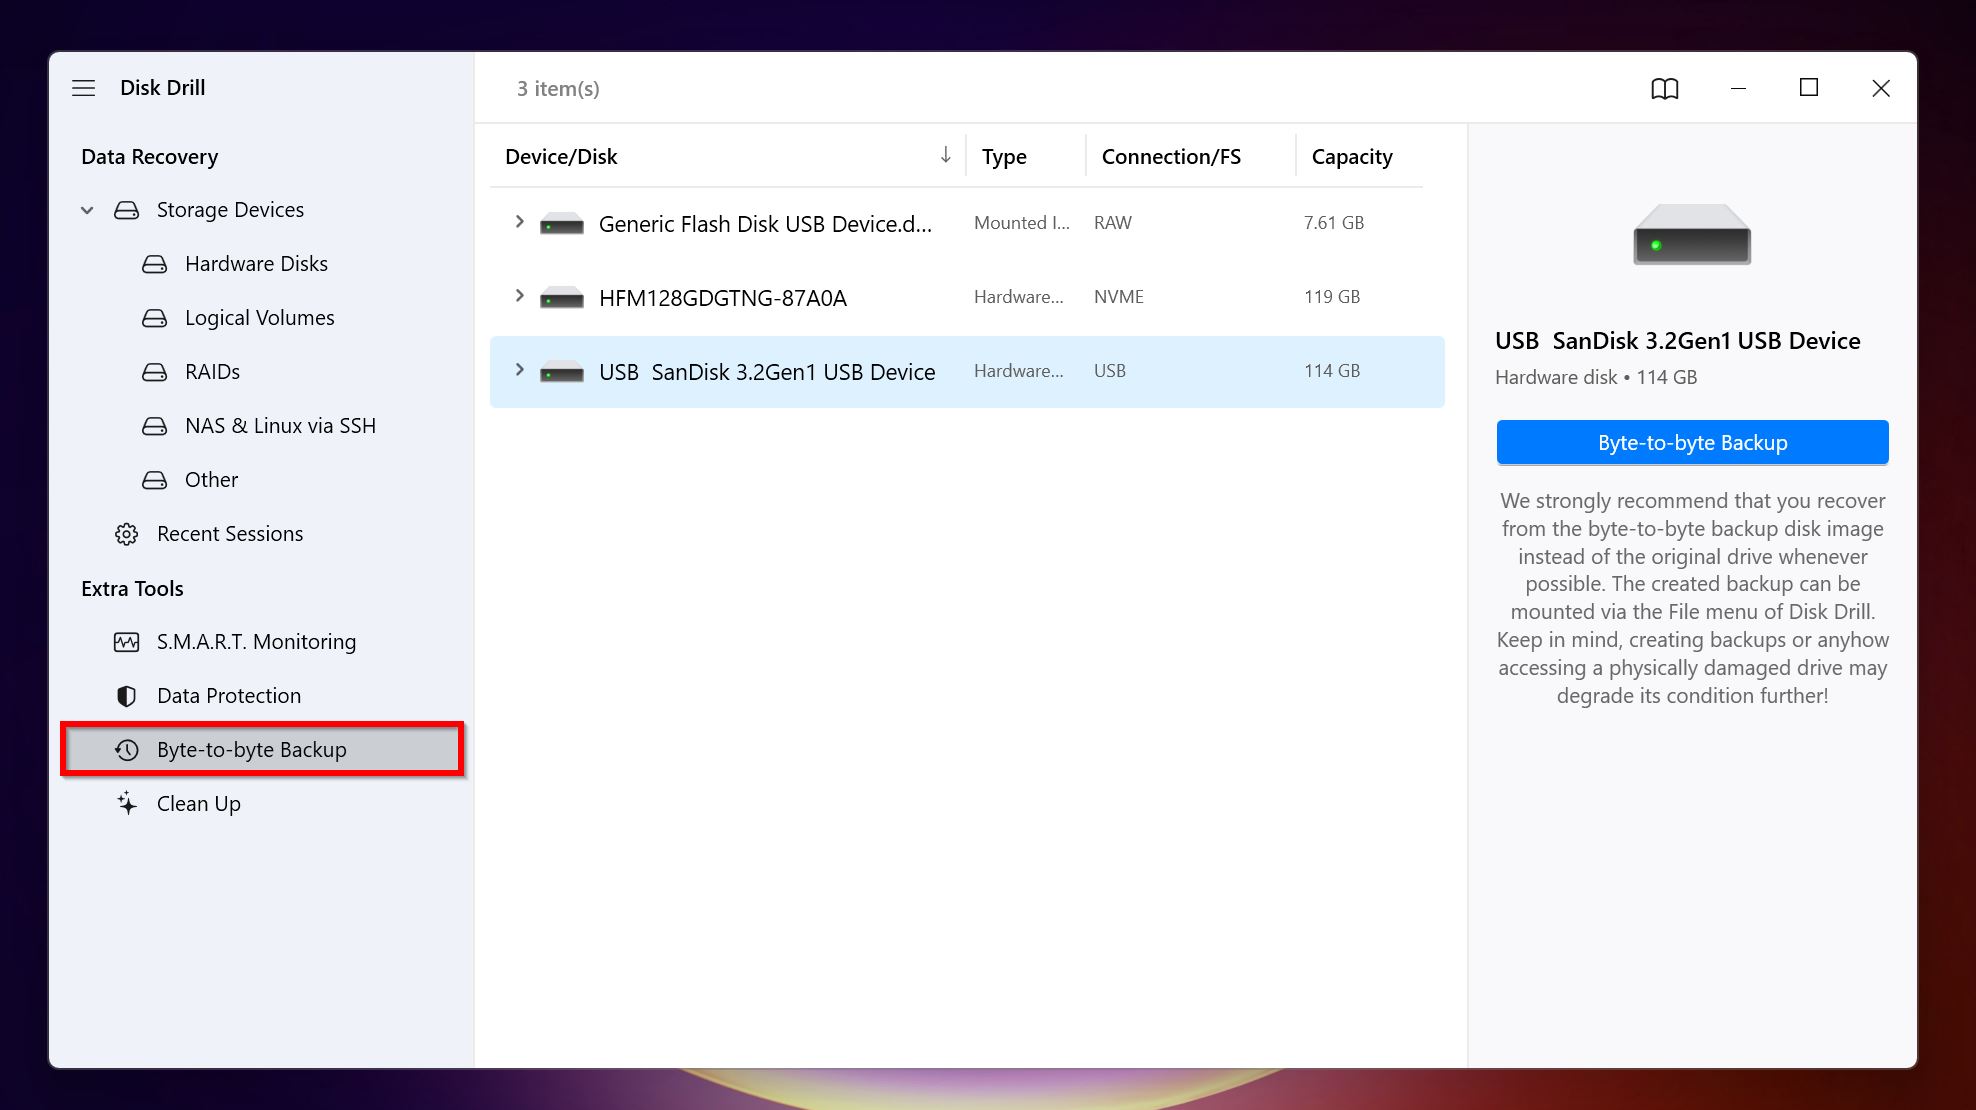
- Open Disk Drill, and click on Byte-to-byte Backup under Extra tools.
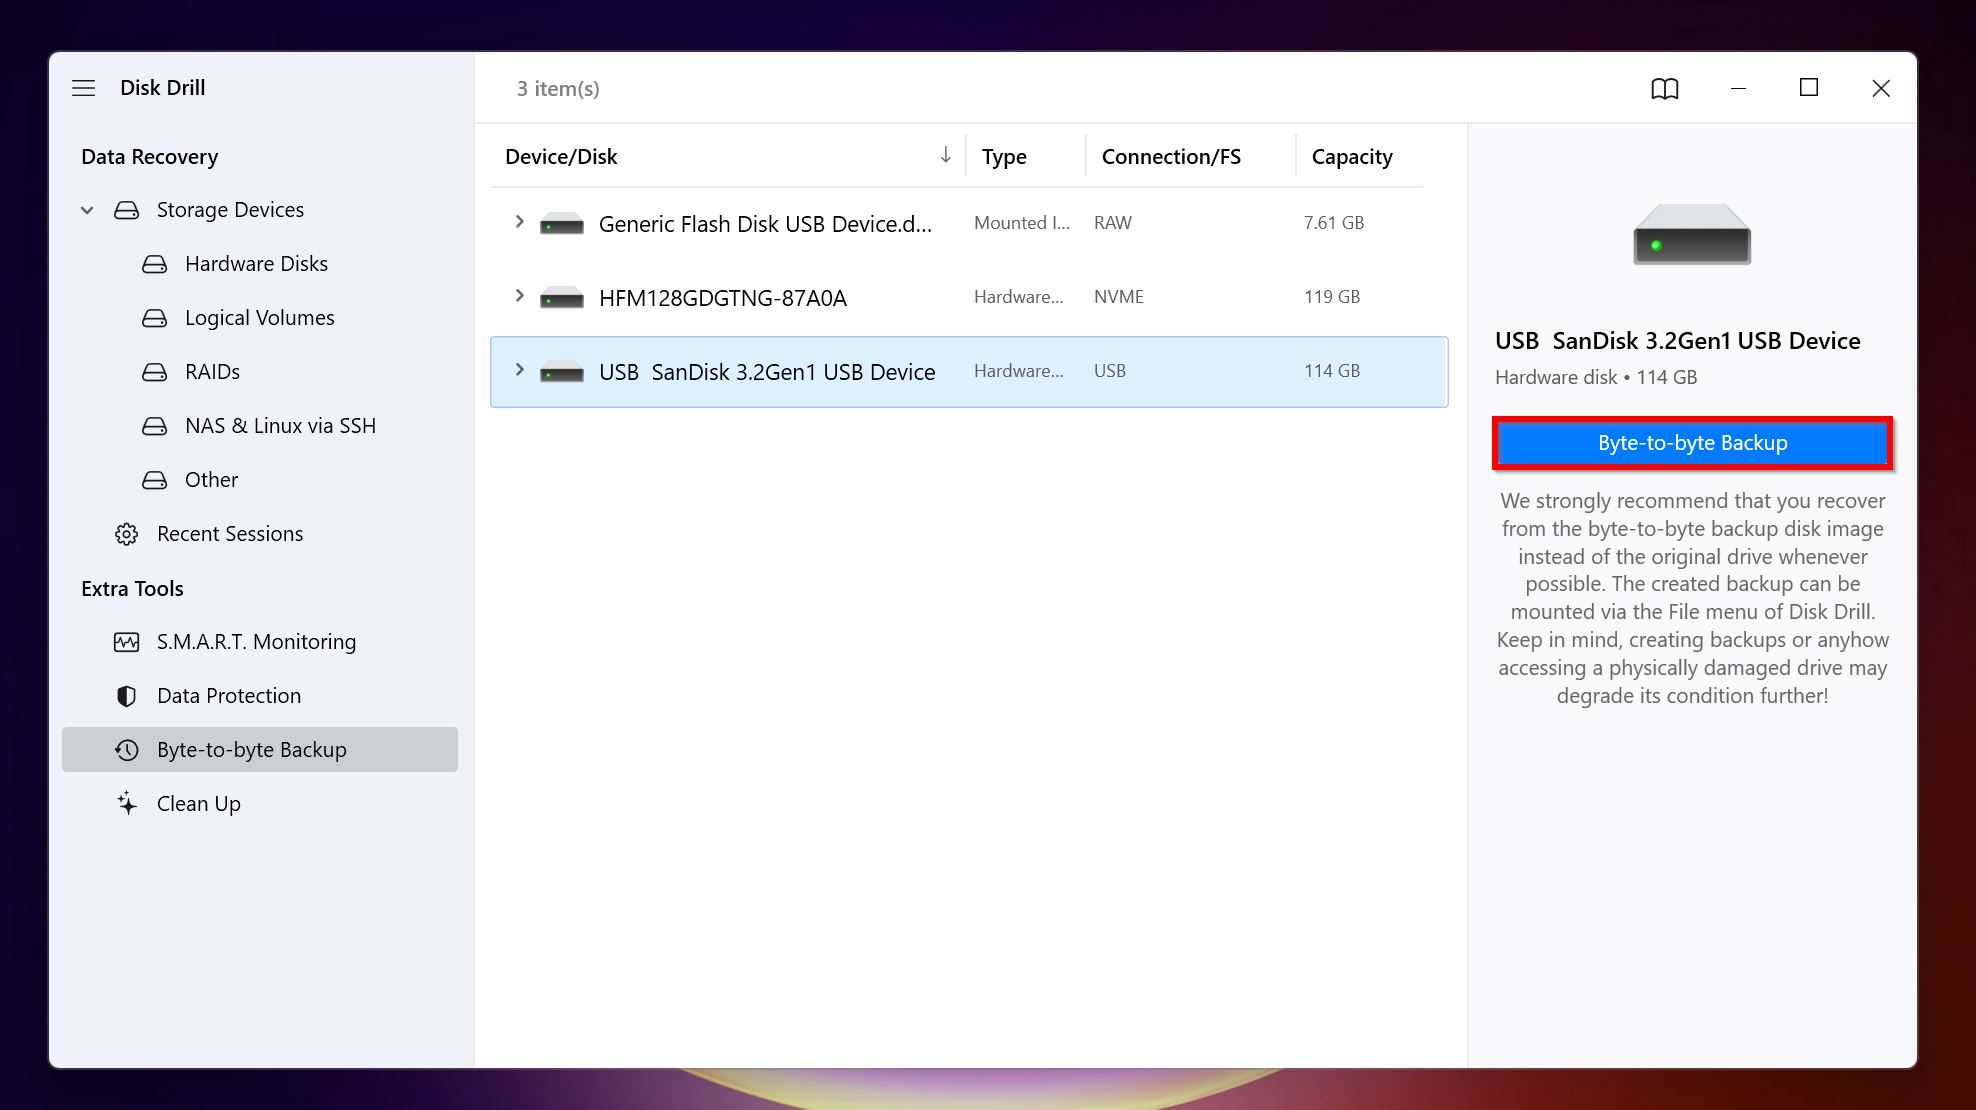
- Select the hard drive with the unallocated space, and click on the Byte-to-byte Backup button.
- Choose where you’d like to save the disk image, and click OK.
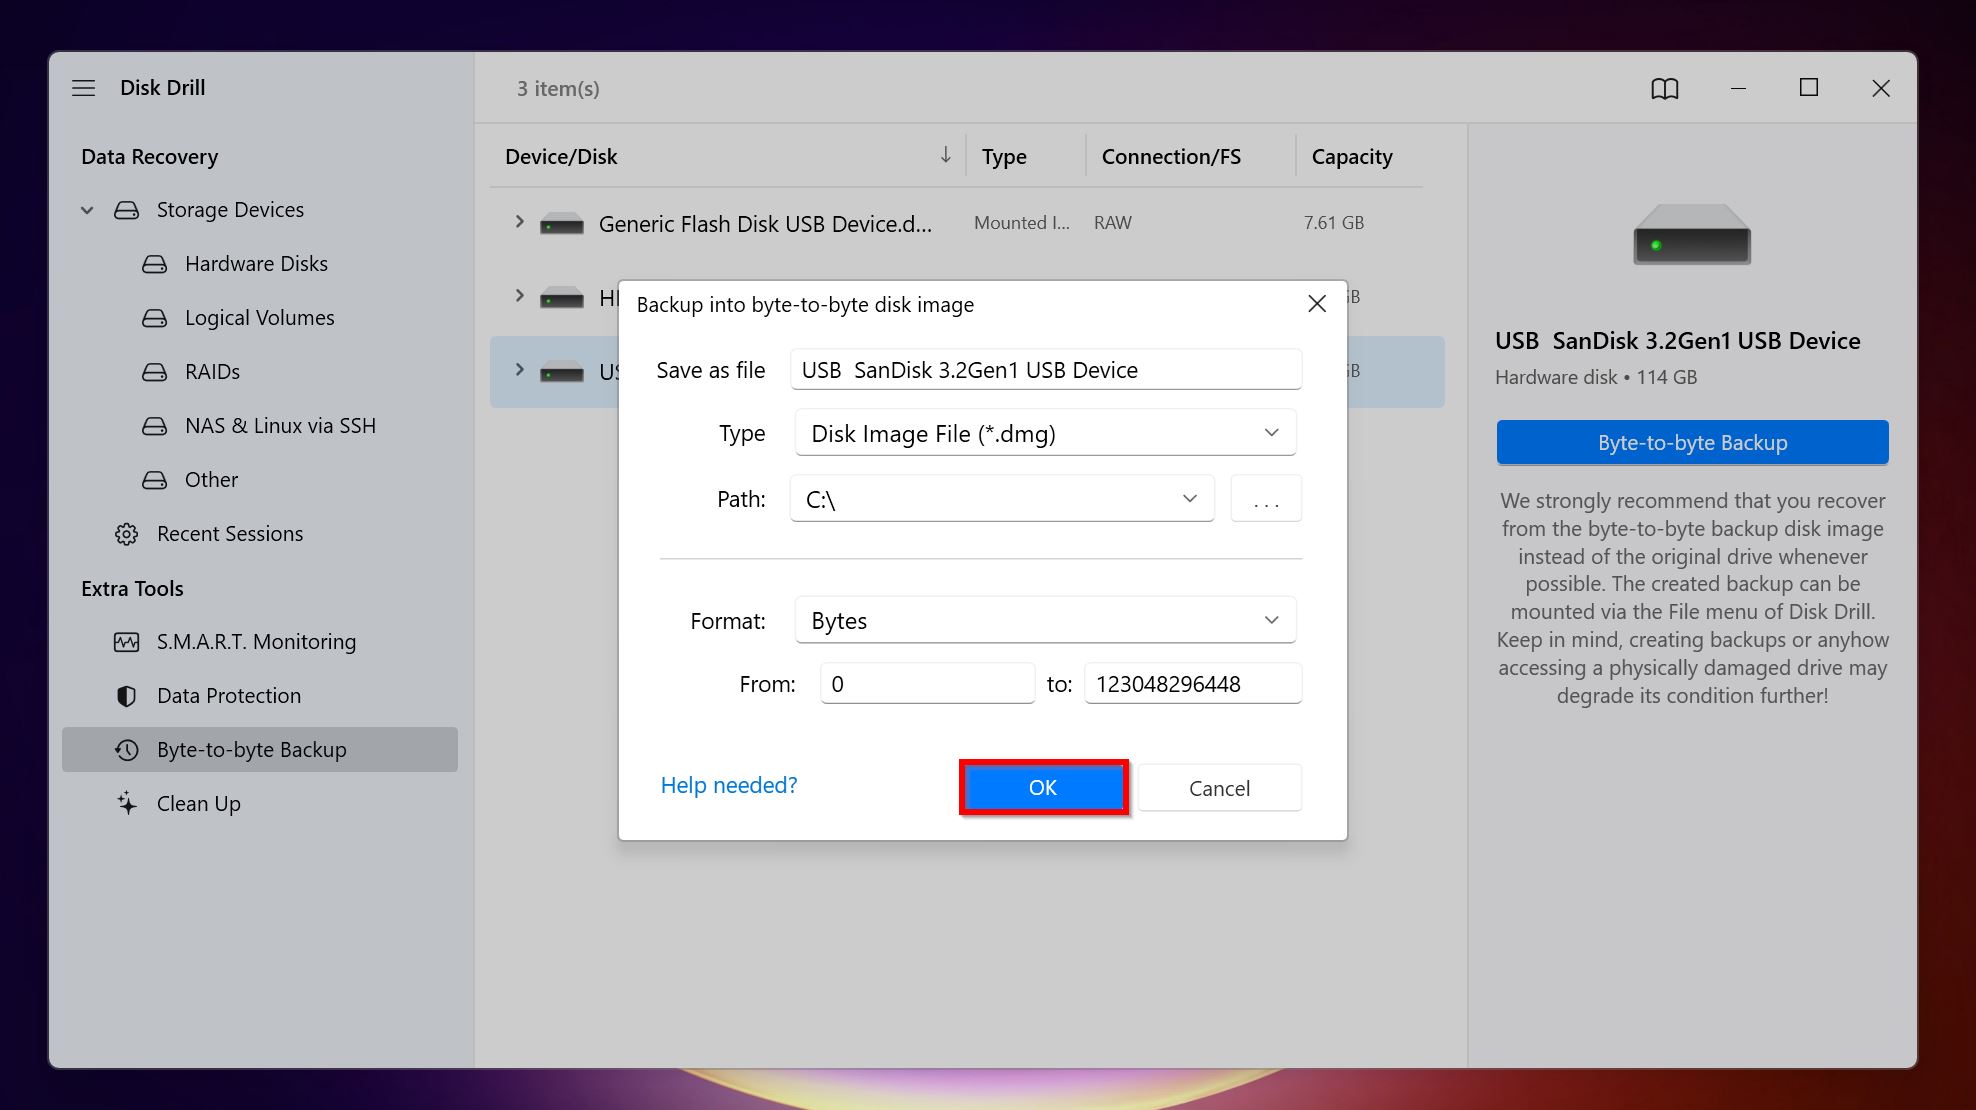
- Disk Drill will create the disk image.
Part 2: Scan the Unallocated Hard Drive Using Disk Drill (Required)
- Download and install Disk Drill if you haven’t already. Do this on a drive other than the one you need to scan.
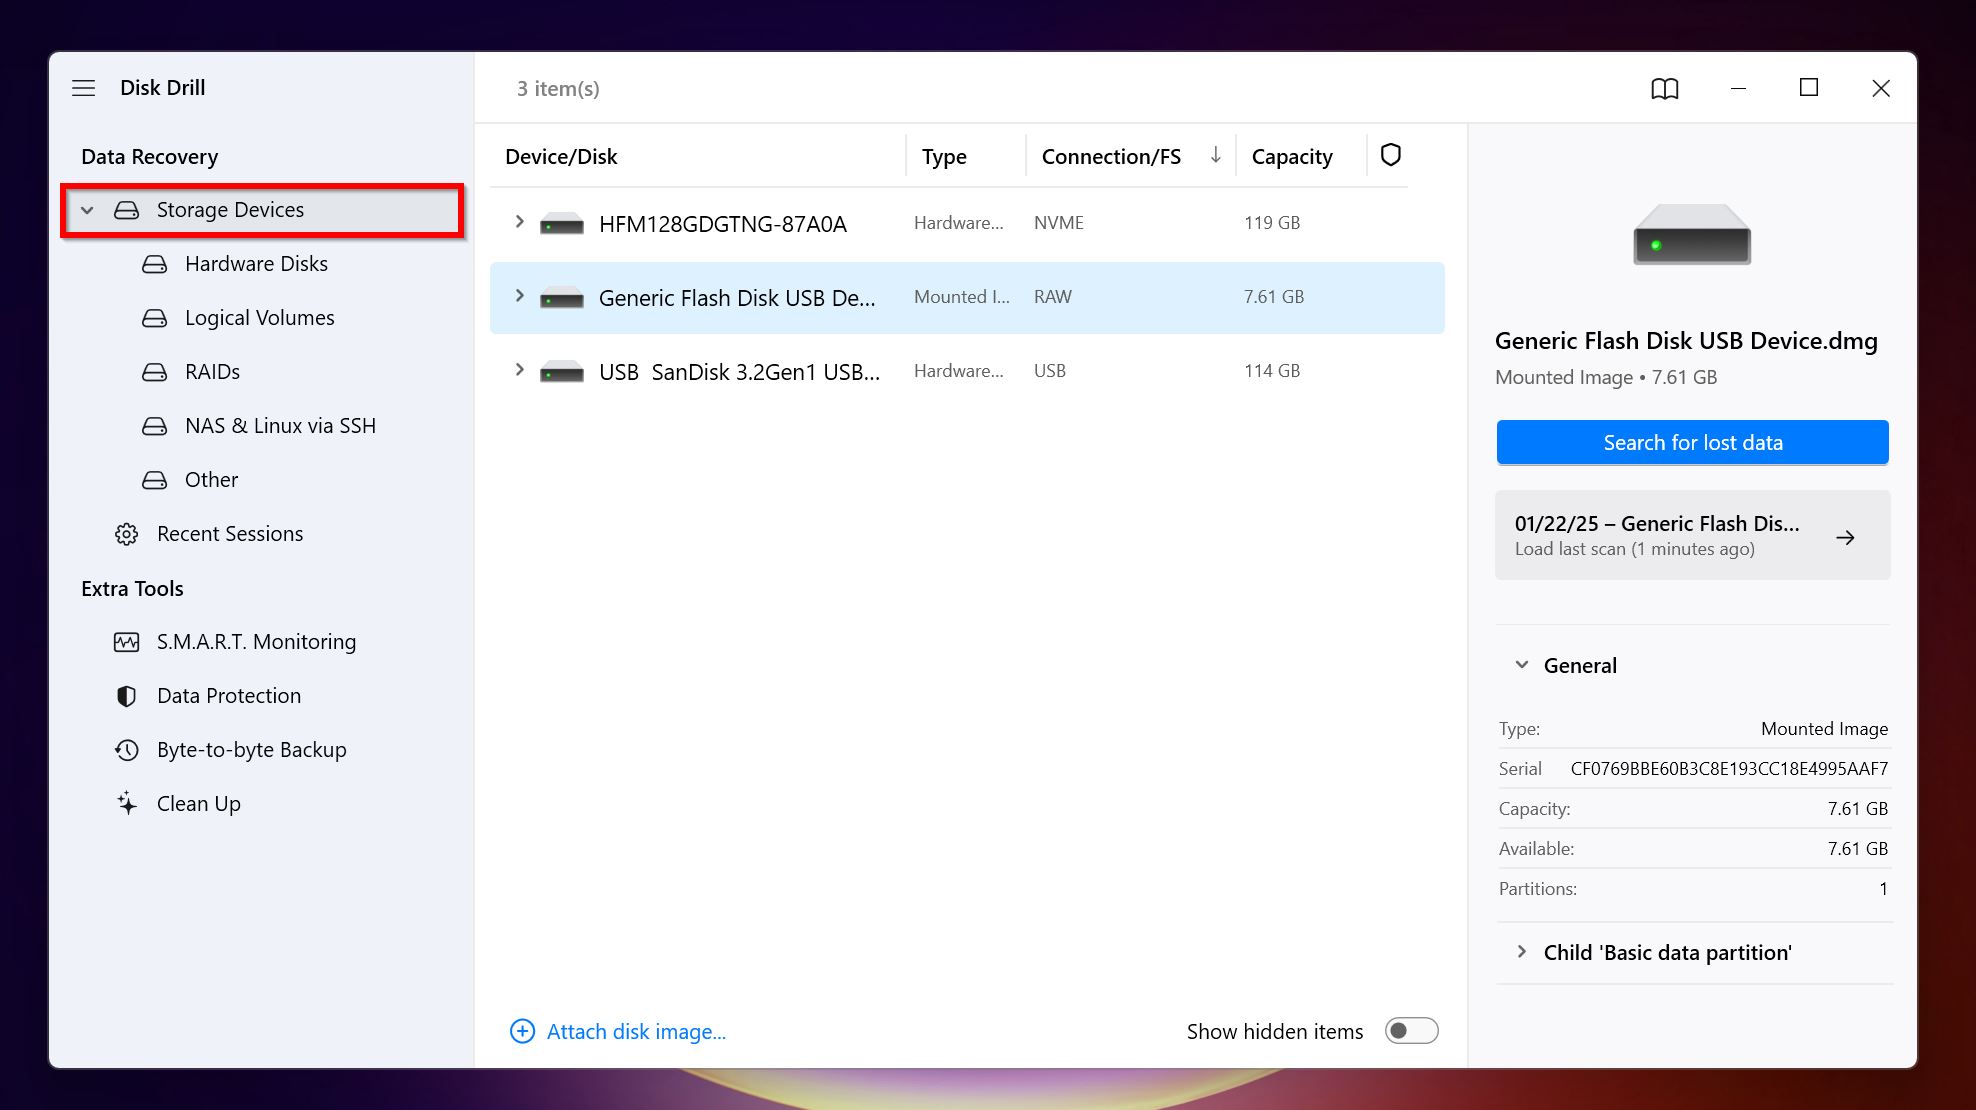
- Open Disk Drill, and ensure you’re on the Storage Devices tab, under Data Recovery.
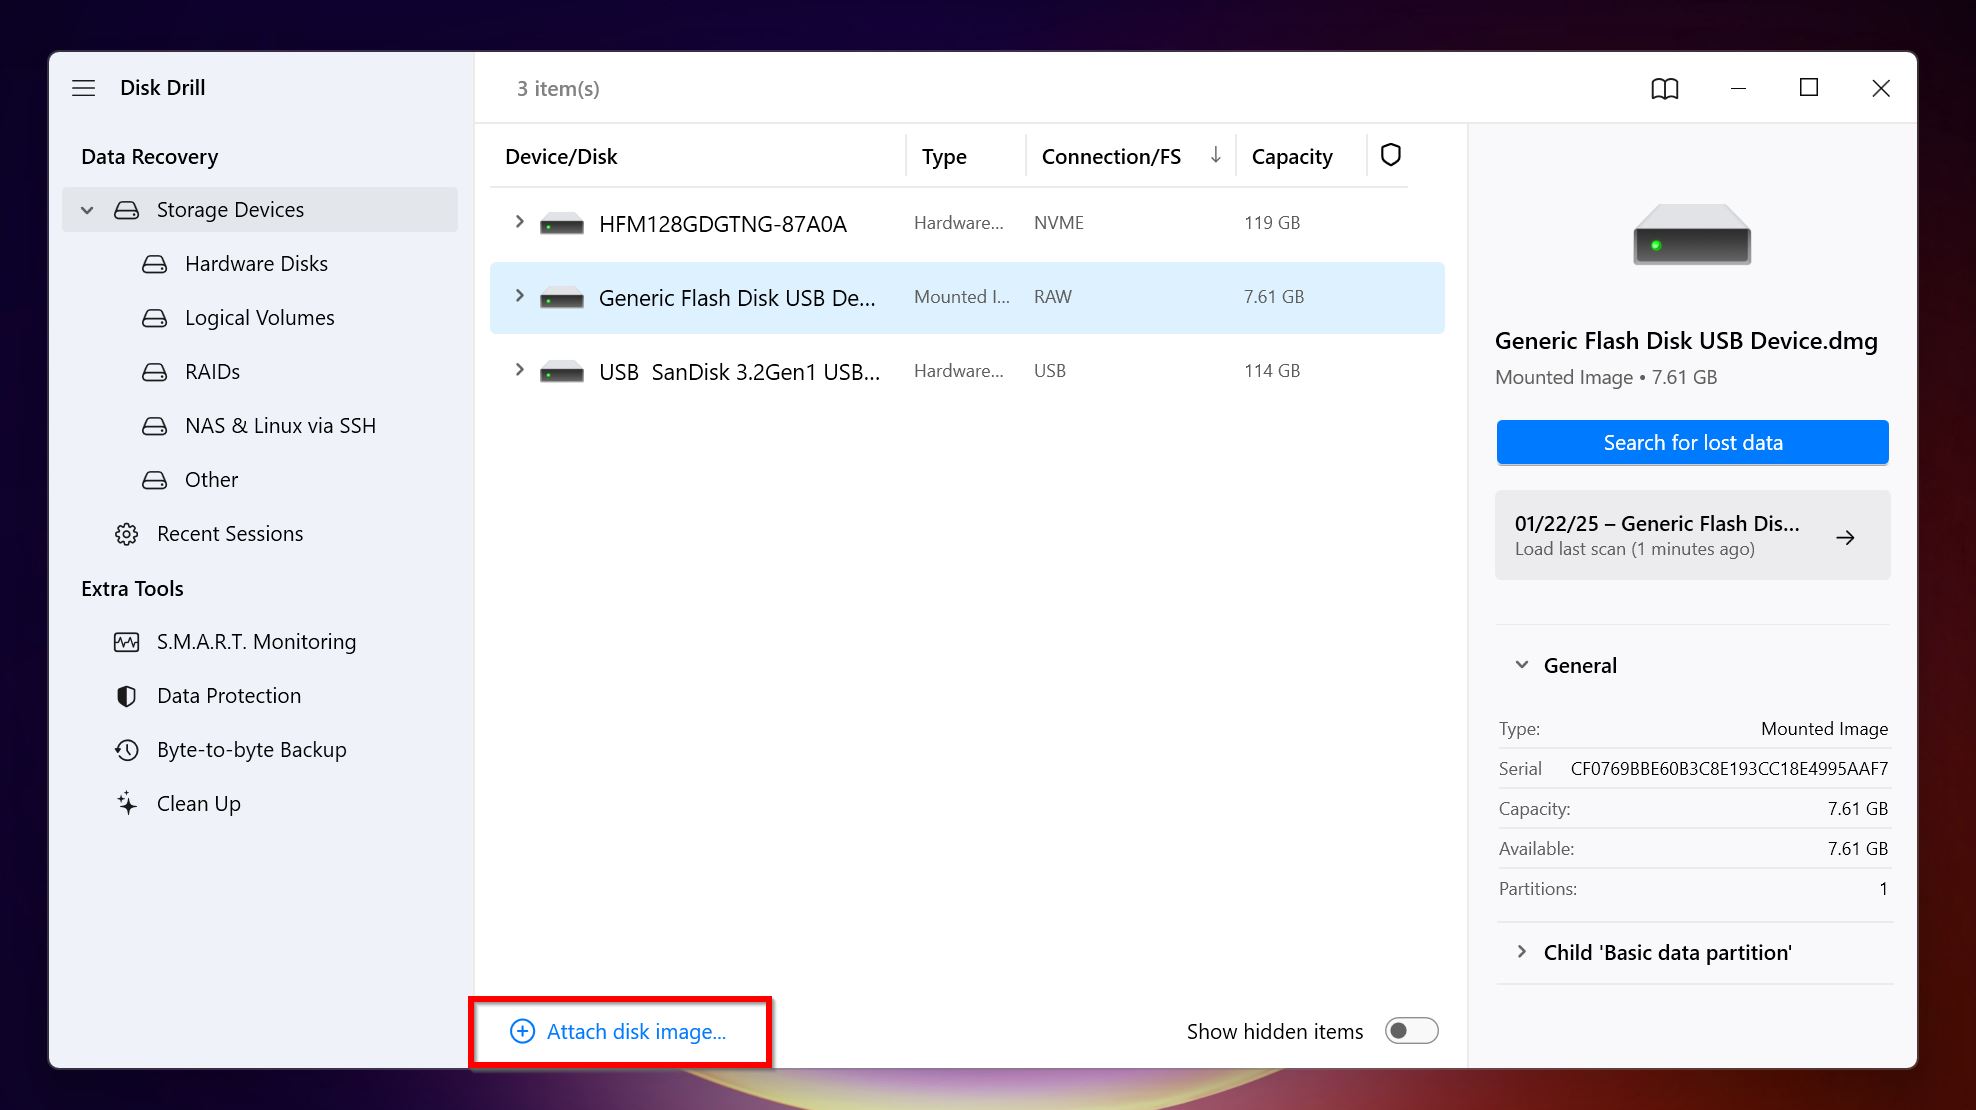
- (Optional) In case you created a disk image, click on Attach disk image, browse for the disk image, and double-click it. The disk image will show up as a separate drive in the drive list.
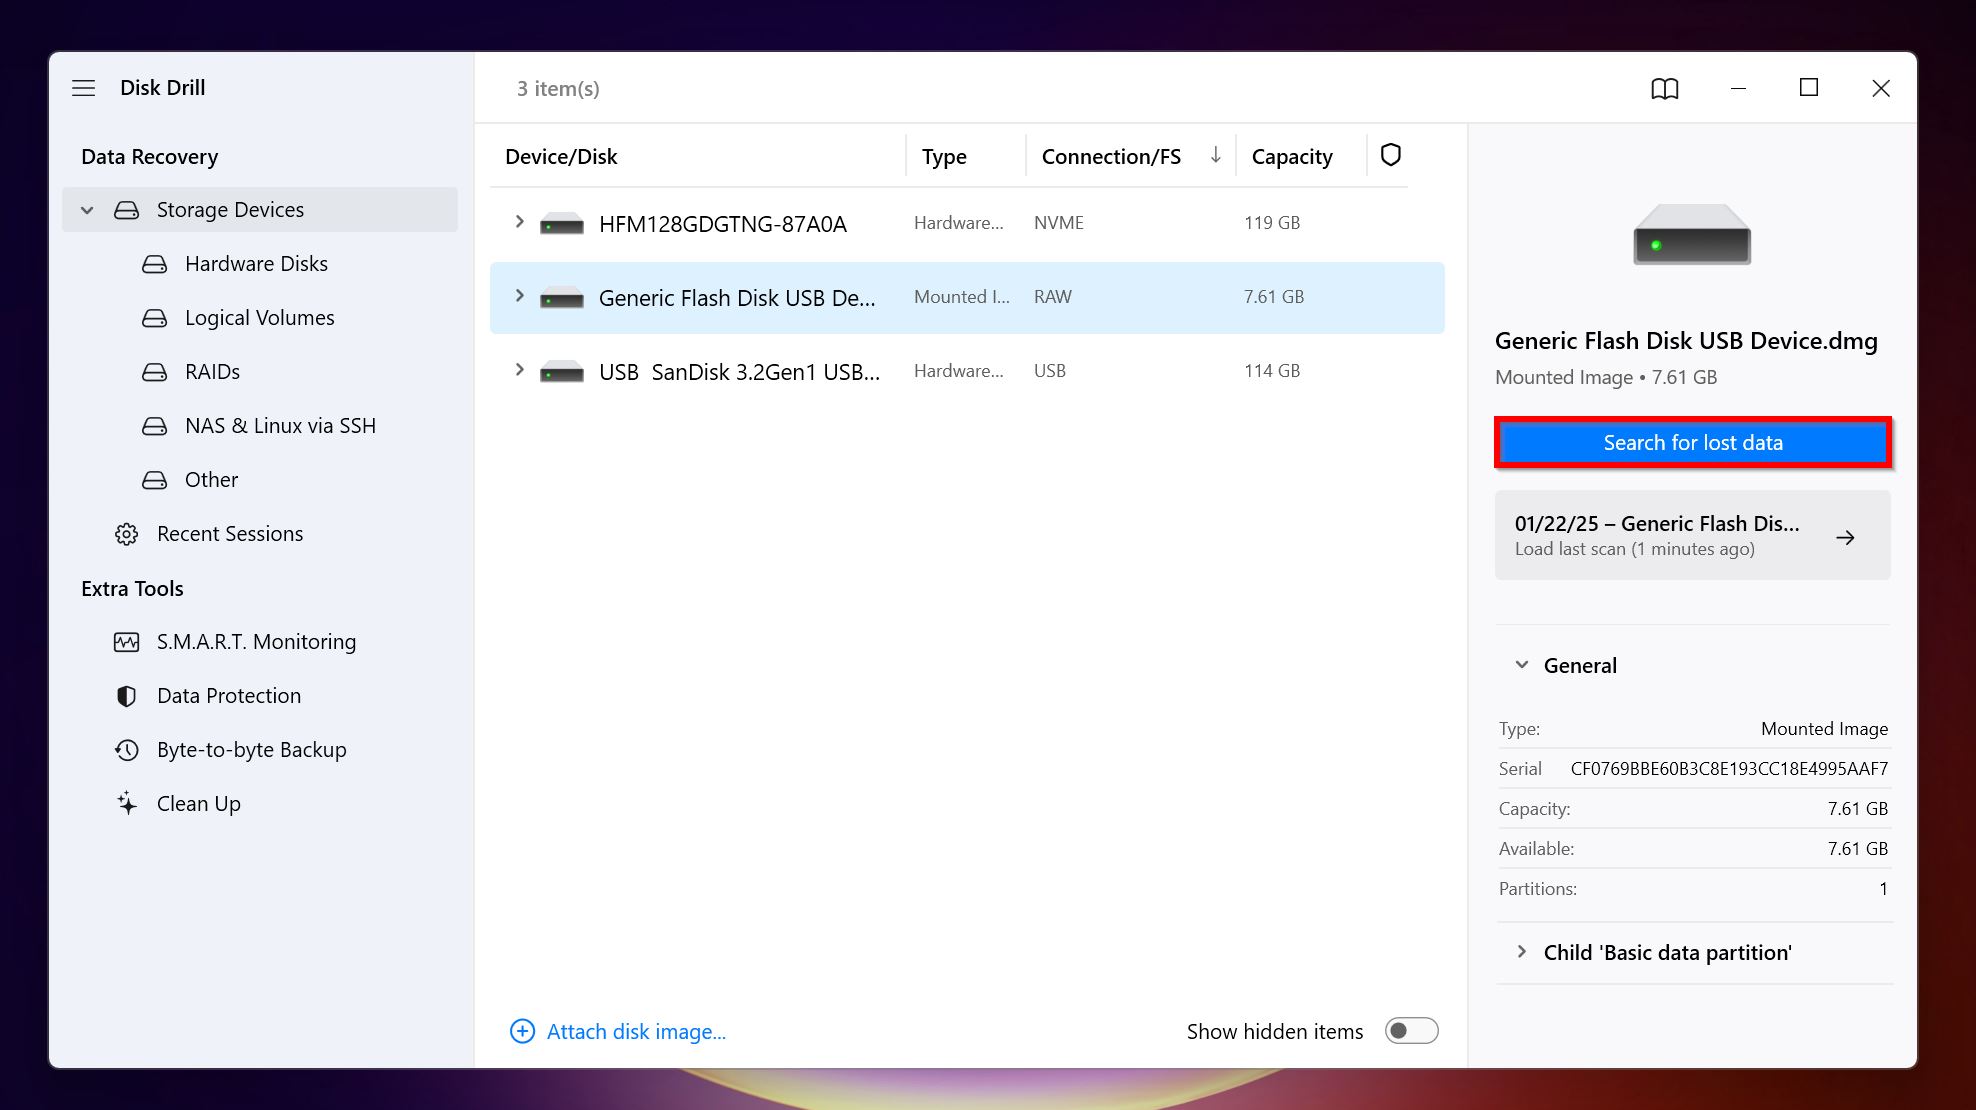
- Select the unallocated hard drive, or partition. If you’re recovering data from a disk image, select it. Click on Search for lost data.
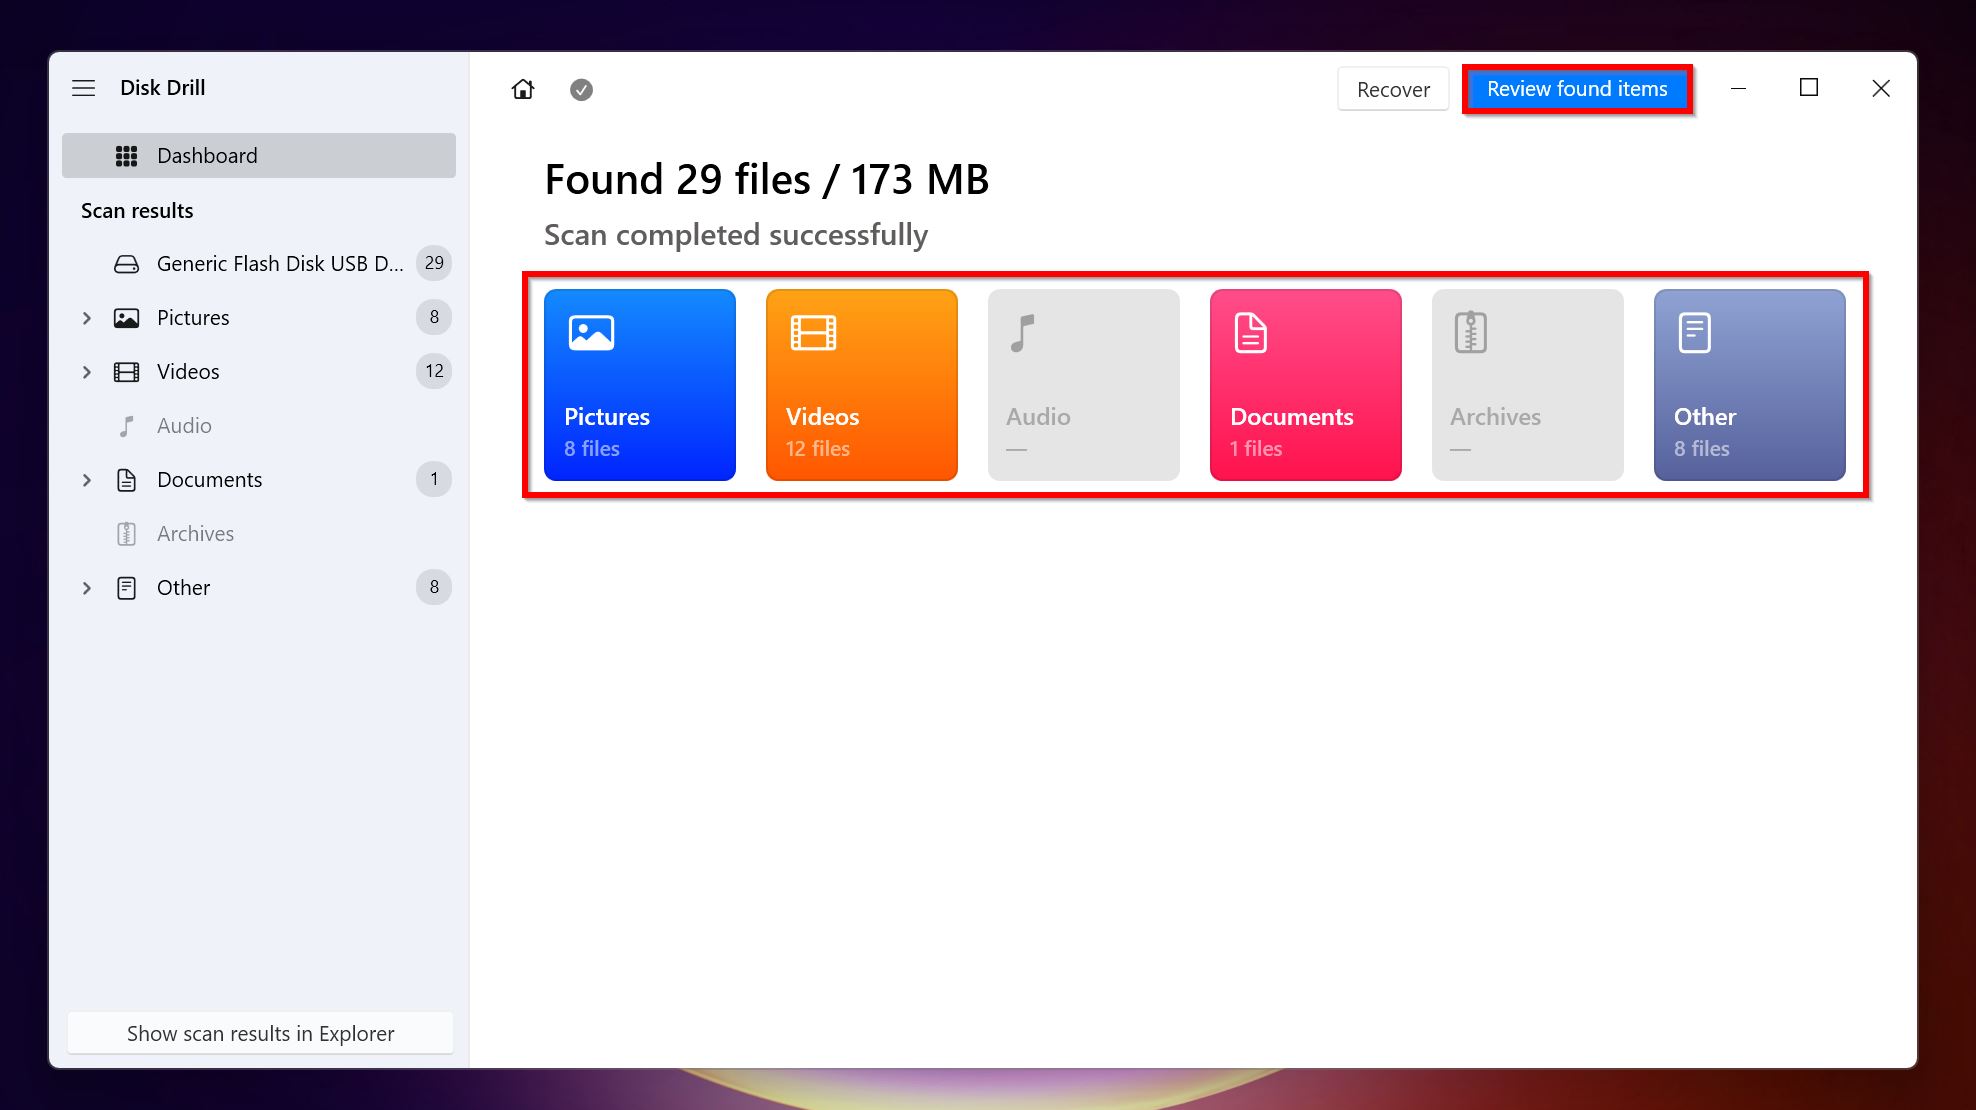
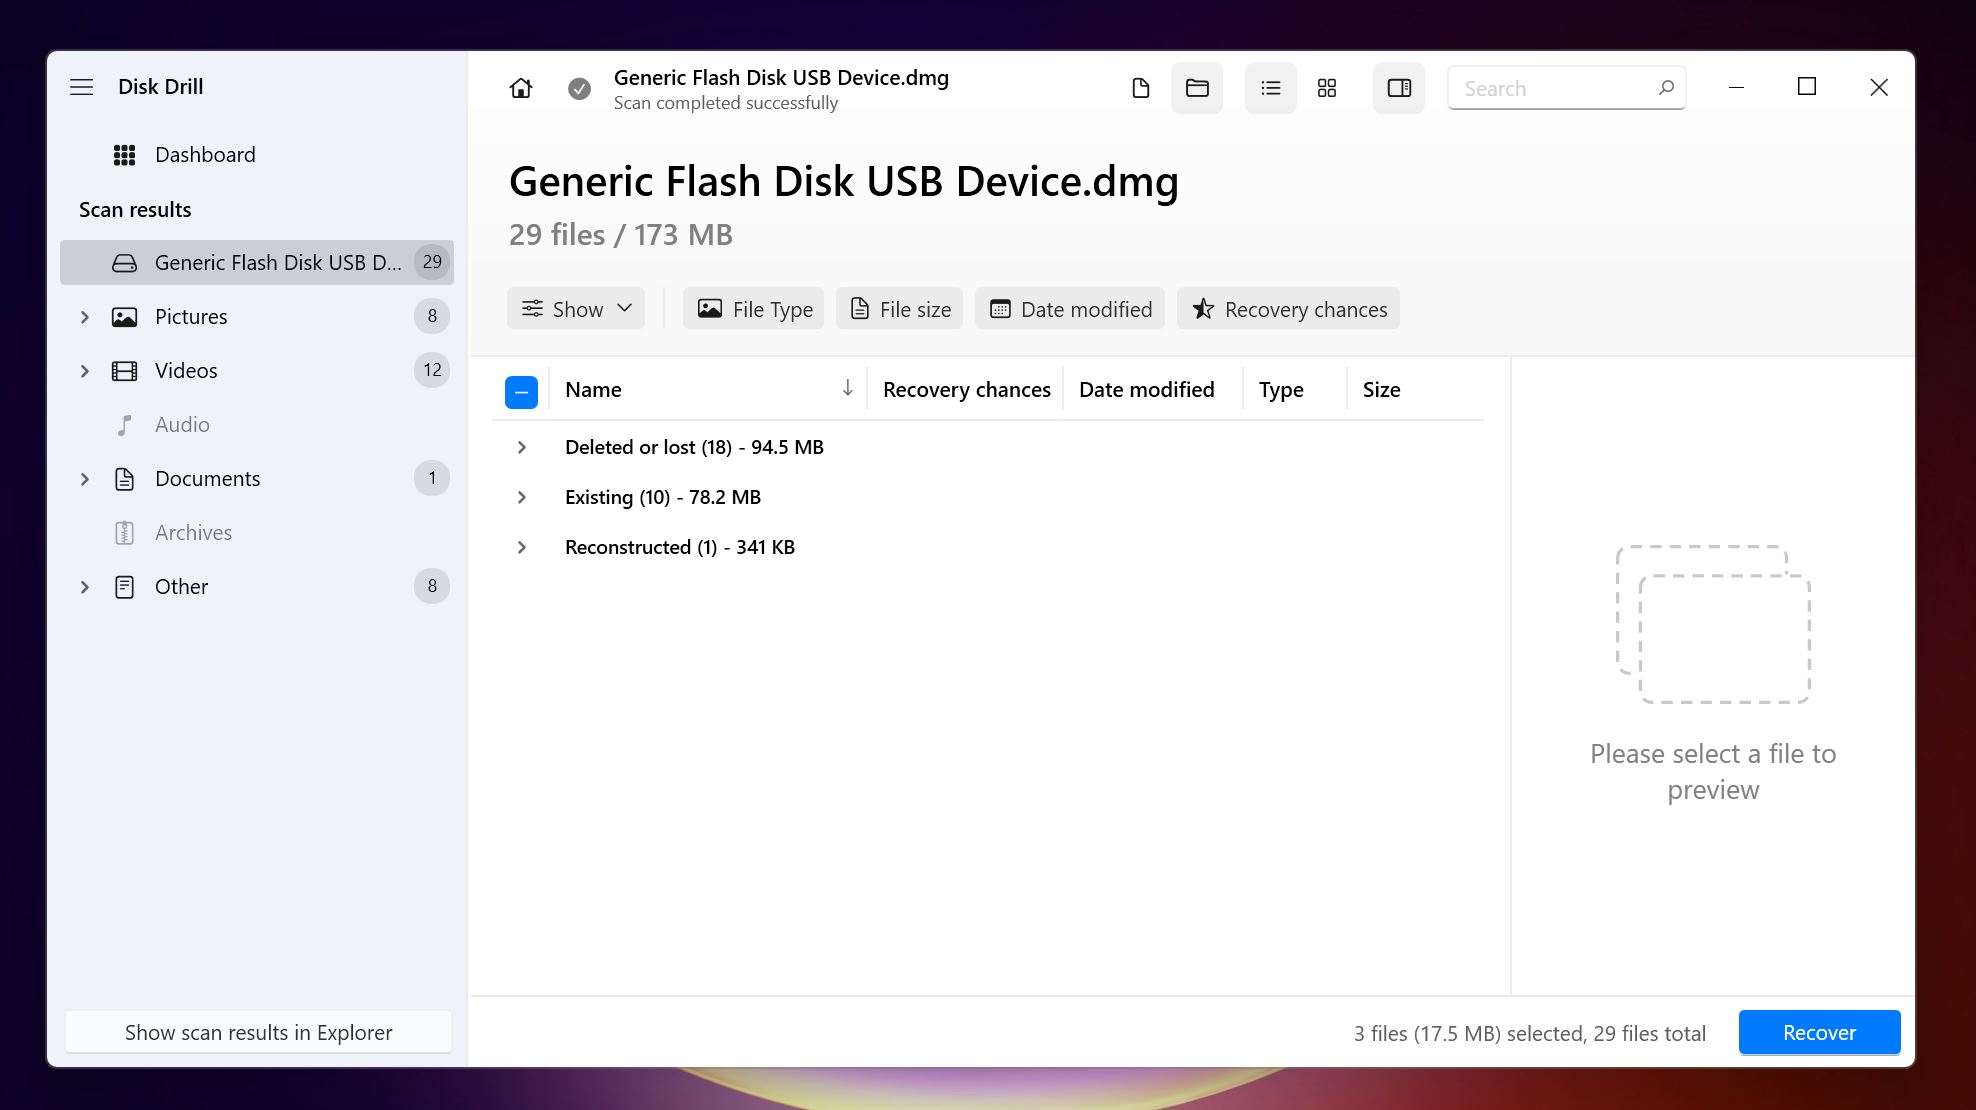
- Click Review found items after Disk Drill finishes scanning the drive. To only view specific file types—Pictures, Videos, Audio, Documents, Archives, and Other—click on the relevant file type tile instead.
- Expand the Deleted or lost, Reconstructed, and Existing sections.
- Select the files you wish to recover, and click Recover. Disk Drill automatically shows you a preview of the currently selected file, but you can preview any supported file on the list, by clicking the eye icon next to its filename.
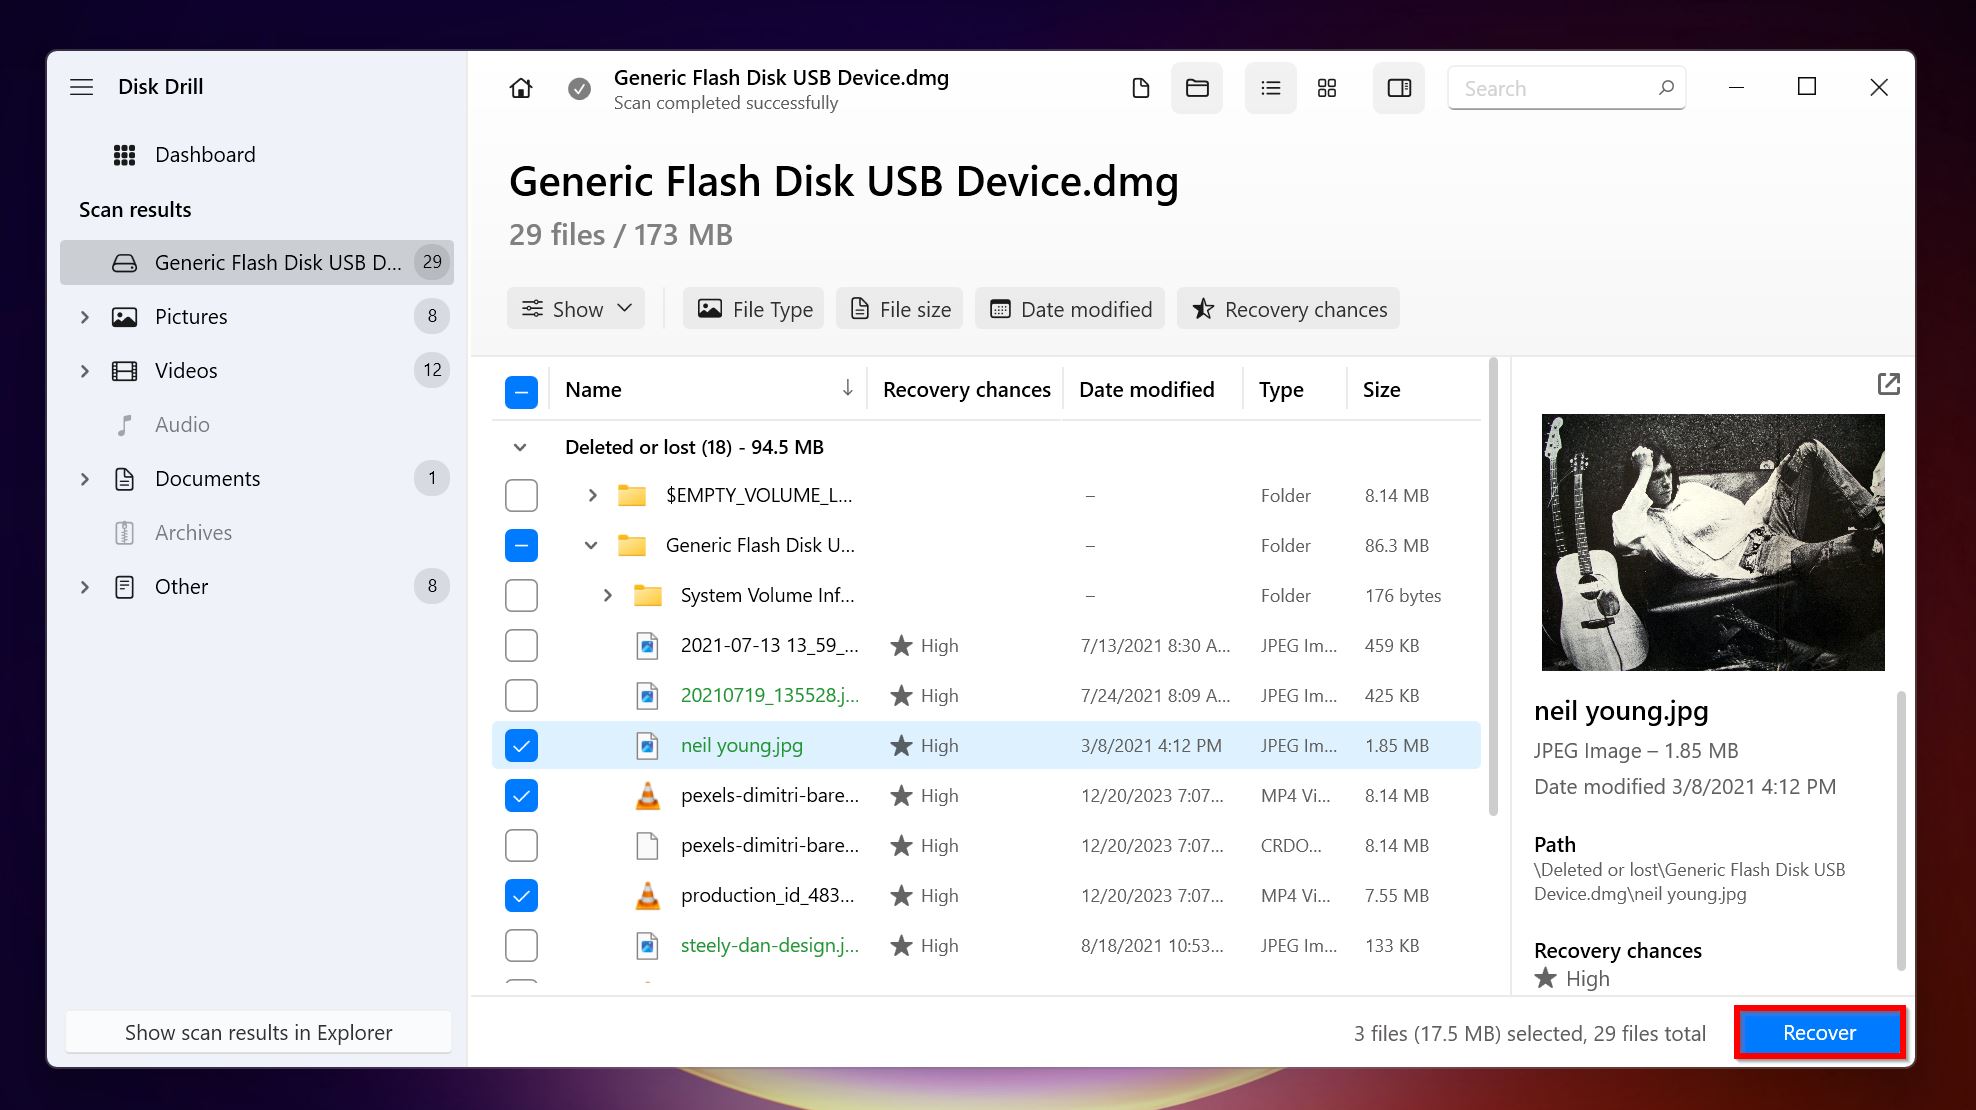
- Choose a recovery destination for the files, and click Next. It’s best to recover these files on a separate drive.

- Disk Drill will recover the selected files.
Option #2: Check Your System for Existing Backup
If you’ve enabled the Windows backup feature, called File History (and it was active BEFORE the partition became unallocated), you can get back your files if they were backed up.
By default, File History creates backups of files stored in your Libraries (Documents, Music, Pictures, Videos), as well as your Desktop, Contacts, and Favorites folders. If you’ve added custom locations to your Favorites, those will be backed up automatically as well.
It’s quite easy to perform unallocated drive recovery using File History:
- Connect the storage device you used to set up File History.
- Type “file history” in Windows Search (Windows Key + S).
- Select the Restore your files with File History option.

- Here, cycle through the backup you want to restore. Select the files using the checkbox, then click on the green Recover button.

- File History will restore the selected file to its original location.
It’s always a good habit to create regular backups, and Windows File History can automate this process for you.
By the way, don’t forget to check your cloud backups if you have them active. Windows 10/11 come with OneDrive preinstalled, and there’s a chance you activated it during your initial setup. Who knows—you might find your files safely stored there.
Option #3: Contact a Data Recovery Service
In our experience, most drives/partitions become unallocated due to logical issues—such as accidentally deleting a partition, or corruption caused by a sudden power outage. However, there are cases where physical problems with the drive itself are to blame.
When physical damage is involved, standard DIY solutions might not do the trick. In these situations, a professional data recovery service may be your best (and sometimes only) option.
There are plenty of good data recovery services that can retrieve your data for you. Keep in mind that these are substantially more expensive than data recovery programs.
Typically, this is how data recovery services function:
- ☎️ You contact a data recovery service and explain your data recovery scenario.
- 🚚 The drive needs to be shipped or dropped off at the data recovery center.
- 💵 The company evaluates the drive and informs you how much data is recoverable, as well as the cost. The evaluation itself is free.
- ✅ You can decide whether you want to move forward with the recovery process.
Many top providers offer “No Data – No Charge” policies and highlight impressive success rates on their websites. However, there’s no guaranteed way to verify those numbers. Instead, rely on real customer feedback—check reviews and ratings on Google, Yelp, and Trustpilot to get a clearer sense of the service’s real-world performance.
Recently, we published an in-depth analysis of the data recovery services market, exploring the feasibility of recovering data at affordable costs. We believe it’s a worthwhile read.
How to Fix an Unallocated Partition
After you’ve successfully recovered your data from the unallocated partition (or if you don’t care about any remaining files), the next step is to make the unallocated space usable again. We’ll cover 4 methods that involve using Windows Disk Management (for two methods), the Diskpart command-line utility, and the TestDisk repair tool:
Option |
When to Use It |
Option A: Create a New Partition |
If you simply need to turn the unallocated space into a usable partition without altering existing ones. |
Option B: Add Space to an Existing Partition |
If you’d prefer to increase the size of an existing partition instead of creating a new one. |
Option C: Use CMD (Diskpart) |
If Disk Management isn’t working for you or you need more advanced, command-line level control to allocate the unallocated space. |
Option D: Use TestDisk |
If a partition has become unallocated due to corruption, lost partition tables, or was accidentally deleted. |
Option #A: Create a New Partition
The easiest way to handle partitions on Windows is by using the built-in Disk Management tool. It only takes a couple of clicks to create a new partition from the unallocated space.
- Press Windows Key + R to launch the Run application. Type diskmgmt.msc in the text box and hit Enter. This will open Disk Management.
- In the Disk Management window, look for the Unallocated section, as shown in the image below.

- Right-click on Unallocated and choose New Simple Volume.

- Click Next on the New Simple Volume wizard welcome screen.

- On the next screen, specify a size for the new partition and click Next.

- Assign a drive letter to your drive using the drop-down menu, then click Next.

- If required, modify the format options on the next screen. You can leave them as default and simply click the Next option.

- Click on Finish. Disk Management will create the new partition.

Option #B: Add Space to an Existing Partition
If you’d rather not create a new partition, you can merge the unallocated space into an existing one to get back unallocated disk space. This is perfect if you simply want to increase the available storage of a drive you already use, without adding another drive letter.
If the unallocated space isn’t directly adjacent to the partition you want to extend, you won’t be able to merge them. In this scenario, you may need to use third-party partitioning tools or simply create a new partition, as covered above. Additionally, keep in mind that Microsoft specifies the “Extend Volume” feature in Disk Management only works with RAW or NTFS partitions
- Press Windows Key + R, type diskmgmt.msc into the Run dialog box, and press Enter.
- Locate the partition you want to expand. Right-click on it and select Extend Volume… from the context menu.
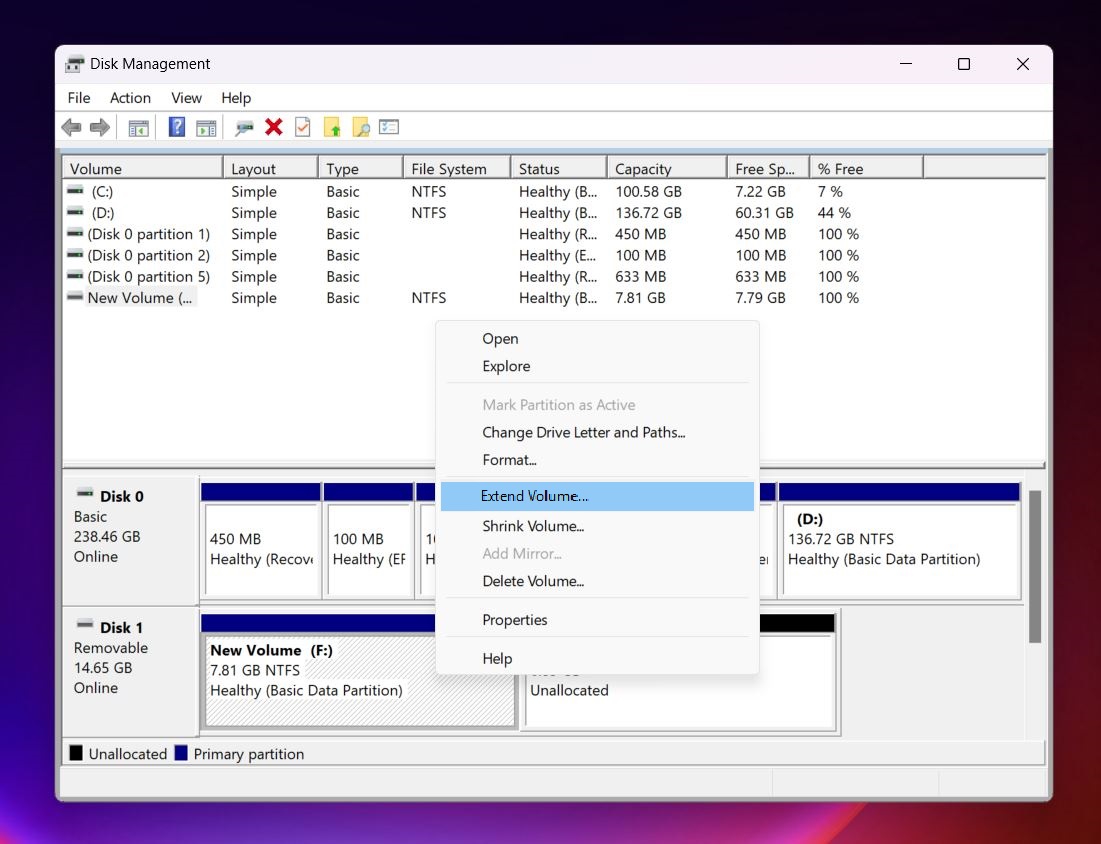
- The Extend Volume Wizard will appear. Click Next and then specify how much of the unallocated space you want to add to the existing partition. By default, it selects all available unallocated space.
- Click Next and then Finish to complete the process. The partition should now be larger, incorporating the previously unallocated space.
Option #C: Use CMD (Diskpart)
For users who are comfortable with the command line, the Diskpart utility provides an alternative to Disk Management.
- Type cmd in Windows Search (Windows Key + S), right-click on Command Prompt > Run as Administrator.

- In the Command Prompt console, type diskpart and press Enter.

- After this, type list disk and hit Enter. The number under the Free column is the amount of unallocated space on your drive.

- Type select disk x (replacing x with the disk number of the disk that has unallocated space–0 in our case) and press Enter.

- Enter create partition primary size=x (replace x with the number listed under the Free column in the 3rd step). This is the size of the new partition that will be created. Press the Enter key.

- Now, type list partition and press the Enter key.

- On the next screen, type select partition x. Replace x the number of the newly created partition. Use the number listed under Size to find the partition easily, as it’ll be the same number you entered in step 5. Press Enter.

- You now need to format the partition. To do so, type format fs=ntfs quick and press Enter. Wait for Diskpart to format the partition.

- Lastly, you need to type assign and press Enter. If you have an older HDD, type active and press Enter after executing the assign command. If Diskpart displays an error after you type active, it simply means the command is not required.

Option #D: Use TestDisk
In cases where a partition has become unallocated due to corruption, lost partition tables, or other forms of logical damage, TestDisk might be the solution you need. It’s a free, open-source tool that we’ve successfully used many times before, and it excels in scenarios where you need to:
- Recover lost or deleted partitions.
- Rebuild damaged partition tables.
- Repair FAT, NTFS, and ext2/ext3 file systems.
- Fix boot sectors on FAT and NTFS volumes.
Much like Diskpart, TestDisk operates only through a command-line interface. But, before you can use it, you’ll first need to download the tool from its official website.
Before confirming any command in TestDisk, double-check that you have selected the correct one. Partition table modifications are immediate and cannot be easily undone. If you encounter difficulties, refer to the official TestDisk documentation or seek advice from our Handy Recovery Advisor Community, where recovery professionals and enthusiasts will be glad to help.
- Head to the official TestDisk website. While version 7.3 is available, we recommend to download the stable 7.2 release for reliability.
- Extract the downloaded files to a folder on your PC.
- Open the folder containing the TestDisk files, right-click on testdisk_win.exe, and select “Run as administrator” When the program starts, choose [Create] to make a log file that records its actions and findings.
![Choose [Create] to make a log file](/wp-content/uploads/2024/12/test-disk-Unallocated.jpg)
- TestDisk will list all connected storage devices. Use the arrow keys to highlight the drive containing the unallocated partition, then press Enter.
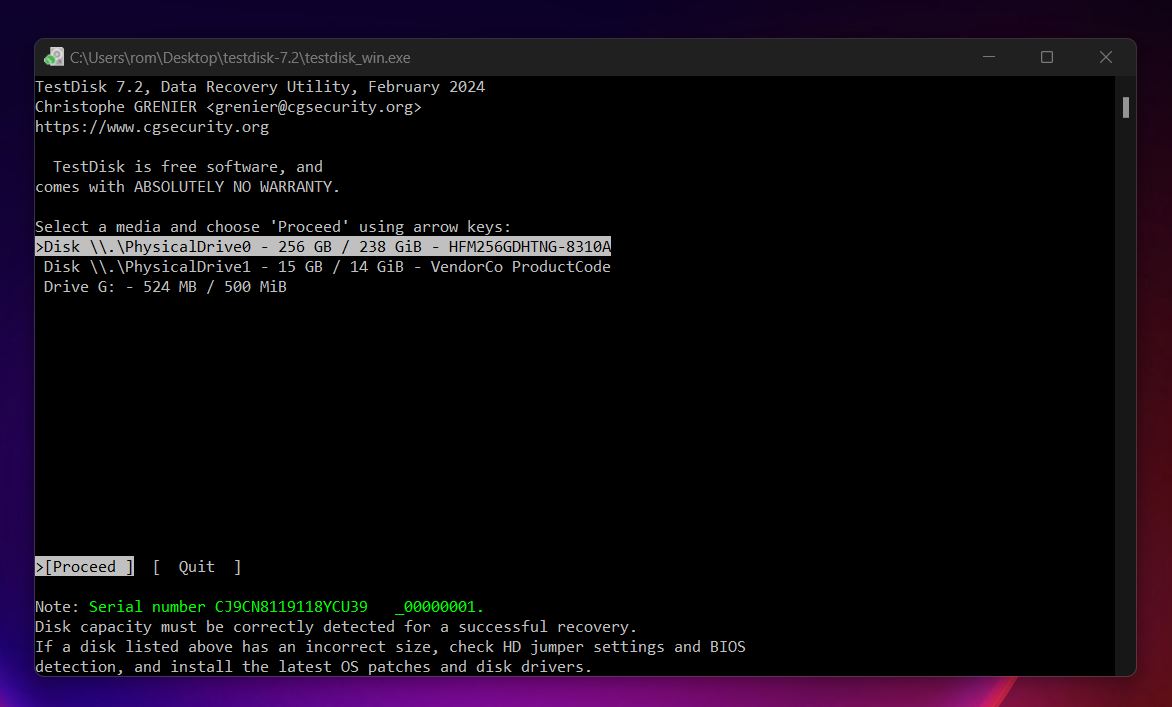
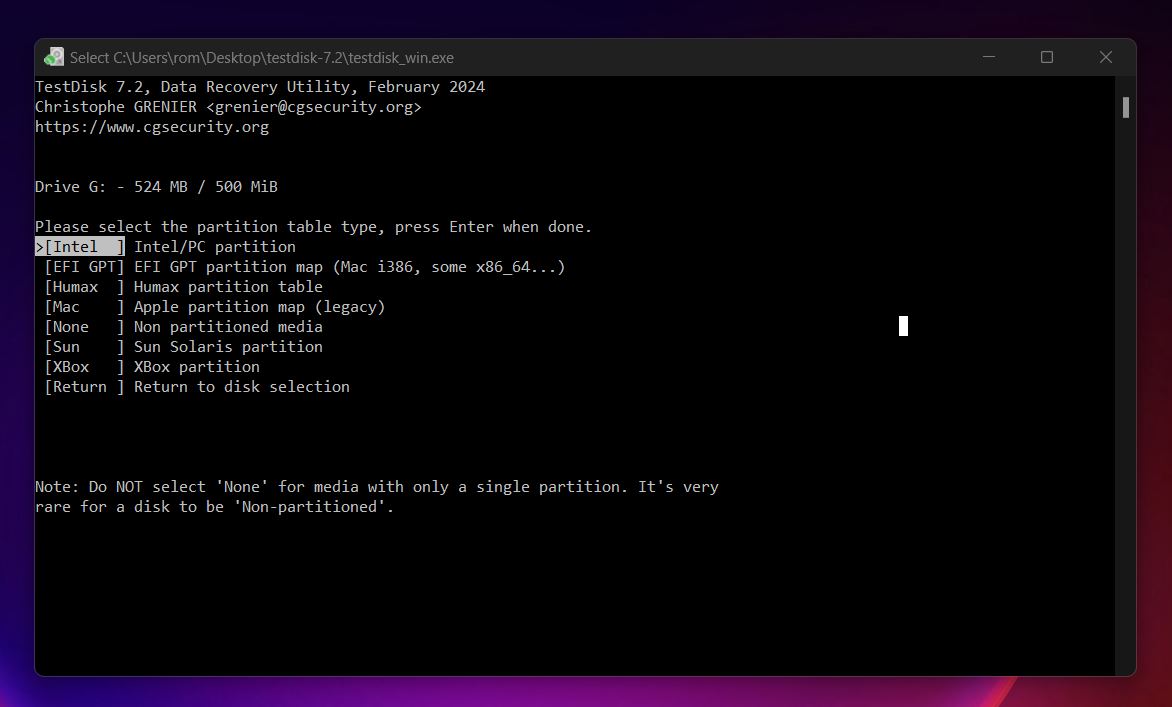
- TestDisk typically detects the partition table type on its own; press Enter to accept the suggested type, or select the correct one if you know it.
- Highlight [Analyse] and press Enter to let TestDisk scan the selected drive for lost or deleted partitions. If initial results are incomplete, you can use [Quick Search] or [Deeper Search] for a more thorough examination. Once you locate the lost partition, highlight it and press Enter.
![Highlight [Analyse] and press Enter](/wp-content/uploads/2024/12/test-disk-Unallocated-analyse.jpg)
- Choose [Write] to update the partition table, then press Y when asked to confirm your choice. This action will restore the previously unallocated partition.
![Choose [Write] to update the partition table](/wp-content/uploads/2024/12/test-disk-Unallocated-write.jpg)
- After writing changes, select [Quit] to exit TestDisk, then reboot your computer. The once-unallocated partition should now appear as a normal, accessible drive in Windows Explorer or Disk Management.
What Reduces Success in Recovering Unallocated Partitions
Data recovery may seem like a simple enough process, but it’s actually quite complex, with several variables at play. There are various factors that can negatively impact your chances of recovering all your files from an unallocated partition/drive. These include:
- Type of Storage Drive: Hard drives are easy enough to recover data from. But, bring an SSD into the picture, and things get complicated. This is mainly due to the garbage collection, and TRIM features in SSDs, that clear up unused data blocks periodically. Data recovery software can’t recover any data that has been cleared up by TRIM.
- Writing New Data to the Drive: Deleted files remain on your hard drive, until new data overwrites them. Writing new files to your drive can significantly reduce the extent of data recovered by data recovery apps.
- Drive Encryption: If the unallocated partition was previously encrypted with BitLocker, it’s almost impossible to recover any meaningful deleted data from it. Your files will be scrambled and inaccessible. You can try commercial BitLocker data recovery tools, but they too are unlikely to work.
FAQ
Can you recover data from an unallocated hard drive?
Yes, you can recover data from an unallocated hard drive:
- Download and install the data recovery software of your choice.
- Open it and select the unallocated space.
- Start a scan to search for data.
- Select the files you want to retrieve and click Recover (or Restore).
- Choose a safe location to restore the recovered files.
How to recover an unallocated partition in an external hard drive?
Here’s how you recover an unallocated partition in your external HDD:
- Recover any data from the unallocated space. You can do this using a good data recovery program like Disk Drill.
- Use Disk Management to create a new partition, or extend an existing partition using the unallocated space.
Alternatively, you can use a tool like TestDisk to recover the partition with its files and file system intact. However, this may not always work.
How to fix an unallocated disk without losing data?
To fix an unallocated disk without losing data, first scan the space for recoverable data using a data recovery program. After recovering your files, re-allocate the space using the Diskpart utility or the Disk Management app in Windows.
How do I recover unallocated space?
To recover the unallocated space on your hard drive, use Disk Management and allocate the space to an existing partition or simply create a new partition. You can use the Diskpart command to do the same. If the unallocated space is the result of a corrupted or missing partition table, you can use TestDisk.
How do you fix a hard drive that won't initialize?
If a hard drive won’t initialize, here are a few things you can do:
- Make sure all cables are properly connected. Reconnect them if need be.
- Use Disk Management’s error-checking feature to find and fix errors on the HDD. To do this–open Disk Management, right-click on the affected drive and click on Properties, go to Tools, and select the Check option.
- Initialize the drive using Disk Management. You can take a look at this tutorial on how to initialize a disk without losing data.
Why is my external hard drive unallocated and how can I fix it?
Your external hard drive may appear as unallocated if its partition table is missing or corrupt, or if the drive was never properly formatted. To fix it, first use data recovery software like Disk Drill to retrieve any important files. Then, open Disk Management and either create a new partition or allocate the unallocated space to an existing partition.
This article was written by Manuviraj Godara, a Staff Writer at Handy Recovery Advisor. It was recently updated by Roman Demian. It was also verified for technical accuracy by Andrey Vasilyev, our editorial advisor.
Curious about our content creation process? Take a look at our Editor Guidelines.