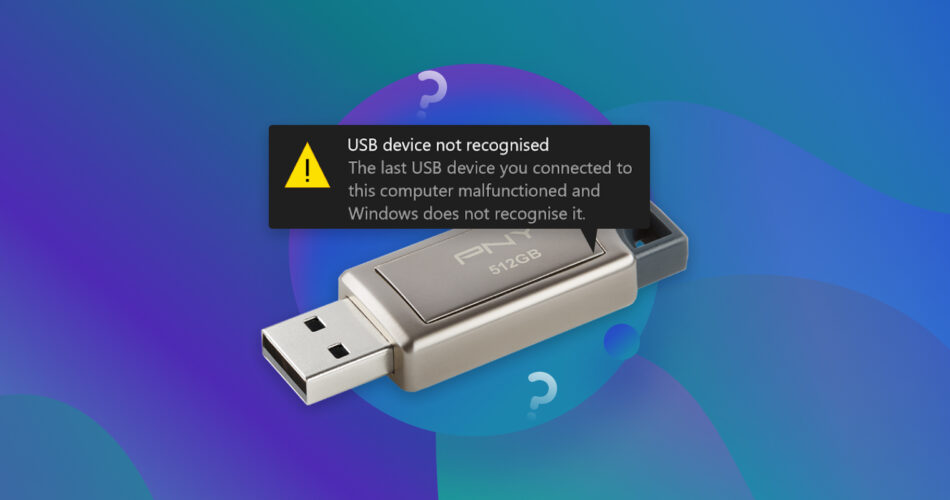
Connected your USB drive to a computer, only to find that it’s not being recognized? I’m familiar with the sense of worry that accompanies this discovery. Although handy, USB drives aren’t a reliable means of long-term storage, and USB drives using cheaper hardware are susceptible to failure quicker than others.
Fortunately, there are many proven solutions you can use to recover the data from a USB flash drive that’s not recognized. I’ll take you through them in this article. Additionally, I’ve included several fixes you can use to get the USB drive back up and running. Let’s take a look.
The Two Types of Unrecognized USB Drives
Before I list the options that are available to you, it’s important to determine what type of unrecognizable USB drive you have. An unrecognizable USB drive will fall into one of two categories:
Scenario |
Description |
The USB flash drive is visible (but inaccessible) in Disk Management or Disk Utility, but cannot be seen in File Explorer or Finder. |
This typically indicates a software-related problem, also known as a logical issue. The fact that the USB drive appears in Disk Management or Disk Utility means that your computer is at least reading the USB drive to some extent. |
The USB flash drive isn’t appearing in Disk Management or Disk Utility, File Explorer or Finder, or BIOS. |
When a USB drive isn’t appearing anywhere on your computer, it usually points to a more severe issue. In many cases, this can be a sign of hardware failure that is preventing the USB drive from booting. |
The recovery options available to you depend on which of the two scenarios you find yourself in. Another important factor is the root cause of the problem, as this will not only have an impact on which recovery method you choose, but also how you approach it.
7 Typical Reasons a USB Flash Drive Can’t Be Recognized
I’ve included a mixture of common logical and physical issues that impact USB drives and cause them to become unrecognizable.
- 🎛️ Failed storage controller – The flash memory controller is a physical component that handles the transfer of data between your USB drive and computer. Without it, the computer won’t recognize the USB drive, preventing all read/write functions.
- ⛓️💥 Faulty USB hub – If you connect the USB drive to your system through a USB hub, the USB hub itself may not be functioning properly, preventing the USB drive from being read by the computer.
- 🪫 Power plan settings – Windows uses a number of power-saving features to reduce unnecessary battery drain. One feature includes the ability to disable USB ports to save power. However, in doing so, anything connected to that port will not be readable.
- 🗄️ Incompatible file system – Your operating system can only read compatible file systems. If your USB drive is formatted with APFS and you try to use it on a Windows machine (that doesn’t have something like APFS for Windows,) it won’t be recognizable even if it contains data.
- ❌ Missing or damaged file system – Likewise, a file system that’s missing or damaged won’t be readable because your operating system doesn’t know where the data is stored. Without the file system entries that link to where your data is physically located, the data will remain inaccessible.
- 🅰️ No drive letter – When you connect your USB drive, it’s often mounted automatically by Windows and assigned a drive letter. However, if no drive letter is assigned, it will not appear like normal in File Explorer.
- 🔒 Unallocated space – Unallocated space refers to parts of your USB drive that aren’t formatted with a file system. However, partitions that have lost their file system may also appear as unallocated space. So, even if the data is there, you won’t be able to access it.
If you feel like one of the above problems is what has caused this issue, don’t worry – I’ve included solutions that address these issues further down in the article.
How to Recover Data From a USB Drive That’s Not Recognized
If you have a backup to recover the data from, definitely recover it from that. However, I suspect many of you found this article because you don’t have a backup to restore from. I’m going to present you with two options: recover the data yourself with DIY data recovery software, or send the USB drive away for recovery by an expert.
Option 1: Using Data Recovery Software
This option is for those with a USB drive that’s visible in Disk Management or Disk Utility but not File Explorer or Finder. Even though Windows doesn’t see the USB drive, data recovery software can bypass the file system and access the drive directly.
You won’t have trouble finding a data recovery tool, since there are so many to choose from. Personally, Disk Drill is my go-to data recovery software tool. It’s quick, easy to use, and highly capable of recovering data in numerous data loss situations.
I highly recommend backing up your USB drive before attempting recovery. In fact, I would consider it essential. The additional stress of scanning the USB drive puts it at risk of being damaged further. Make a byte-to-byte backup of the USB drive using a program like Clonezilla, or use the byte-to-byte feature available in Disk Drill. This allows you to scan the copy instead.
- Download and install Disk Drill.
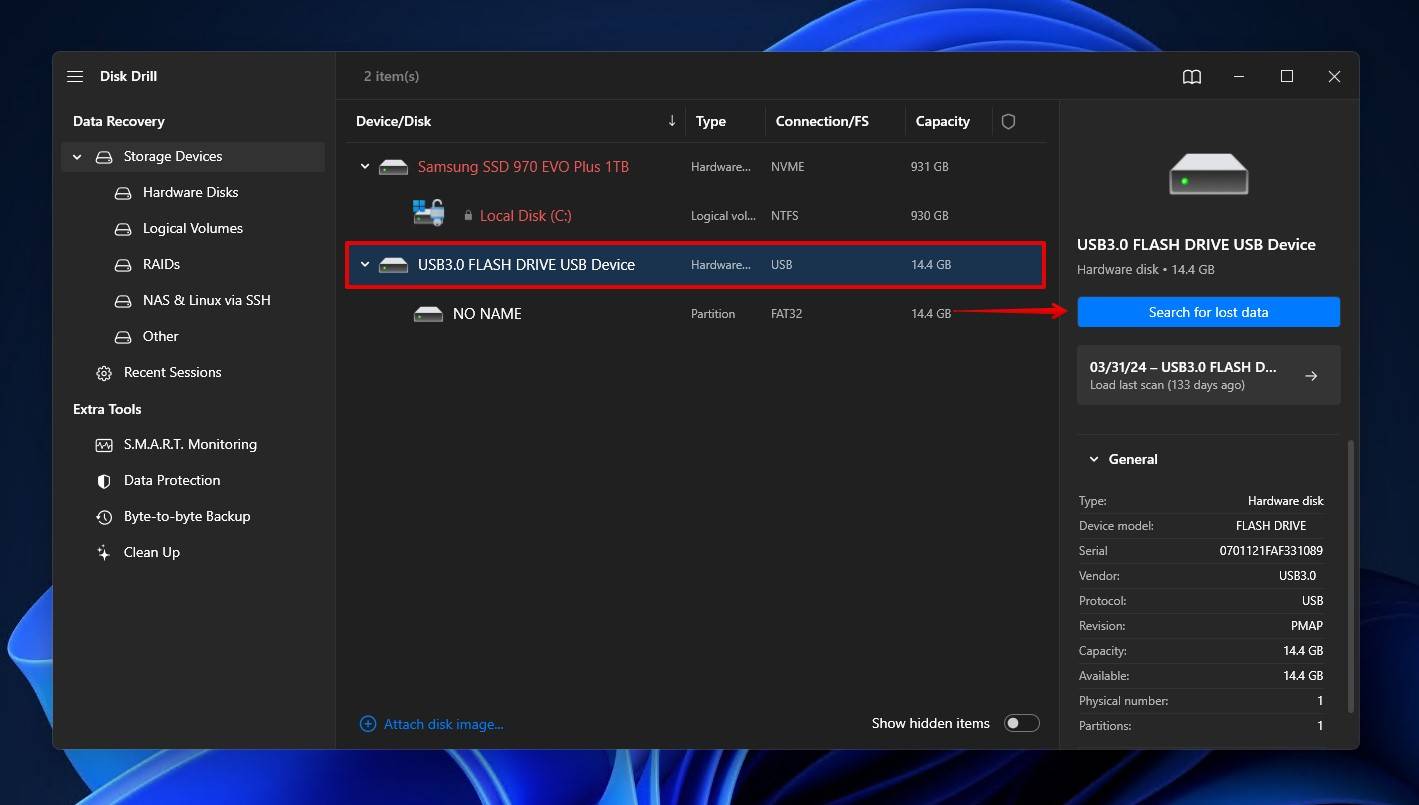
- Select the USB drive from the list of devices, then click Search for lost data.
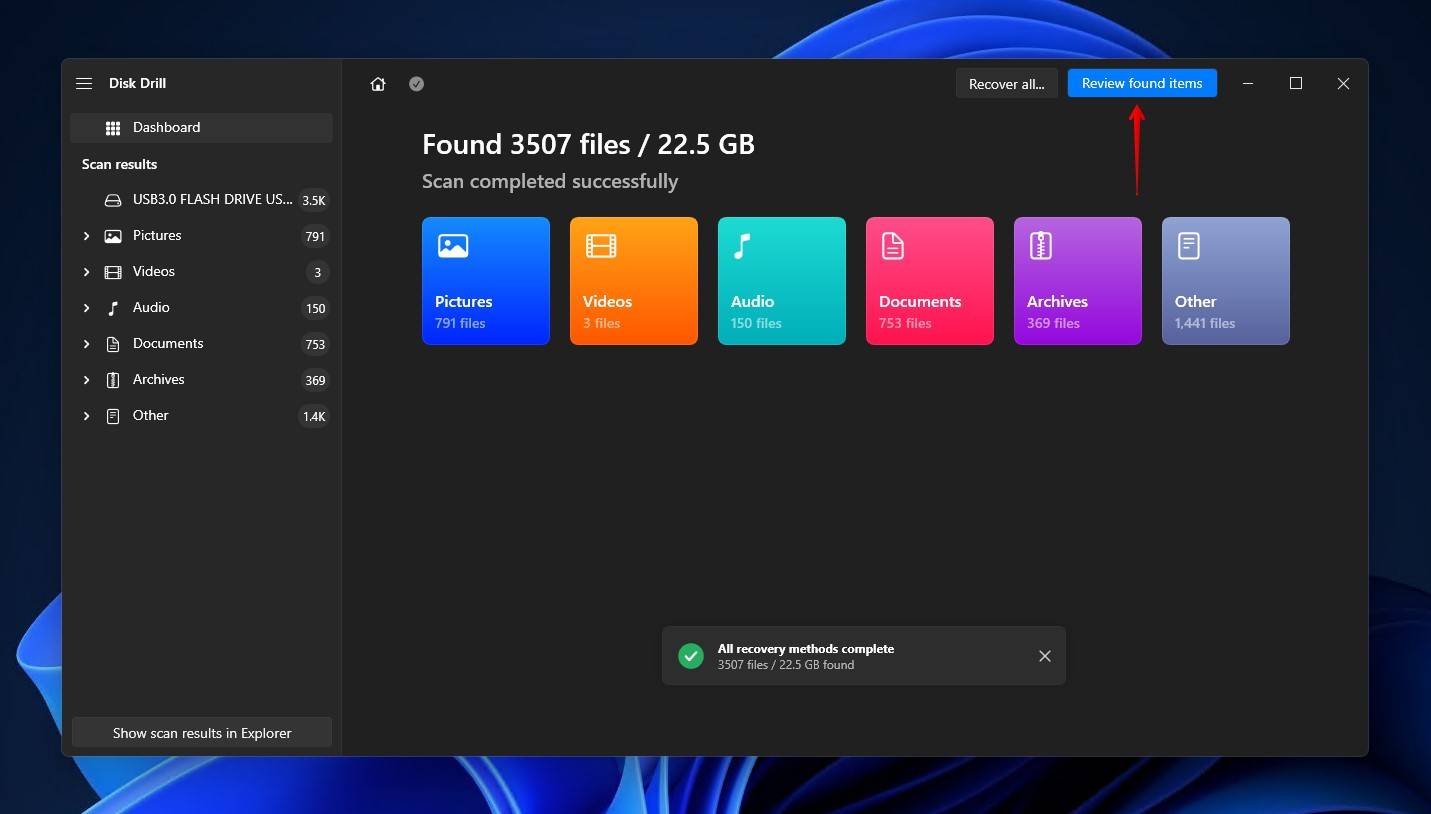
- Click Review found items once the scan is finished, or Recover all to recover everything that was found.
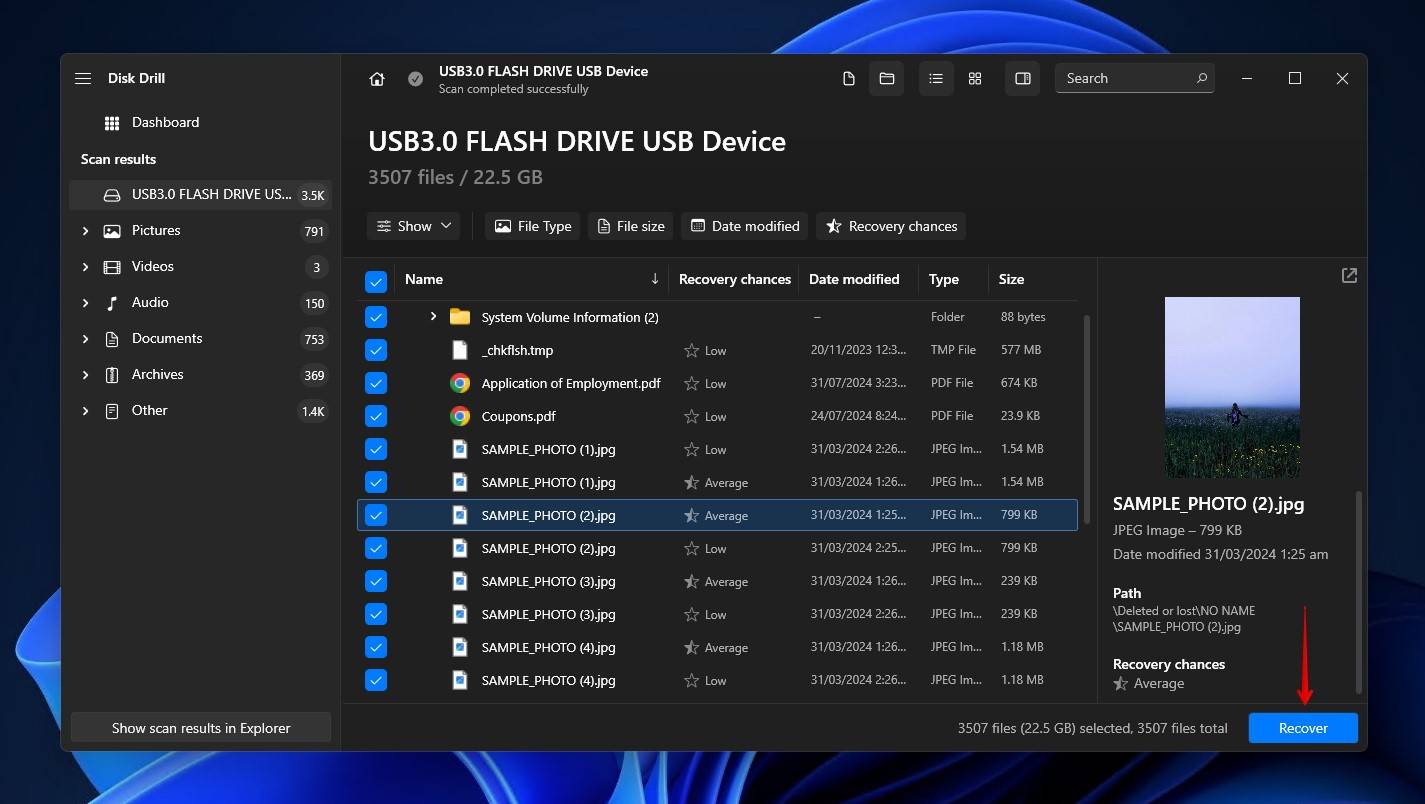
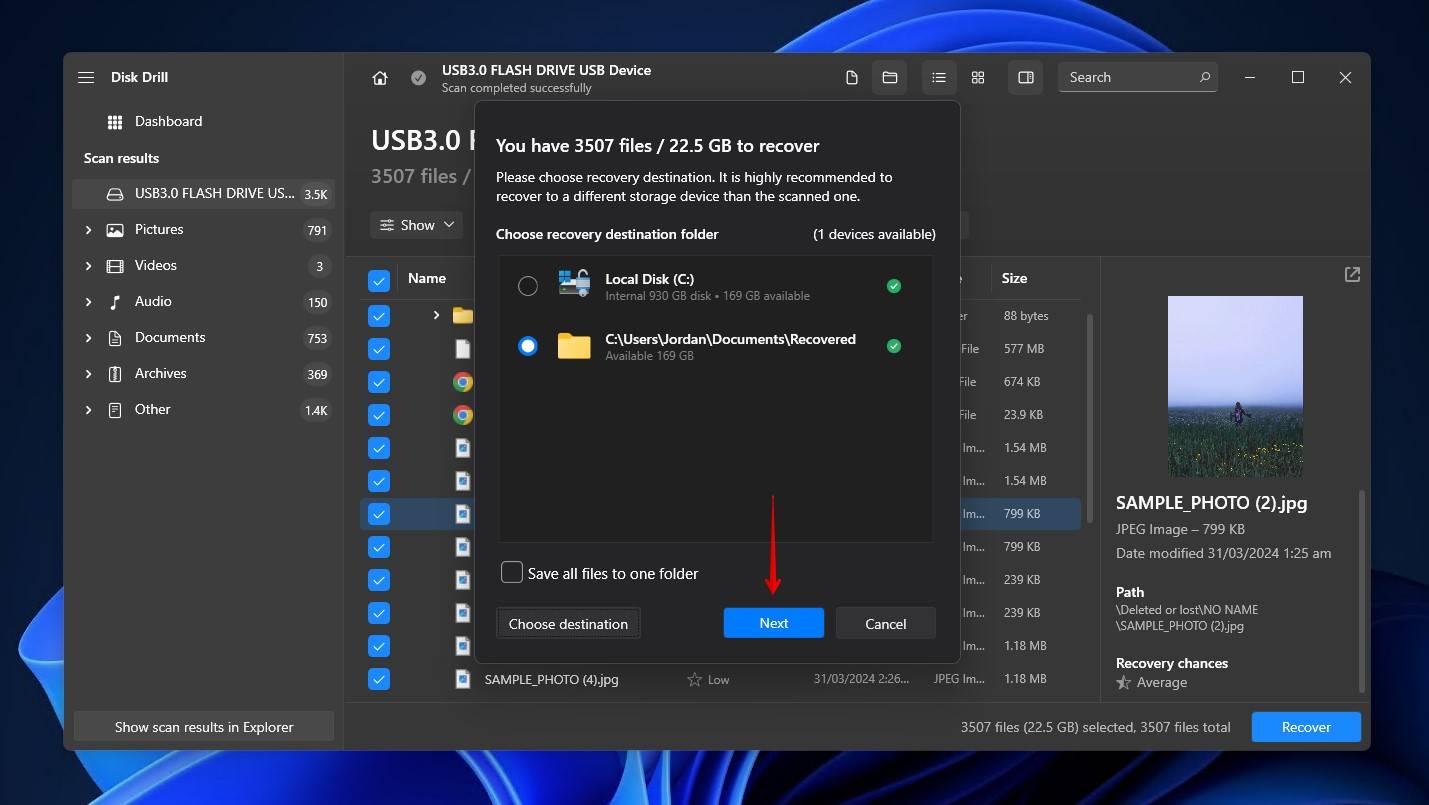
- Select the files you wish to recover. Existing data will be located under the Existing dropdown, while data that has been lost will either be under Deleted or lost or Reconstructed. You can preview each file before recovery to ensure it’s intact. When you’re ready, click Recover.
- Choose where you want to store the recovered data. Avoid restoring the data to the same USB drive you just scanned. When ready, click Next.
Of course, you may want to check out other data recovery tools to get the job done. If you want something free, check out Recuva, a completely free and user-friendly data recovery tool. PhotoRec is another great option for its signature-based recovery methods. Check out this list of Disk Drill alternatives to explore more options.
Option 2: Using a Data Recovery Service
In more severe cases when the USB drive isn’t showing up anywhere, DIY data recovery software isn’t going to cut it. Instead, you’ll need to opt for the professional treatment. Using a data recovery service gives you the highest chance of success, as you’re leaving it in the hands of industry specialists who are equipped with the expertise and equipment to do it right. The drawback is that it can be significantly expensive, which is why doing it yourself is the preferred option for a lot of people (and an option that I continue to recommend where possible.)
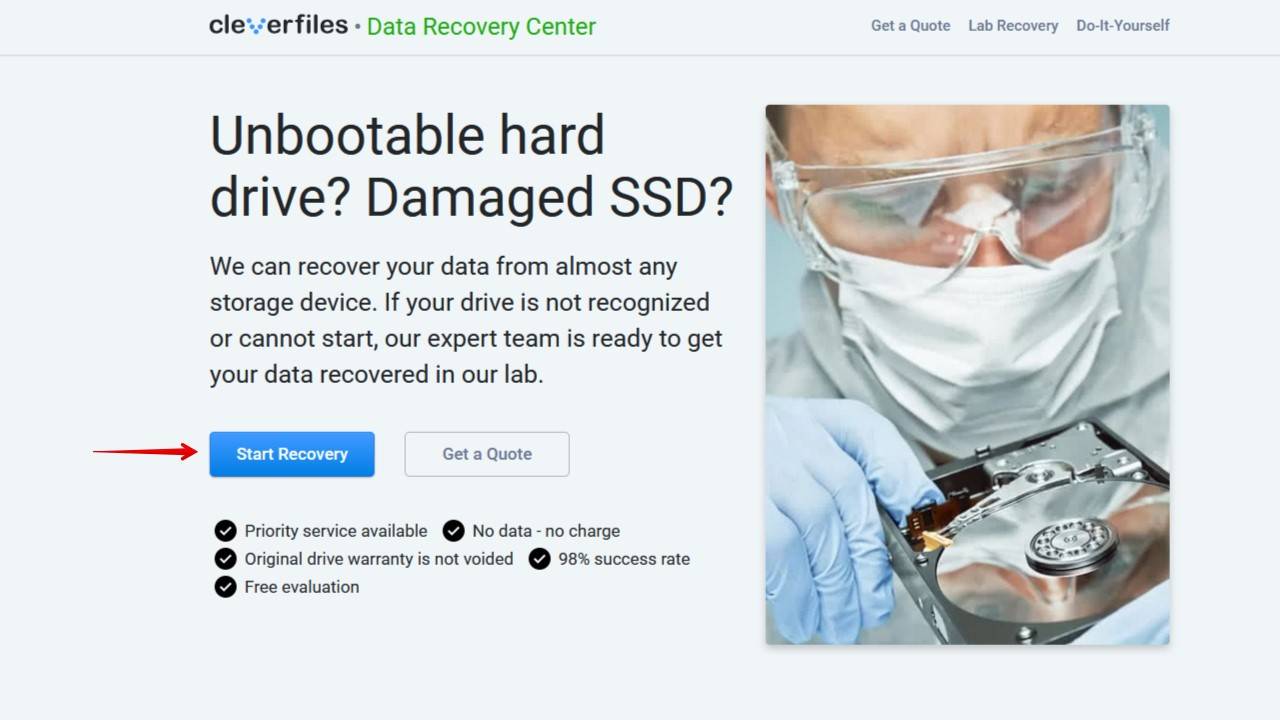
Let me give you a rundown of what this process looks like using the CleverFiles Data Recovery Center as an example:
- Click Start Recovery to start the process.
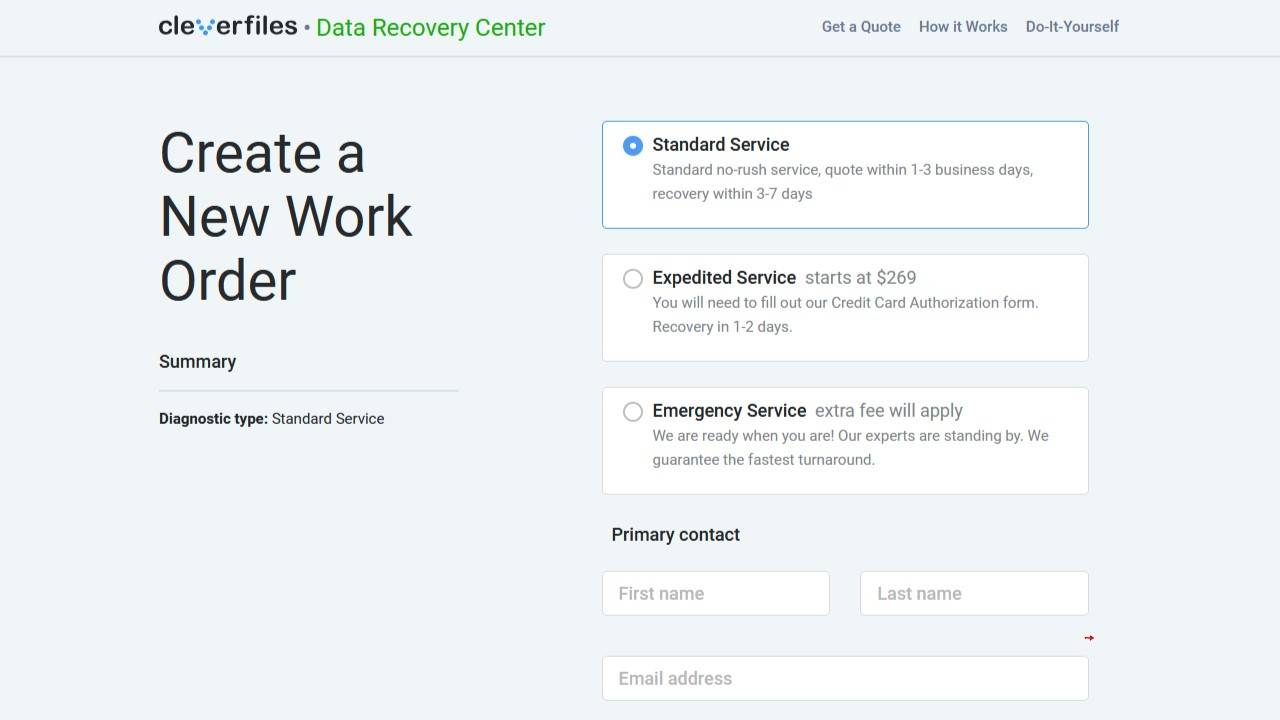
- Choose the level of service you require and fill out the work order with your personal details.
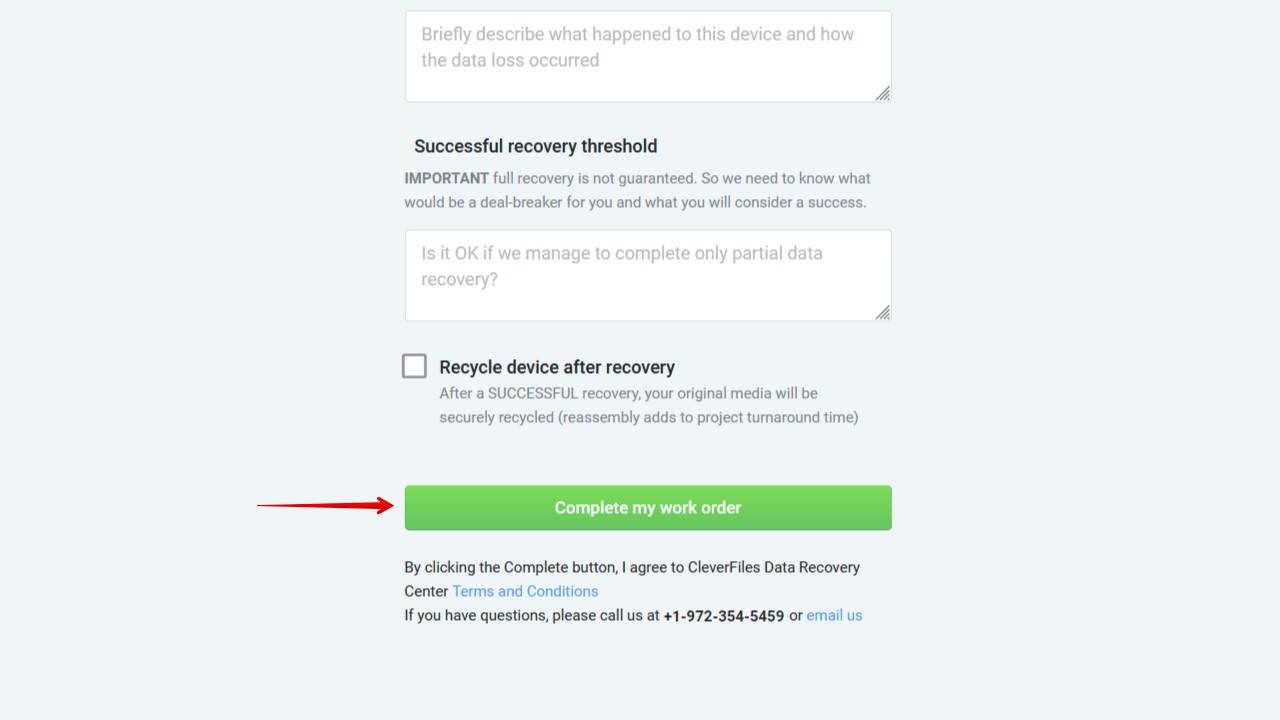
- Once you’re ready, you can submit the work order and send the USB drive away for recovery. Your data will be copied to a healthy storage device and returned to you.
4 Possible Fixes for an Unrecognized USB Flash Drive
Once your data is recovered (or at least backed up), you can explore some potential fixes to get your USB flash drive up and running. I’ll start with basic recommendations first, then gradually move into more technical solutions.
These fixes will only work if the USB drive is at least partially visible (as in showing up in Disk Management.) For USB drives that aren’t being recognized by your computer at all, you’re better off replacing the USB drive entirely.
Method 1: Assign or Change the Drive Letter
Windows won’t let you access a storage device without first assigning a drive letter. When you connect the USB drive, it should receive a drive letter automatically once it’s mounted. However, if a drive letter wasn’t assigned (or it was removed,) assigning one may be enough to fix the problem. Changing it is also a good idea, as it appeared to fix the issue for this user on Reddit.
This is how you assign a drive letter in Disk Management:
- Right-click Start and click Disk Management.
- Right-click the volume of your USB drive and click Change Drive Letter and Paths.
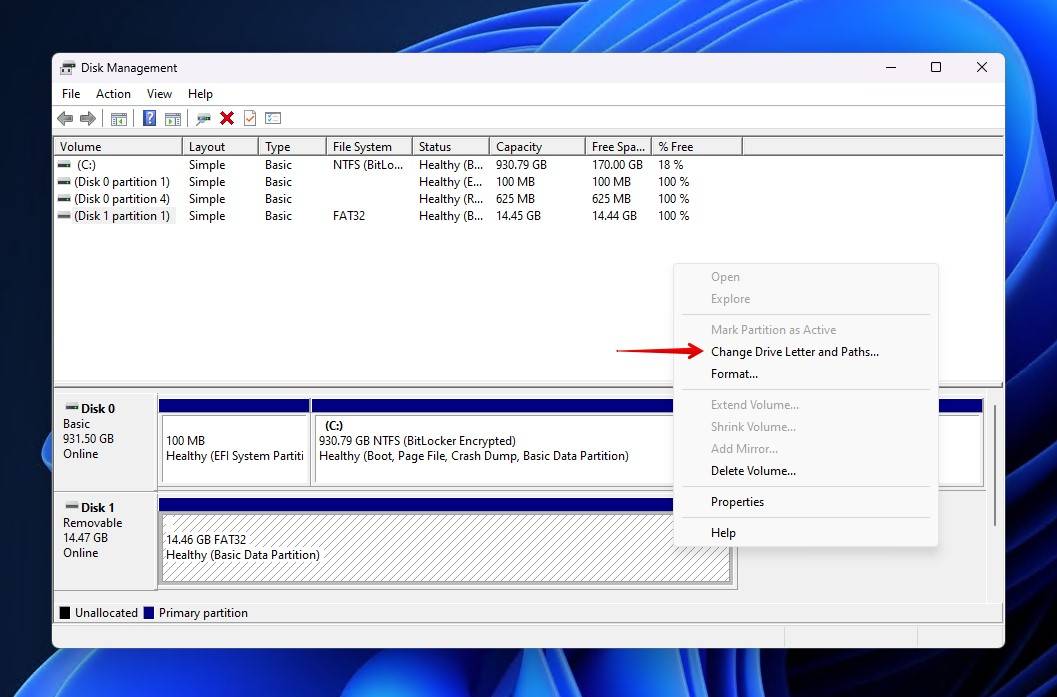
- Click Add to add a drive letter, or Change if you already have one. Since I don’t have one, I will click Add.
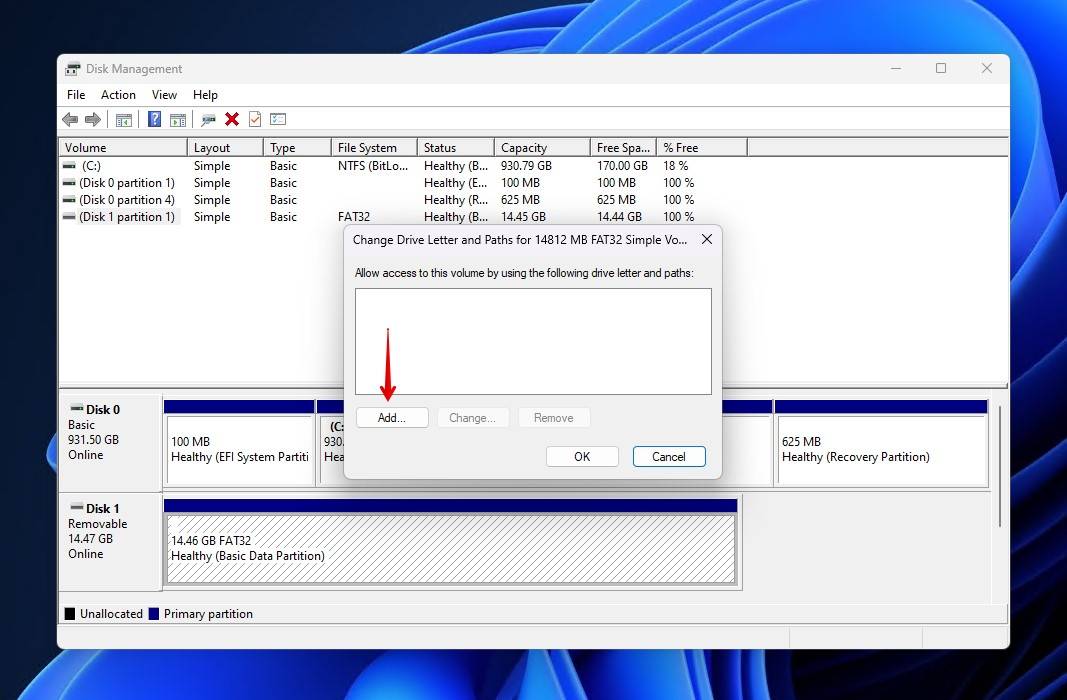
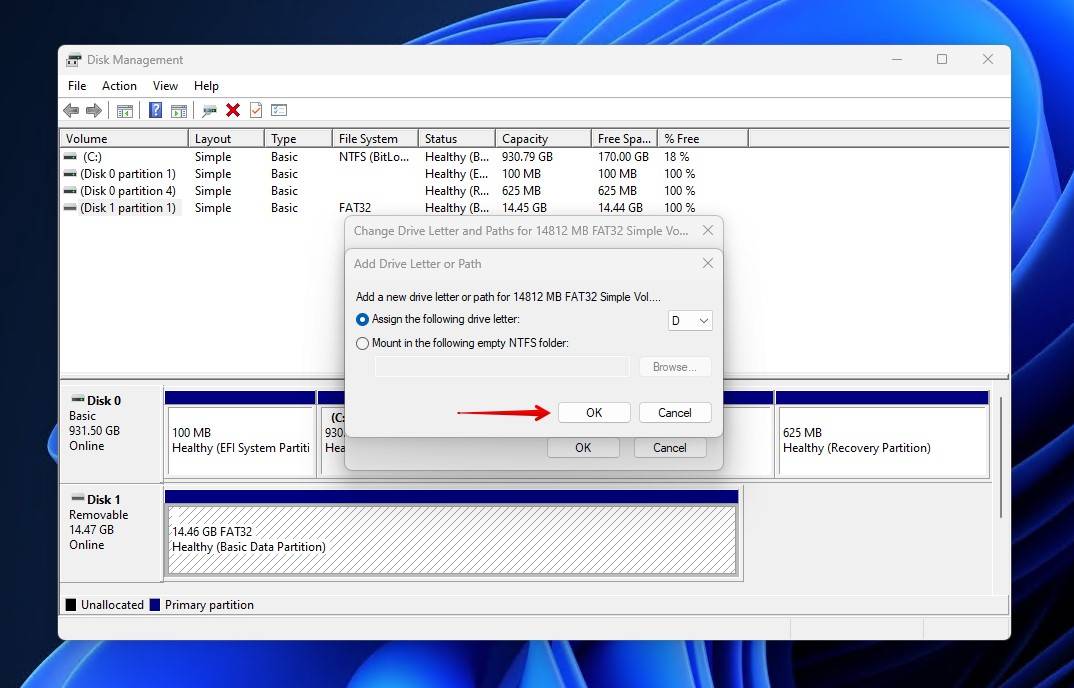
- Select a drive letter and click OK.
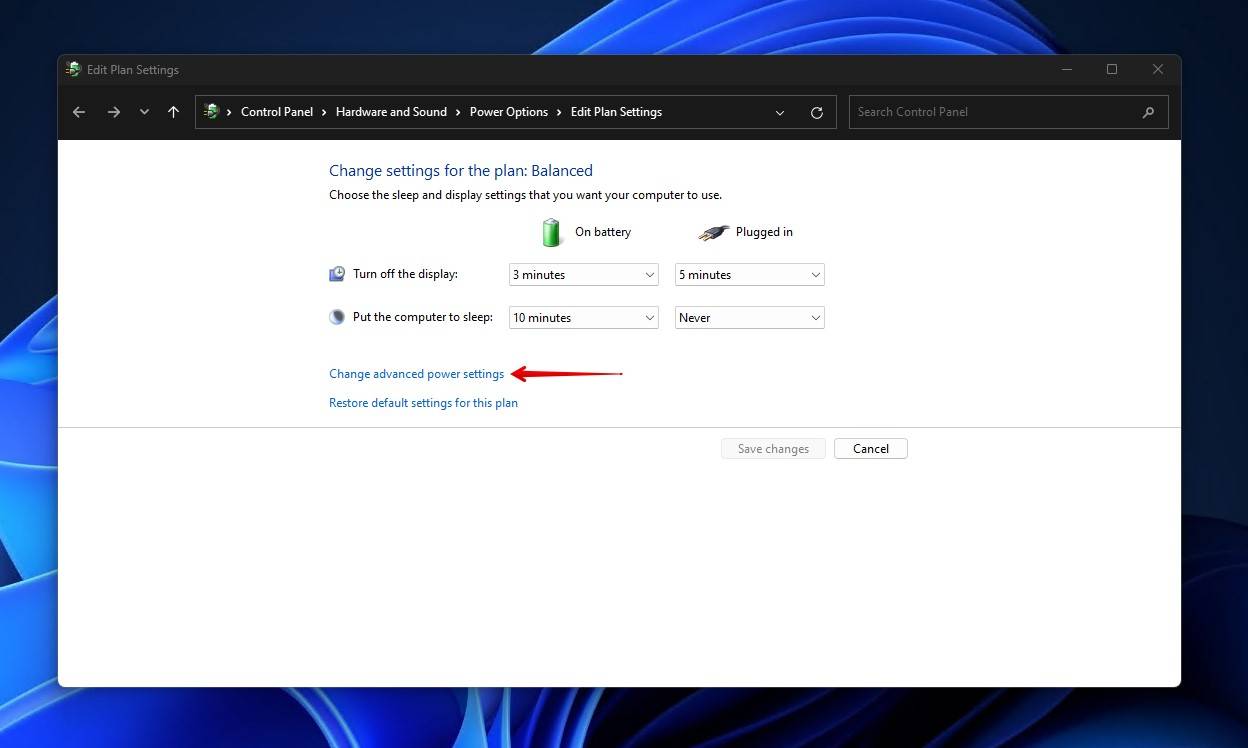
Method 2: Change the ‘USB Selective Suspend’ Setting
USB Selective Suspend is a power-saving feature in Windows that disables USB ports when they’re not being used to conserve battery power. Your USB ports should turn back on automatically, but sometimes they don’t in some cases, sometimes after your computer wakes from sleep mode.
You can disable the USB Selective Suspend setting by following these instructions:
- Type “Edit power plan” and open the first result.

- Click Change advanced power settings.
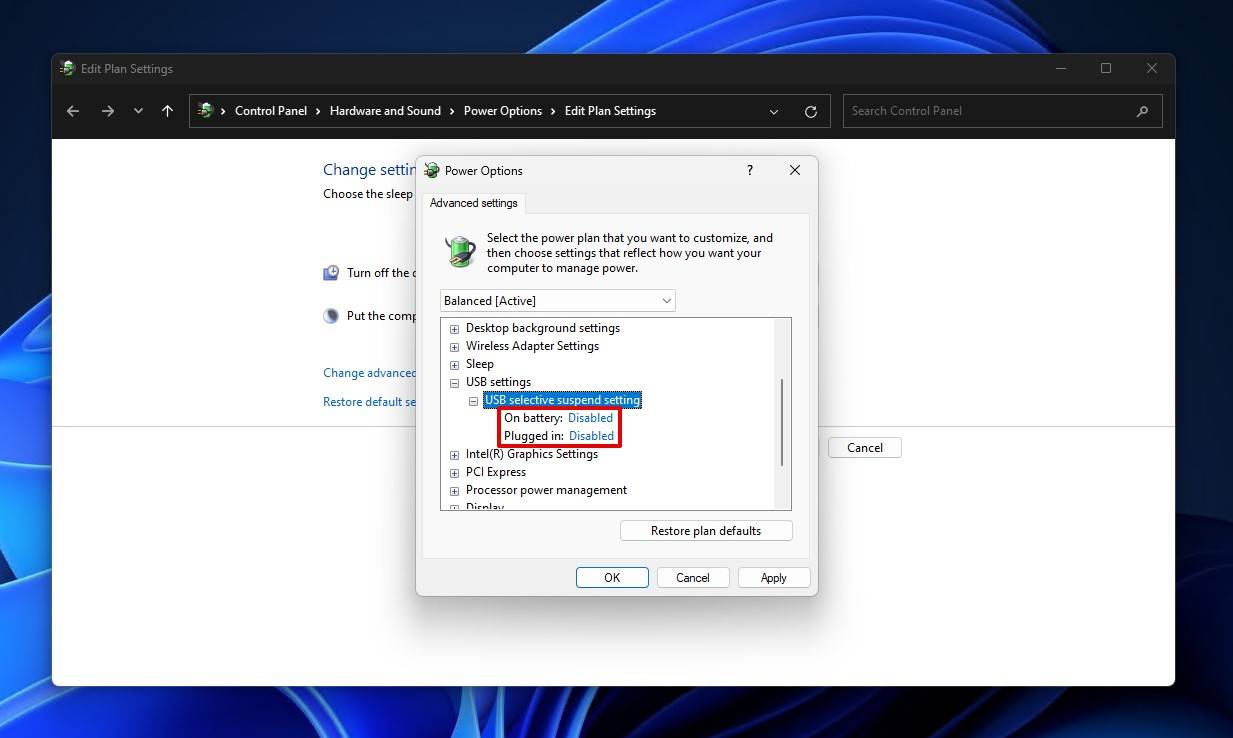
- Expand the USB settings dropdown, then expand the USB selective suspend setting dropdown.
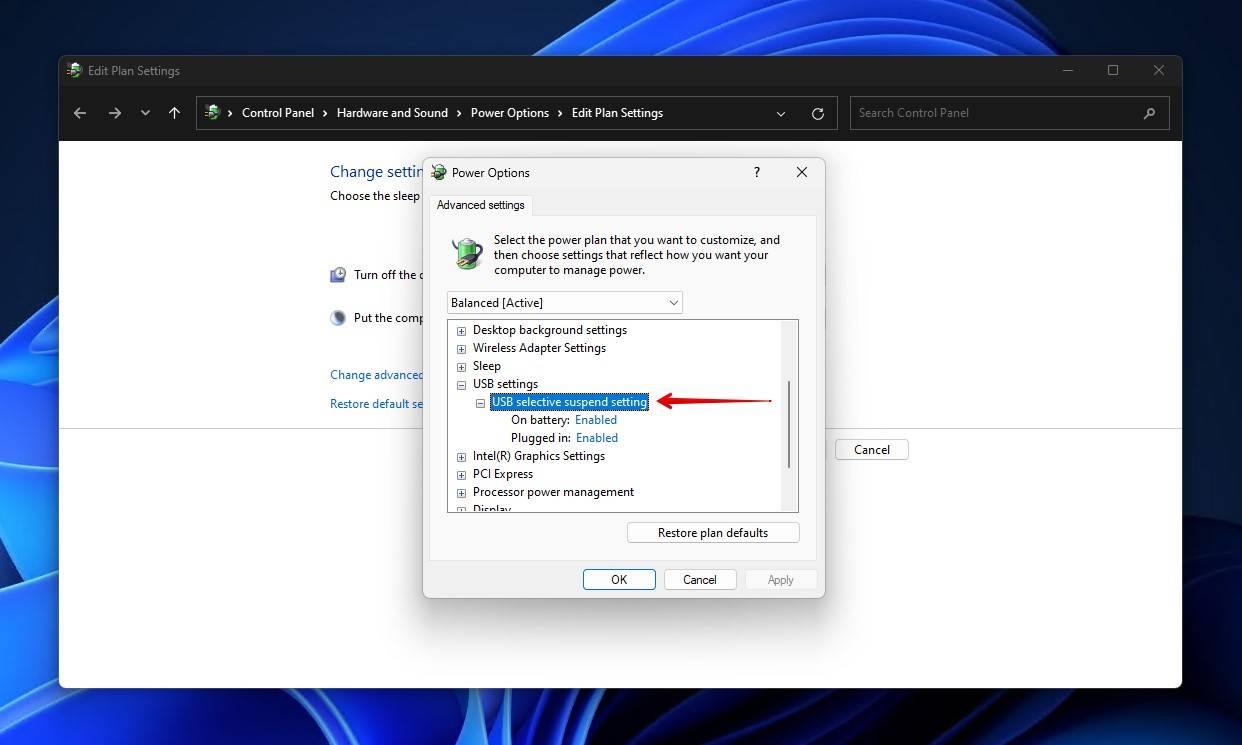
- Change both options to Disabled, then click Apply and OK.
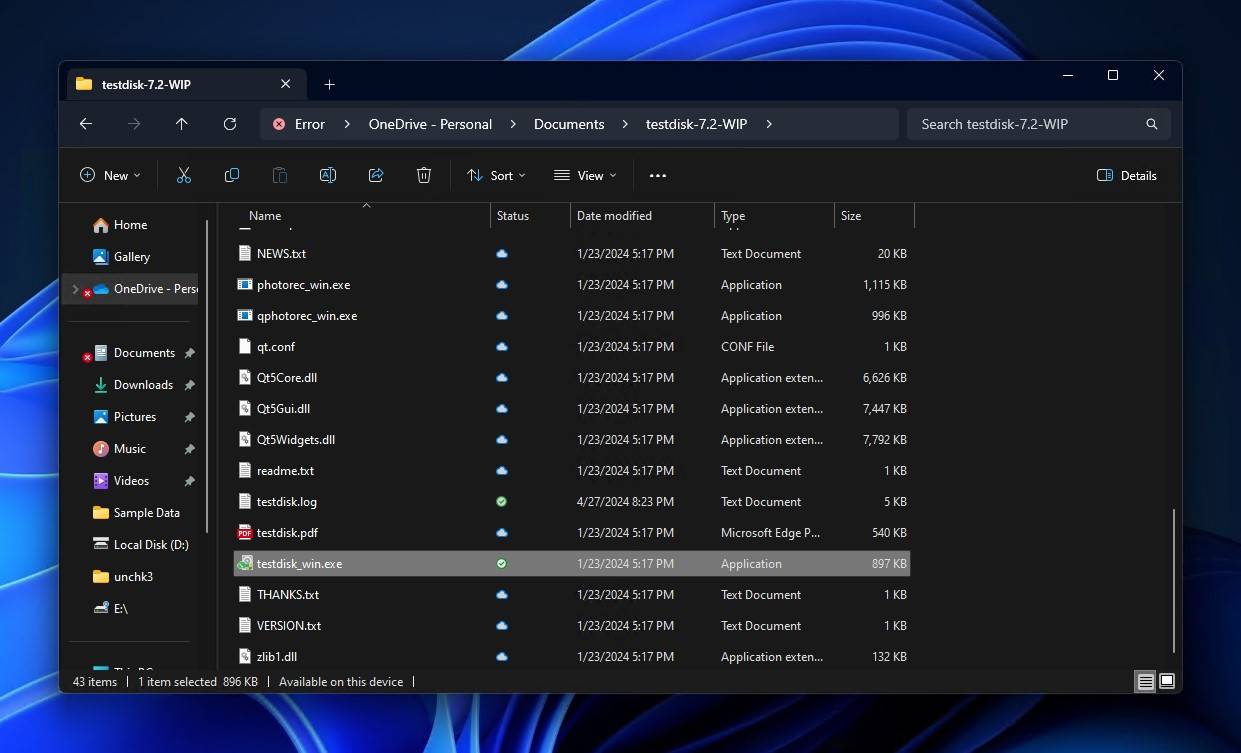
Method 3: Recover the Partition With TestDisk
TestDisk is an open-source partition recovery software tool. It’s packaged alongside PhotoRec, the data recovery tool I mentioned earlier. I recommend this option for those whose USB drive is not appearing due to a missing partition. TestDisk has a chance of recovering the entire partition by fixing the underlying damage. It’s an extremely useful tool to have in your arsenal, and other users agree.
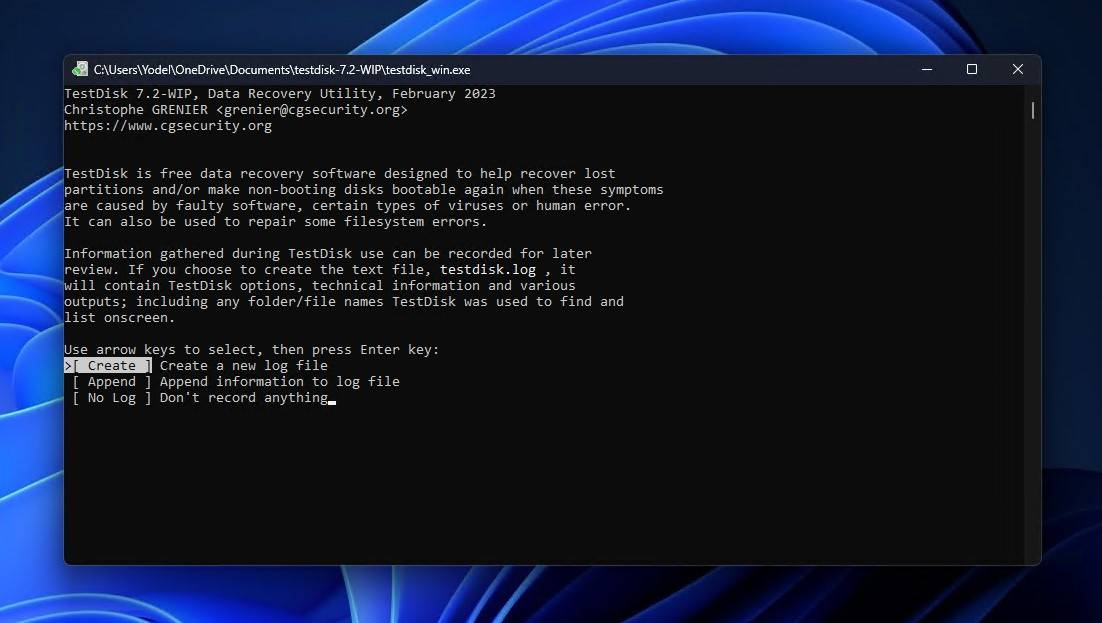
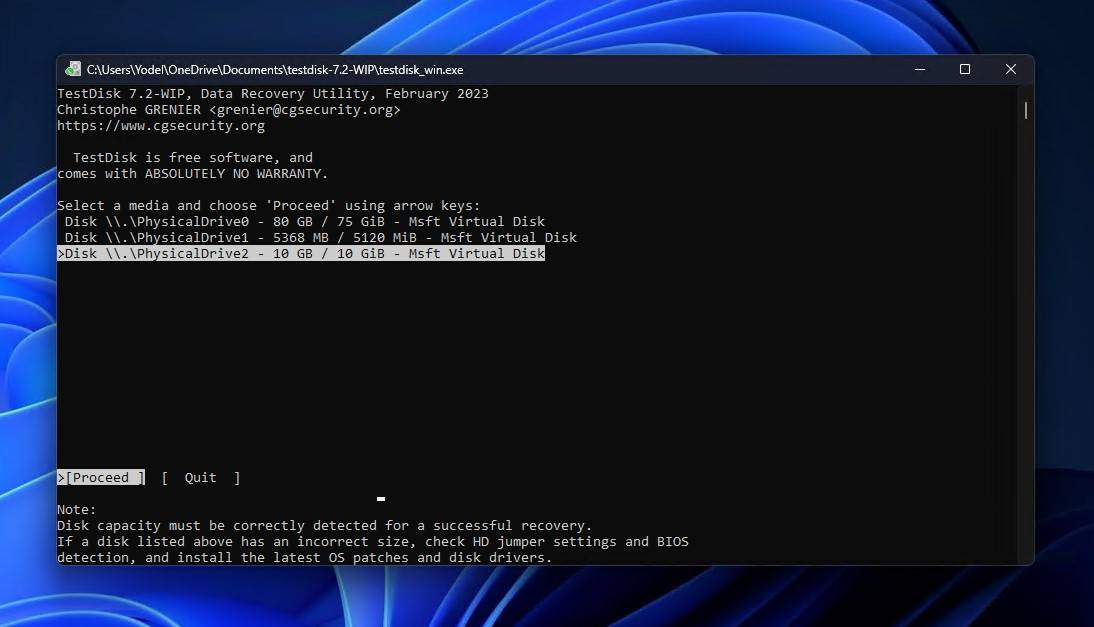
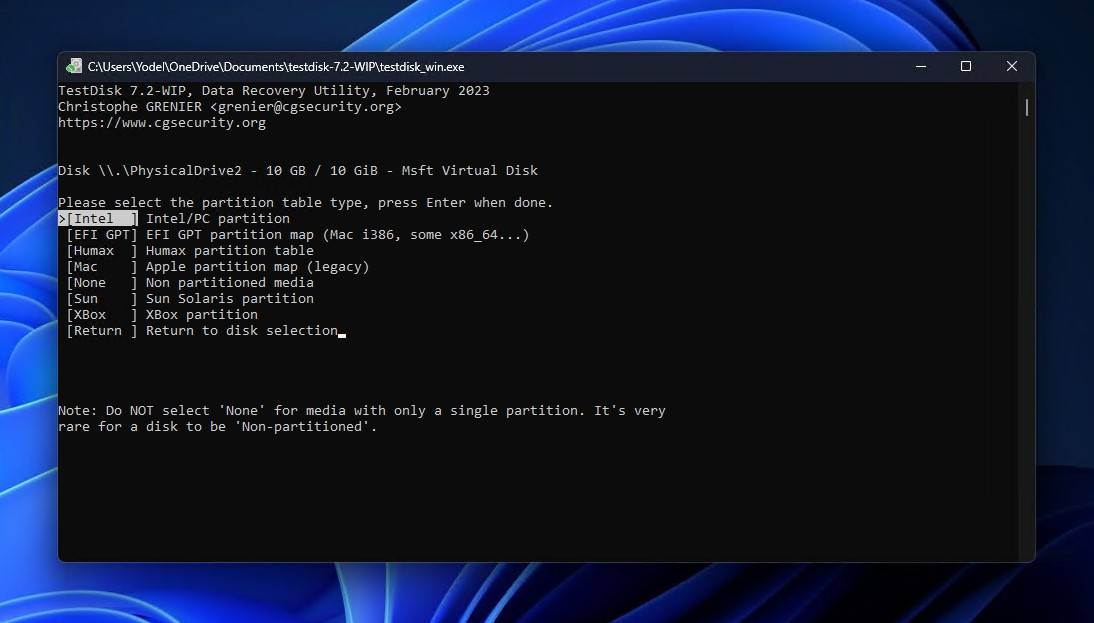
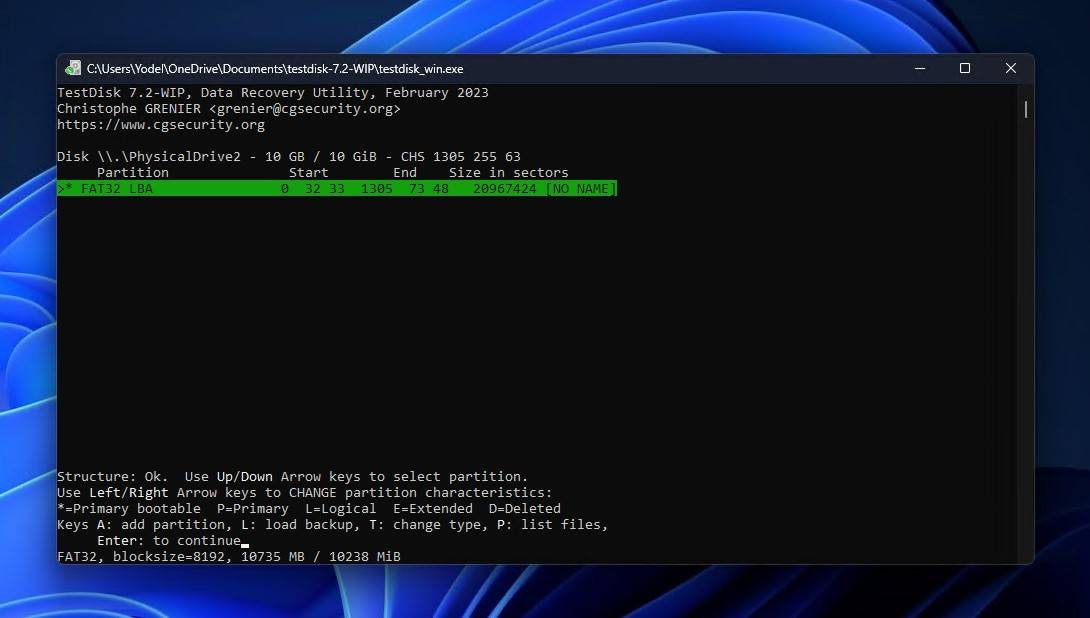
Here’s how you recover the partition using TestDisk:
- Download and extract the contents of TestDisk. Run testdisk_win.
- Press Enter to create a log file.
- Select the USB drive using the up and down arrow keys then press Enter.
- Choose the partition table type and press Enter.
- Press Enter to analyze the USB drive, then press Enter again to begin the quick search.

- Select the lost partition and press Enter. If nothing is found, you may need to do a deeper search first.
- Move to the Write option, then press Enter.
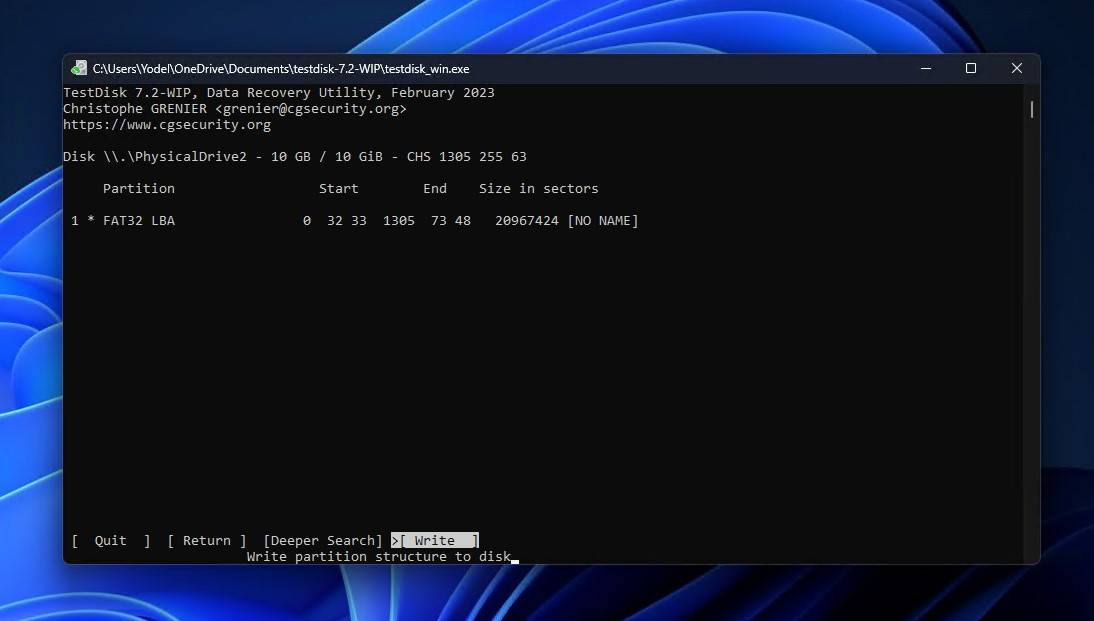
- Press Y.
If you’re confused, I don’t blame you. TestDisk can be complicated. If you’re ever stuck, refer to the official TestDisk documentation.
Method 4: Format the USB Flash Drive
If nothing else works, you can always just reset the USB flash drive by formatting it. I leave this method at the bottom because it’s almost guaranteed to work, but it will also delete all of your data in the process. Now, you can recover data following a quick format, but I’m not about to recommend you format the USB drive and then recover the data. Instead, only perform these steps if you’ve backed up the data or recovered it already.
Follow these steps to format a USB flash drive:
- Right-click Start and click Disk Management.
- Right-click on the volume (or unallocated space) on your USB drive and click Format.
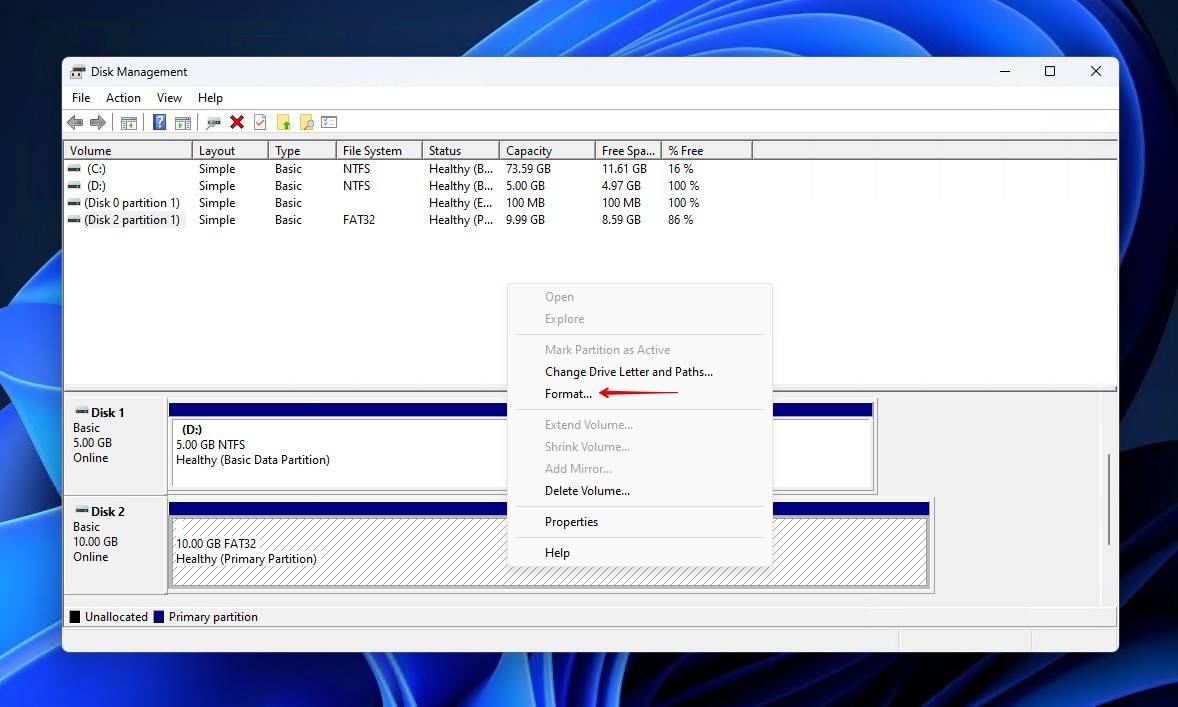
- Give the volume a label, choose a file system, and make sure that Perform a quick format is ticked. When you’re ready, click OK.
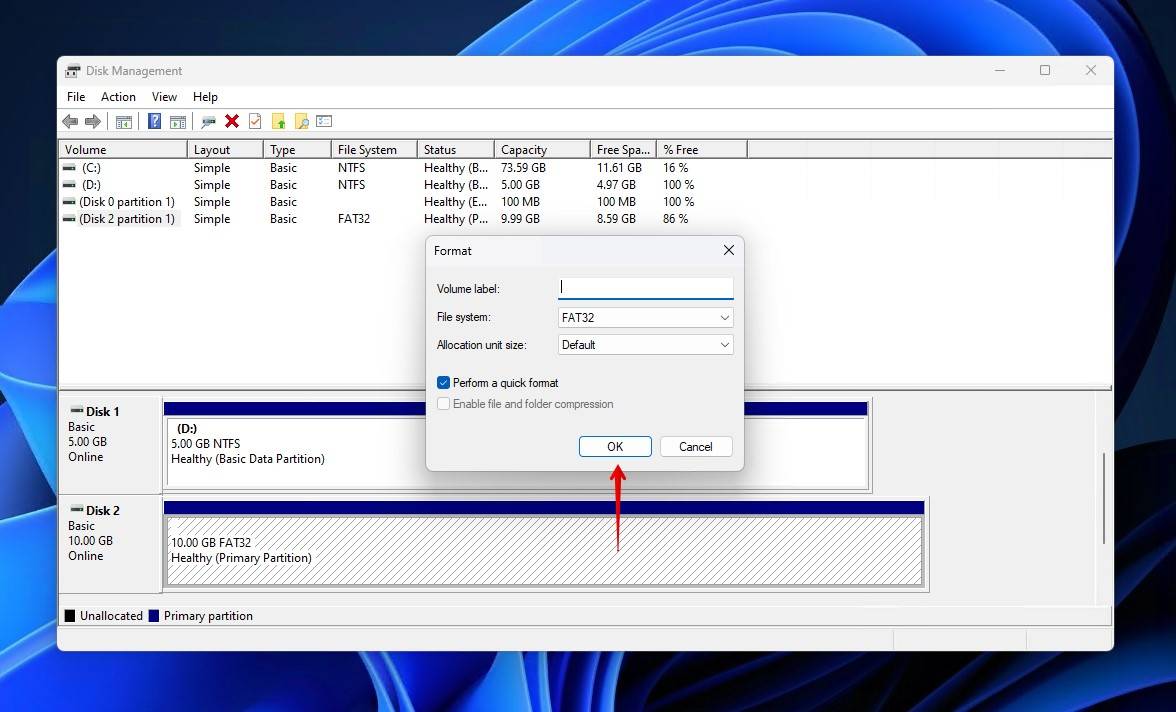
- Click OK again to confirm.
False Fixes Out There
Among the multitude of solutions available on the net, some of them are not actually viable for fixing this particular problem. I’ve compiled a few commonly recommended solutions and given some context as to why they won’t work:
- Updating your drivers – The generic Windows drivers are sufficient in ensuring your USB drive is recognized and accessible, so updating the drivers of your USB is generally unnecessary. Furthermore, this won’t work in cases where the drive doesn’t appear in Disk Management, let alone Device Manager.
- Fixing errors with CHKDSK – Yes, CHKDSK can be helpful in fixing a lot of issues, but not this one because it requires a drive letter to run. Seeing as Windows doesn’t recognize the USB drive, CHKDSK won’t be able to scan it.
Be wary of some of the solutions presented online. If you’re ever in doubt, make a backup first.
Conclusion
I’m no stranger to USB drives that fail and end up becoming unrecognized. I can’t say that it’s a common problem that I run into, but it definitely happens more than I’d like it to. At this point, however, I’ve come to understand more than a few ways to enact data recovery from a USB flash drive that’s not recognized and troubleshoot it to get it working again.
I hope that the information I’ve included in this article was beneficial in helping you get your data back. Going forward, I would suggest that you regularly back up the data located on your USB drive to a reliable storage device that’s better suited for long-term storage.
FAQ
Can I recover data from a USB flash drive that’s not showing in File Explorer?
Yes, but not if the USB flash drive isn’t showing in Disk Management. Back up the USB flash drive, then use a data recovery tool to scan and recover its contents.
How can I fix an unrecognizable USB without losing data?
Back it up first. Backing it up guarantees that whatever data you have left is safely stored in a file. This is important in all data recovery cases but especially crucial in circumstances where you suspect logical damage is present and you need to fix a USB drive without formatting. Once the data is backed up, you can work your way through the fixes presented in this article.
How can I check if the USB port is working correctly?
The simplest way is to see if a USB port is working is to try connecting a different device, like a USB mouse or keyboard. If the device is recognized by Windows and operating correctly, the USB port is fine.
Should I try using the USB flash drive on a different computer?
Trying the USB flash drive on a different computer is a useful troubleshooting step that can help localize the issue. If the USB drive works on a different computer, then it’s an issue with your system. Likewise, if the USB flash drive is still unrecognized on another computer, it’s an issue with the drive.
When should I consider professional data recovery services?
DIY data recovery software is useful in many cases, but it can’t work miracles. You should consider consulting a data recovery professional if the USB drive is physically damaged or not being recognized at all, even in BIOS.
This article was written by Jordan Jamieson-Mane, a Staff Writer at Handy Recovery Advisor. It was also verified for technical accuracy by Andrey Vasilyev, our editorial advisor.
Curious about our content creation process? Take a look at our Editor Guidelines.