Sometimes, it may feel like technology devolved compared to decades ago, when computers relied on cassettes and floppies for storage. Modern computers are linked and share files over networks. However, that also translates to increased complexity and increased chances of something going wrong.
Thankfully, as we’ll see in this article, it’s (usually) possible to recover deleted file(s) from a network drive and bring back your essential but temporarily lost work files.
In today’s networked reality, devices can access the same files in two distinct ways: either by sharing folders, with each shared folder stored locally on a device, or through network-enabled drives (NAS) that all devices can access in a network. The approaches and solutions we’ll see apply to both (unless stated otherwise). Also, Apple’s devices may be pretty popular nowadays, and everything we’ll see also applies to them. However, we’ll employ a Windows user’s perspective to avoid complicating things.
How to Recover Deleted Network Files
You might have absent-mindedly deleted some files without realizing you needed them. Or you might have moved them from a NAS drive to a USB flash drive, which the puppy then used as a chewing toy. Thankfully, there are just as many ways to recover deleted network files as there are to lose them. Let’s see some of the best.
In this article, we’ll use features built into the OS and NAS drives, plus a single but highly-rated third-party data recovery solution. For more options on the latter, check our article on the top 10 best data recovery software.
Method 1: Recover Data from Recycle Bin (NAS)
“NAS” stands for “Network Accessed Storage” and usually refers to NAS drives that house one or more HDDs or SSDs. A network adapter and a mini OS allow remote access from other devices in the same network to everything stored on those HDDs or SSDs. However, typical computers (like your old PC) can also play this role.
An easy way to recover file(s) deleted from a shared drive, either a dedicated NAS or a PC, is if you have first enabled its recycle bin. Still, although that’s possible when using a PC as network storage, that’s not always an option with dedicated NAS drives.
If you are using such a device, you should check its documentation to see if it supports a recycle bin. If you haven’t lost any data (yet), make sure to enable the feature, for it can be a lifesaver in such scenarios. If you lost files and the feature was enabled, or if you are using a PC, you can recover files from your network drive, as we see in this section. You can skip this step if that feature was turned off or unsupported on your network storage.
Recovering Data from a NAS PC’s Recycle Bin
Windows, macOS, and most Desktop Environments for Linux come with a recycle bin (but you might also find it as “Trashcan”). Although the terminology might not be identical, the steps to recover deleted network files from a NAS PC, no matter the OS, are similar:
- Find the recycle bin’s icon on your desktop or the default file manager.
- “Open” the recycle bin to access its contents as a typical folder.
- Select one or more of the files and folders there, and right-click on one to access a quick menu where one of the options will allow you to recover the deleted file(s) from your shared drive.
Recovering Data from a Dedicated NAS Drive
Even if your dedicated NAS Drive supports a recycle bin, the steps to recover your files differ between brands and models. Let’s see how you can do it on Synology and QNAP NAS drives.
To recover deleted network files from a Synology NAS Drive, you can:
- Make sure you have the File Station add-on installed, and launch it.
- Select the #recycle subfolder.
- Choose one or more files and folders you want to recover.
- Right-click on one of them and choose Restore.
- If using an older Synology NAS Drive, instead of Restore, you will find two options to Copy to or Move to another folder everything you selected. They’ll be under the aptly named Copy to/Move to entry on the same quick menu.
If the recycle bin wasn’t enabled, jump to Method 3 for a solution to get your files back.
Still, to avoid such mishaps in the future, it’s worth enabling the network drive’s recycle bin as follows:
- From Synology DiskStation Manager (DSM), move to Control Panel and select Shared Folder.
- Choose the shared folder for which you want to enable the recycle bin, and click Edit.
- Place a checkmark on the option to Enable (the) Recycle Bin. For additional security, you can also enable Restrict access to administrators only.
- Save the changes.
To get back deleted network files from a QNAP NAS Drive:
- Visit the drive’s web interface and select the folder you want to recover data from.
- Enter the @Recycle subfolder you’ll find there.
- Select one or more files and folders you want to get back.
- Right-click on one and choose Recover.
To enable the recycle bin on a QNAP NAS Drive:
- Navigate from your drive’s web interface to NAS Control Panel > Network & File Services > Network Recycle Bin.
- Place a checkmark before Enable Network Recycle Bin.
- If you like, you can customize the recycle bin’s File retention time and exclude some file extensions (for files that will always skip the recycle bin and be immediately deleted).
For more info on NAS drives and extra methods of recovering data from them, check our guide on how to recover data from NAS using NAS recovery software.
Method 2: Recover Files Using File History -> Previous Versions (Shared Folder)
If you want to revert some files to a previous state, and they were stored on a secondary Windows PC you were using as a file server / NAS drive alternative, you can use the OS’s File History feature.
Although you can perform the following steps “remotely” to restore files on your server/NAS PC from another one on your local network, there are some caveats. Do both PCs use the same version of Windows, and you’ve logged in on both using the same credentials or through an account with unrestricted access to the host PC’s storage? Then, you can follow along by “visiting” the network files’ location through a file manager (like Windows Explorer). However, if that doesn’t work, and you can’t see any Previous Versions of your files available, despite knowing that they exist, that could be because the two PCs don’t “communicate” the files’ availability through a network connection. If that’s the case, you can use Windows’ own Remote Desktop solution or a third-party client like TeamViewer, Parsec, or one of the many flavors of VNC to remote-control your server/NAS PC and access the Previous Versions of your files “through” a file manager. In both cases, apart from the connection method between the two PCs, the following steps are identical.
To restore files that you know were backed up with File History on Windows 10/11:
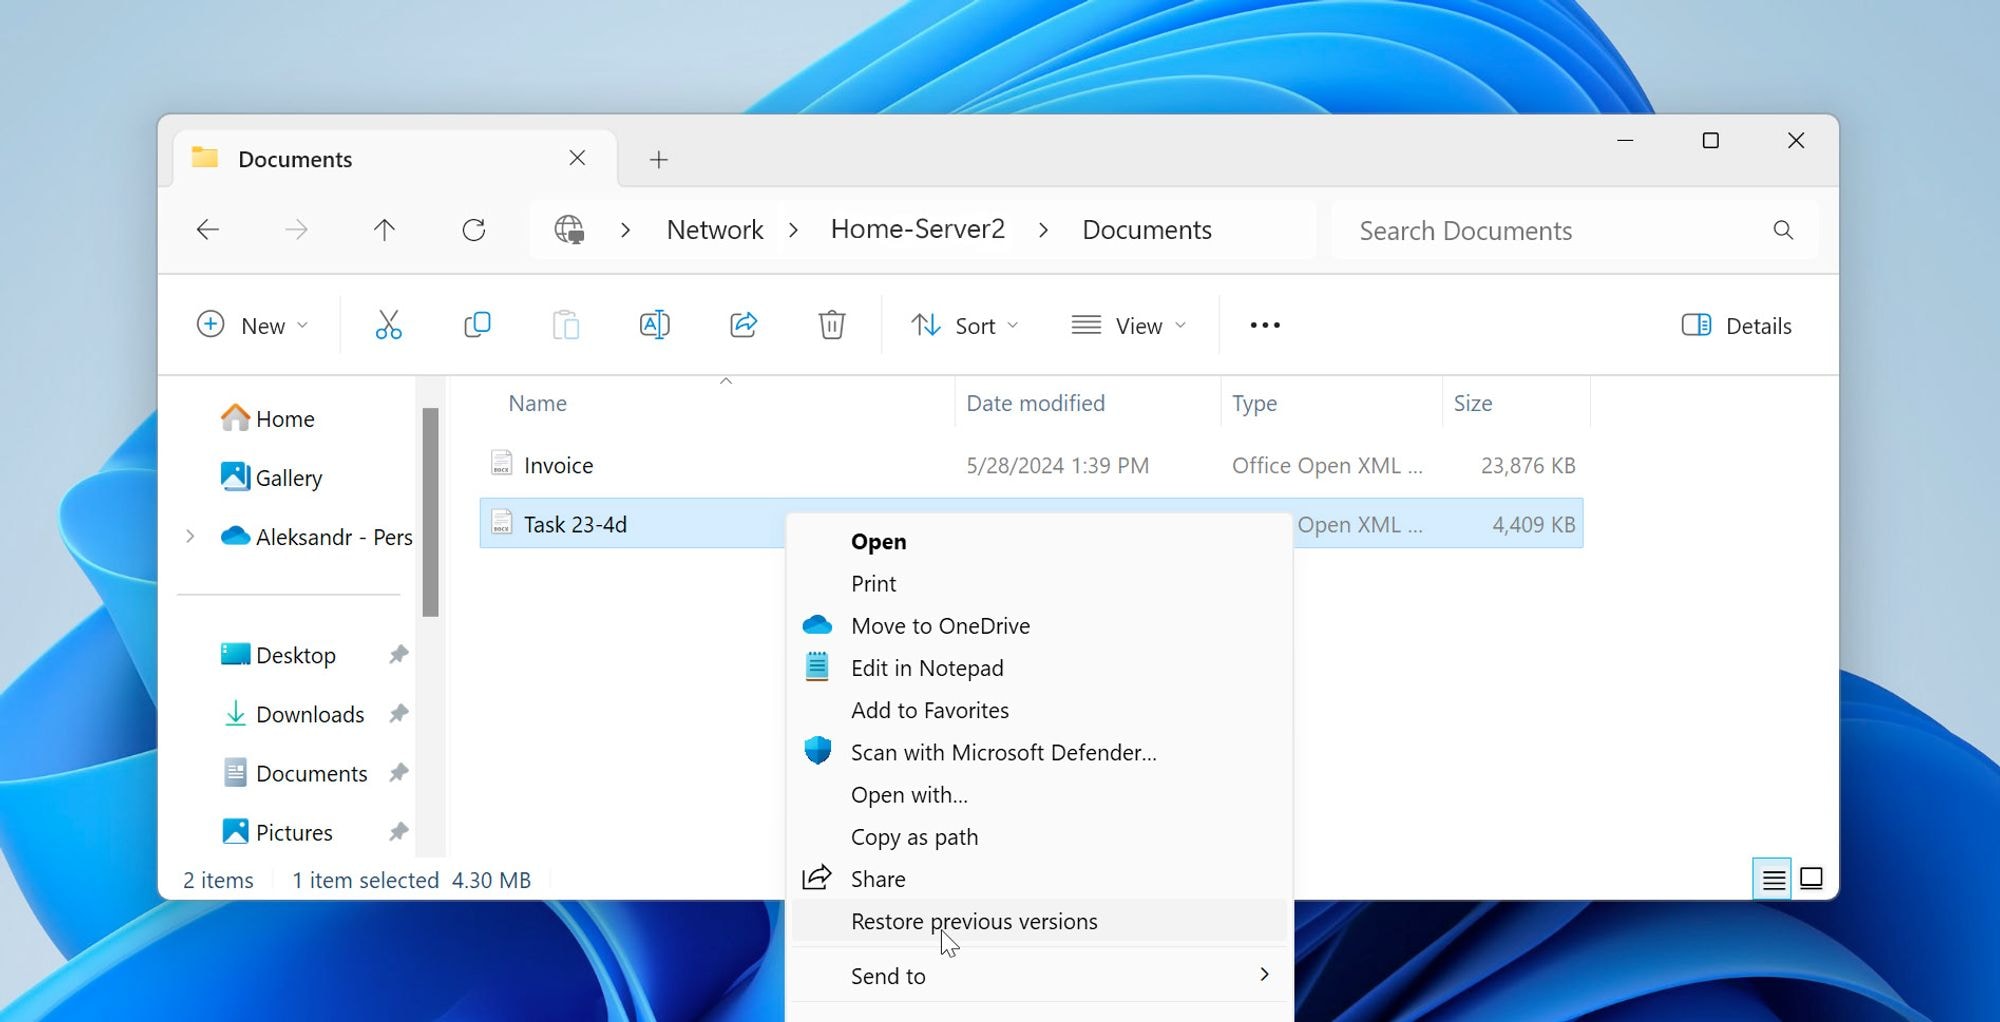
- Fire up your favorite file manager and navigate to the altered files you want to revert to a previous state. Right-click on each of them and select Restore previous versions. On Windows 11, that action is hidden in a submenu under Show more options.
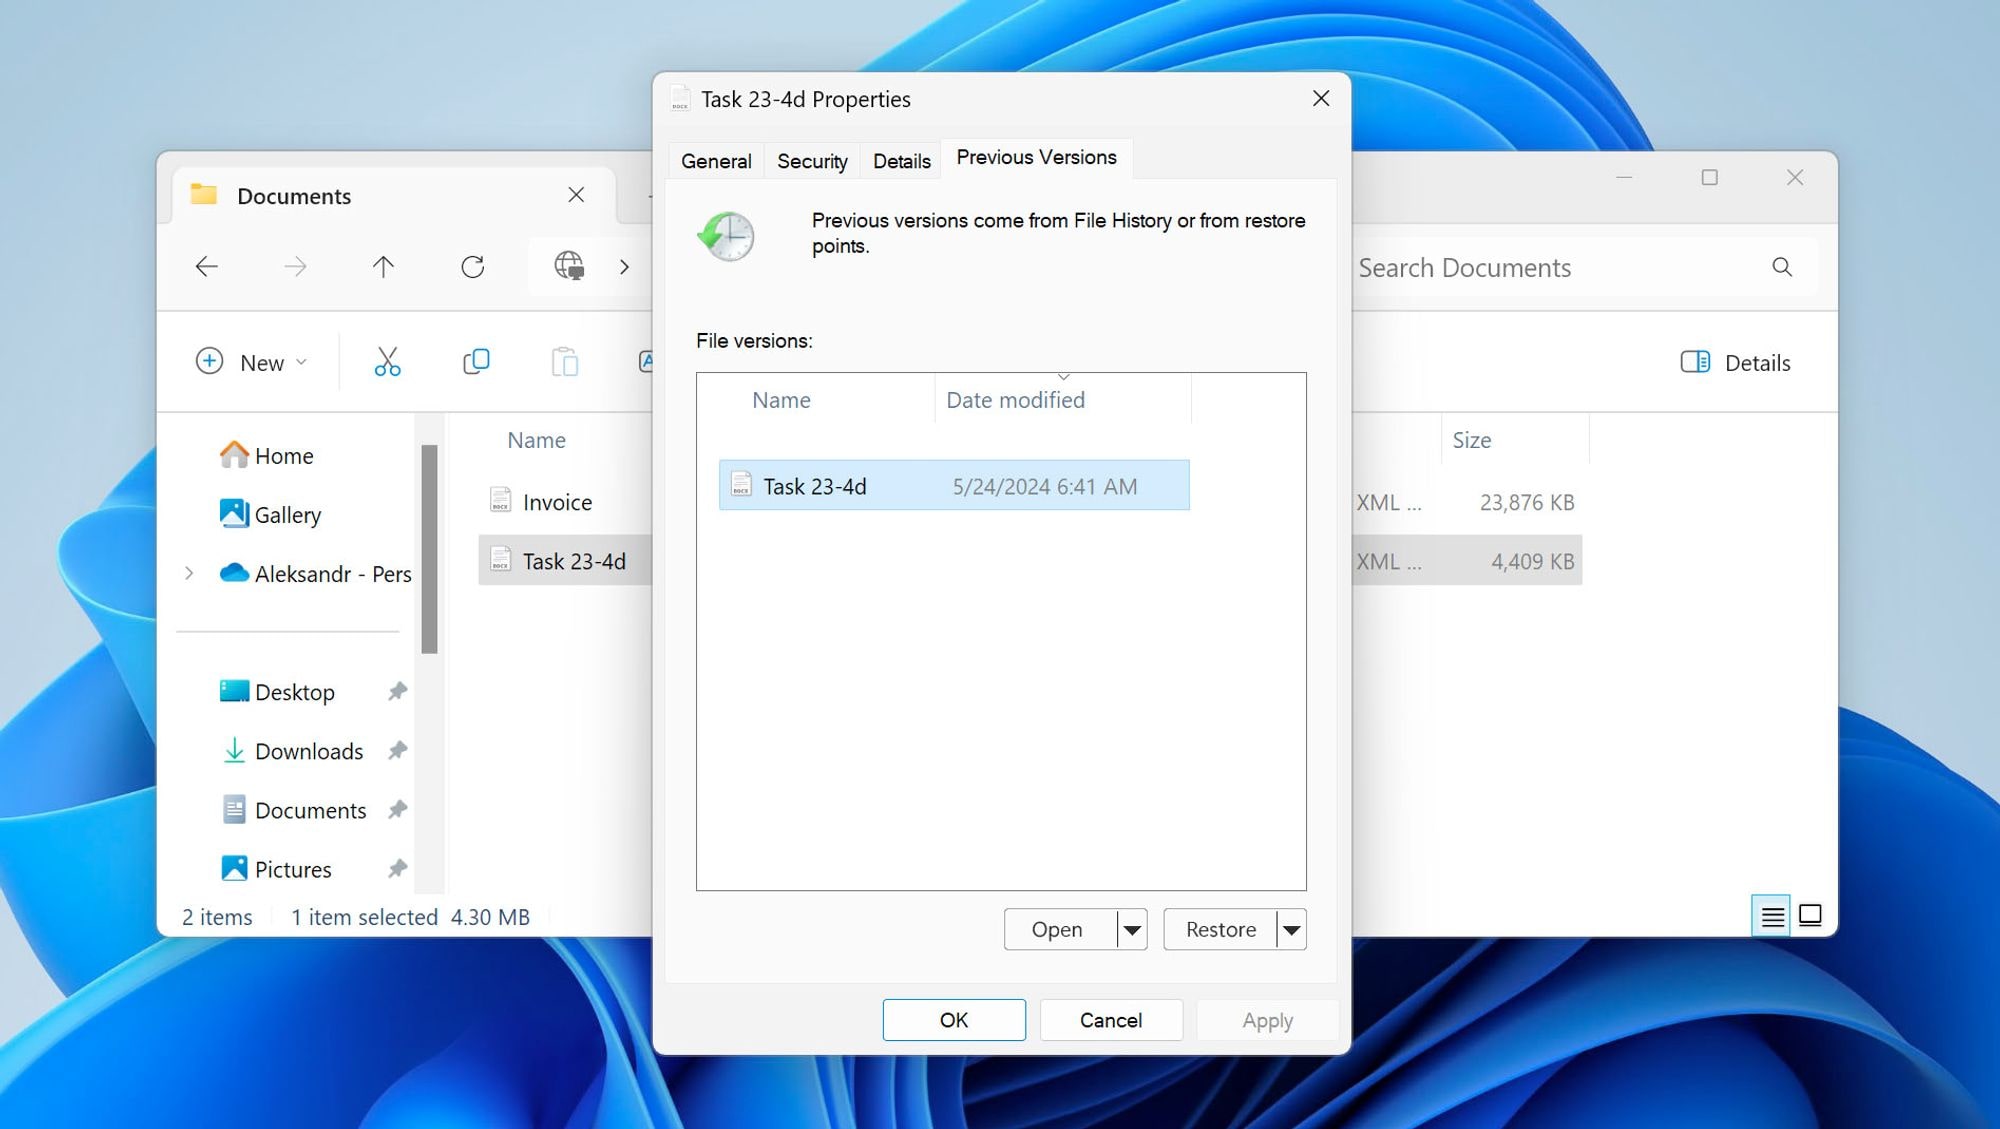
- Choose the version to which you want to revert. Click Restore to bring the old version back, and OK to exit. To store a copy of the old file’s iteration instead of overwriting the existing one, click the drop-down icon on the right of Restore and choose Restore to instead. Then, select a new location where you want to store the older copy of the current file.
Method 3: Use Data Recovery Software (NAS/Shared Folder)
Most Windows, Mac, Linux PC, or NAS setups you might use as network storage also support SSH, so you can relatively effortlessly recover deleted network files. However, to do that, you must use a data recovery solution that supports such setups, like the latest versions of Disk Drill.
As for “why Disk Drill, when other data recovery tools offer similar functionality”? Because it offers the best combination of features, user-friendliness, performance, and results, as we realized when we reviewed it. Plus, in a world of shoddy software, we appreciate how Disk Drill has been repeatedly proven to be safe and trustworthy.
Although this is one of the most effortless ways to get your lost files back, it comes with some caveats. You weren’t using dedicated NAS software on a Windows, Mac, or Linux host, but “merely” sharing folders? Do you want to scan those folders remotely for lost files using a computer with a different OS than the one on the file host? Then, unfortunately, incompatibilities may cut such plans short. For example, the Windows version of Disk Drill can connect to remote computers “through” SSH just fine. However, if the remote computer is a Mac sharing folders stored on a device using its native APFS/HFS file systems, the Windows version of Disk Drill isn’t compatible with those. It might also be impossible to scan typical shared folders between Windows PCs this way since, by default, Windows doesn’t allow access to its storage through SSH. In such scenarios, it’s better to download a version of Disk Drill tailor-made for the host OS of your file server (the computer with the shared folders) and scan them “locally” to recover deleted file(s) from your shared drive. You can also check out the top Disk Drill alternatives for different data recovery pathways.
To recover deleted file(s) from shared computer folders using Disk Drill:
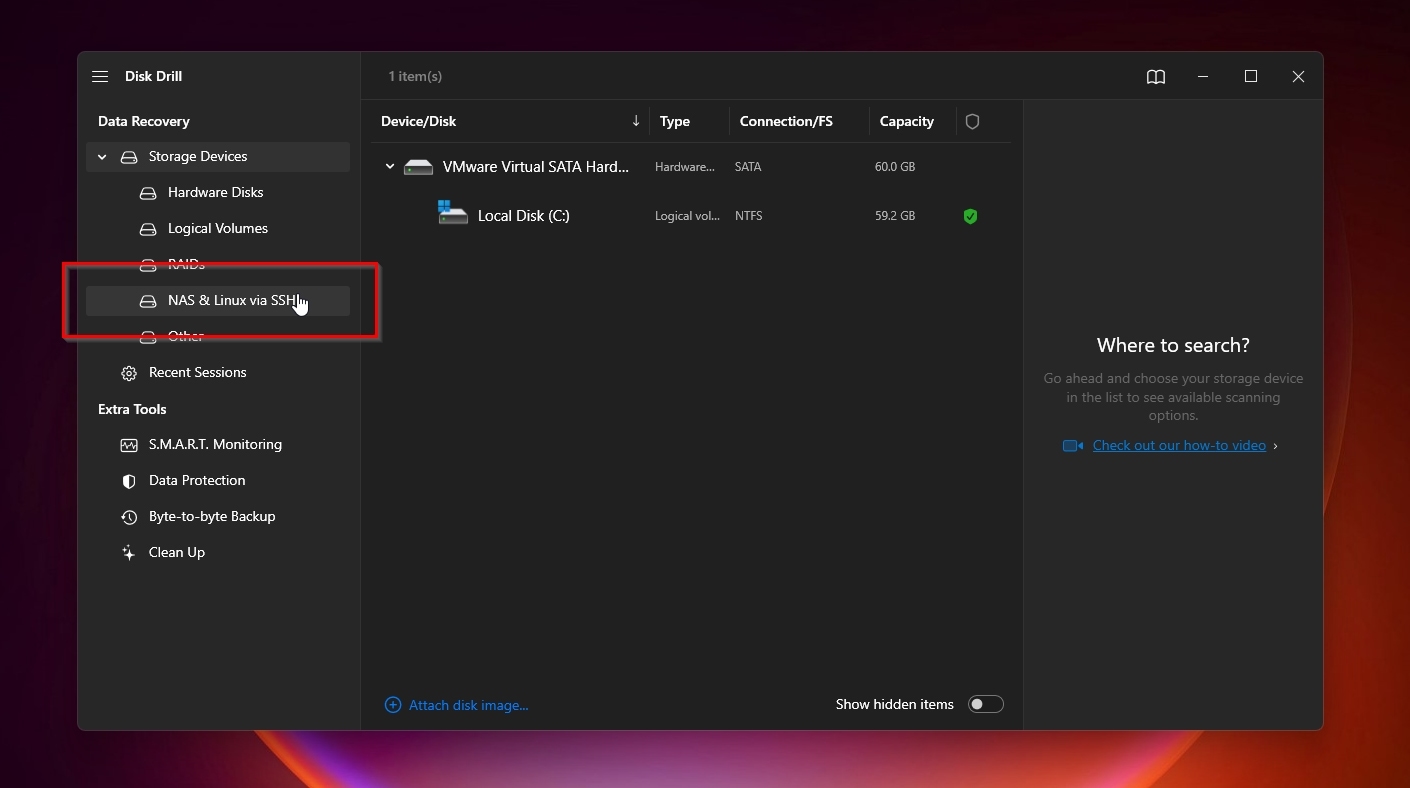
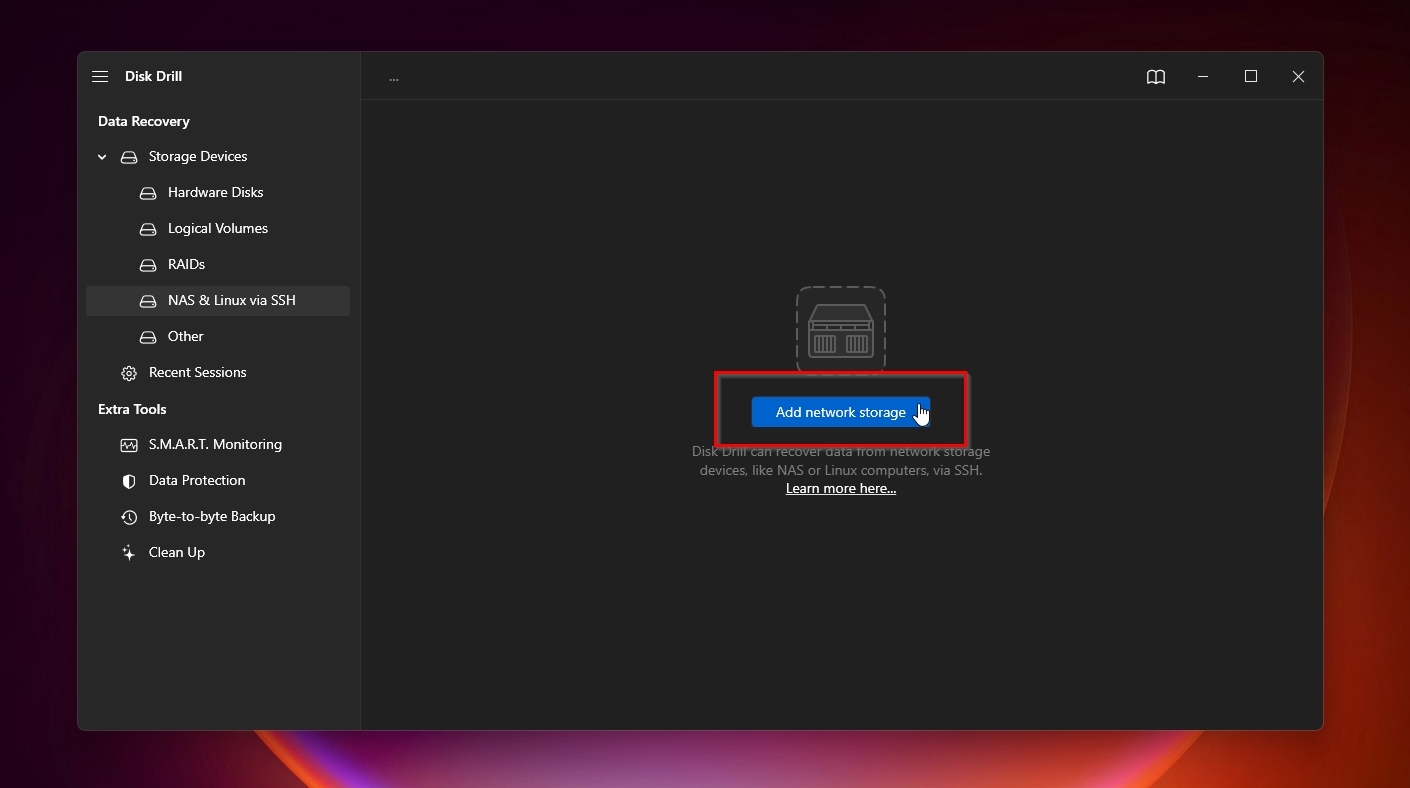
- Make sure you download and install one of the latest versions of Disk Drill since older ones don’t support recovery through SSH. After installing it, launch it, expand the Storage Devices field on the left of its window, and select NAS & Linux via SSH.
- Click on Add network storage.
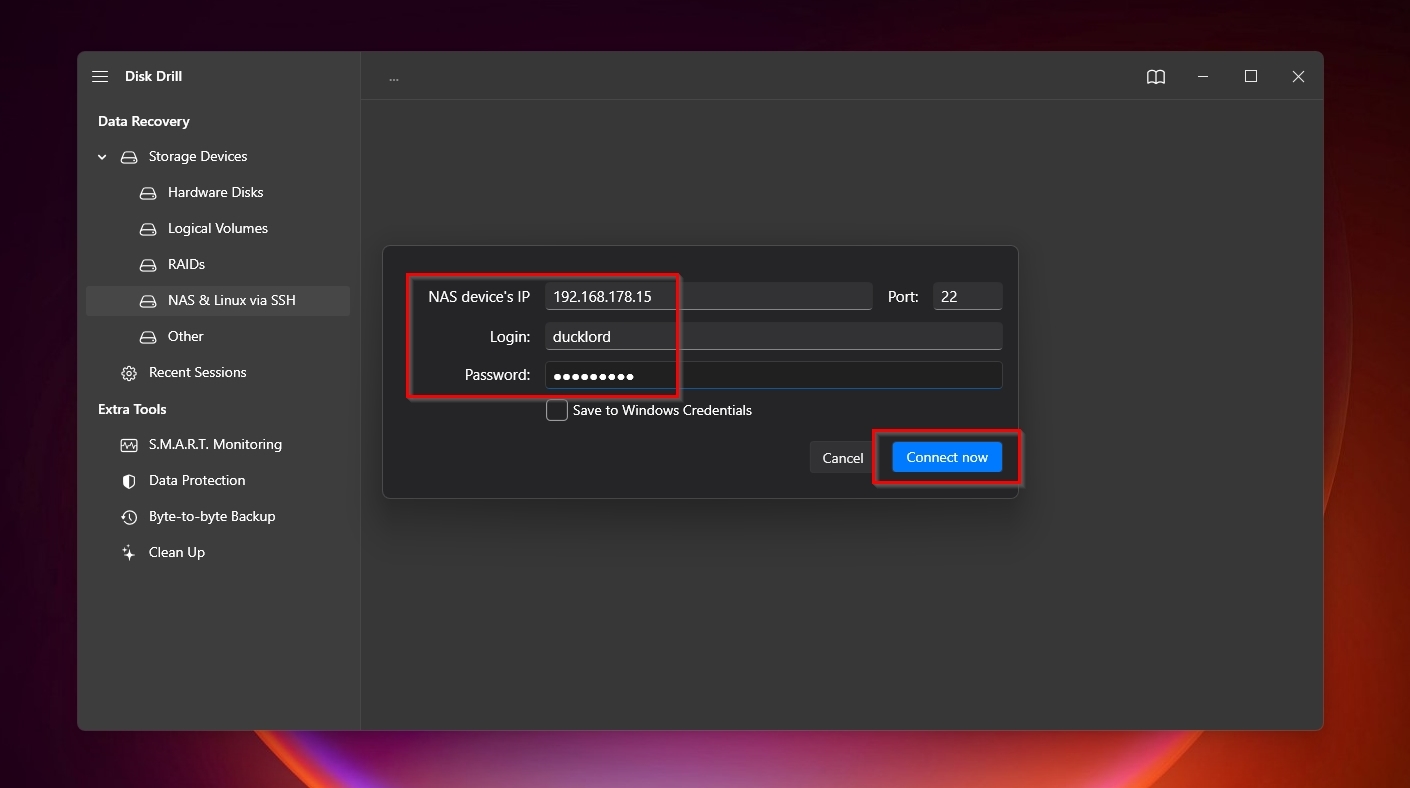
- Add your NAS device’s IP address and a Login and Password for an account with complete access rights to your NAS device’s storage. Unless you’ve customized their settings manually, you can leave the Port set to 22 for most NAS setups. You can also save those settings by enabling Save to Windows Credentials for quick logins in the future. When ready, click on Connect now.
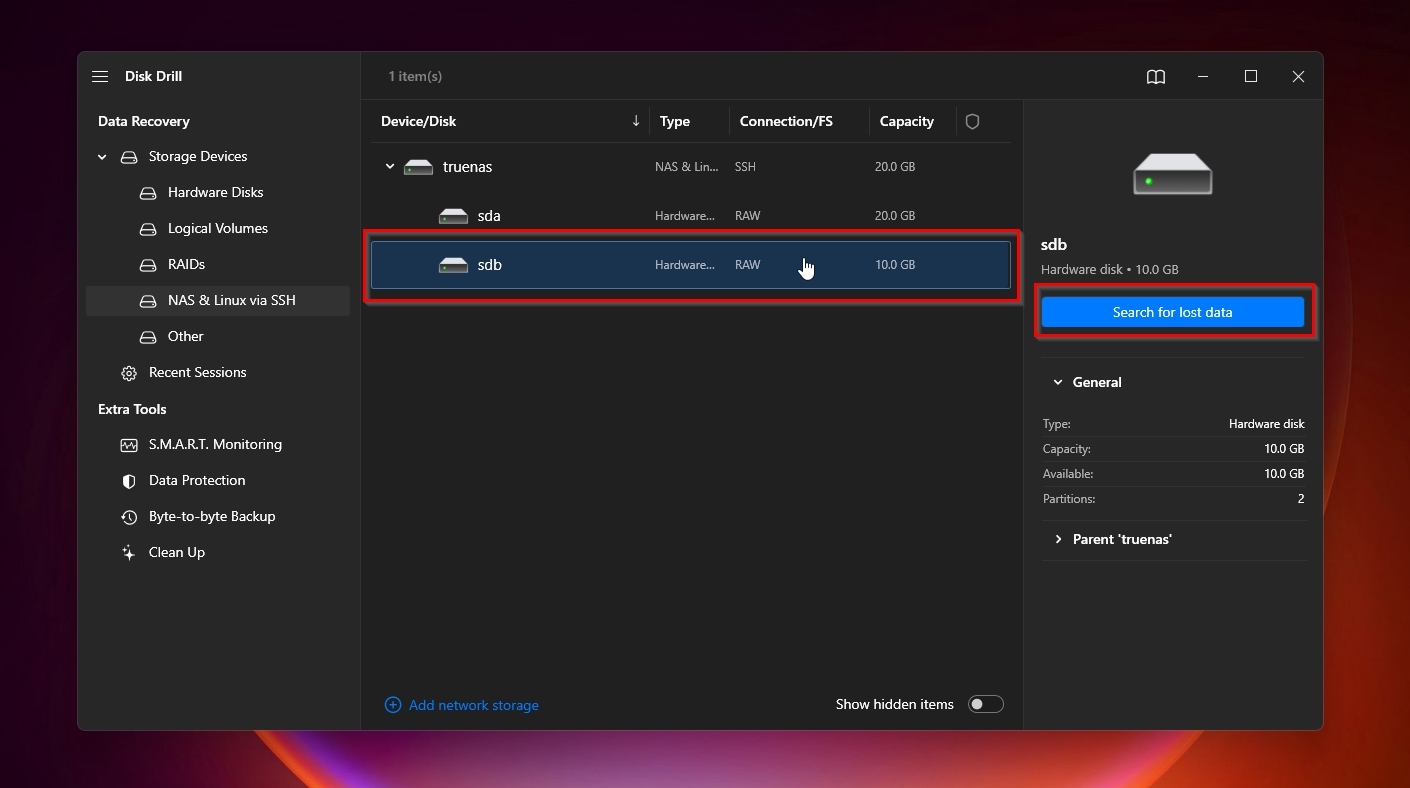
- Select the storage Device/Disk on your NAS that you want to scan for lost files. Then, click Search for lost data.
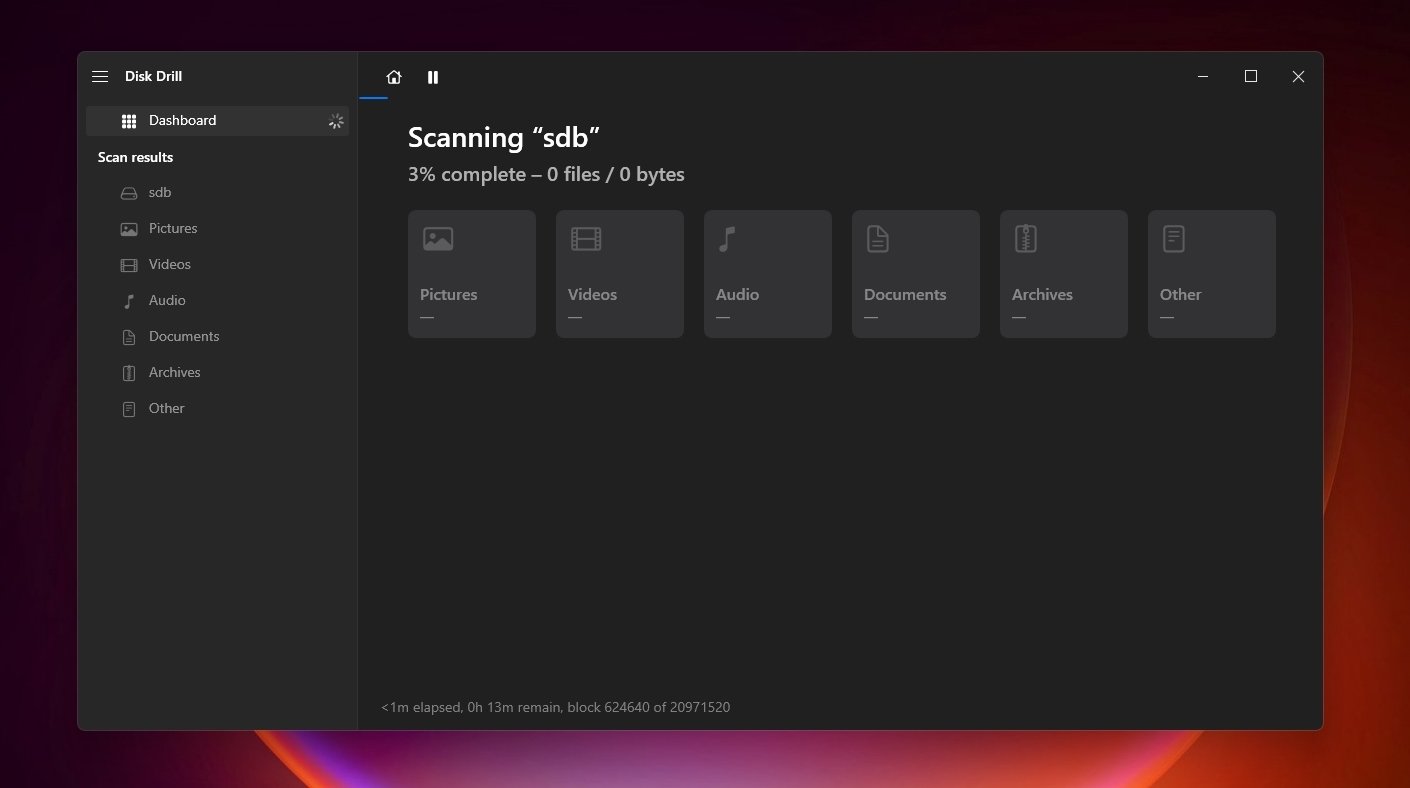
- Allow Disk Drill to complete its scan.
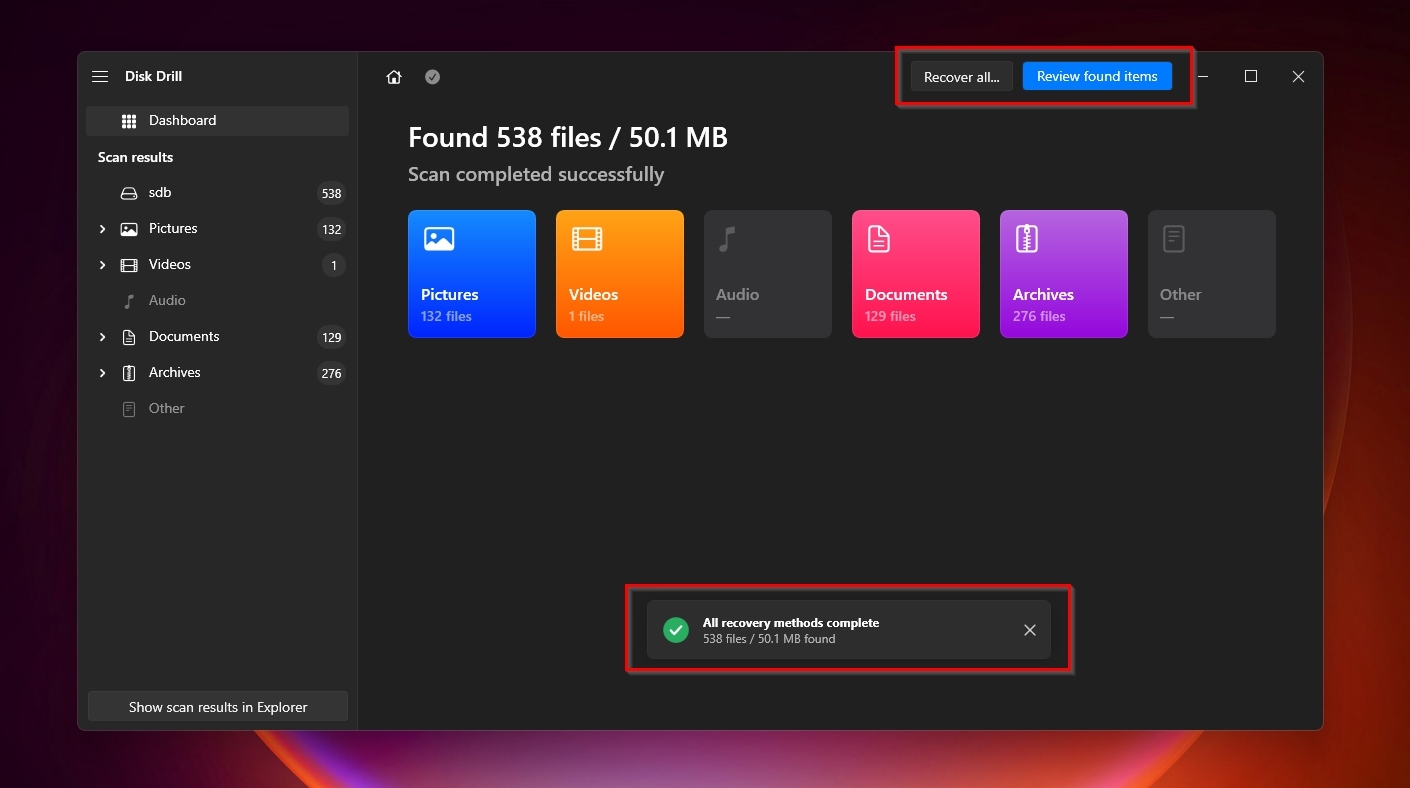
- When done, Disk Drill will inform you that All recovery methods (are) complete on a hover window. Feel free to close it and click on either Recover all if you have a registered version of Disk Drill and want to effortlessly recover all files it found without overthinking it, or Review found items to select what to bring back from the brink of extinction. For this article, we’re going with the second option.
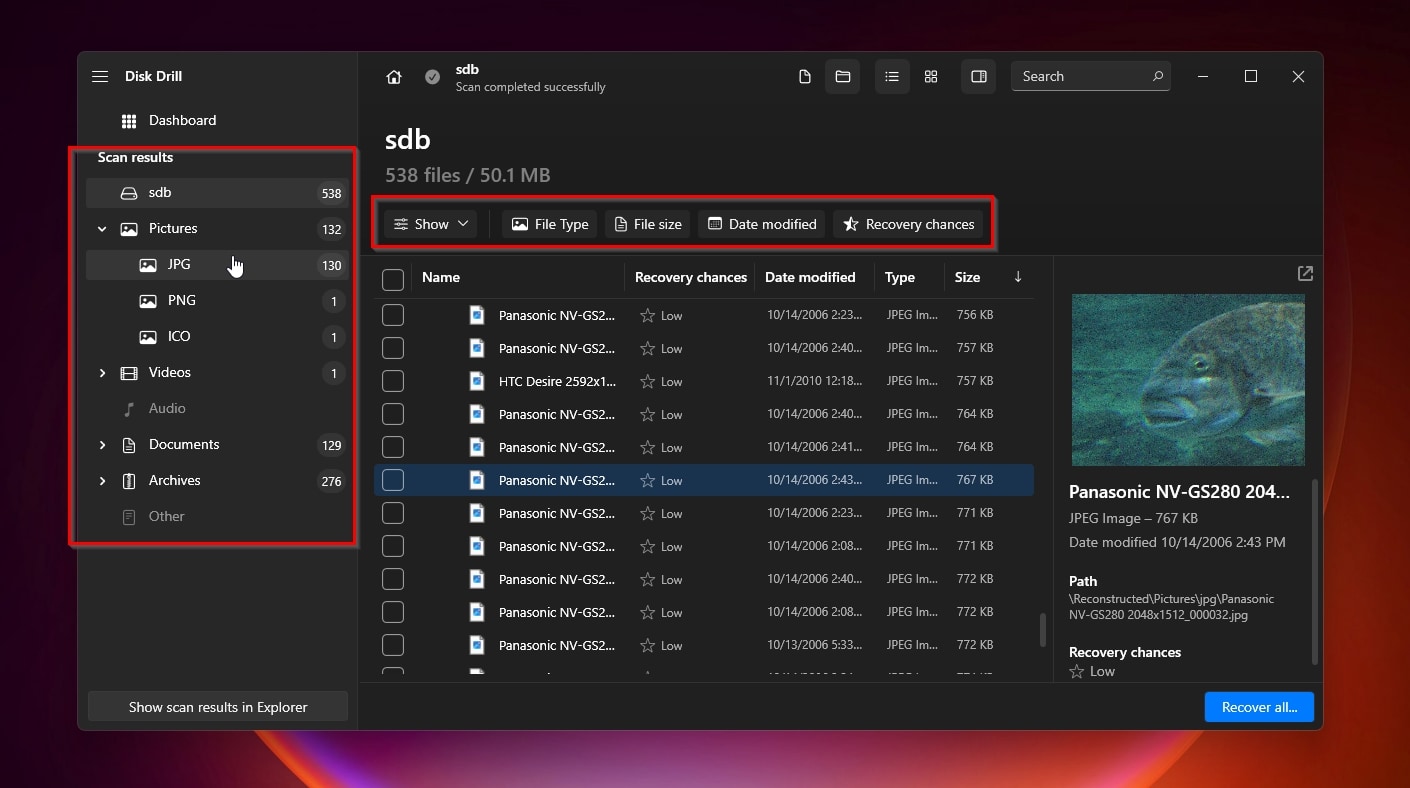
- Did Disk Drill locate thousands of files on your NAS drive? Make sense of them using the app’s Categories, on the left, and filters, above the file list, to reduce the visible number of files based on properties like their type (Pictures, Documents, etc.), File size, Recovery chances, etc.
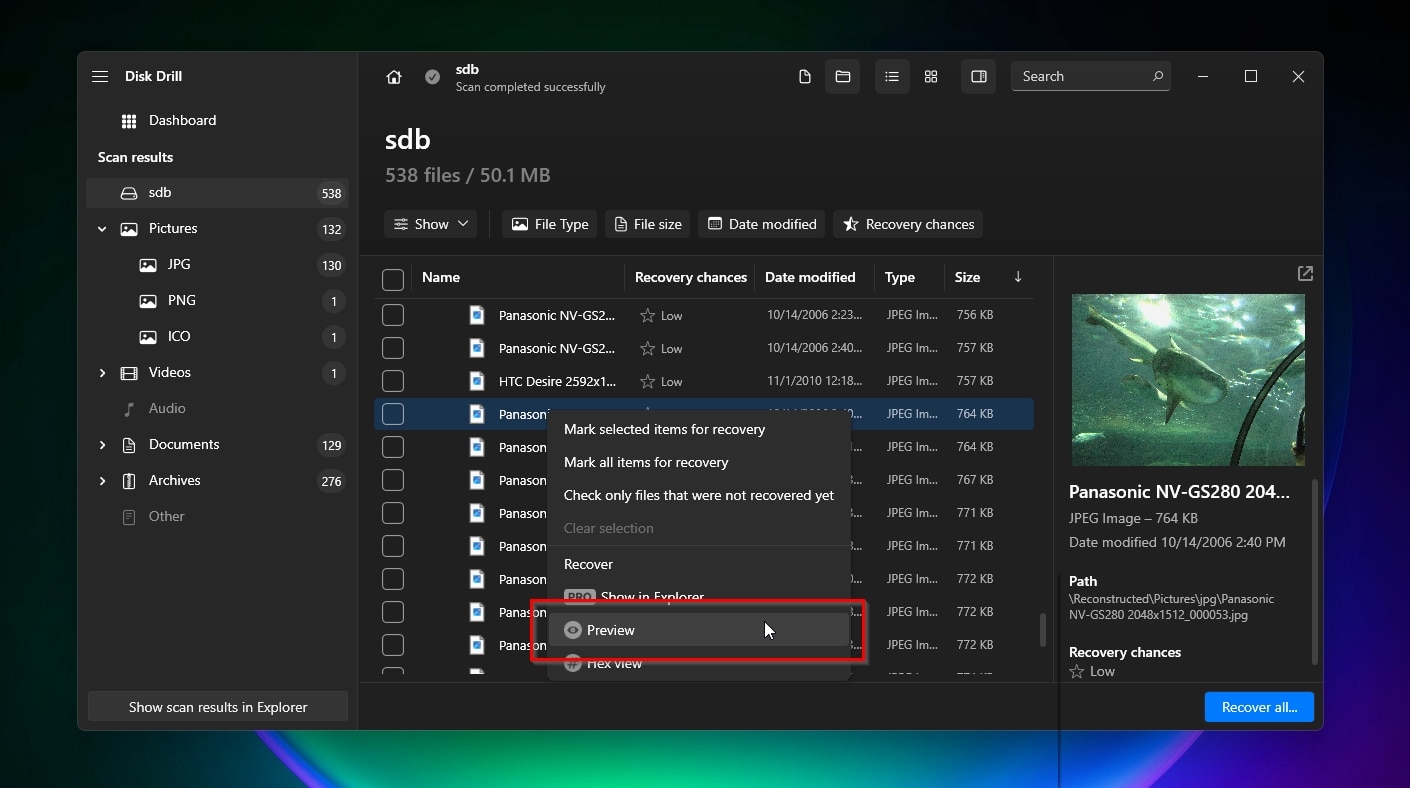
- If you are unsure about one or more files, Preview them by right-clicking on them and selecting that option from the menu that appears. Disk Drill can preview many types of files, including images, documents, etc. Even when it can’t, this option can reveal extended information about a selected file, like its actual path.
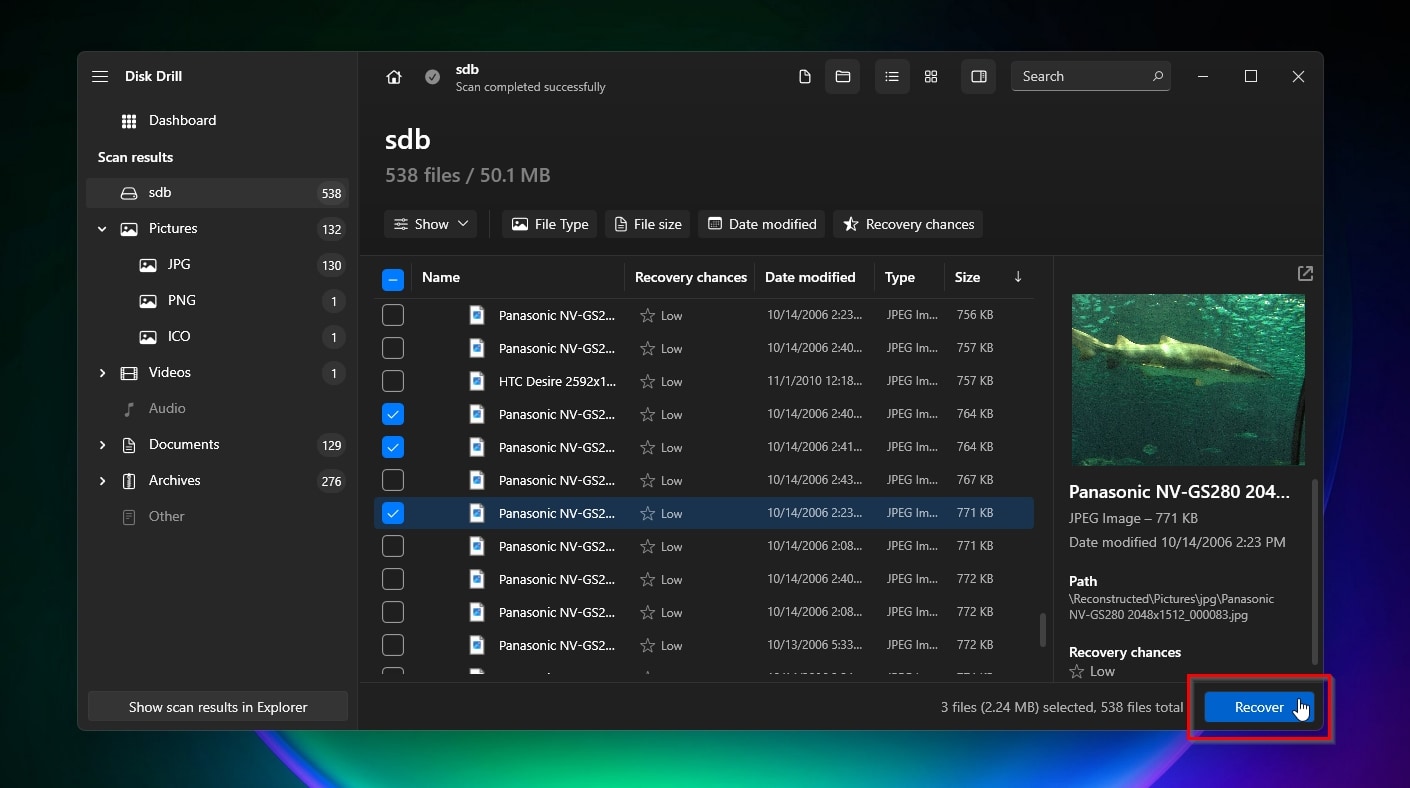
- Place a checkmark on the left of the files you decide to recover.
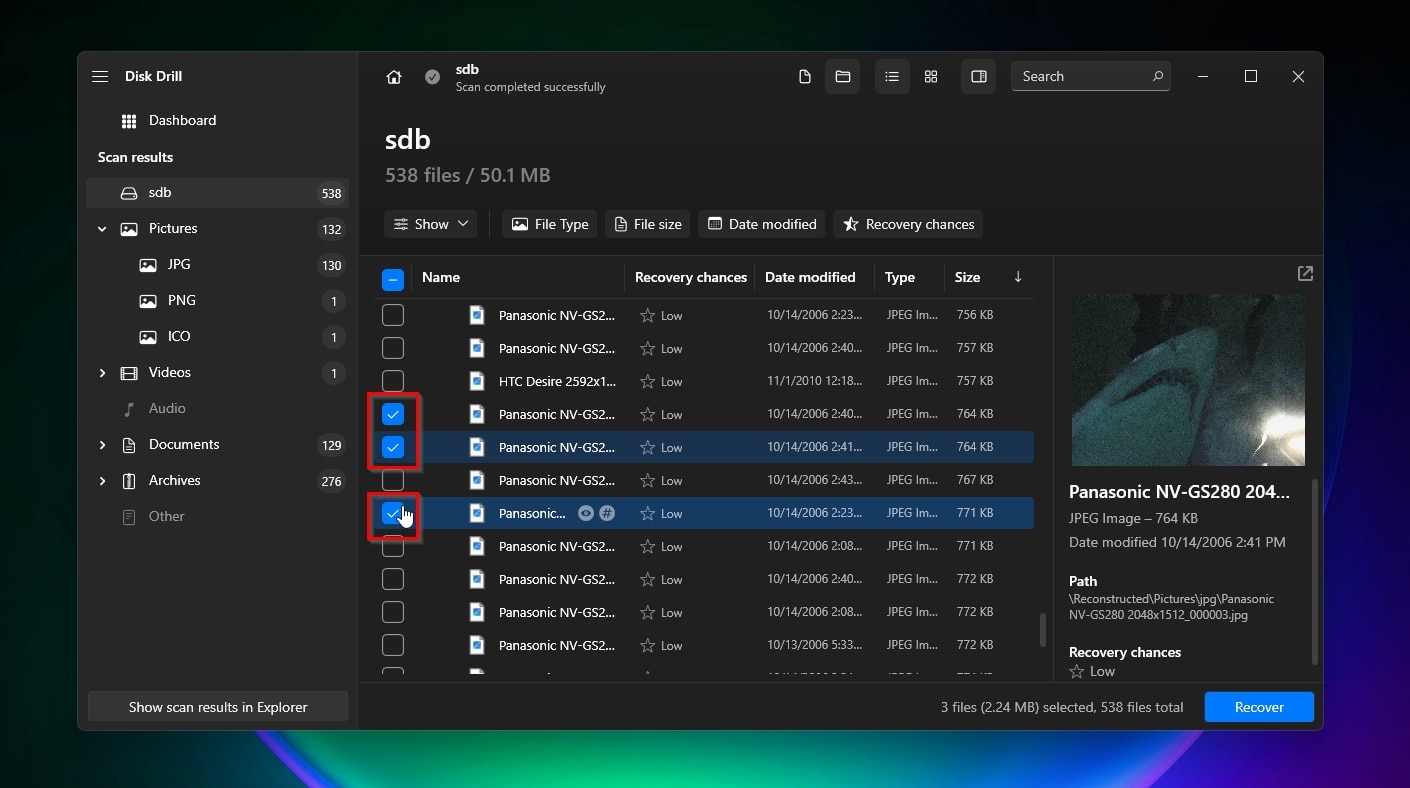
- Click Recover on the bottom right of the window to proceed to the next step.
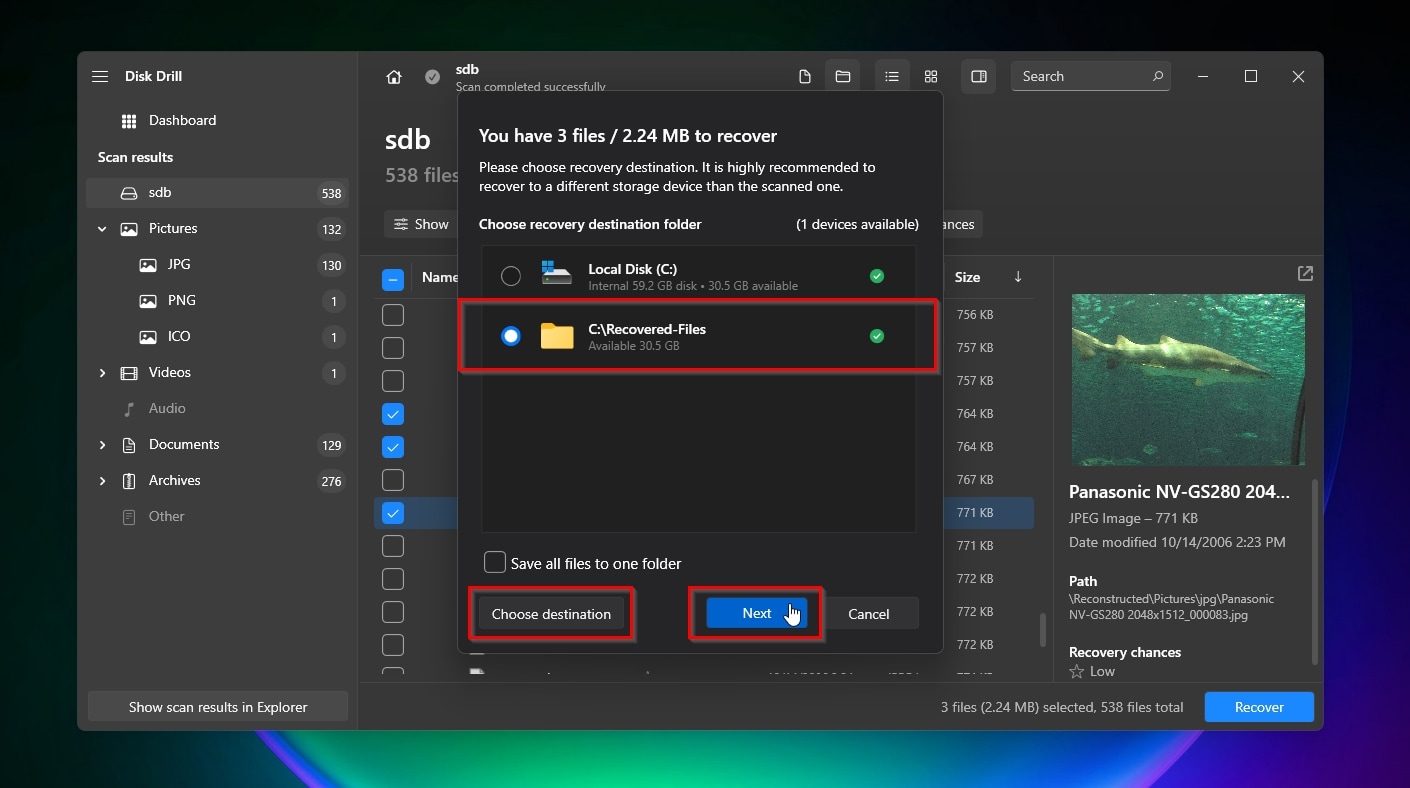
- Choose the destination folder where Disk Drill will store the recovered files. If it doesn’t show up on the list of locations Disk Drill “remembers”, select your desired spot with a click on Choose destination. When done, click Next.
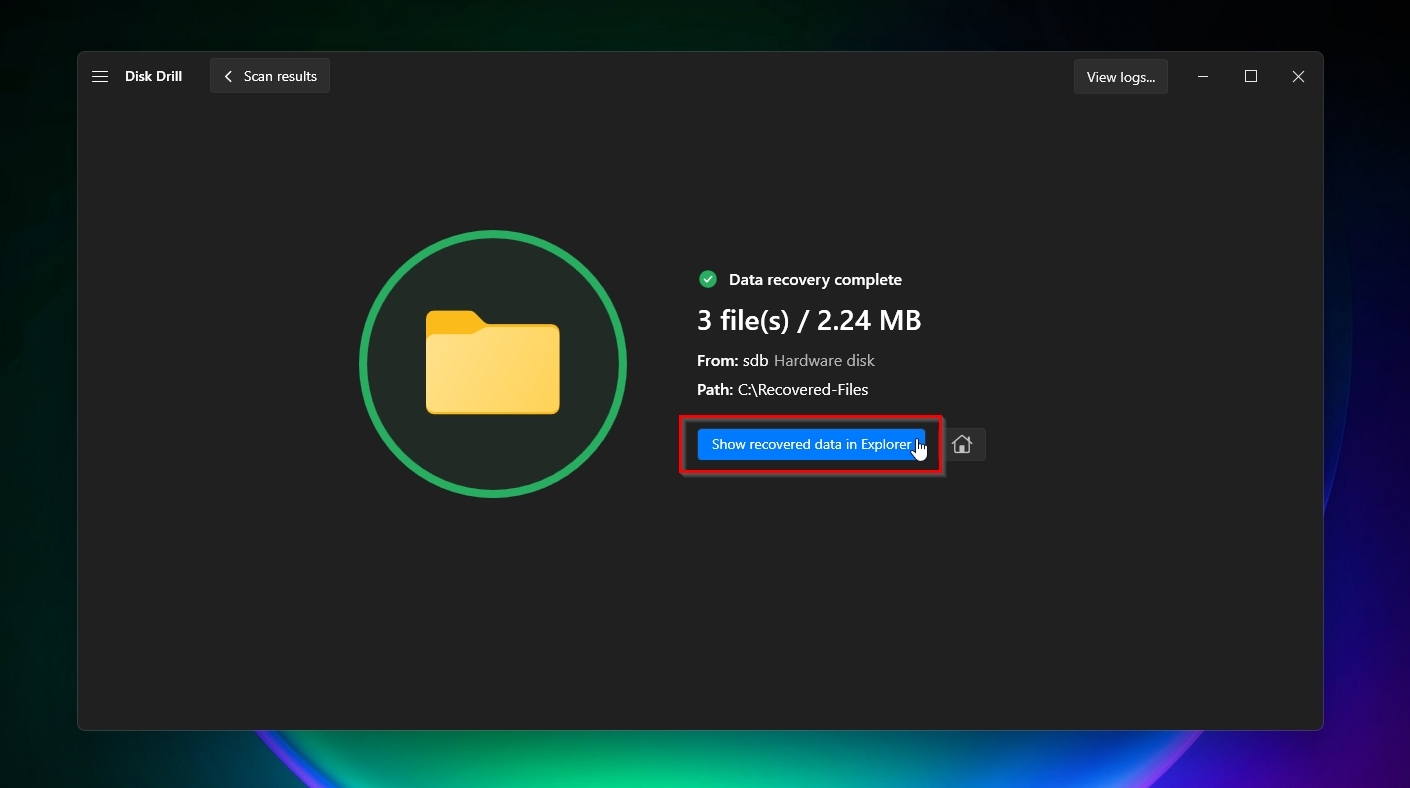
- Soon after, clones of the selected files will be stored in your chosen destination folder. Disk Drill lets you insta-visit it by clicking Show recovered data in Explorer.
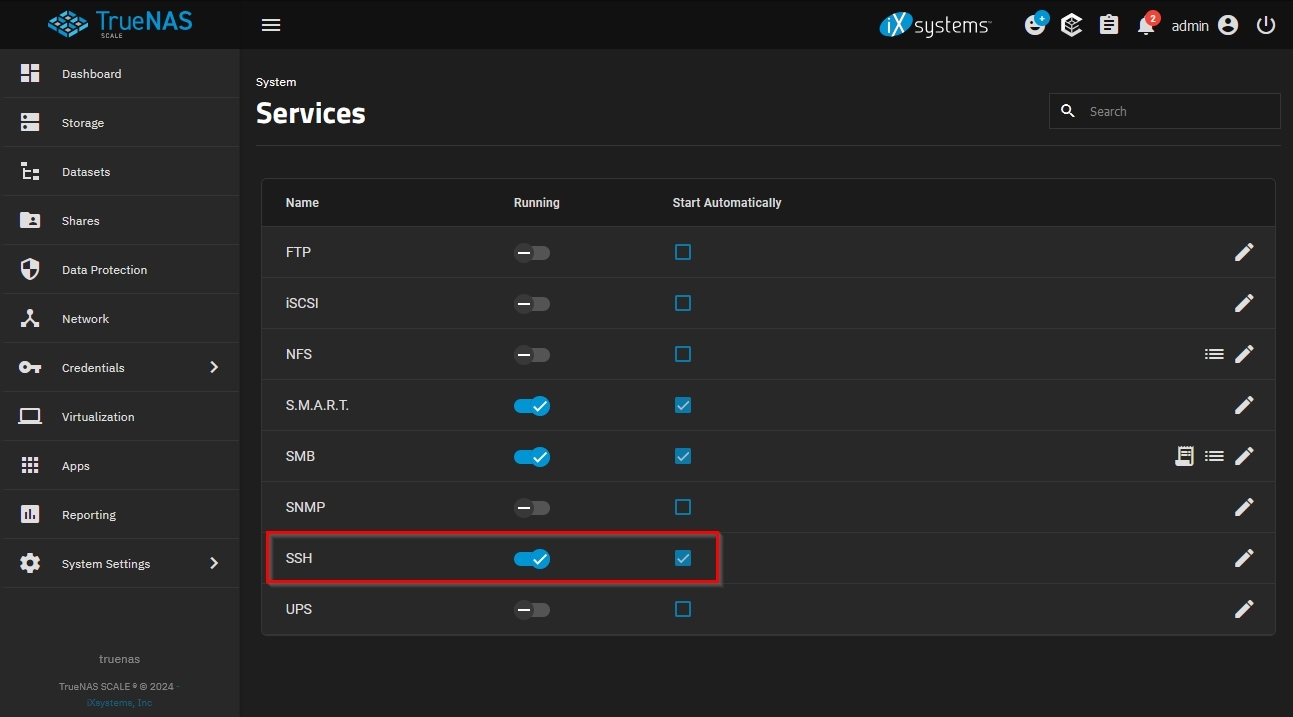
Are you trying to restore files from a NAS drive or PC that you know supports SSH, but Disk Drill doesn’t acknowledge its existence? SSH might be turned off on your NAS for security reasons. You can usually enable it from your NAS drive’s/server’s Services: look there for SSH and turn it on. In most cases, you’ll also be able to set it to start automatically to avoid going through these steps again.
Conclusion
As we saw in this article, losing some data on your local network storage is rarely a catastrophe. Quite often, it’s possible to recover files from network drives and shared folders, as long as you take advantage of the features built into our modern OSes or use some smart third-party tools tailor-made for such tasks.
Still, network storage is inherently more complex, and that’s why we covered in this article some of the most significant points that can play a major role in any attempt at network data recovery.
This article was written by Odysseas Kourafalos, a Editor-in-Chief at Handy Recovery Advisor. It was also verified for technical accuracy by Andrey Vasilyev, our editorial advisor.
Curious about our content creation process? Take a look at our Editor Guidelines.