Windows 8 is arguably the most confusing operating system Microsoft has released in the last two decades, which might explain why so many users want to know how to recover deleted files on Windows 8. If you’re among them, then you’ve found the right article because we describe several universally applicable methods to help you recover both recently and permanently deleted files.
Pro tip: The clock starts ticking as soon as you delete the wrong file. Unless you stop what you’re doing and begin its recovery ASAP, you risk losing it permanently. So, pick one of the methods described below and apply it to undelete your files on Windows 8.
However, we’ve also seen many cases where files weren’t actually deleted—people just couldn’t locate them. So, before we go into recovery methods, let’s first cover some Windows 8 features that can help you find lost or misplaced files.
How to Find Lost Files in Windows 8
To look for lost files, you can use two main tools: the Start Screen and File Explorer. When Windows 8 first launched, its layout threw a lot of users for a loop. The classic Start menu got swapped out for a full-screen Start Screen with tiles instead of icons and a layout clearly aimed at touchscreens. But under the hood, the basics were still there—you still have good old File Explorer for navigation, the Recycle Bin for deleted files, and a familiar search function.
Use the Start Menu or File Explorer
To search for a file with the Start Screen, just press the Windows key or move your cursor to the lower-left corner to bring it up. You’ll see a full-screen layout with tiles for apps, files, and settings. Now, simply start typing the file name or a keyword—no need for a separate search bar. Windows 8 instantly starts a search as soon as you type.

Your results will pop up right away, with files that match. When you see the file you need, click it to open it directly. If you’d rather go to the folder where the file’s stored, right-click the file in the results and select Open file location. This opens File Explorer and takes you straight to the file’s folder.
If the Start Screen didn’t help you find lost files in Windows 8, File Explorer can give you a more thorough search across all folders and connected drives. Here’s how to use it:
- Press Windows + E or click the folder icon on the taskbar to open File Explorer, where you can browse through all your files and folders.
- In the left panel, select This PC. This option lets you search across your main storage locations and any connected devices.
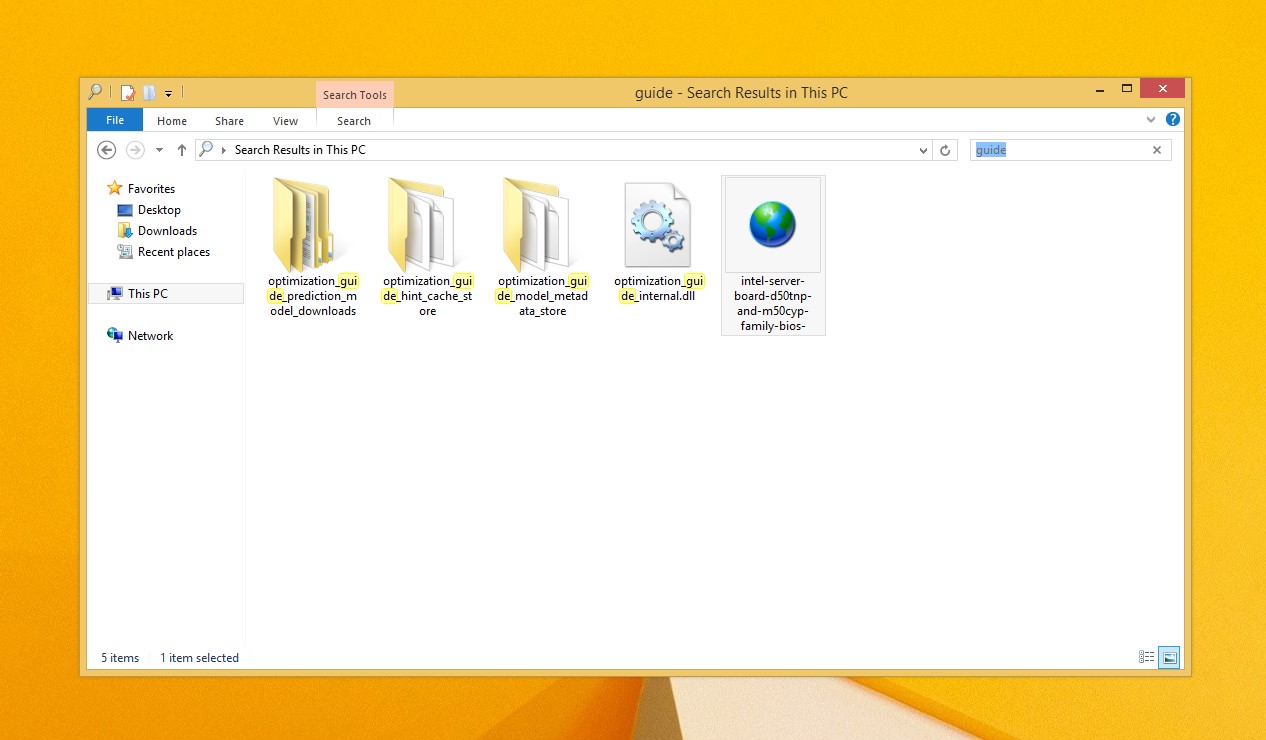
- At the top-right, click in the search bar and type part of the file name, a keyword, or even a file extension (like .docx for Word files or .jpg for photos).
- If you get too many results, you can filter to narrow things down. After you start typing, a Search tab appears at the top. Click it to filter by file type, date modified, size, and more.
- Once you find your file, double-click to open it. Or, to go to its folder, right-click and choose Open file location. This will take you straight to the file’s exact spot in File Explorer.
Got nothing? Check Recycle Bin
If you found nothing, the next logical step is to check the Recycle Bin. It looks and acts the same as in other versions of Windows.
![]()
As always, there are two main ways to delete a file in Windows, and Windows 8 is no exception:
- 🟢 Delete. When you select a file and press the Delete key on your keyboard, or right-click and select Delete from the context menu, the file moves to the Recycle Bin.
- 🔴 Permanent delete. When you select a file and press Shift + Delete, the file skips the Recycle Bin and becomes permanently deleted. You’ll need to use more advanced recovery methods to recover permanently deleted files.
Sometimes, even if you didn’t use Shift + Delete, a file might still skip the Recycle Bin and get permanently deleted. Here are some cases where this can happen:
- If a file’s size exceeds the Recycle Bin’s limit, Windows will permanently delete it instead. You’ll usually get a prompt letting you know.
- Files deleted from external storage, like USB drives or SD cards, don’t go to the Recycle Bin. They’re deleted permanently right away.
- Your Recycle Bin might be set to permanently delete files. To check, right-click the Recycle Bin icon, go to Properties, and make sure the “Don’t move files to the Recycle Bin” option isn’t selected.
That being said, here’s how to recover deleted files that are still in the Recycle Bin on Windows 8/8.1:
- Double-click the Recycle Bin icon on the desktop.

- Select all missing files.
- Option 1: Click on any of the selected files to drag them all to your desktop or any other folder.
- Option 2: Right-click any of the selected files and select the Restore option to move them to their original locations.
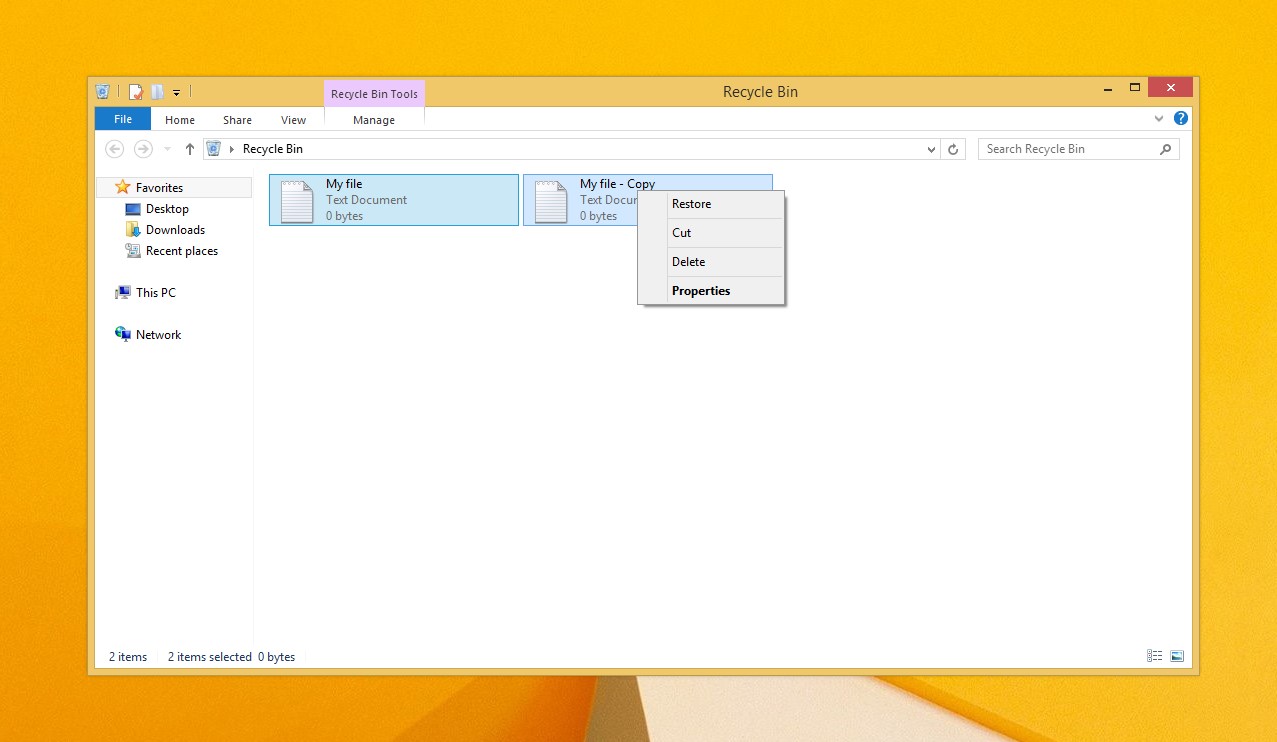
If you can’t find the missing files in the Recycle Bin because it has already been emptied or because the files were deleted using the Shift + Delete shortcut, then you need to move on to the next method.
How to Recover Permanently Deleted Files in Windows 8/8.1
When you delete a file on Windows 8 (or most other systems), it’s not truly “gone” instantly. Instead, the system marks the space where the file was stored as available for new data. Think of it like removing a label from a file folder—the folder is still there, but Windows now considers that space open to use for something else.
![]()
Until new data is written over that area, the original file remains on the drive and can often be recovered with specialized software. These tools scan the disk for data marked as “deleted” but not yet overwritten. Whereas Windows 10 users can download Microsoft’s new Windows File Recovery tool from the Microsoft Store, Windows 8 users have to rely on third-party data recovery applications.
Such applications are available at a variety of price points, and there are even many excellent free solutions capable of recovering all commonly used file formats (documents, images, videos, audio, file archives, and more) from internal hard drives, external hard drives, memory cards, USB flash drives, and other storage devices.
One easy-to-use undelete tool for Windows 8 is Disk Drill Data Recovery. Its free version can recover up to 500 MB, and users can choose exactly which missing files they want to recover and preview them while they’re still technically deleted. Here’s how to get back permanently deleted files in Windows 8/8.1 using Disk Drill:
- Go to Disk Drill’s official website. Be careful not to download the latest version (Disk Drill 5), as it won’t run on Windows 8. Instead, use the download link for Disk Drill 4.5, which supports Windows 7, 8, and 8.1.
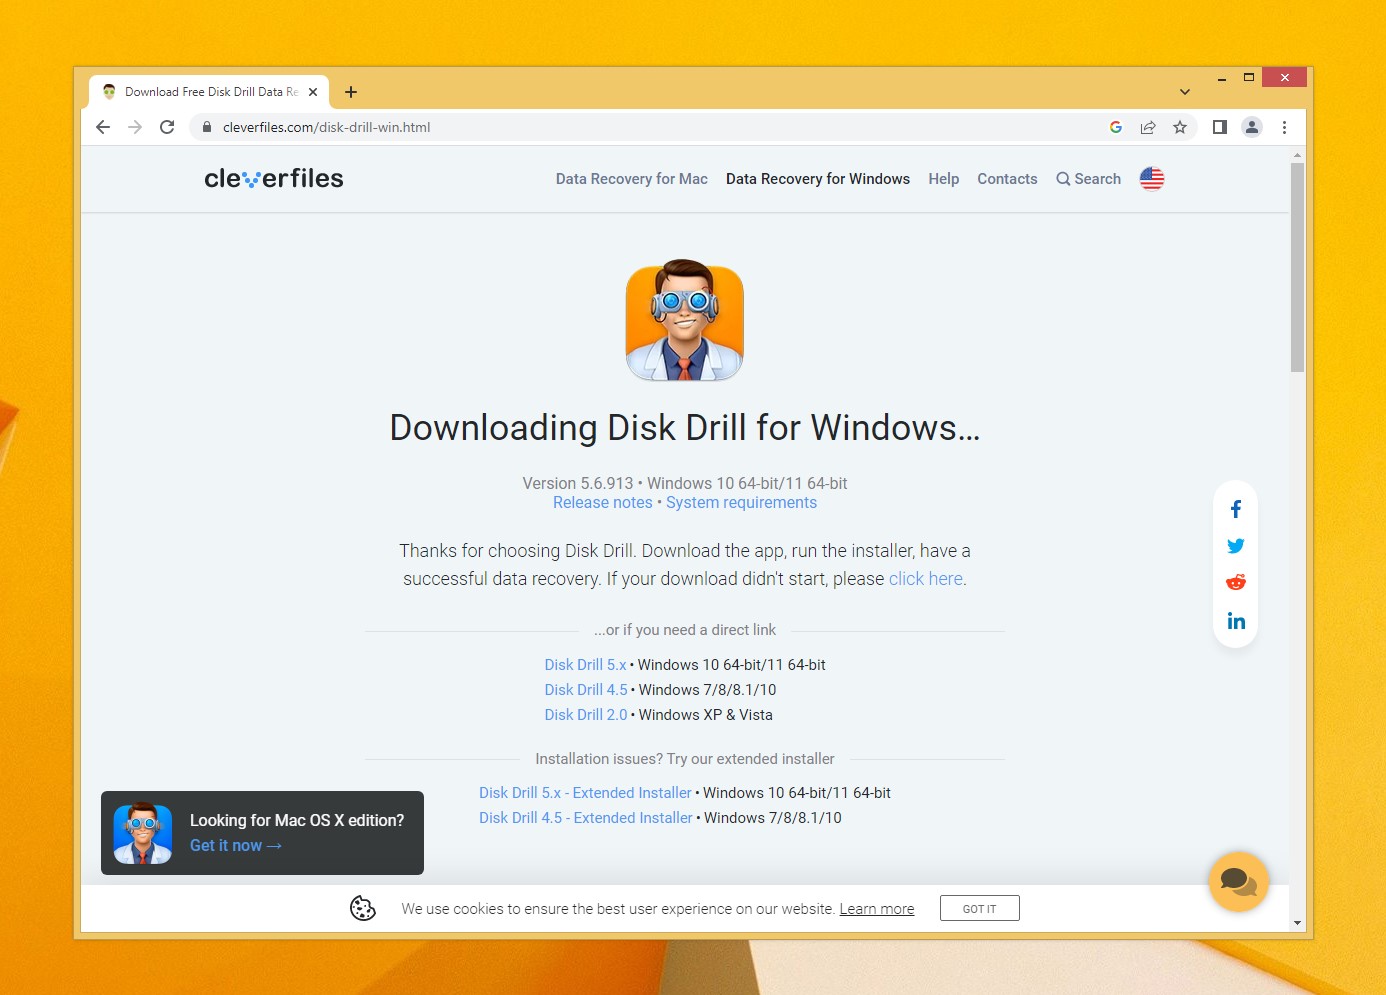
- Open the downloaded file to start the installation process. It may ask for permissions, so allow any prompts that appear to proceed.
- Open Disk Drill, and you’ll see a list of available storage devices on your system.
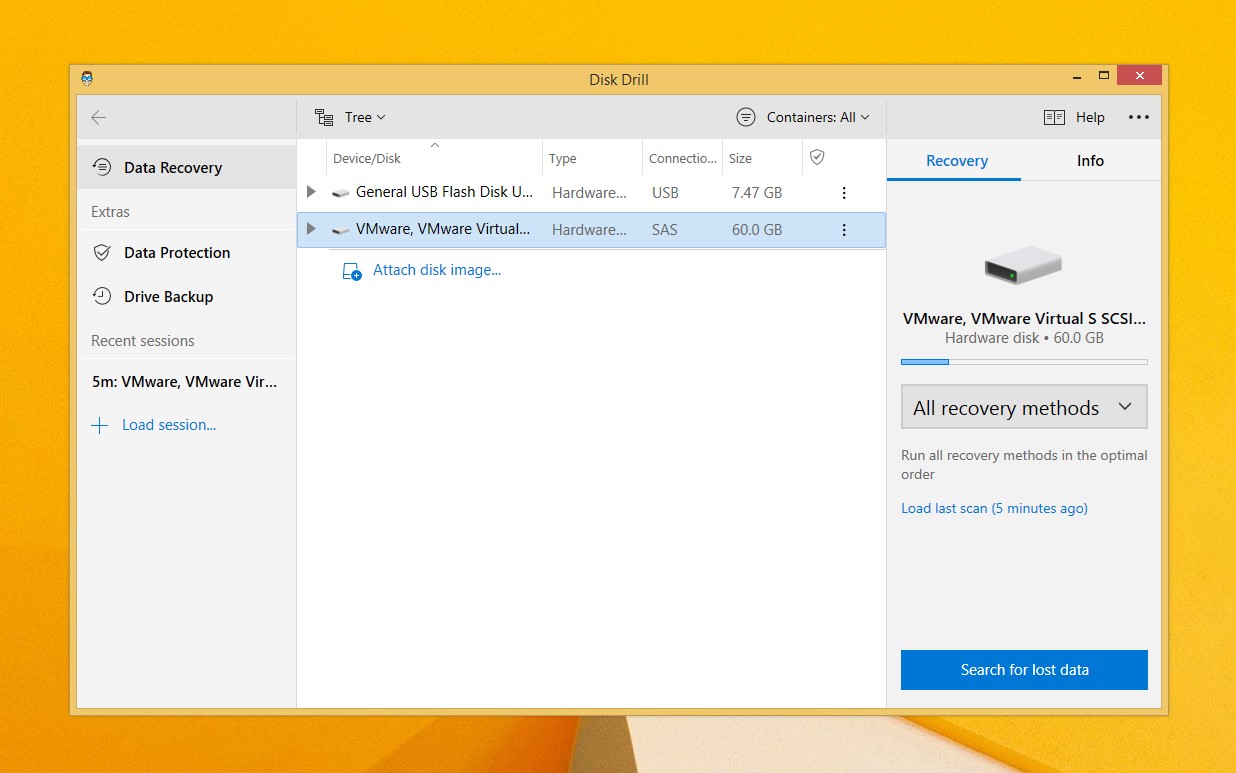
- Find the drive where your lost data was stored before it was moved to the Recycle Bin or permanently deleted—usually your C: drive if it’s the main one, or an external drive if that’s where the data was.
- Click the Search for lost data button. This starts Disk Drill’s scan, where it searches for any files marked as deleted.
- Disk Drill defaults to All recovery methods as the scan mode, which means it will automatically go through all available methods. Keep this setting as it covers all bases for file recovery.
Disk Drill will go through three scan modes to search for recoverable files:
- Quick Scan: Fast and checks the file table for recently deleted files.
- Deep Scan: Does a full scan of the entire drive, looks for raw data to reconstruct files. Perfect for more complicated data loss.
- Signature Scan: If the file system is really damaged or missing, Signature Scan detects files by their unique signatures. It’s great when other scans can’t locate what you need.
- As Disk Drill scans, you’ll see files show up in real-time, sorted into categories like Pictures, Video, Audio, and Documents.
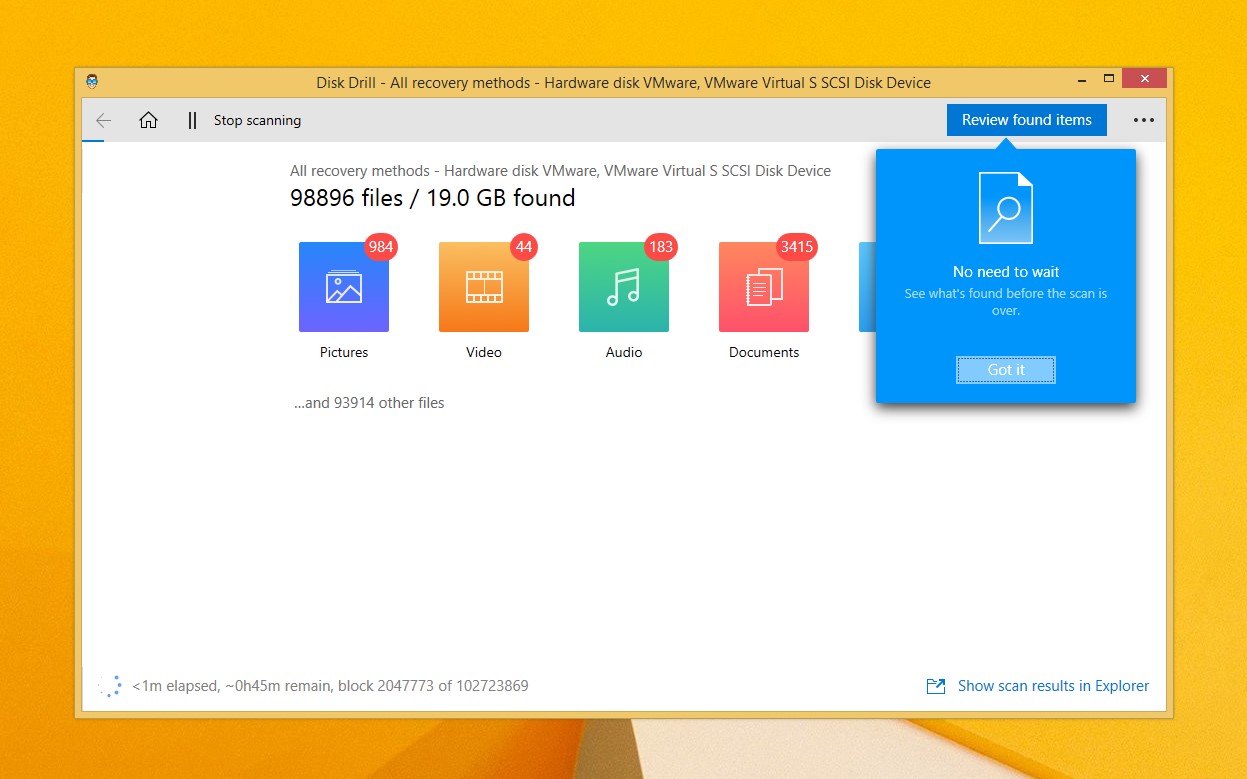
- You can click on any category to see what’s been found so far. To get an overview of everything, click Review found items at the top. Disk Drill also gives helpful tips and suggestions along the way, which makes it easier to understand your options and next steps, as shown in the screenshot.
- Next, you’ll see all recoverable files, sorted by type and folder structure (if possible). You can use the search bar to look for specific files by name or filter by file type to help narrow things down.
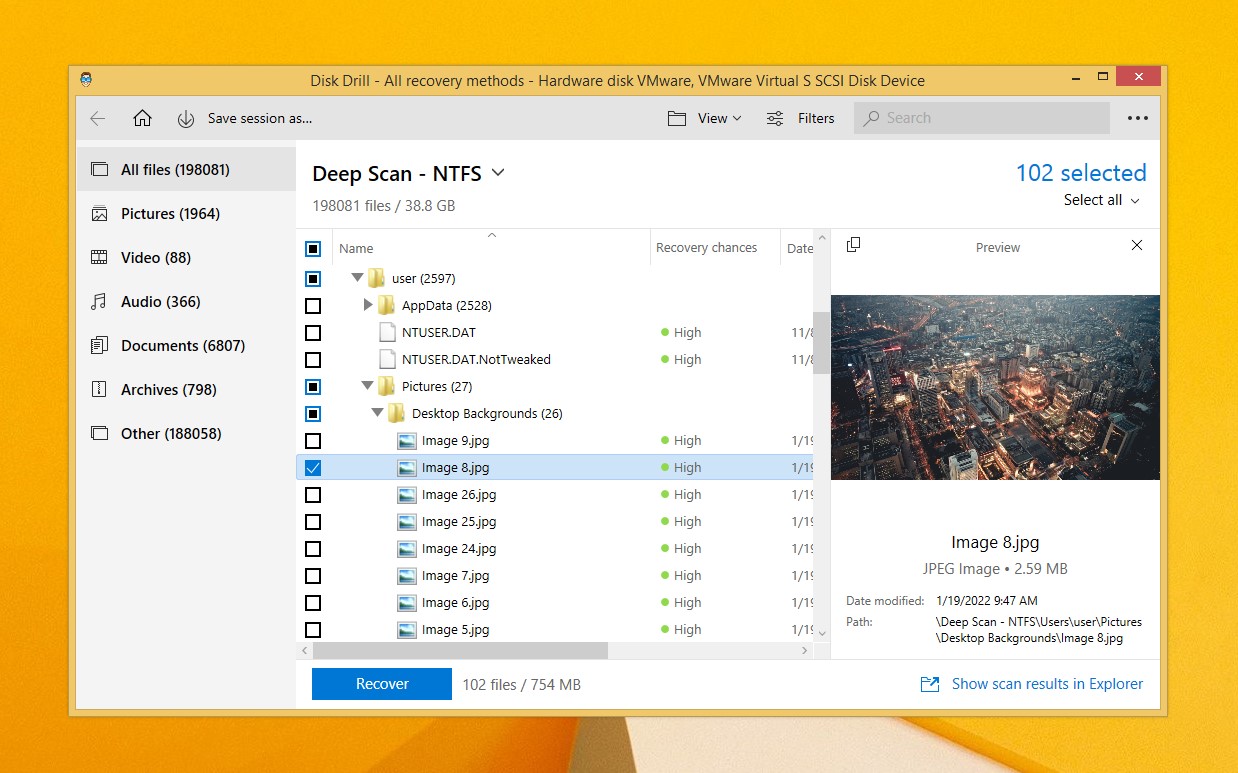
- Click any file to preview it—Disk Drill supports previews for all file types that have the appropriate software installed on your Windows 8 system. Disk Drill also rates recovery chances as High, Average, or Low, so you’ll know the likelihood of getting each file back intact.
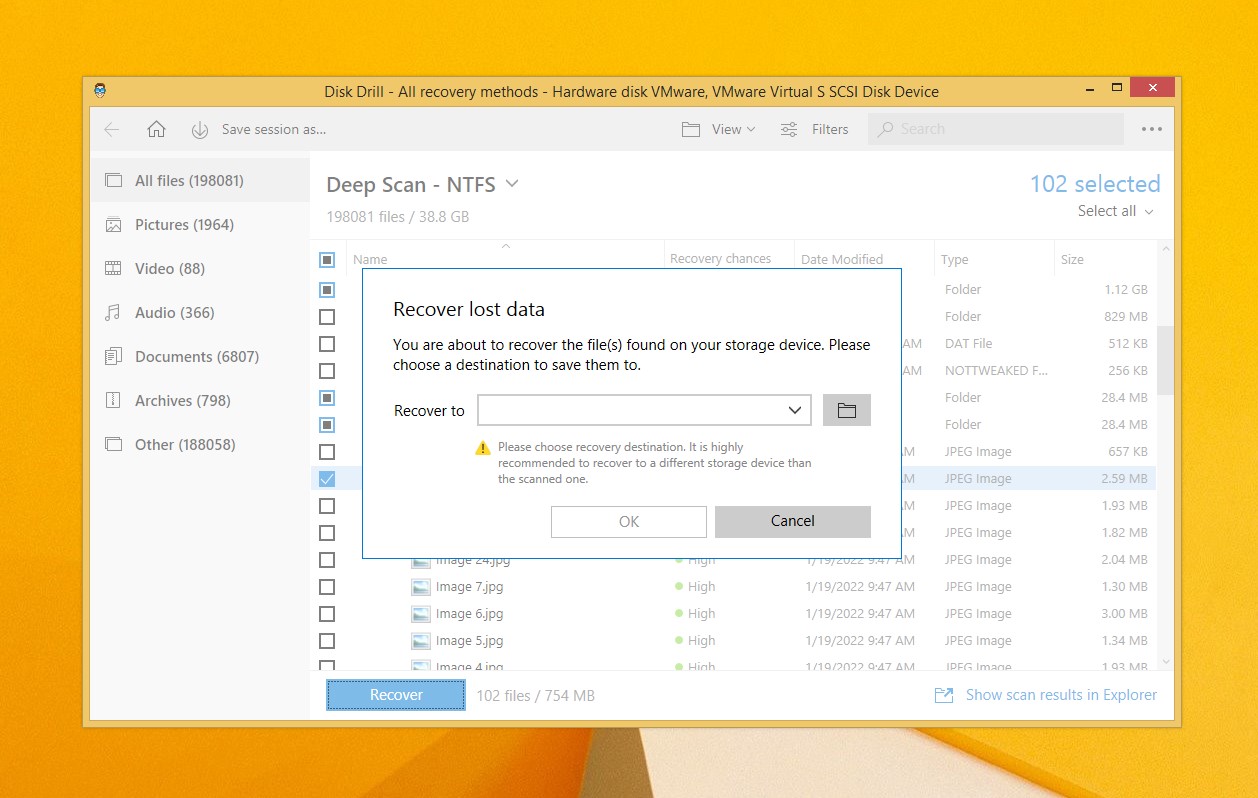
- Choose the files you want, and click Recover at the bottom. Disk Drill will ask where you want to save the recovered files. If possible, choose a different drive or an external device to avoid overwriting any remaining recoverable data on the original drive.
To recover more than 500 MB of data, you need to upgrade to Disk Drill PRO.
If, for some reason, Disk Drill doesn’t seem like the right fit for you, there are plenty of other recovery options. You can check out the top Disk Drill alternatives for data recovery on Windows, each with its own set of features and strengths.
Don’t Forget About Built-in Windows 8 Backup Options
Oh, and we’ve got to mention Windows 8’s backup options. Microsoft has included some kind of backup tool in Windows for a while, with basic features in early versions and eventually rolling out Backup and Restore in Windows 7.
![]()
With Windows 8, they added File History. It was first introduced in Windows 8 build 7878 under the name History Vault. By the time Windows 8 officially launched, it was rebranded as File History—a simple but powerful tool that quietly backs up your documents, photos, videos, and other key files without much setup, and you can use it to recover even permanently deleted files that are no longer present in the Recycle Bin.
Unfortunately, File History isn’t automatically enabled on Windows 8/8.1 computers. To use it for recovery, it would need to have been activated BEFORE any data loss happened.
To restore permanently deleted files using File History on Windows 8/8.1:
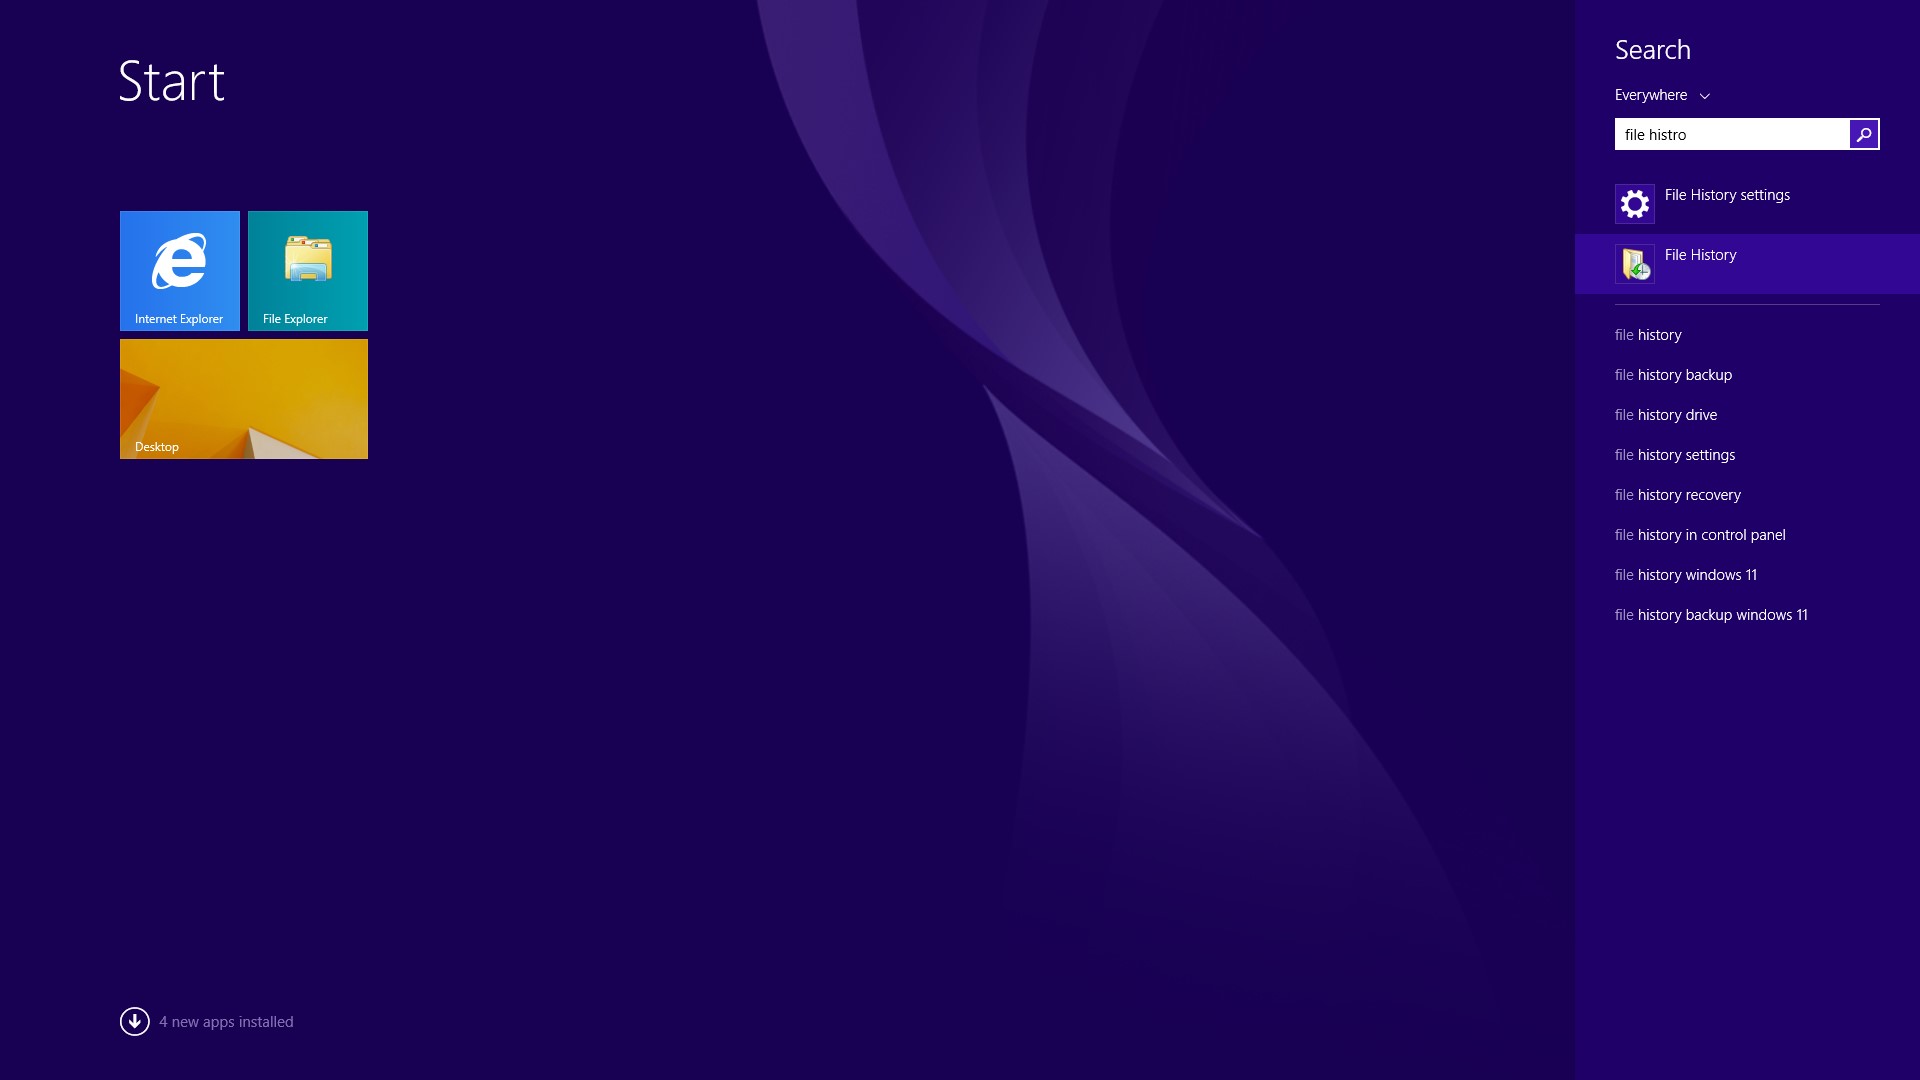
- Press the Windows key to display the Windows 8 Start screen.
- Type “file history” and select Restore your files with File History from the list of results on the right.
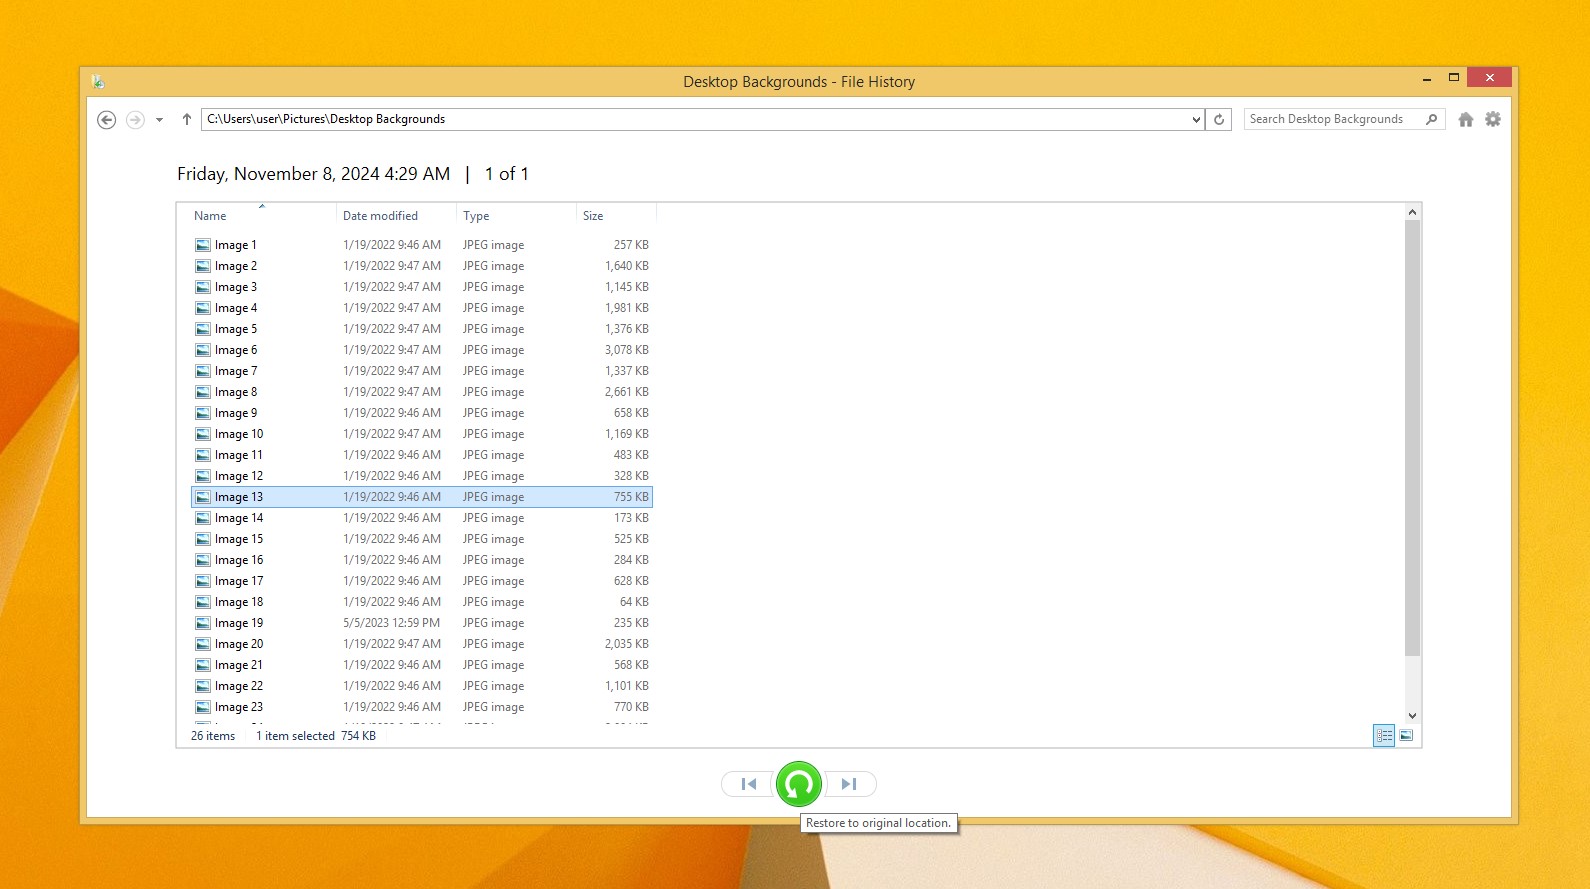
- Navigate to the folder where your files were located.
- Use the arrow buttons to select a backup that contains the missing files.
- Select your files and click the green restore button.
Is it Still Safe to Use Windows 8?
Windows 8.1 officially went out of support on January 10, 2023. So, if you’re still with it, just know that Microsoft has stopped sending it security updates, software patches, or any love at all. No Extended Security Update (ESU) program is here to save the day, so if you stick with 8.1 it could mean you’re left vulnerable to security risks and potential compliance issues.
Interesting fact: As of October 2024, only 0.19% of users still run Windows 8, and just 0.31% use Windows 8.1.
We recommend an upgrade to Windows 11. Here’s what you need:
- Processor: 1 GHz or faster, with two or more cores on a compatible 64-bit processor or SoC (system on a chip).
- Memory: 4 GB of RAM (at least).
- Storage: 64 GB of free space for updates and apps.
If your current computer doesn’t meet these specs, it might be time for a PC upgrade as well. Trust us, your system (and sanity) will thank you for it. Plus, you’ll stay up-to-date with the latest apps, security features, and all the good stuff Microsoft’s rolled out since the days of tiles and charms.
FAQ
How to recover permanently deleted files on Windows 8.1 without software?
If you don’t want to use third-party software, you can recover permanently deleted files on Windows 8.1 using the File History, but keep in mind that File History must have been activated and running before the files were deleted.
What is the best data recovery software for Windows 8?
The best free data recovery software for Windows 8 includes Disk Drill, Recuva, and PhotoRec. Out of these, Disk Drill can recover the most file formats, but its free version is limited to 500 MB of recovered data.
How to recover deleted photos on Windows 8?
To recover deleted photos on Windows 8, first check the Recycle Bin. If they aren’t in the Recycle Bin, see if File History is turned on. Go to Control Panel > System and Security > File History, choose Restore personal files, find your photos, and restore them. If File History wasn’t set up, you’ll likely need data recovery software like Disk Drill or Recuva, which can scan your drive and help recover the photos.
This article was written by David Morelo, a Staff Writer at Handy Recovery Advisor. It was recently updated by Roman Demian. It was also verified for technical accuracy by Andrey Vasilyev, our editorial advisor.
Curious about our content creation process? Take a look at our Editor Guidelines.
