Have you accidentally formatted a drive you didn’t mean to and lost important files? Or maybe you planned to format it but realized afterward that you forgot to back up your data? You’re definitely not alone. Formatting mishaps are one of the leading causes of data loss, and this guide has become a go-to resource for thousands of users—drawing over 12,000 visitors last year alone! So let’s not waste time. Here’s everything you need to know to recover your formatted hard drive.
The moment you realize formatting caused you to lose important files, stop using the drive right away. Using it could overwrite the files you’re trying to recover, which will make it much harder to get them back. To better understand how to proceed, thoroughly read through our article.
Want to skip the basics and jump straight to the recovery guide? Click here.
Can I Recover Data from a Formatted Hard Drive?
The short answer is: Yes, you can. However, there are a few factors that may make this process more or less challenging. Stick with us as we equip you with the information you need to recover data from formatted hard drives easily.
What Kind of Drive Are You Using?
There are two common types of drives – HDDs and SSDs. This may seem like superfluous information, but there are key differences between these drives that make data recovery a bit more nuanced.
- Hard Disk Drives (HDDs) store data physically. When you write data onto them, they alter some parts of their surfaces magnetically. As a result, even if you format the data, it is still possible to recover it.
- Solid State Drives (SSDs) are a bit more complicated. They use flash memory and rely on the TRIM command to optimize performance. TRIM erases data blocks completely when they’re marked for deletion. As a result, formatting an SSD often wipes all data, which makes recovery nearly impossible.
And now, some positive news. If you’re using an external SSD with Windows OS, there is a strong likelihood that the TRIM function was not operational. TRIM support over USB is rare—while some external SSDs do support it, they represent a very small percentage of devices. Additionally, if your drive is formatted in exFAT, TRIM will not activate automatically. While we won’t go further into the technical details, this means that data recovery from a formatted external SSD is still possible. Here’s a helpful video that demonstrates how to verify if TRIM is enabled on your SSD.
How Did You Format the Drive?
At first glance, this might seem like a trivial question – does it even matter? Well, it actually matters quite a bit. There are two types of formatting methods you could have used, but only one can be easily recovered from.
- Quick format overwrites the file system, which makes the files inaccessible without actually erasing them. No commands are sent to remove the data itself, so if you performed a quick format, your data is still on the drive and can be recovered. Also If you have an SSD, don’t forget about TRIM, which we discussed earlier, as it can impact recovery.
- Full format (the one performed when you uncheck the Quick Format option) goes one step further than the previous method. In older operating systems, this process simply checked for bad sectors and fixed them. However, nearly all newer OS updates not only delete data but also overwrite it with zeroes. This action permanently removes all stored files. Data from fully formatted drives cannot be recovered using recovery software.
There’s also another formatting method—low-level formatting—but it’s probably not relevant to your case. This process is typically handled by manufacturers or specialized software. While full formatting works at the partition level, low-level formatting formats every bit of memory on the drive, resetting it entirely to factory settings. As you might expect, like full formatting, data recovery is impossible after low-level formatting.
While the principle of storing/writing data (magnetic vs flash memory) has a significant impact on data recovery after formatting, file systems also play a huge role. File systems are like a library catalog for your data. They keep track of where files are located on the storage device. Formatting essentially rewrites the catalog, which removes references to the old data.
Perhaps the most critical aspect to understand regarding file systems and data recovery is that formatting to the same file system can potentially corrupt data records more severely than formatting from one file system (e.g., format A) to another (e.g., format B). However, many data recovery software solutions are capable of recovering data not only by relying on file system records, but also by identifying unique file signatures left on the device. But enough theory, let’s move on to practical data recovery methods.
How to Recover a Formatted Hard Drive
By now, you probably have a good idea whether you can recover data from your hard drive. Unlike some other types of data loss, recovering data from formatted drives requires specialized data recovery software. Unfortunately, the internet is filled with conflicting information on the available tools, which might make it difficult to choose reliable software.
To make this easier, we’ve got a list of the best data recovery apps right here. But in this article, we’ll use Disk Drill.
Disk Drill has been around for some time now (the Windows version was released in 2015) and has gained significant traction in the data recovery market. As of this article update, Version 5 is the latest release, but some users, like this popular Reddit reviewer, have already had a chance to try Version 6 and shared their thoughts.
![]()
Many users and reviewers have praised its recovery algorithms, interface, and reliability. It can successfully recover data from formatted drives or file system loss across various file systems (FAT32, exFAT, NTFS, EXT4, and more). It boasts a large database of supported file types (signatures) and is constantly being updated. To us, this means that the creators are always making sure that their performance does not dip, and that they take reviews and feedback seriously. We have personally extensively tested it in several other cases too.
In the example below, we’re working with a formatted external hard drive. That said, the same steps work for formatted internal (non-system) drives—or even system drives, as long as you can connect them to another computer to run the recovery.
If you formatted your system drive and didn’t install a new OS (keep in mind, installing a new OS can seriously hurt your recovery chances), and you don’t have another computer to connect the drive to, your best bet is to use bootable data recovery software.
Here’s a step-by-step guide to recover a formatted hard drive:
Step 1: Download the Software
Download Disk Drill from the Cleverfiles’ official website. As you click the download link, the latest version (Disk Drill 5) should download automatically. This version is designed for Windows 10 and Windows 11.
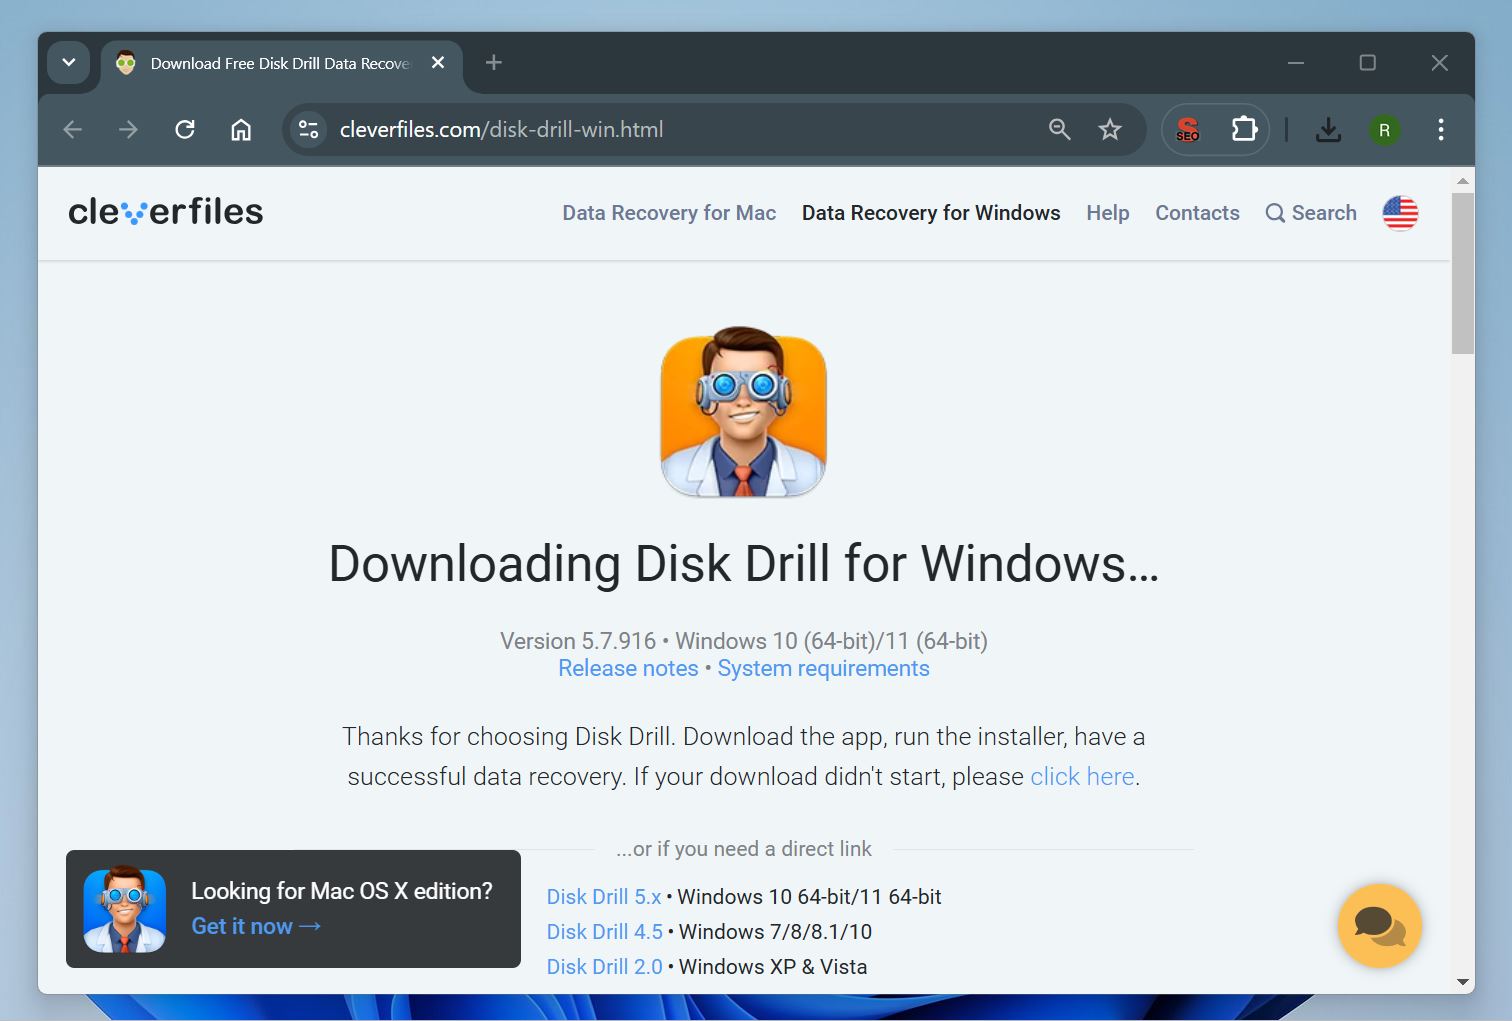
You’ll also notice an option to download older versions if you’re using older Windows. For instance:
- Disk Drill 4.5 for users running Windows 7, 8, or 8.1. It retains most of the features of newer releases.
- Disk Drill 2.0 is a legacy version intended for systems like Windows XP and Vista. While it lacks some of the advanced features of newer versions, it remains a good option for data recovery on older machines.
Did you know? We also put Disk Drill through rigorous testing to evaluate its safety and reliability for your PC. It won’t harm your system during the data recovery process.
Step 2: Install It
Find the downloaded file (usually in your Downloads folder) and double-click it to open.
Caution! – Make sure that you install Disk Drill on a separate drive. If you install it on the formatted hard drive (or partition), it can lead to overwriting and permanent data loss.
Follow the setup wizard. The clean user interface will guide you through the installation process. Click Next, choose your installation folder, and agree to the terms of use.
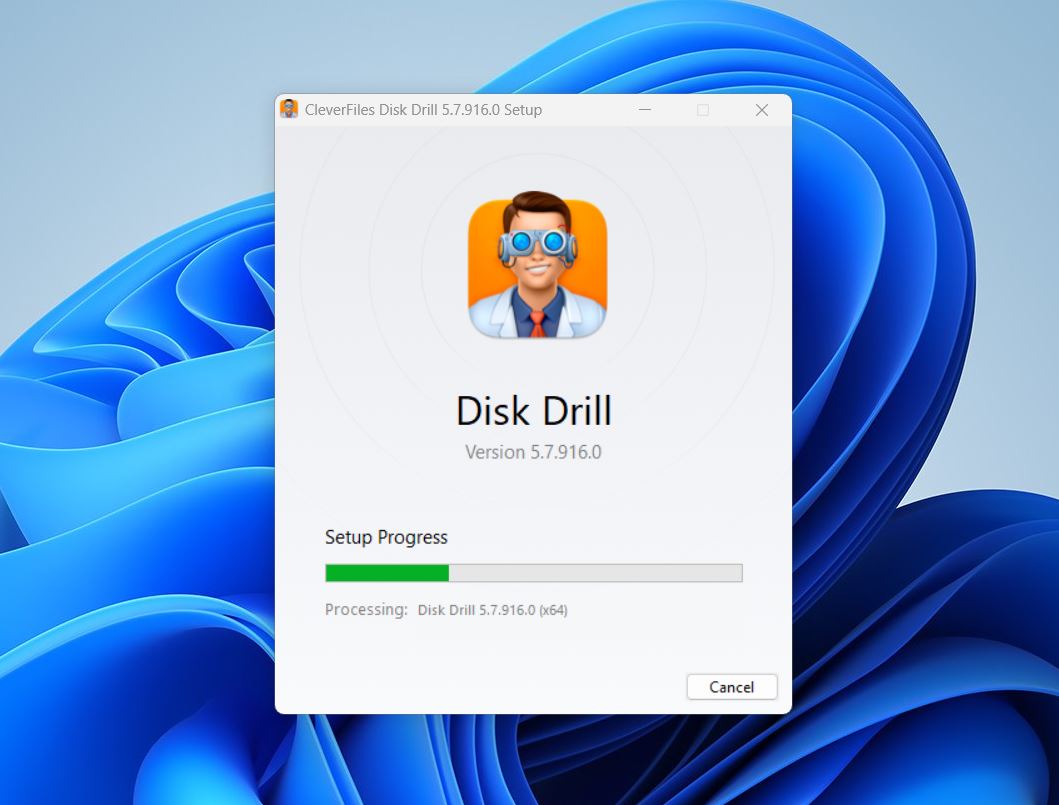
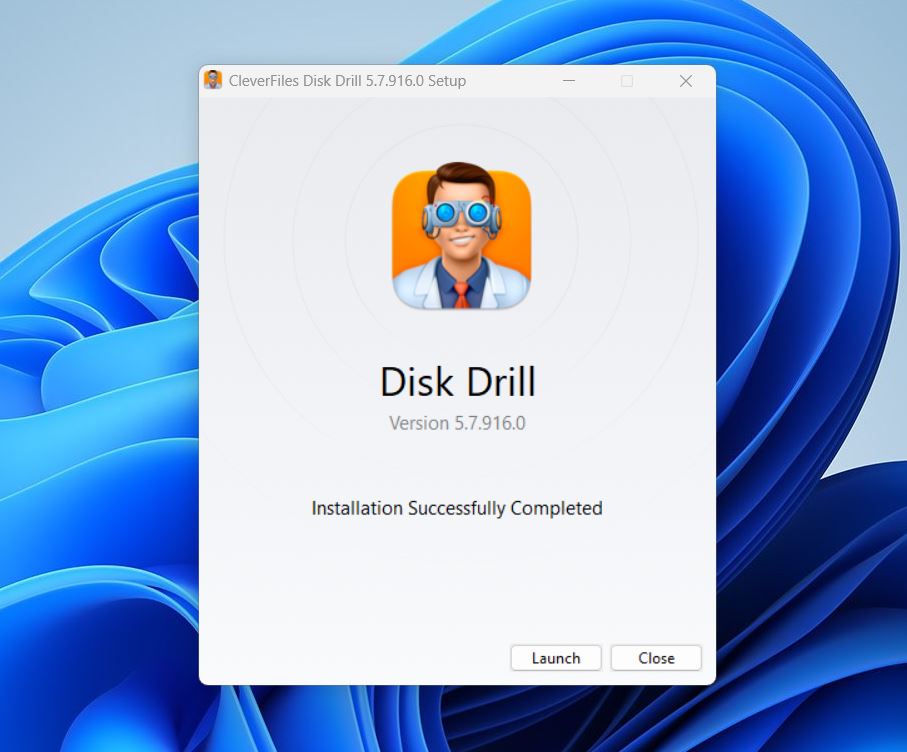
The whole process should take about a minute. When the installation finishes, you’ll see an option to Launch Disk Drill. Click it to open the software.
Step 3: Connect the Drive (For External Drives)
Make sure the connection is solid, and if the drive has its own power source, double-check that it’s turned on. Once it’s plugged in, your first stop is File Explorer under This PC. If you can’t spot the drive there—it might just be missing a letter assignment.
Right-click the Start Menu and select Disk Management. 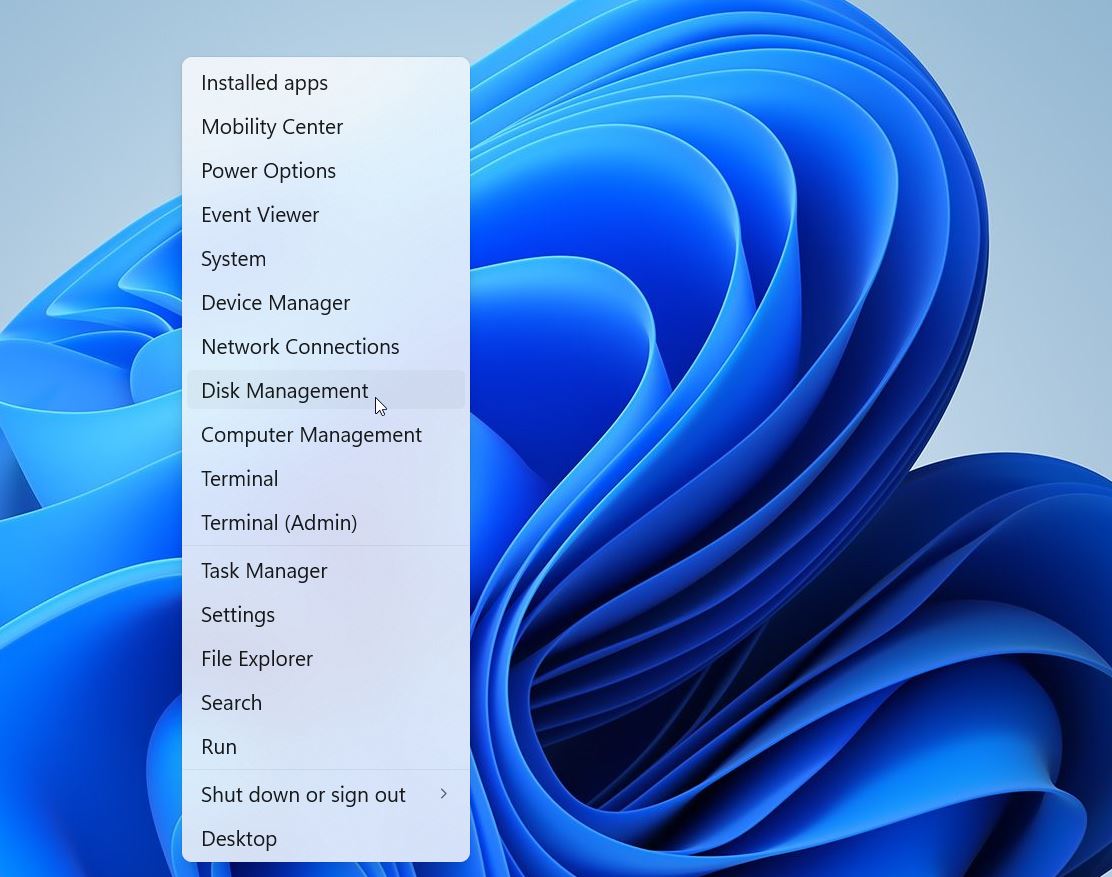 Scroll down to the list at the bottom, where all connected drives are listed. Look for your drive by its size—it’s usually a dead giveaway.
 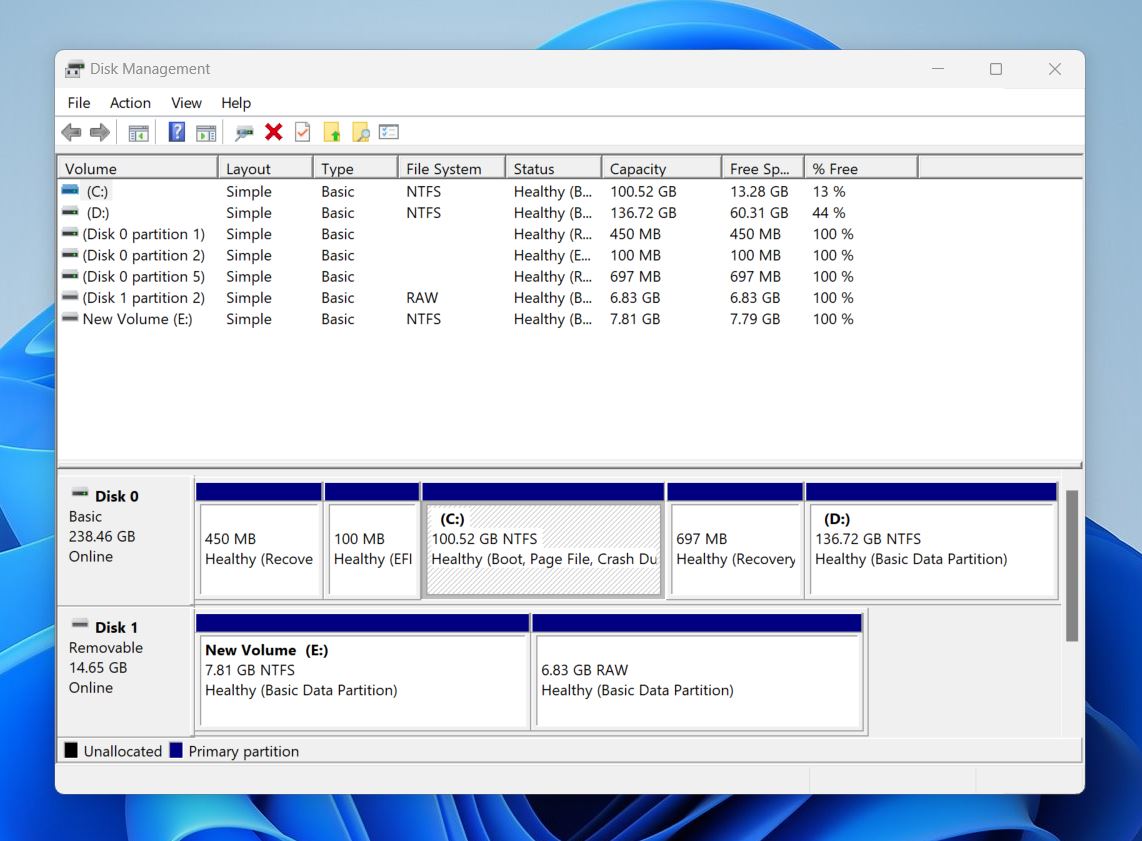 If it’s there, you’re in good shape. The missing letter might explain why it’s not popping up in File Explorer, but that won’t stop Disk Drill from scanning it. You’re all set to move on to the next step.
Step 4: Launch the Tool and Select the Drive
Now it’s time to get down to business. On the main screen, you’ll see a list of all connected drives and partitions. Look for the drive you want to recover data from—it should show up with its size and name. You can choose to scan the entire drive or just a specific partition if only the partition was formatted. That said, we still recommend scanning the entire drive.
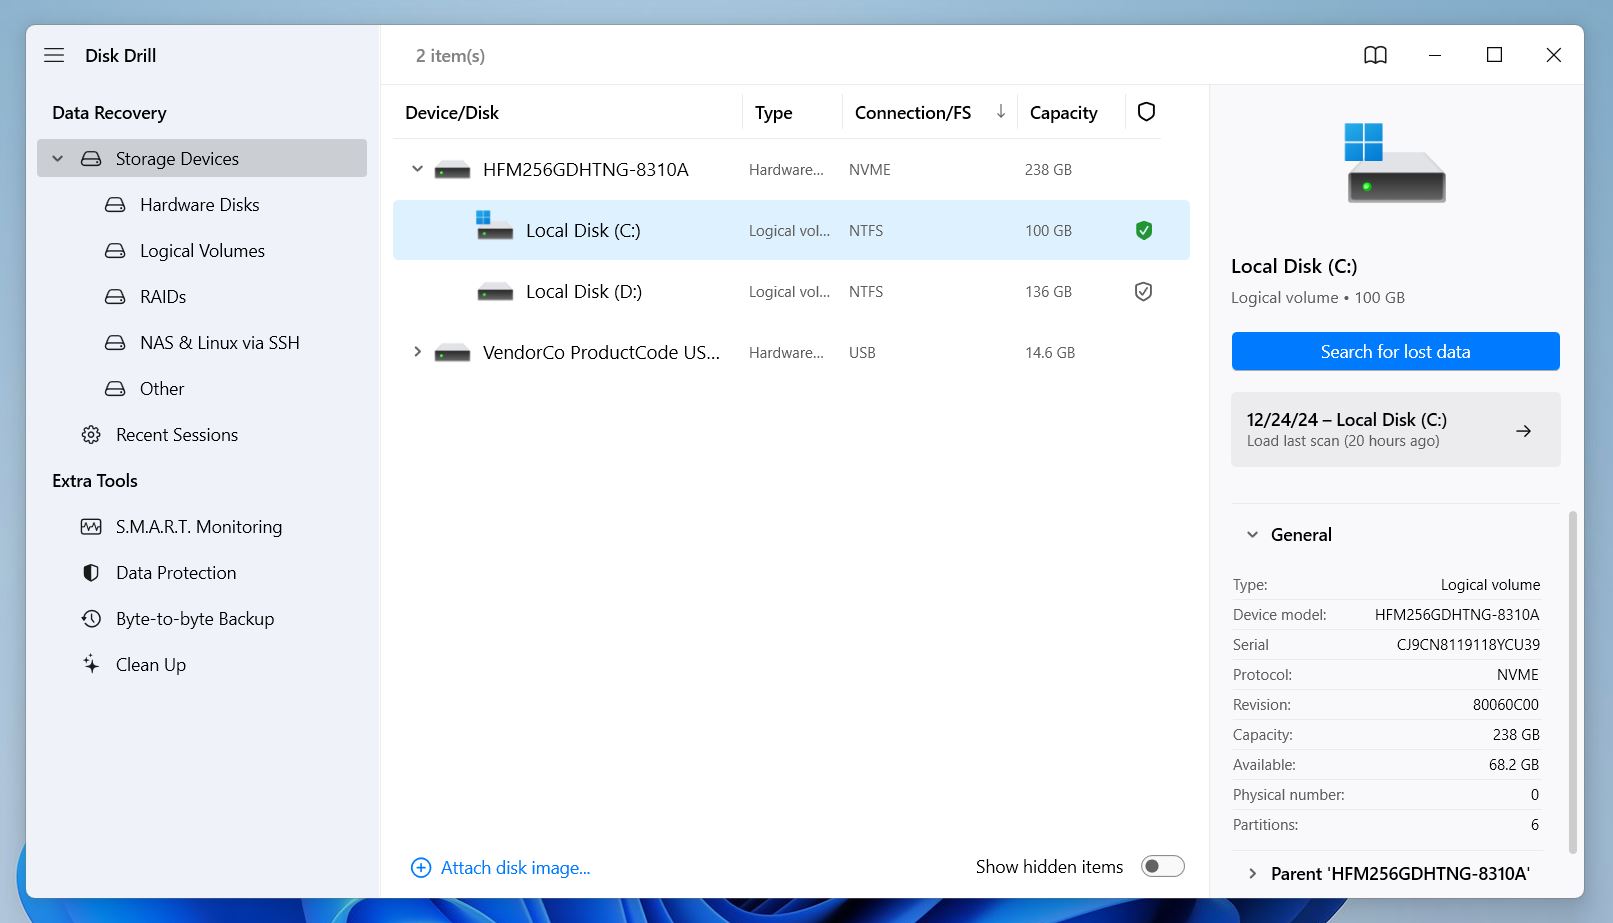
If you don’t see all the partitions listed, toggle the Show Hidden Items option at the bottom of the screen. This will reveal any hidden or unallocated partitions that might still contain recoverable data.
Disk Drill operates on a freemium model, that lets you restore up to 500 MB of data at no cost. The free version also includes several handy tools, like S.M.A.R.T. monitoring, which lets you keep tabs on your drive’s health, and byte-to-byte backup, a feature that creates a full image of your drive. This image can then be scanned instead of the drive itself, which is incredibly useful if you’re dealing with a failing drive.
For example, if you formatted a drive because your system prompted you to, it could be a red flag that something more serious is wrong with the drive. In such cases, creating an image first is critical—it protects your data, as even read-only operations on a failing drive can lead to permanent loss. If you encounter this red flag, you can refer to the link we shared earlier for a step-by-step guide on how to create an image of your drive and scan it instead.
Step 5: Start the Scan
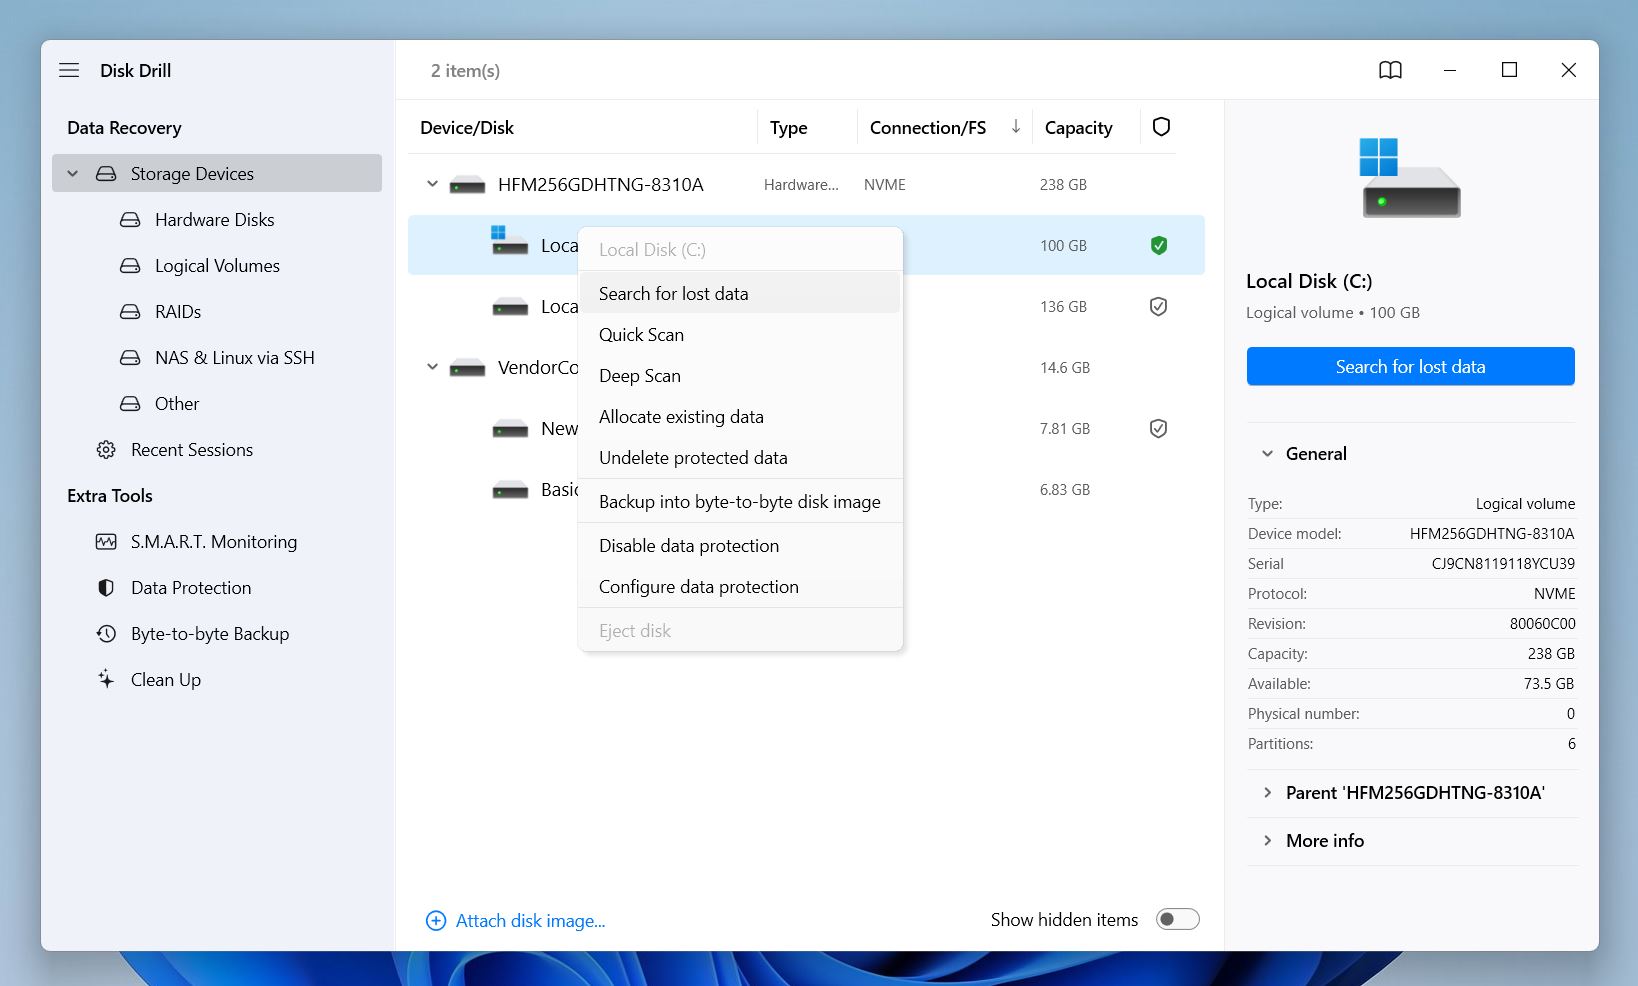
To begin the recovery, simply click the Search for lost data button next to the drive or partition you selected. If you prefer, you can also right-click the drive or partition and select the same option from the context menu.
Once you click it, Disk Drill’s advanced algorithm begins scanning the formatted drive for traces of recoverable files. The entire scan may take some time (It depends on the hard drive’s size, the type of connection, its condition, and the number of file systems the disk has been formatted or used with).

As the scan progresses, Disk Drill automatically organizes all recoverable files into specific categories like Pictures, Video, Audio, Documents, Archives, and Other Files. You have two main options for retrieving your data:
- Once the scan finishes, you can simply click on the Recover All button to retrieve all files found without sorting through individual categories. Just choose a safe location to save everything.
- If you want to go in while the scan is still running, that’s no problem! You can start looking through files as they’re being discovered. Click on a specific category, like Videos, to see the videos already found, or click Review Found Items to view all files so far. This way, you can quickly locate specific files without waiting for the scan to fully complete.
Step 6: Filter The Results
If you opt for Review Found Items, you’ll see a neatly organized list of files, usually divided into three categories – Deleted or Lost, Existing, and Reconstructed.
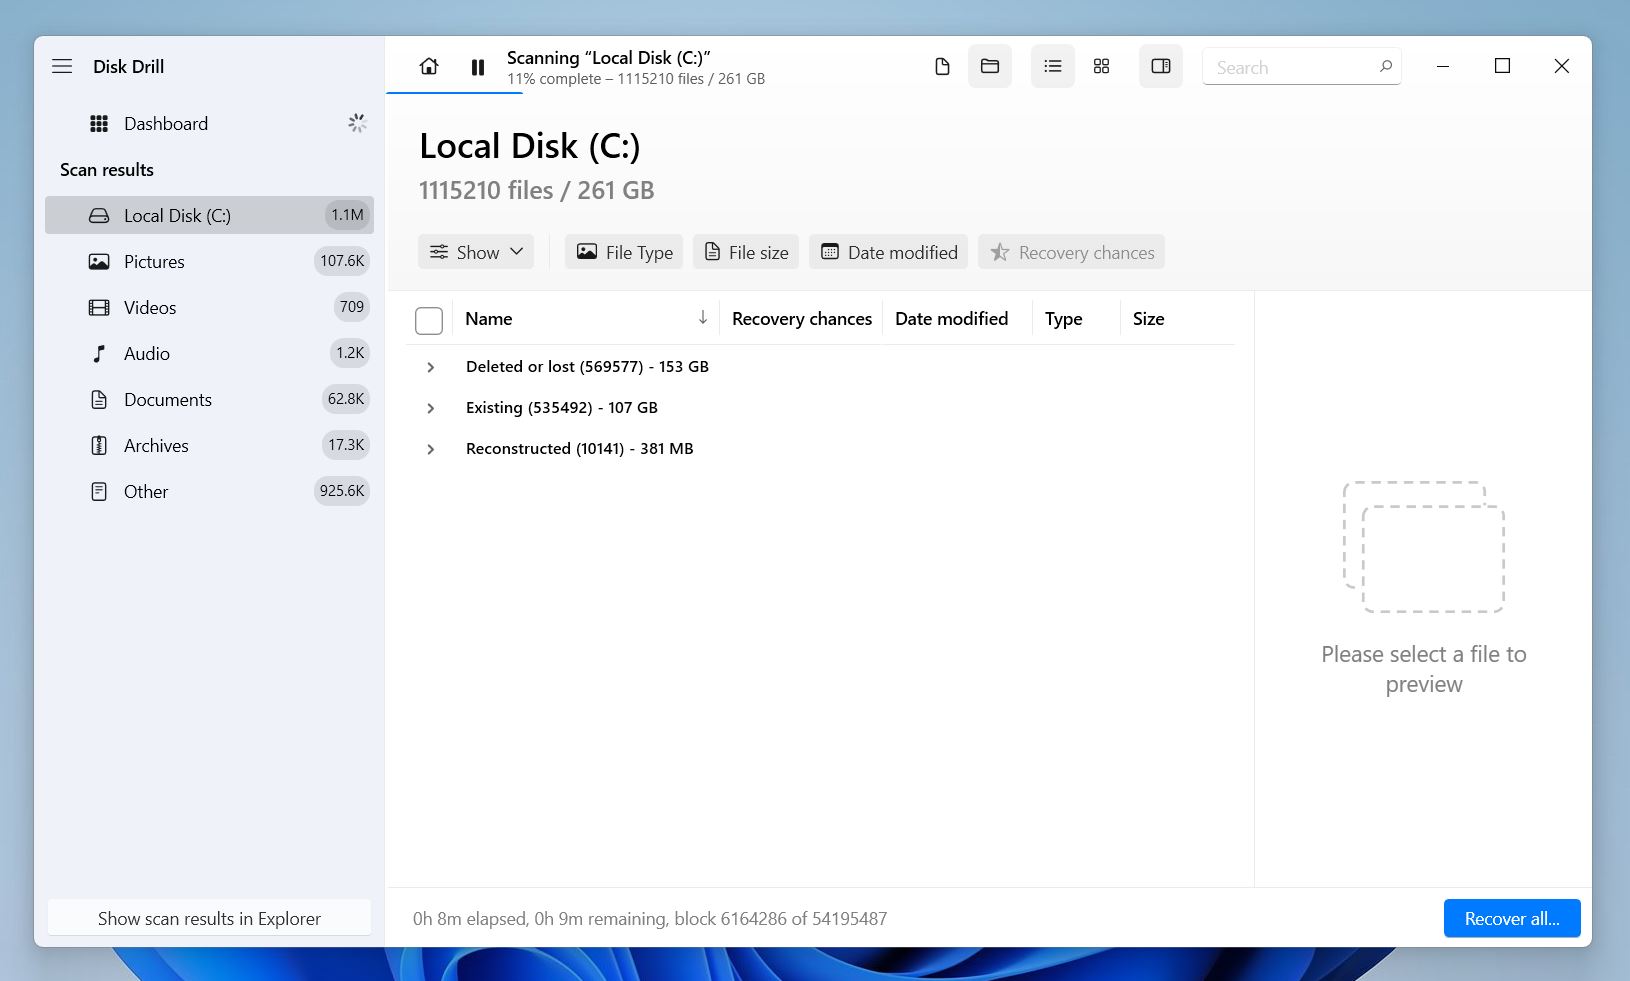
- 📁 Deleted or Lost: This category lists the files you lost during the hard drive format.
- ⚒️ Reconstructed: This category has files that Disk Drill found based on their structures. Disk Drill employs signature scans to find such files.
- 💾 Existing: Since you’re dealing with a formatted hard drive, chances are this category might be empty. However, this category is useful if you want to access files that you cannot normally access through File Explorer.
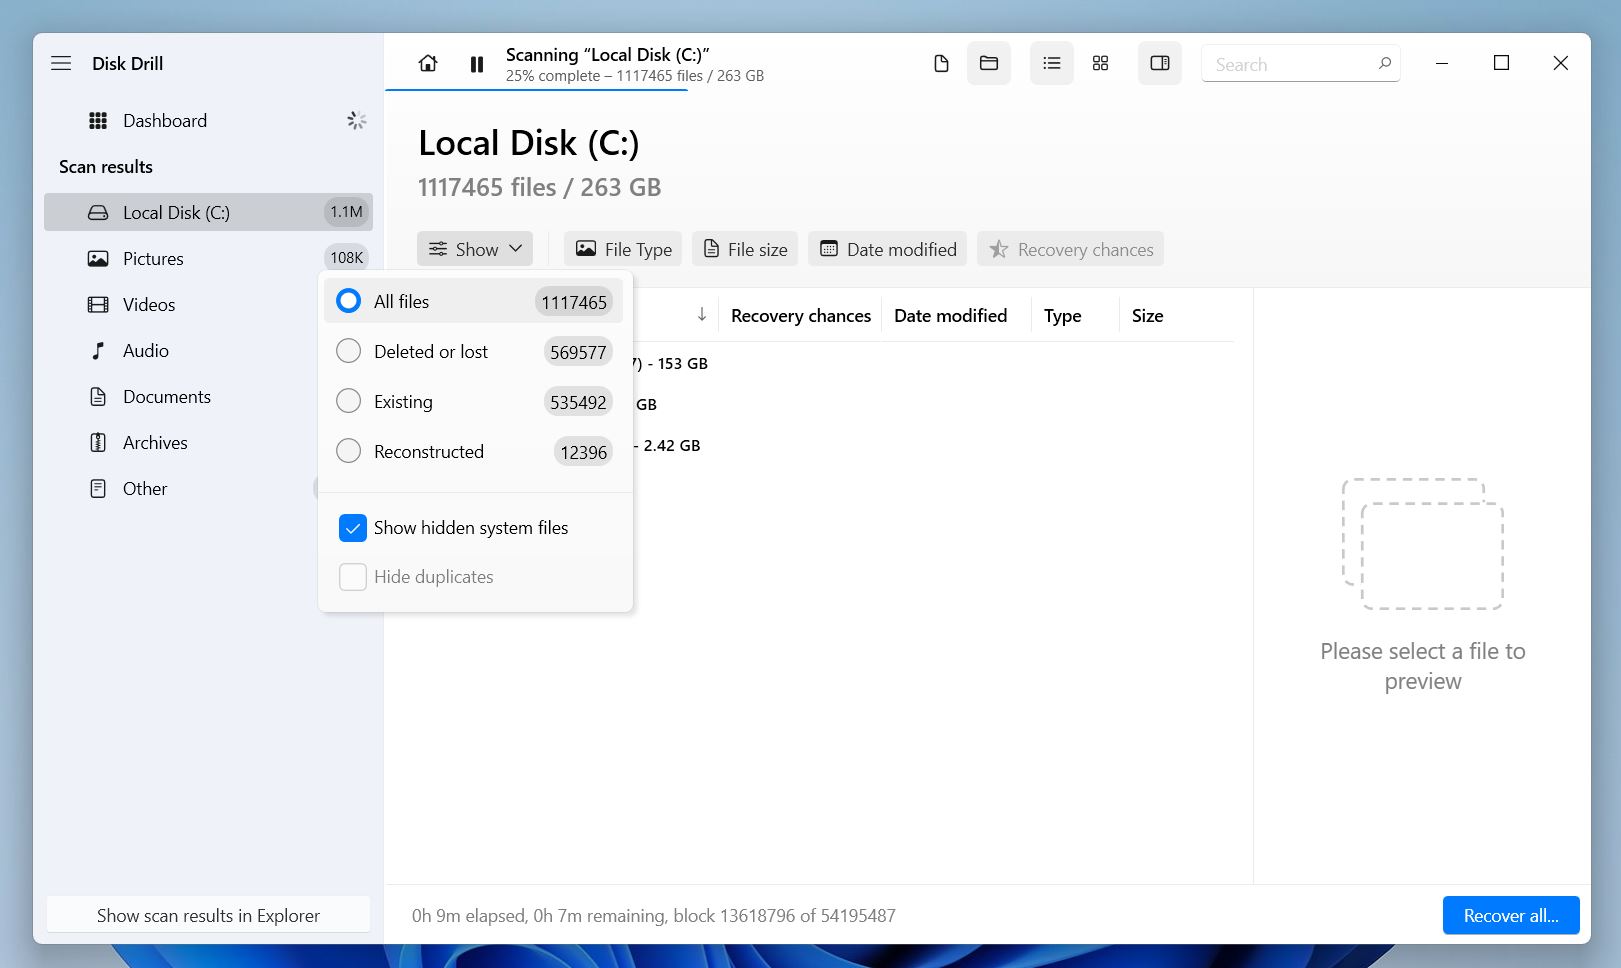
At the top, you can adjust how the files are displayed. You can switch between Tree View, which organizes files by folder structure (great for navigating familiar directories), or Icons View, which shows thumbnails for easier visual identification of files like photos or videos.
You can also use quick filters to refine what you’re looking at. Under the Show menu, you can:
- Display All Files to see everything found.
- Narrow it down to Only Deleted or Lost files if you’re focused on recovering specific missing data.
- View Existing Files that are still intact.
- Hide Duplicates to avoid cluttering the list.
- Enable Show Hidden System Files if you need access to system-level data.
You can also use the search bar at the top, just like you would in File Explorer to quickly find files by a name, a partial name, or even just a file extension.
For instance:
- Type in “report” to find all files with “report” in the name.
- Enter “.jpg” to pull up all JPEG images found.
- Use a partial name like “doc” to locate files with names containing those letters, such as Word documents or folders named “Documents.”
Step 7: Preview Recoverable Files
As you click on individual files, a small preview will appear on the right side. Disk Drill can preview nearly all file types—either natively supported by your operating system or through third-party apps installed on your PC.
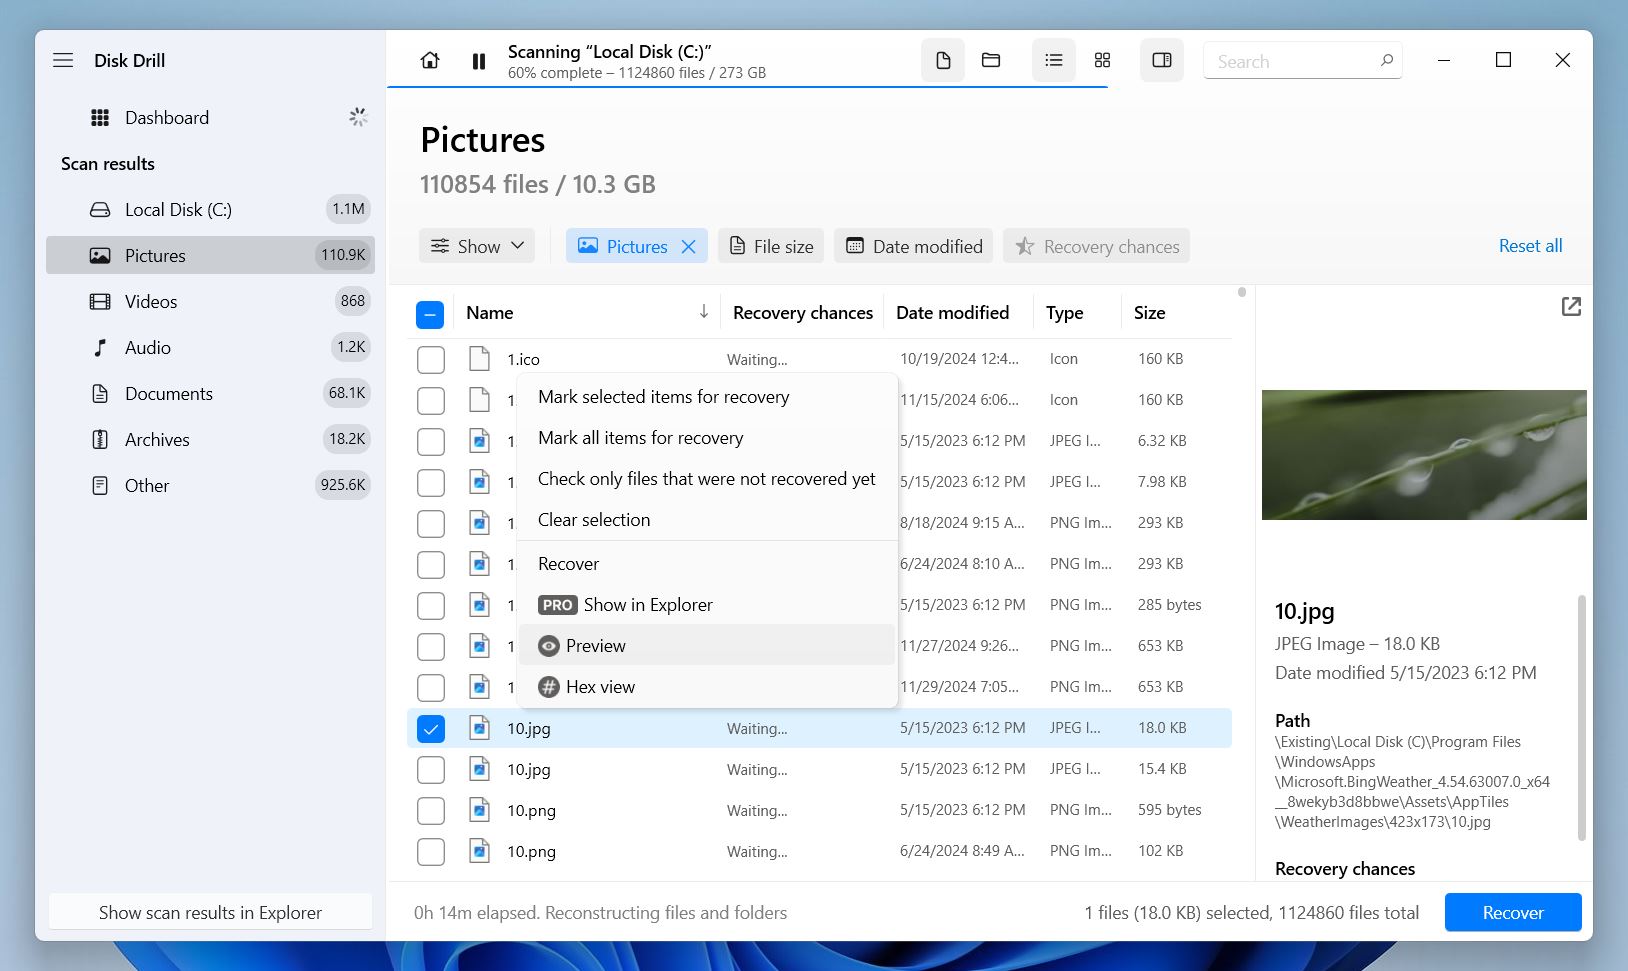
To open a full preview, click the eye icon next to the file name, or right-click and choose Preview from the menu.
Need a deeper info? Select Hex View from the menu to see the file’s raw data in hexadecimal format—super handy for recovery pros checking file integrity or structure.
By the way, if a preview opens without any issues, that’s a solid indicator the file is fine and fully recoverable.
You’ll also notice that each file has a Recovery Chances rating next to it. This gives you a quick idea of how likely it is to restore the file successfully. The ratings are usually:
- High: Almost guaranteed to recover.
- Average: Possible, but the file might be partially damaged.
- Low: Recovery is unlikely or the file might be corrupted.
Step 8: Select and Recover Files
After you’ve selected the files you want to recover or decided to go with the Recover All option, click the Recover button.
Disk Drill will ask you to specify a folder as the target destination before starting the recovery process. If you select the same drive you’re recovering data from, Disk Drill will notify you. This is not recommended, as saving files to the same drive can overwrite the data you’re trying to recover.
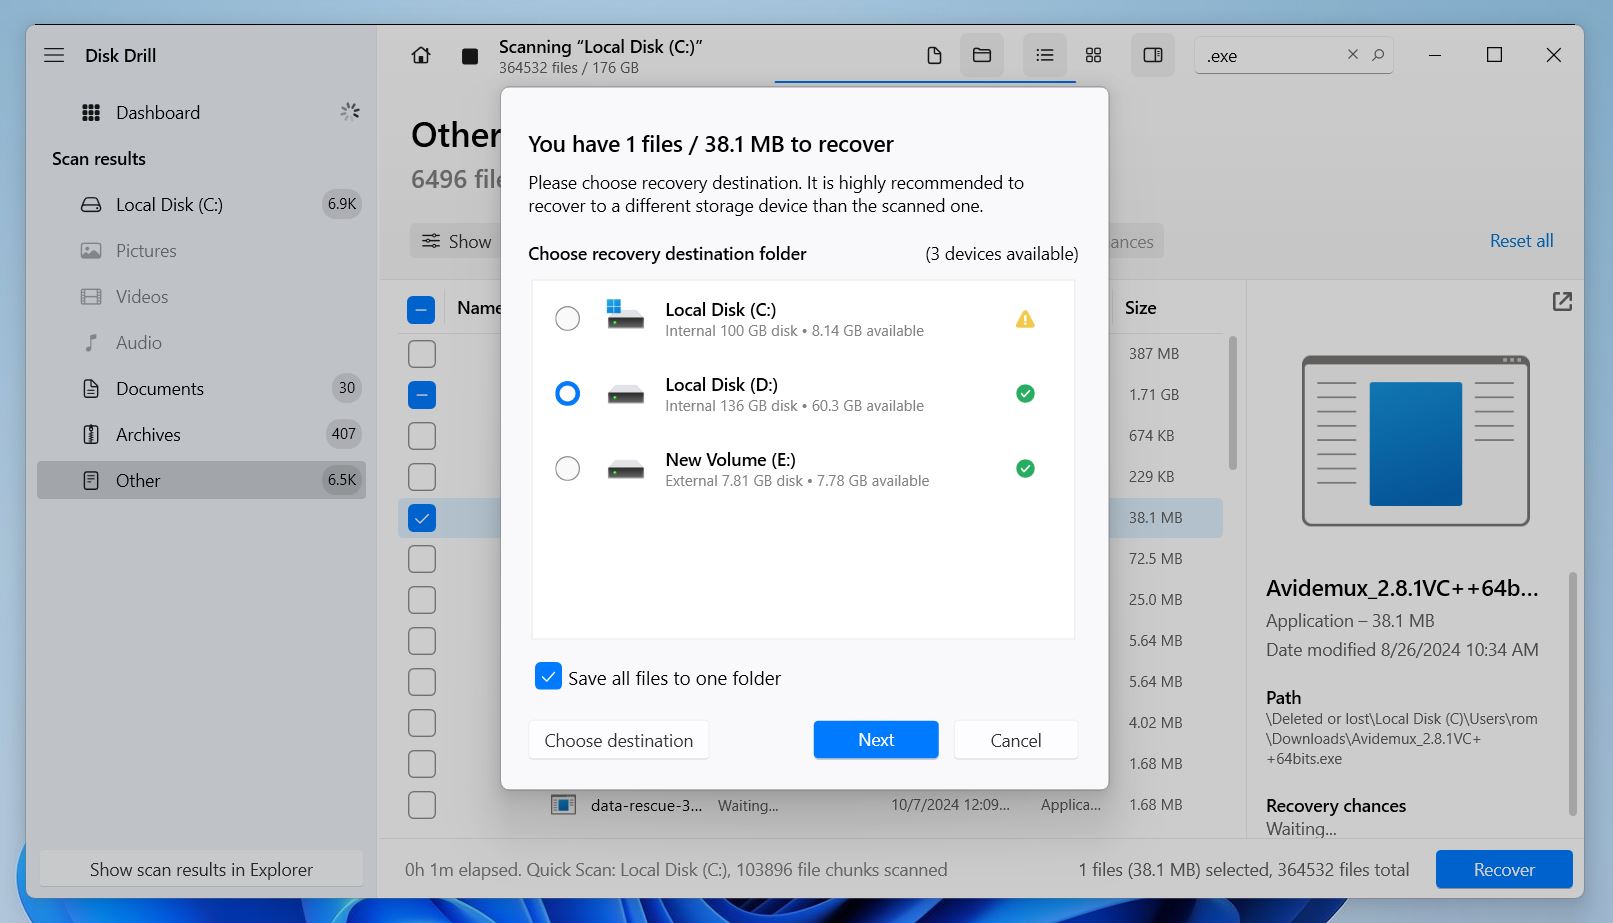
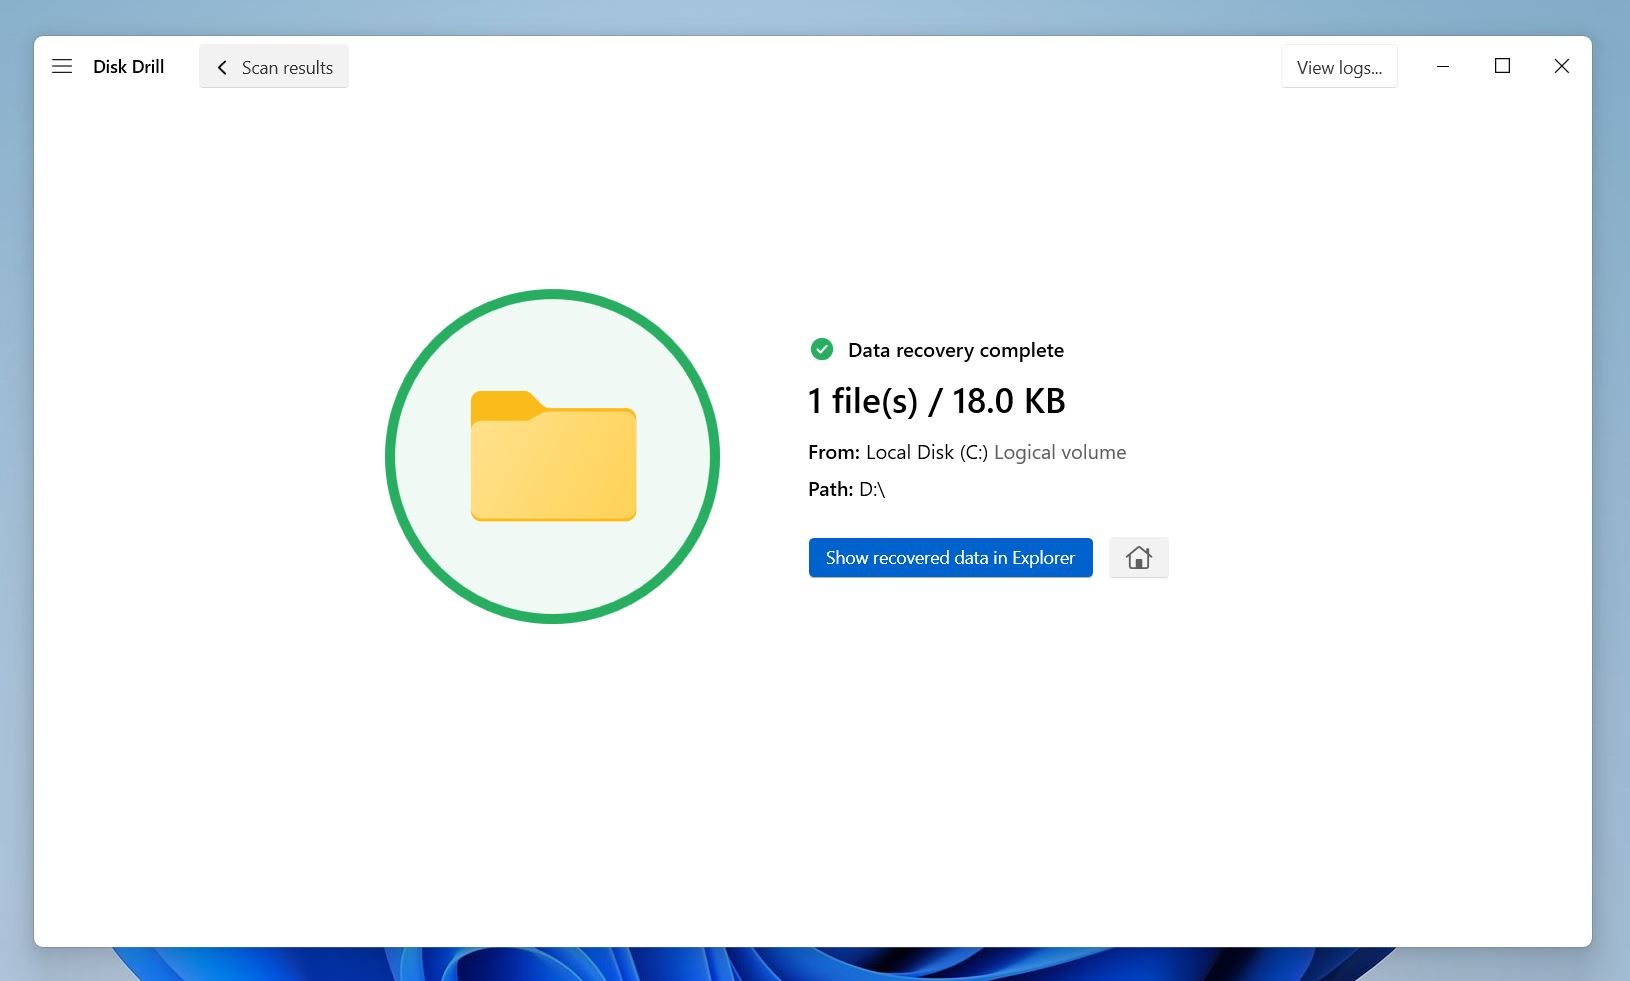
After the recovery is complete, Disk Drill will prompt you to Show recovered data in Explorer. Click on it, and a new File Explorer window will open with your selected folder and the recovered files. Take a moment to check if the files are intact and working as expected.
And that’s it—recovery is done!
Is It Possible to Recover a Formatted Hard Drive Without Software?
The only way to recover a formatted hard drive without software is through backups. However, the catch is that most people don’t think about backups until it’s too late. This method only works if you have already set up some type of backup, like File History (available on all Windows versions since Windows 8), Backup and Restore (since Windows Vista), or a cloud service like OneDrive. Let’s take a look at most popular option: File History.
File History creates incremental backups of your files by storing multiple file versions with timestamps. As a result, you can easily restore previous versions of your files. Backup and Restore is another backup tool that performs destructive backups, meaning your previous backups get overwritten by recent versions.
Keep in mind that any backup solution is only useful if it was active and backing up your drive before the drive was formatted. If you haven’t set up any backups yet, we strongly recommend our guide on backups to learn how to get started with backups and protect your data in the future.
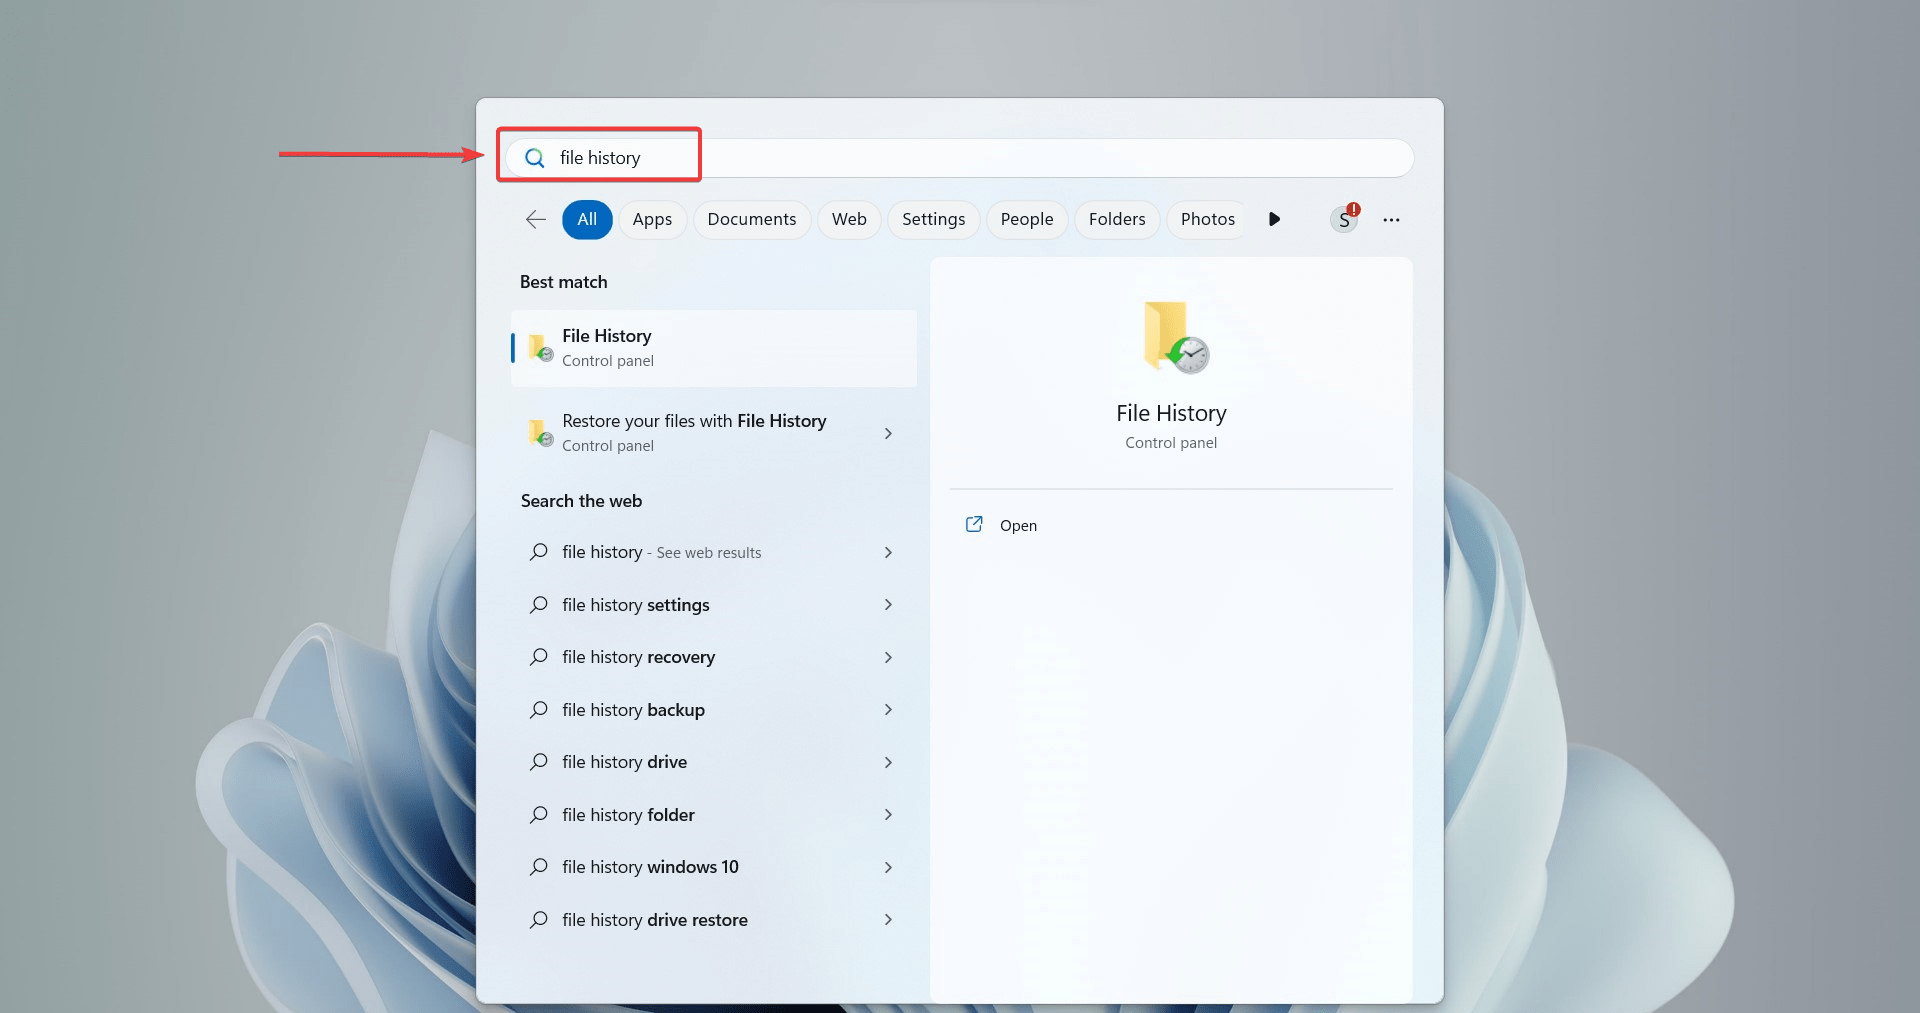
To recover data from a formatted hard drive with File History:
- Search for Restore files with File History, then open the control panel.
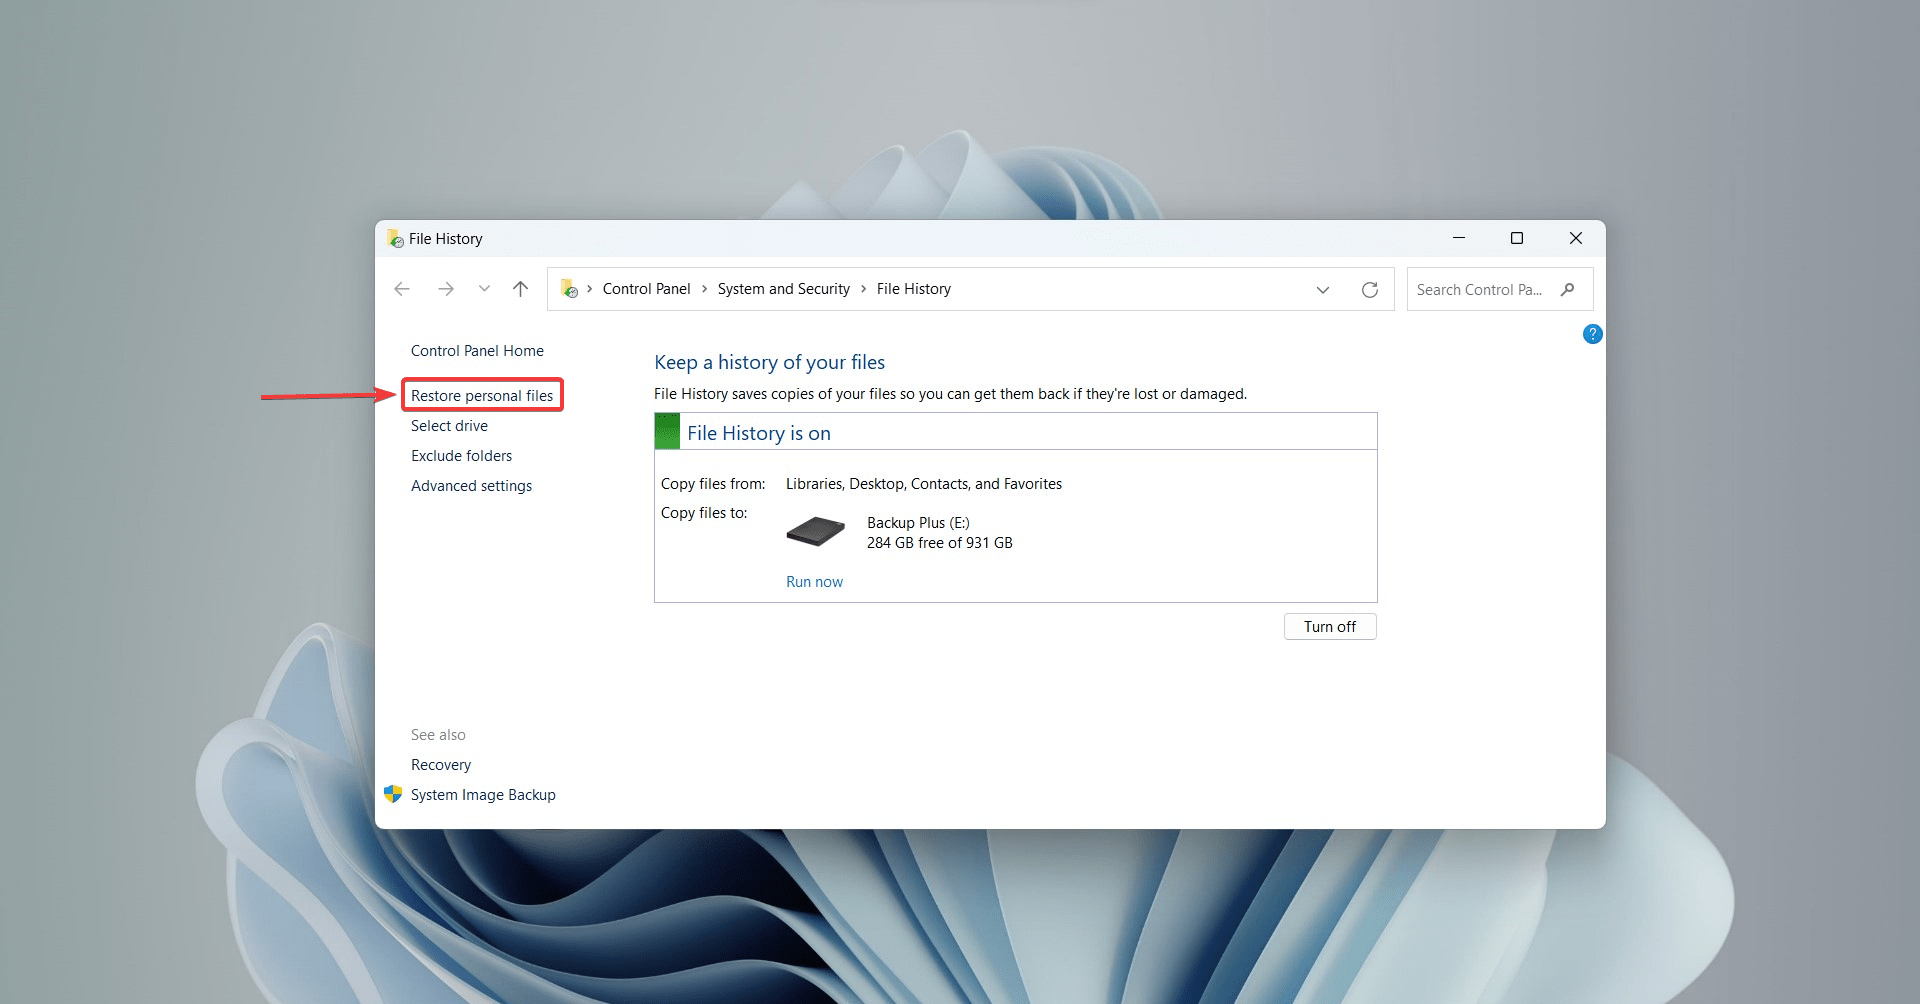
- Make sure that the File History option is turned on. Now, choose an external device as the destination to restore backups and click Run Now.
- Select the Restore personal files option.
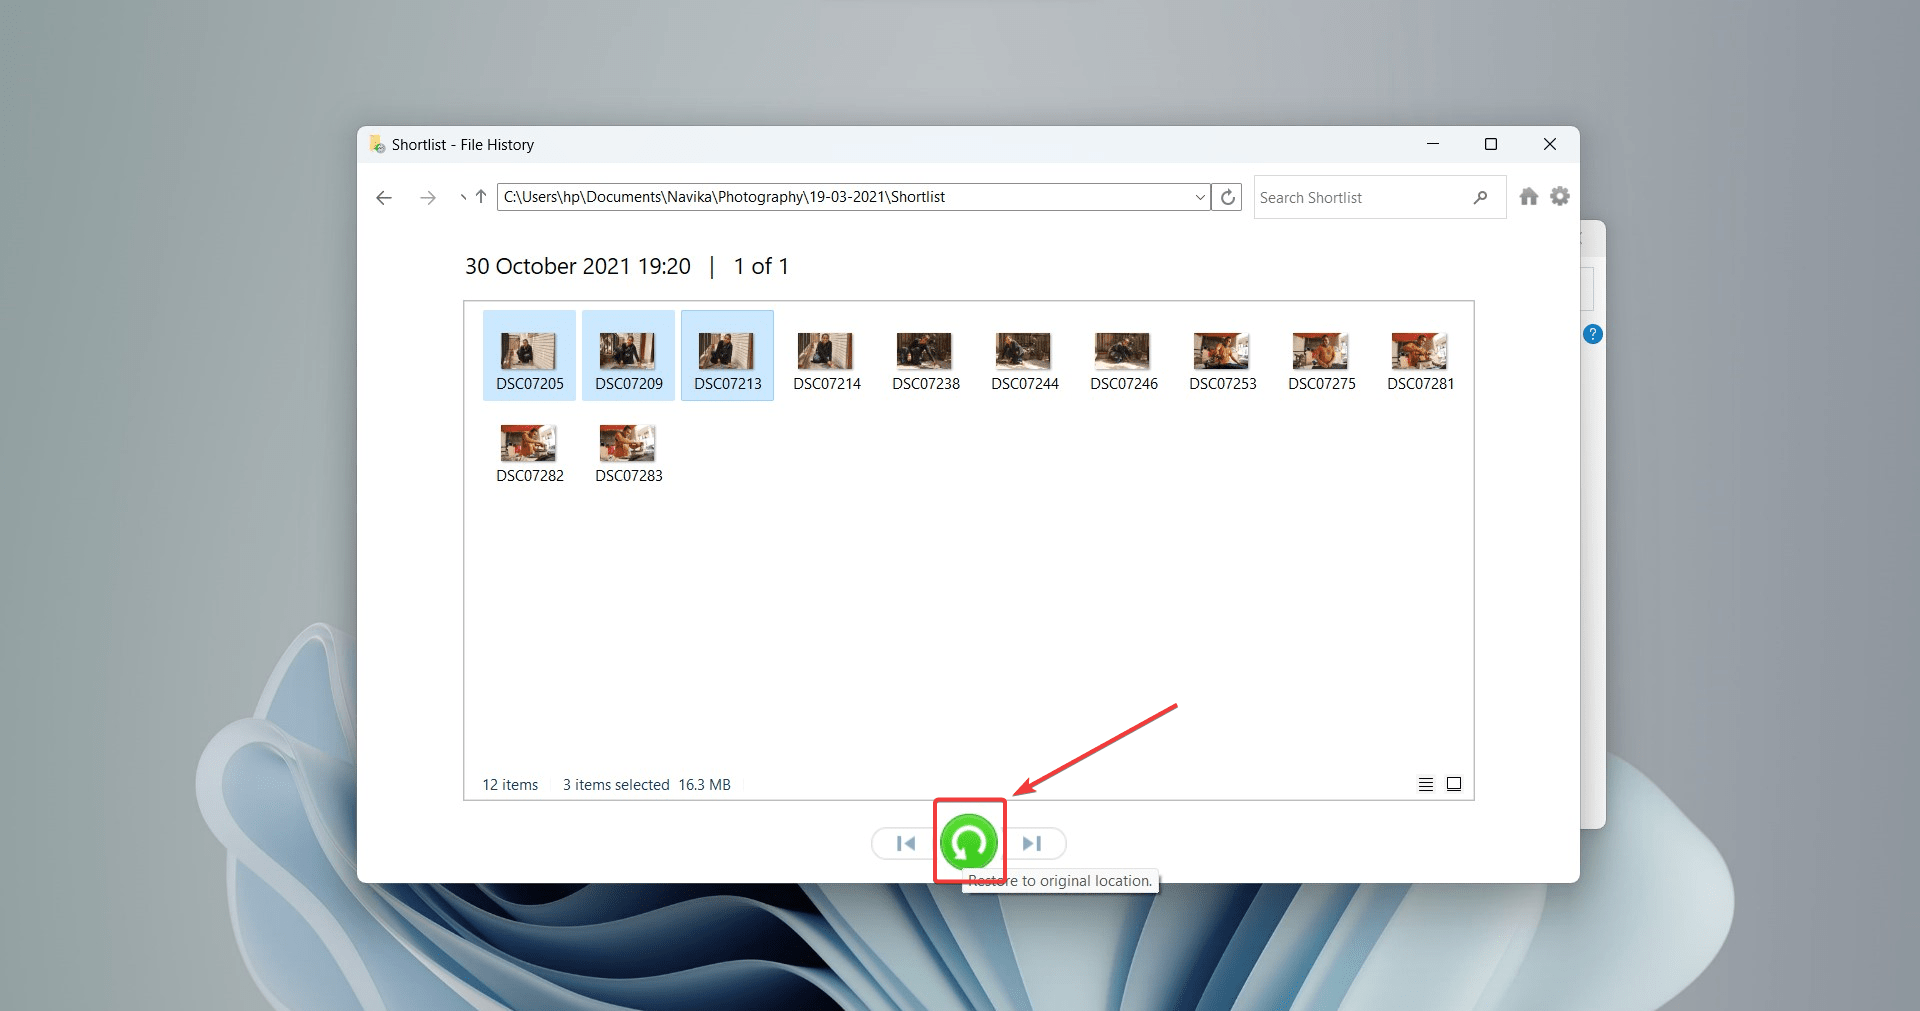
- Choose folders, individual files, or multiple files that you would like to retrieve, and click on the green Restore icon. Your files will then be recovered to their original location.
To recover data from a formatted hard drive with Backup and Restore:
- In the Search box, type backup.
- Select Backup and Restore, then click the Restore my files button.
- Locate the files you want to recover and select the location where you’d want the files to be restored. Be sure that you don’t use the formatted hard disk for this.
- Click the Restore button to get back your files from the backup.
Don’t forget about OneDrive, the preinstalled cloud backup tool on Windows 10 and 11. If you synced your files to OneDrive, you can log in and restore them directly from the cloud, even if the drive was formatted.
Final Words
If you find yourself stuck during the recovery process or unsure of your next steps, don’t hesitate to ask for help. There are plenty of online communities where you can get guidance. For example, Reddit has forums like r/DataRecoveryHelp where experienced users and professionals share advice. You can also visit our own online community, where members of our team and other readers can offer tips and point you in the right direction. Sometimes, a fresh perspective is all you need to solve the problem.
FAQ
Is there any way to recover files from a formatted hard drive for free?
Yes, there are ways to recover files from a formatted hard drive for free. Start with backups using tools like File History on Windows or cloud services like OneDrive, which might have copies of your files. If you don’t have backups, you can still try free or trial versions of data recovery software. Recuva offers a completely free version. Tools like Disk Drill also have free versions, though it limits free recovery to 500 MB.
Is it possible to recover data from formatted hard disk using CMD?
No, you can’t recover data from a formatted hard disk using CMD. Command Prompt tools like chkdsk or attrib are limited to fixing logical errors, recovering hidden files, or repairing file system issues. They can’t restore files lost due to formatting.
If your hard drive has been formatted, you’ll need dedicated data recovery software to scan and recover the lost data.
Are there any risks to my drive or system when using data recovery tools?
Generally, using data recovery tools is safe and won’t harm your drive or system if done correctly. Most tools operate in a read-only mode, they don’t modify or overwrite the data on your drive during the recovery process.
However, if your drive is failing or physically damaged, even read-only operations can stress it further and potentially lead to permanent data loss. In such cases, it’s safer to create a byte-to-byte backup of the drive first and scan the backup instead.
Just make sure you downloaded the software from the official website or got it from a trusted distributor. As long as you follow best practices, the risks are minimal.
Can you recover files after format on Windows 10 the same way as Windows 11?
Yes, the process for data recovery after formatting is nearly identical on Windows 10 and Windows 11. Both operating systems support similar data recovery tools and built-in features. You can use File History, Backup and Restore (Windows 7), or OneDrive to retrieve backups if available. Third-party recovery tools like Disk Drill, EaseUS Data Recovery Wizard, or Recuva also work the same way on both versions.
Can I recover data from my C drive after a format, or is it more complicated than recovering from other drives?
Yes, you can recover data from your C drive after a format, but it’s a bit trickier since the C drive usually houses your OS. If it’s been formatted, you likely can’t boot into the system or run recovery tools directly.
To recover data, you’ll need to either use a bootable media to run data recovery software in a separate environment or remove the drive and connect it to a different computer to scan it as an external drive on a working PC.
Is it harder to recover deleted files after formatting a drive multiple times?
Yes, it’s harder to recover deleted files after formatting a drive multiple times, but it’s not impossible. It depends on factors like the type of formatting used. If it was a quick format, recovery is generally doable. However, if it was a full format, recovery becomes impossible since it actively overwrites the data.
Also, formatting a drive in the same file system, like NTFS to NTFS, is more destructive to your data compared to formatting it in a different file system. So, keep that in mind.
This article was written by Joshua Solomon, a Contributing Writer at Handy Recovery Advisor. It was recently updated by Roman Demian. It was also verified for technical accuracy by Andrey Vasilyev, our editorial advisor.
Curious about our content creation process? Take a look at our Editor Guidelines.