
Have you tried to play some of your M4A files, only to find that they either (a) won’t play, or (b) skip over certain parts? Before you abandon the M4A format and start redownloading your entire library in MP3, did you know that M4A files can actually be repaired? In fact, there are a multitude of proven ways to quickly restore them to working order. In this article, we’ll show you just some of the ways you can repair corrupted M4A files.
M4A is a container format similar to MP4. The difference is that it doesn’t contain a video stream; it’s exclusively made for audio. Because it uses the MPEG-4 container to save data, which is fundamentally a video container, many video repair tools (including those we included in our best video repair software list) will also be capable of repairing M4A audio files.
How to Repair Corrupted M4A Files Online
One of the quickest solutions is to repair the corrupted M4A files online. Online tools excel in fixing minor forms of corruption and don’t require you to download any additional software. The tools we’ve included below are both free, but each uses a slightly different approach.
M4A files that are DRM-protected will use the M4P extension instead. M4P files are not fixable, as their contents are encrypted. Instead, you will need to find a way to download the M4A version.
Option A: Clever Online Video Repair
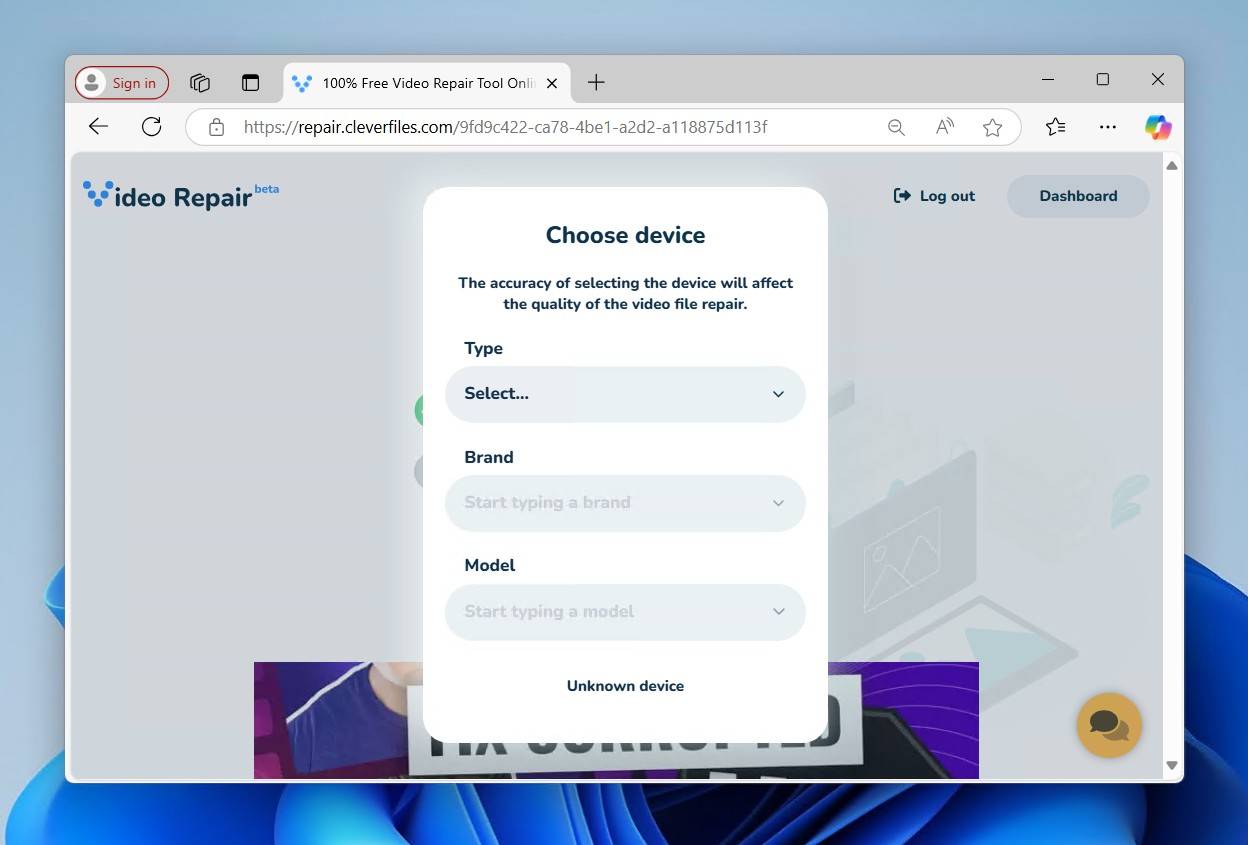
Clever Online Video Repair is a completely free browser-based tool that supports the ability to repair M4A files, as well as a number of other multimedia formats. Unlike other online repair tools that typically have a maximum upload limit of 500 MB, this tool supports up to 5 GB. While it’s uncommon for audio files to reach this size, even when lossless, it’s useful for repairing other multimedia files like videos shot in 4K or higher.
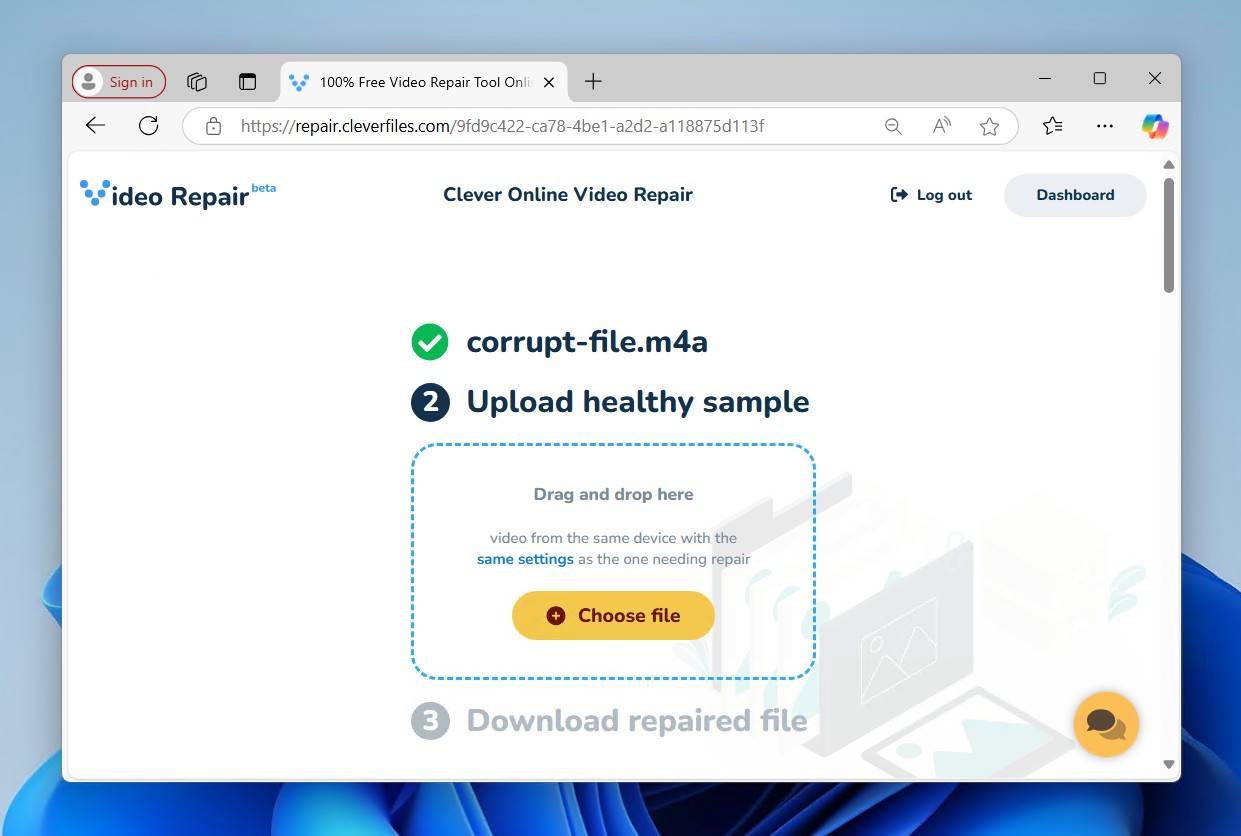
To use this repair tool, you will need a healthy M4A file that was recorded on the same device. Why? Because the tools will extract usable information from the working file, and then use it to repair the corrupted one.
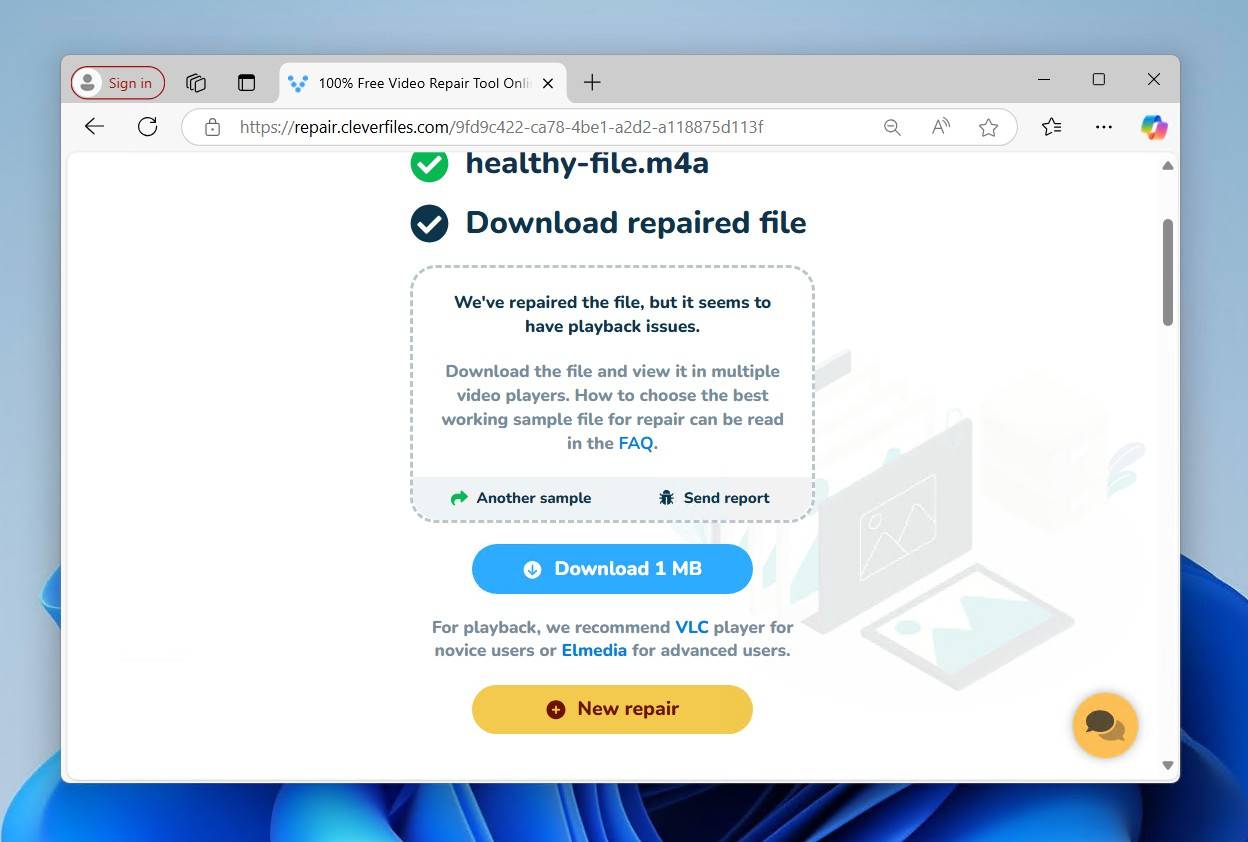
This tool is especially useful for repairing M4A files that are truncated. Truncation is caused by an incomplete audio recording or file transfer, resulting in the ‘missing moov atom’ error, as seen here.
Follow these steps to repair a corrupted M4A file for free:
- Go to repair.cleverfiles.com and upload your corrupted M4A file.

- Select the device that the M4A file was recorded on.
- Upload the healthy M4A file that you’re using as a reference.
- Download the repaired M4A file.
Option B: Online Converter
If you don’t mind converting the file into MP3 format, or you’re unable to find a healthy M4A file recorded on the same device, this free Online Converter tool is a good option. It will attempt to fix your M4A file, even without a working reference, and convert it to MP3 in the process. Bear in mind, however, that without a working reference file, your chances of success may be reduced.
This is how you fix an M4A file by converting it to MP3:
- Go to onlineconverter.com/repair-m4a and upload your corrupted M4A file.
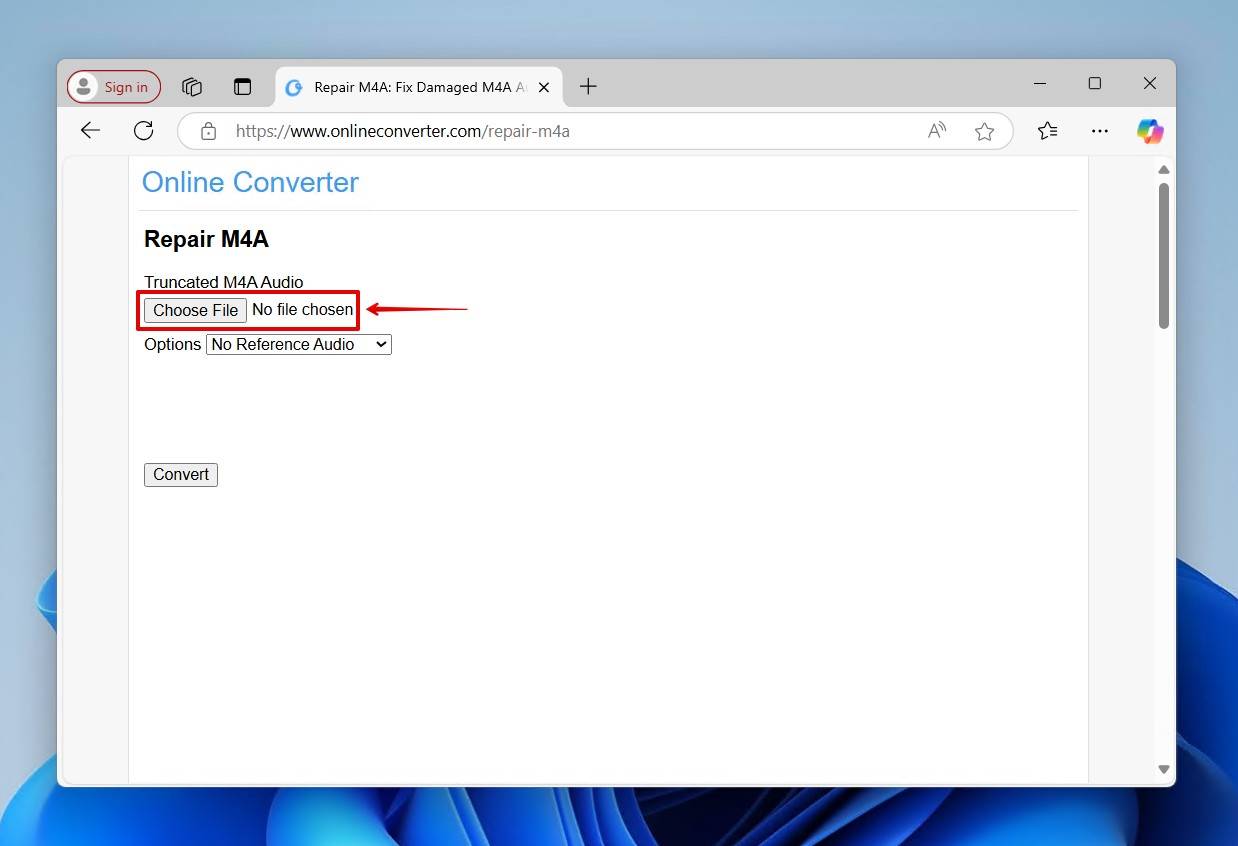
- Upload the reference file if you have one.
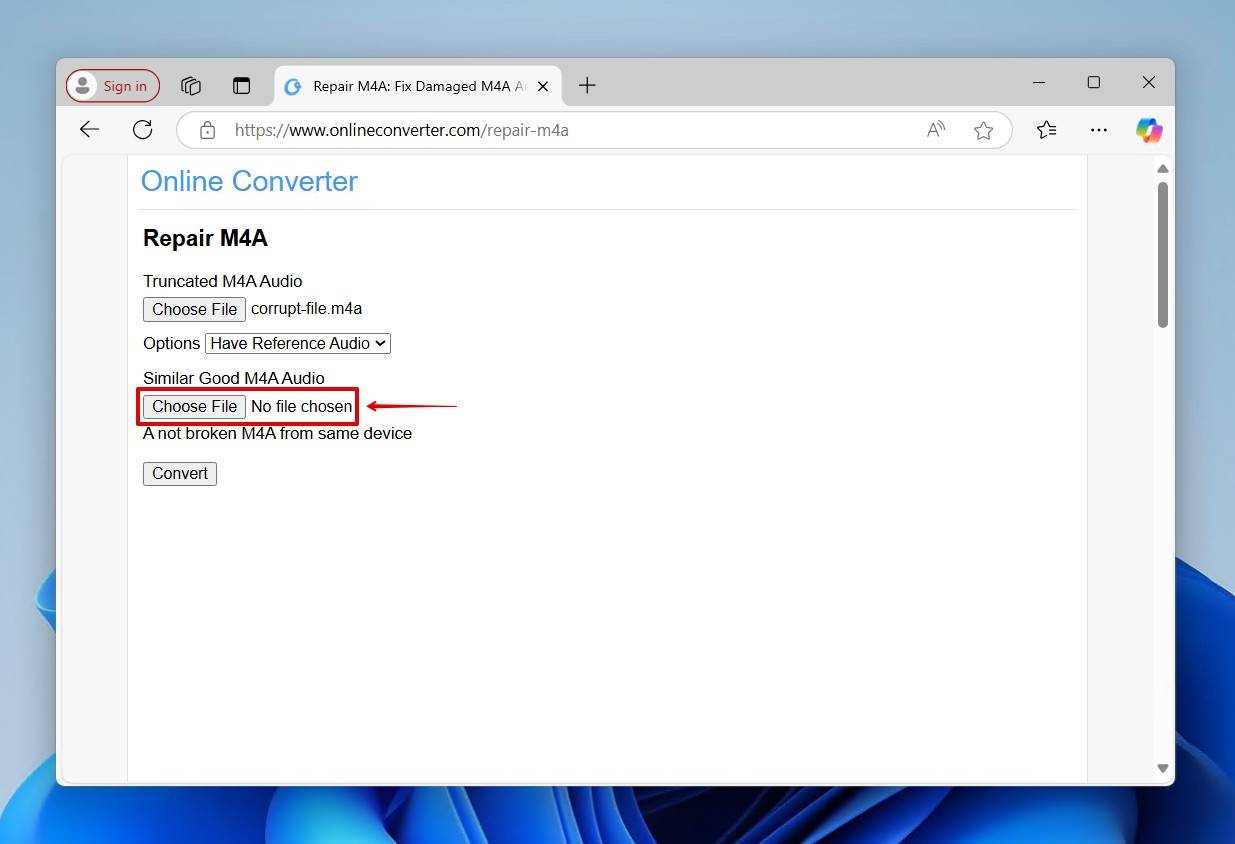
- Click Convert.

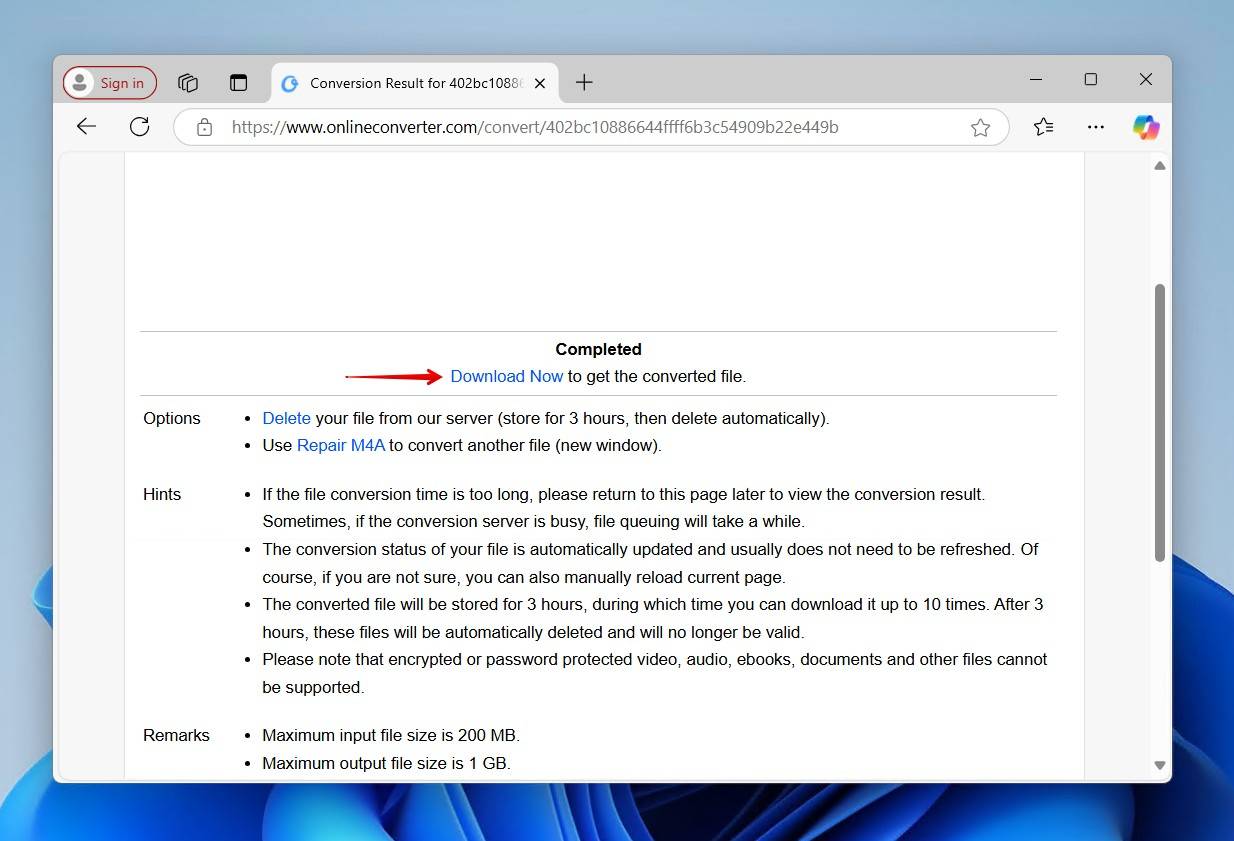
- Download the converted file.
How to Fix M4A Files Using Desktop Software
Another option to repair M4A files is using software to re-encode the file, either to the same format or another, like MP3. In doing so, the contents of the file will be moved to a new container, bypassing any container corruption that could have been preventing playback. It can also help if you don’t have a media player that supports one of the two codecs that M4A uses, Apple Lossless Audio Codec (ALAC) or Advanced Audio Coding (AAC).
Re-encoding requires processing the music file again. While this can bypass corruption issues, some quality loss is to be expected. Therefore, you should test playback after conversion to ensure the results are satisfactory.
We’ve chosen two free and open-source solutions that have proven to work in the past: VLC Media Player and HandBrake.
Option A: VLC Media Player
VLC Media Player comes with the built-in ability to convert media from one format to another. When converting a file, you have the option to choose a profile that determines what codecs will be used. For simplicity, we’ll be using the MP3 profile, which will convert the file from M4A to MP3.
If you’re an advanced user, you may prefer to create your own profile where you can choose to re-encode with AAC, which will also give you control over the bitrate, channels, and sample rate.
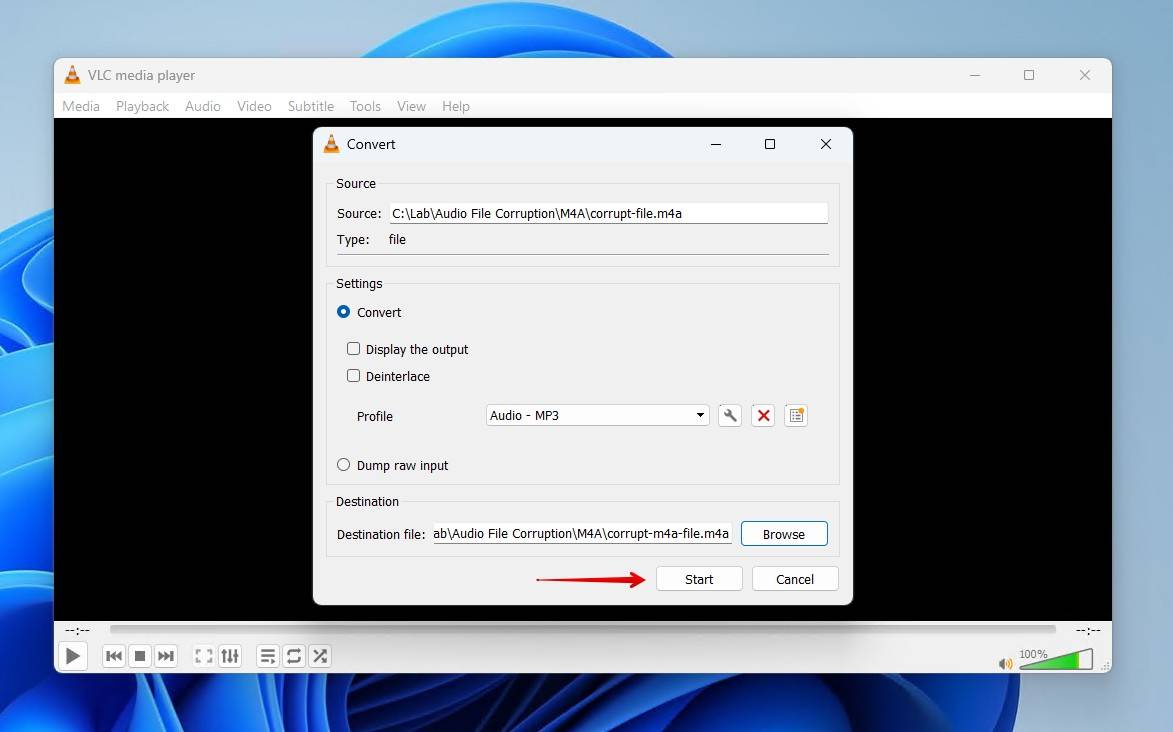
This is how you fix a corrupted M4A file by re-encoding it:
- Download and install VLC if you don’t already have it.
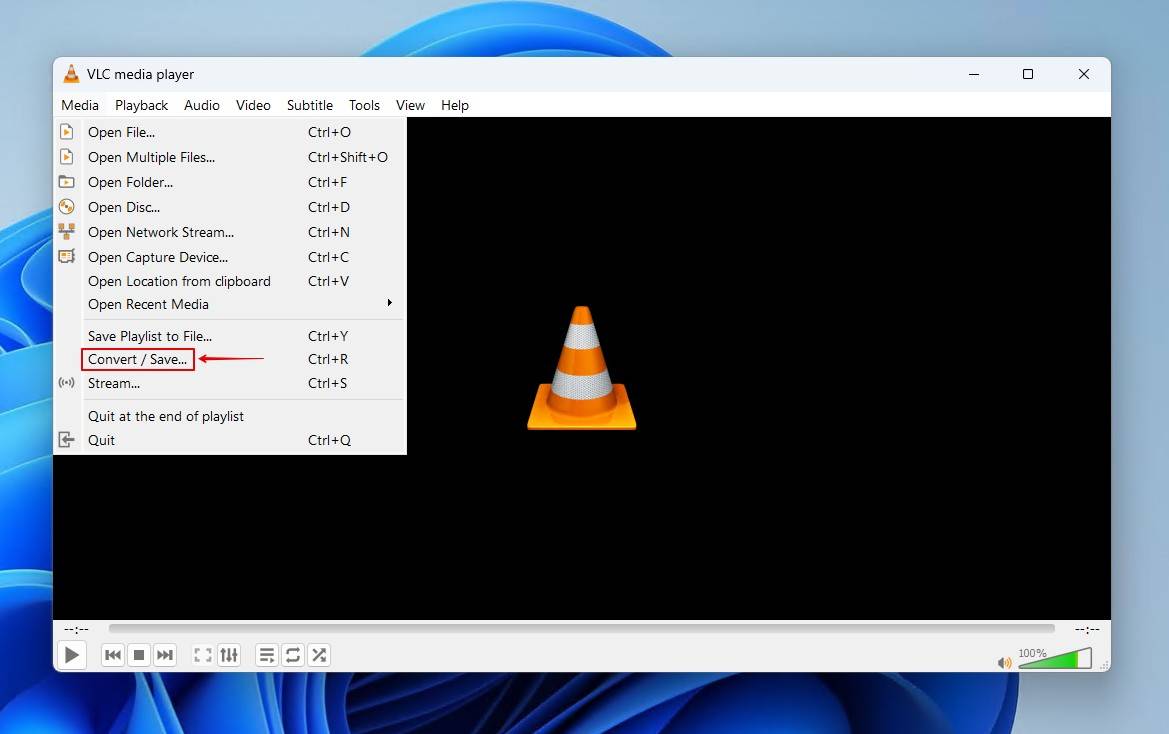
- Click Media, then Convert / Save.
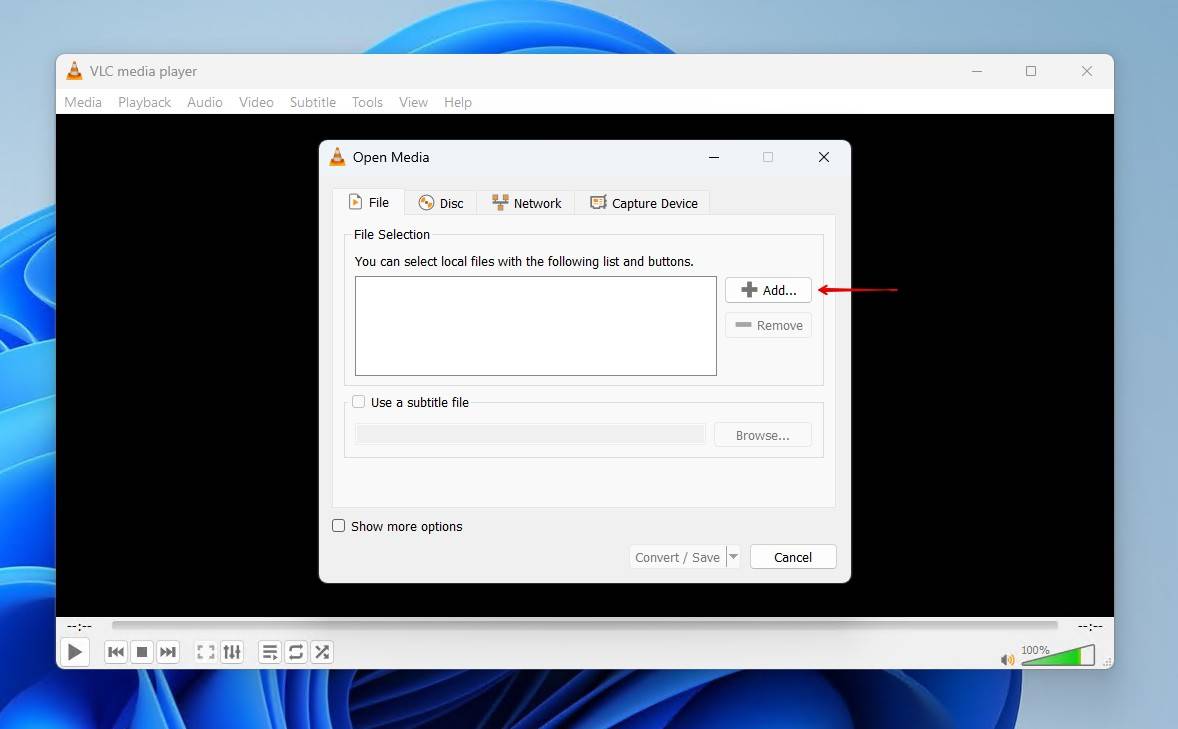
- Add your corrupted M4A file.
- Click Convert / Save.

- Choose the profile you want to use (or create your own), choose a destination location, then click Start.
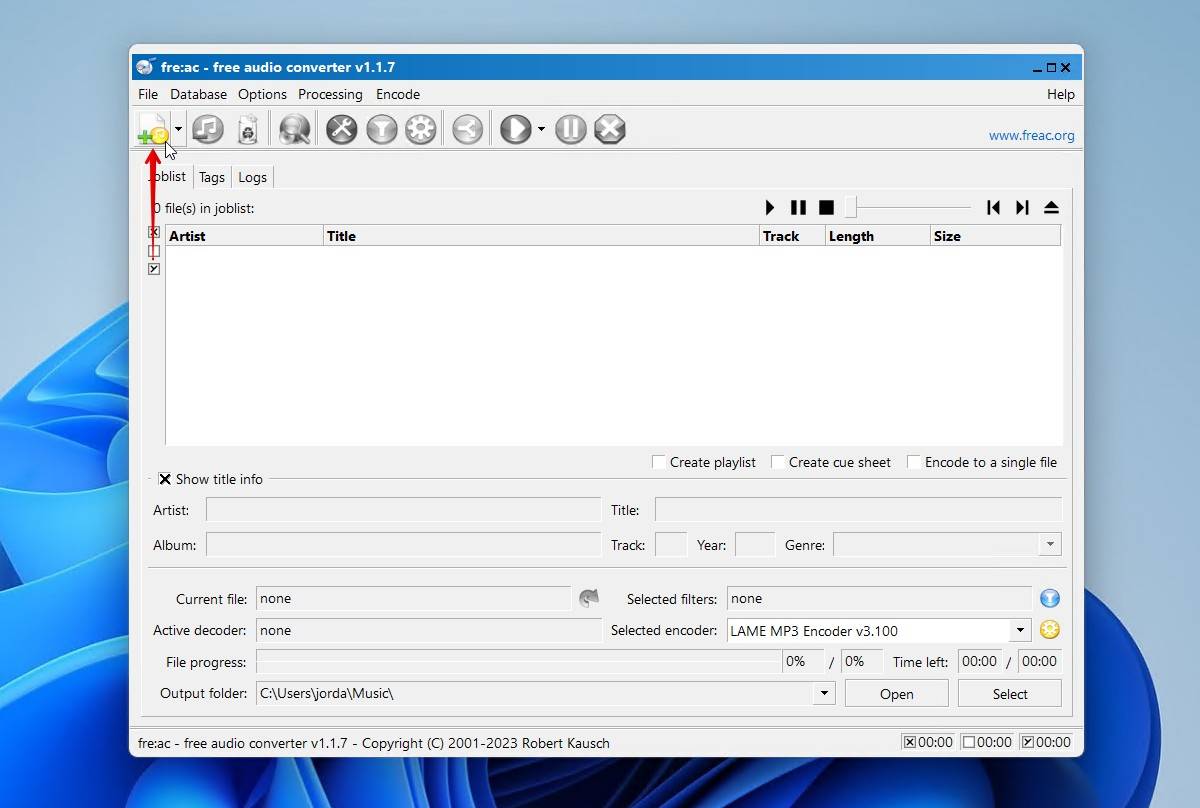
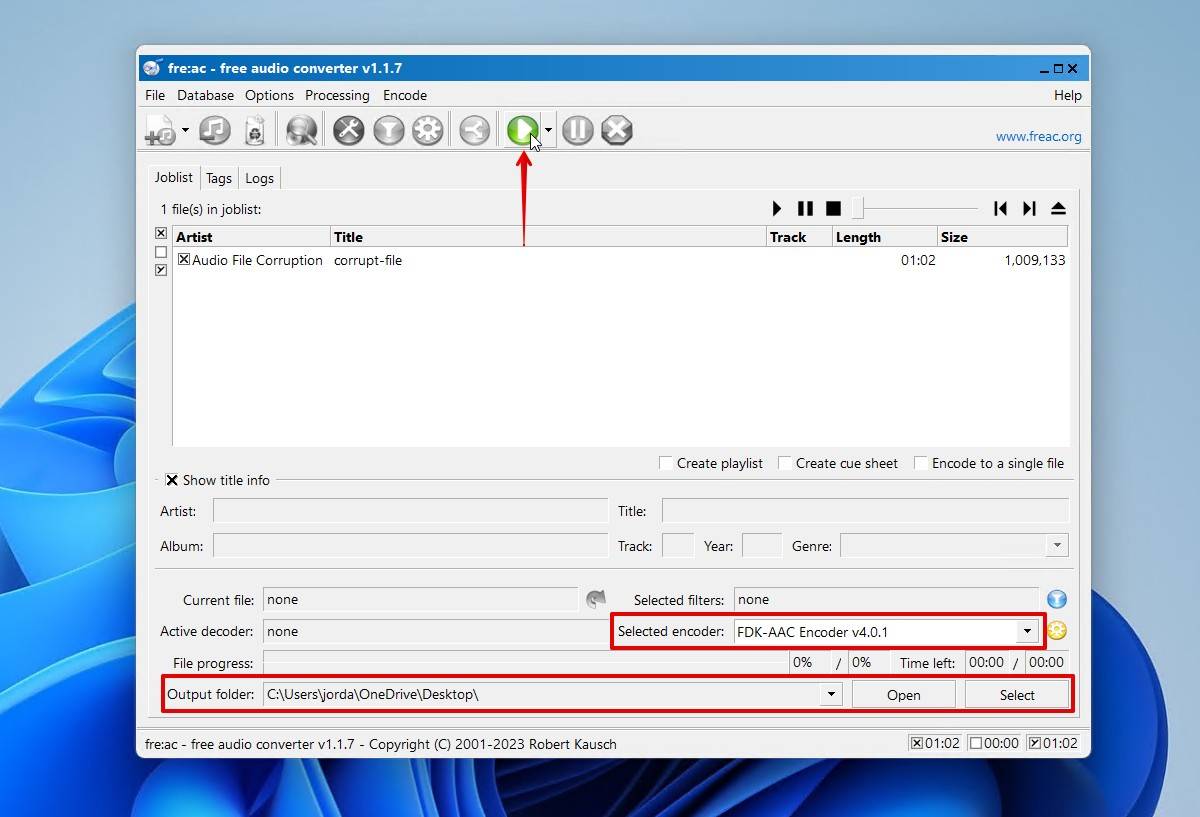
Option B: fre:ac
Another good option for transcoding M4A files is fre:ac, a dated (but still very functional) audio converter. We’ll be demonstrating how to re-encode again with the AAC codec, but you can change the encoder to MP3 if you want to change the format.
This is how you re-encode an M4A file with fre:ac:
- Download and install fre:ac.
- Add the corrupted M4A file.
- Change the codec to FDK-AAC Encoder v4.0.1, select an output folder, then start the encoding process.
How to Fix Corrupt M4A Files Using Command Line Tools
Have a preference for doing everything through a command-line interface (CLI)? When it comes to fixing advanced cases of corruption, command-line tools are arguably the best ones for the job due to how versatile they are.
Option A: FAAC
You have the option of manually repairing the M4A file header. This may sound complicated, but it’s actually very simple. Basically, it involves removing the data at the beginning of the file, decoding it into a different format, and then re-encoding it back to M4A.
These instructions are for Terminal or PowerShell. If you prefer to use Command Prompt, the required syntax is faad.exe (for decoding) and faux.exe (for encoding) when invoking the tools. Remember to change the directory with cd before you run them.
Before we start, you’ll need to download a hex editor to view and modify the file’s contents. We’ll be using HxD, but other options include wxHexEditor, Frhed, and HexEdit.
Follow these instructions to manually repair the M4A file header:
- Download FAAD. We are using FAAD2 v2.10.1 x64.
- Download FAAC. We are using FAAC v1.30 Binary for Win32.
- Extract faad.exe and faac.exe to the same folder. Copy your corrupted M4A file and paste it into the same folder, as you don’t want to work on the original. It should look something like this.

- Open the M4A file in the hex editor you downloaded earlier, and search for the mdat atom by pressing Ctrl + F and typing “mdat”.
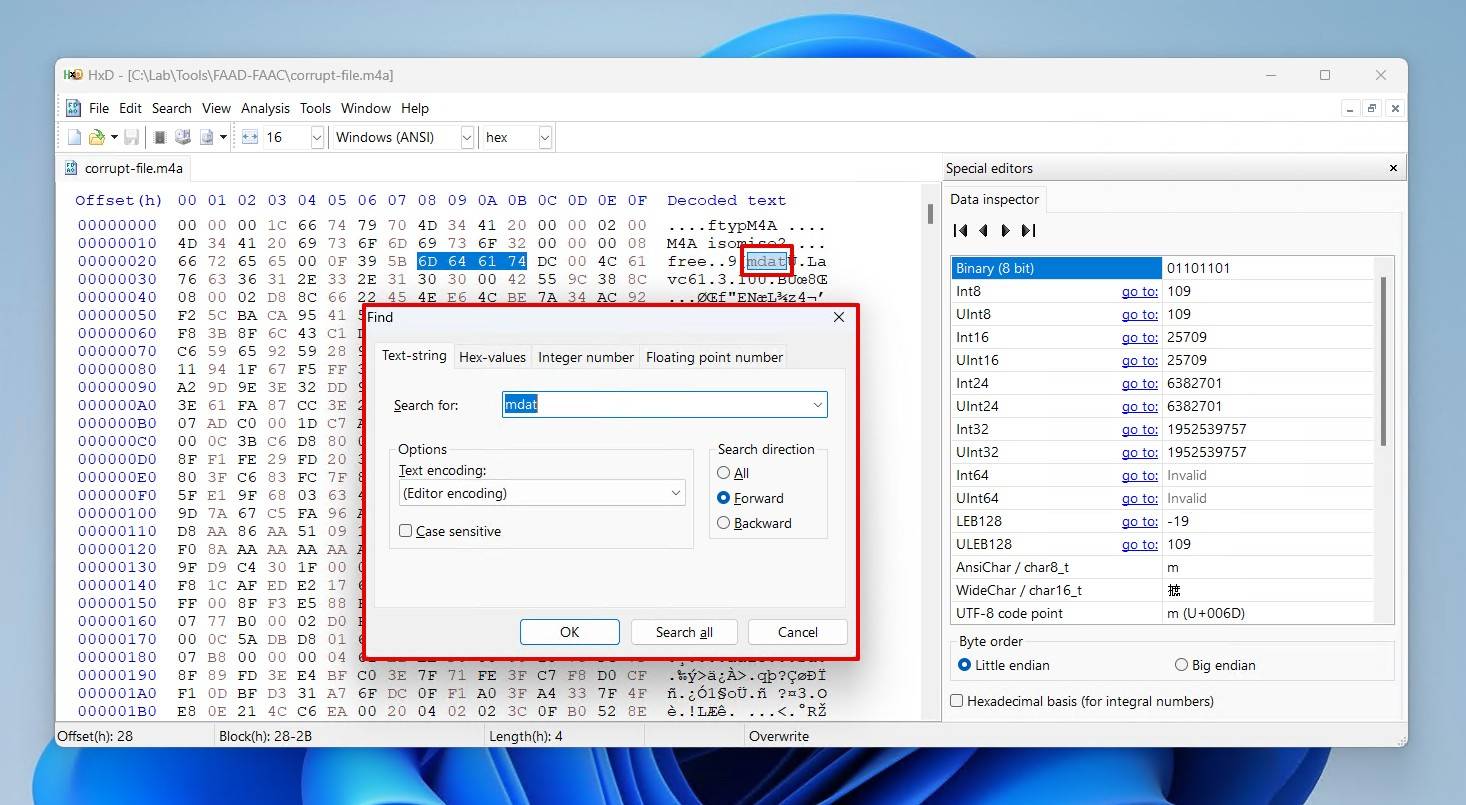
- Delete everything from mdat backward, including mdat. To delete it, just highlight the decoded text and hit Del on your keyboard.

- Save the file.

- Right-click an empty space in the folder, then click Open in Terminal.
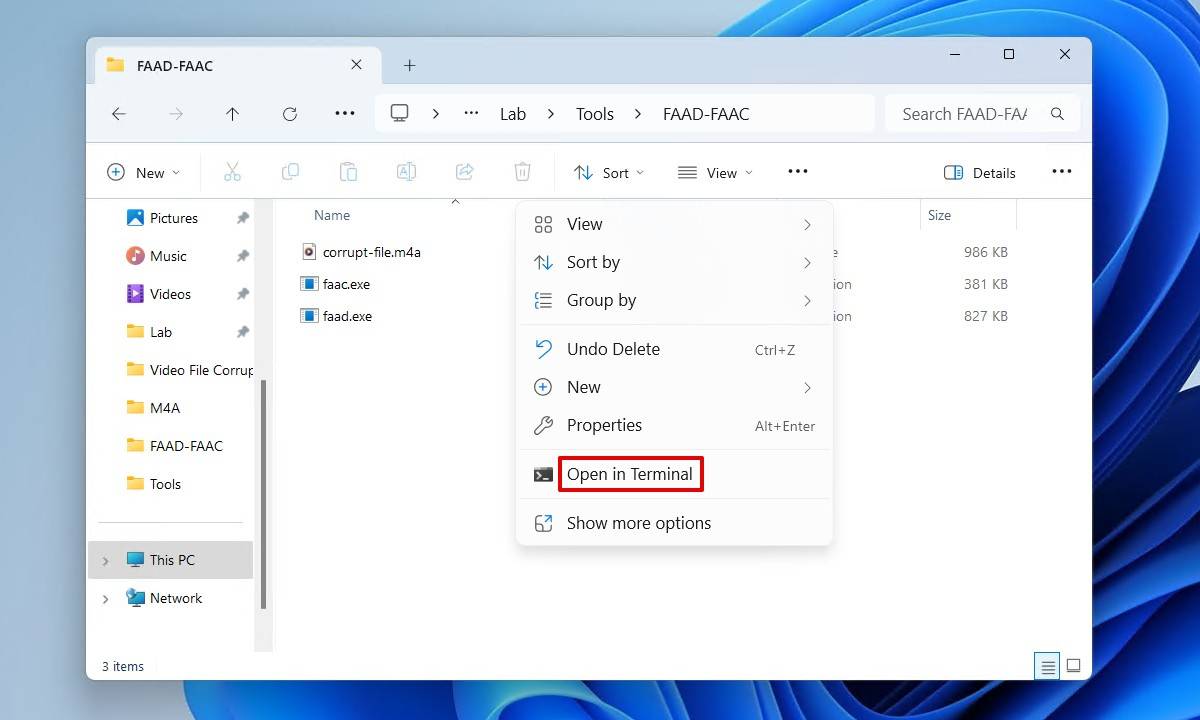
- Type the following command. Replace the filename with your own. Press Enter. A new WAV file will be created in the folder.
./faad “corrupt-file.m4a”
- Type the following command, replacing repaired-file.m4a with your desired output name and corrupt-file.wav with the filename of the WAV file created in the previous step. Press Enter.
./faac -b160 -o repaired-file.m4a “corrupt-file.wav”
The repair process shouldn’t take too long, but it will be relative to the size of your file. The repaired file will appear in the same folder as the others.
Option B: FFmpeg
FFmpeg is an incredibly versatile multimedia framework that allows you to do almost anything with your video or audio files. When using FFmpeg as an M4A repair tool, there are two reliable ways you can go about repairing the M4A file.
Be forewarned that FFmpeg can get a little complicated. If you’re not comfortable working with a command line, consider using a GUI wrapper like AxiomUI instead. It provides a UI that’s more intuitive, and the point-and-click aspect might be easier for some.
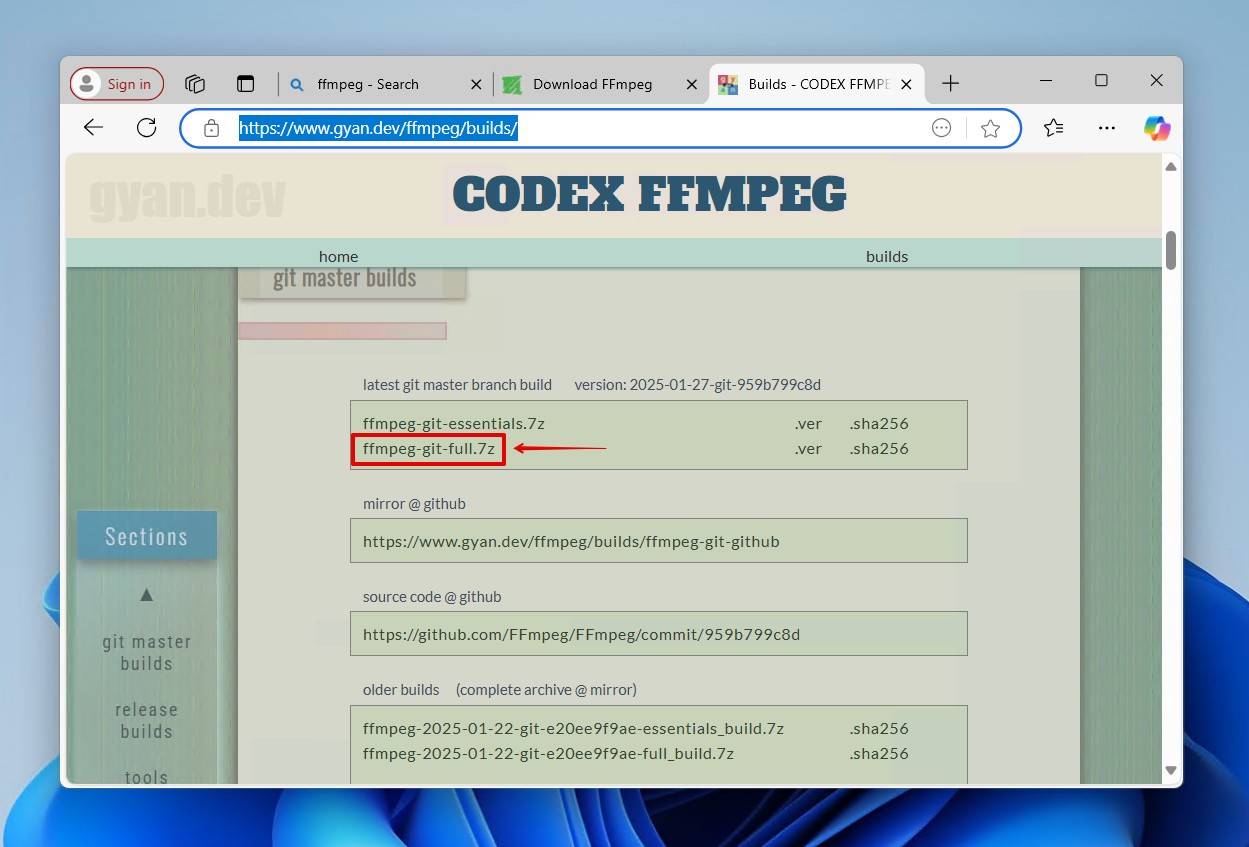
Before we start, let’s install FFmpeg. The official version of FFmpeg is only available as uncompiled source code, but there are some precompiled Windows builds that make the installation process a bit easier. We’re using the one from gyan.dev, but you can find others on the FFmpeg download page.
- Download the full FFmpeg build from gyan.dev.
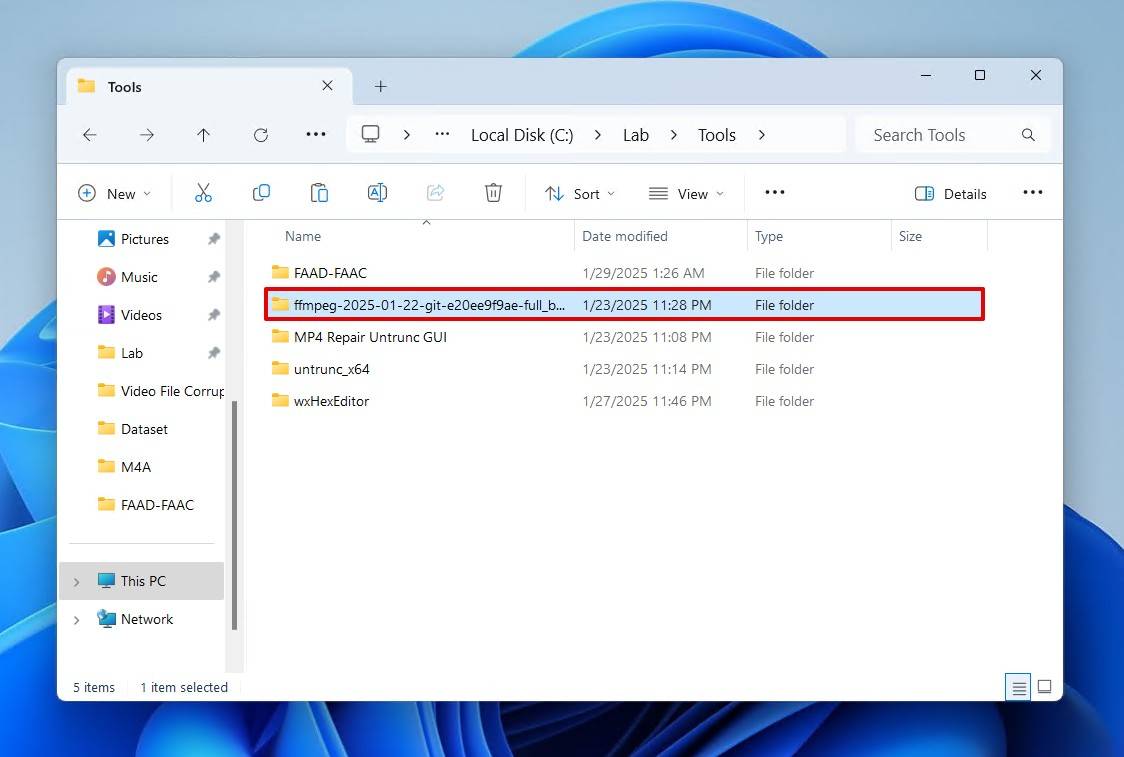
- Extract it somewhere it will reside permanently.
- Open Start and type “environment variables”. Open Edit the system environment variables.
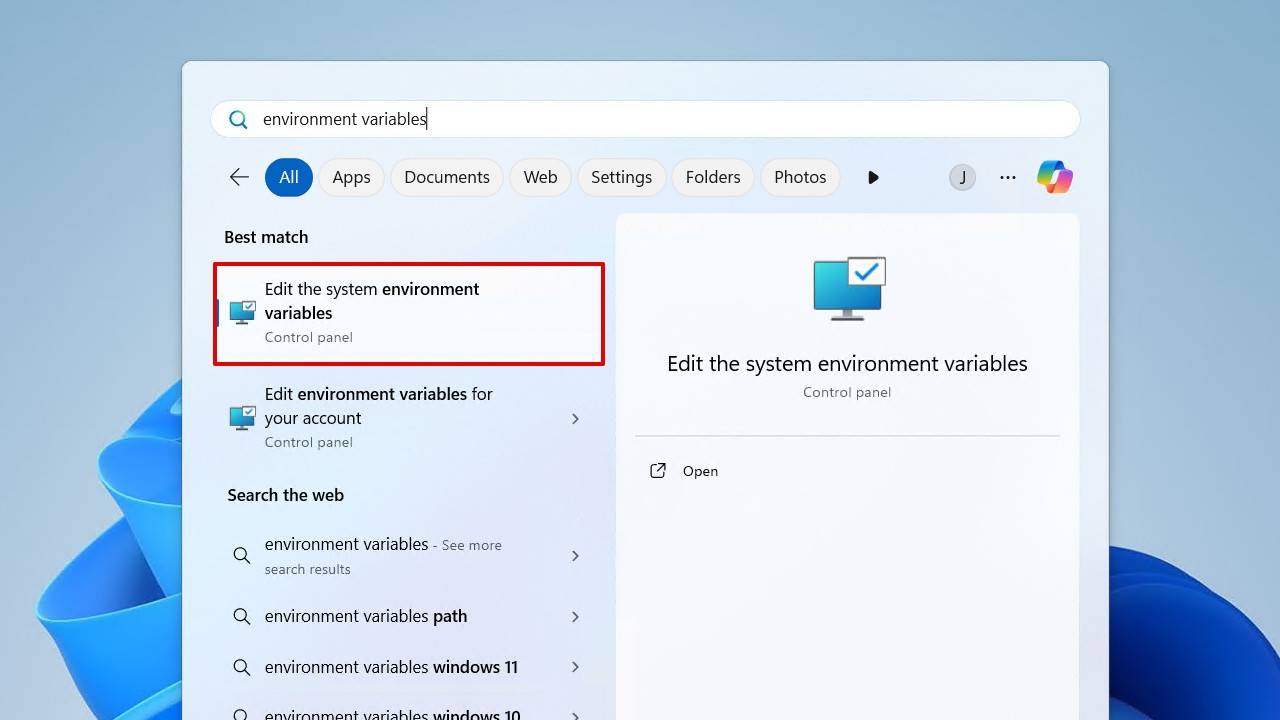
- Click Environment Variables.
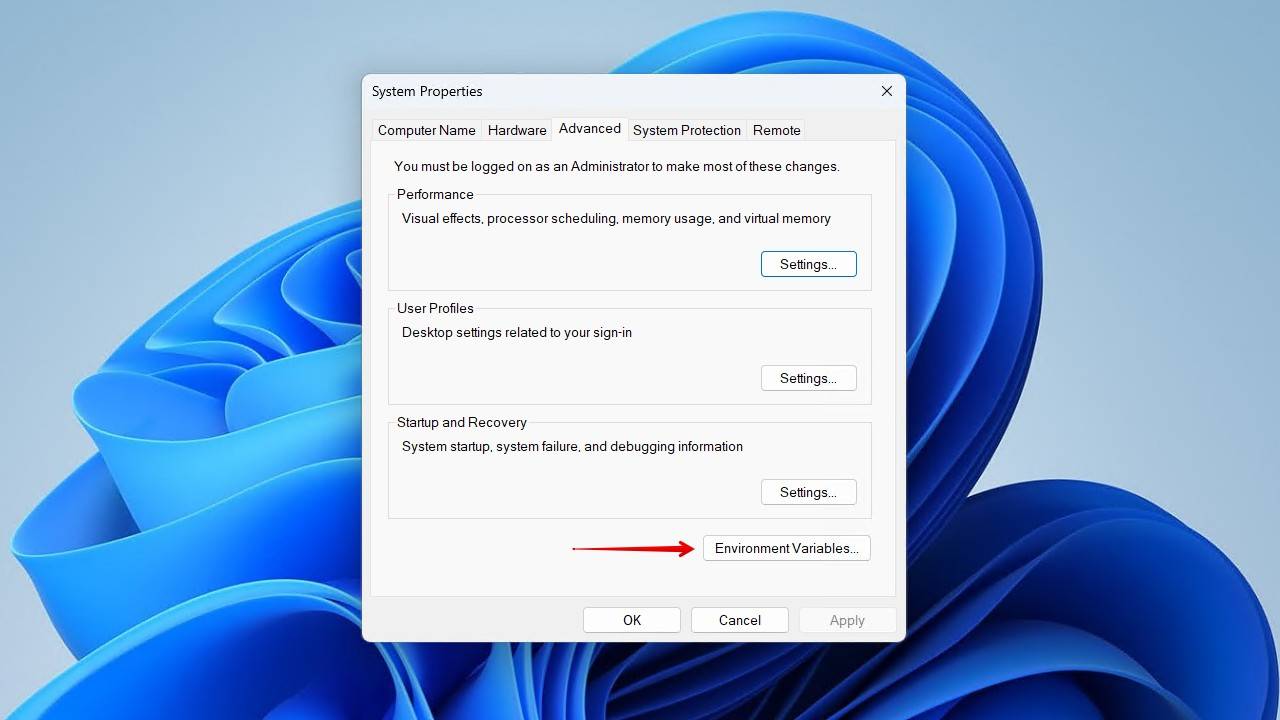
- Click Path in the System variables section, then click Edit.
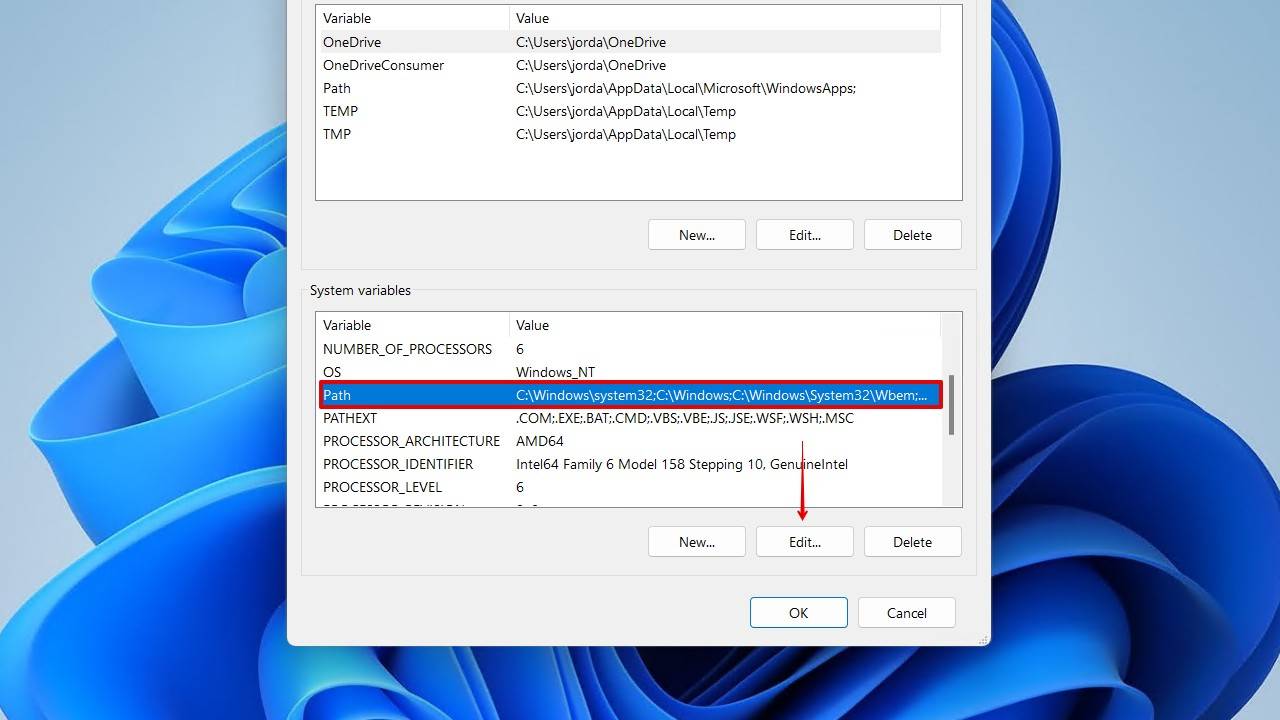
- Click New, then add the path to the bin subfolder, located in FFmpeg. For example, mine is located below:
C:\Lab\Tools\ffmpeg-2025-01-22-git-e20ee9f9ae-full_build\bin

- Click OK until all of the windows are closed.
Copy to a New M4A Container
Copying the contents of your M4A file to a fresh, new M4A container is called remuxing. Unlike re-encoding, remuxing doesn’t affect the quality of your audio. Remuxing the file has a chance of fixing metadata corruption and file structure issues.
We’ll be using the following command to achieve this:
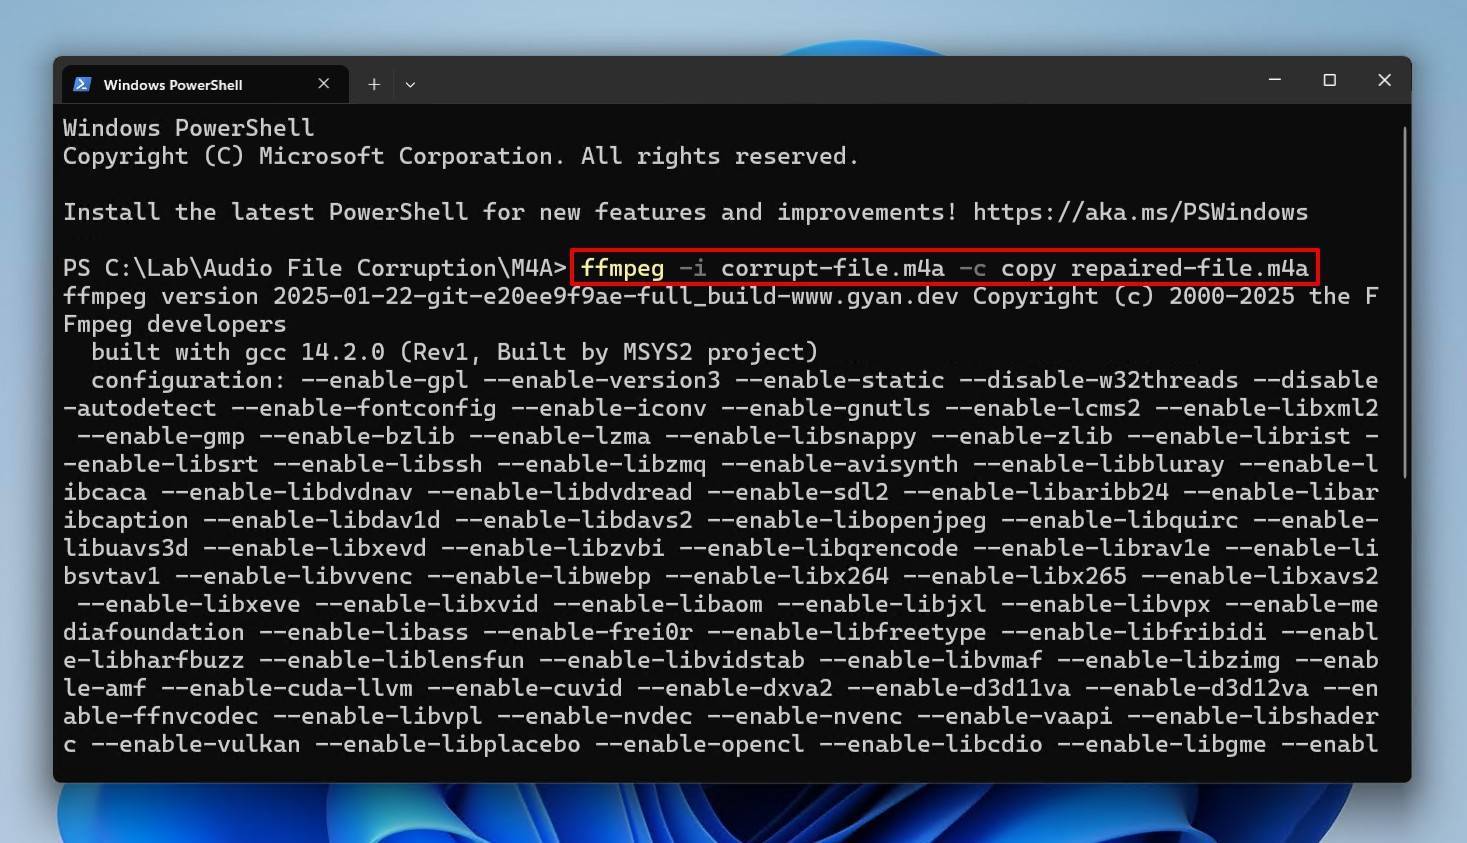
ffmpeg -i corrupt-file.m4a -c copy repaired-file.m4a
- ffmpeg – Invokes the FFmpeg tool.
- -i corrupt-file.m4a – Specifies the input file name.
- -c copy – Instructs FFmpeg to copy the existing codec.
- repaired-file.m4a – Filename of the repaired output file.
This is how you remux an M4A file using FFmpeg:
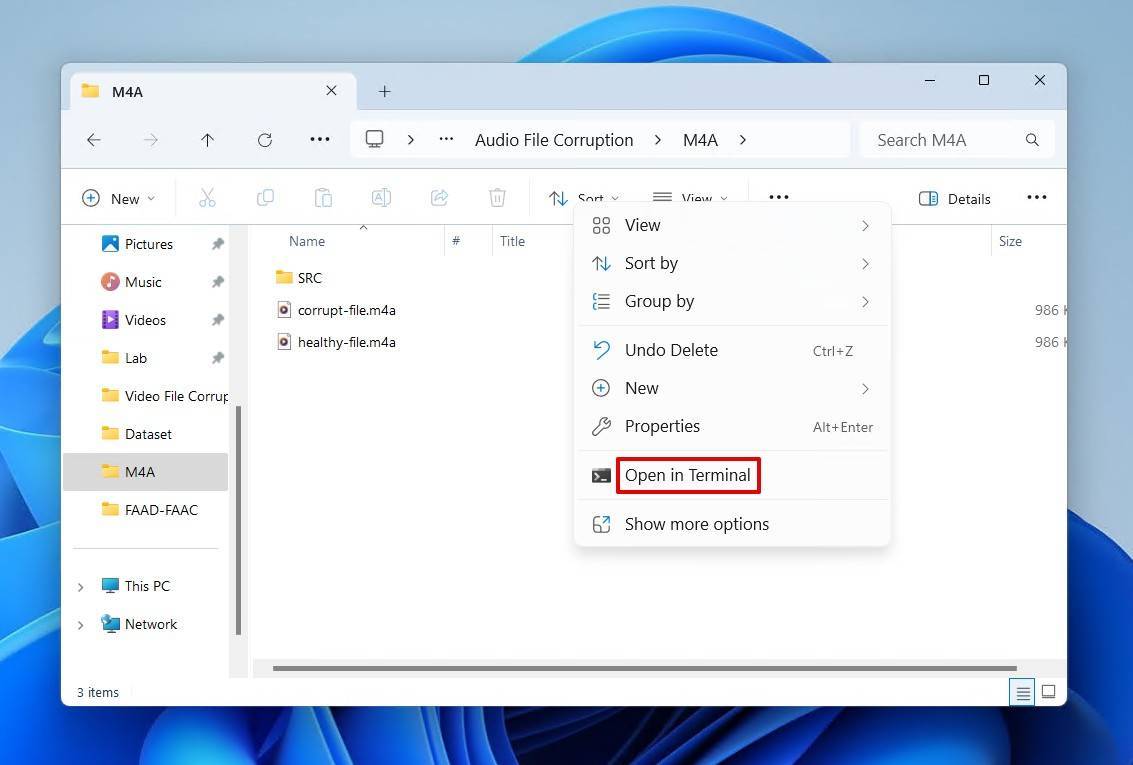
- Open the folder containing your corrupted M4A file. Right-click an empty space and click Open in Terminal.
- Type the following command, updating it accordingly. Press Enter.
ffmpeg -i corrupt-file.m4a -c copy repaired-file.m4a
Re-encode the M4A File
Should remuxing not work, you can also try re-encoding the M4A file. Bear in mind that some quality loss is to be expected when re-encoding, but FFmpeg allows you to control the audio bitrate to give you some control over the final product.
Here is the command we’ll be using, as well as a breakdown of the flags in use:
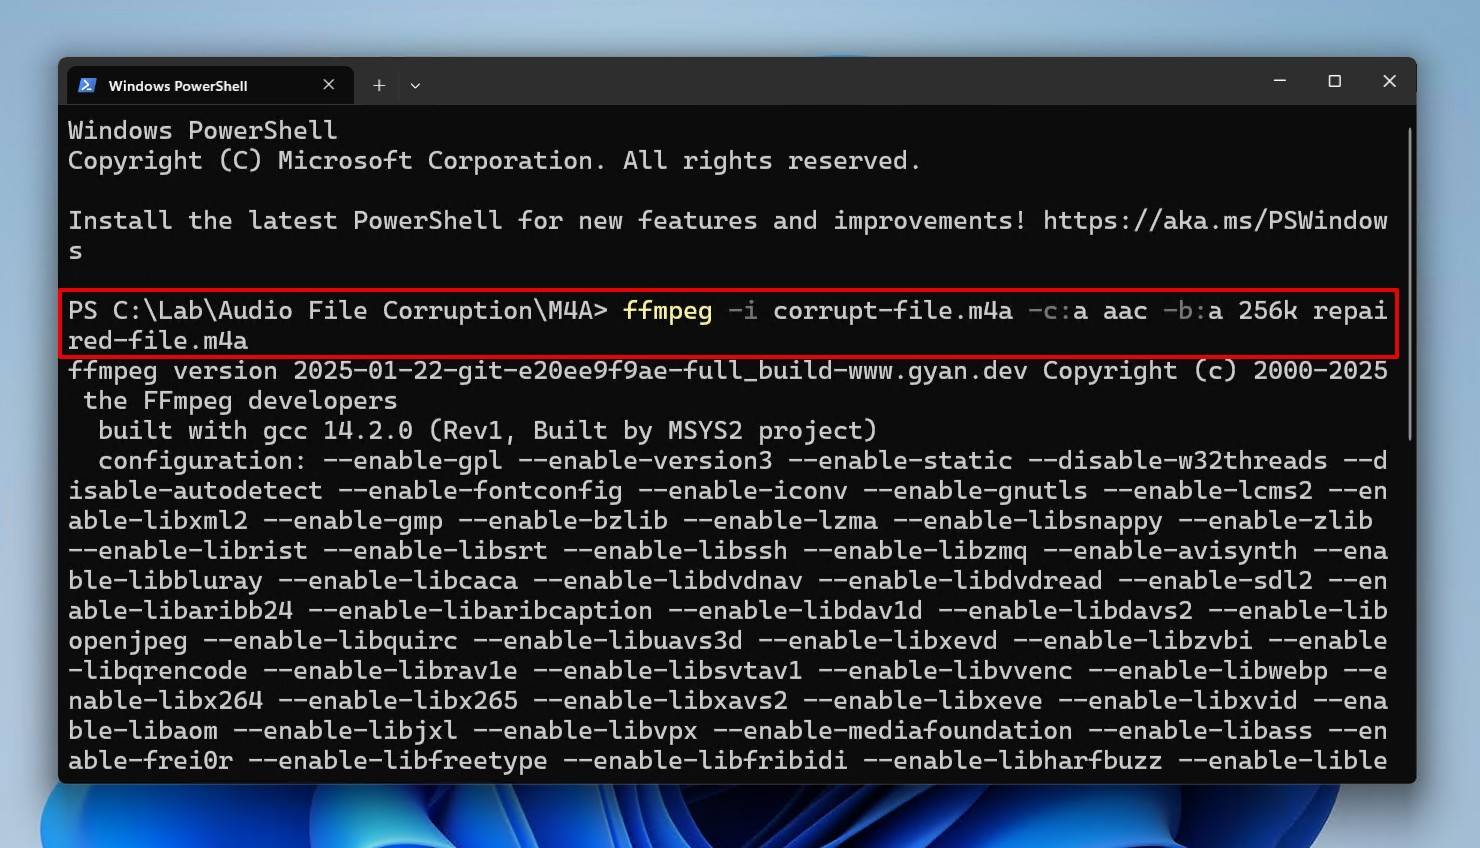
ffmpeg -i corrupt-file.m4a -c:a aac -b:a 256k repaired-file.m4a
- -c:a aac – Specifies that the audio codec used should be AAC.
- -b:a 256k – Sets the bitrate for the audio streams. Lower this to 128k if you want a smaller file but lower quality, or raise it to 320k for better quality but larger file size.
Use this command to re-encode the M4A file with FFmpeg:
- Open the folder containing your corrupted M4A file. Right-click an empty space and click Open in Terminal.
- Enter the following command. Remember, you can update the bitrate to control the quality of the file. Press Enter.
Having issues with FFmpeg? Despite its usefulness, it can be quite hard to use, sometimes causing you to spend more time troubleshooting than repairing. The r/ffmpeg community on Reddit has over 19,000 members, many of whom are happy to help by sharing tips and troubleshooting advice. Be sure to include as much information as possible to receive the best support.
FAQ
How can I repair M4A files on a Windows PC?
Repair M4A files on Windows by converting them to another format with VLC Media Player. Alternatively, you can remux or re-encode the file with FAAC or FFmpeg.
What causes M4A files to become corrupted?
M4A files can become corrupted due to a recording interruption, incomplete file download, and even bad sectors. Essentially, anything that can result in some of the file’s binary data being altered or deleted.
Can I repair M4A files without losing audio quality?
Yes, you can repair M4A files without losing audio quality by remuxing them. This simply copies the codec from one container to another. Remuxing doesn’t work in every situation though, and sometimes re-encoding is the only repair option that works.
Are there free tools available to repair M4A files?
Yes, Clever Online Video Repair is a free online tool that can repair M4A files. You can also re-encode the file with an online converter, or do it on your PC with software like VLC, HandBrake, or FFmpeg.
Can I repair M4A files on my smartphone?
Absolutely. The best way to repair M4A files on a smartphone is using an online tool like Clever Online Video Repair, as you don’t need to download any software and your files can be uploaded directly from your device.
Is it safe to upload my M4A files to online repair services?
Yes, but it depends on where you upload your M4A files. Each online repair service will have its own terms that dictate how your data is used. As with anything you do online, do your due diligence before uploading anything.
What should I do if my M4A file is only partially repaired?
Try repairing it again with another repair method. Try it with an online tool, and if that doesn’t work, re-encode it with VLC Media Player. For advanced cases of corruption, FFmpeg gives you a lot of control over file repair.
Can I batch-repair multiple M4A files?
Yes, you can batch remux corrupted M4A files using a batch file and FFmpeg. Here’s how:
- Move your M4A files to a single folder.
- Enter the following into a new Notepad:
- @echo off
- mkdir repaired
- for %%i in (*.m4a) do ffmpeg -i “%%i” -c copy “repaired\%%~ni.m4a”
- pause
- Save it as m4a-repair.bat in the same folder as your M4A files.
- Run the batch file. Your repaired files will be in the repaired folder that was created.
This article was written by Jordan Jamieson-Mane, a Staff Writer at Handy Recovery Advisor. It was also verified for technical accuracy by Andrey Vasilyev, our editorial advisor.
Curious about our content creation process? Take a look at our Editor Guidelines.