Did you go to play an M4V file, only to find that it’s corrupted or damaged? In such a state, it will either not play at all, or only play certain parts of the file. As frustrating as this is, it is possible to repair the M4V file to working order. Some readers who found our other video repair articles useful reached out about M4V recovery. Therefore, we’ve gone ahead and tested all of the most effective M4V repair methods and compiled them into this easy-to-read guide.
We’ve included a bunch of solutions that have proven effective for M4V video repair. These solutions have been categorized into levels based on their difficulty. While all of these solutions are demonstrated on Windows, they will also work on macOS.
Level 1: Easy Fixes
The following solutions are intended to be quick and easy, as sometimes it’s not necessary to use highly advanced solutions when basic ones suffice. Here are some of the easiest ways you can repair M4V files on Windows and macOS.
Option A: VLC Media Player
Before deeming the video file unplayable, it’s a good idea to try playing it with a media player that supports a wide array of codecs. VLC is a good choice of software for this. If you haven’t tried yet, go ahead and try playing the video with VLC.
If the M4V video is still unplayable, there’s an automatic repair feature built-in to VLC that we’re going to use to our advantage. The repair function we’re using is designed to work with AVI files, so before we start, make a copy of the corrupted M4V file and rename it with the AVI extension. For example, a file named video.m4v will be renamed to video.avi.
File name extensions are hidden in Windows 11 by default. To enable them, open File Explorer, click View, then Show, then tick File name extensions.
Follow these steps to try fixing the video file with VLC:
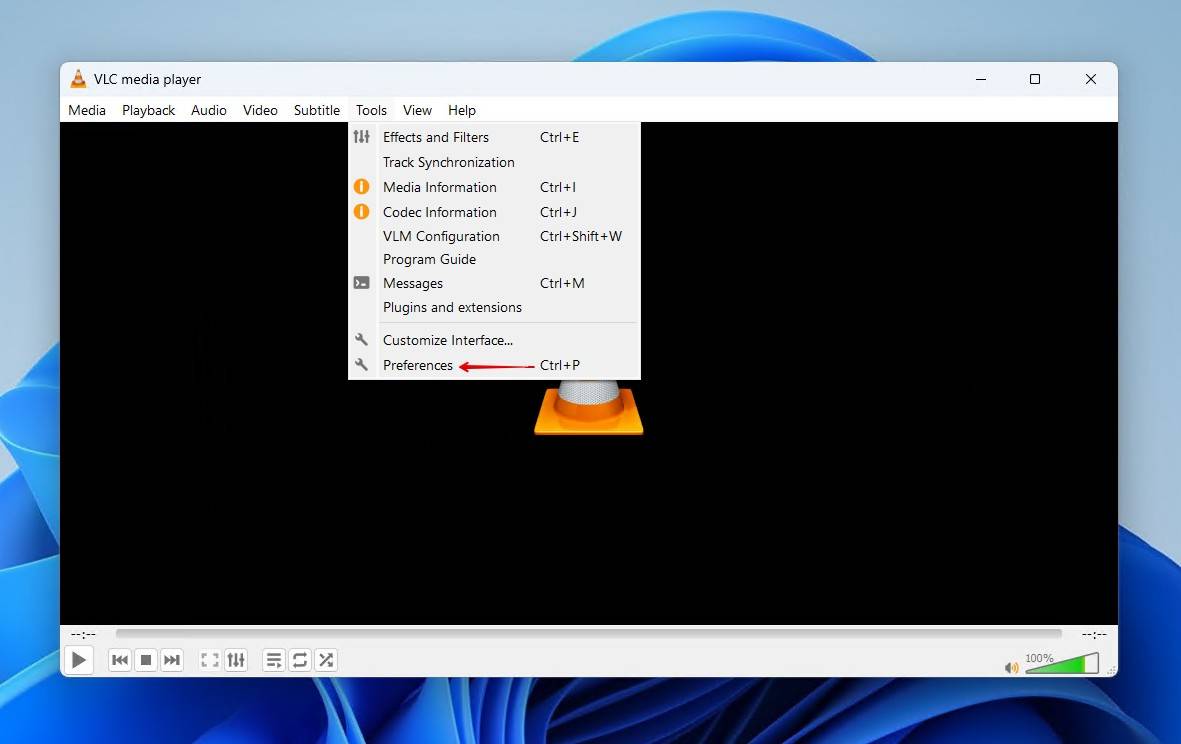
- Open VLC. Go to Tools, then click Preferences.
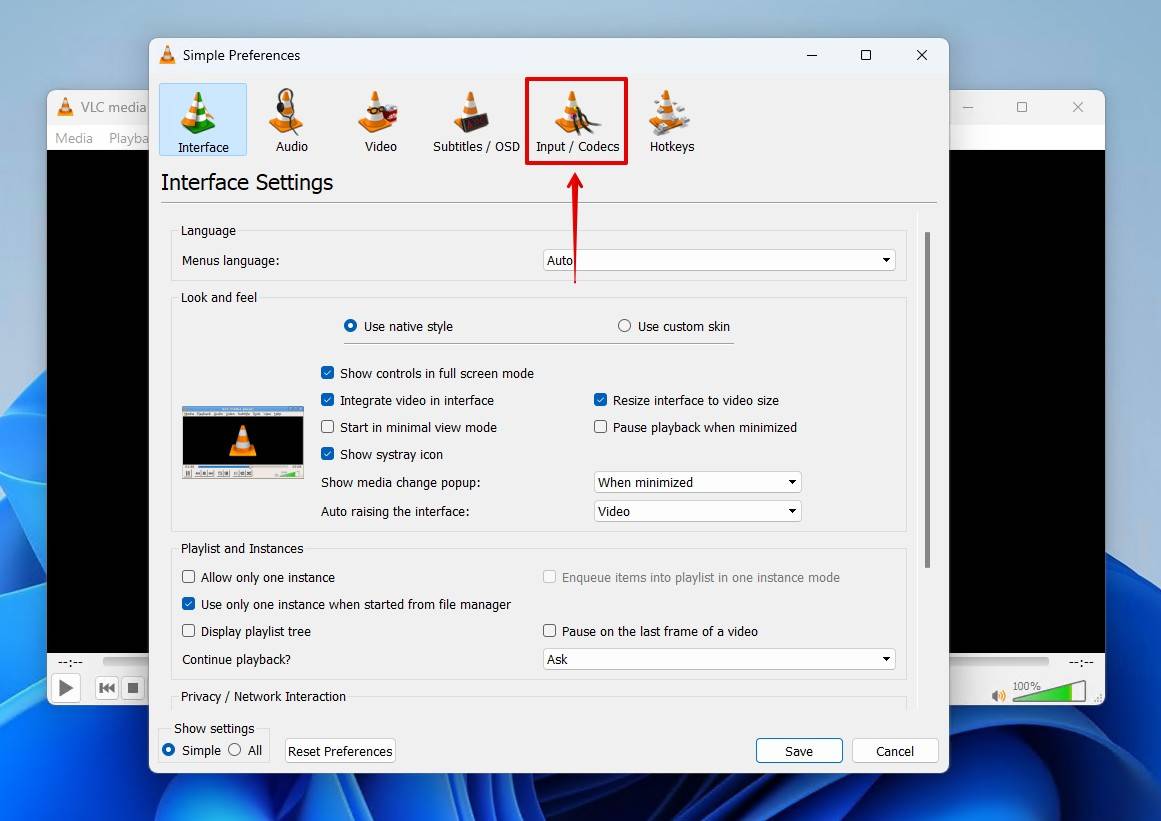
- Go to the Input / Codecs tab.
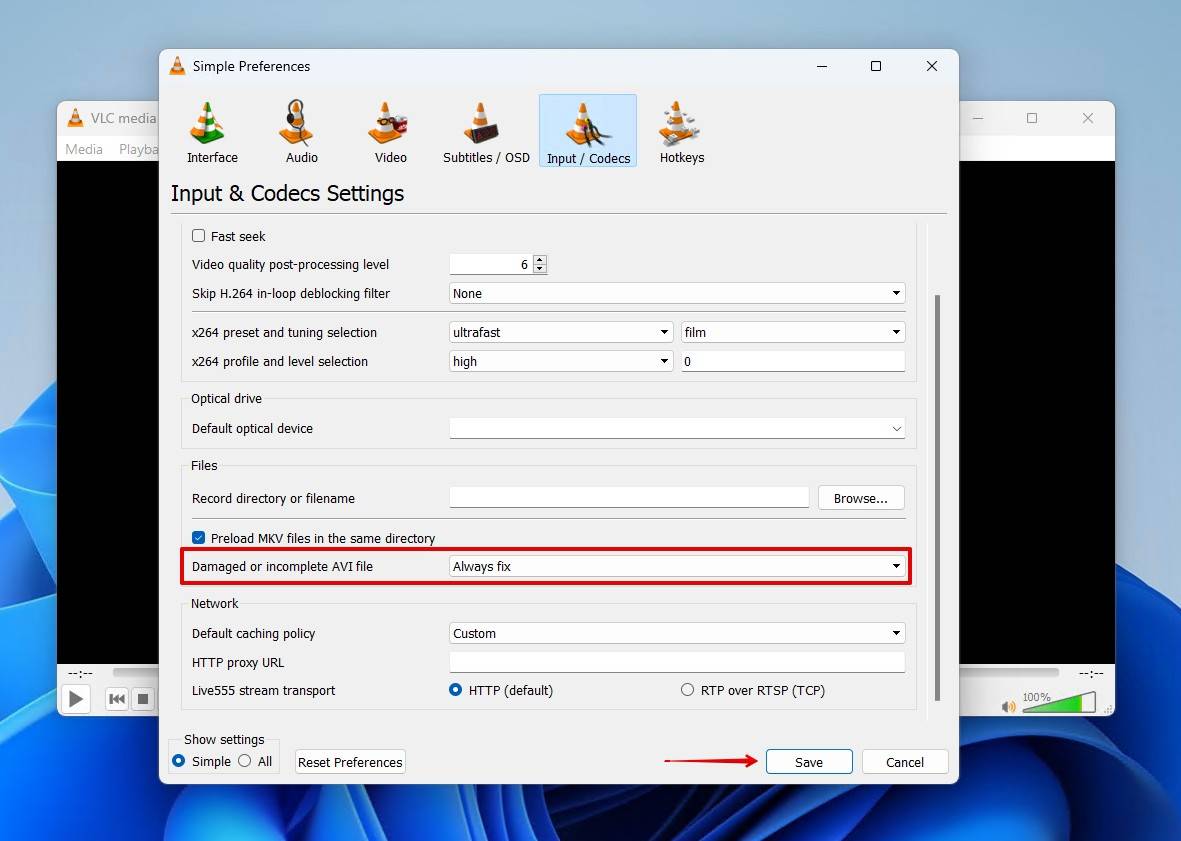
- Scroll down to the Damaged or incomplete AVI file dropdown. Change it to Always fix, then click Save.
- Try playing the video with VLC.
Option B: Clever Online Video Repair
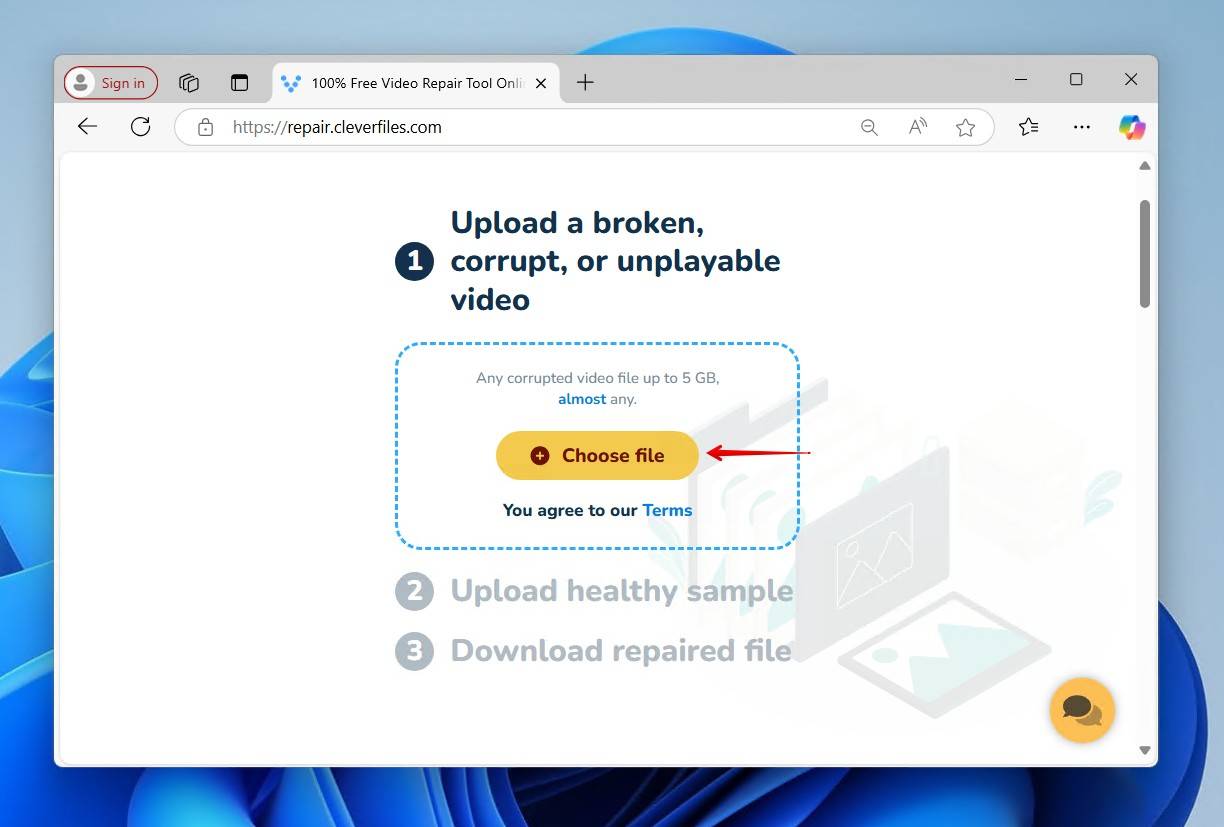
Repairing videos using online tools has always been a quick and reliable way of restoring them to working order. Clever Online Video Repair is a free video repair tool that allows you to fix corrupted or damaged M4V videos. Unlike other online video repair tools that typically only allow uploads up to 500 MB, Clever Online Video Repair supports files up to 5 GB in size, which is another reason why we recommend it.
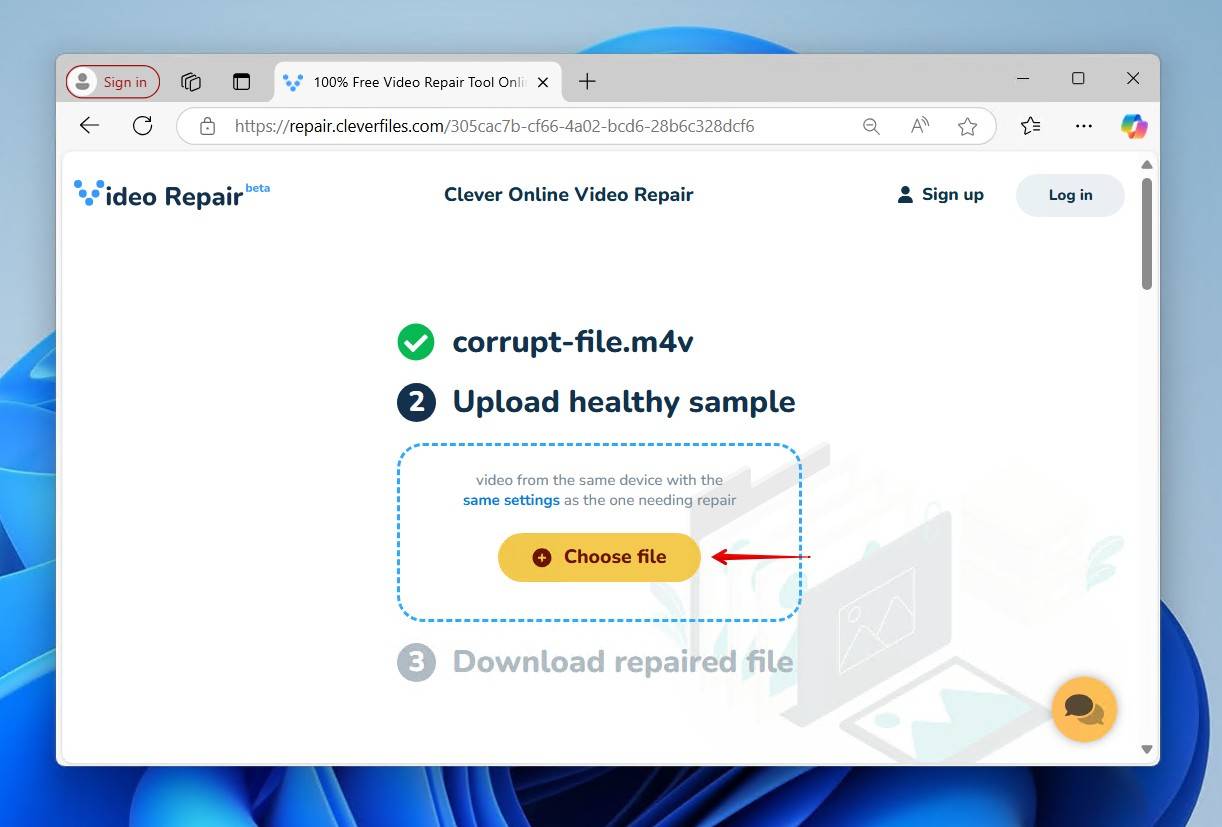
In order to repair the corrupted M4V video, you will need a healthy, working video recorded on the same device. The repair tool will take the necessary information from the healthy video file to fix the damaged one.
You can also repair files directly from your phone if you don’t have access to a PC, and repaired files are accessible from any device.
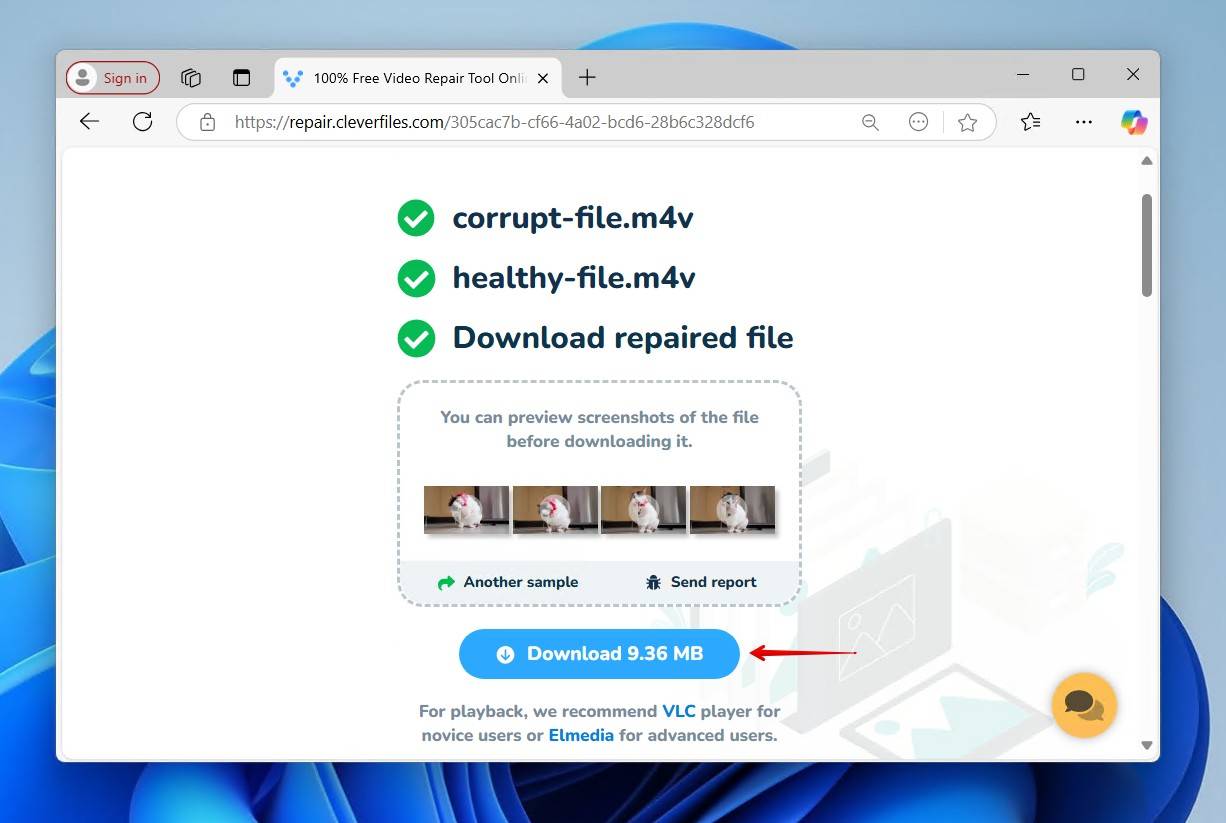
Here’s how you can use Clever Online Video Repair to fix a M4V video file:
- Open repair.cleverfiles.com and upload your damaged M4V video file.
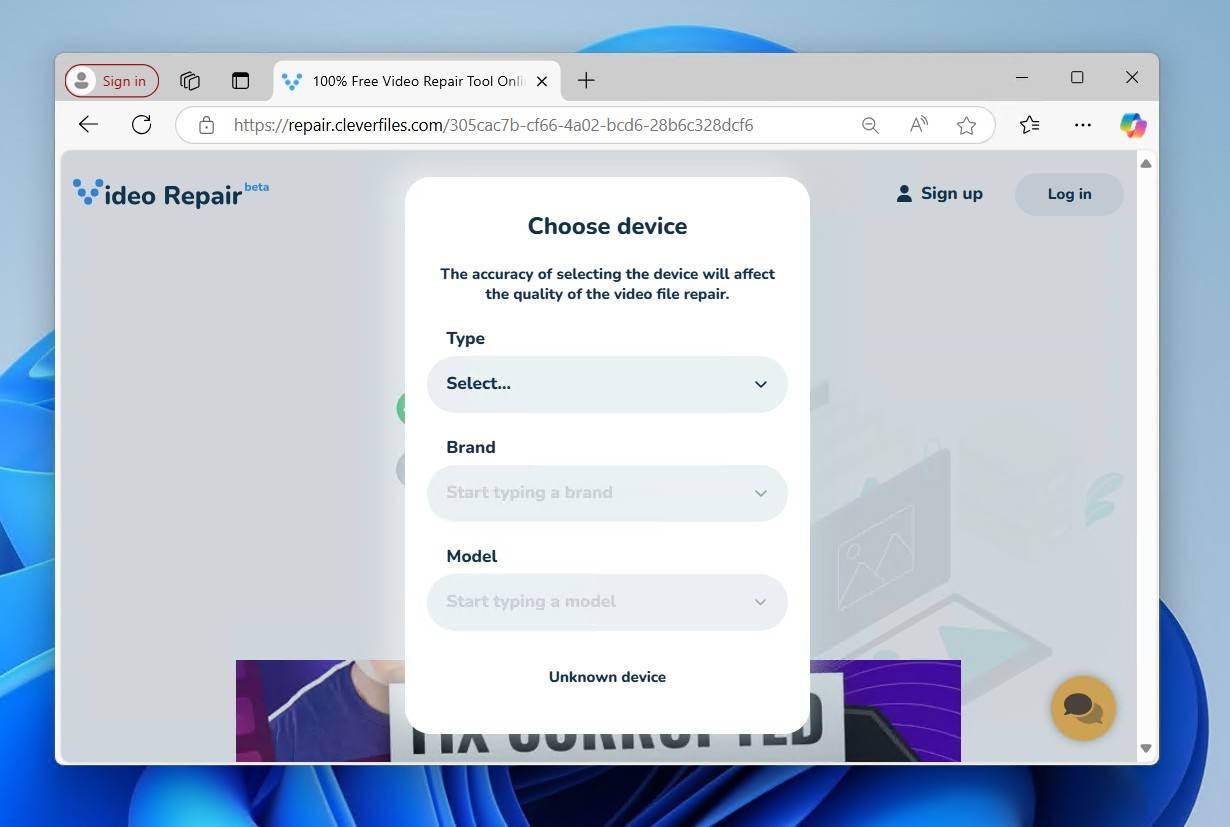
- Select the device that was used to record the video, or click Unknown device.
- Upload a healthy reference M4V file that was recorded on the same device.
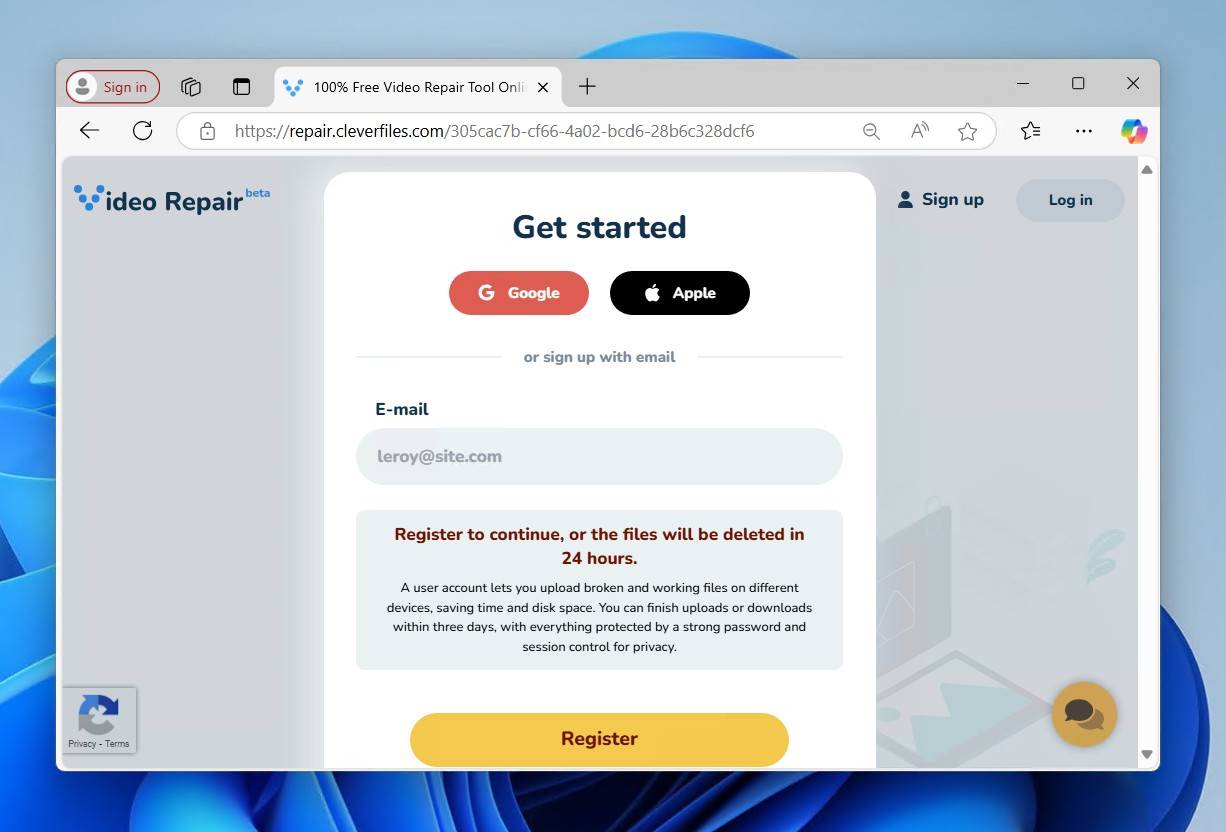
- Create a free account, or sign in.
- Download the repaired M4V file.
Level 2: Intermediate Fixes
More severe cases of damage may necessitate slightly more powerful M4V repair tools, some of which we’ve included in our extensive guide on how to fix corrupted or damaged video files. More specifically, ones that are capable of re-encoding the file, either to a different format or the same one. Re-encoding can repair corruption by reprocessing the video into a new container, bypassing damaged or corrupted metadata. We’ve included three options here, all of which are free and open-source.
Option A: HandBrake
Handbrake is an open-source video transcoder designed to convert videos from one format to another. Initially released in 2003, it has become a reliable choice for many due to it offering an array of advanced options while still being easy to use.
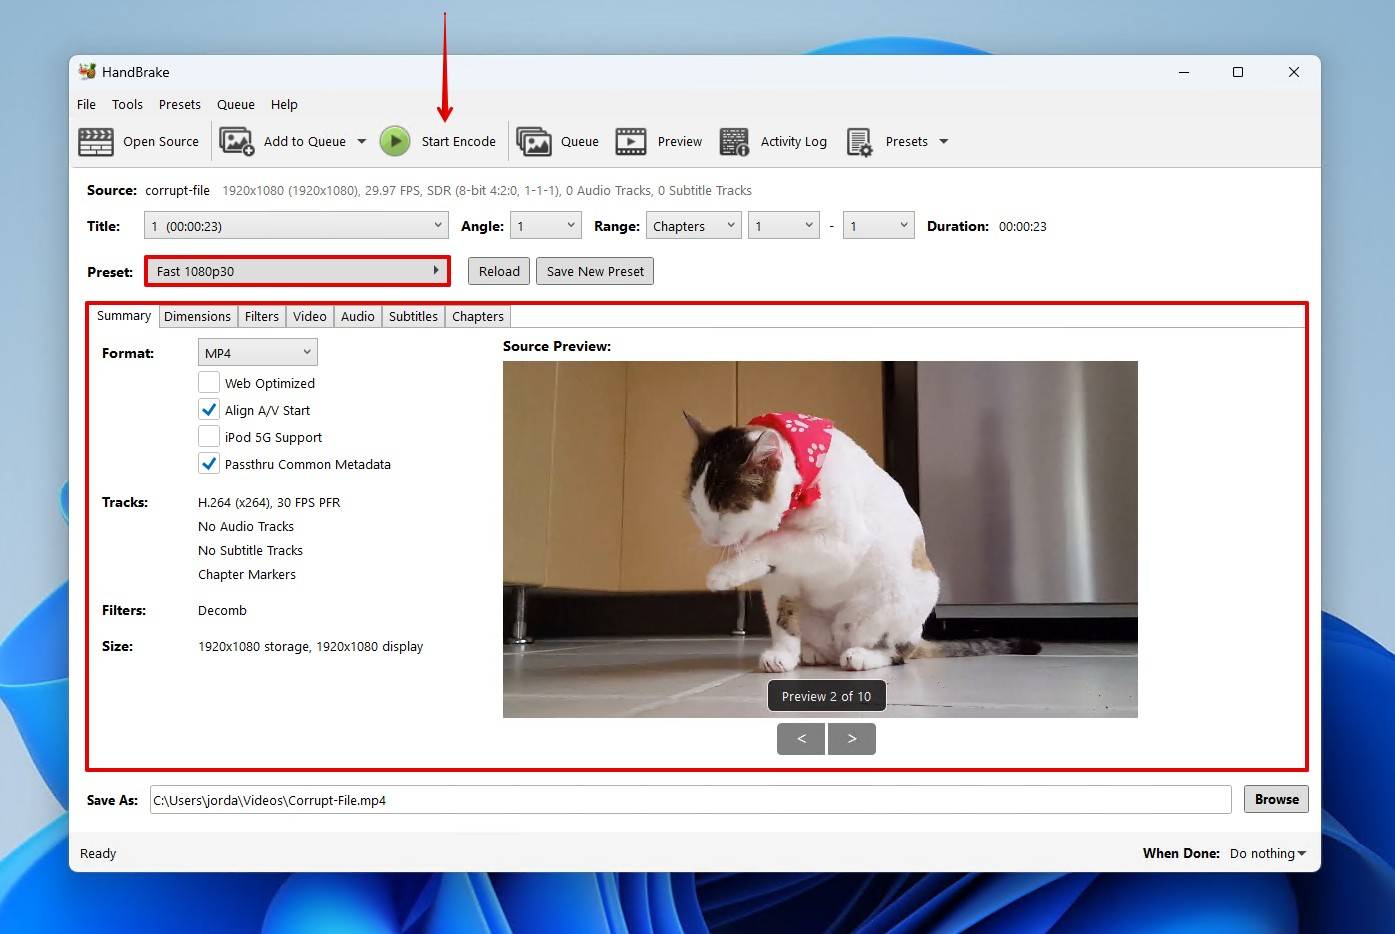
This is how you re-encode an M4V video with Handbrake:
- Download and install HandBrake.
- Drag the corrupted M4V file into HandBrake.
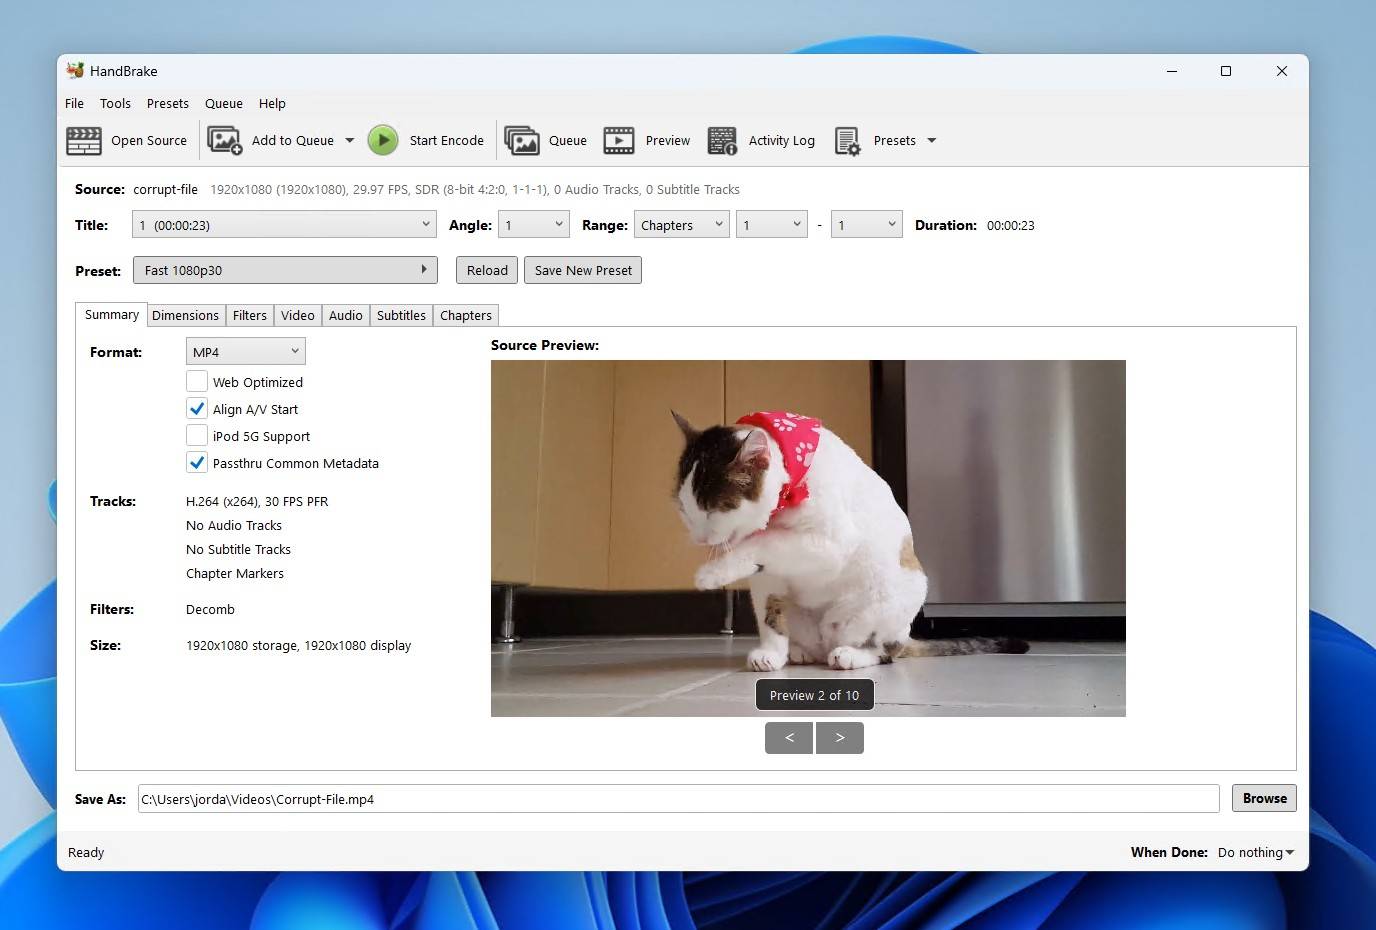
- Select the settings you want for the output file, or choose one of the preset options. When you’re ready, click Start Encode.
Long videos will take some time to re-encode, especially if you choose high-quality settings. Let HandBrake run in the background, and if needed, you can configure your system to automatically shut down in the bottom-right corner if you want to leave it going overnight.
Option B: VLC Media Player
You may be surprised to learn that VLC also includes the ability to convert videos, which will re-encode them. It might not include all of the options that a dedicated application like Handbrake does, but it has everything you’d need to perform basic re-encoding.
Re-encode the M4V video with VLC using these steps:
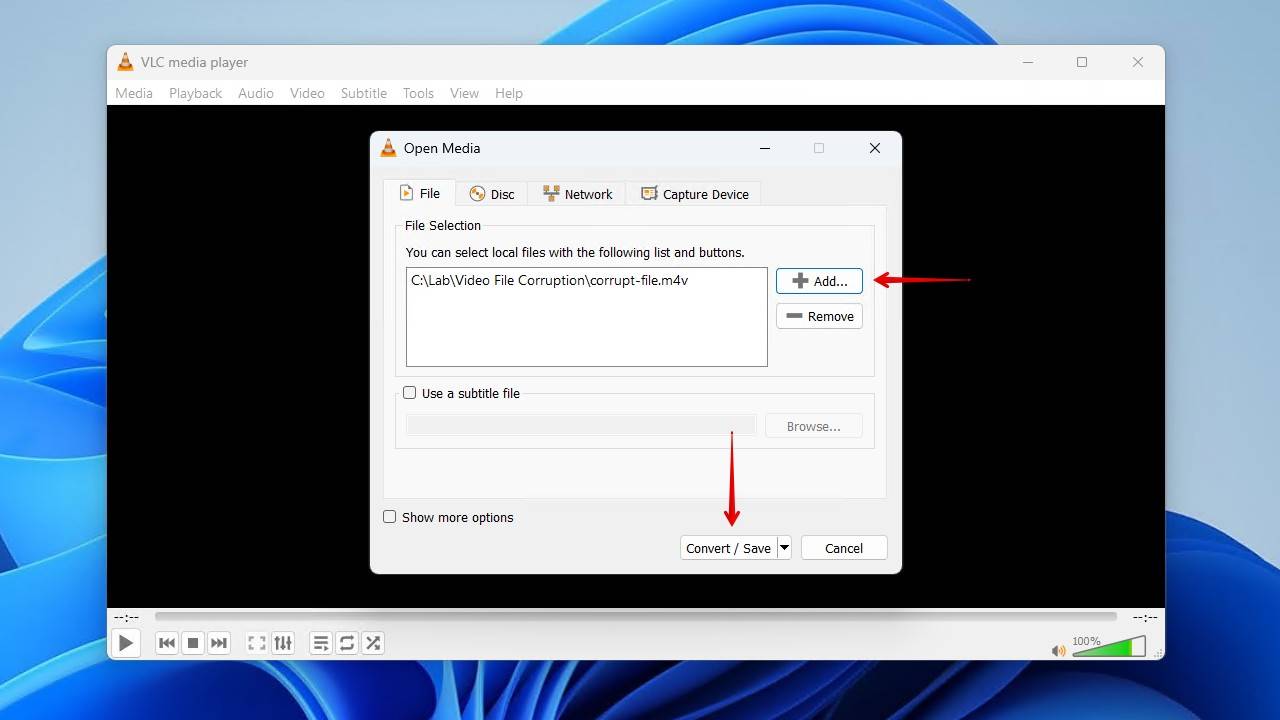
- Open VLC and click Media, then Convert / Save.
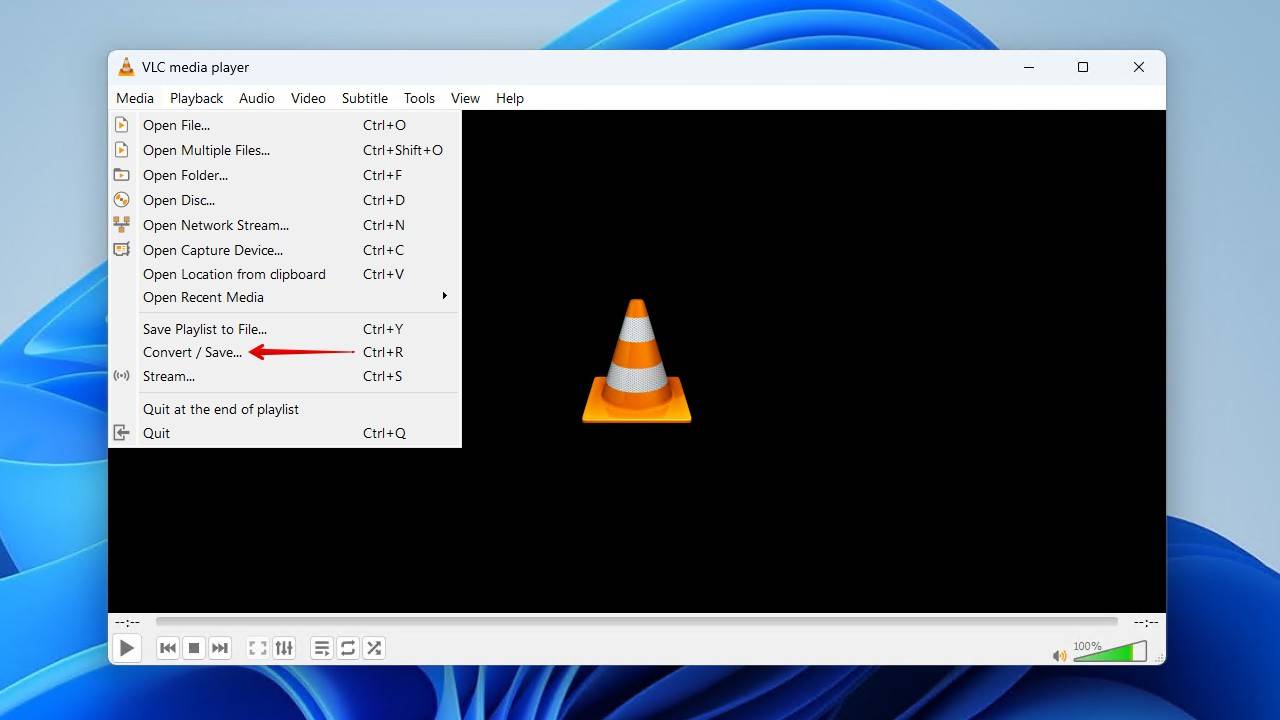
- Click Add and select the corrupted M4V file. Then click Convert / Save.
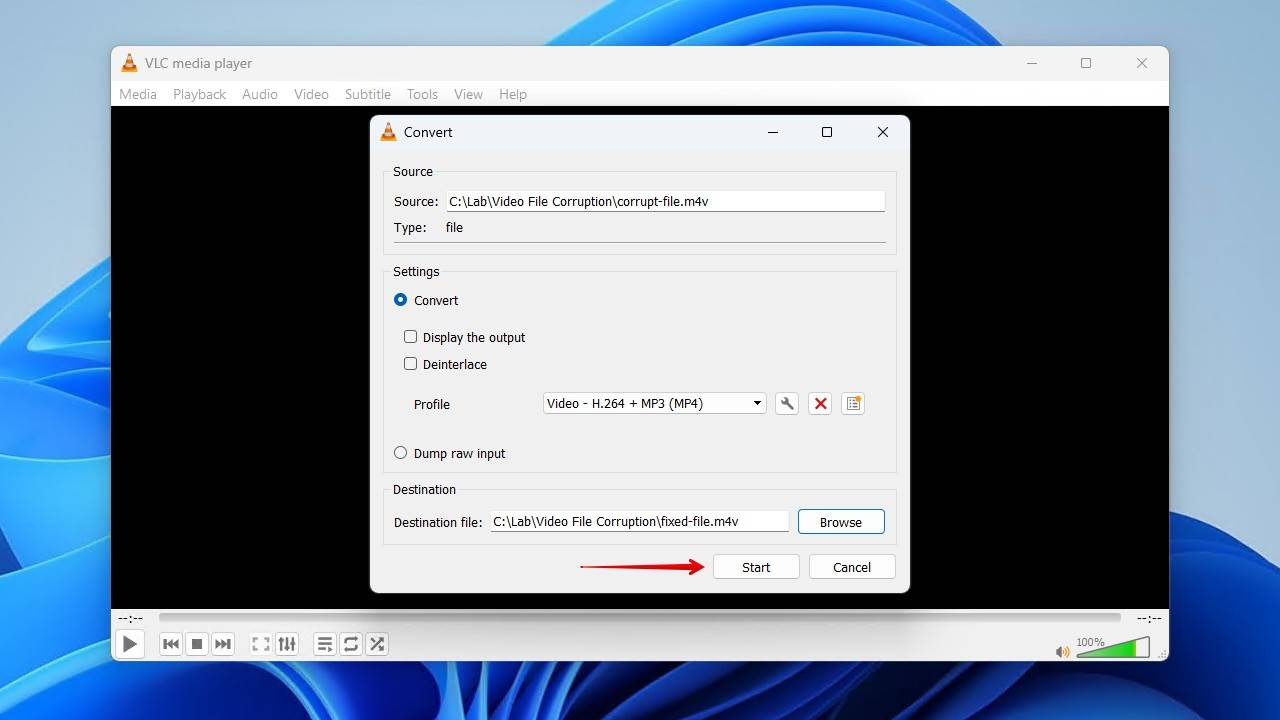
- Choose a profile (or create a new one), select an output location, then click Start.
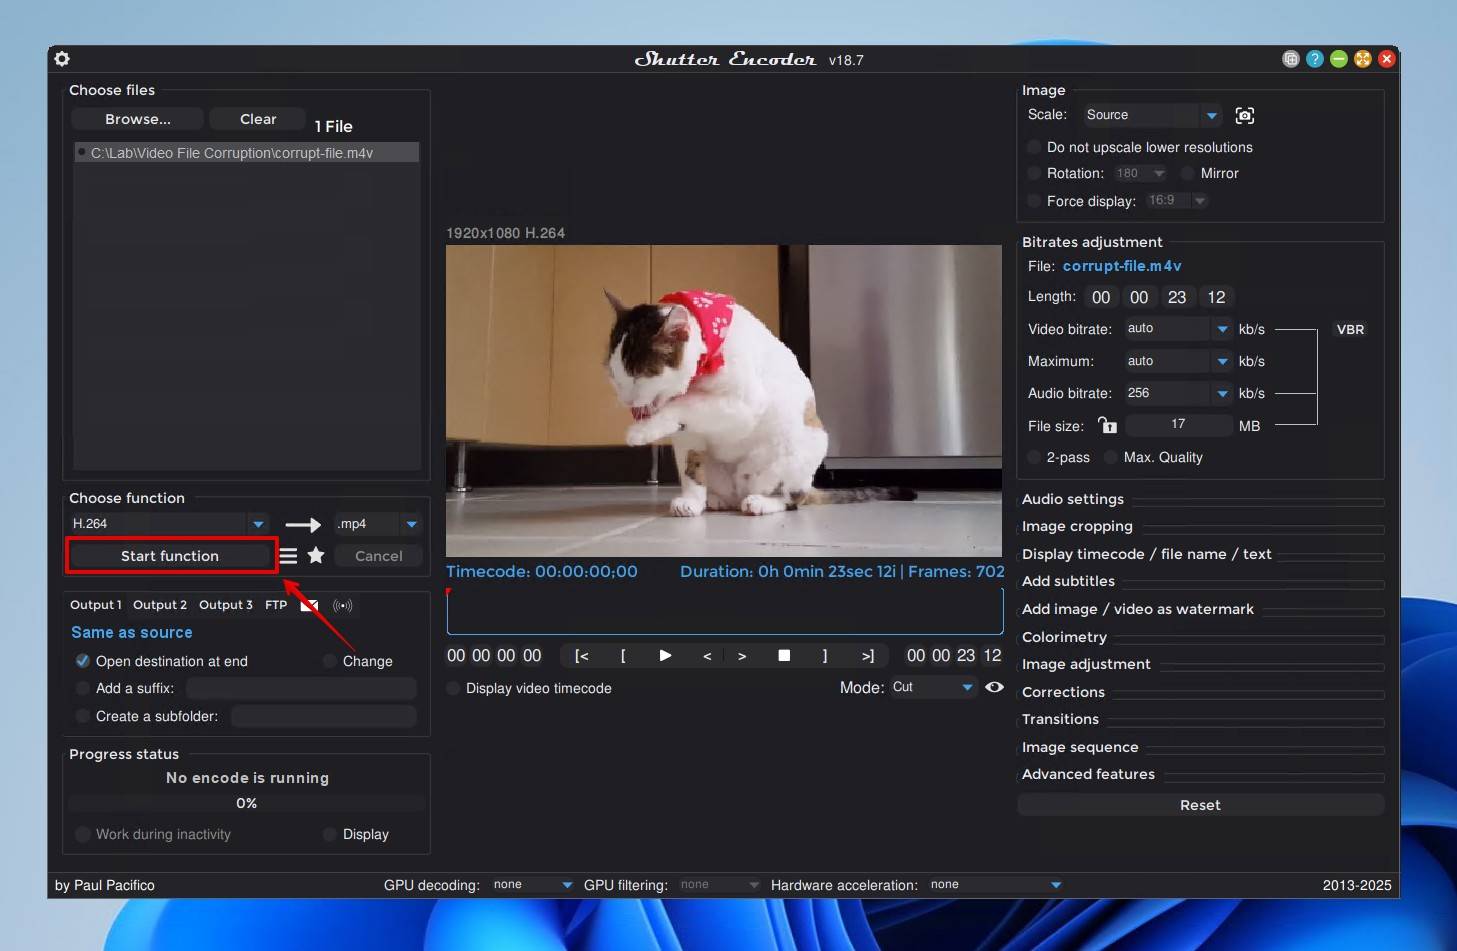
Option C: Shutter Encoder
Shutter Encoder is a common choice for re-encoding videos. It makes use of FFmpeg, a powerful open-source tool for handling multimedia files. As FFmpeg is run at the command line, it’s included further down the article as a more challenging fix. However, we’ve included Shutter Encoder because it makes using FFmpeg a whole lot easier thanks to the refined graphical user interface (GUI). For some, it’s even better than Handbrake.
Here’s how you can easily re-encode a video with Shutter Encoder:
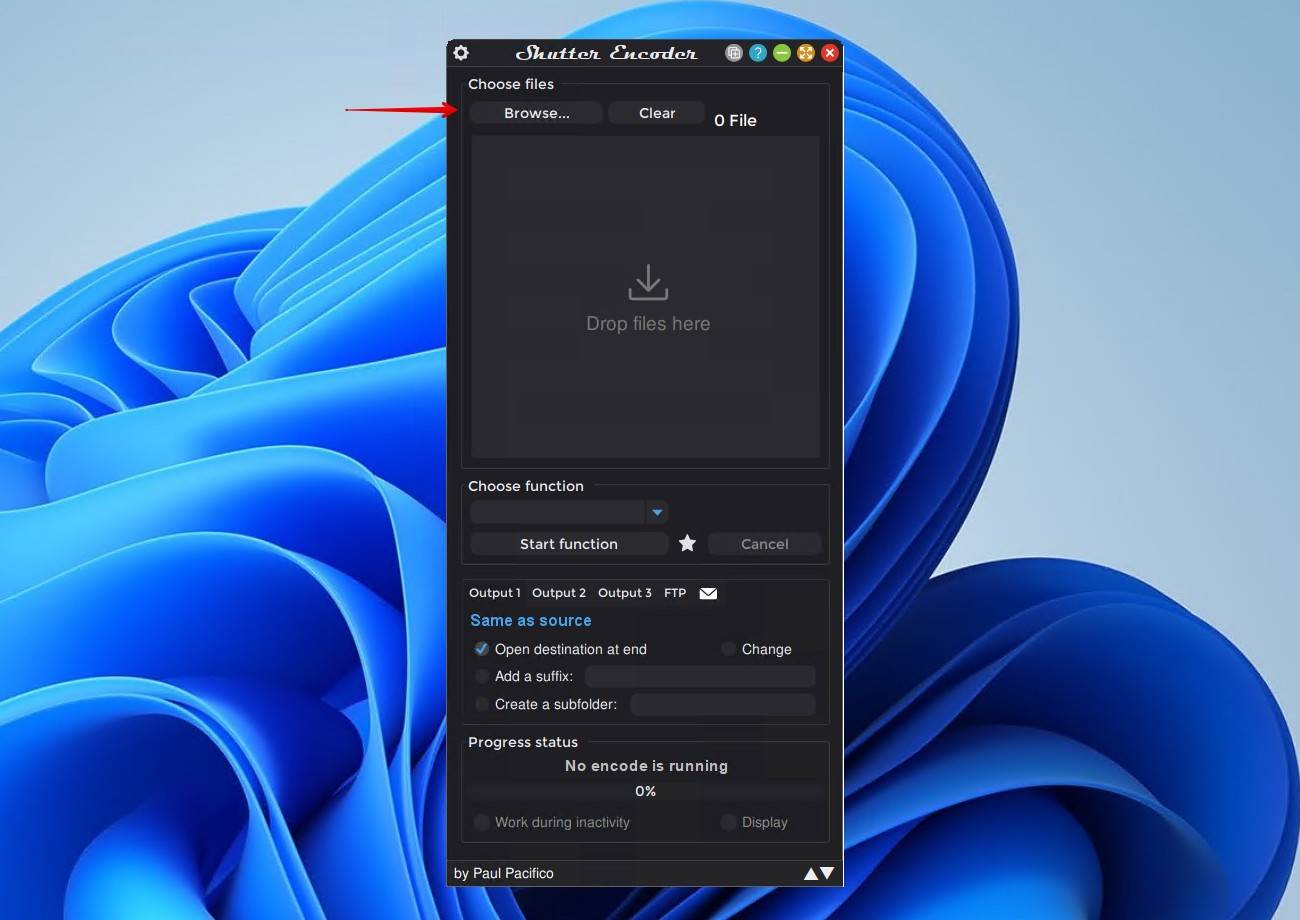
- Download and install Shutter Encoder.
- Click Browse and select your corrupted M4V video file. Alternatively, drag it into the box.
- Click Choose function, then select your desired output codecs.
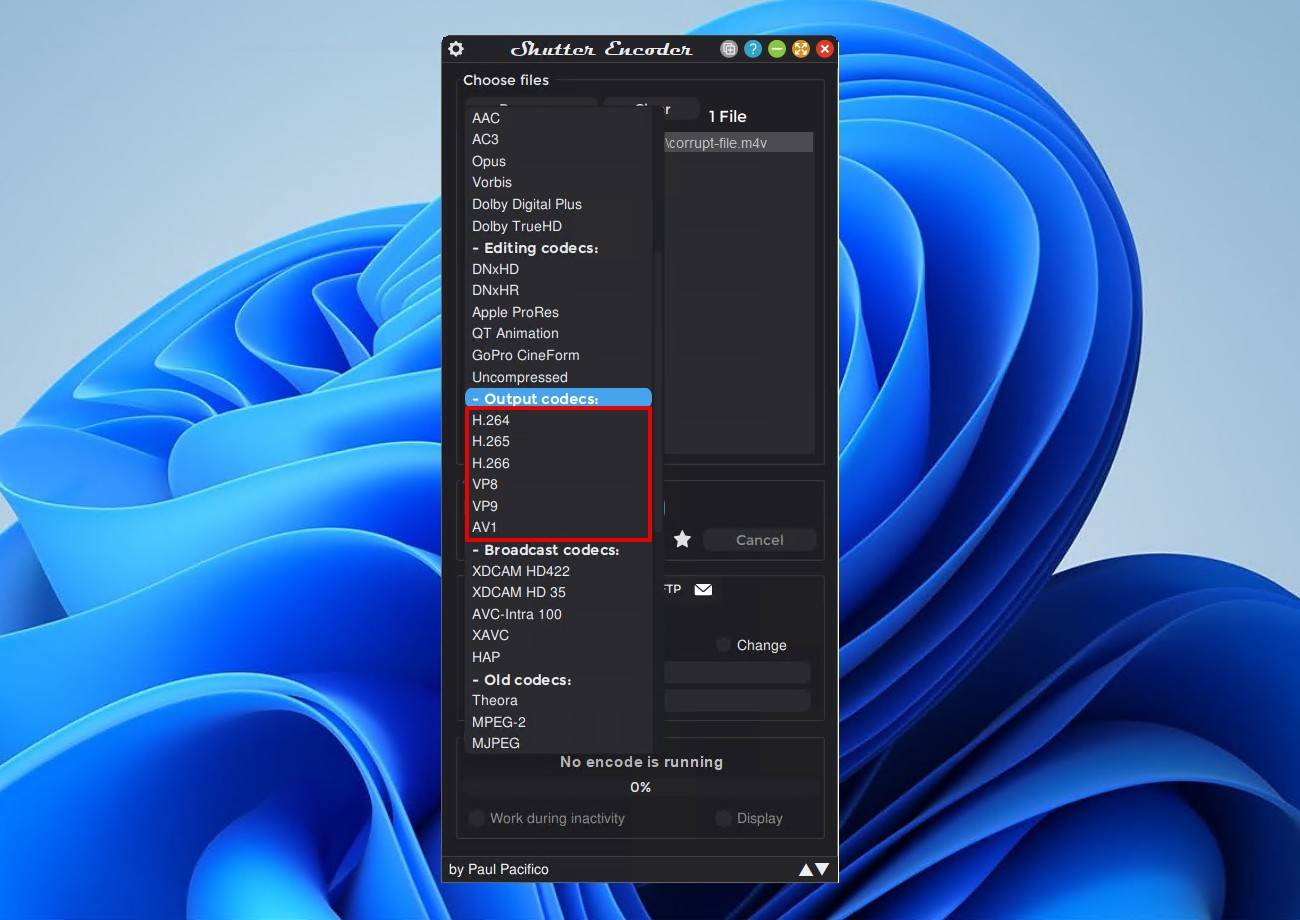
- Make any adjustments to the settings as needed. When you’re ready, click Start function.
Level 3: Expert Fixes
We’ve reserved the more challenging fixes for those who either didn’t have much success with the methods already mentioned or want to jump straight to the hard-hitting fixes that can repair M4V video files.
Option A: Untrunc
Untrunc is a command-line tool specifically designed to fix truncated video files, specifically those using the MP4, M4V, MOV, or 3GP containers.
In this case, Untrunc can only help fix M4V files that contain misplaced (but present) ftyp, moov, or mdat atoms. For instance, if you want to fix a truncated MP4 video file that has misplaced atoms, Untrunc can help by moving them to the correct locations.
Like Clever Online Video Repair, a healthy reference video file that was recorded on the same device is required. Untrunc will extract the necessary information and use it to fix the damaged M4V file.
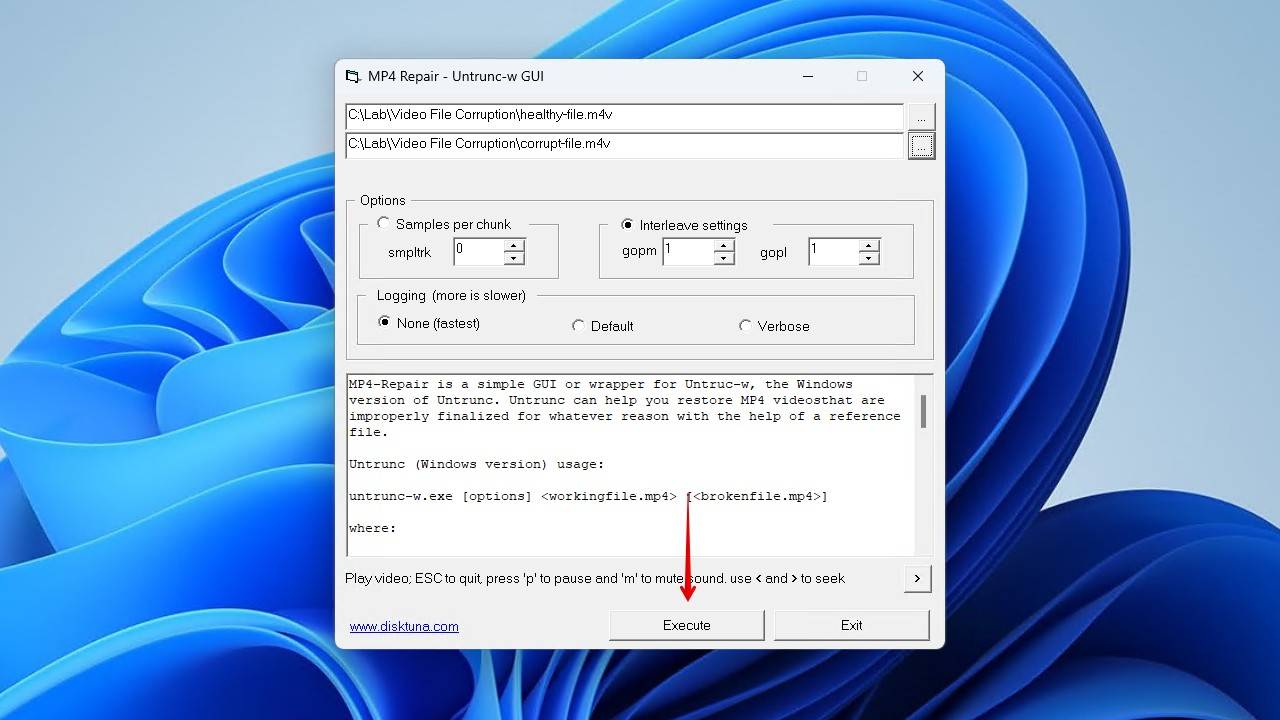
Untrunc comes packed with its own GUI under the filename untrunc-gui.exe. You can also use MP4 Repair Untrunc GUI, which is our preferred tool because it has the same functionality but a slightly better user interface (UI). We’ll demonstrate how to use MP4 Repair Untrunc GUI first:
- Download and open MP4 Repair Untrunc GUI (mp4repair.exe).
- Select your reference file.
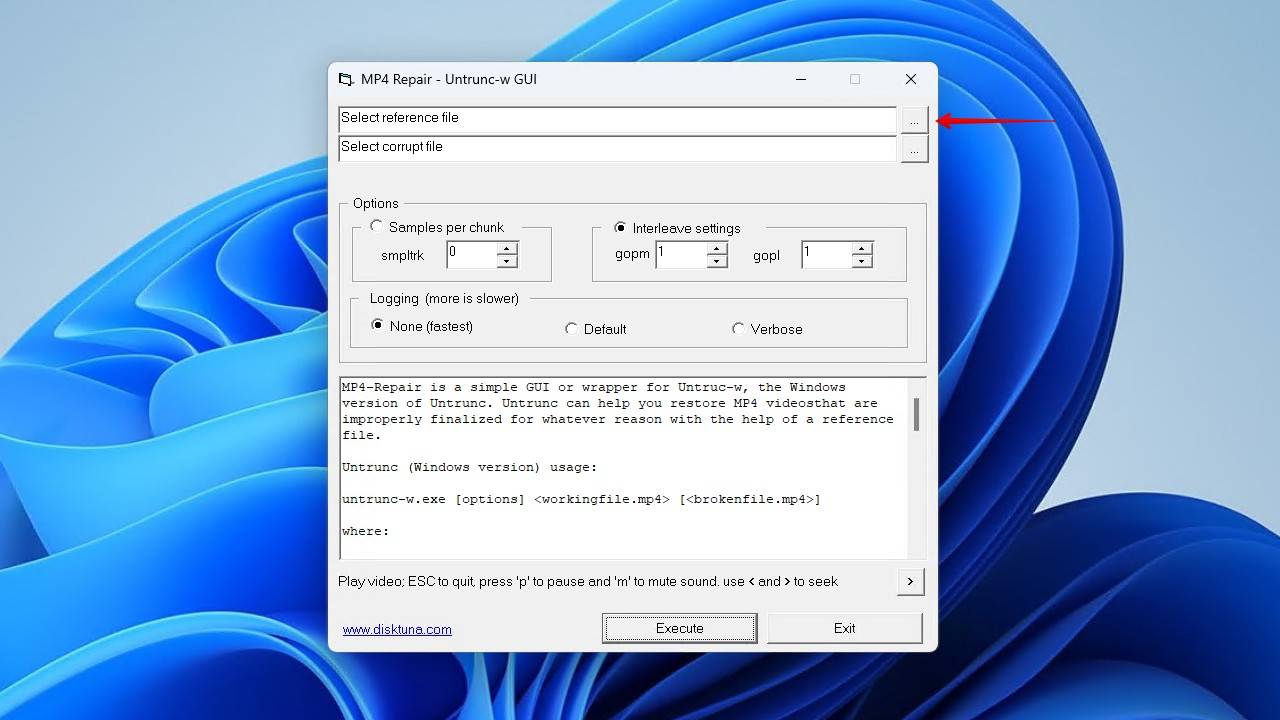
- Select the corrupt file.
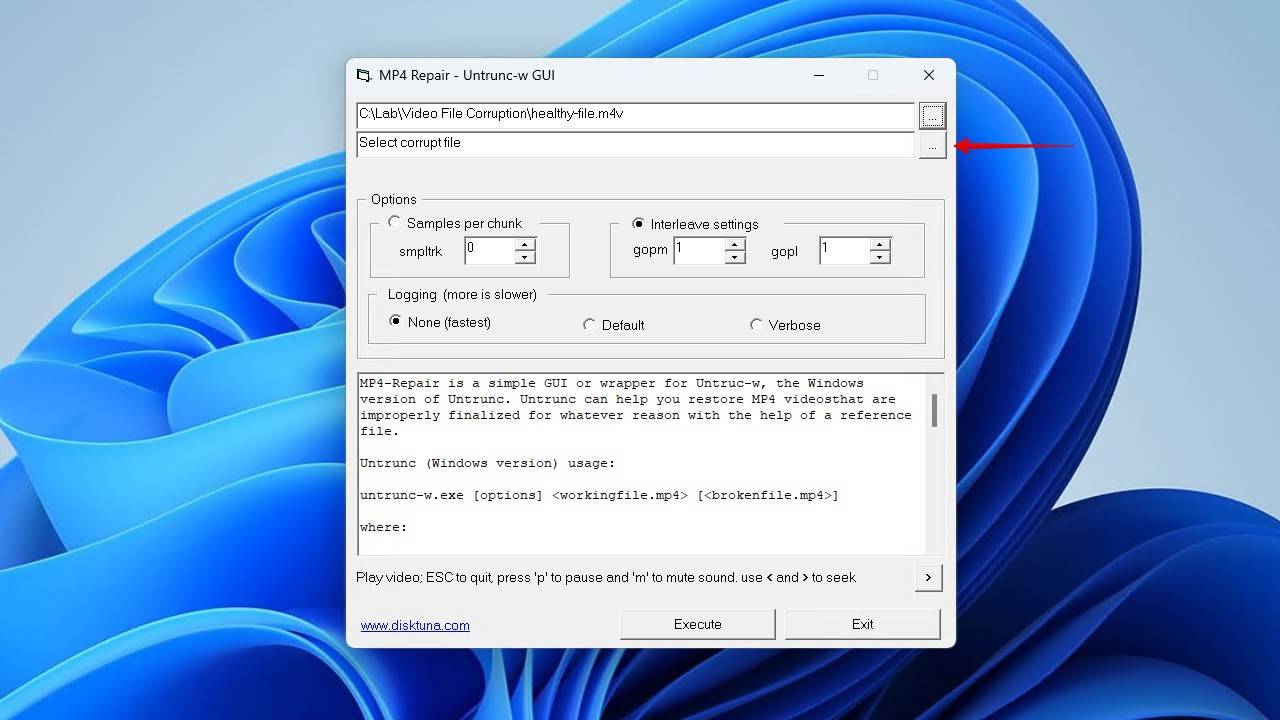
- Click Execute.
Installing the command-line version of Untrunc requires setting up a path to it in Windows. This will allow you to invoke it anywhere, rather than having to manually specify where it is all the time.
Follow these instructions to set up an environment variable for Untrunc:
- Download the automatic Windows build by AppVeyor.
- Extract it somewhere where it will reside permanently.
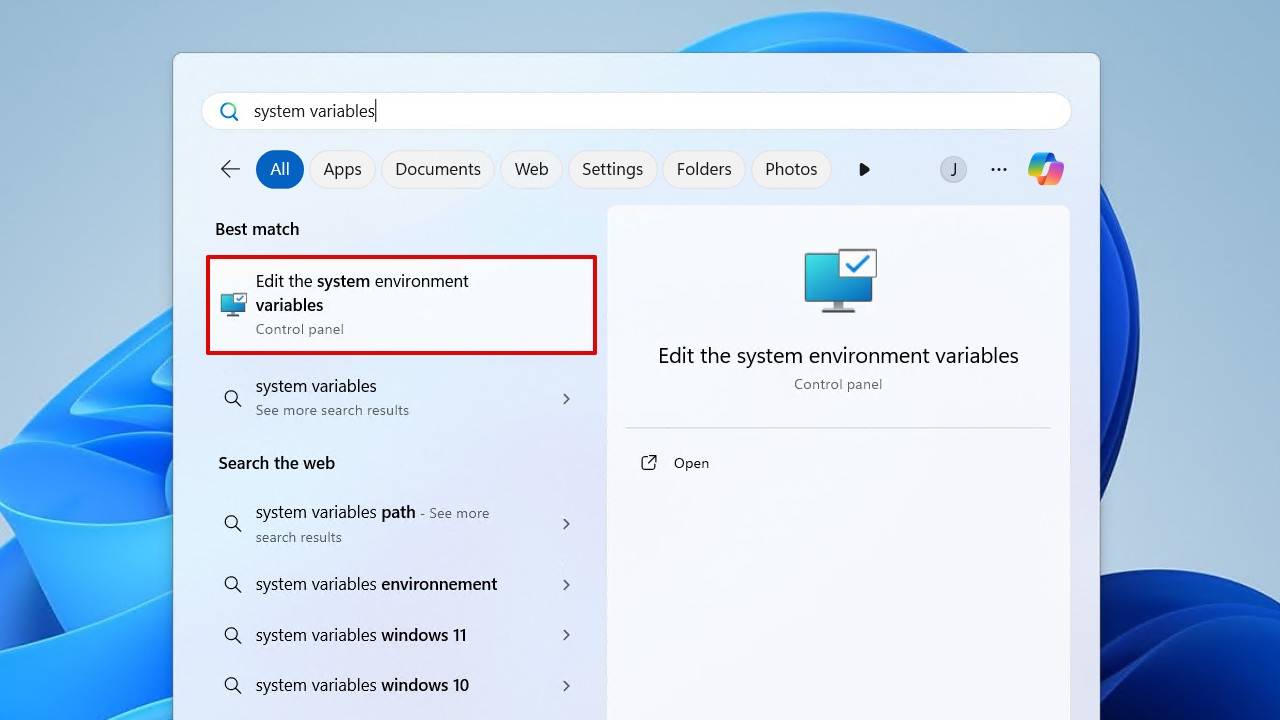
- Open Start and search “System Variables”. Click Edit the system environment variables.
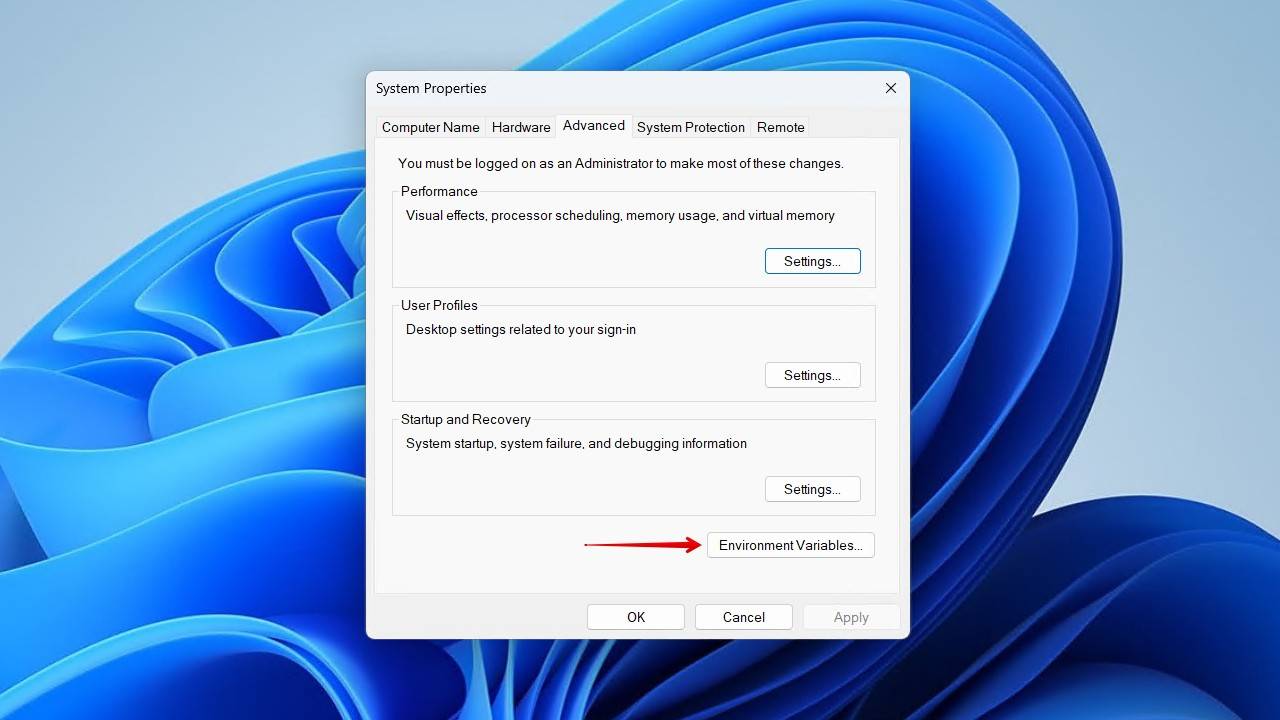
- Click Environment Variables.
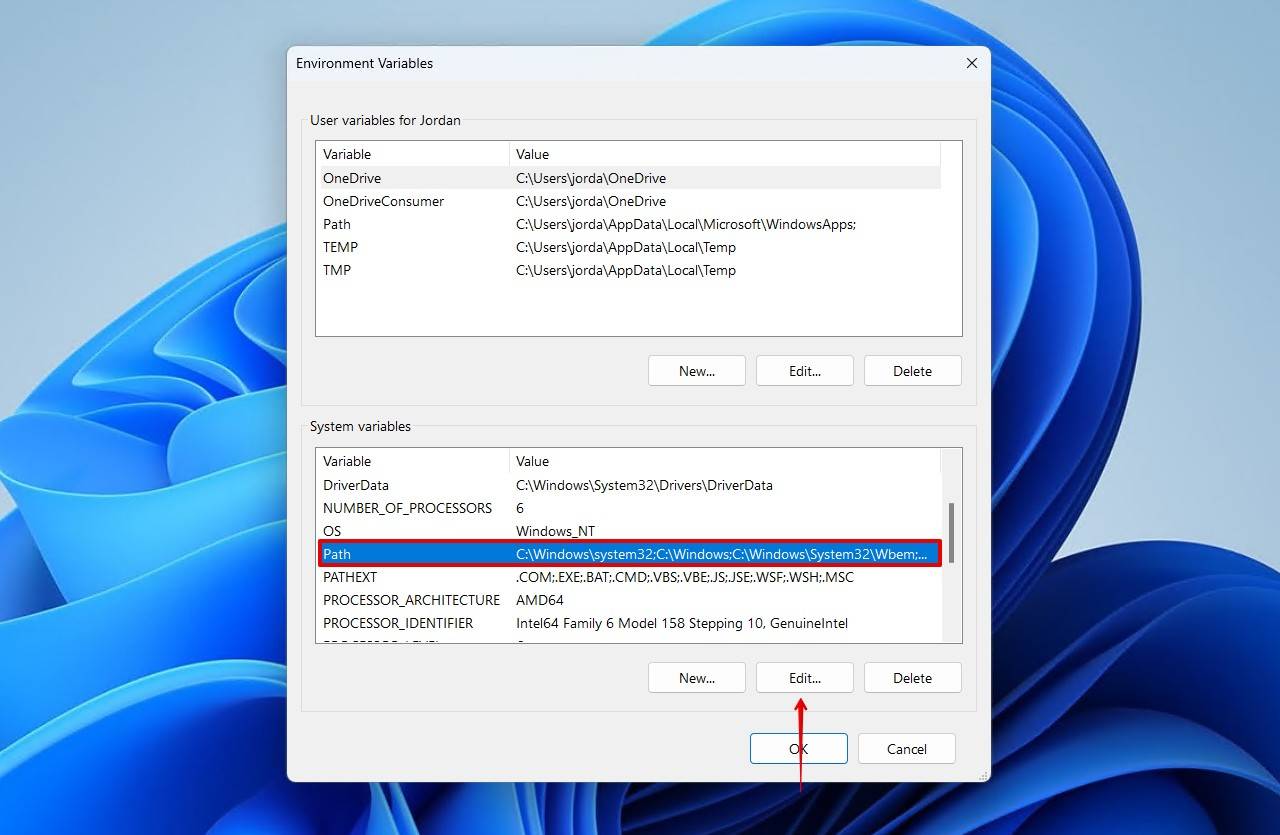
- Select Path in the System variables section, then click Edit.
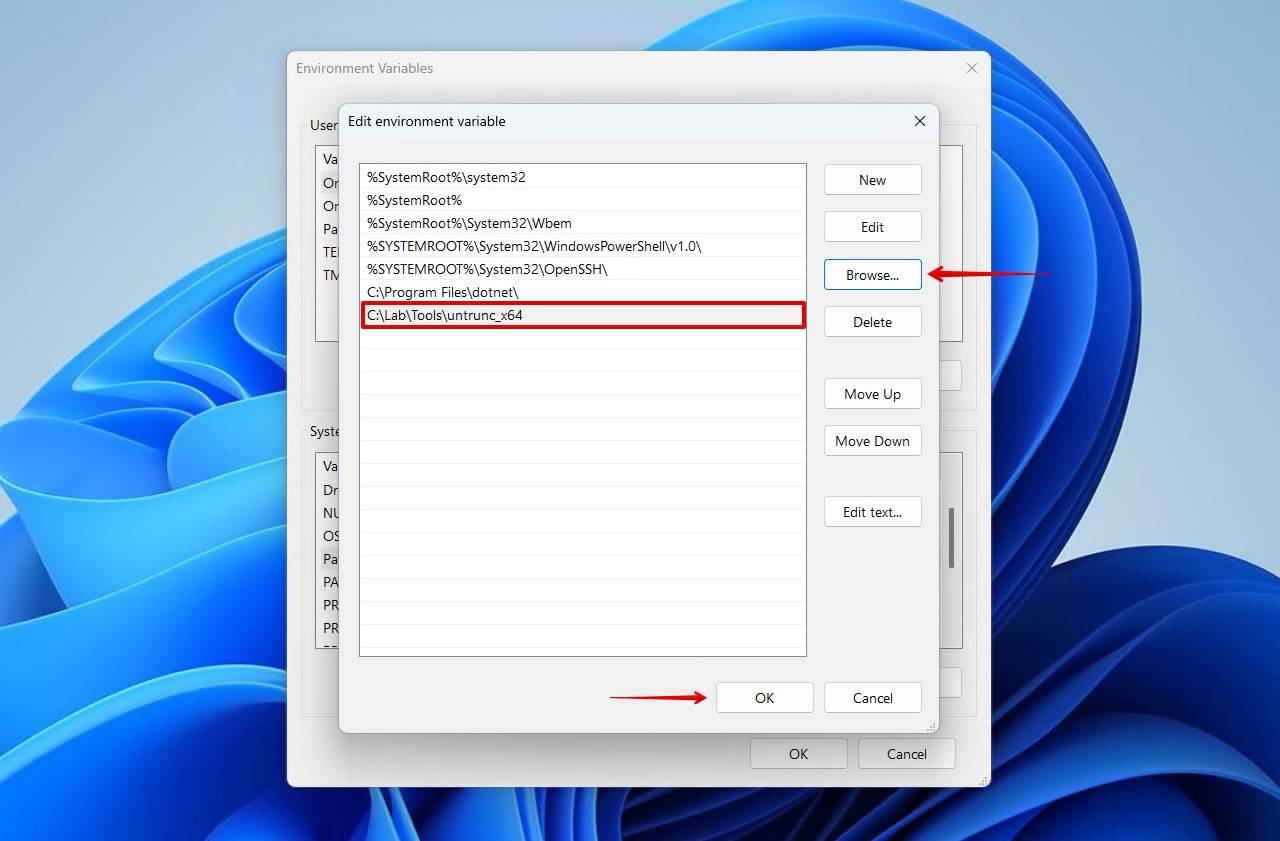
- Click Browse, then select the untrunc_x64 folder. Close all of these windows by clicking OK.
At this point, Untrunc is set up and usable. You can test this by opening Terminal (Right-click Start and click Terminal (Admin)) and typing untrunc -V. It should respond with the version you’re using.
Now that it’s set up, this is how you use Untrunc to repair a truncated M4V video:
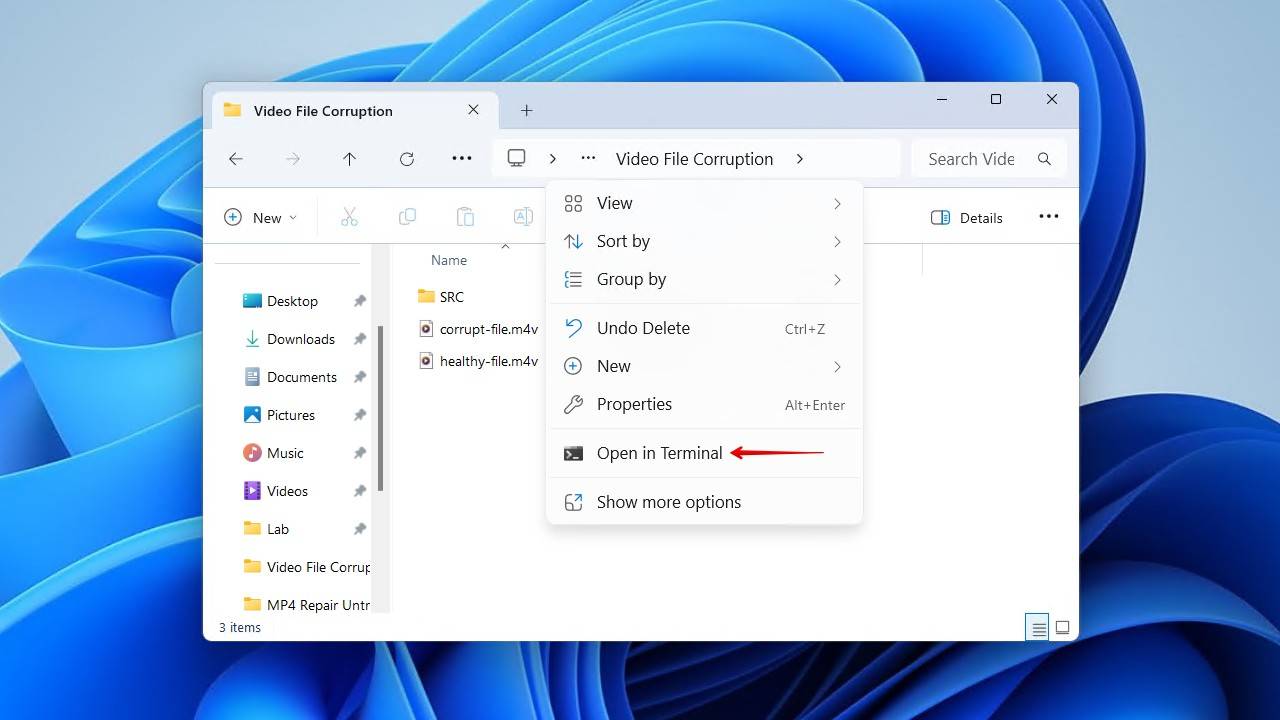
- Go to the folder that contains the corrupted and healthy files. Right-click an empty space and click Open in Terminal.
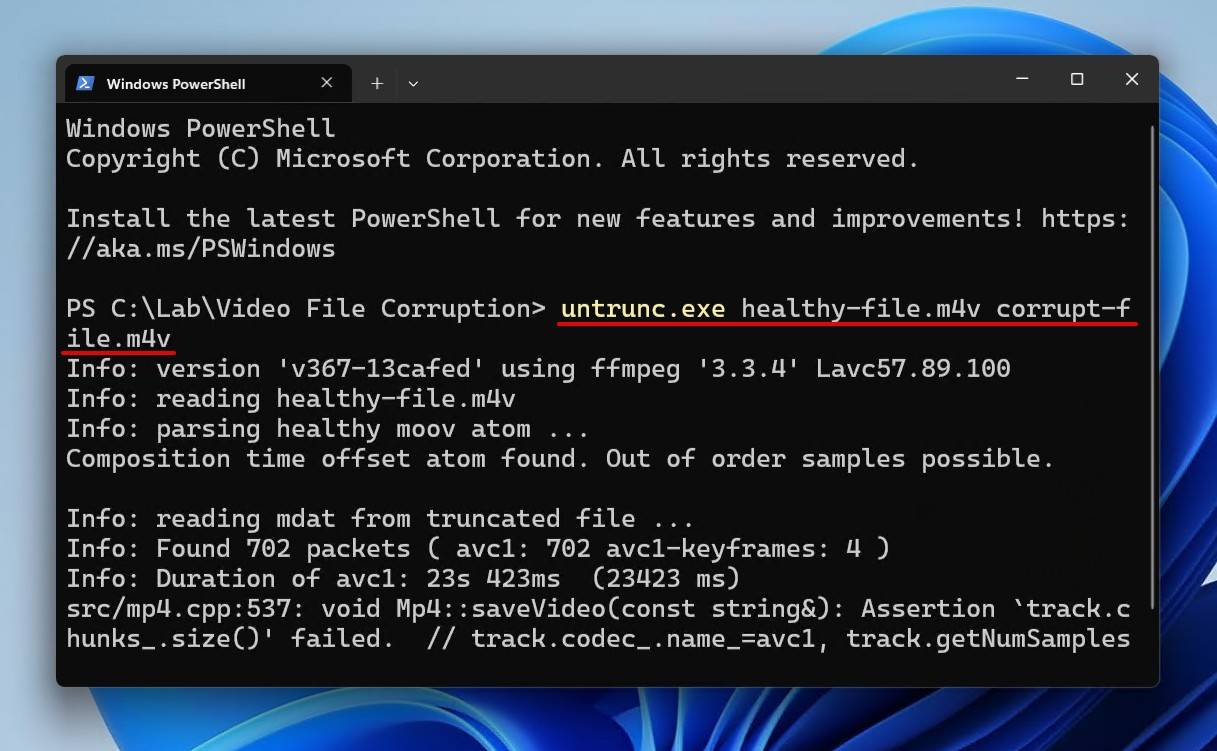
- Type in the following command. Remember, you must specify your reference file, then the corrupted one.
untrunc.exe healthy-file.m4v corrupt-file.m4v
Check out our guide to the best video repair software that can fix damaged video files if you want to explore all of the best options.
Option B: FFmpeg
Few tools exist that are as versatile in functionality as FFmpeg. FFmpeg is a multimedia framework that can perform a host of tasks. We’re going to use it to copy the stream from your M4V file and put it in an MP4 container. Here’s why.
The M4V format also doubles as a pure stream format used by tools and video capture devices, allowing them to be written directly to the disc. These files should still be playable, but sometimes the final format may appear unplayable to video players (which sometimes happens with M4V streams created by Adobe’s Creative Suite).
By moving it to an MP4 container, video players are much more likely to play the video as normal. Bear in mind, however, that the necessary atoms must be present. If you’re getting the error ‘Moov atom not found’, check out our guide on how to fix the ‘Moov atom not found’ video error.
For Mac users, FFmpeg can be installed with Homebrew. Windows users, however, will need to download a pre-compiled version and manually set up the environment.
This is how you install FFmpeg on Windows using the full build by Gyan.dev:
- Download the full build of FFmpeg.
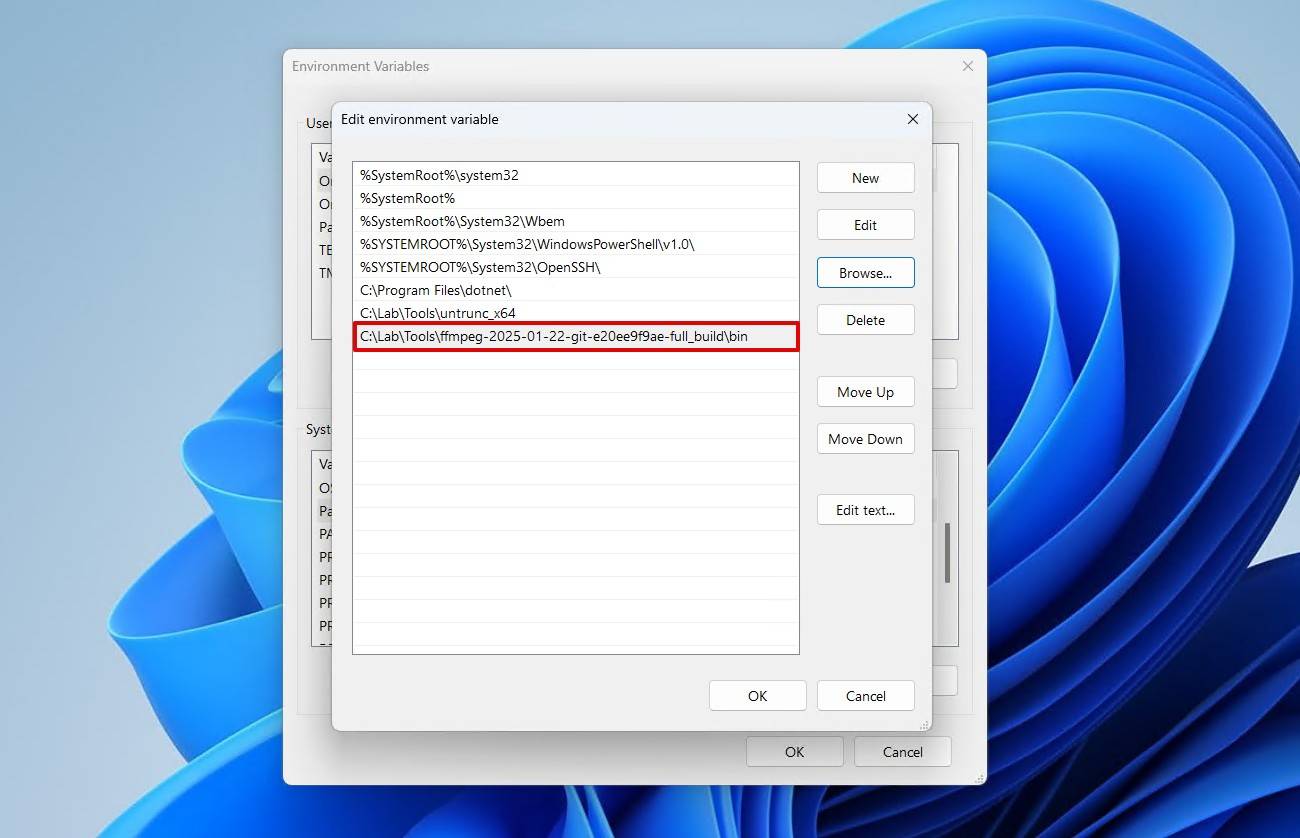
- Return to the Environment Variables window and edit the path again. We demonstrated how to get there when setting up Untrunc.
- Click Browse, and select the bin subfolder of the FFmpeg folder. Close all windows by clicking OK on each one.
Once FFmpeg is installed and it can be referenced from anywhere in the Terminal, it’s time to make use of it. Here’s how you can move the contents of your M4V file to an MP4 one using FFmpeg:
- Open the folder that contains your corrupted video. Right-click an empty space and click Open in Terminal.
- Run the following command. Be sure to change the file names to your own.
ffmpeg -i corrupt-file.m4v -vcodec copy -acodec copy fixed-file.mp4

If you’re finding FFmpeg is too difficult to set up and use, or there’s something that you’re stuck on, feel free to check our guide on how to repair corrupted videos with FFmpeg or reach out to our Handy Recovery Advisor Community for further help. There, you’ll have access to our experts, as well as some experienced readers, who would be happy to help. Be sure to provide as much info as possible; like technical information about the video file and what FFmpeg command you’re using. Being specific helps provide tailored help!
FAQ
How can I repair M4V files on Windows?
You can repair M4V files on Windows using Untrunc. After providing it with a healthy reference file recorded on the same device, it will use the necessary information to repair the M4V file. The same can be achieved with the online tool Clever Online Video Repair. For more advanced repairs, you can try re-encoding with VLC Media Player or FFmpeg.
What causes M4V videos to become corrupted?
M4V videos become corrupted when the file is incomplete. For instance, if the video is interrupted while it’s recording, it will be corrupted. Likewise, if you’re downloading a video file and it’s canceled before it’s done, the file will be incomplete.
Can I repair M4V files online without any software?
Repair M4V files only using Clever Online Video Repair, a free online video repair tool that allows you to repair damaged or corrupted M4V video files without the need to download any software.
How to repair M4V files for free?
Tools like VLC, Handbrake, Shutter Encoder, Untrunc, and FFmpeg are all great options for repairing M4V files for free. In terms of online tools, you also have Clever Online Video Repair as a free option.
Can I fix partially downloaded M4V files?
Yes. Partially downloaded M4V files can be fixed using video repair software. However, it will not work for all M4V video files and heavily depends on what information was downloaded before the download was stopped.
Can I repair a DRM-protected M4V file?
No. DRM-protected M4V files are encrypted to protect copyrighted content. Only authorized players with the necessary keys can decrypt the file. You will need to remove the DRM protection first.
What should I do if FFmpeg shows errors during repair?
Try a different repair method or diagnose what went wrong based on the logs. FFmpeg includes several ways of approaching video repair, from moving the streams to a new container to re-encoding the file into a different format.
What if my M4V file plays without sound?
Either the audio stream is missing or it’s using the incorrect codec. Likewise, it could be that your video player does not support the codecs being used. This user experienced the same issue and managed to fix it by changing which codecs the file use.
What if software tools can’t fix my M4V video file?
Video repair tools can only get you so far. For video files that suffer from damage that can’t be fixed by software, you can use the Treasured repair service by Aero Quartet. This involves sending the corrupted file to an expert who will manually fix it and comes highly recommended by the community.
Can I repair M4V files on my phone?
Yes. You can use a browser-based video repair tool like Clever Online Video Repair to upload the file, repair it, and then download the fixed version to your phone.
This article was written by Jordan Jamieson-Mane, a Staff Writer at Handy Recovery Advisor. It was also verified for technical accuracy by Andrey Vasilyev, our editorial advisor.
Curious about our content creation process? Take a look at our Editor Guidelines.