If you accidentally deleted a partition on your SD card, or if the partition has stopped showing up in File Explorer, you’re not the first. It’s a tricky situation, but it’s often possible to fix it without any bad consequences like data loss. We’ll show you exactly what steps you can take to recover a lost partition on your SD card and restore access to your files. Stick with us—we’ll make it simple.
Is it Possible to Recover Lost or Deleted SD Card Partitions?
Yes, it’s absolutely possible to recover lost or deleted SD card partitions.
SD card partitions can be more prone to corruption or deletion because they are often used with multiple devices. Some common reasons for partition loss are virus attacks, abrupt ejection, sudden device crashes, accidental formatting, etc.
A lot of people think that a lost or deleted partition on an SD card means the files stored there are gone too. That’s a common assumption, but it’s not usually the case. When you delete a partition, the data is still on the card—it’s just that your device can’t access it.
The partition table is like a map that helps your device locate files on the card. When you delete a partition, you’re erasing the map, but the files themselves are still there. Without the map, your device can’t see or access the files, but they’re not erased.
To give your SD card the best chance of recovery, keep the card untouched until you’re ready to use our recovery method.
4 Steps to Recover Lost Partition on SD Card
We’ll walk you through the entire memory card partition recovery process in four steps. We’ve structured it to start with the simplest things you can try—who knows, maybe you’ll fix the problem in step one! If not, the later steps go into more advanced methods to recover your lost partition and restore access again. Let’s get started.
Step #1: Check the SD Card Drive Letter in Disk Management
If your SD card has multiple partitions and one isn’t showing up in File Explorer, it could just be a problem with the drive letter for that partition. The partition itself is likely still intact, and it might be possible to fix the issue right away if you assign a new drive letter in Disk Management.
The first step is to check if your computer recognizes the SD card and assigns it a drive letter. A missing or incorrect drive letter might be the reason your partition isn’t showing up. This is a simple fix and could solve the problem right away.
To check your SD card we’ll need Disk Management, it’s Windows’ go-to tool for anything related to drives. It shows drive status, drive letters, partitions, and more, this tool is where you should start.
Here’s how to do it:
- Press Windows + X on your keyboard, and from the menu that appears, select Disk Management. This will open a tool that displays all connected drives and their status.
- Look through the list of drives to locate your SD card. If it doesn’t have a drive letter assigned, it’s why the card isn’t visible in File Explorer.
- Right-click on your SD card and choose Change Drive Letter and Paths.
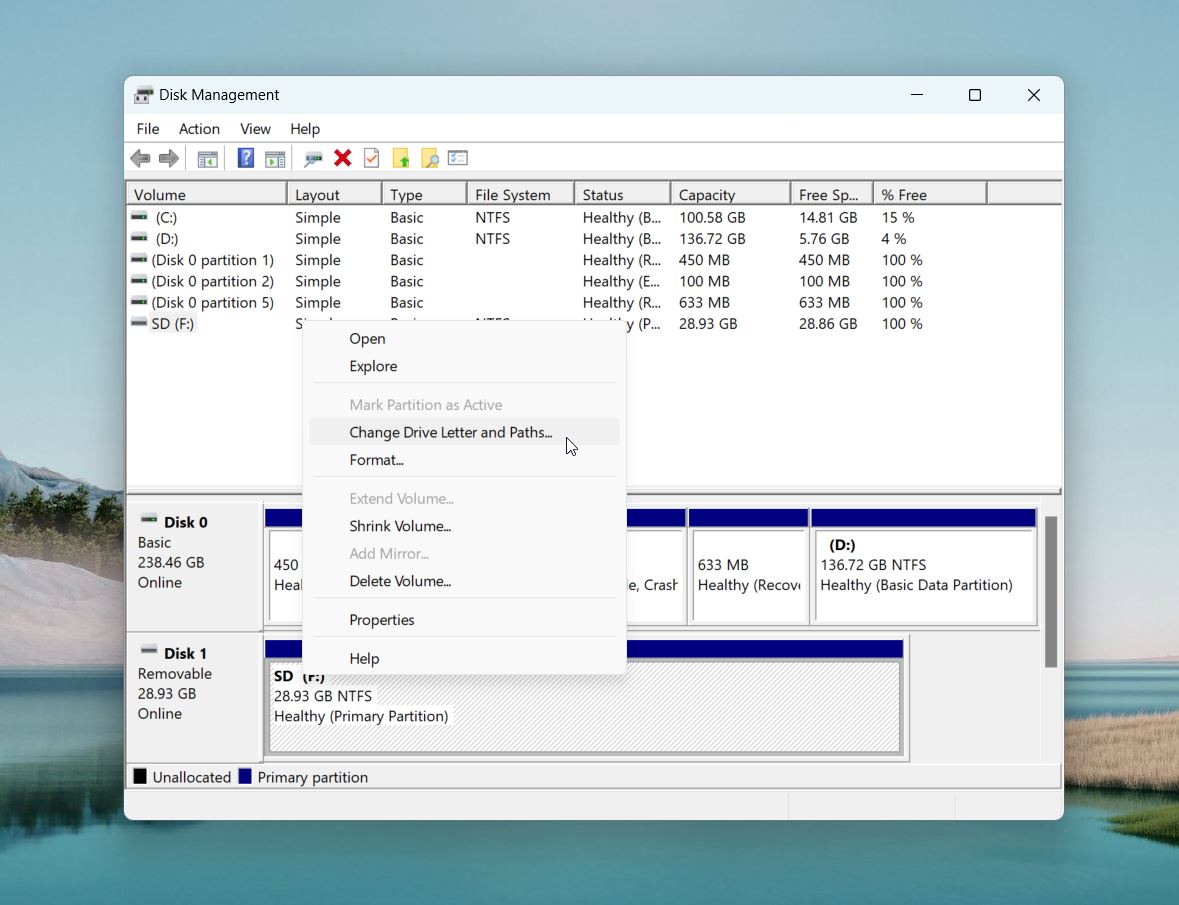
- If no drive letter exists, select Add to create one. If there is a drive letter but the card isn’t accessible, click Change to assign a new letter. Choose a letter not currently in use, like “Z,” and confirm your choice.
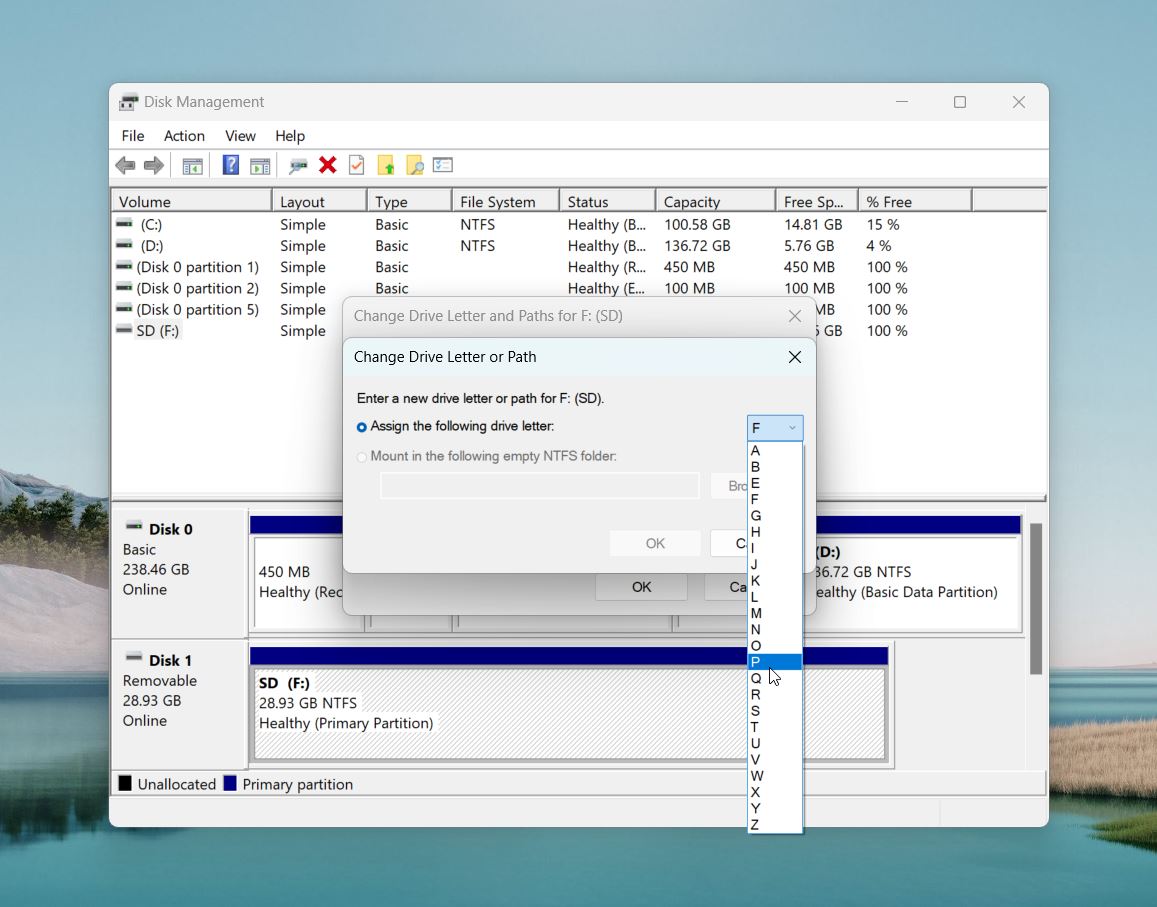
- Open File Explorer to check if the SD card now appears and is accessible. If the card works, your problem is solved.
If your SD card shows as RAW and it previously used the NTFS file system, it might be worth running CHKDSK on it. In some cases, a damaged boot sector can cause this issue, and CHKDSK may be able to restore it. While this isn’t guaranteed to work, if your SD card was formatted as NTFS, it’s definitely worth trying. Here’s a short guide to run CHKDSK:
- Press Windows + S, type cmd, and select Run as Administrator to open an elevated Command Prompt.

- In the Command Prompt, type “chkdsk X: /f”, just replace X: with your SD card’s drive letter.
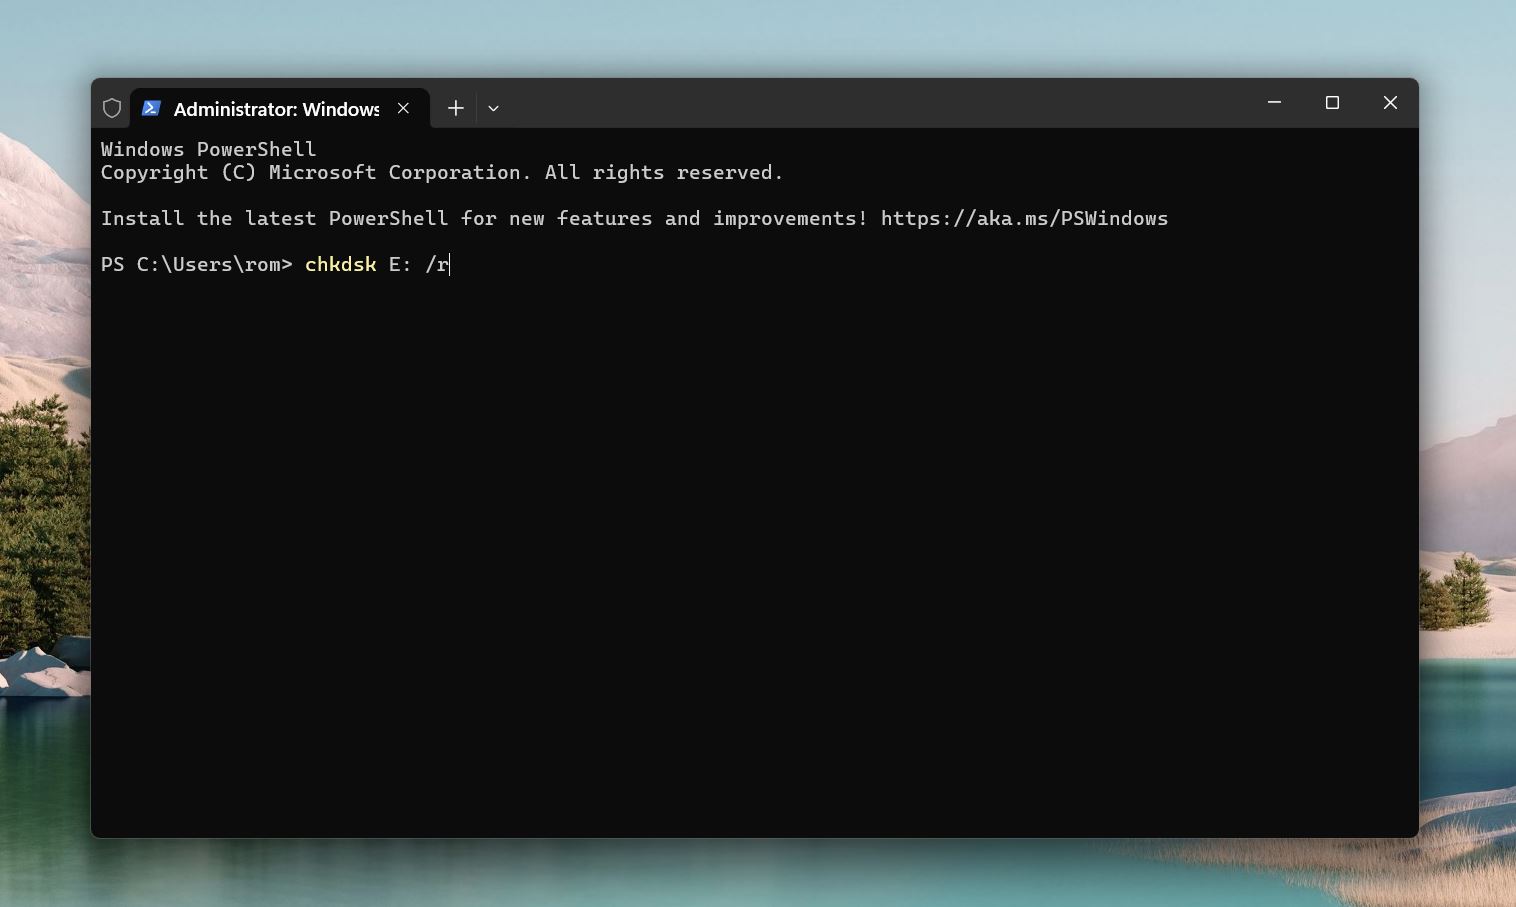
- Press Enter to start the scan.
If your SD card shows up as an Unallocated space or as a RAW, this means the partition is deleted or corrupted. In this state, you’ll need recovery tools to restore the lost partition or recover the data. Proceed to the next step to back up your files and prepare for recovery.
Step #2: Back Up Your SD Card
If that didn’t work, the second step is to back up your files. This is especially important because the next method uses TestDisk, a recovery tool that often fixes partitions and restores access to your files without any trouble. But there are times when things don’t go as expected, and data can be lost during the process. A backup gives you a safety net just in case.
Of course, if you don’t care about your files and just want to recover the lost partition on your SD card, feel free to jump to the next step.
But you can’t access your files in File Explorer, how to make a backup? That’s where data recovery software comes in. These programs don’t require the SD card to work perfectly—they just need it to be detected in Disk Management. If Disk Management recognizes the card, even as unallocated or RAW, recovery software can make a backup image of your SD card, and, if something goes wrong, can scan and retrieve your files from this image, including existing, deleted, and hidden ones.
To choose the right tool for the job, you can check out our best partition recovery software list. It highlights the top tools available for tasks like this. But if you’re short on time, we recommend going straight to our number one pick: Disk Drill.
In our opinion, Disk Drill is one of the best tools of its kind because of its powerful recovery capabilities, impressive performance, and user-friendly interface. It doesn’t matter if you’re tech-savvy or not—with Disk Drill recovery takes just a couple of clicks.
Here’s a how to make a backup of your SD card with Disk Drill:
- Download and Install Disk Drill from their official website. Once the download is complete, you can go on to the steps required for installation.❗️
Beware: We strongly advise against downloading the software from third-party websites. Harmful malware can latch onto your system from these installers.
- To begin the process, connect the SD card to your computer. You can either do this with a card reader or use your laptop or PC’s built-in card reader.
- On Disk Drill’s main screen, select the Byte-to-Byte Backup option.
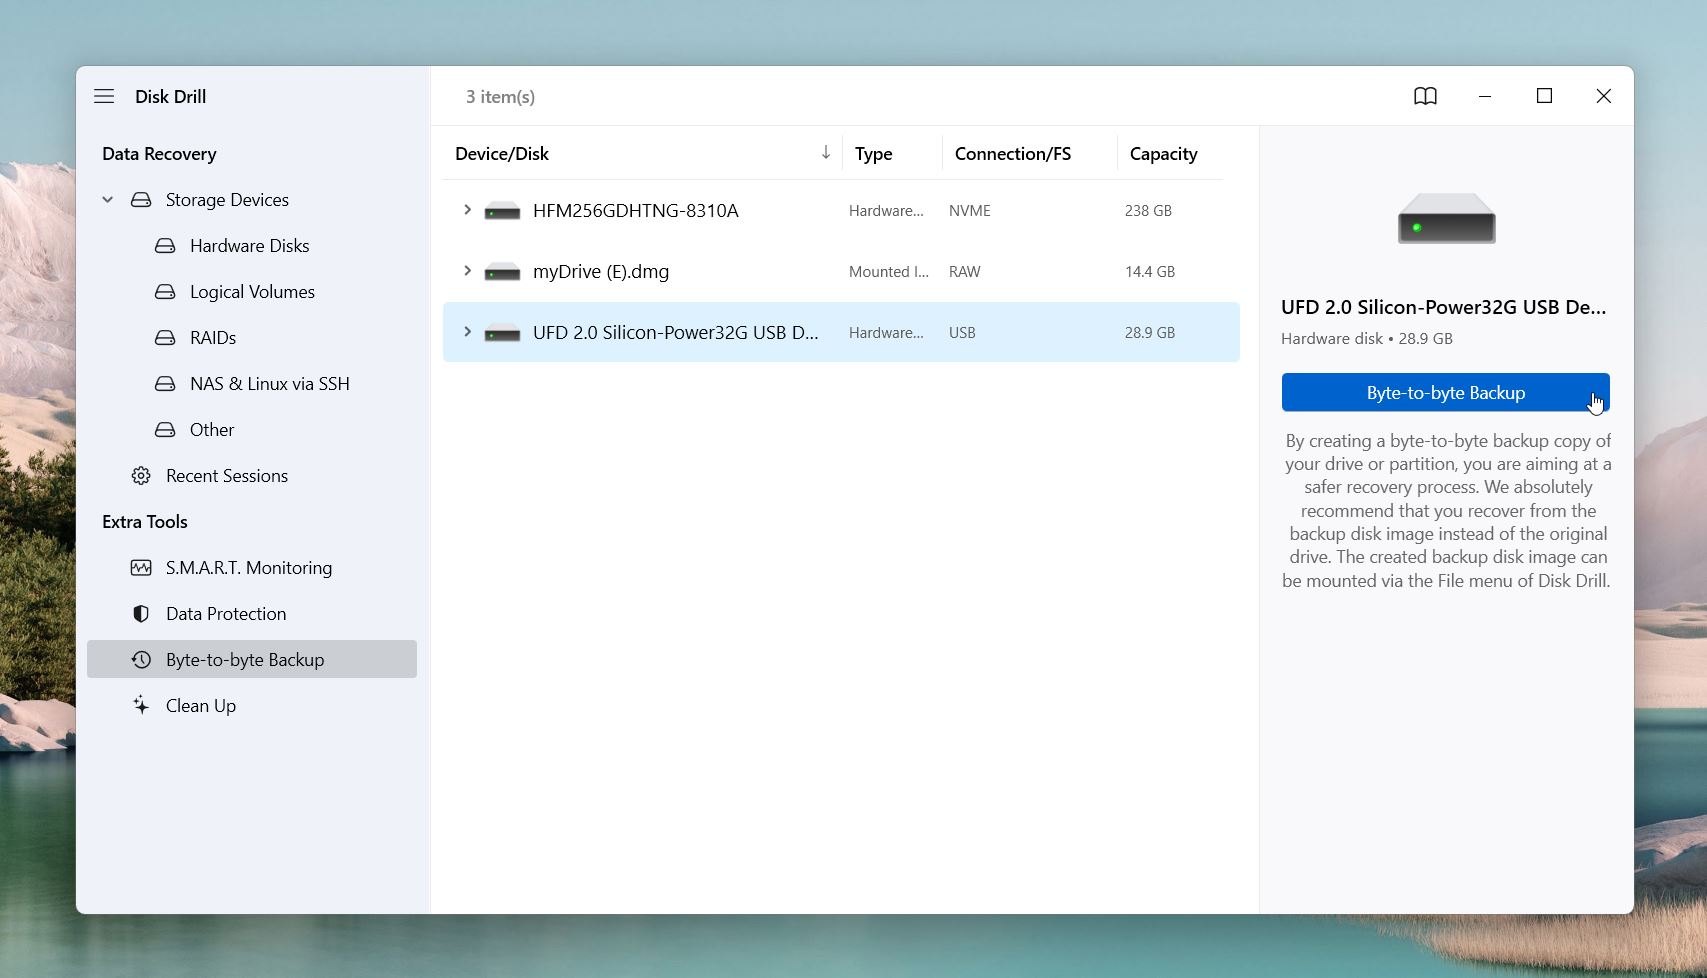
- Choose your SD Card and click on Byte-to-Byte Backup button.
- Disk Drill will prompt you to pick a location to save the backup file. Choose a storage device with enough free space to hold the entire card image.
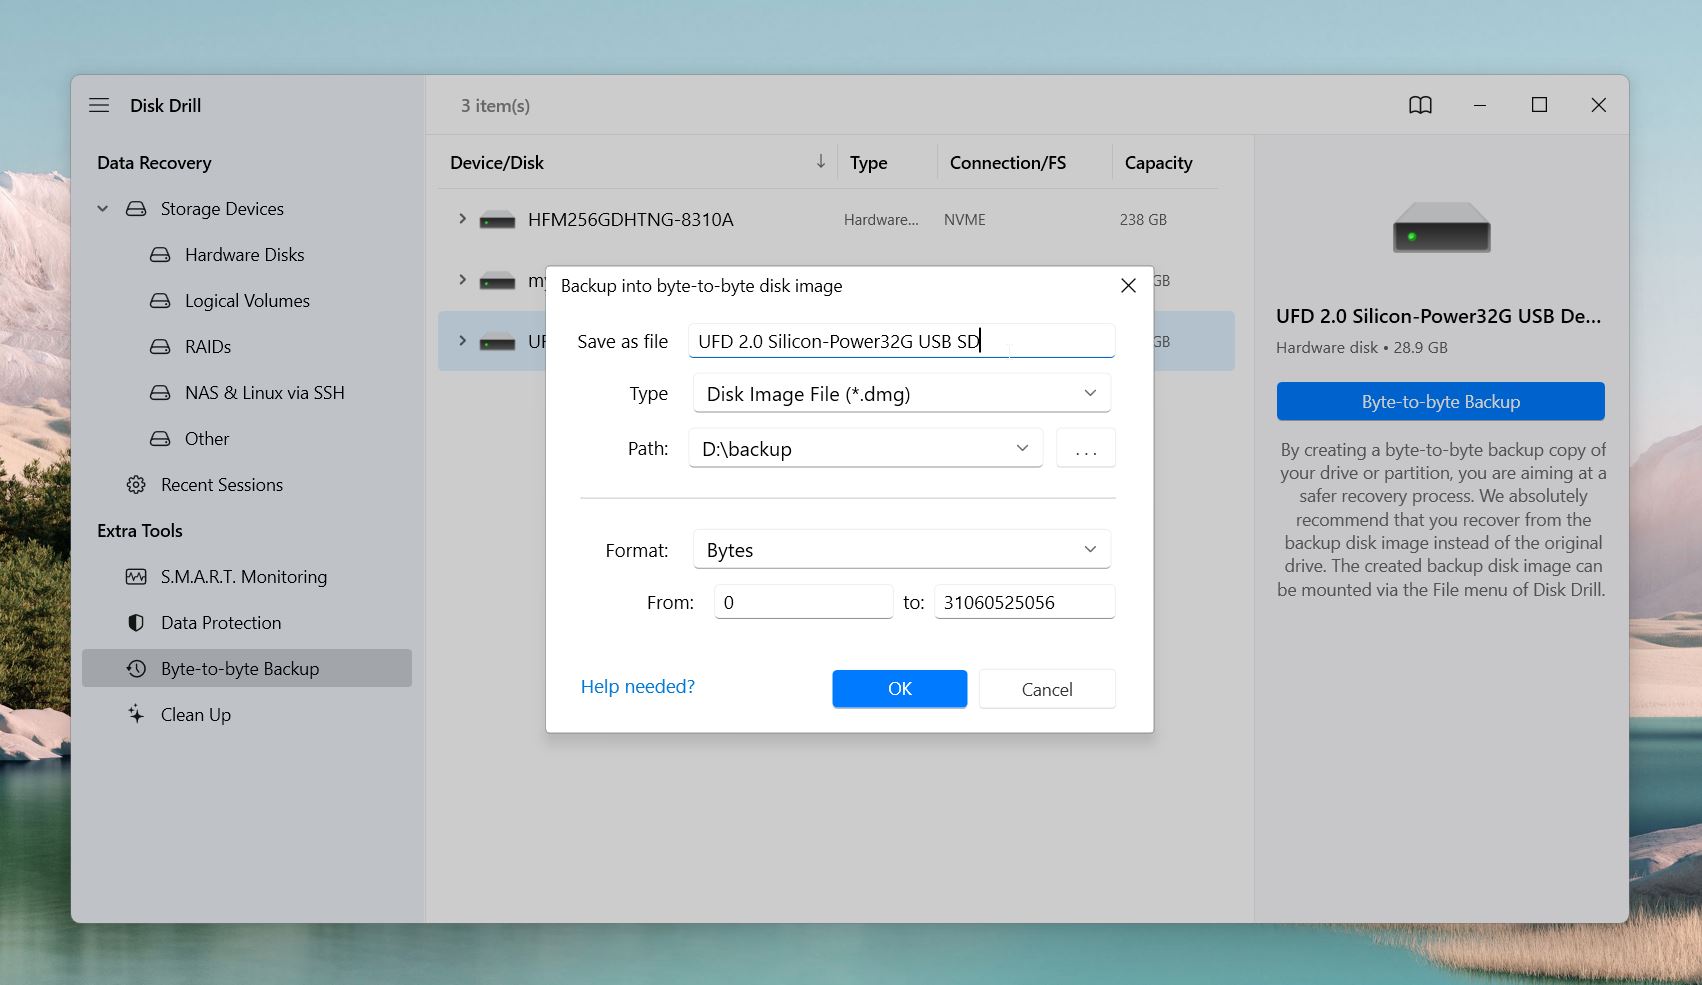
Once the backup is complete, you can move on to the next step in the recovery process. This backup will give you a safety net in case anything goes wrong. If your SD card loses its data during recovery attempts, you can return to this step and use the backup image to recover your files.
That said, keep in mind the free version of Disk Drill has a 500MB recovery limit. If your SD card has more data than that, you’ll need to upgrade to the PRO version for unlimited recovery.
Step #3: Restore the SD Card Partition with TestDisk
Now, it’s time to use TestDisk. TestDisk is a powerful, open-source tool that can recover lost partitions. We’ve used it many times in situations exactly like this, and more often than not, it gets the job done.
Here’s what TestDisk can do:
- Recover lost or deleted partitions.
- Rebuild damaged partition tables.
- Repair FAT, NTFS, and ext2/ext3 file systems.
- Fix boot sectors on FAT and NTFS volumes.
That said, TestDisk isn’t as user-friendly as tools like Disk Drill. It requires a command-line interface and manual input, which makes it a bit tricky for beginners. You’ll need to follow this guide closely and double-check each step. Be extra careful to select the correct storage device—choosing the wrong one could lead to irreversible data loss.
You can follow these steps to recover a lost SD card partition with TestDisk on Windows:
- Download the TestDisk recovery software from the official site. Once you’ve downloaded the folder, extract it. In our case, the folder was named “testdisk-7.2”.
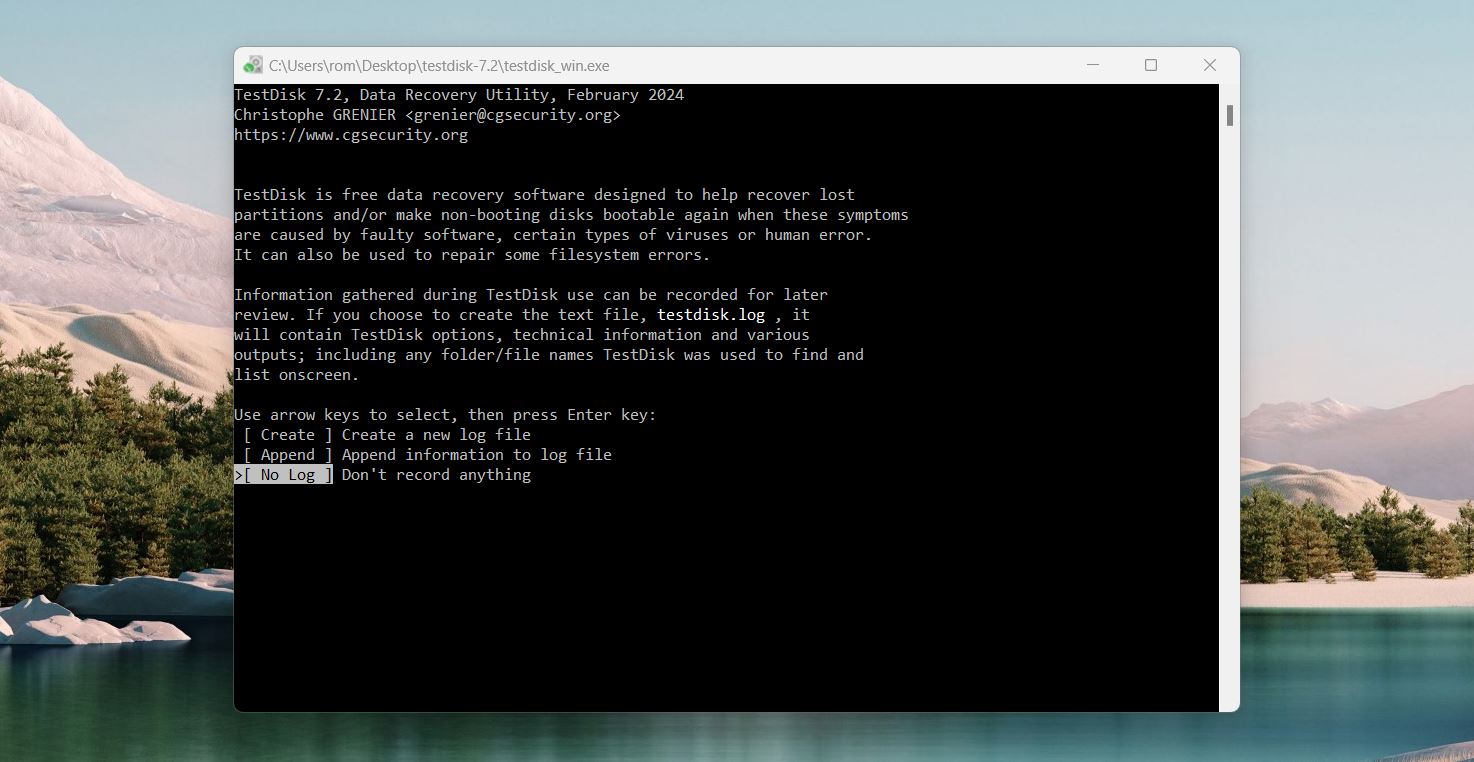
- Open the folder and navigate to the testdisk_win application. Now, launch it. A terminal home screen will appear on your screen. Select the Create or No Log option and hit Enter. TestDisk will now scan your computer for connected devices.
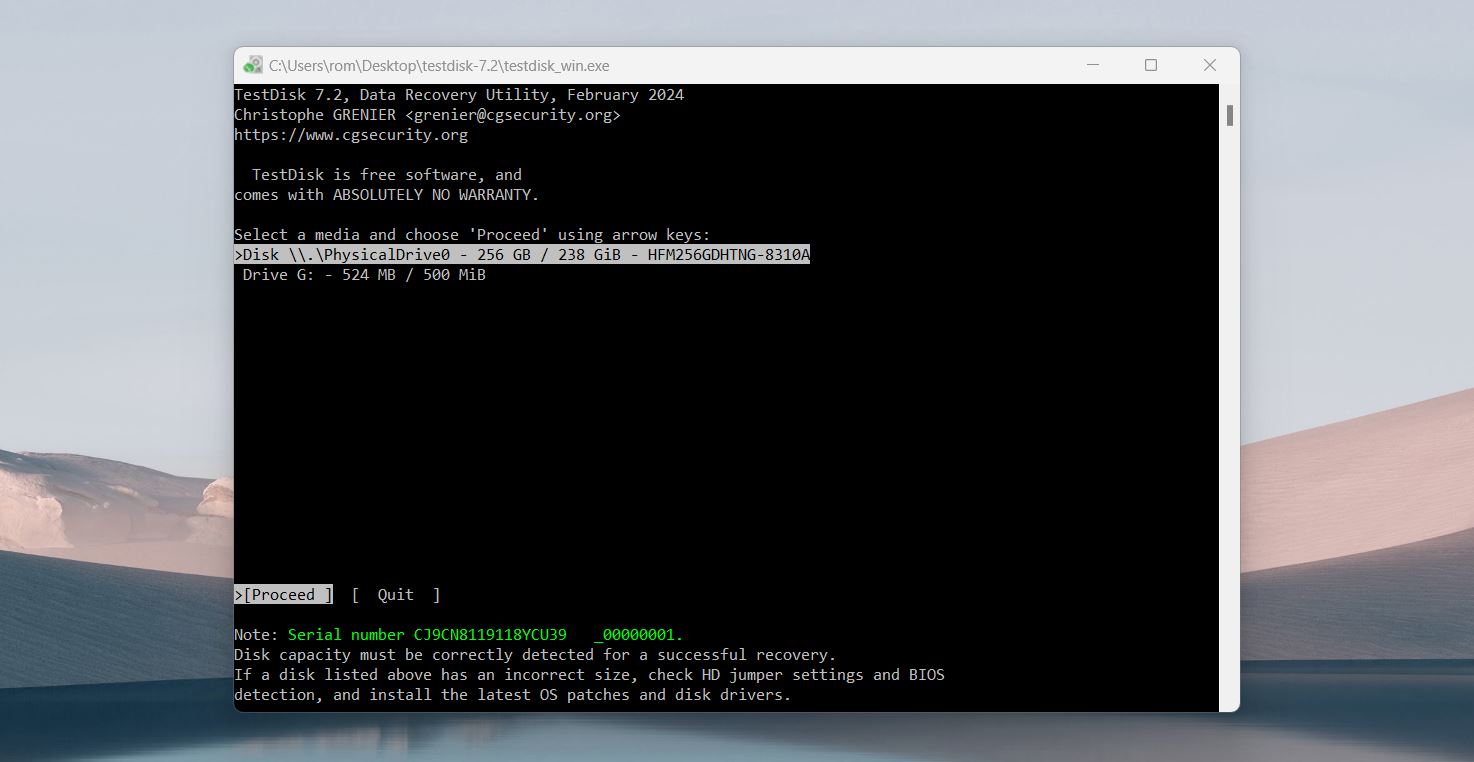
- Select the SD card from the list of devices and Proceed. Select the partition table on the next screen and press Enter again.
 👀
👀TestDisk will usually detect this automatically, so you can confirm the selection and move forward.
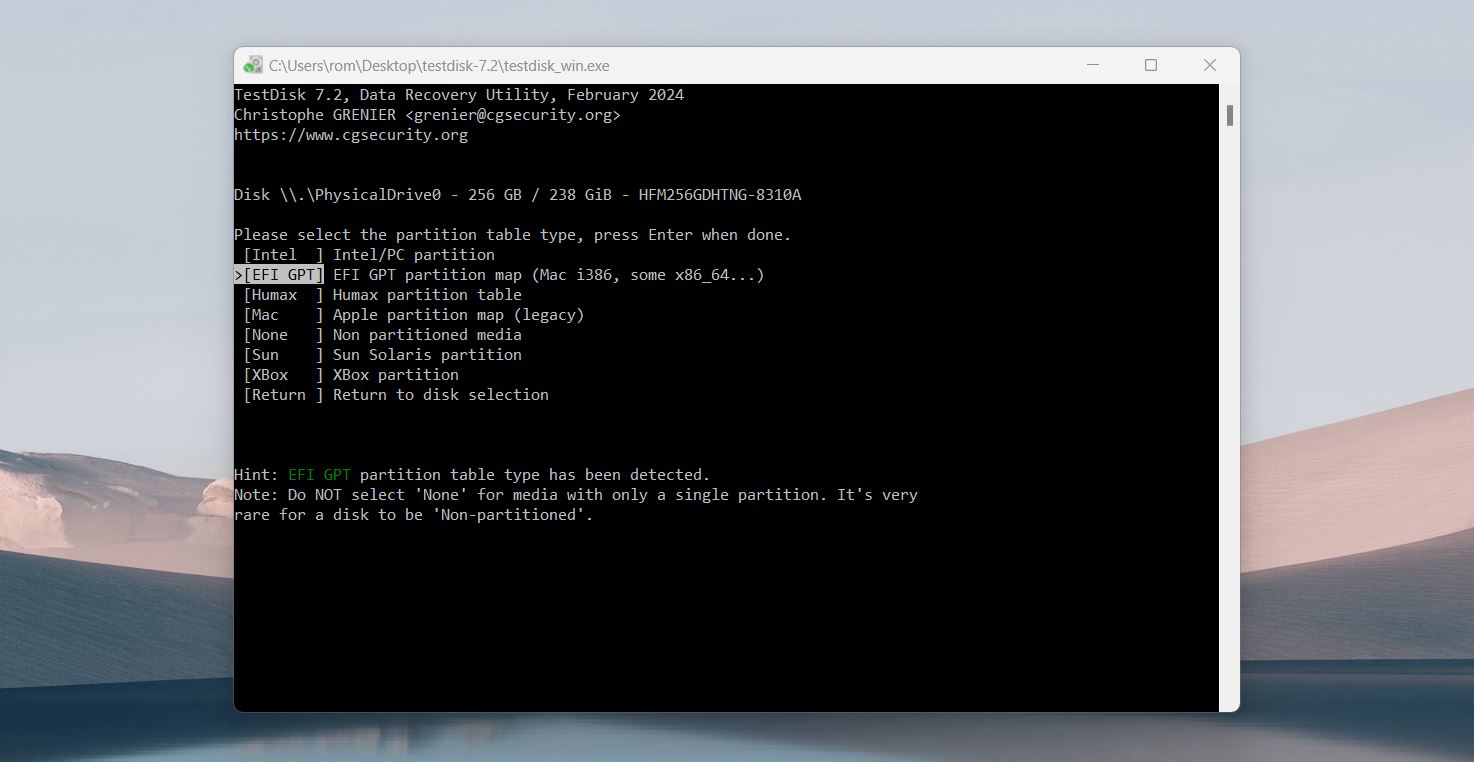
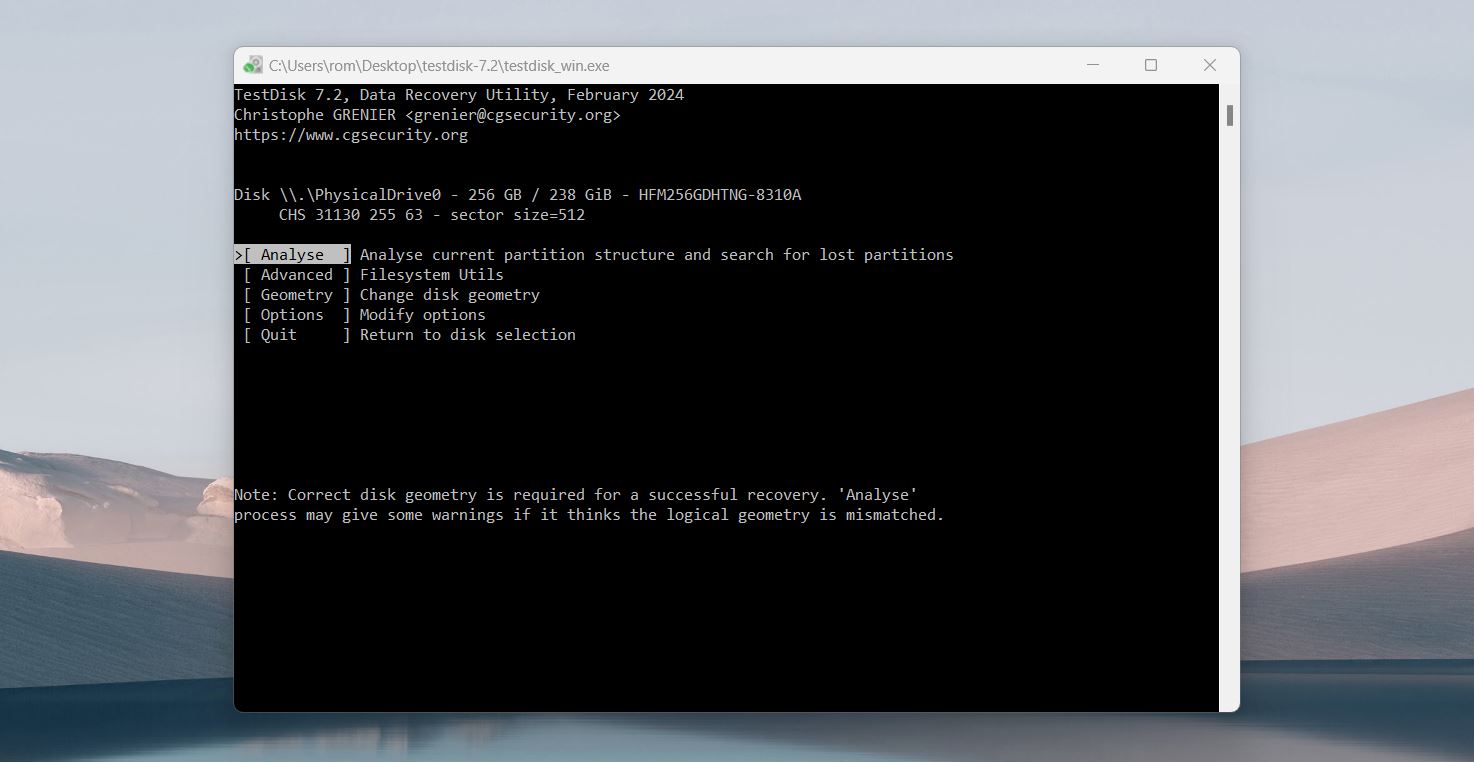
- Now, TestDisk will present you with various options. You can select the Analyze option and initiate a Quick Search to begin the SD card partition recovery process.
- Once the detected partition appears on the screen, you can press Enter to continue. When you navigate to the next screen, you can select the Deeper Search option to scan the lost or deleted SD card partition.
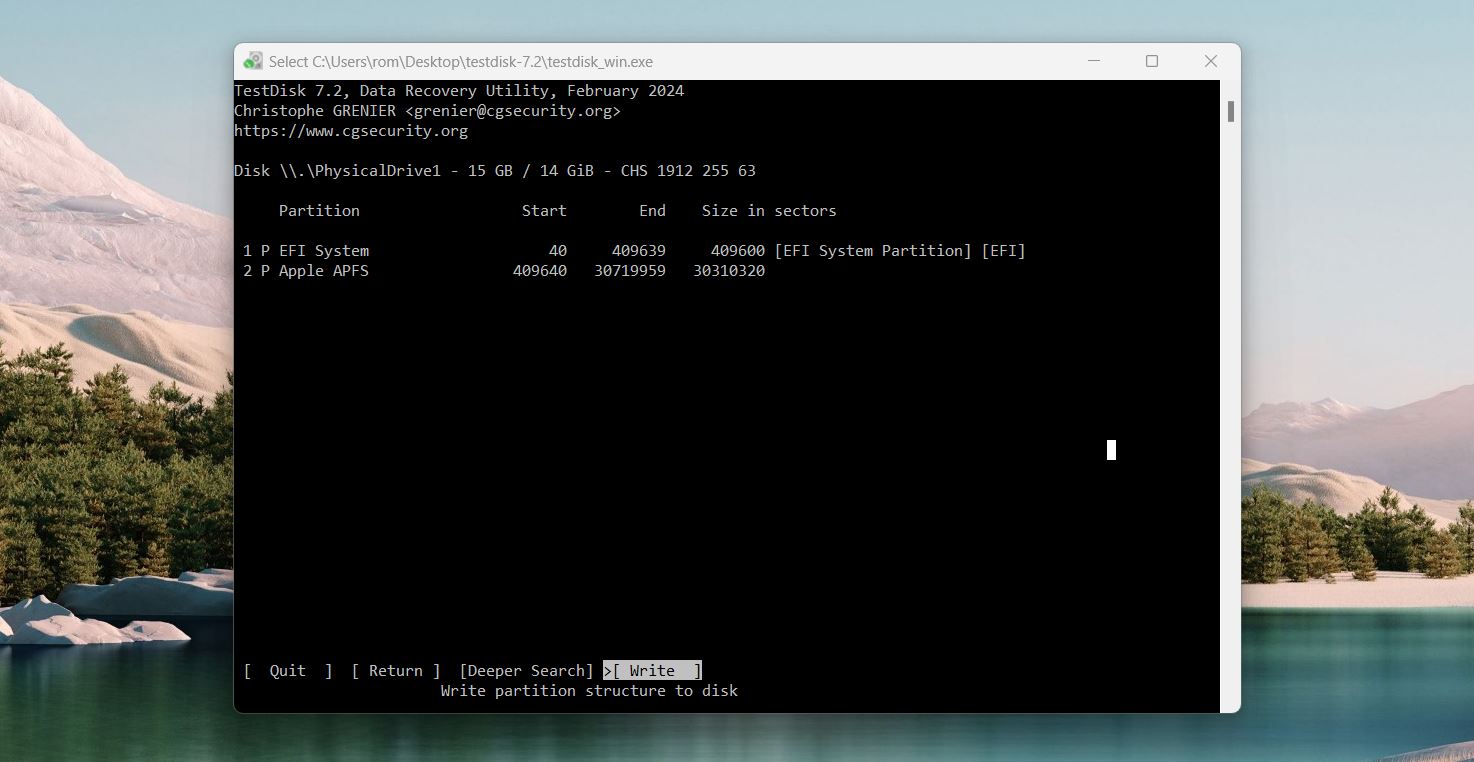
- After the scan is complete, you can select the partition you wish to recover and follow the prompts on the screen. You can press P to list all the files and C to copy the selected files. Once the selection is made, TestDisk will copy the files to your selected folder, and the “Copy Done!” message will appear on your screen.
TestDisk is a great free tool and often fixes the issue of missing or deleted partitions. It’s powerful, reliable, and can restore your SD card in many cases. But it doesn’t always work. Sometimes there’s simply nothing for TestDisk to repair or recover if the partition is severely damaged or completely gone.
If TestDisk doesn’t fix the problem, that’s okay—we’re prepared for this outcome. Since we created a complete backup earlier, your data is safe and it’s time to get it off the SD card.
Step #4: Retrieve Your Files From the Backup
To get your files from the byte-for-byte backup, the first step is to mount the backup image in Disk Drill. It’ll make a backup image look like a real drive on your computer, so you’ll be able to scan it just as if it were the original SD card.
Here’s how you can retrieve your files from the backup image:
- Open Disk Drill, click Attach Disk Image at the bottom, and select the backup file.
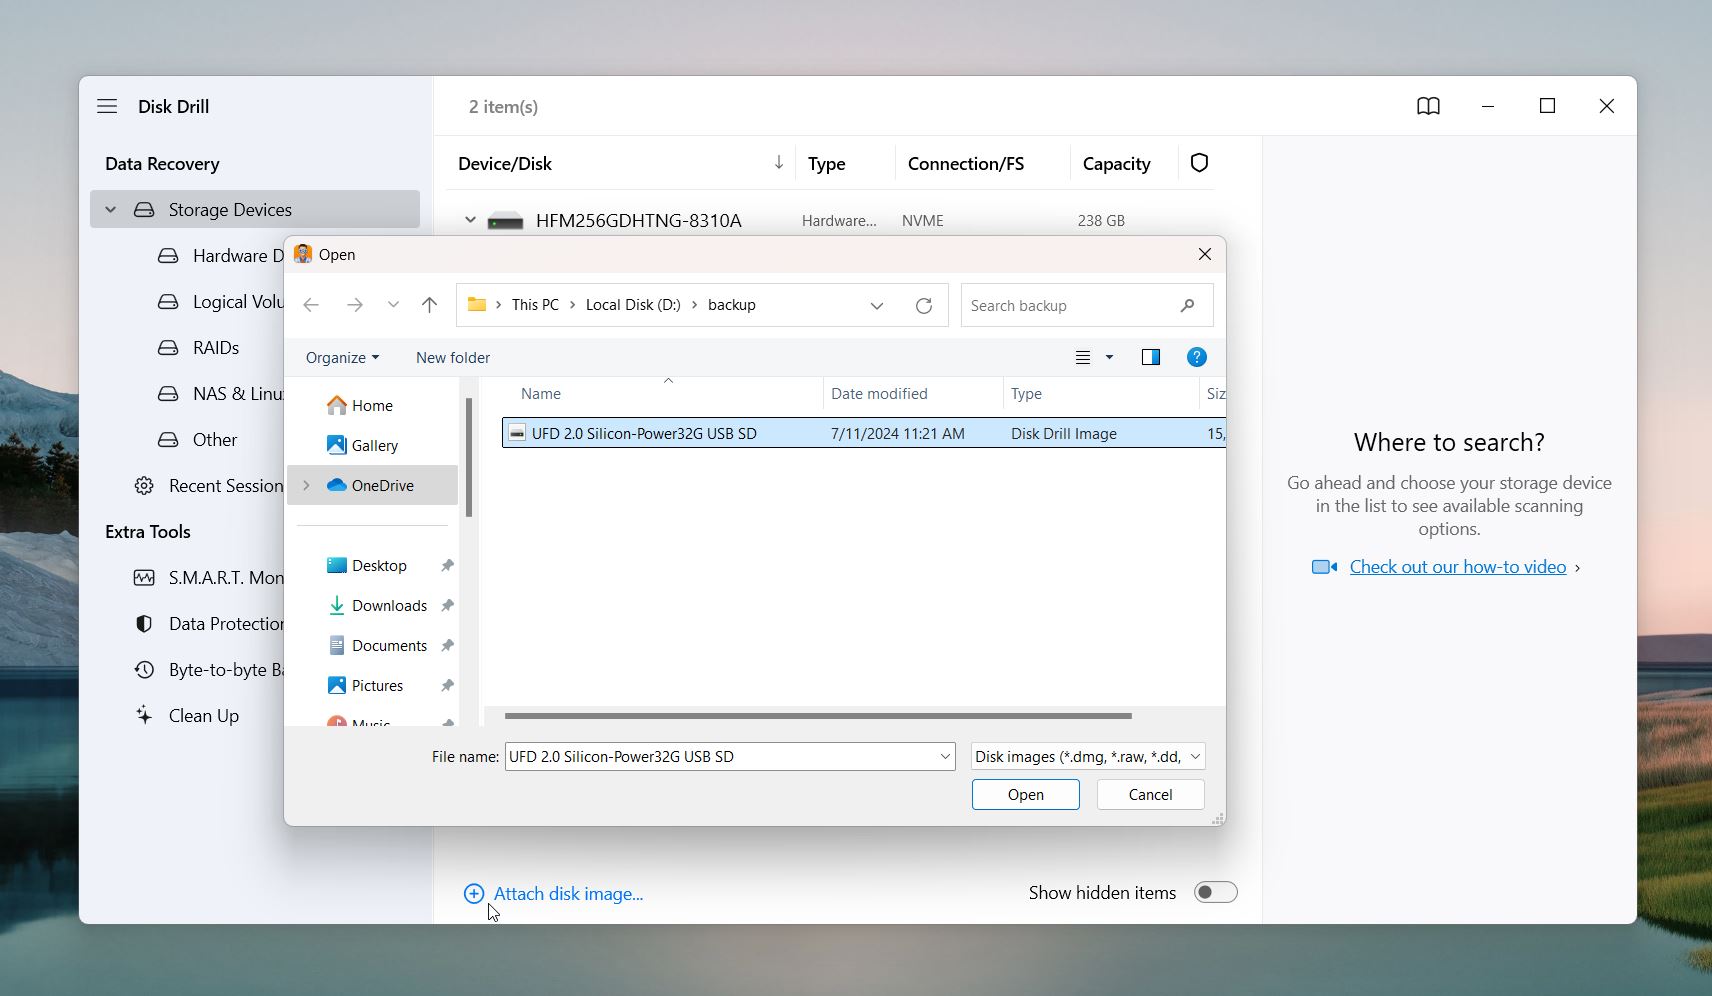
- After the image loads select it, and use the Search for Lost Data button to scan it.
- Disk Drill will organize the files it finds into categories like Pictures, Videos, Audio, Documents, and so on. You can filter through the results.
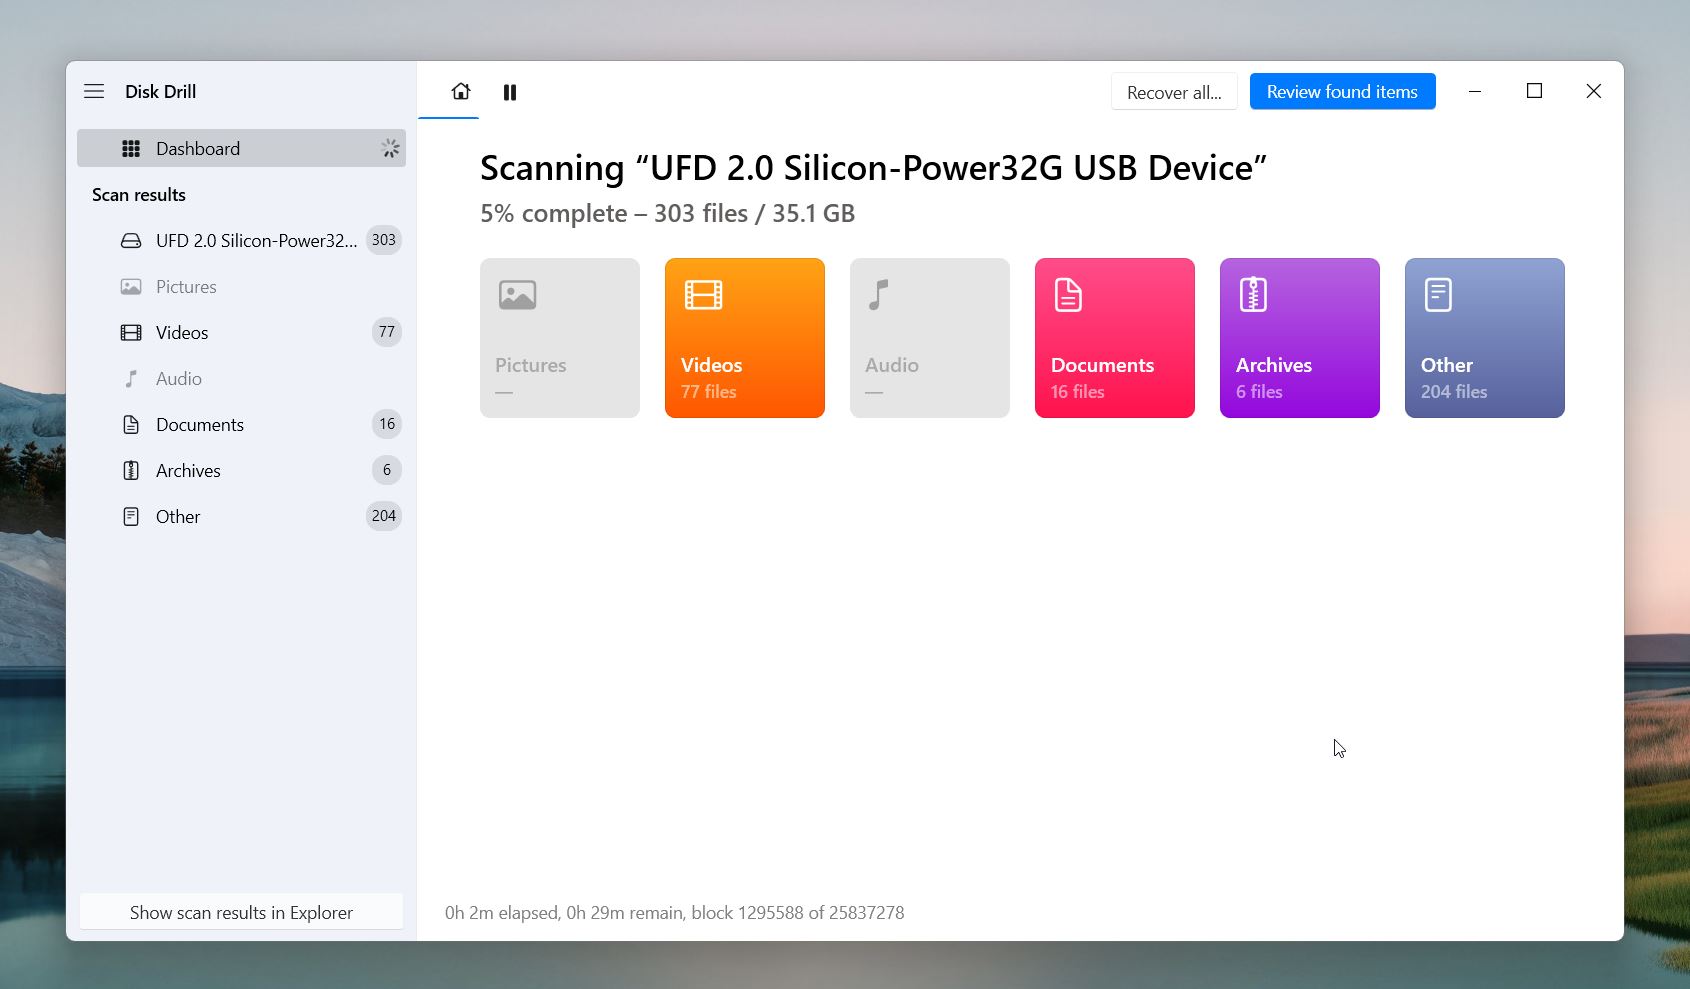
- You can click on Review found items to see a list of all found files.
- Disk Drill will show a list of recoverable files, grouped into categories like existing files, deleted files, and hidden files.
- You’ll see the success rate indicator provided for each file. Disk Drill uses markers like low, average, or high to estimate the likelihood of successful recovery. This is particularly useful for deleted/lost files, as not all data can be recovered in perfect condition. Since you’re after your existing files, they should recover just fine.
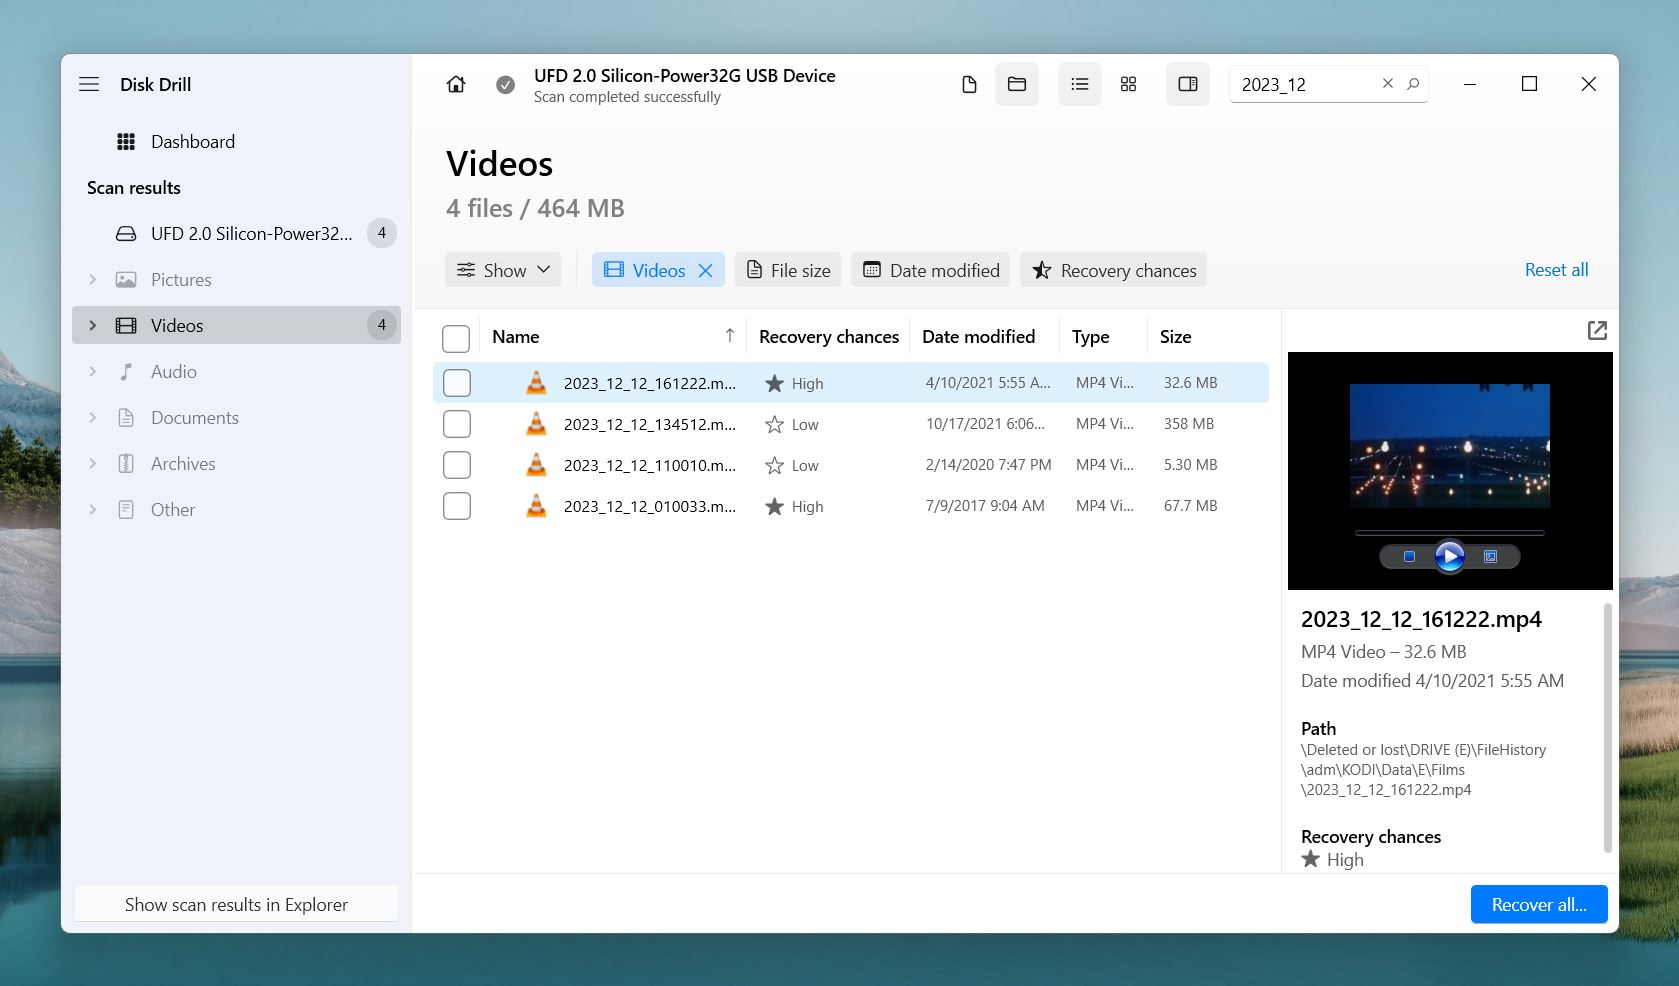
- Preview the files you want to recover. Just hover your mouse over the eye button to the right of the file name.
- Select the files you wish to retrieve and select the Recover button.
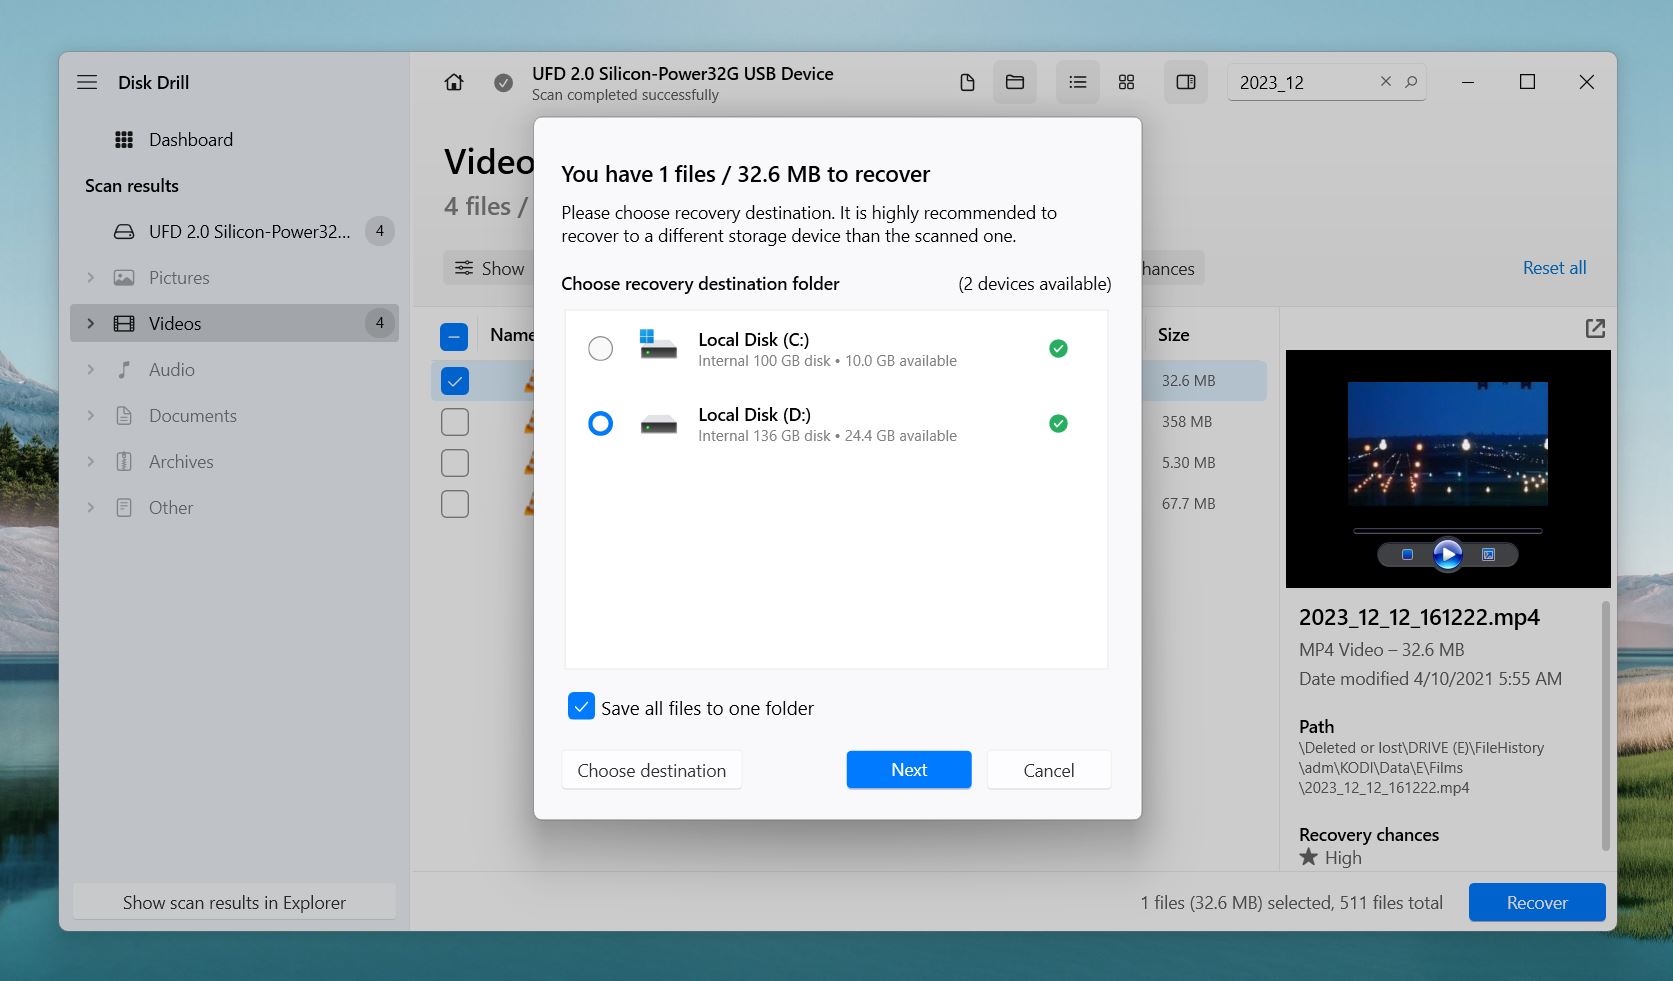
- Choose a location to save the recovered files.
Disk Drill isn’t just for SD cards—it’s a versatile tool that works with almost any storage device. You can use it to recover data from internal drives, external drives, SSDs, USB drives, all kinds of memory cards, and even Android and iOS devices. It can also help you recover your files from a formatted partition.
Step #5: Format the SD Card
The last step is to get your SD card back to normal so you can use it just like before (especially if TestDisk didn’t fix your card). To do that, we’ll need to format it.
Formatting is a sure thing—it wipes your SD card clean and creates a new partition structure, which makes it work like it’s brand new. This process will erase all the data on the card, but since you’ve already got your files off of it, it shouldn’t be a problem.
To format your SD card, we’ll need to head back to Disk Management. Look for your SD card in the list of drives. It might show up as unallocated or RAW, formatting will fix this and make the card usable again.
Scenario 1: Here’s how to format your SD card if it shows as RAW:
- Right-click the SD card and select Format.
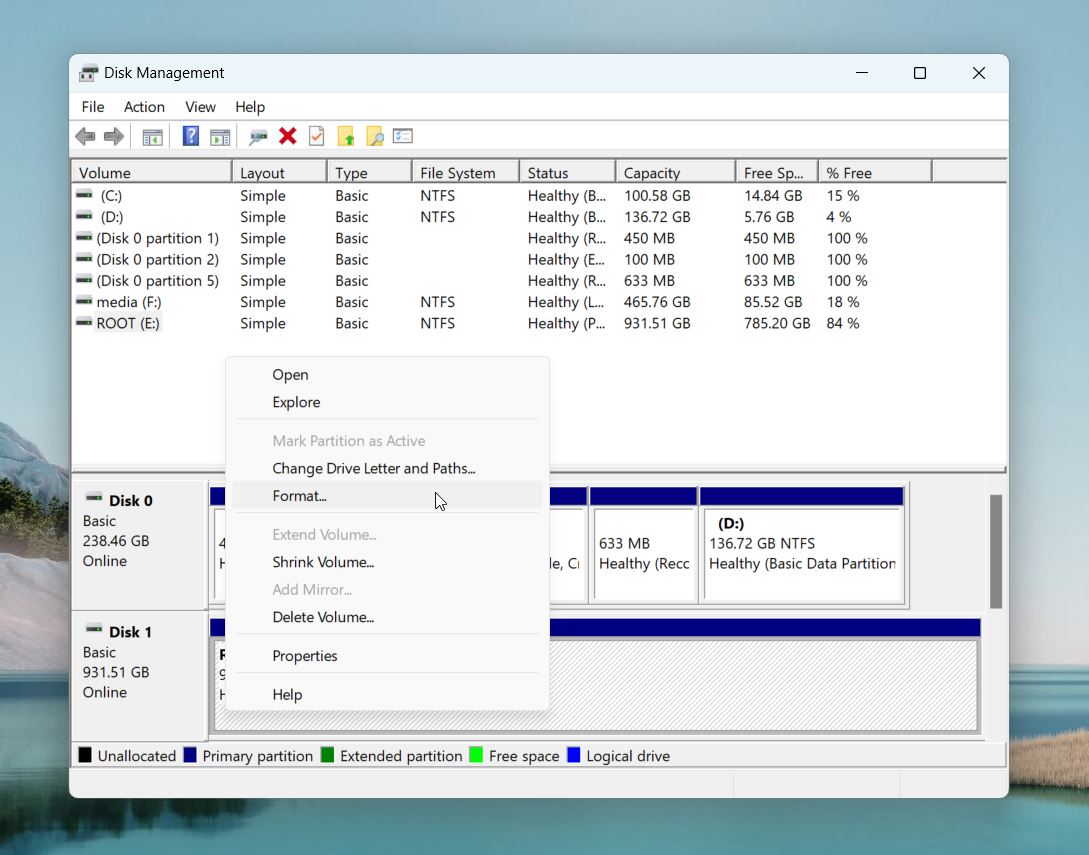
- In the Format window, choose a file system like FAT32 for compatibility or exFAT for larger SD cards.
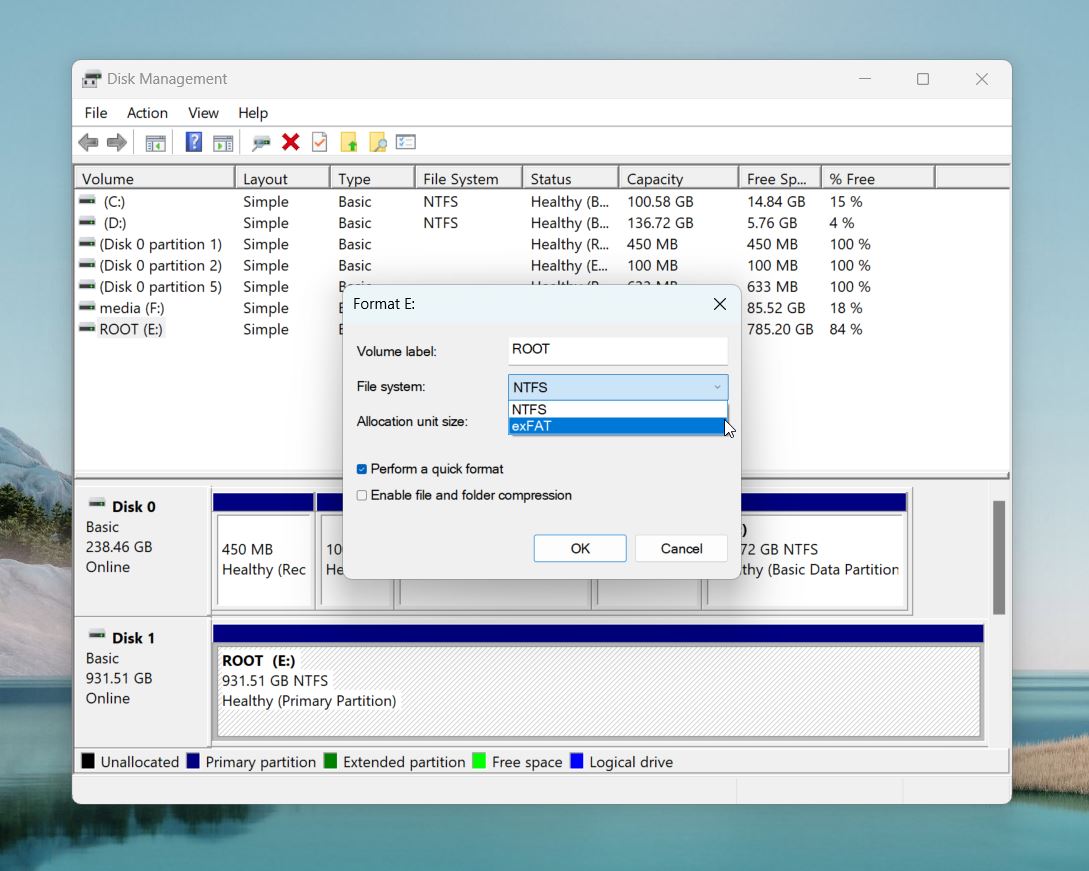
- Keep the allocation unit size at the default setting.
- Check Quick Format for faster formatting, then click OK.
- Disk Management will reformat the card and create a new file system.
Scenario 2: Here’s how to format your SD card if it shows as Unallocated:
- Right-click the unallocated space on the SD card and choose New Simple Volume.
- The New Simple Volume Wizard will open. Click Next to proceed.
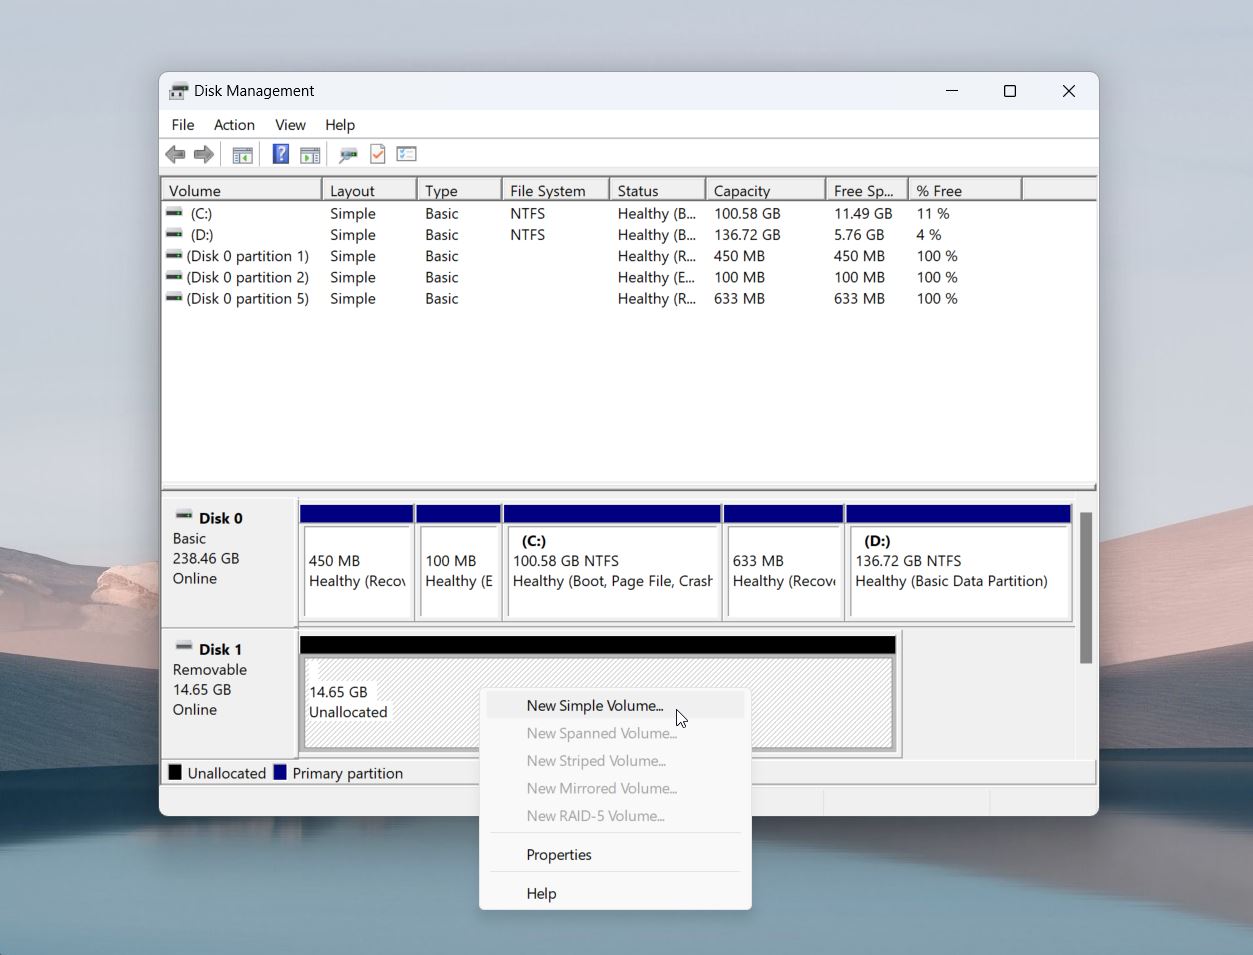
- Follow the wizard to assign a drive letter to the SD card (e.g., “E” or “F”).
- Now format it with a file system (such as NTFS or FAT32).
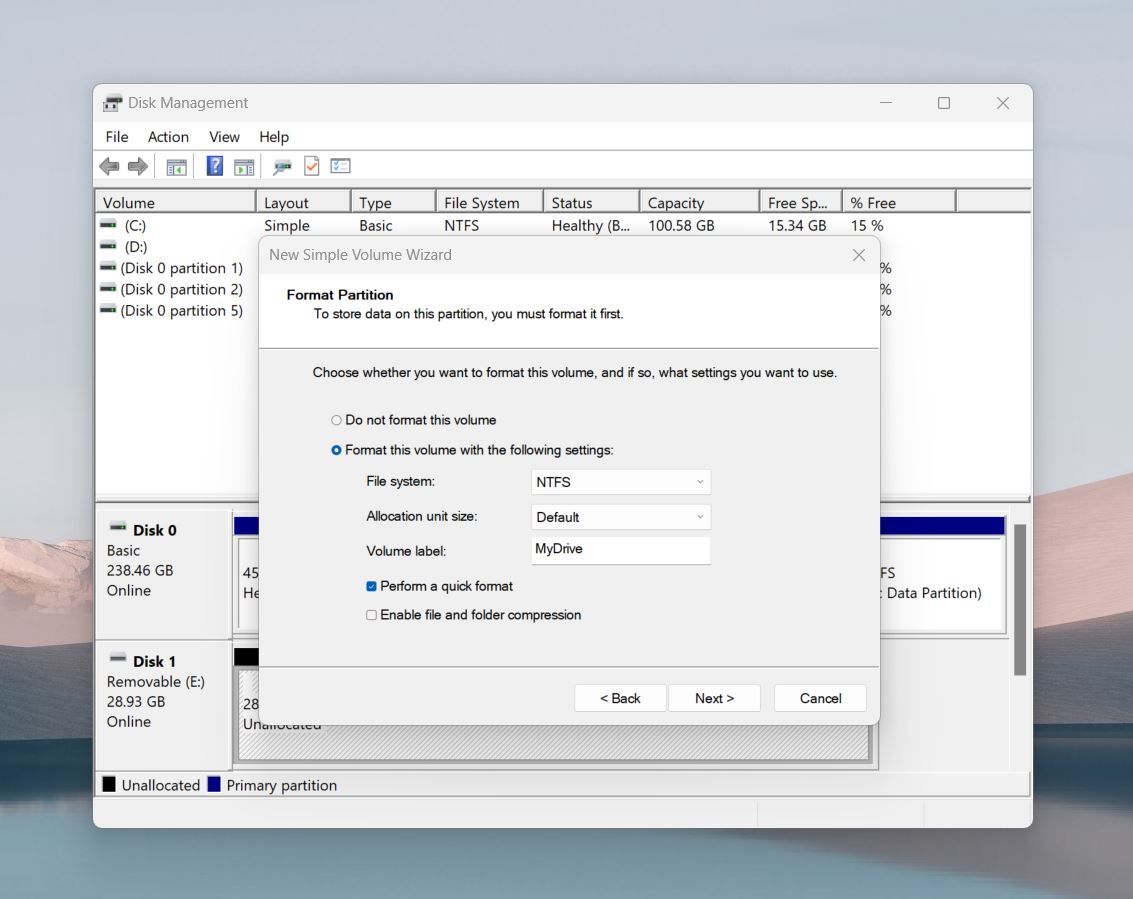
- Leave the allocation unit size at the default setting.
- Check Quick Format, then click Next and Finish.
Formatting is a solution for many problems with SD cards and usually works without any issues. Whether your card showed up as RAW or unallocated, this step should resolve the problem.
Summing Up
After these four steps, your SD card should now be fully functional. You should now see your SD card in File Explorer, ready to use. Simply transfer the files we backed up in Step #2 back to the card, and it’ll be as if nothing ever happened. Your SD card is now fully functional and ready to go!
When it comes to recovery, it’s important to stick with trusted tools. We highlighted Disk Drill and TestDisk because they’ve been around for years and have proven themselves reliable.
We’ve heard from people who Googled “SD partition recovery” and downloaded the first app they saw, only to make things worse. Using random, unverified tools can lead to more problems, corrupt your data, or make recovery impossible later.
Take your time, rely on proven tools, and you’ll avoid unnecessary problems. With tested SD card recovery tools like Disk Drill and TestDisk, you’ll keep your SD data safe.
FAQ
Can I recover a deleted disk partition without formatting the drive?
Yes, you can recover a deleted disk partition without formatting the drive. Tools like TestDisk and Disk Drill can help with that. If the partition table is still recoverable TestDisk can scan your drive, restore the missing partition table, and make it accessible again without touching your files.
However, it’s a good idea to use recovery software like Disk Drill to back up your files before partition recovery. This protects your data if something goes wrong during the process.
How do I recover an SD card partition table?
You can restore the lost or deleted SD card partition table with TestDisk. It is open-source software that has been designed to help recover lost partitions if there’s an error. You can follow these steps to restore the SD card partition on Windows:
- Download, install and launch the TestDisk recovery tool.
- Click on Create > Enter.
- Select the SD card and Proceed. Now, click Intel from the partition table and Enter.
- Select Analyze > Quick Search.
- Select Deeper Search to scan the SD card partition.
- Now, you can choose the partition for recovery.
Why is the SD card partition not showing up?
If the SD card partition is not appearing on your File Explorer or you cannot access it, this means the SD card partition is lost, deleted, or corrupted. Also if the SD card doesn’t have a drive letter assigned, it won’t show up in File Explorer. Assign a drive letter in Disk Management to fix this.
What is the best SD card partition recovery tool?
Some of the best SD card partition recovery tools are Disk Drill and TestDisk. Disk Drill is a user-friendly app that can recover data from a lost/deleted partition on an SD card. TestDisk, on the other hand, is an open-source option designed for advanced users. It can repair partition tables, rebuild boot sectors, and recover lost partitions but requires working with a command-line interface. Both tools are highly effective.
How do I fix an unallocated SD card?
The unallocated space on your hard drive is also known as unused or free space. Sometimes, the entire storage is unallocated for unknown reasons, which can create problems, and you might need to fix it. Follow these steps to fix an unallocated SD card.
- First, connect the SD card to your computer.
- Open Disk Management and choose your SD card.
- Now, select the unallocated space. Right-click and choose New Simple Volume from the expanded list.
- This will take you to the New Simple Volume Wizard. Follow it to complete the remaining steps and fix the unallocated SD card.
How do you unpartition an SD card?
To unpartition an SD card, you can navigate to Disk Management and follow these steps:
- Press Win + R and type diskmgmt.msc.
- Now, open Disk Management.
- Right-click the partition that you want to delete and then click Delete Volume.
- Now, the partition will be deleted.
However, beware that this action can also format your SD card. Thus, always remember first to take a backup of your data.
This article was written by Joshua Solomon, a Contributing Writer at Handy Recovery Advisor. It was recently updated by Roman Demian. It was also verified for technical accuracy by Andrey Vasilyev, our editorial advisor.
Curious about our content creation process? Take a look at our Editor Guidelines.
