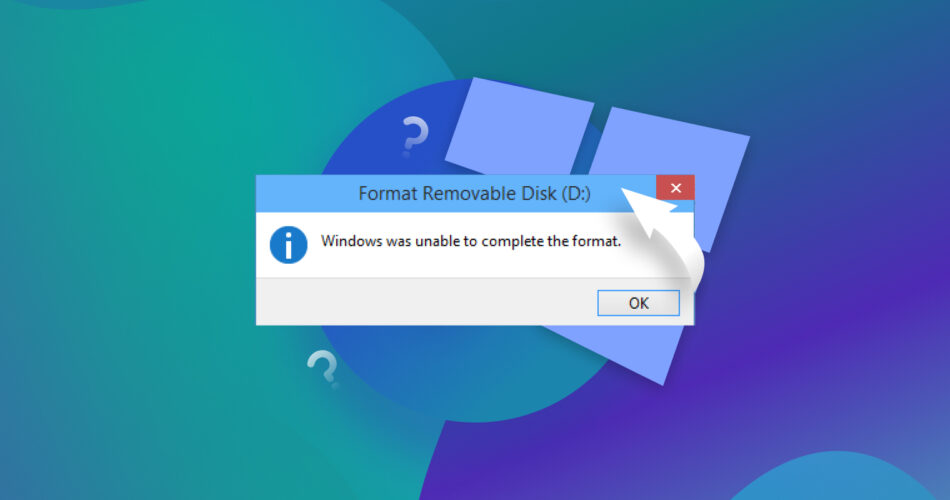
Formatting is a great way to reset any storage device and remains a common ‘fix-all’ solution for tackling drive-related problems. So, you may be surprised when an error message appears stating “Windows was unable to complete the format”. What gives? It seems like nothing has changed since the last time you used the drive successfully.
The reason why this is happening can range from something as simple as incorrect permissions all the way to a faulty drive component. Just like there are many reasons why this could occur, there are also many ways you can fix it. In this article, I’ll touch on several proven, ready-to-implement solutions that have fixed this problem in the past.
Why the “Windows Was Unable to Complete the Format” Message Appears
When Windows is unable to complete a format, it boils down to the operating system (OS) being unable to access the drive either at all or long enough for the new file system to be written. As you’d suspect, there are many issues that can cause this, so the devil is in the details when it comes time to troubleshoot.
In the cases I’ve come across, either from personal experience or during my research for this article, this error message can appear for the following reasons:
- 🔒 Incorrect permissions – To perform a format, the user account you’re logged in to must have write access to the drive. Without it, Windows can only read its contents. Similarly, if the drive is in a read-only state, formatting won’t work.
- ⚙️ It’s a system drive – Windows won’t let you format the system drive. This failsafe is to prevent accidentally deleting your OS and any other contents it contains. Double-check the drive you’re trying to format.
- 🔌 Poor physical connection – For external storage devices, check if the USB cable works. Faulty cables can cause intermittent disconnections, interrupting the format process. Likewise, a damaged port may cause the connection to become unstable.
- 👾 Virus is preventing the action – Albeit rarely, a malware-infected drive can contain a virus that prevents the ability to execute formats in certain ways, as seen here.
- 🟥 The device contains bad blocks – Bad blocks, or bad sectors, are parts of the drive that are no longer operational. As stated here, “When a storage device contains a certain number of bad sectors, you won’t be able to format it using Windows built-in tools.”
In my opinion, 99% of the time the problem is fixable. However, if you discover that the drive is inoperable due to a malfunctioning hardware component, like a failing storage controller, formatting will not be enough to fix the drive. Instead, you should recover the data you can and replace the drive.
8 Methods to Fix the “Windows Was Unable to Complete the Format” Error
I encourage you to try each step down below methodically. The methods are arranged in a logical way that hopes to eliminate any common oversights.
Method 1: Check the Physical Connection
When you encounter “Windows was unable to complete the format” with a USB drive or USB-connected device, it’s imperative that you check the connection points. As opposed to internal drives, portable storage media like USB drives are much more liable to physical wear over time since they’re constantly being handled.
Inspect the connection for:
- Bent pins
- Dust, dirt, or debris
- Exposed circuitry
- Loose fittings
Method 2: Check Your Permissions
This will happen if your user account doesn’t have the appropriate permissions to interact with the drive. In this case, Windows is unable to complete the format until either (a) you use a user account with the correct permissions, or (b) you grant the current user account the necessary access.
This method is only viable for disks using the NTFS file system, as exFAT and FAT do not have the same access control security features.
Follow these steps to provide your user account with the necessary permissions. Bear in mind that this must be performed on an account that can grant access:
- Open File Explorer.
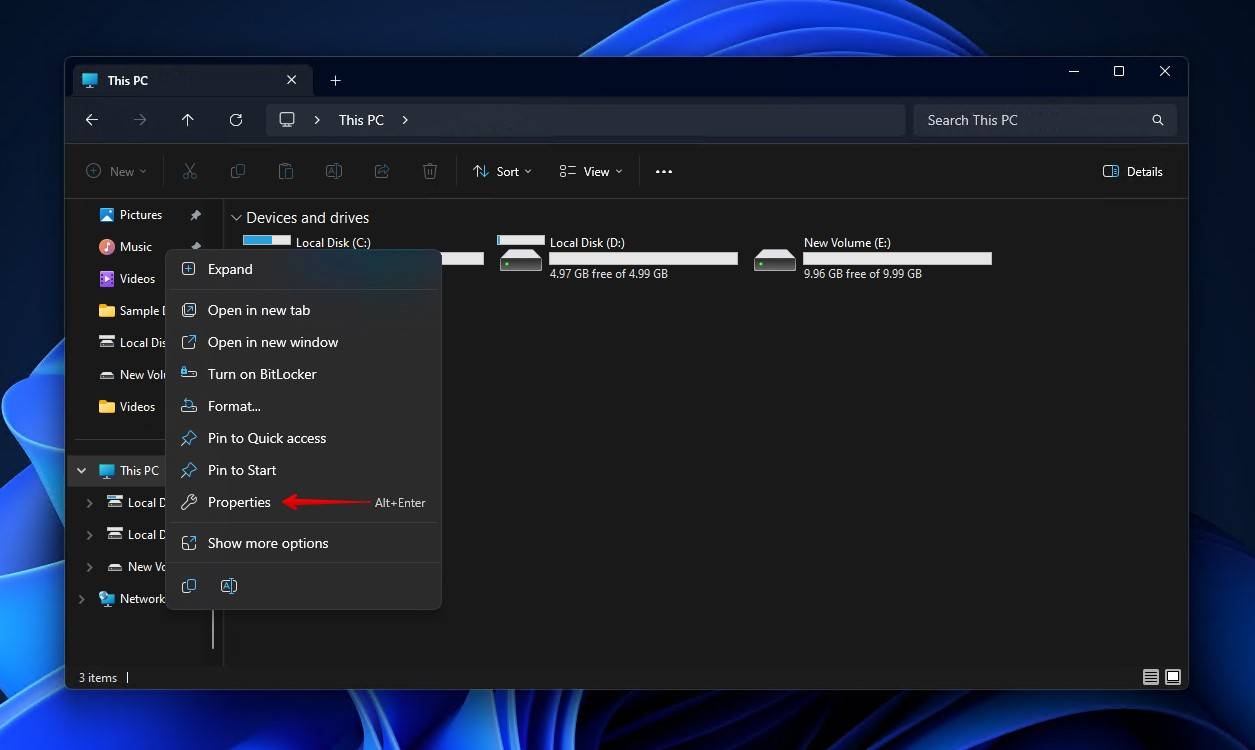
- Right-click the drive and click Properties.
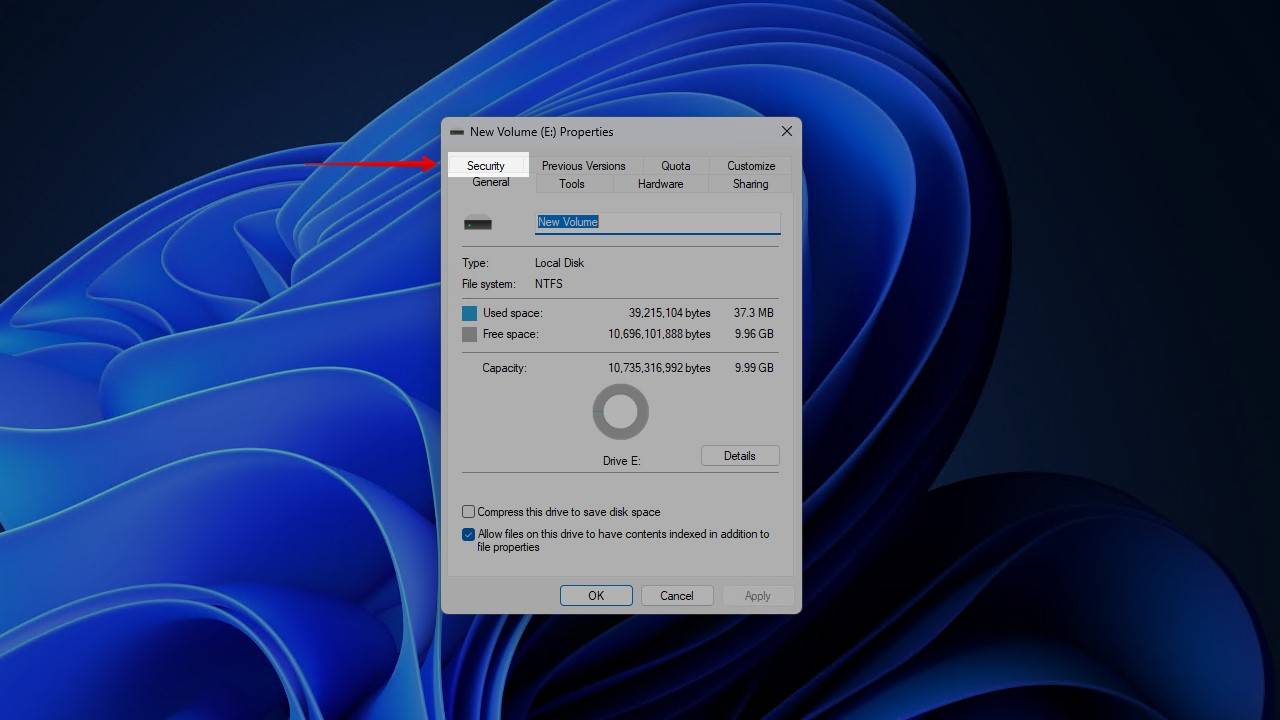
- Click Security.
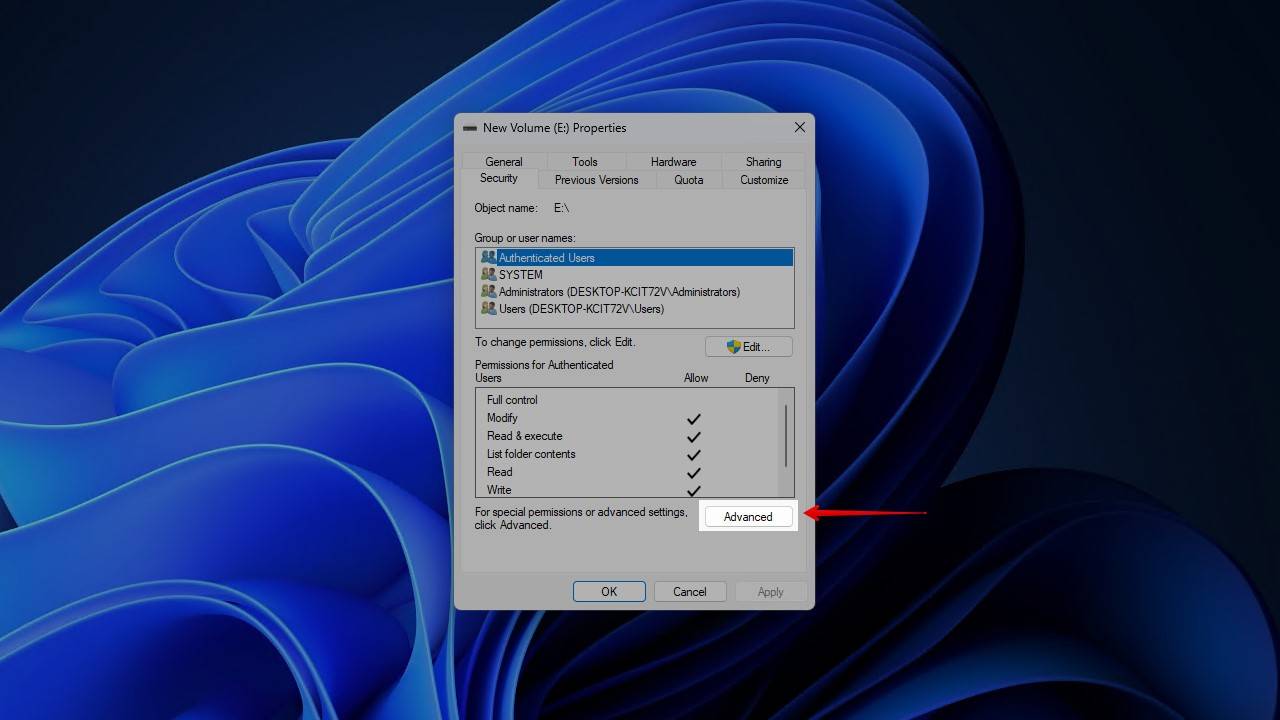
- Click Advanced.
- Click Change permissions.
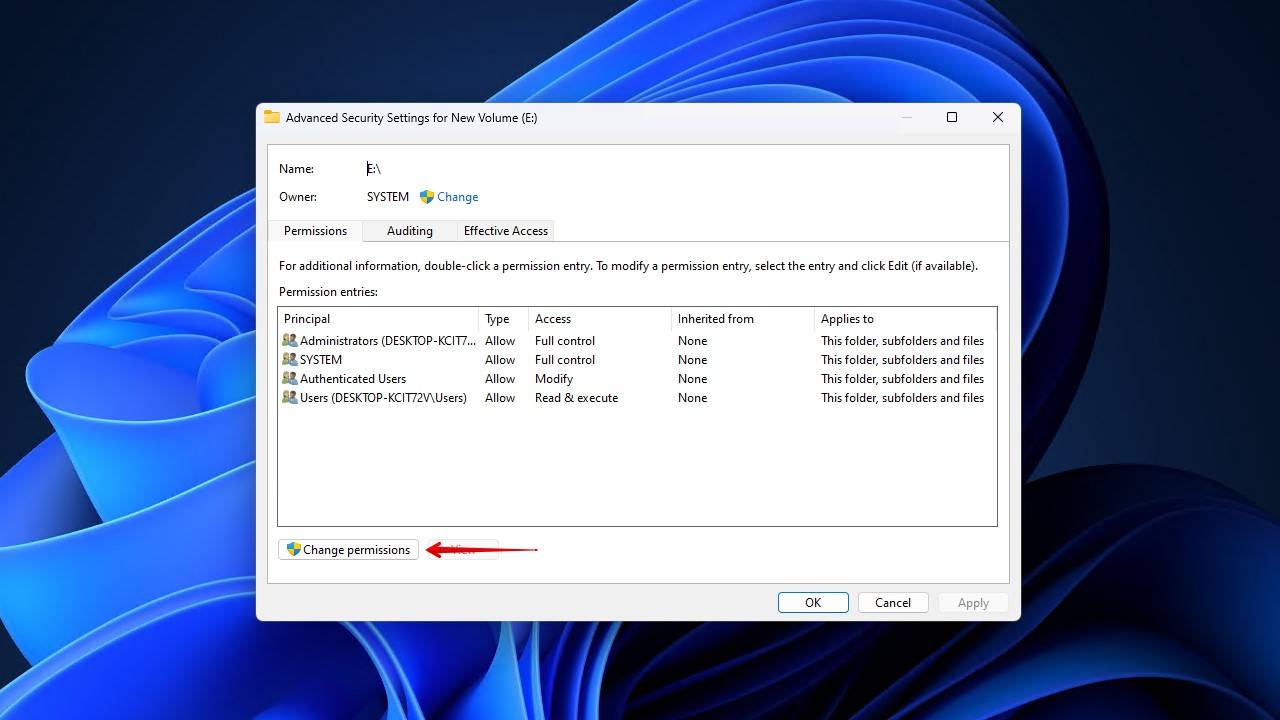
- Click Add.
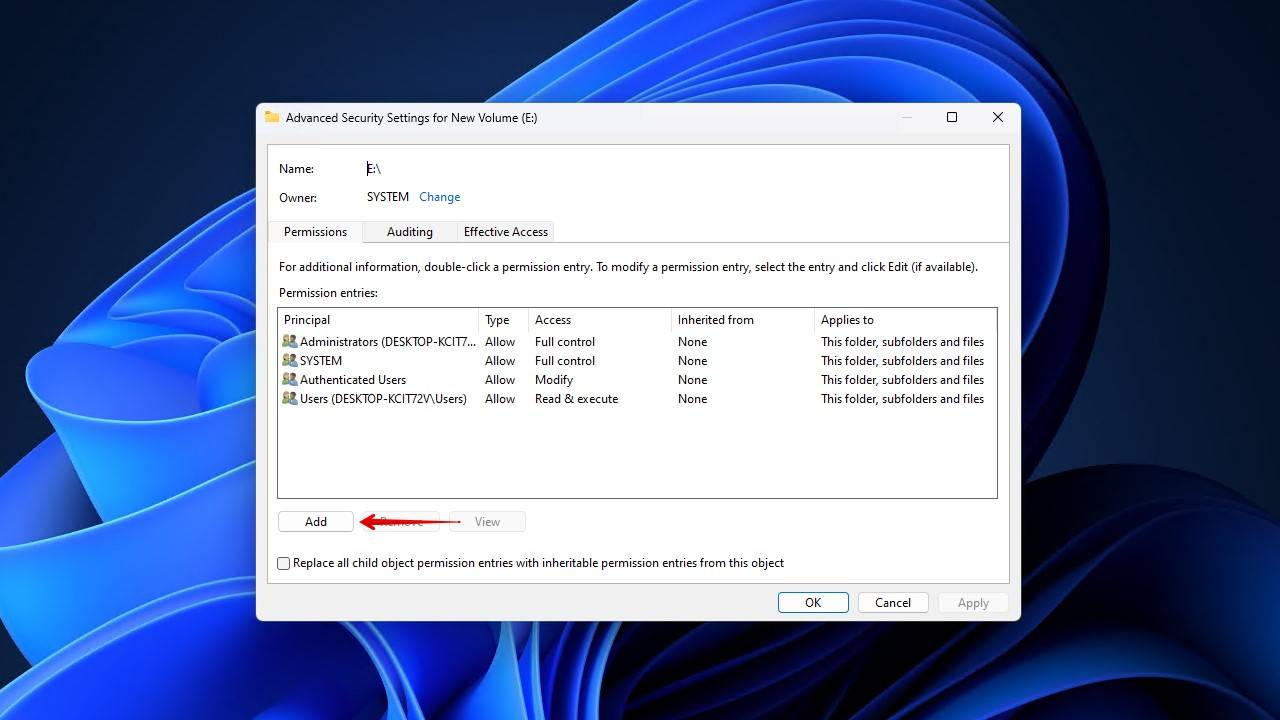
- Click Select a principal.
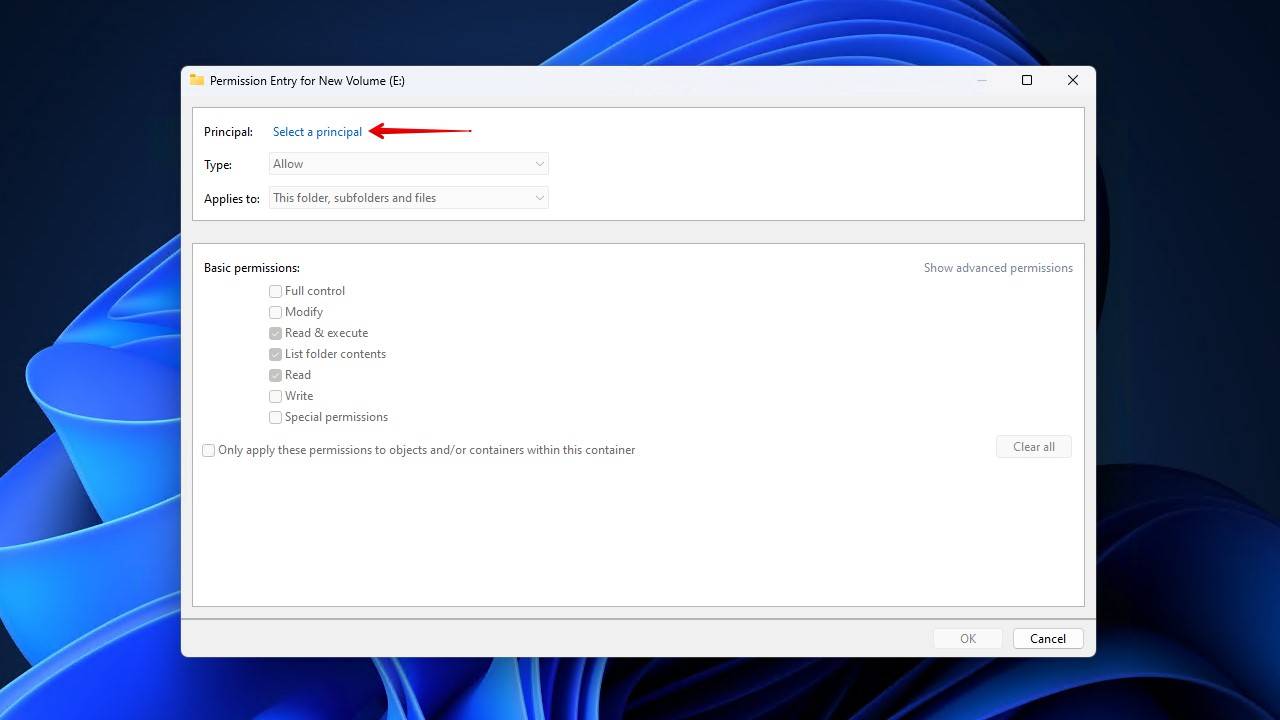
- Enter your username and click Check Names. Click OK.
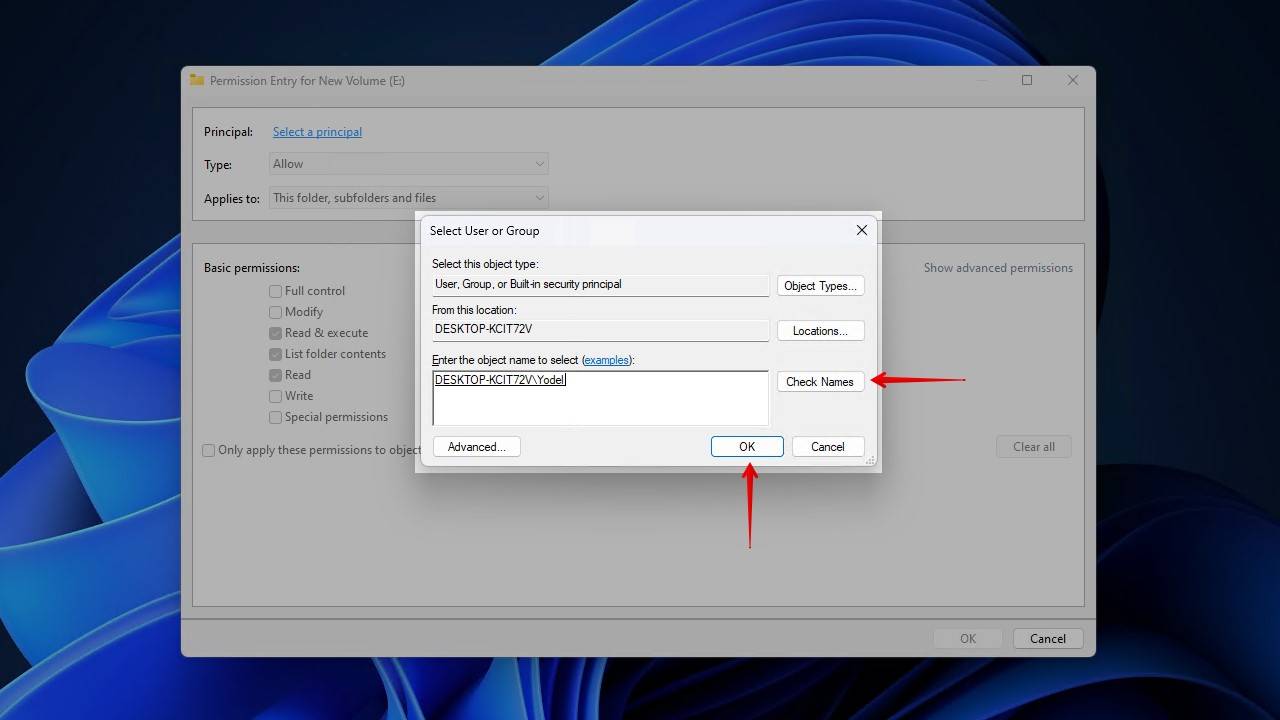
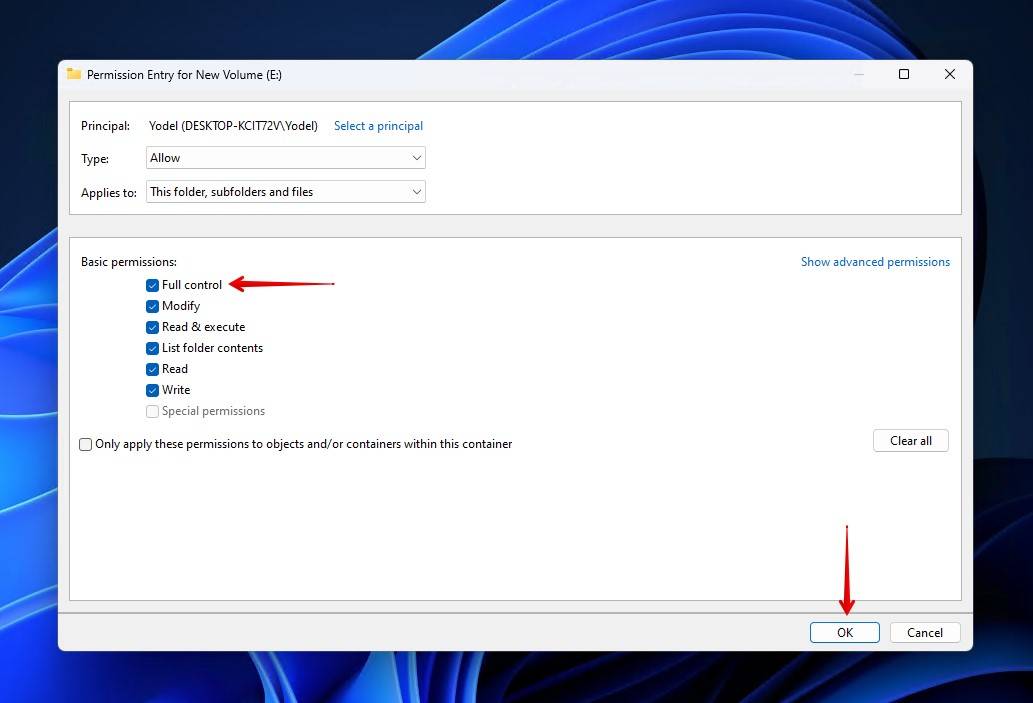
- Tick Full control, then click OK.
Method 3: Disable Read-only Mode
This method is particularly important for SD card users who are facing this problem. When you get the message “Windows was unable to complete the format” with an SD card, ensure the read-only switch is at the top, meaning it’s unlocked. For other types of storage devices, it’s a little bit more difficult, but still very much possible.
Here’s how you can remove the read-only attribute from the drive:
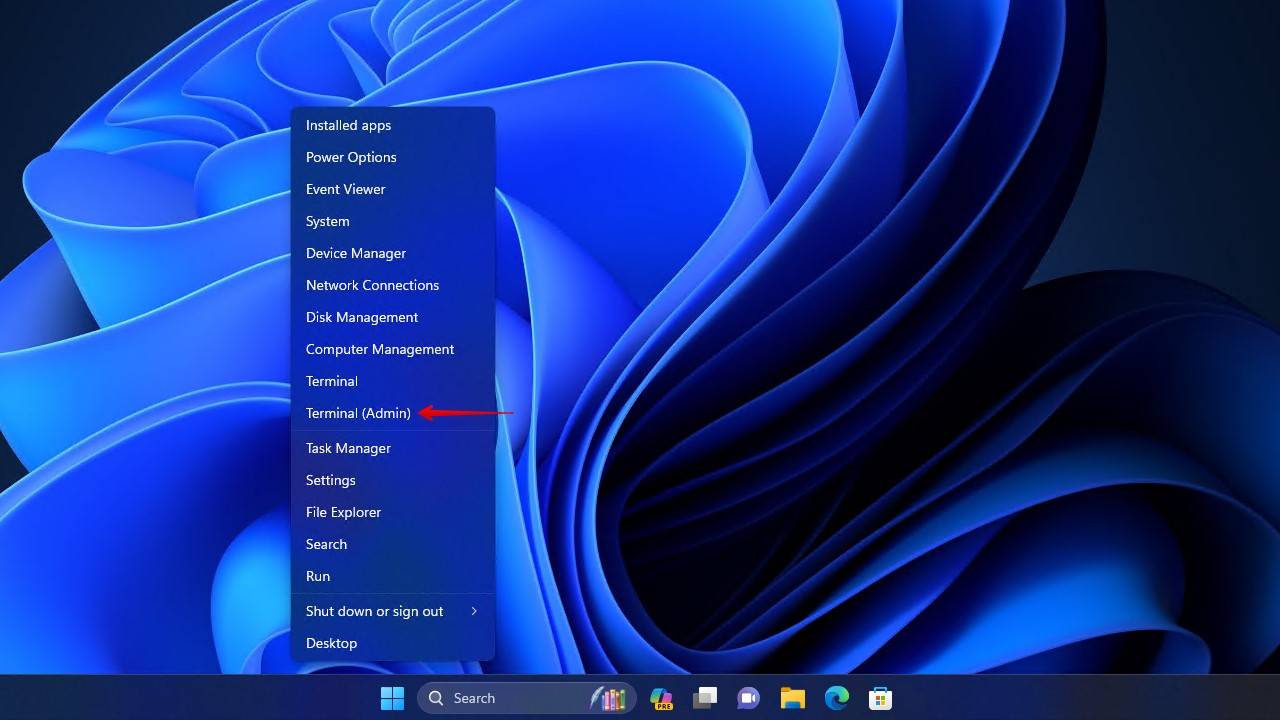
- Right-click Start and click Terminal (Admin).
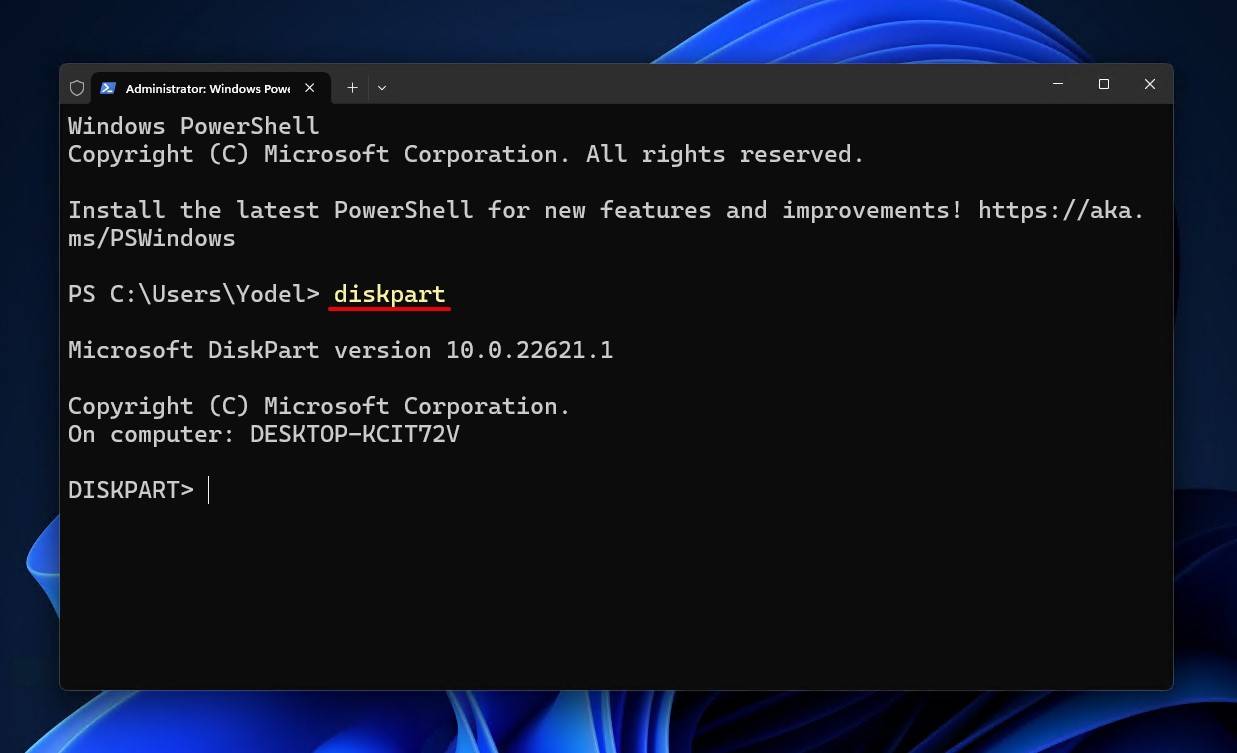
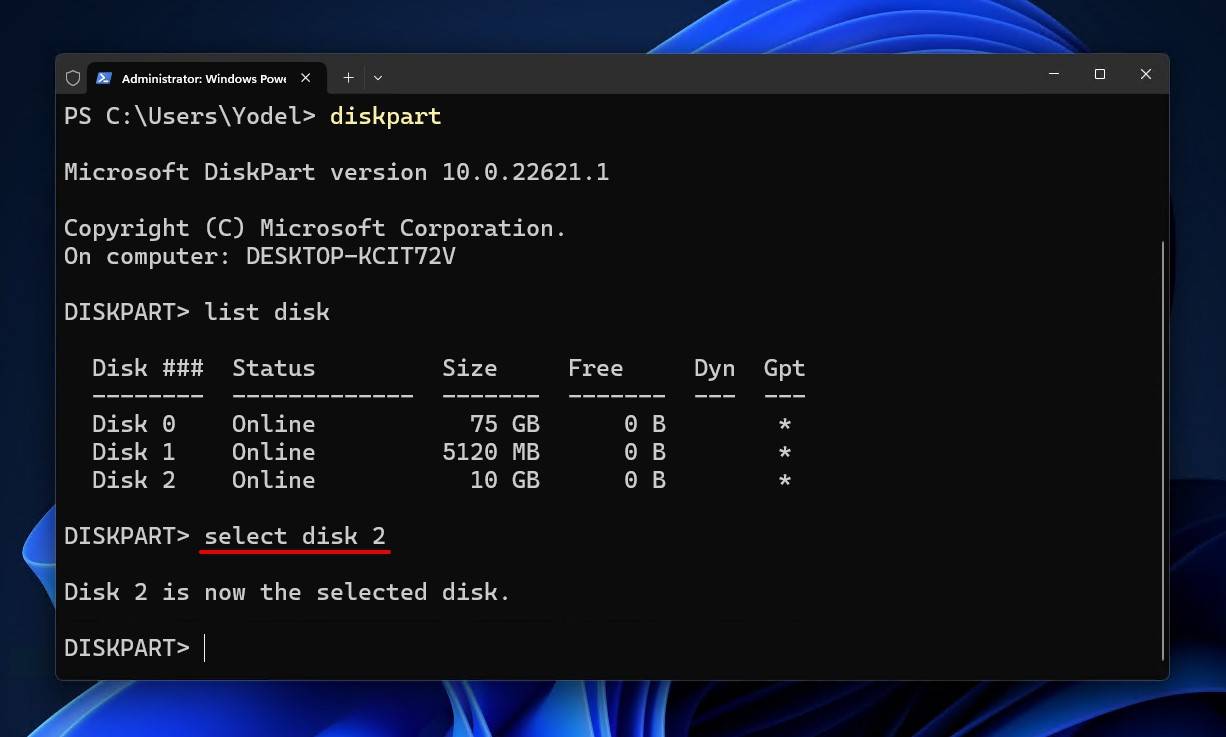
- Type diskpart. Press Enter.
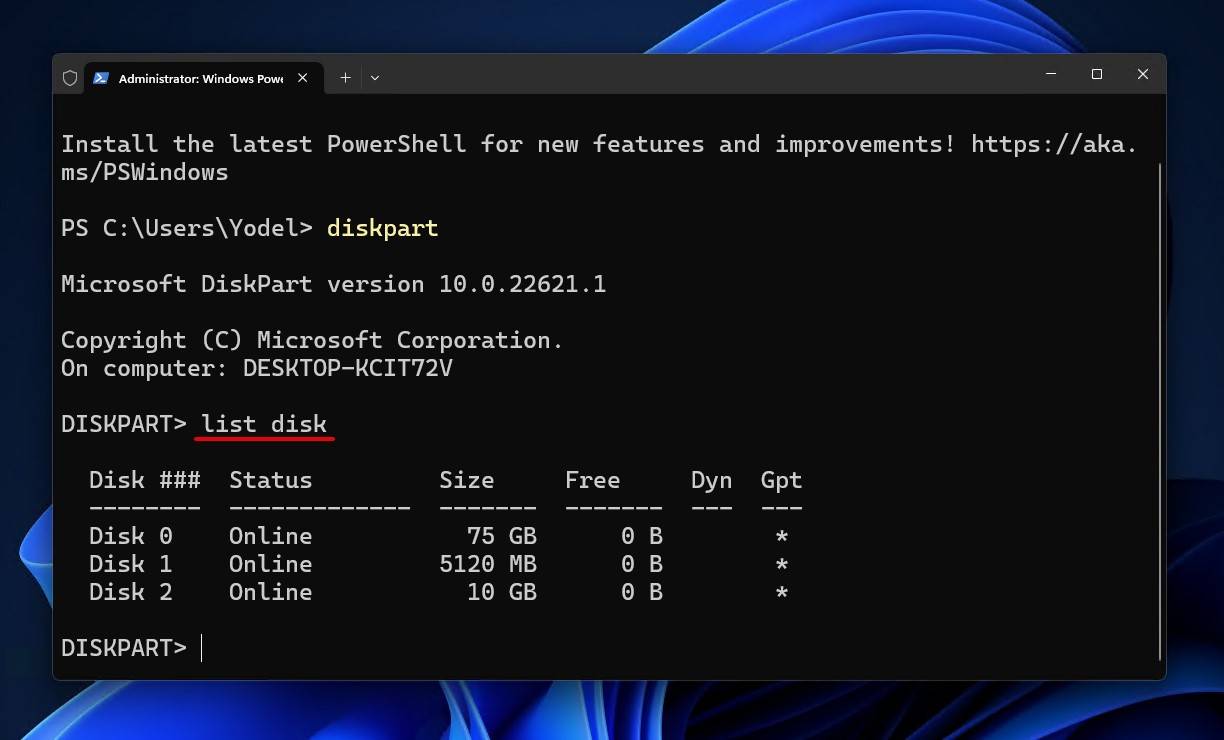
- Type list disk. Press Enter. Make note of the disk number associated with your storage device.
- Type select disk *, replacing * with your disk number.
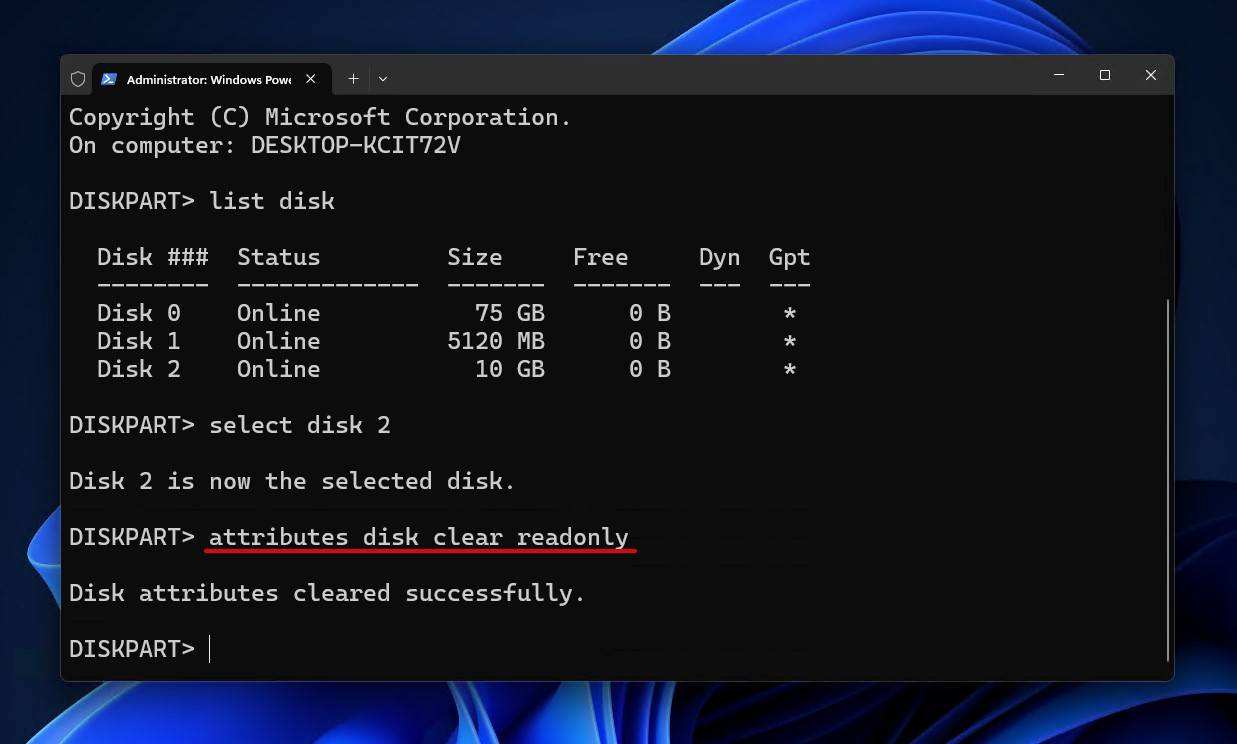
- Type attributes disk clear readonly. Press Enter.
Method 4: Use an Alternative Formatting Method
Sometimes you’ll encounter a problem where you can’t format a drive using the same method you usually do, as mentioned here when a Reddit user was facing the same problem. Any time I’ve run into an issue formatting through Disk Management or File Explorer, formatting through a command-line interface (CLI) has always worked.
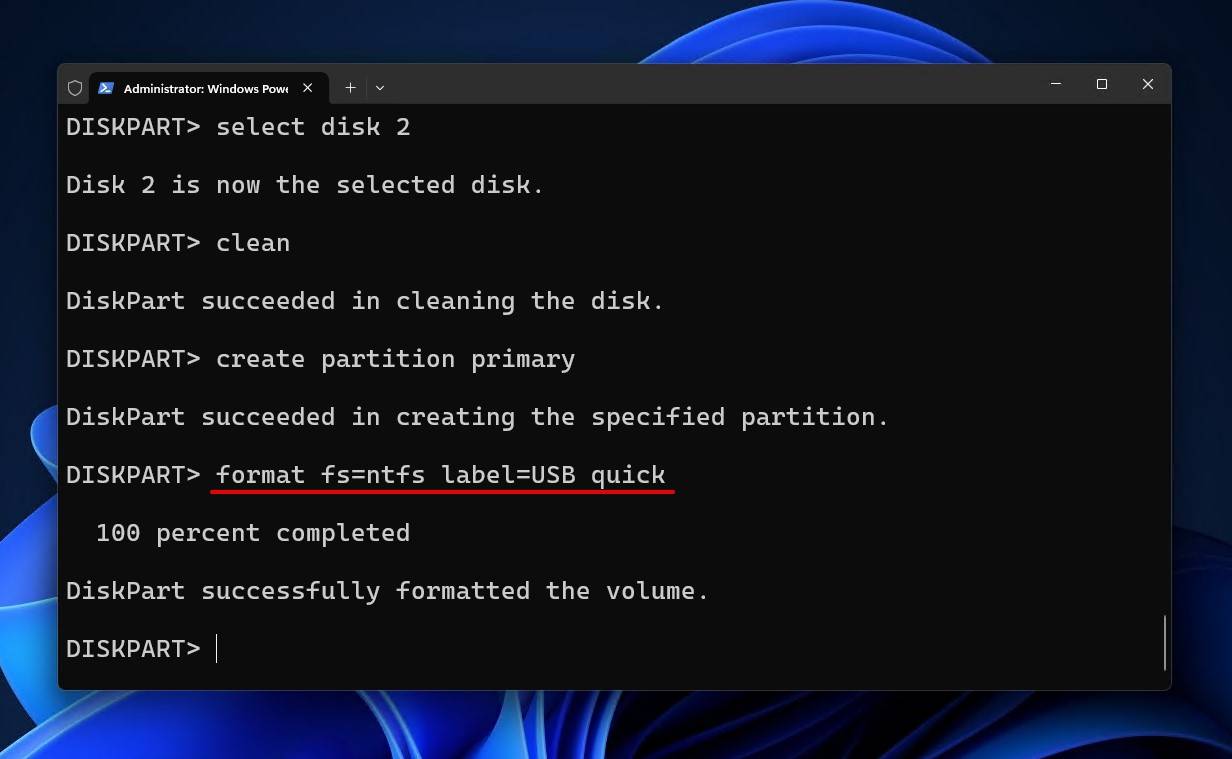
If Windows is unable to complete the format through Disk Management or File Explorer, follow these steps to do it with the diskpart command:
- Right-click Start and click Terminal (Admin).
- Type diskpart. Press Enter.

- Type list disk. Make note of the disk number associated with the drive you want to format.

- Type select disk *. Replace * with the appropriate disk number. Press Enter.

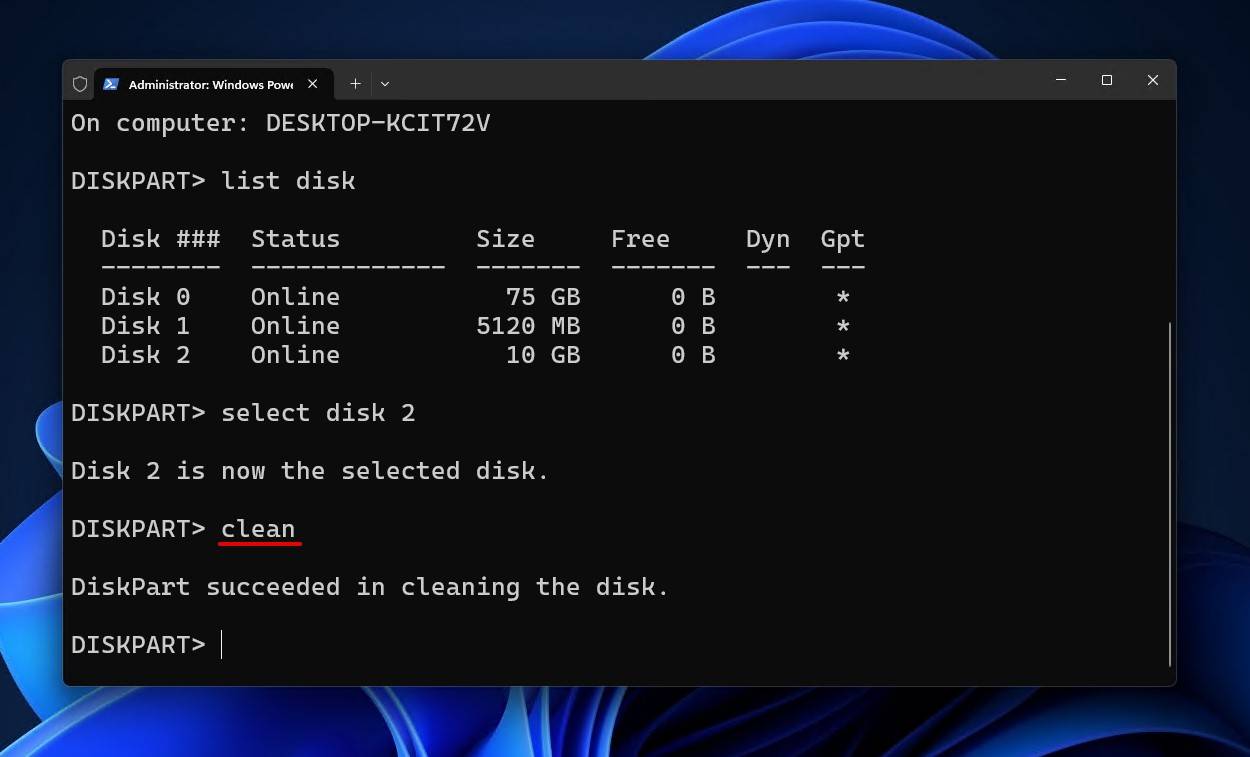
- Type clean. Press Enter.
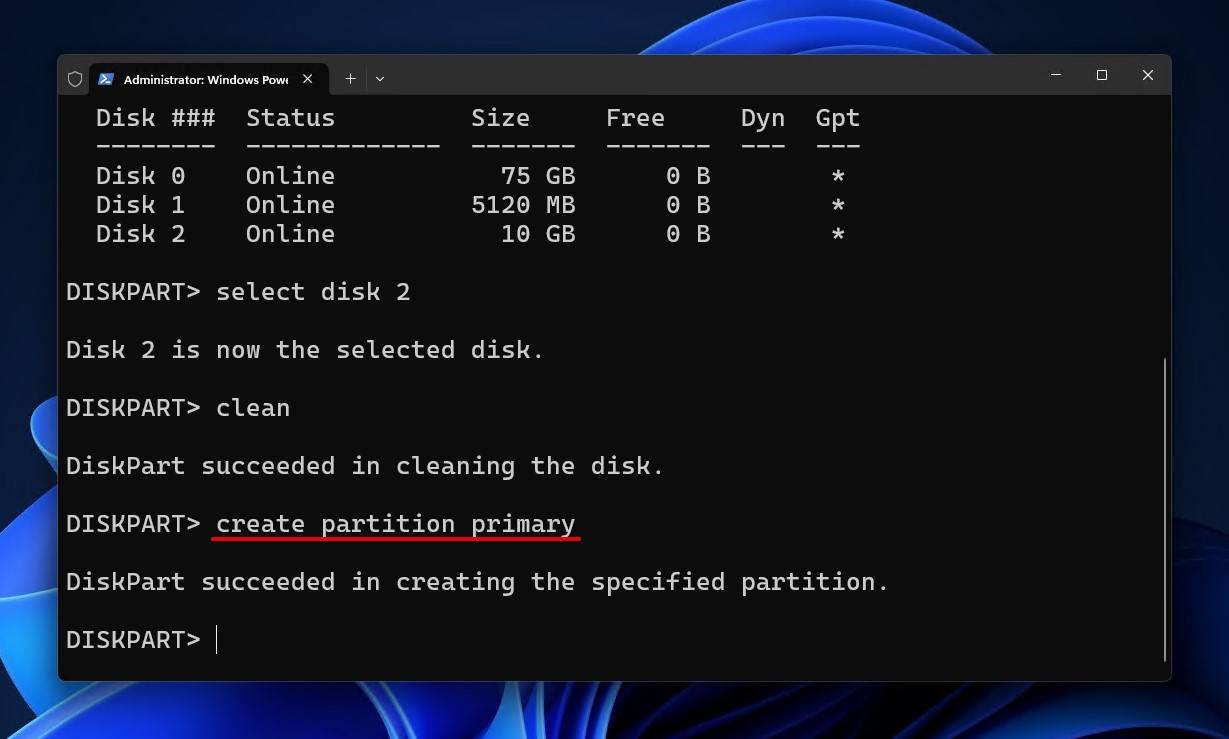
- Type create partition primary. Press Enter.
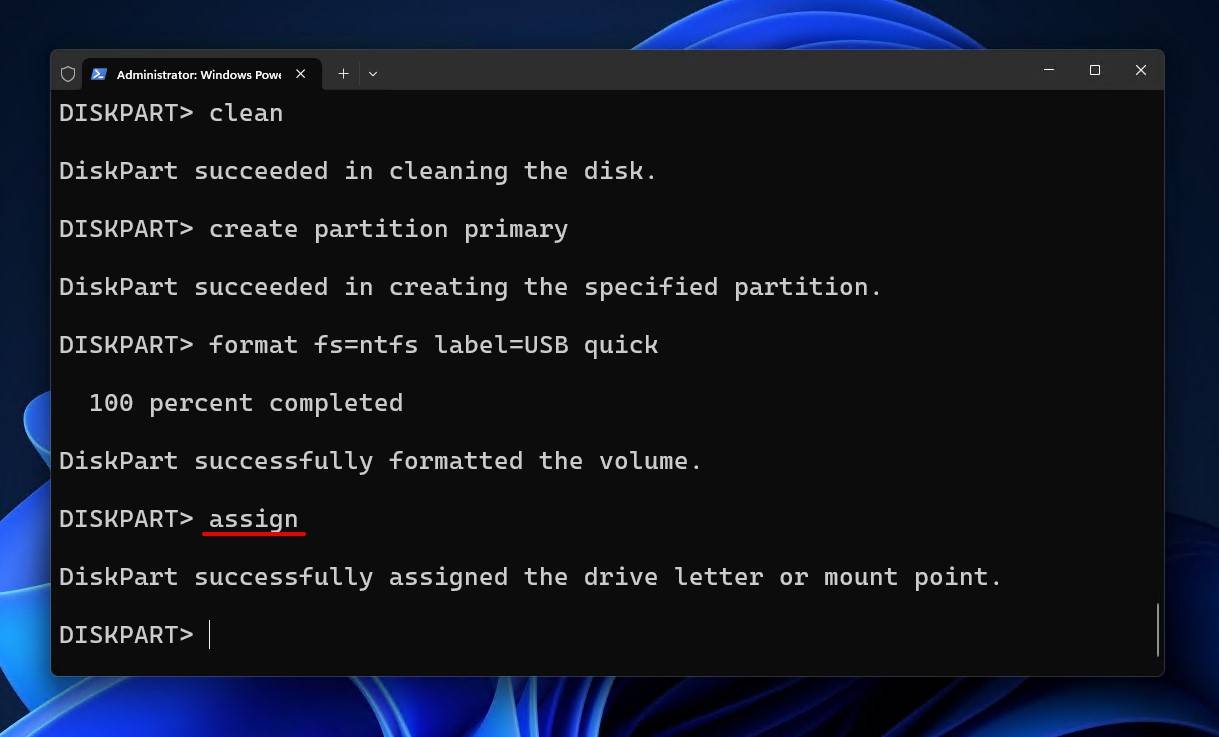
- Type format fs=ntfs label=* quick. Replace * with the desired name for the drive. If you want to another file system, like FAT32, be sure to update the command appropriately.
- Type assign. Press Enter.
Method 5: Format With a Different Operating System
Using a Ubuntu live USB drive, you can use GParted to delete your partition and create a new one. This is a good way to circumvent your host OS in case Windows was unable to complete the format using one of the aforementioned methods, with the added advantage of not having to perform a completely fresh install.
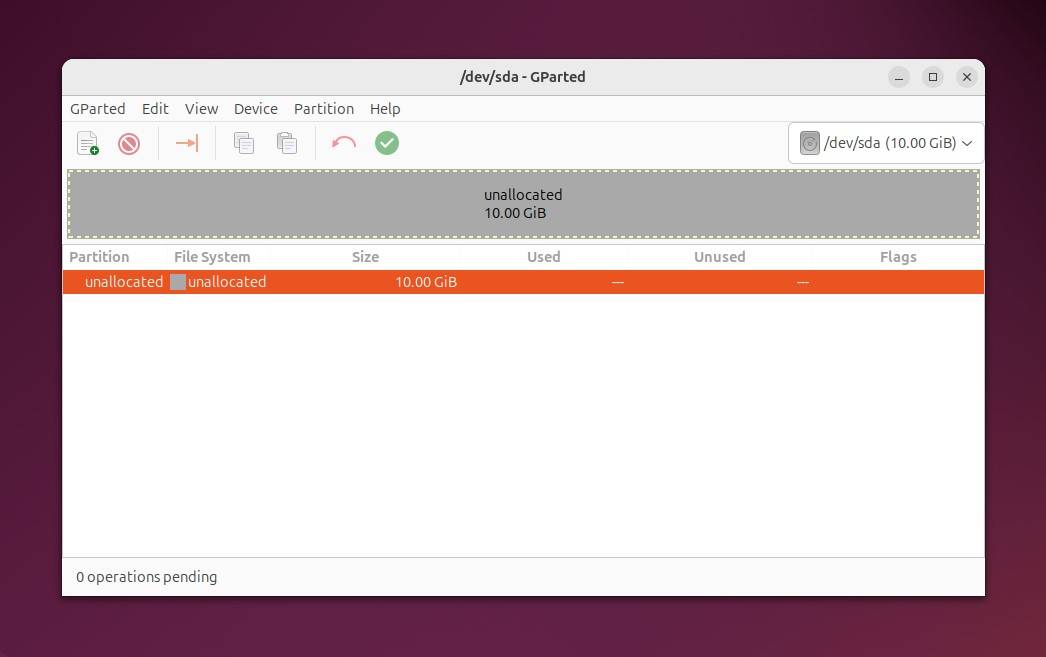
This is quite an advanced solution that you’ll only find mentioned in some cases, which is why it’s a little bit lower on the list. You will need to know how to create a live USB drive (with a tool like Rufus), and then run it on your computer. Nevertheless, it is a very effective way of formatting a drive, especially considering it’s free, operates outside the OS, and includes a graphical user interface (GUI).
Method 6: Scan the Drive for Problems
Provded the partition on your drive still contains a functioning file system, you can attempt to find and resolve disk errors using CHKDSK, a file system-repair tool included with Windows. In the event that the issue is caused by a logical problem, CHKDSK may be all you need to restore the ability to perform a format.
Here’s how you can run CHKDSK:
- Right-click Start and click Terminal (Admin).
- Type chkdsk *: /r. Replace * with the drive letter assigned to the drive you’re trying to format. Press Enter.
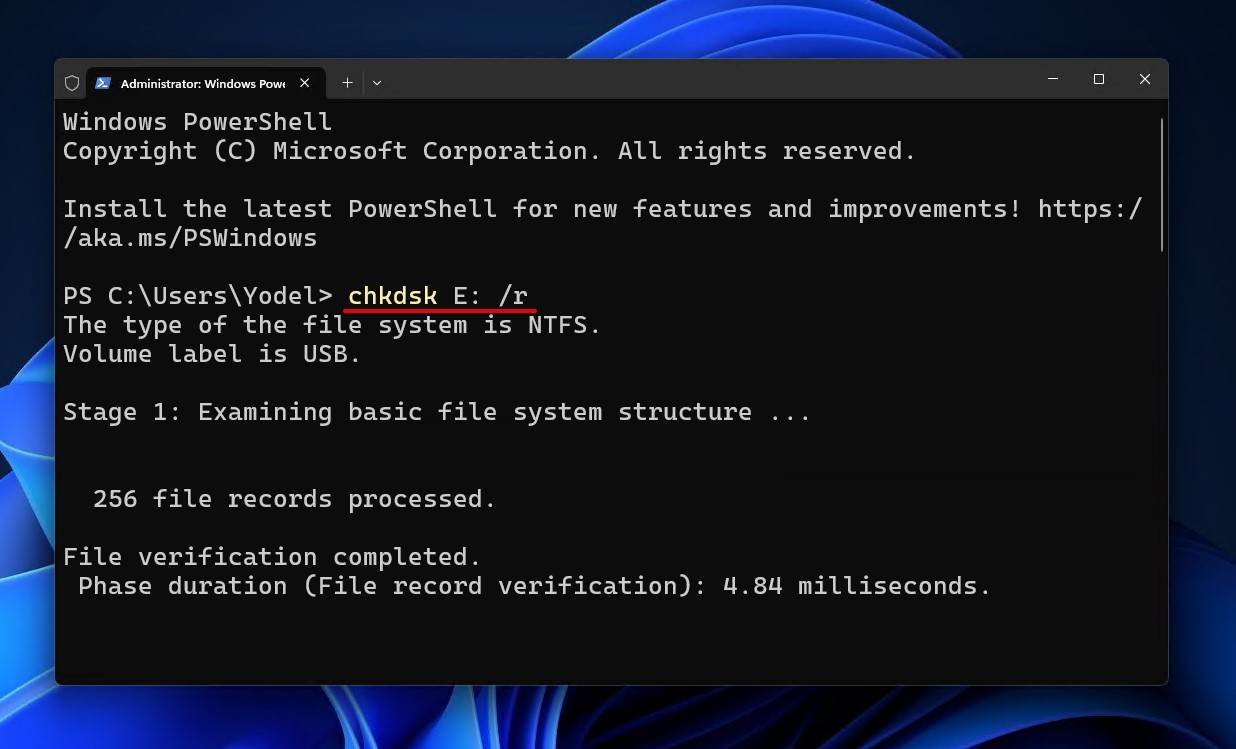
I prefer using the /r parameter because it includes the functionality of /f (which fixes file system errors) with the added ability to scan for bad sectors.
The caveat of CHKDSK is that it only works if a file system is present. If your file system is inoperable and the disk is displayed as RAW, you’ll need to use a third-party tool like Victoria for Windows which is used for diagnostics and minor repairs.
This is how you can use Victoria to scan the drive for problems:
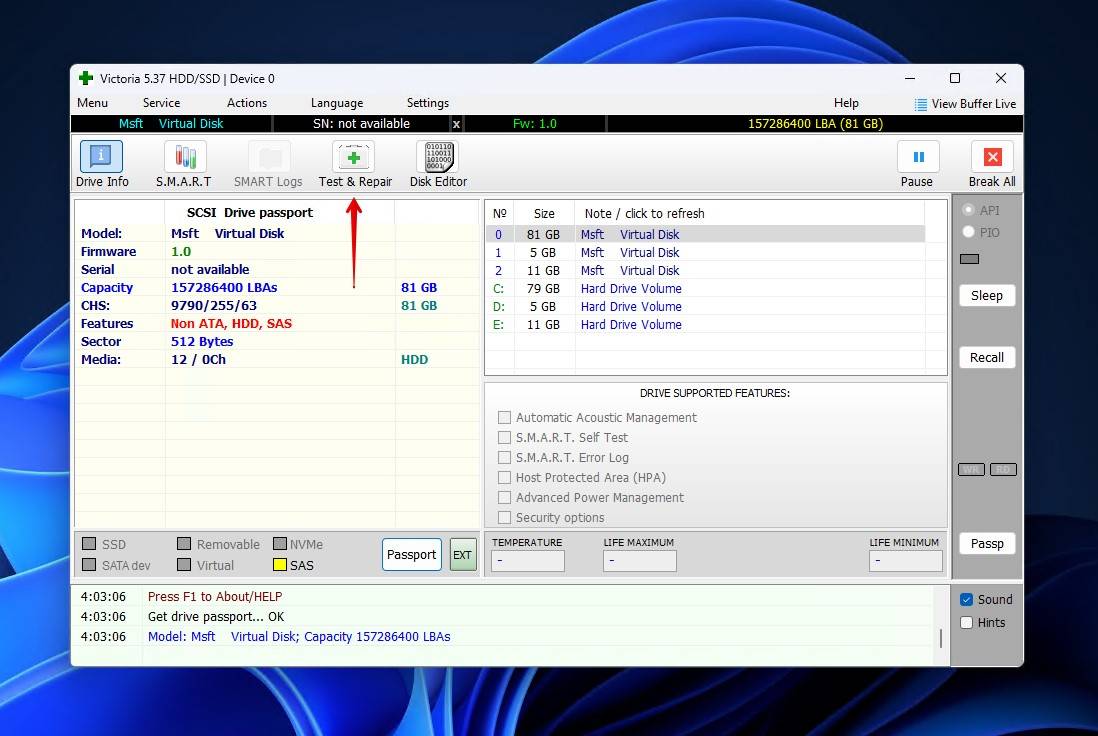
- Download and open Victoria.
- Click Test & Repair. By default, it will ignore (but make note of) bad sectors that it finds.
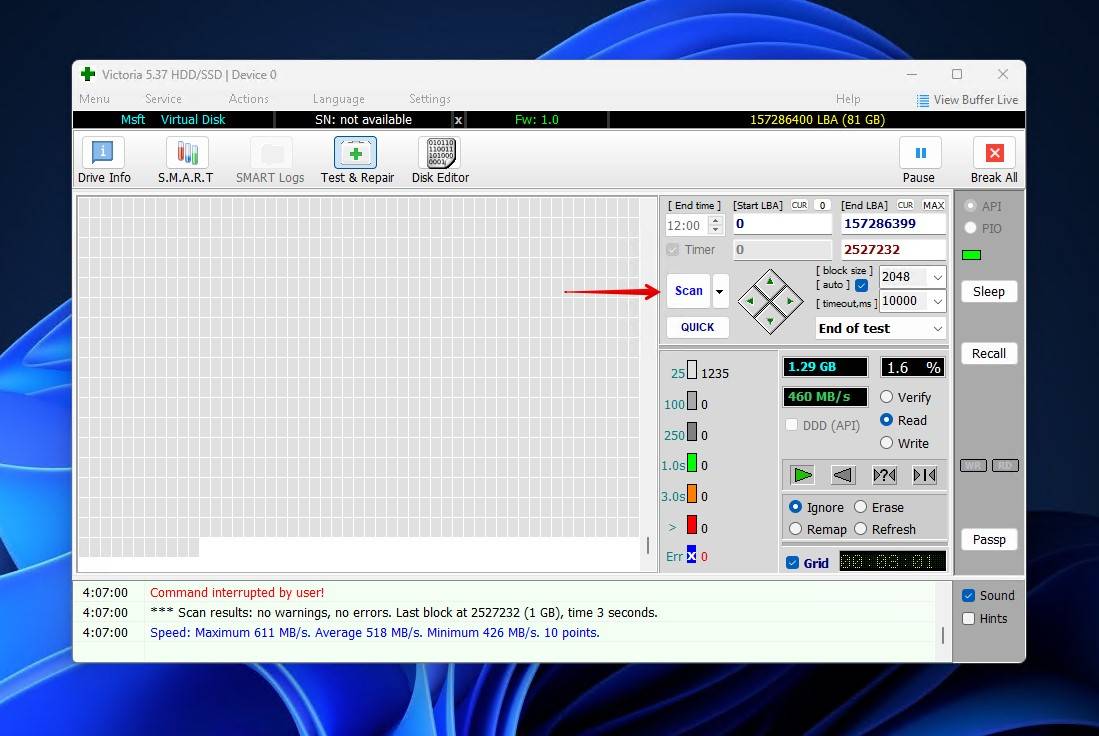
- Click Scan.
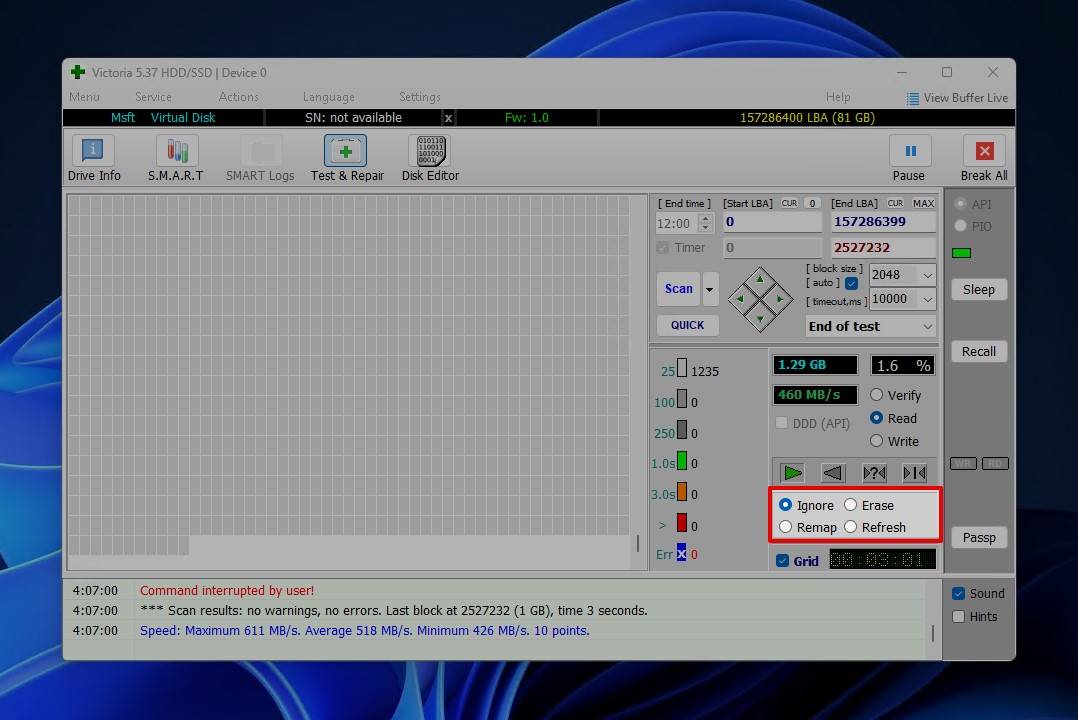
- Once the scan is complete, you can change the scan action from Ignore to Remap if bad sectors were discovered and you wish to remap them to spare sectors.
Method 7: Perform a Low-level Format
The term low-level format is rarely used nowadays. Instead, you’ll be more likely to be familiar with two options: quick format and full format. A low-level format is similar to a full format in that it deletes the file system structure and then writes raw data (usually zeros) to each sector on the drive. During this process, it maps out and disables bad sectors at the hardware level.
Low-level formats are performed by manufacturers before the drive leaves the factory. If you suspect a sudden increase in bad sectors is the culprit behind being unable to format, a low-level format can map out new ones and replace them with reserves.
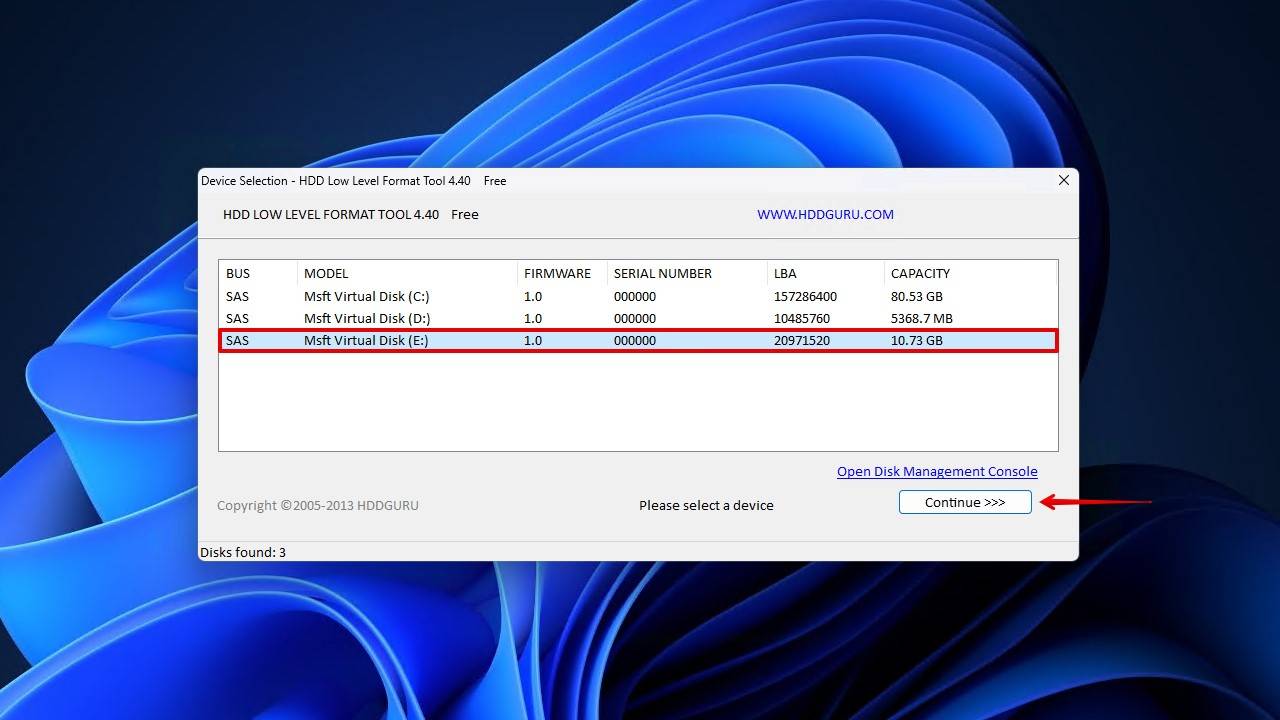
This is how you perform a low-level format with the HDD LLF Low Level Format Tool:
- Download the Low Level Format Tool.
- Select the drive you wish to low-level format. Click Continue.
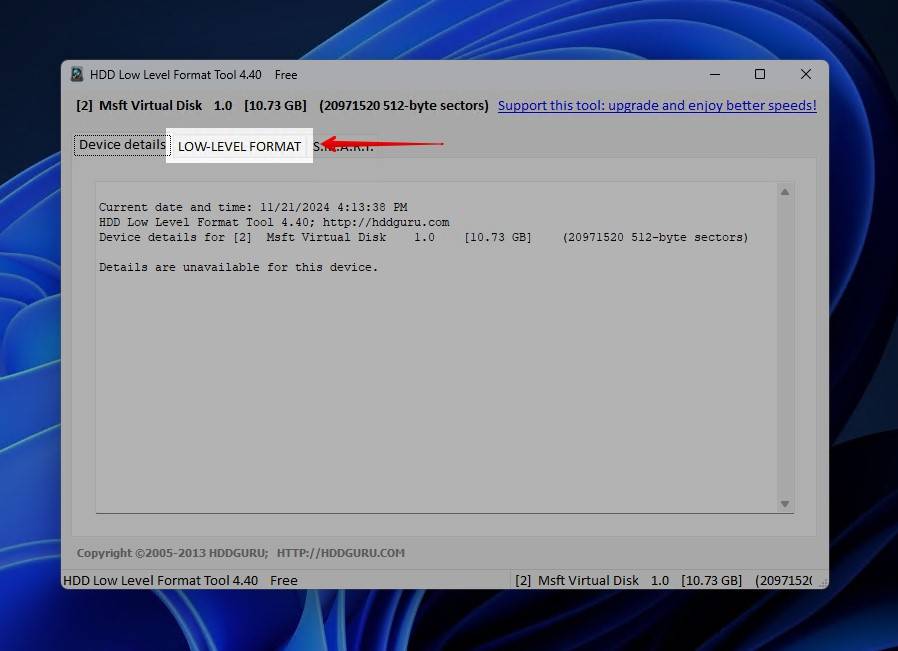
- Click the Low-level Format tab.
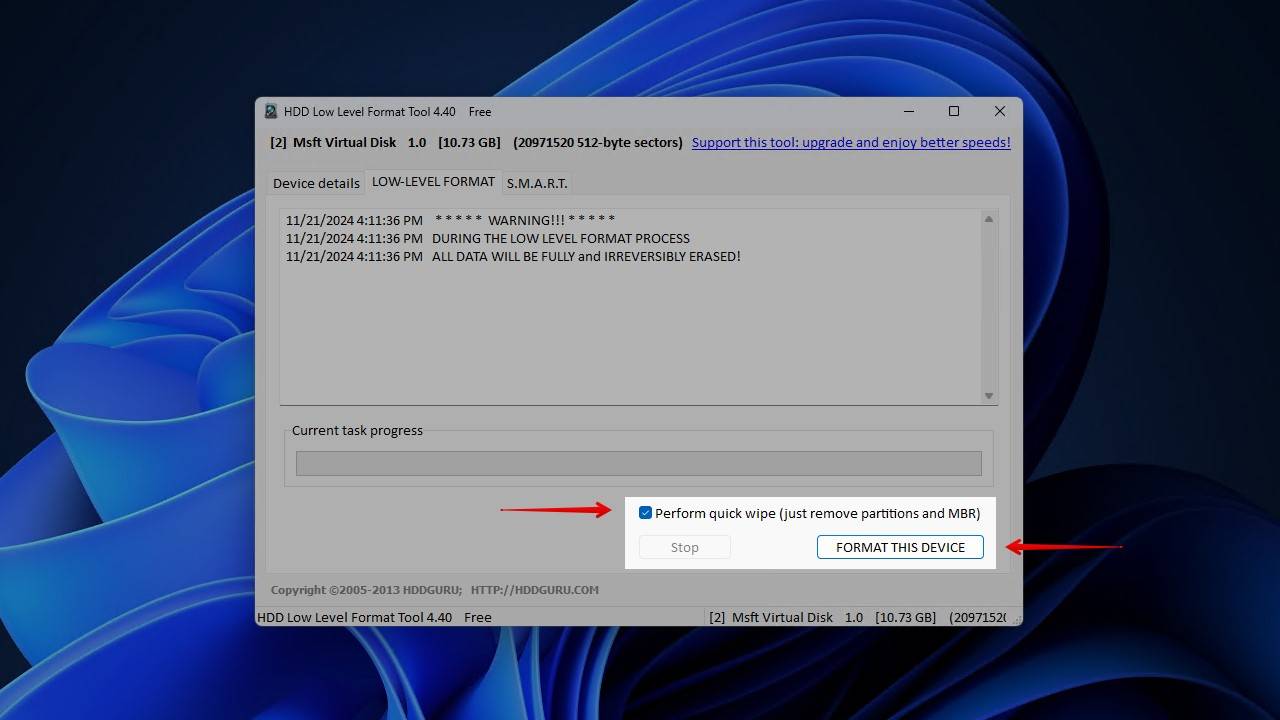
- Tick Perform quick wipe (just remove partitions and MBR) and click Format this device.
Method 8: Replace the Disk
If none of the previous methods have worked to fix the “Windows was unable to format” message, I’d say it’s time to accept the fact that the drive may be beyond repair. A good indication of this is if you’ve already tried several ways to format it with no success, like with this Windows user who simply received one message after another.
Disk Turned RAW? Need Your Data Back? Try Data Recovery Software
You may find yourself in a spot where you need to get the data from the drive before doing anything or something went ‘wrong’ during the fixes. It could be that your disk turned RAW before you were able to transfer the files and format the disk, or you were able to perform the format successfully, only to realize that there were some files you still needed. In either of these cases, you’ll need to recover the data using a data recovery tool.
Disk Drill is a great data recovery option because it can recover data from disks that have become RAW, as well as those that have been quick formatted. It uses several scanning algorithms to find as much recoverable data on the drive as possible, allowing you to pick and choose what you’d like to restore.
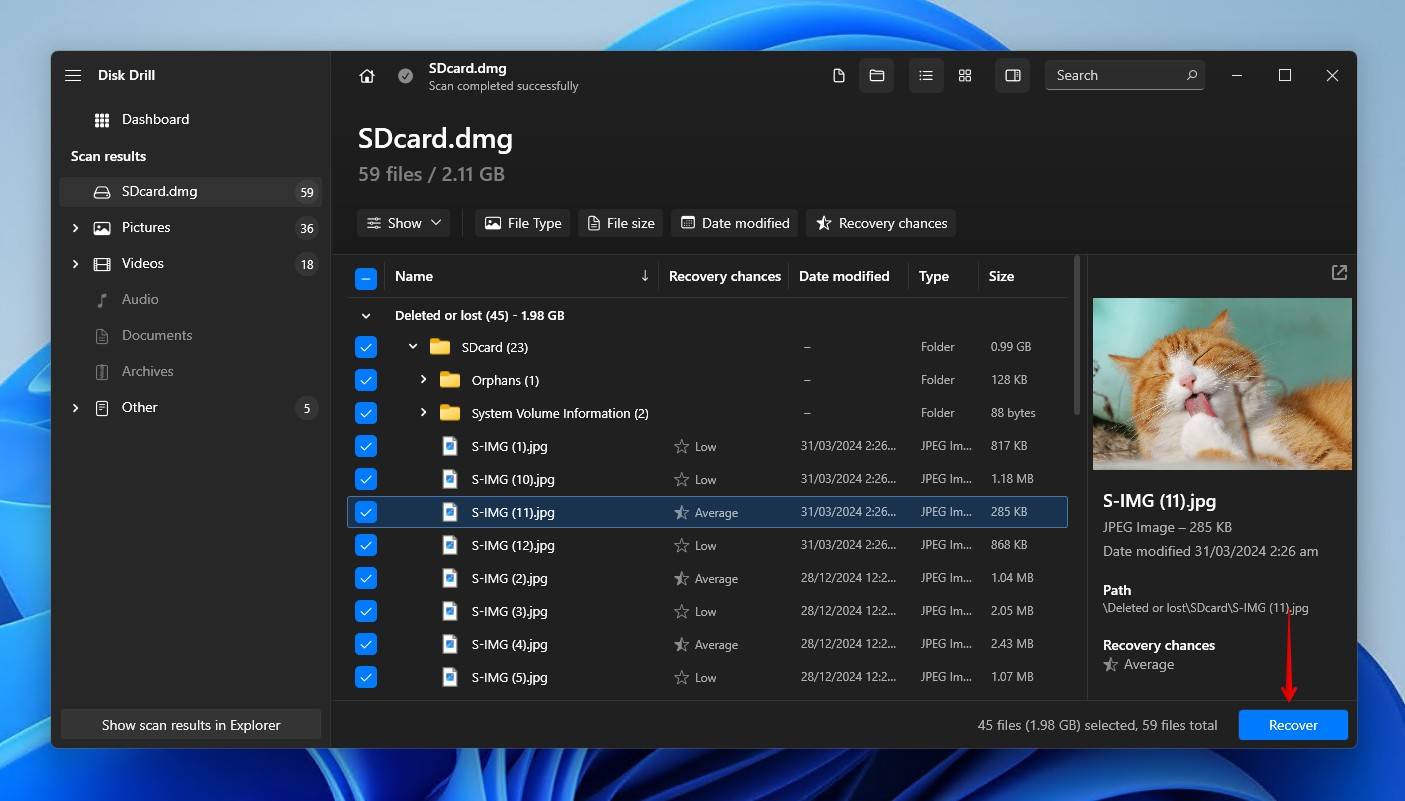
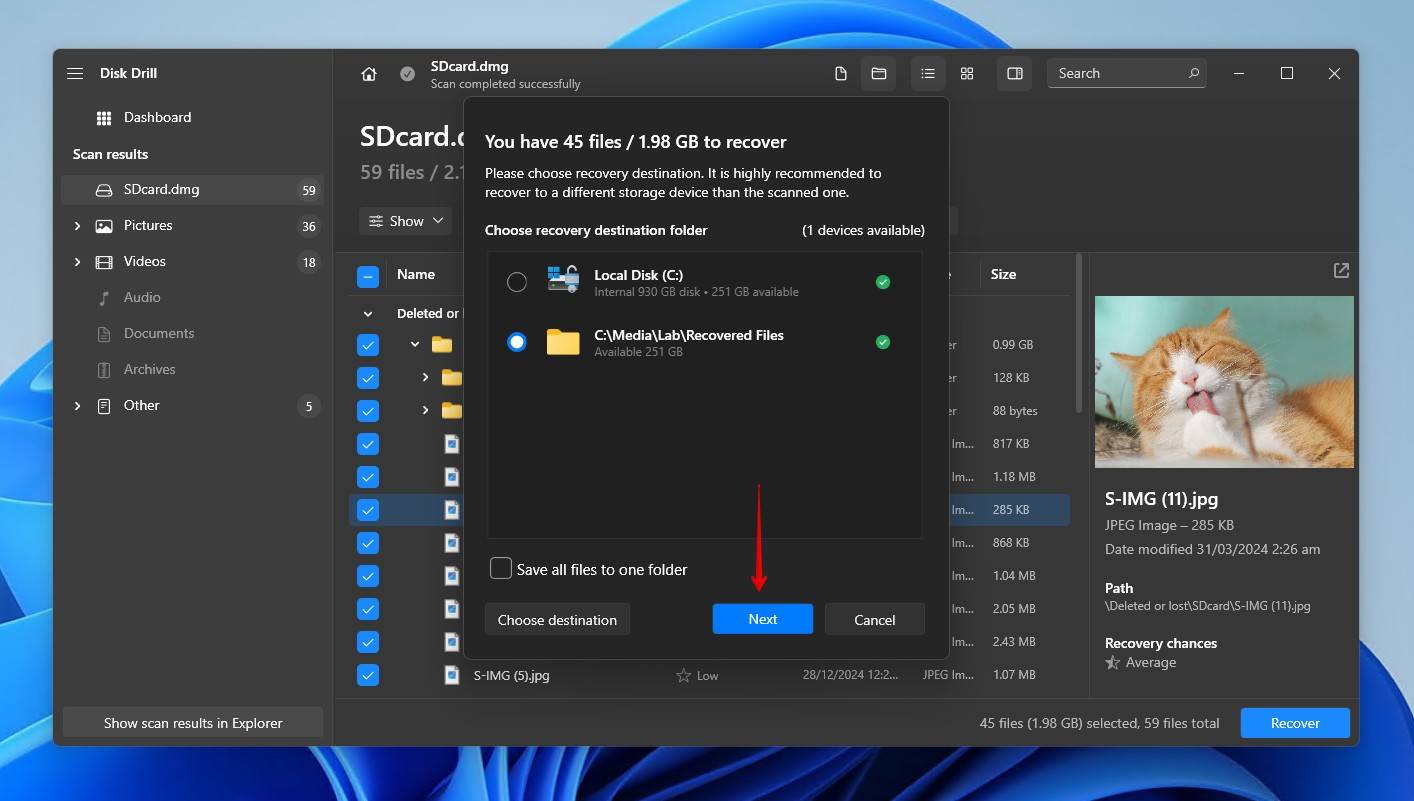
Here’s a quick look at what it looks like to use Disk Drill:
- Download and install Disk Drill.
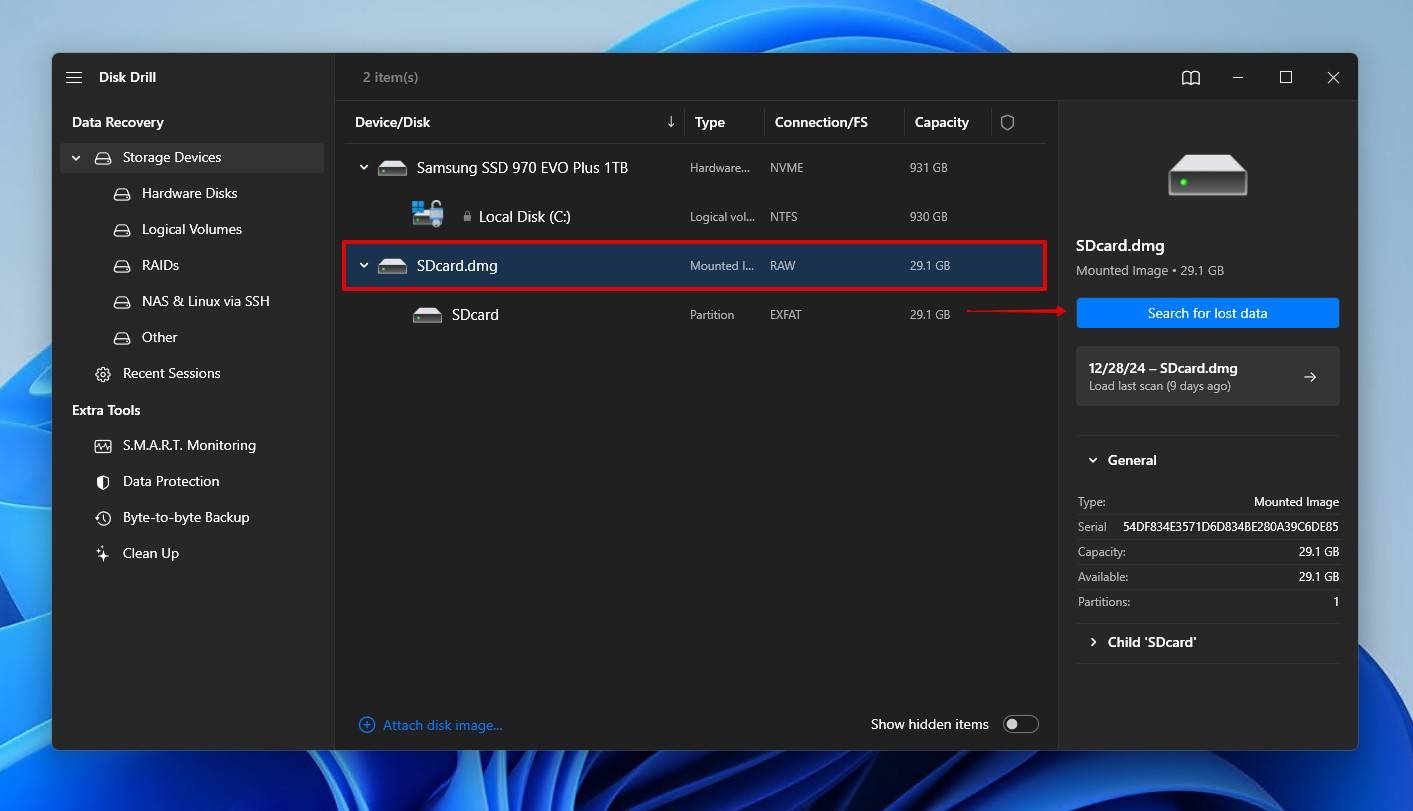
- Select the drive experiencing the problems, then click Search for lost data.
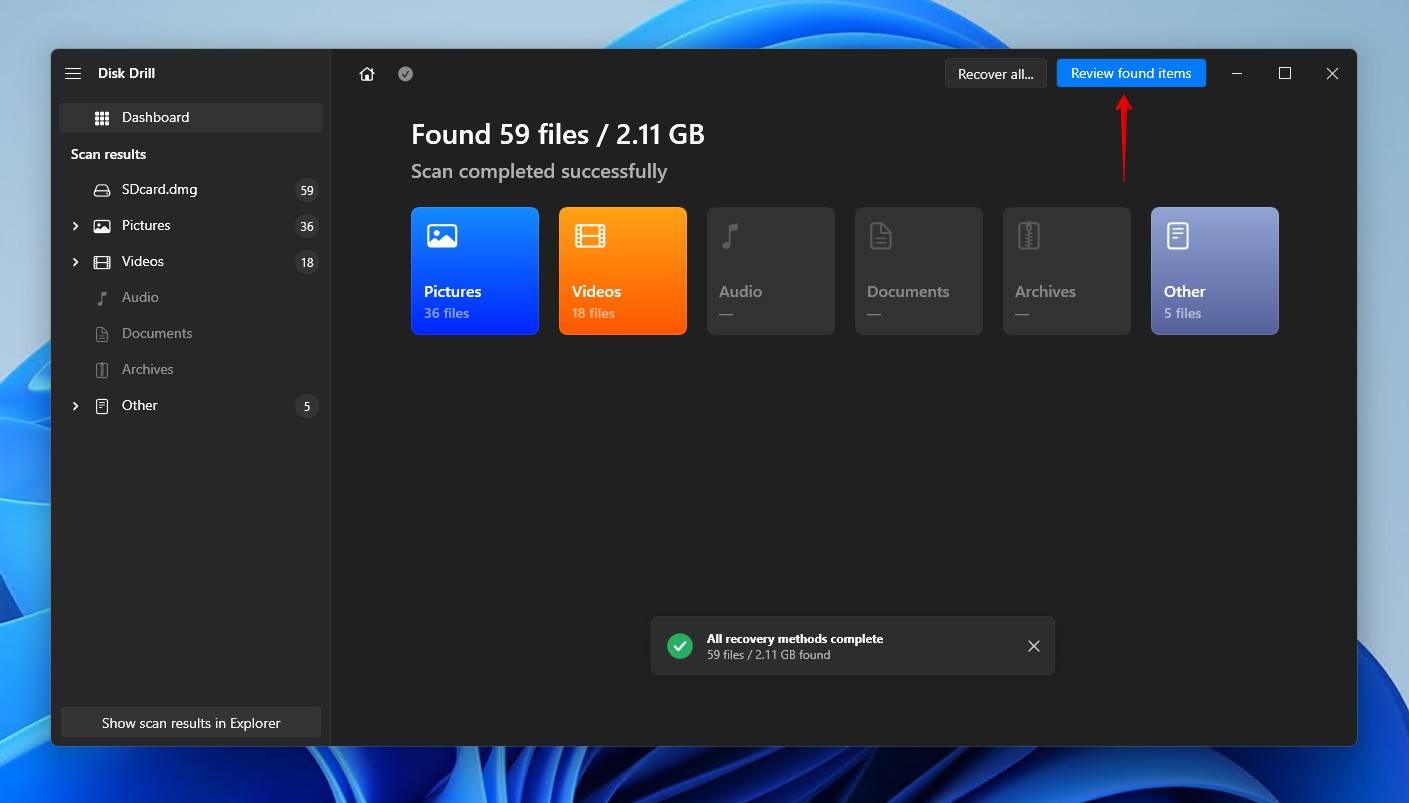
- Click Review found items to see what was discovered.
- Choose what files you wish to recover from the disk, then click Recover.
- Select a recovery location on a separate physical disk, then click Next.
Should the drive fail to boot, data recovery may need to be performed by a data recovery specialist instead.
Conclusion
What’s worse than having to format a drive to fix it? Being unable to complete a format. Using one of the methods outlined in this article, I’m confident that you’ll be able to format your drive, one way or another. But remember that it can happen again, so here are a few tips to keep your disk, and its data, safe going forward:
- Back it up. Whether you’re just creating backups of your most important files, or backing up the entire disk, creating a backup is the best way of keeping the data safe.
- Monitor disk health. Your drive has valuable SMART data that keeps a record of its vitals. Checking drive health every so often, or using an app to monitor it for you, is a great idea.
- Use anti-malware software. Whether it’s relying on Windows Security or opting for a third-party solution, having one monitoring your computer at all times goes hand-in-hand with practicing good internet safety.
FAQ
What does the “Windows was unable to complete the format” error mean?
Windows displays this message when something has prevented or interrupted the formatting process. It’s a general error message that can point to a number of problems, acting more as a sign that something is wrong than a specific indication of what is wrong.
How can I check if my drive has bad sectors?
Run a surface test. A surface test will attempt to read (and in some tests, write) the data in each sector. If a sector takes too long to respond, it will be marked as bad. Logical bad sectors can be repaired, while physical ones are permanently unusable.
Is it safe to format a RAW drive?
If your file system becomes lost, it’s possible for it to become RAW. In cases where you want to fix the RAW drive without formatting because there’s data you want to keep, you’ll have to recover the data first before formatting. However, if it’s a brand-new drive or you no longer want the data on it, formatting is the only way to get it working again.
How can I format a drive that appears in Device Manager but not Explorer?
An external hard drive may show up in Device Manager but not Explorer because it’s using an incompatible file system or it hasn’t been assigned a drive letter. Either way, the drive can still be formatted through Disk Management, CMD (with diskpart), or on another computer with an OS that can read the existing file system.
This article was written by Jordan Jamieson-Mane, a Staff Writer at Handy Recovery Advisor. It was also verified for technical accuracy by Andrey Vasilyev, our editorial advisor.
Curious about our content creation process? Take a look at our Editor Guidelines.
